3 Step E FR DE IT - Das Ofenzentrum
←
→
Page content transcription
If your browser does not render page correctly, please read the page content below
3 Step E
                                          EN          NL          FR          DE          IT         NO

EN : This product is only suitable for well insulated rooms or occasional use. DE : Dieses Produkt ist nur für gut isolierte Bereiche oder gelegentli-
che Verwendung geeignet. FR : Ce produit convient uniquement à des endroits bien isolés ou pour un usage occasionnel. IT : Questo prodotto è
adatto solo per spazi ben isolati o per uso occasionale. ES : Este producto sólo es adecuado para espacios bien aislados o un uso ocasional. NL :
Dit product is uitsluitend geschikt voor goed geïsoleerde ruimten of voor sporadisch gebruik. PL : Produkt ten jest odpowiedni wyłącznie do dobrze
odizolowanych miejsc lub do okazjonalnego użytku. NO : Dette produktet egner seg kun for godt isolerte rom eller sporadisk bruk. RO : Acest
produs este adecvat exclusiv spaţiilor bine ventilate sau utilizării ocazionale. CZ : Tento výrobek je vhodný pouze do dobře izolovaných prostor
nebo k příležitostnému použití. DK : Dette produkt er kun egnet til velisolerede rum eller lejlighedsvis brug. PT : Este produto somente é adequado
para espaços bem isolados ou uso ocasional. SE : Denna produkt är endast avsedd för välisolerade utrymmen eller tillfällig användning. FI : Tämä
tuote soveltuu ainoastaan hyvin eristettyihin tiloihin tai satunnaiseen käyttöön. SK : Tento výrobok je vhodný len pre dobre izolované priestory alebo
na občasné použitie. SI : Ta izdelek je primeren le za dobro izolirane prostore ali za občasno uporabo. HR : Ovaj proizvod je pogodan samo za
dobro izolirane prostore ili povremenu upotrebu. HU : Ez a termék csak jól szigetelt terekhez vagy eseti használatra alkalmas.

     The product complies with the European Safety Standards EN60335-2-30 and the European Standard Electromagnetic Compatibility (EMC)
     EN55014, EN60555-2 and EN60555-3 These cover the essential requirements of EEC Directives 2014/35/EU and 2014/30/EU

                                                                                                                             08/53885/0     Issue 1
                                                                                                                             OCN 10969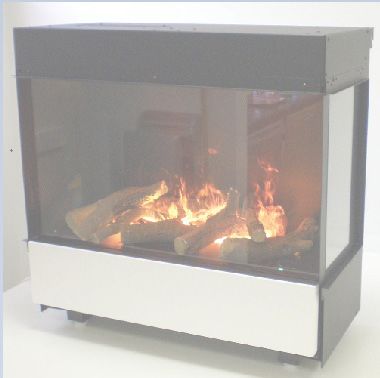
EN................................................................................................... 1
NL...................................................................................................11
FR................................................................................................. 21
DE................................................................................................. 31
IT................................................................................................... 41
NO................................................................................................. 51
3-Step                                                                              EN

IMPORTANT: THESE INSTRUCTIONS SHOULD BE READ CAREFULLY AND RETAINED FOR FUTURE REFERENCE

When using electrical appliances, basic precautions should always be followed to reduce the risk of
fire, electrical shock and injury to persons, including the following:
If the appliance is damaged, check with the supplier before installation and operation.
Do not use outdoors.
Do not use in the immediate surroundings of a bath, shower or swimming pool.
Do not locate the appliance immediately below a fixed socket outlet or connection box.
This appliance can be used by children aged form 8 years and above and persons with reduced
physical, sensory or mental capabilities or lack of experience and knowledge if they have been given
supervision or instruction concerning use of the appliance in a safe way and understand the hazards
involved. Children shall not play with the appliance. Cleaning and user maintenance shall not be
made by Children without supervision.
Children of less than 3 years should be kept away unless continuously supervised. Children aged
from 3 years and less than 8 years shall only switch on/off the appliance provided that it has been
placed or installed in its intended normal operating position and they have been given supervision or
instruction concerning use of the appliance in a safe way and understanding the hazards involved.
Children aged from 3 years and less than 8 years shall not plug in, regulate and clean the appliance
or perform user maintenance.
Do not use this appliance in series with a thermal control, a program controller, a timer or any other
device that switches on the heat automatically, since a fire risk exists when the appliance is acci-
dentally covered or displaced.
This appliance is not equipped with a device to control the room temperature. Do not use this ap-
pliance in small rooms when they are occupied by persons not capable of leaving the room on their
own, unless constant supervision is provided.
Ensure that furniture, curtains or other combustible material are positioned no closer than 1 metre
from the appliance.
In the event of a fault unplug the appliance.
Unplug the appliance when not required for long periods.
Although this appliance complies with safety standards, we do not recommend its use on deep pile
carpets or on long hair type of rugs.
The appliance must be positioned so that the plug is accessible.
If the supply cord is damaged it must be replaced by the manufacturer or service agent or a similarly
qualified person in order to avoid a hazard.
Keep the supply cord away from the front of the appliance.
Warning: In order to avoid overheating, do not cover the appliance. Do not place material or gar-
ments on the appliance, or obstruct the air circulation around the appliance, for instance by curtains
or furniture, as this could cause overheating and a fire risk.
Warning: In order to avoid a hazard due to inadvertent resetting of the thermal cut-out, this appliance
must not be supplied through an external switching device, such as a timer, or connected to a circuit
that is regularly switched on and off by the utility.
CAUTION - Some parts of this product can become very hot and cause burns. Particular attention
has to be given where children and vulnerable people are present.

                                                  1
General Information
Unpack the heater carefully and retain the packaging for possible future use, in the event of moving or returning
the fire to your supplier. The Remote Control, batteries and lamps are packed separately in the carton.
The fire incorporates a flame effect, which can be used with or without heating, so that the comforting effect
may be enjoyed at any time of the year. Using the flame effect on its own only requires little electricity.
Before connecting the heater check that the supply voltage is the same as that stated on the heater.
Please note: Used in an environment where background noise is very low, it may be possible to hear a sound which is
related to the operation of the flame effect. This is normal and should not be a cause for concern.
Electrical connection.
WARNING – THIS APPLIANCE MUST BE EARTHED.
This heater must be used on an AC ~ supply only and the voltage marked on the heater must correspond to the supply
voltage.
Before switching on, please read the safety warnings and operating instructions.
PLEASE RETAIN THIS USER’S GUIDE FOR FUTURE REFERENCE
Do not put Opti-myst plastic components into a dishwasher.
Only slide out the drawer when the water tank needs to be filled or a lamp needs to be changed otherwise you
will inadvertently alter the water level and the flame effect operation.
Only use tap water in this appliance with a maximum hardness of 10 dH.
Always ensure that the appliance is sitting on a level floor.
If you intend not using the appliance for longer than 2 weeks, drain the water from sump and water tank and
dry the sump.
Once installed, never move this appliance or lay on its back, without draining the water from sump and water
tank.
The water tank, sump, sump lid, tank cap and air filters must be cleaned once every two weeks, particularly in
hard water areas.
The appliance should never be operated if the lamps are not working.
The lamps should be regularly inspected as described under ‘Maintenance’ and ‘Changing Lamps’.
Technical Information
Model No: 3 Step E
Heat Output 230V 240V
Nominal Heat Output PNom 0.9 1.0 kW
Minimum Heat Output Pmin 0.9 1.0 kW
Maximum Continuous Heat Output Pmax 0.9 1.0 kW
Auxiliary Electricity Consumption
In Standby Mode PNom 0.87 0.93 W
electronic room temperature control plus week timer
Installation Instructions
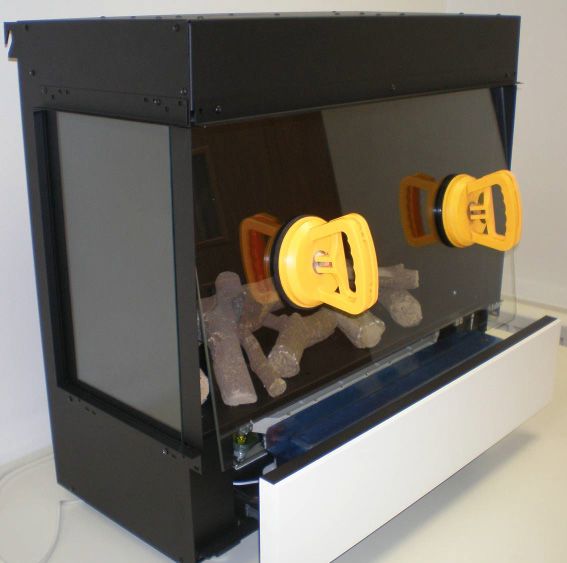
The 3-Step can be changed to suit 3 styles, the Tripple (3 side glass), the Duet (2side glass) and the Relax (front glass
only).The product comes already comes as a Relax. To change between models fix the suction cups to the front glass
and lift the glass upwards and then down and away from the product see fig 3a. Remove the rubber cord on the inside of
the side glass at the bottom and top. Slide the side metal plate and side glass out together see fig 3b. Seperate the side
glass and slide it back into place. Use the larger rubber cord to fix the side glass in place found in the instruction pack.
Replace the front glass by repeating the steps above in reverse. Use the suction cups to adjust the side glass so that
you have a both the front and side glass fitting correctly. Ensure that there is a gap of 300mm between the top of the fire
and the underside of any shelf. Wall Mounting: Build a platform for the unit to stand on. Using the dimensions in Fig1
mount the wall brace supplier level and in a desired position on to the wall by using 4 appropriate fixings for your wall.
With two persons hold the fire by the sides and gently manoeuvre into position and suspend the fire from the wall brace.
Under the appliance there are four adjustable supports provided for levelling, where the base of the fireplace opening is
raised above the level of the platform. When building a front fascia ensure that there is an opening at the front for air to
get into the product, see Fig21. This is essencial for the flame effect.Also ensure that there is venting at the top of the
product, this is essencial for the heater to function correctly, see Fig20.
Before installing this appliance, we recommend that;
1. Choose which style of 3-step you require and make the required adjustment to the appliance
2. You have your chimney cleaned by a competent chimney sweep.
3. You block off the chimney flue.
This procedure is important for the efficient operation of the heating unit and will also reduce heat loss up the chimney.
2Installation.
Ensure that all packing items are removed (read any warning labels carefully).
Retain all packing for possible future use, in the event of moving or returning the appliance to your supplier.
You are now ready to install the electric fire. Make sure the unit is switched OFF.
Using the correct fixings for your wall fix the wall bracket to the wall. Plug the fire into a 13amp/240 volt outlet. Ensure
that the supply cable exits at the front of the fire, at the right or left hand corner to suit your supply socket location and
is not trapped under the fire such that it might cause it to be damaged.
Before using the manual controls firstly fill the water tank (See ‘Maintenance’, ‘Filling the water tank’).
Operating the Fire
WARNING: FAILURE TO FOLLOW THESE OPERATING INSTRUCTIONS MAY RESULT IN INJURY AND/OR DAMAGE.
Manual Controls
The Opti-myst Manual controls are located on the base of the appliance.
(See Fig.2 for Manual Control lay out)
Switch ‘A’:- Controls the electricity supply to the Fire.
Note: This switch must be in the ‘ON’ ( I ) position for the Fire to operate with or without heat when activated.
Switch ‘B’:- Press once to turn on the flame effect. This will be indicated by an audible “beep”. Although the main lights
operate immediately it will take a further 45 seconds before the flame effect starts.
Press to put fire into standby mode. This will be indicated by one “beep”.
Remote Control
The remote control is packed with 2 AA batteries in a bag. Lift off the battery cover on the back of the remote control and
insert the batteries taking note of the polarity.
The remote control has already been paired to your product during factory assembly. In the unlikely event that the re-
mote control disconnects from the product, or you obtain a spare remote control, you will need to complete the pairing
process:
1. With the product plugged in press switch A to the ON (I) position. You should hear an audible beep
2. Press and hold ‘Button 6’ until PAIR appears on the display
3. Bring the remote control close to the product where the receiver is . See Fig 3C
4. The product will start to beep and blink
5. Press ‘Button 6’ to complete the pairing process. The product will go into standby mode.
Switching on the appliance
Press and hold the ENTER button for 3 seconds to activate the remote control. FIRE will be displayed and ON will be
blinking. Press ENTER to swtich on the appliance. To turn off the appliance press MENU so that FIRE is blinking, press
ENTER twice.
Adjust the Flame Setting
With the remote control activated press once. FIRE will be blinking on the display. Press ENTER. The current flame
setting will be displayed F1-F6. Press the UP and DOWN buttons to adjust the setting. After you have selected your flame
setting press BACK twice to exit the menu and return to the home screen.
Switching on the Heat
With the remote control activated press MENU once. FIRE will be blinking on the display. Press ADV once, HEAT will be
blinking. Press ENTER. The current heat setting will be displayed OFF LO HI. Press the UP and DOWN buttons to adjust
the setting. After you have selected your flame setting press ENTER
Setting the Thermostat
The temperature shown on the display is the room temperature set point. This is the temperature that the heater will
maintain during the heating periods. If the room temperature is above this temperature then the heater will not operate.
The heater leaves the factory with this temperature set at 15ºC which represents a typical comfortable room temperature.
If you require a different room temperature then press either up or down on the home screen until the display shows the
temperature you require.
Thermal Safety Cut-out
A thermal safety cut-out is incorporated in the fan heater to prevent damage due to overheating. This can happen if
the heat outlet was restricted in any way. If the cut-out operates, unplug the heater from the socket outlet and allow
approximately 10 minutes before reconnecting. Before switching the heater back on remove any obstruction that may be
restricting the heat outlet, then continue normal operation.
3CAUTION: In order to avoid a hazard due to inadvertent resetting of the thermal cutout, this appliance must not be
supplied through an external switching device, such as a timer, or connected to a switch that is regularly switched on and
off by the utility.
Setting the Date and Time
To set the date and time on the heater;
1. Press the Menu button
2. Press ^ button 4 times
3. Press Enter when the Date & Time icon is blinking
4. Press Enter to set Time
5. Press v and ^ to set the Hour, press Enter
6. Press v and ^ to set the Minutes, press Enter to confirm the time
7. Press v and ^ to set the Day, press Enter
8. Press v and ^ to set the Month, press Enter
9. Press v and ^ to set the Year, press Enter to confirm the date
Modes of Remote Operation
User Timer: Provides greatest flexibility to the user. Four times slots are available throughout the day and these can be
customised for each day of the week. See “How to adjust the timer modes” for instructions on adjusting these from the
factory default time periods & temperatures.
Manual Mode: This mode heats the room to the temperature you have set the remote control to.
Frost Protection: This mode will maintain a room temperature to 7ºC. This mode should be used to provide protection
against frost as indicated by the frost icon.
Choosing and Setting a Mode
User Timer - To re-programme the factory default Timer Modes:
1. Press Menu Button
2. Press ^ once to the schedule Icon is blinking. Press Enter
3. Press ^ Twice then press Enter
*Days of the weeks are now displayed at the top of the screen*
Day 1 = Monday
Day 2 = Tuesday
Day 3 = Wednesday
Day 4 = Thursday
Day 5 = Friday
Day 6 = Saturday
Day 7 = Sunday
44. Press Enter to Modify Day 1 or Press ^ to navigate to the desired day and Press Enter to Select
5. P1 will be displayed on screen
6. Press Enter to select P1, to navigate to P2, P3 or P4 press ^ and press Enter to select
7. ON will be highlighted, press Enter to set the on Time
8. Press v or ^ to adjust the on Hour time, press Enter to Confirm
9. Press v or ^ to adjust the on Minute time, press Enter to Confirm
10. Press v or ^ to adjust the Temperature setting, press Enter to Confirm
11. Press v or ^ to adjust the off Hour time, press Enter to Confirm
12. Press v or ^ to adjust the off Minute time, press Enter to Confirm
Press Enter to modify Programme P2, follow steps 5-12, Press ^ to skip to P3
Press Enter to modify Programme P3, follow steps 5-12, Press ^ to Skip to P4
Press Enter to modify Programme P4, follow steps 5-12
To copy newly programmed P1-P4 heating programmes to other days press the Enter button.
Copy will be displayed on screen
To copy to the next day in sequence, press ^ button. To deselect the next day in sequence press
Enter button.
The days of the week that are selected will be displayed at the top of the screen. The days that
have been deselected will not be visible (see Diagrams).
Press Enter to confirm, backlight will flash and return to home screen.
5Manual Mode - To choose a constant heat mode. This mode ignores the User Timer and maintains the displayed
temperature.
• Press Menu Button
• Press ^ twice to highlight the Hand icon
• Press Enter to Confirm
• Use v and ^ to adjust to the desired temperature
Frost protect - Frost protect mode maintains a room temperature of 7ºC throughout a 24 hour period. This mode should
be used to provide protection against frost as indicated by the Frost icon.
• Press the Menu button
• Press ^ three times to highlight the snowflake icon
• Press Enter to confirm
• Press v or ^ to exit this mode and enter manual mode.
Getting the Desired Flame Effect
1. Using the remote control press MENU, FIRE on the display will be flashing, press ENTER. The current setting
will be displayed. Press ^ or v to toggle between F1 and F6. F1 being the lowest setting and F6 being the highest
setting.
2. Generally the flames appear more realistic when the flame control is turned down.
3. Give the flame generator time to react to changes you may make.
4. The fire will use less water if the flame effect is set to a lower level.
5. Do not tilt or move the fire while there is water in the tank or sump.
6. Make sure that the fire is on a level floor.
Customising the display
The maximum temperature set point on the product is 32ºC You have the option to reduce this set point. You can also
change ºC to ºF
1. Press the Menu button.
2. Press the ADV button twice - SP will be blinking.
3. Press Enter to confirm.
4. Press v or ^ to choose between ºC and ºF.
5. Press Enter to confirm.
6. Press v or ^ to choose your maximum temperature set point.
7. Press Enter to confirm.
8. Press BACK three times to return to the home screen.
6Adaptive Start
The built-in electronics in this appliance hava a learning function with regards to how long it takes to heat up a
room. Having learnt how quickly it can heat up your room, the appliance is able to turn on at just the right time in
order to get the room up to a comfortable temperature when you want it. For example, if you get up at 7am, you
would normally have to guess when to turn the heating on in order for it to pre-heat the room in time. Depending on
how cold it is outside, this could mean the room is still cold when you have to get out of bed, or mean that its been
warm for half an hour before it needed to be. Adaptive Start means that if you select 21ºC at 7am, the heater will
turn on exactly when it needs to in order to meet this target, running for shorter periods of time when the weather
is mild, and ensuring the room is nice and warm in the winter.
The Adaptive Start function will automatically activate when you use the Timer Mode.
Remote Control
1
1 Display Screen
2 ‘Menu’ Button
3 ‘Back’ Button 2
3 4
4 ‘Advance’ Button
5
5 ‘Up and Down’ Arrows
6
6 ‘Enter’ Button
7Maintenance
WARNING: ALWAYS DISCONNECT FROM THE POWER SUPPLY BEFORE ATTEMPTING ANY MAINTENANCE
Fitting Replacement lamps.
If a large amount of the smoke appears grey or colourless it may be that one or more lamps have failed.
You can check for lamp failure as follows.
1. Leaving the flame effect on, gently pull the drawer fully out by the tab. (See Fig. 3)
2. View the lamps from a distance in front of the fire and observe which lamp needs to be changed.
3. Put Switch ‘A’ in the ‘OFF’ position, and unplug the fire from the mains.
4. Leave the appliance for 20 minutes to allow the lamps to cool down before removing them.
5. Remove the water tank by lifting upwards and place in a sink.
6. Remove the sump as described in the Cleaning Section.
7. Remove the defective lamp, by gently lifting vertically and disengaging the pins from the lamp holder, (See Fig.4 and
5). Replace with an original, 12V, 45w, Gu5.3 base, 8º beam angle, coloured lamp. Purchase the lamps from your
supplier
8. Carefully insert the two pins of the new lamp into the two holes in the lamp holder. Push firmly in place. (See Fig. 4
and 5).
9. Replace the Sump and water tank and carefully close the drawer.
10.Switch on.
Filling the water tank.
When the water tank is empty, flame and smoke effect shuts off, and you will hear 2 audible ‘beeps’. Follow these steps
to refill:
1. Press Switch ‘A’ to (0) (See Fig. 2)
2. Gently pull out the drawer as far as possible by the tab. (See Fig. 3)
3. Remove the water tank by lifting upwards and outwards.
4. Place the water tank in sink and remove cap, Anti-clockwise to open. (See Fig. 6)
5. Fill tank with tap water with a maximum hardness of 10 dH only. This is necessary to prolong the life of the flame
and smoke producing unit. In situations with a higher water hardness, the water should be filtered (for example with
a Maxtra filter). Do not use a decalcifier.
6. Screw the cap back on, do not overtighten.
7. Return the tank to the sump, with the tank cap facing down and the flat side of the tank facing outward.
8. Gently push the drawer back in as far as it will go.
9. Press Switch ‘A’ to ‘ON’ ( I ) position (See Fig. 2)
10.Press Switch ‘B’ once to turn on flame effect. (See manual control section and Fig. 2)
Cleaning.
WARNING – ALWAYS DISCONNECT FROM THE POWER SUPPLY BEFORE CLEANING THE HEATER.
We Recommend cleaning the following components once every 2 weeks, particularly in hard water areas:-
Water Tank, Sump and Seal, Sump lid, Tank cap and seal, Air filter.
For general cleaning use a soft clean duster – never use abrasive cleaners. To remove any accumulation of dust or fluff
the soft brush attachment of a vacuum cleaner should occasionally be used to clean the outlet grille of the fan heater.
Water tank
1. Remove water tank, as described earlier, put into sink and empty water.
2. Using the supplied brush gently rub the inside surfaces of the cap paying particular attention to the rubber ring in the
outer groove and the centre rubber seal.
3. Put a small quantity of washing up liquid into the tank, refit the cap and shake well, rinse out until all traces of washing
up liquid are gone.
4. Refill with filtered tap water only, replace the cap, do not overtighten.
Sump
1. Press Switch ‘A’ to the ‘OFF’ (0) position
2. Gently pull the drawer out as far as possible. (See Fig. 3)
3. Remove the water tank by lifting upwards.
4. Disconnect the electrical connector, located on the left side of the sump, by first loosening the two retaining screws
and gently withdrawing the connector. (See Fig. 8)
5. Release the lower sump locking tabs by turning 90°, this allows the sump to be lifted completely from its location.
(See Fig. 9)
6. Gently lift up the sump assembly, taking care to keep level so as not to spill any water. Sit the assembly in the sink.
(See Fig. 10)
7. Release the two upper sump locking tabs by turning 90°, then lift off the sump lid. (See Fig. 11)
8. Carefully tilt, as shown, so that the liquid drains out of the sump. (See Fig. 12)
89. Put a small amount of washing up liquid into the sump, and using the supplied brush, gently clean all surfaces
including the metal disc and the rubber seal located in the top grooved surface. Do not remove the rubber seals.
(See Fig. 13 and 14)
10.When cleaned, thoroughly rinse the sump with clean water.
11. Clean the outlet surface of the sump lid with the brush and flush out thoroughly with water. (See Fig. 15 & 16)
12.Reverse the above steps to reassemble.
Air filter.
1. Press Switch ‘A’ to the ‘OFF’ (0) position (See Fig. 2)
2. Gently pull the drawer out as far as possible. (See Fig. 3)
3. Remove the tank and place in a sink with the cap facing upwards.
4. Gently slide upwards the air filter plastic holder. (See Fig. 17)
5. Remove the filter combination from the plastic holder.
6. Gently rinse with water in the sink and dry with fabric towel before returning.
7. Replace the filter combination making sure that the course black filter is in contact with the plastic holder. (See
Fig. 18)
8. Replace the tank.
9. Close the drawer fully.
10.Press Switch ‘A’ to the ‘ON’ ( I ) position (See Fig. 2)
Additional Information
Recycling.
For electrical products sold within the European Community. At the end of the electrical products useful life it
should not be disposed of with household waste. Please recycle where facilities exist. Check with your Local
Authority or retailer for recycling advice in your country.
After Sales Service.
Your product is guaranteed for one year from the date of purchase. Within this period, we undertake to repair or exchange
this product free of charge (excluding lamps & subject to availability) provided it has been installed and operated in
accordance with these instructions. Should you require after sales service or should you need to purchase any spares,
please contact the retailer from whom the appliance was purchased or contact the service number relevant to your
country on the warranty card. Please do not return a faulty product to us in the first instance as this may result in the loss
or damage and delay in providing you with a satisfactory service.
Please retain your receipt as proof of purchase.
9Troubleshooting
Symptom Cause Corrective Action
The flame effect will Mains plug is not plugged in. Check plug is connected to wall socket
not start. correctly.
Switch A is in the ‘ON’ ( I ) position, but
mode Switch B has not been pressed. (See Press Switch B once for flame effect. (See
Fig. 2) Fig. 2)
Low water level.
Check the water tank is full and there is
Low voltage connector not connected water in the sump.
properly. (See Fig. 8)
Check that the connector is inserted
correctly. (See Fig. 8)
The flame effect is too Flame effect is set too low. Increase level of flame by using remote
low. control. (See Section Operating the Product)
The water in the sump may be too high due If water level in the sump is more than
to the drawer being opened and closed 40mm, the sump should be removed and
a number of times, water tank removed emptied in the sink.
a number of times, or the fire has been
moved.
Clean Metal Disc with soft brush supplied.
Metal Disc at the base of Sump might be (See Fig. 13) See ‘Maintenance.’ for a step
dirty (See Fig. 13) by step procedure.
Unpleasant smell Dirty or stale water. Clean the unit as described under
when unit is used. maintenance.
Only use tap water in this appliance with a
maximum hardness of 10 dH.
The flame effect has Flame effect setting is too high. Turn the flame effect Thumb Wheel ‘D’ down
too much smoke. to minimum and slowly turn up, about ¼
a turn, at a time. Give the flame generator
some time to adjust before increasing. (See
Fig. 2)
Main lamps are not There is no water in the tank. Follow instructions under Maintenance,
working and there are ‘Filling the water tank’.
no flames or smoke. Check the plug is connected to wall socket
correctly.
Switch ‘A’ Fig. 2 is in the ‘ON’ ( I ) position.
Press switch ‘B’ Fig. 2 until you can hear one
beep only, for flame effect.
Condensation on the The mist setting is too high Reduce the mist intensity by turning the
glass thumb wheel ‘D’ down
The glass may be cold during product start- Reduce the mist intensity to low and turn
up switch ‘C’ to high speed.
Run the product under this setting until the
glass clears then return to your preferred
setting.
Repeat this procedure should condensation
return
103-staps NL
BELANGRIJK: DEZE INSTRUCTIES DIENEN ZORGVULDIG DOORGELEZEN EN VOOR TOEKOMSTIG GEBRUIK
BEWAARD TE WORDEN.
Bij het gebruik van elektrische apparaten dienen de elementaire voorzorgmaatregelen altijd in acht
genomen te worden, om het risico op brand, elektrische schokken en verwondingen bij personen te
voorkomen, inclusief het volgende:
Neem, als het apparaat beschadigd is, contact op met de leverancier vóórdat dit geïnstalleerd
en gebruikt wordt.
Niet buiten gebruiken.
Niet in de directe omgeving van een bad, douche of zwembad gebruiken.
Het apparaat niet rechtstreeks onder een vast stopcontact of aansluitdoos plaatsen.
Dit apparaat kan worden bediend door kinderen van 8 jaar en ouder en door personen met
verminderde fysieke, zintuiglijke of geestelijke capaciteiten of gebrek aan ervaring en kennis, als zij
onder supervisie staan of instructies krijgen ten aanzien van het veilige gebruik van het apparaat
en begrijpen welke gevaren zich kunnen voordoen. Kinderen mogen niet met het apparaat spelen.
Reinigen en onderhoudswerkzaamheden mogen niet door kinderen zonder supervisie uitgevoerd
worden.
Kinderen van 3 jaar of jonger moeten uit te buurt gehouden worden, behalve wanneer zij onder
constante supervisie staan. Kinderen vanaf 3 jaar, maar jonger dan 8 jaar, mogen het apparaat alleen
aan/uit zetten, op voorwaarde dat dit in de normale gebruiksstand geplaatst of geïnstalleerd is en ze
begeleiding of instructie hebben gekregen ten aanzien van het veilige gebruik van het apparaat en de
betreffende gevaren begrijpen. Kinderen ouder dan 3 en jonger dan 8 jaar mogen de stekker van het
apparaat niet in het stopcontact steken, hem instellen en reinigen, of onderhoudswerkzaamheden
uitvoeren.
Gebruik dit apparaat niet in serie geschakeld met een thermische bediening, een programmabediening,
een timer or ieder ander apparaat, omdat er een brandrisico bestaat als de verwarming per ongeluk
afgedekt of verplaatst wordt.
Dit apparaat is niet uitgerust met een inrichting om de kamertemperatuur te controleren. Gebruik dit
apparaat niet in kleine ruimtes als ze worden gebruikt door mensen die niet zelfstandig de ruimte
kunnen verlaten, behalve als er constante supervisie aanwezig is.
Zorg ervoor dat meubelen, gordijnen en andere brandbare materialen zich op meer dan 1 meter van
het apparaat bevinden.
Haal in het geval van een storing de stekker van het apparaat uit het stopcontact.
Haal de stekker van het apparaat uit het stopcontact als hij langere tijd niet wordt gebruikt.
Hoewel het apparaat aan de veiligheidsnormen voldoet, raden wij het gebruik op hoogpolig tapijt
of langharige kleden af.
Het apparaat moet zodanig gepositioneerd worden dat de stekker bereikbaar is.
Als het snoer beschadigd is, moet hij vervangen worden door de fabrikant of servicedienst of een
vergelijkbaar gekwalificeerd persoon om een gevaar te voorkomen.
Het snoer uit de buurt van de voorkant van het apparaat weghouden.
Opgelet: Het apparaat niet afdekken om oververhitting te voorkomen. Geen materiaal of kleding op
het apparaat leggen, of de luchtcirculatie om het apparaat verhinderen, door bijvoorbeeld gordijnen
of meubels, omdat dit tot oververhitting en brandgevaar kan leiden.
Opgelet: Om gevaar door onbedoeld resetten van de thermische beveiliging te voorkomen, mag
dit apparaat niet worden gevoed via een extern schakelapparaat, zoals een timer, of worden
aangesloten op een systeem dat het apparaat regelmatig in- en uitschakelt.
WAARSCHUWING - Sommige onderdelen van dit product kunnen heel heet worden en brandwonden
veroorzaken. Er moet extra worden opgelet wanneer er kinderen en kwetsbare personen aanwezig
zijn.
11Algemene informatie
Verwijder de kachel voorzichtig uit de verpakking en bewaar deze voor mogelijk toekomstig gebruik voor
verhuizingen of het terugbrengen van de kachel naar de verkoper. De afstandsbediening, batterijen en lampen
zijn afzonderlijk verpakt in de doos.
De haard heeft een vlameffect die met of zonder warmte gebruikt kan worden, zodat op elk moment van het jaar
genoten kan worden van de gezelligheid die het biedt. Voor gebruik van alleen het vlameffect is maar een klein
beetje elektriciteit nodig.
Controleer alvorens de stekker van de verwarming in het stopcontact te steken of het voltage hetzelfde is als op de
verwarming aangegeven wordt.
Opgelet: Bij gebruik in omgeving met weinig achtergrondgeluid kan een geluid hoorbaar zijn als het vlameffect
geselecteerd wordt.. Dit is normaal en niet iets om u zorgen over te maken.
Elektrische aansluiting.
WAARSCHUWING - DIT APPARAAT MOET GEAARD ZIJN.
Deze kachel mag alleen gevoed worden met wisselstroom en het op kachel aangegeven voltage moet overeenkomen
met het voltage van de stroomtoevoer.
Lees vóór het inschakelen de veiligheidswaarschuwingen en bedieningsinstructies door.
BEWAAR DEZE GEBRUIKSHANDLEIDING VOOR TOEKOMSTIGE RAADPLEGING
Plaats de plastic onderdelen van de Opti-myst niet in een vaatwasmachine.
Trek de la er alleen uit als het waterreservoir bijgevuld moet worden of als er een lamp vervangen moet worden.
U zult anders het waterniveau en de werking van het vlameffect onbedoeld wijzigen.
Alleen kraanwater met een maximale hardheid van 10 dH in dit apparaat gebruiken.
Zorg er altijd voor dat het apparaat op een vlakke ondergrond staat.
Als u het apparaat langer dan 2 weken niet gebruikt, laat dan het water uit de opvangbak en uit het waterreservoir
lopen en maak de opvangbak droog.
Eenmaal geïnstalleerd, mag dit apparaat nooit verplaatst of op zijn rug gelegd worden, zonder dat het water uit
de opvangbak en de watertank is verwijderd.
Het waterreservoir, de opvangbak, het deksel van de opvangbak, de tankdop en luchtfilters moeten om de
2weken gereinigd wordenvooral in gebieden met hard water.
Het apparaat mag nooit worden gebruikt als de lampen niet werken.
De lampen moeten regelmatig worden geïnspecteerd zoals beschreven onder ‘Onderhoud’ en ‘Lampen
vervangen’.
Technische informatie
Modelnr: 3-staps E
Warmte-uitvoer 230V 240V
Nominale warmteafgifte PNom. 0.9 1.0 kW
Minimale warmteafgifte Pmin. 0.9 1.0 kW
Maximale continue warmteafgifte Pmax. 0.9 1.0 kW
Aanvullend elektriciteitsverbruik
In de stand-by-modus PNom. 0.87 0.93 W
Elektronische bediening van de kamertemperatuur plus weektimer
Installatie-instructies
De 3-stap kan worden aangepast aan 3 stijlen, de Triple (3-kantsruit), de Duet (2-kantsruit) en de Relax (alleen voorruit).
Het product wordt al geleverd als Relax. Om te wisselen tussen modellen, bevestigt u de zuignappen op de voorste ruit
en tilt u het glas naar boven, vervolgens naar beneden en weg van het product, zie Afb. 3a. Verwijder het rubberen koord
boven- en onderaan de binnenkant van de zijruit. Schuif de metalen zijplaat en de zijruit samen naar buiten, zie Afb.
3b. Scheid de zijruit af en schuif het terug op zijn plek. Gebruik het grotere rubberen koord om de zijruit op zijn plek te
bevestigen, zoals te vinden in het instructiepakket. Vervang de voorruit door de bovenstaande stappen in omgekeerde
volgorde te herhalen Gebruik de zuignappen om de zijruit zodanig te verstellen dat u zowel de voorruit als de zijruit
goed hebt geplaatst. Zorg ervoor dat er een ruimte van 300 mm is tussen de bovenkant van het vuur en de onderkant
van de plank. Muurmontage: bouw een platform waarop het apparaat kan staan. Met de dimensies in Afb. 1 monteert
u de muurbeugelsteun vlak en in een gewenste positie op de muur met 4 geschikte bevestigingen voor uw muur. Houd
met twee personen het vuur aan de zijkanten vast en manoeuvreer voorzichtig in positie en hang het vuur aan de
muurbeugel op. Onder het apparaat bevinden zich vier instelbare steunen voor het nivelleren, waarbij de voet van de
openhaardopening boven het niveau van het platform wordt geheven. Zorg er bij het opbouwen van de frontlijst voor dat
er aan de voorkant een opening aanwezig is, zodat er lucht bij het product kan komen, zie Afb. 21. Dit is essentieel voor
het vlameffect. Zorg er ook voor dat er ontluchting aan de bovenkant van het product is. Dit is van essentieel belang
voor het correct functioneren van de kachel, zie Afb. 20.
12Ij raden u het volgende aan voordat u het apparaat installeert:
1. Kies de gewenste driestaps-stijl en breng de vereiste aanpassing aan het apparaat aan
2. Laat uw schoorsteen vegen door een erkende schoorsteenveger.
3. U sluit het rookkanaal af.
Deze procedure is belangrijk voor een efficiënte werking van de verwarmingseenheid en zal ook warmteverlies via de
schoorsteen voorkomen.
Installatie.
Zorg ervoor dat alle verpakkingsartikelen zijn verwijderd (lees eventuele waarschuwingsetiketten zorgvuldig).
Pak de kachel voorzichtig uit en bewaar de verpakking voor mogelijk toekomstig gebruik, in het geval dat de
kachel wordt verplaatst of naar uw leverancier wordt geretourneerd.
U kunt nu beginnen met de installatie. Zorg ervoor dat het apparaat UIT staat.
Gebruik de juiste bevestigingen voor uw muur om de muurbeugel aan de muur te bevestigen. Sluit het apparaat aan
op een stopcontact van 13 Amp/240 Volt. Zorg ervoor dat de voedingskabel aan de achterkant van de kachel er in de
linker- of rechterhoek uitkomt, afhankelijk van de positie van het stopcontact en niet onder de kachel vastzit. om zo te
voorkomen dat hij beschadigd raakt.
Vul, voordat de handmatige bediening gebruikt wordt, eerst het waterreservoir (Zie “Onderhoud”, “Het vullen
van het waterreservoir”).
Het vuur bedienen
WAARSCHUWING: HET NIET VOLGEN VAN DEZE BEDIENINGSINSTRUCTIES KAN LETSEL EN/OF SCHADE TOT
GEVOLG HEBBEN.
Handmatige bedieningselementen
De handmatige bedieningselementen van de Opti-myst bevinden zich aan de onderkant van het apparaat.
(Zie Afb. 2 voor de indeling van de handmatige bediening)
Schakelaar ‘A’: regelt de stroomtoevoer naar het apparaat.
Opmerking: Deze schakelaar moet in de ‘AAN’ (I) positie staan om de kachel te laten werken, met of zonder warmte,
wanneer deze wordt geactiveerd.
Schakelaar ‘B’: éénmaal indrukken om het vlameffect in te schakelen. Dit wordt aangegeven door een hoorbare
pieptoon. Hoewel de hoofdlampen onmiddellijk werken, duurt het nog 45 seconden, voordat het vlameffect begint.
Indrukken om de kachel in de stand-by-modus te zetten. Dit wordt aangegeven door één pieptoon.
Afstandsbediening
De afstandsbediening wordt met 2 AA-batterijen in een zakje geleverd. Haal het batterijklepje aan de achterkant van de
afstandsbediening omhoog en plaats de batterijen. Let daarbij op de polariteit (+ en -).
De afstandsbediening is tijdens de fabrieksmontage reeds aan uw product gekoppeld. In het onwaarschijnlijke geval
dat de afstandsbediening de verbinding met het product verliest, of u een additionele afstandsbediening krijgt, moet u
de koppelingsprocedure opnieuw uitvoeren:
1. Wanneer het product op de elektriciteit aangesloten is, zet u A op de AAN (I) stand. U moet een pieptoon
horen.
2. Houd ‘knop 6’ ingedrukt totdat “PAIR” op het scherm verschijnt.
3. Houd de afstandsbediening dicht bij het product waar de ontvanger zich bevindt . Zie Afb. 3C.
4. Het product zal beginnen te piepen en te knipperen.
5. Druk op ‘knop 6’ om de koppelingsprocedure te voltooien. Het product schakelt over naar de stand-bystand.
Het apparaat inschakelen
De ENTER knop indrukken en 3 seconden ingedrukt houden om de afstandsbediening te activeren. FIRE (Vuur) wordt
weergegeven en ON zal knipperen. Druk op ENTER om het apparaat aan te zetten. Om het apparaat uit te schakelen,
drukt u op MENU, zodat FIRE (Vuur) gaat knipperen, druk vervolgens tweemaal op ENTER.
De vlaminstelling aanpassen
Druk éénmaal met de geactiveerde afstandsbediening. FIRE (Vuur) zal op de weergave beginnen te knipperen. Indrukken
ENTER. De huidige vlaminstelling wordt weergegeven F1-F6. Druk op de UP en DOWN knoppen om de instelling aan
te passen. Nadat u uw vlaminstelling hebt geselecteerd, drukt u tweemaal op BACK om het menu te verlaten en terug
te keren naar het startscherm.
De warmte inschakelen
Druk eenmaal op MENU met de geactiveerde afstandsbediening. FIRE (Vuur) zal op de weergave beginnen te knipperen.
Druk éénmaal op ADV en het woord HEAT zal gaan knipperen. Druk op ENTER. De huidige warmte-instelling wordt
weergegeven: OFF, LO, HI. Druk op de UP en DOWN knoppen om de instelling aan te passen. Nadat u uw vlaminstelling
hebt geselecteerd, drukt u op ENTER
De thermostaat instellen
De temperatuur die op het display wordt weergegeven, is het instelpunt voor de kamertemperatuur. Dit is de temperatuur
13die de kachel tijdens de opwarmingsperioden zal aanhouden. Als de kamertemperatuur hoger is dan deze temperatuur, zal
de kachel niet werken. De kachel verlaat de fabriek met deze temperatuur ingesteld op 15 °C, wat met een comfortabele
kamertemperatuur overeenkomt. Als u een andere kamertemperatuur wenst, drukt u in het startscherm op omhoog of
omlaag, totdat de display de door u gewenste temperatuur weergeeft.
Thermische veiligheidsschakelaar
In de kachel is een thermische veiligheidsschakelaar ingebouwd om schade door oververhitting te voorkomen. Dat kan
gebeuren wanneer de warmte-uitgang op één of andere manier geblokkeerd is. Als de uitschakeling optreedt, haal dan
de stekker van de kachel uit het stopcontact en wacht ongeveer 10 minuten, voordat u hem opnieuw aansluit. Voordat
u de kachel weer inschakelt, moet u eventuele obstakels verwijderen die de warmte-uitgang belemmeren en vervolgens
kunt u de normale werking voortzetten.
OPGELET: Om gevaar door het onbedoeld resetten van de thermische beveiliging te voorkomen, mag dit apparaat niet
worden aangesloten via een extern schakelapparaat, zoals een timer, of worden aangesloten op een systeem dat de
kachel regelmatig in- en uitschakelt.
Datum en tijd instellen
Om de datum en tijd op de kachel in te stellen:
1. Druk op de Menu-knop
2. Druk 4 keer op de ^ knop
3. Druk op Enter wanneer het pictogram Datum/tijd knippert
4. Druk op Enter om de tijd in te stellen
5. Druk op v en ^ om het uur in te stellen en druk op Enter
6. Druk op v en ^ om de minuten in te stellen en druk op Enter om de tijd te bevestigen
7. Druk op v en ^ om de dag in te stellen en druk op Enter
8. Druk op v en ^ om de maand in te stellen en druk op Enter
9. Druk op v en ^ om het jaar in te stellen en druk op Enter om de datum te bevestigen
Modi van de afstandsbediening
Gebruikerstimer: Biedt gebruiker de grootste flexibiliteit. Voor iedere dag zijn er 4 tijdslots beschikbaar en deze kunnen
voor elke dag van de week worden aangepast. Zie "Een modus kiezen en instellen" voor instructies over het aanpassen
van deze instellingen die vanuit de fabriek een aantal standaardtemperaturen hebben meegekregen.
Handmatige modus: In deze modus wordt de kamer verwarmd tot de temperatuur, waarop u de afstandsbediening hebt
ingesteld.
Vorstbescherming: In deze modus wordt een kamertemperatuur van 7 °C aangehouden. Deze modus moet worden
gebruikt om bescherming tegen vorst te bieden, zoals aangegeven in het vorstpictogram.
Een modus kiezen en instellen
Gebruikerstimer - Om de fabrieksstandaarden van de timer-modi opnieuw te programmeren:
1. Druk op de Menuknop
2. Druk één keer op ^ tot het schema-pictogram knippert. Druk op Enter
3. Druk tweemaal op ^ en dan op Enter
*Weekdagen worden nu bovenaan het scherm weergegeven*
Dag 1 = Maandag
Dag 2 = Dinsdag
Dag 3 = Woensdag
Dag 4 = Donderdag
Dag 5 = Vrijdag
Dag 6 = Zaterdag
Dag 7 = Zondag
144. Druk op Enter om Dag 1 te wijzigen of druk op ^ om naar de gewenste dag te gaan en druk vervolgens op Enter
om de dag te selecteren
5. Op het scherm wordt weergegeven: P1
6. Druk op Enter om P1 te selecteren, om naar P2, P3 of P4 te navigeren, drukt u op ^ en druk daarna op Enter om
te selecteren
7. ON wordt gemarkeerd, druk op Enter om de Time (tijd) in te stellen
8. Druk op v en ^ om het uur van de inschakeltijd in te stellen en druk op Enter om te bevestigen
9. Druk op v en ^ om de minuut van de inschakeltijd in te stellen en druk op Enter om te bevestigen
10. Druk op v en ^ om de temperatuur in te stellen en druk op Enter om te bevestigen
11. Druk op v en ^ om het uur van de uitschakeltijd in te stellen en druk op Enter om te bevestigen
12. Druk op v en ^ om de minuut van de uitschakeltijd in te stellen en druk op Enter om te bevestigen
Druk op Enter om programma P2 te wijzigen, volg stappen 5-12, druk op ^ om naar P3 te gaan
Druk op Enter om programma P3 te wijzigen, volg stappen 5-12, druk op ^ om naar P4 te gaan
Druk op Enter om programma P4 te wijzigen, volg stappen 5-12
Om de nieuw geprogrammeerde instellingen van P1-P4 naar de andere dagen te kopiëren, drukt u op de Enter-knop.
Kopiëren wordt op het scherm weergegeven
Druk op de toets ^ om naar de volgende dag in de reeks te kopiëren. Om de volgende dag in de reeks te deselecteren,
drukt u op de
Enter-knop.
De dagen van de week die zijn geselecteerd, worden bovenaan in het scherm weergegeven. De dagen die
zijn gedeselecteerd, zijn niet zichtbaar (zie diagrammen).
Druk op Enter om te bevestigen, de achtergrondverlichting knippert en u keert terug naar het startscherm.
15Handmatige modus: - Om een constante verwarmingsmodus te kiezen. Deze modus negeert de gebruikerstimer
en handhaaft de weergegeven temperatuur.
• Druk op de Menuknop
• Druk twee keer op ^ om het handpictogram te markeren
• Druk op Enter om te bevestigen
• Gebruik v en ^ om de gewenste temperatuur aan te passen
Vorstbescherming - De vorstbeschermingsmodus handhaaft een kamertemperatuur van 7 °C, gedurende een periode
van 24 uur. Deze modus moet worden gebruikt om bescherming tegen bevriezing te bieden, zoals aangegeven in het
vorstpictogram.
• Druk op de Menuknop
• Druk driemaal op ^ om het sneeuwvlok-pictogram te markeren
• Druk op Enter om te bevestigen
• Druk op v of ^ om deze modus te verlaten en naar de handmatige modus te gaan.
Het gewenste vlameffect instellen
1. Druk op de afstandsbediening op MENU en op het display knippert FIRE (Vuur), druk vervolgens op ENTER. De huidige
vlaminstelling wordt weergegeven. Druk op ^ of v om tussen F1 en F6 heen en weer te gaan. F1 is de laagste
instelling en F6 is de hoogste instelling.
2. In het algemeen lijken de vlammen het meest realistisch wanneer de vlamcontrole laag is ingesteld.
3. Geef de vlamgenerator de tijd om te reageren op de wijzigingen die u aanbrengt.
4. Het vuur gebruikt minder water als het vlameffect op een lager niveau staat ingesteld.
5. Kantel of verplaats het vuur niet, terwijl er water in het reservoir of in de opvangbak zit.
6. Zorg ervoor dat het vuur zich op een vlakke vloer bevindt.
Het display aanpassen
De maximale temperatuurinstelling van het product is 32 °C. U hebt de mogelijkheid deze instelling te verlagen. U kunt
ook °C naar °F wijzigen
1. Druk op de Menuknop.
2. Druk tweemaal op de ADV-knop en SP gaat knipperen.
3. Druk op Enter om te bevestigen.
4. Druk op v of ^ om te kiezen tussen °C en °F.
5. Druk op Enter om te bevestigen.
6. Druk op v of ^ om uw maximale temperatuurinstelling te kiezen.
7. Druk op Enter om te bevestigen.
8. Druk driemaal op TERUG om terug te keren naar het startscherm.
16Aangepaste start
De ingebouwde elektronica in dit apparaat heeft een leerfunctie en leert zelf hoe lang het duurt om een kamer
te verwarmen. Omdat het heeft geleerd hoe snel het uw kamer kan verwarmen, zal het apparaat op het juiste
moment inschakelen om de kamer op een aangename temperatuur te brengen op het moment dat u dat wilt.
Als u bijvoorbeeld om 7 uur ‘s morgens opstaat, moet u normaal gesproken gissen wanneer u de verwarming
moet inschakelen om de kamer op tijd op temperatuur te krijgen. Afhankelijk van hoe koud het buiten is, kan dit
betekenen dat de kamer nog steeds koud is wanneer u uit bed komt of het betekent dat het al een half uur warm
is, voordat het nodig was. Aangepaste start betekent, dat wanneer u 21 °C om 7 uur ‘s morgens instelt, de kachel
op het juiste moment aangaat om deze doeltemperatuur te halen. Bij zacht weer verwarmt de kachel minder lang,
bij koud weer wat langer, zodat de kamer in de winter lekker warm is.
De Aangepaste start wordt automatisch geactiveerd wanneer u de Timermodus gebruikt.
Afstandsbediening
1
1 Weergavescherm
2 ‘Terug’-knop
3 ‘Menu’-knop 3
2 4
4 ‘Geavanceerd’-knop
5
5 ‘Omhoog en omlaag’-pijlen
6
6 ‘Enter’-knop
17Onderhoud
WAARSCHUWING: MAAK ALTIJD DE AANSLUITING OP DE STROOMVOORZIENING LOS VOORDAT
U ONDERHOUD GAAT UITVOEREN
Montage van vervangende lampen.
Als een grote hoeveelheid van de rook grijs of kleurloos lijkt, kan het zijn dat een of meer lampen stuk zijn.
U kunt lampstoringen als volgt controleren.
1. Laat het vlameffect aan en trek de lade voorzichtig helemaal uit het lipje. (Zie Afb. 3)
2. Bekijk de lampen van een afstand voor het vuur en kijk welke lamp moet worden vervangen.
3. Zet schakelaar ‘A’ in de ‘OFF’ stand en haal de stekker van de kachel uit het stopcontact.
4. Laat het apparaat 20 minuten staan om de lampen te laten afkoelen, voordat u deze verwijdert.
5. Verwijder het waterreservoir door het naar boven te tillen en plaats het in een gootsteen.
6. Verwijder de opvangbak zoals wordt beschreven in het gedeelte Reiniging.
7. Verwijder de defecte lamp door deze voorzichtig verticaal op te tillen en de pinnen van de lamphouder los
te maken, (Zie Afb. 4 en 5). Vervang de lamp door een originele gekleurde 12V, 45W lamp met een Gu5.3-basis en
8° stralingshoek. Koop deze lamp van onze leverancier.
8. Steek de twee pinnen van de nieuwe lamp voorzichtig in de twee gaten in de lamphouder. Druk stevig op zijn plaats.
(Zie Afb. 4 en 5).
9. Vervang de opvangbak en het waterreservoir en sluit de lade voorzichtig.
10.Schakel de kachel in.
Het vullen van het waterreservoir.
Wanneer het waterreservoir leeg is, schakelen de vlam- en rookeffecten zich uit en zult u 2 pieptonen horen. Volg deze
stappen voor het bijvullen:
1. Druk op Schakelaar ‘A’ om (0) (Zie Afb. 2)
2. Trek de lade met het lipje voorzichtig zo ver mogelijk naar buiten. (Zie Afb. 3)
3. Verwijder het waterreservoir door het naar boven en naar buiten op te tillen.
4. Plaats het waterreservoir in de gootsteen en verwijder de dop: draai tegen de klok in om hem te openen (Zie Afb. 6)
5. Vul het reservoir alleen met kraanwater met een maximale hardheid van 10 dH. Dit is noodzakelijk om de
levensduur van de vlam- en rookproducerende eenheid te verlengen. In situaties met een hogere waterhardheid
moet het water gefilterd worden (bijvoorbeeld met een Maxtra-filter). Gebruik geen ontkalker.
6. Schroef de dop er weer op, draai niet te strak aan.
7. Plaats de waterreservoir weer in de opvangbak met de reservoirdop naar beneden gericht en de platte kant van het
reservoir naar buiten.
8. Duw de lade voorzichtig helemaal naar binnen.
9. Zet Schakelaar ‘A’ op de ‘ON’ ( I ) stand (Zie Afb. 2)
10.Druk één keer op Schakelaar ‘‘B’ op om het vlameffect in te schakelen. (Zie het hoofdstuk Handmatige bediening en
Afb. 2)
Reinigen
WAARSCHUWING: HAAL ALTIJD DE STEKKER UIT HET STOPCONTACT VOORDAT DE VERWARMING
SCHOONGEMAAKT WORDT
We raden u aan om de volgende componenten eenmaal per 2 weken te reinigen, vooral in gebieden met hard water:
Waterreservoir, opvangbak en afdichting, deksel opvangbak, tankdop en afdichting, luchtfilter.
Gebruik voor normaal reinigen een zachte, schone stofdoek - gebruik nooit schuurmiddelen. Voor het verwijderen van
stofophopingen of pluis kan soms de zachte opzetborstel van de stofzuiger gebruikt worden om het rooster van de fan
schoon te maken.
Waterreservoir
1. Verwijder het waterreservoir, zoals eerder beschreven, zet het in de gootsteen en giet het water eruit.
2. Gebruik de meegeleverde borstel om de binnenkant van de dop voorzichtig af te wrijven, waarbij u vooral let op de
rubberen ring in de buitenste groef en de middelste rubberen afdichting.
3. Doe een kleine hoeveelheid afwasmiddel in het reservoir, plaats de dop terug en schud goed, spoel het vervolgens
uit, totdat alle resten afwasmiddel zijn verdwenen.
4. Vul het reservoir alleen met gefilterd leidingwater, plaats de dop terug en draai hem niet te vast.
Opvangbak
1. Zet schakelaar ‘A’ op de ‘OFF’- (0) stand.
2. Trek de lade er voorzichtig zo ver mogelijk uit. (Zie Afb. 3)
3. Verwijder het waterreservoir door het naar boven te tillen.
4. Trek de elektrische stekker uit het stopcontact aan de linkerkant van de opvangbak, door eerst de twee schroeven
los te draaien en de stekker er dan voorzichtig uit te trekken. (Zie Afb. 8)
185. Maak de onderste vergrendelingen van de opvangbak los door 90° te draaien, zodat het reservoir volledig van zijn
plek kan worden getild. (Zie Afb. 9)
6. Til de opvangbak voorzichtig op en zorg ervoor dat hij waterpas blijft, zodat u geen water morst. Plaats hem in de
gootsteen. (Zie Afb. 10)
7. Maak de twee bovenste vergrendelingen van de opvangbak los door deze 90° te draaien en til vervolgens het
mondstuk op. (Zie Afb. 11)
8. Kantel voorzichtig, zoals aangegeven, zodat de vloeistof uit de opvangbak loopt. (Zie Afb. 12)
9. Doe een kleine hoeveelheid afwasmiddel in de opvangbak en gebruik de meegeleverde borstel om alle oppervlakken
in de opvangbak en de omzetter voorzichtig schoon te maken, inclusief de metalen schijven en de rubberen afdichting
in het bovenste gegroefde oppervlak. Verwijder de rubberen afdichtingen niet. (Zie Afb. 13 en 14).
10.Reinig na het afwassen de opvangbak grondig met schoon water.
11. Reinig het oppervlak van de uitgang van het deksel van de opvangbak met de borstel en spoel deze grondig uit met
water. (Zie Afb. 15 en 16)
12.Voer de bovenbeschreven stappen in omgekeerde volgorde uit om het geheel weer in elkaar te zetten.
Luchtfilter
1. Zet schakelaar ‘A’ in de ‘OFF’- (0) stand (Zie Afb. 2)
2. Trek de lade er voorzichtig zo ver mogelijk uit. (Zie Afb. 3)
3. Verwijder het waterreservoir en plaats deze in een gootsteen met de dop naar boven gericht.
4. Schuif de plastic houder van het luchtfilter voorzichtig omhoog. (Zie Afb. 17)
5. Verwijder de filtercombinatie uit de plastic houder.
6. Voorzichtig met water in de gootsteen afspoelen en met een theedoek afdrogen, voordat het filter teruggeplaatst
wordt.
7. Plaats de filtercombinatie terug en zorg ervoor dat het ruwe zwarte filter contact maakt met de plastic houder.
(Zie Afb. 18)
8. Plaats het reservoir terug.
9. Sluit de lade volledig.
10.Zet schakelaar ‘A’ in de ‘ON’ ( I ) stand (Zie Afb. 2)
Extra informatie
Recyclen.
Voor elektrische producten die binnen de Europese Gemeenschap verkocht worden. Aan het einde van de
levensduur van de elektrische producten, mogen deze niet met het huishoudvuil weggegooid worden. Recylce
waar faciliteiten aanwezig zijn. Vraag uw plaatselijke overheid of winkelier wat de recyclerichtlijnen in uw land zijn.
Aftersales Service.
Uw product heeft een jaar garantie vanaf de aankoopdatum. Binnen deze periode repareren of nemen wij het product
gratis terug (m.u.v. lampen & op basis van beschikbaarheid), op voorwaarde dat het volgens deze instructies geïnstalleerd
en gebruikt is. Neem, als u aftersales service nodig hebt of reserveonderdelen wilt kopen, contact op met de winkelier
waar u het apparaat gekocht hebt of bel het servicenummer van uw land zoals vermeld op het garantiebewijs. Stuur een
defect product niet onmiddellijk naar ons terug. Dit kan verlies of beschadiging veroorzaken, of tot vertraging leiden bij
het verlenen van een bevredigende service.
Bewaar het bonnetje als bewijs van aankoop.
19Probleemoplossen
Symptoom Oorzaak Corrigerende actie
Het vlameffect start De stekker is niet aangesloten. Controleer of de stekker correct in het
niet. stopcontact zit.
Schakelaar A staat in de ‘ON’ ( I ) stand, Druk schakelaar B éénmaal in voor het
maar modusschakelaar B is niet ingedrukt. vlameffect. (Zie Afb. 2)
(Zie Afb. 2)
Laag waterniveau. Controleer of het waterreservoir vol is en
er water in de opvangbak zit.
Lage voltagestekker is niet goed Controleer of de stekker er correct
aangesloten. (Zie Afb. 8) ingestoken is. (Zie Afb. 8)
Het vlameffect is te Het vlameffect is te laag ingesteld. Verhoog het vlamniveau met behulp van de
laag. afstandsbediening. (Zie het hoofdstuk Het
product gebruiken)
Het water in de opvangbak kan te hoog zijn Als het waterniveau in de opvangbak meer is
doordat de lade een aantal keren geopend dan 40 mm, moet de opvangbak verwijderd
en gesloten is, het waterreservoir een paar worden en in de spoelbak geleegd worden.
keer verwijderd is of de kachel verplaatst is.
De metalen schijf onderaan de opvangbak Reinig de metalen schijf met meegeleverde
kan vuil zijn (Zie Afb. 13) zachte borstel. (Zie Afb. 13) Zie ‘Onderhoud’
voor een stapsgewijze procedure.
Onaangename Vies of oud water. Reinig het apparaat, zoals beschreven onder
geur tijdens gebruik Onderhoud.
apparaat. Alleen kraanwater met een maximale hardheid
van 10 dH in dit apparaat gebruiken.
Het vlameffect geeft Instelling vlameffect is te hoog. Draai het duimwiel ‘D’ voor het vlameffect
te veel rook. naar het minimum en draai het langzaam
omhoog, ongeveer een kwartslag per keer.
Geef de vlamgenerator even de tijd om aan te
passen alvorens dit te verhogen. (Zie Afb. 2)
De hoofdlampen Er zit geen water in het waterreservoir. Volg de instructies onder Onderhoud, ‘Het
werken niet en er zijn vullen van het waterreservoir’.
geen vlammen of Controleer of de stekker correct in het
rook. stopcontact zit.
Schakelaar ‘A’ Afb. 2 staat in de ‘ON-’ ( I )
stand.
Druk op schakelaar ‘B’ Afb. 2 totdat u slechts
één pieptoon hoort, voor het vlameffect.
Condens op het glas De nevelinstelling is te hoog Verlaag de nevelintensiteit door het duimwiel
‘D’ naar beneden te draaien
De ruit kan koud zijn tijdens het opstarten Verlaag de nevelintensiteit naar laag en draai
van het product schakelaar ‘C’ op hoge snelheid.
Voer het product onder deze instelling uit
totdat de ruit leeg is en ga terug naar de
gewenste instelling.
Herhaal deze procedure als de condensatie
terugkeert
20You can also read