5.8 Viber Integration Guide - Bright Pattern Documentation Generated: 6/19/2022 9:53 pm
←
→
Page content transcription
If your browser does not render page correctly, please read the page content below
5.8 Viber Integration Guide
Bright Pattern Documentation
Generated: 6/19/2022 9:53 pm
Content is available under license unless otherwise noted.
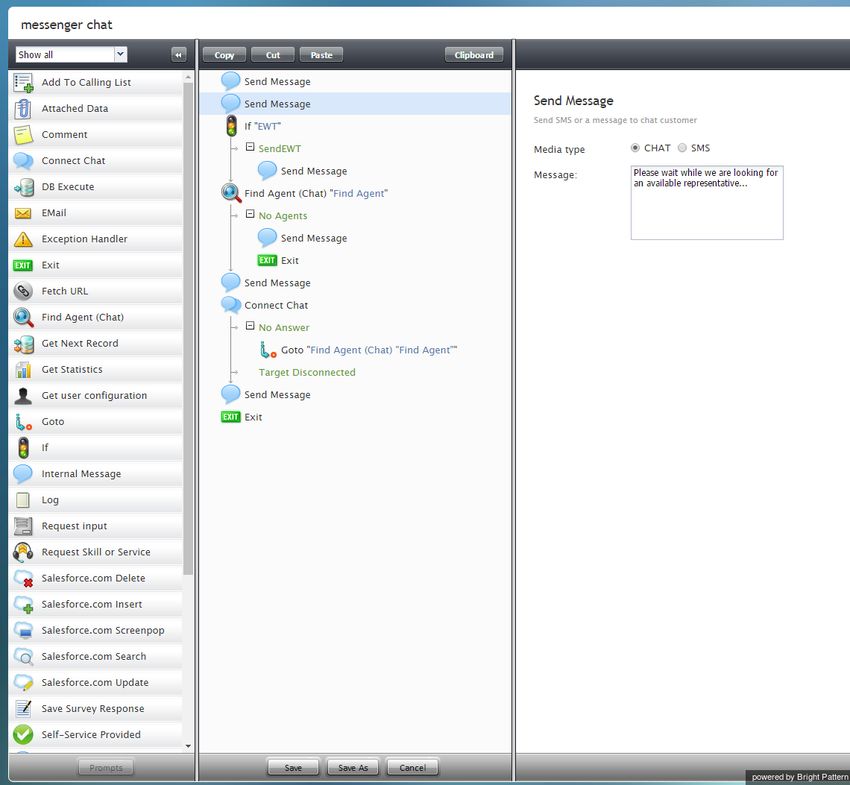
Table of Contents

Table of Contents                                                    2
About                                                                3
 The Faster Way to Connect to Customers                               3
 Reduce Agent Load with Automation                                    3
 Agent Desktop Integration                                            3
 Improve Customer Experience                                          4
Audience                                                             4
Prerequisites                                                        4
 Software Versions                                                    5
Integration Configuration                                            5
 Step 1: Get your Viber Public Account credentials.                   5
 Step 2: Create a new integration account.                            5
 Step 3: Specify Viber integration account properties.                6
 Step 4: Log in and/or complete Agent Desktop installation.           7
Customizing Interactions Using Scenarios                             7
Scenario Configuration                                               8
 Step 1: Create a web chat scenario.                                  8
 Step 2: Specify screen properties for the scenario.                  8
 Step 3: Customize your scenario in Scenario Builder.                 9
Scenario Blocks                                                      10
 Send Message                                                        11
 If                                                                  11
 Find Agent                                                          11
 Connect Chat                                                        12
 Exit                                                                12
Using Viber on Agent Desktop                                         12
 Login                                                               13
 Ready State                                                         14
Customer View                                                        14
About
The Bright Pattern Contact Center Viber Integration Guide provides instructions for setting up your Bright Pattern
Contact Center to function in an integrated manner with your business’s Viber Public Account.

When integrated with the Viber mobile messenger app, Bright Pattern Contact Center omnichannel cloud call
center software enables agents of your contact center to connect with customers via interactive chat conversations
with SMS-style text messages, photos, location sharing, and more.

The Faster Way to Connect to Customers
Bright Pattern’s omnichannel system routes Viber messages to agents logged in to the Agent Desktop application.
This application connects customers with agents who can assist with problem resolution and customer service
inquiries.

Agents can respond in context to any customer inquiry, be it an unsolicited inquiry or a notification reply. Users of
this application can recognize customers, record and distribute the interactions to supervisors, capture customer
satisfaction with post-transactional surveys, and assess performance through an extensive set of reports.

System administrators can tailor their Viber experience to accommodate their organization’s business processes.
Such customization is achieved using Bright Pattern’s omnichannel Scenario Builder application.

Reduce Agent Load with Automation
Integration with Bright Pattern provides access to Bright Pattern scenarios, which automate frequent requests into
self-service using Interactive Voice Response (IVR) technology. With chat scenarios, customers are prompted to
provide information such as name, email, and their question, and their information is directed to the appropriate
agent or service queue. Administrators can use call scenarios to design custom forms, auto-generated messages,
and surveys for any service.

Scenarios and IVR technology provide the following features:

     The capability to work with multiple Viber Public Accounts
     Skills-based omnichannel routing of chat with priority and media precedence; multiple interactions per agent;
     priority overrides
     Web application “screen pop” functionality on the agent side, driven by URL query string parameters
     Chatbot API and bot integrations
     Quality management tools
     Accurate tracking of metrics related to agent performance, interaction details, and so forth
     Chat transcripts
     The ability to save interaction records
     Agent performance reports

Agent Desktop Integration
Seamless integration with the Viber mobile application means that contact centers can stay connected to their
customers using their app of choice. Agents at your contact center work within Bright Pattern's efficient, integrated
Agent Desktop user interface, utilizing the same contacts and tools with which they are familiar.

Agent Desktop integration offers the following features:

     Dynamic user interface
     Built-in softphone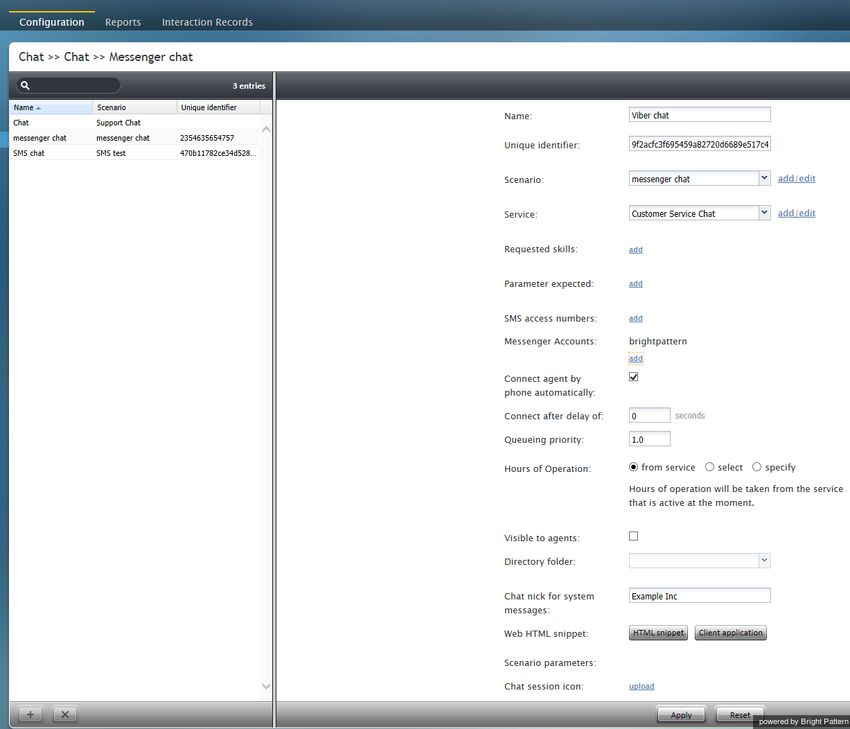
Numerous ways to take phone calls using external devices
     Click-to-dial functionality
     Chat/SMS text
     Social messengers
     Built-in Knowledge Base
     Email case management
     Multi-session chat on analyst
     Canned responses
     Directory access
     Call control (hold, transfer, conference)
     Multiple calls to analyst
     Send screen on transfer
     Disposition and notes
     Supervisor UI with real-time dashboards, multichannel monitoring, and grading

Improve Customer Experience
Viber customer data is pushed to the integrated Agent Desktop, enabling customers to be identified automatically
according to their Viber ID and the information they provided when initiating a conversation with your contact
center. Moreover, customers keep their place in queue, ensuring that priority customers are identified as such and
are served faster.

Built-in screen recording, monitoring, and grading quality management tools ensure maximum service quality. For
example, a customer does not have to repeat information on transfer because the information follows the
interaction through transfers and is saved to the activity history. To ensure the best service quality possible, agents
and supervisors can routinely assess customer satisfaction by using built-in post-transactional surveys attached to
both service and agent performance reports.

Audience
The Viber Integration Guide is intended for the IT and/or technical personnel responsible for the data infrastructure
of the contact centers that use Bright Pattern Contact Center solutions for customer interaction processing.
Readers of this guide are expected to have experience in administration of these systems, as well as a solid
understanding of contact center operations and resources that are involved in such operations.

Prerequisites
Viber integration requires that you have admin-level access to both Bright Pattern Contact Center and a Viber
Public Account (login into partner portal using your Viber app).
Software Versions
For all types of integration described in this guide, the following is required:
Bright Pattern Contact Center version 5.0 or later
A Viber Public Account
Integration Configuration
When Bright Pattern Contact Center is integrated with Viber, your Bright Pattern Agent Desktop environment is
equipped to handle customer-initiated interactions from the Viber application on a customer’s mobile phone,
tablet, or computer. Incoming messages are routed to the integrated Agent Desktop environment, where agents
have direct access to the phone, live chat, email, SMS text, various other mobile messenger apps, customer and
agent records, interaction details, and more.
Viber integration configuration involves linking your Viber Public Account to your Bright Pattern Contact Center
tenant. You can add a Viber integration account to Bright Pattern Contact Center by following these steps.
Step 1: Get your Viber Public Account credentials.
If you have not done so already, apply for a Public Account at viber.com. A Public Account is a business account that
enables your contact center to interact with Viber users.
Note that a Public Account is not the same as a personal (i.e., nonbusiness, regular-use) account. Viber integration
is supported for Public Accounts only.
Step 2: Create a new integration account.
1. Log in as Admin to the Contact Center Administrator application.
2. Navigate to Configuration > Integration Accounts.
3. Click the Add "+" button to add a new account.
4. In the Create integration account window that appears, select Messenger and click OK.Create a new Messenger integration account
Step 3: Specify Viber integration account properties.
Using the credentials that you saved when you first applied for a Viber Public Account, enter values for the
following screen properties. (If you do not know your credentials, ask your system administrator.)
Bot Username - The exact name of your Viber Public Account username
Type - For this integration account, select Viber as the type of integration.
Token - The password that is given to you after your Public Account application is approved
Set Webhook - Set Webhook is necessary for Viber to send you a message from the customer. Clicking theSet
Webhook button opens the Set Webhook window, where the Webhook URL is entered.
Webhook url - The Webhook URL is the address of your server and port number (e.g.,
“office.yourcompany.com”). If you do not know the server URL, ask your system administrator.
Set webhook
Test Connection - This button tests the credentials and confirms whether the connection is valid.
Click Apply to save your changes.Viber integration account
Step 4: Log in and/or complete Agent Desktop installation.
1. Sign in to Agent Desktop with your username and password, being sure to select your desired phone device.
2. By default, you log in with a softphone. To choose another device, click the current Phone device setting and
select the desired type of device from the menu that appears. For more information about the available
device options, see the Bright Pattern Contact Center Agent Guide, section Selecting a Phone Device.
3. Click the Login button.
Note that if this is your first login into Agent Desktop on the given computer, you will be prompted to install the
Agent Desktop Helper Application.
Setting the agent state to Ready will allow incoming Viber messages to be routed to you. If you accept such a
message, the customer’s message opens in Agent Desktop in the same manner as any other web chat or SMS text.
All of Agent Desktop’s features and controls are available to you in the integrated interface.
For more information about using Agent Desktop, see the Bright Pattern Contact Center Agent Guide.
Customizing Interactions Using Scenarios
You can determine how Bright Pattern Contact Center handles Viber messages and Viber customer data directly
from Bright Pattern scenarios.For every customer interaction that enters your contact center, Bright Pattern Contact Center has to process that
specific interaction to determine what to do with it (e.g., what prompts or announcements to apply, what resources
to queue for, what music to play, or when to overflow to alternate resources). The logic of such automated
interaction processing is defined in scenarios. Execution of a scenario with respect to a specific interaction is
triggered by a particular event, such as the initiation of a chat session from a specific web page or app.
Scenarios are designed and edited in the application called Scenario Builder. This application is launched from the
Contact Center Administrator application when you add a new scenario or select an existing one for editing. For
more information, see the Contact Center Administrator Guide, section Scenarios Overview.
Note that your contact center (i.e., tenant) can have multiple Viber integration accounts if it has multiple scenario
entries. Each scenario entry can have only one Viber Public Account (one maximum for each messenger type). Each
service can have one Viber Public Account as an outbound chat account. And the same Viber Public Account can be
assigned to one scenario entry/service only.
Scenario Configuration
The following steps will walk you through the process of creating a scenario.
Step 1: Create a web chat scenario.
1. In the Contact Center Administrator application, navigate to Configuration > Scenarios > Chat.
2. At the bottom of the screen, click the Add "+" button to add a new chat scenario. Alternatively, you may select
and edit the web chat scenario template called "Mobile Chat."
Step 2: Specify screen properties for the scenario.
Screen properties for the scenario are displayed on the right side of the screen. Specify all values as you would for
any other chat scenario. For more information on such screen properties, see the Contact Center Administrator
Guide, section Chat.
Pay particular attention to the field called Messenger Accounts. In this field, select the username of your Viber
Public Account or add a new one by clicking the add/edit link.Viber chat scenario
Step 3: Customize your scenario in Scenario Builder.
1. Open your new scenario by double-clicking its name in the Chat list on the left. The scenario will open in the
Scenario Builder application.
2. Before you do anything else, save your scenario by clicking the Save As button and giving this scenario a
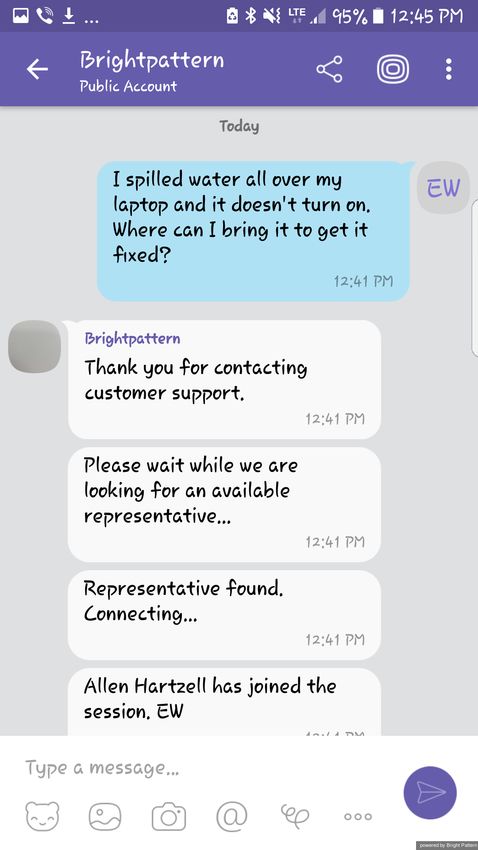
unique name, such as "Messenger Chat," to differentiate the new scenario from the scenario template.Scenario Blocks Actions or prompts called blocks are organized in each scenario, forming the order of operations for a specific service. For Viber integration, this service is a chat service, and the scenario tells the Bright Pattern system how to route messages from customer to agent, what information to collect from the customer, what automatic messages to present to the customer, and what conditional exits to take in a variety of situations. In the example shown, the web chat scenario template called "Mobile Chat" has been opened for editing and renamed "messenger chat." You should use this scenario as a base for yours, customizing the screen properties of each block to suit your chat service. For more information on these blocks, refer to the Bright Pattern Contact Center Scenario Builder Reference Guide. To access Viber data from a scenario, the following scenario blocks should be present in your scenario, in this order. If they are not, drag them onto the center pane of Scenario Builder. 1. Send Message 2. Send Message 3. If 4. Find Agent 5. Send Message 6. Connect Chat 7. Send Message 8. Exit
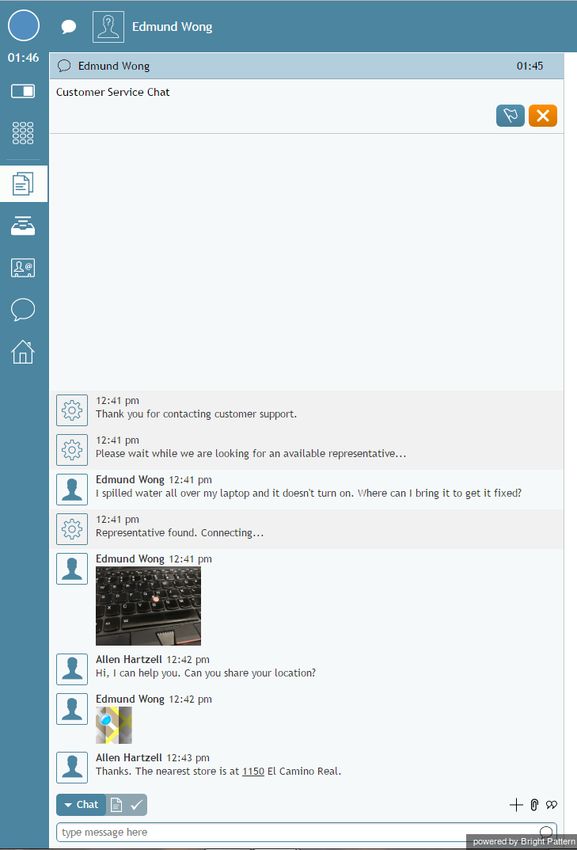
Messenger chat scenario example

Send Message
The Send Message block is used to send a text message to a chat/mobile/messenger customer via SMS. More
information about Send Message settings is available in the Scenario Builder Reference Guide, section Send Message.

If
The If block allows branching of a scenario based on verification of some specified conditions. Multiple conditional
exits (branches) can be configured in the same block.

For examples of how this block is used, see the Scenario Builder Reference Guide, section If.

Find Agent
The Find Agent scenario block finds an agent qualified to handle a given interaction. When the agent becomes
available, the block creates a variable called $(destination) and sets it to the agent’s phone number (for voice) or
username (for chat).

For descriptions of this block’s screen properties, see the Scenario Builder Reference Guide, section Find Agent.

Connect Chat
The Connect Chat scenario block connects a chat to the destination specified in the $(destination) variable (typically,
the agent found by the preceding Find Agent block or to the specified chat scenario entry). If the agent is logged in,
the system tracks the agent’s state according to the state of the interaction. The block handles the call transfers
and conferences internally and only ends when the remote party disconnects or the last agent disconnects.

For descriptions of this block’s screen properties, see the Scenario Builder Reference Guide, section Connect Chat.

Exit
The Exit scenario block disconnects the currently active interaction and exits the scenario.

For descriptions of this block’s screen properties, see the Scenario Builder Reference Guide, section Exit.

Using Viber on Agent Desktop
Designed to increase agent productivity, the Bright Pattern Contact Center Agent Desktop application displays only
the controls and information needed at each point of work. Incoming Viber messages are routed to agents using
the "Messenger Chat" scenario that you created in the Customizing Interactions Using Scenarios section of this
guide. Viber messages are delivered as “Customer Service Chats” and look the same as other web chats or mobile
chats that are normally sent to agents.
Chatting on Viber from the Agent Desktop

Login
 1. Log in to Agent Desktop with your username and password, being sure to select your desired phone device.
 2. By default, you log in with a softphone. To choose another device, click the current Phone device setting and
    select the desired type of device from the menu that appears. For more information about the available
    device options, see the Bright Pattern Contact Center Agent Guide, section Selecting a Phone Device.
3. Click the Login button.
4. Note that if this is your first time logging into Agent Desktop on the given computer, you will be prompted to
install the Agent Desktop Helper Application.
Ready State
Setting the agent state to Ready will allow incoming chat interactions to be routed to you. Agents can accept or
reject chat interactions while logged in and ready. If accepted, the customer’s message is shown in theChat Panel
of Agent Desktop in the same manner as any other web chat or SMS text. All of Agent Desktop’s features and
controls are available in the integrated interface.
Agents can:
Reply to customer chats using the Text Input Field and Send Message button
Send photos and files using the Add Attachment button
Create and send canned chat responses (i.e., automatic greetings)
Transfer and conference with other agents or send conversations to a service queue
Set dispositions for the interaction
Receive a customer’s location as a link to a mapping service (e.g., Google Maps)
Refer to the Bright Pattern Contact Center Agent Guide to learn more about the Agent Desktop user interface and
its applications.
Customer View
For the customer, the Viber chat looks the same as any other normal Viber interaction.Viber conversation on mobile
You can also read