6-IN-1 KITCHEN SYSTEM SISTEMA DE COCINA 6 EN 1 APPAREIL CULINAIRE 6 EN 1 HB5500
←
→
Page content transcription
If your browser does not render page correctly, please read the page content below

TM

6-IN-1 KITCHEN SYSTEM
SISTEMA DE COCINA 6 EN 1
APPAREIL CULINAIRE 6 EN 1

HB5500
Thank you for your purchase!
   Gracias por su compra!
    Merci de votre achat!

Should you have any questions or concerns with your new product,
please call our Customer Service Line at 1-800-231-9786 (US and
Canada). Please do not return to the store.

Si usted tiene alguna inquietud o pregunta con su producto, por
favor llame a nuestra línea de servicio al cliente una atención
inmediata 1-800-231-9786 (EE.UU/Canadá) 01-800-714-2503
(México). No devuela a la tienda.

Si vous avez des questions ou des préoccupations à propos de
votre nouveau produit, veuillez communiquer avec notre Service à
la clientèle au 1 800 231-9786 (États-Unis et Canada). Veuillez ne
pas rapporter le produit au magasin.

                               2
Please Read and Save this Use and Care Book.

                      IMPORTANT SAFEGUARDS.
 When using electrical appliances, basic safety precautions should always be followed to
reduce the risk of fire, electric shock, and/or injury, including the following:
• Read and save all instructions.                            • Do not use the blender with wet hands.
• To protect against risk of electrical shock, do not        • Do not push food into the feed chute with your fingers
  immerse base, motor, cord or plug in water or other          or other utensils. Always use the food pusher provided.
  liquid. Do not use the appliance in the bathroom,          • Always operate motor base with attachment and/or
  near water, or outdoors.                                     lid locked securely in place.
• This appliance should not be used by children and          • Do not attempt to override the lid interlock
  close supervision is necessary when used by or near          mechanism.
  children.                                                  • Never blend hot oil or fat.
• Unplug cord from outlet when not in use, before            • Never add ingredients to the container while the
  putting on or taking off parts, and before cleaning.         immersion blender is operating.
• Do not operate any appliance with a damaged                • Do not operate the appliance continuously for more
  cord or plug or after the appliance malfunctions,            than 2 minutes. Allow the motor to rest for 1 minute
  or is dropped or damaged in any manner. Call the             between each use.
  appropriate toll-free number in this manual.               • Never mix dry, thick or heavy mixtures for more
• The use of attachments not recommended or sold               than 30 seconds. Stop the operation and stir the
  by the appliance manufacturer may cause fire,                ingredients before continuing. Allow the motor to
  electric shock or injury; do not use attachments for         rest for 1 minute between each use.
  anything other than intended use.                          • When using heavy loads, the appliance should not
• This appliance is not intended for commercial,               be operated for more than 15 seconds.
  professional or industrial use. It is designed and built   • Do not remove the motor with attachment from
  exclusively for household use.                               ingredients during operation. Ensure the appliance
• Do not place on or near a hot gas or electric burner         is off and has stopped before removing to avoid
  or in a heated oven.                                         contact with moving blades or whisk.
• Do not let the cord hang over edge of table or             • Keep fingers, hands, knives and other utensils away
  counter, or touch hot surfaces.                              from moving blade and disks.
• Do not use outdoors.                                       • The maximum rating is based on the Food processor
• Do not use the appliance other than for intended use.        attachment. The power input of the others
• Do not touch moving parts, disks or blades. The              accessories is less than the allowable deviation
  blades are sharp; handle carefully and store out of        • This appliance is not intended for use by persons
  reach of children.                                           (including children) with reduced physical, sensory
• When mixing liquids, especially hot liquids, use a           or mental capabilities, or lack of experience and
  tall container or make small quantities at a time to         knowledge, unless they have been given supervision
  reduce spillage.                                             or instruction concerning use of the appliance by a
• Keep hands and utensils away from moving blades              person responsible for their safety.
  or discs while processing food to reduce the risk          • Children should be supervised to ensure that they
  of severe injury to persons or damage to the food            do not play with the appliance.
  processor. A scraper may be used but must be used
  only when the food processor is not running.
• Always ensure processing bowl lid is locked into
  place before use.
• Do not process hot or boiling liquids in food
  processor bowl – allow liquids to cool before placing
  into the food processor bowl.
• Do not leave the appliance unattended when in use.

                        SAVE THESE INSTRUCTIONS.
                              This product is for household use only.

                                                         3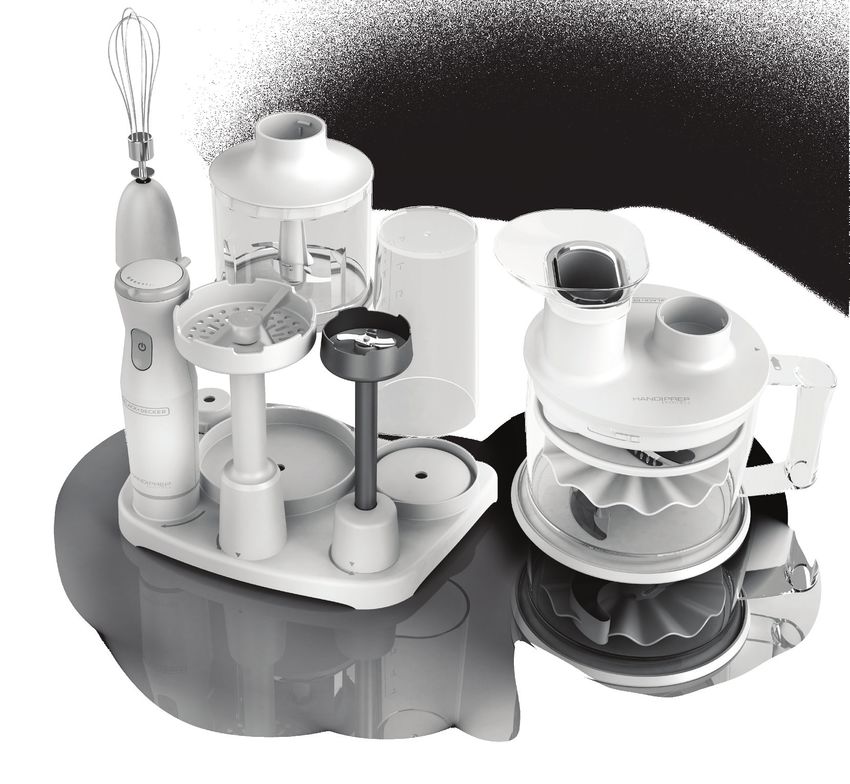
POLARIZED PLUG (120V models only)                              ELECTRICAL CORD
This appliance has a polarized plug (one                       1. A short power-supply cord is provided
blade is wider than the other). To reduce                      to reduce the risk resulting from becoming
the risk of electric shock, this plug is                       entangled in or tripping over a longer cord.
intended to fit into a polarized outlet only                   2. Extension cords may be used if care is
one way. If the plug does not fit fully into                   exercised in their use.
the outlet, reverse the plug. If it still does                 3. If a long detachable extension cord is used:
not fit, contact a qualified electrician. Do                      a) The marked electrical rating of the
not attempt to modify the plug in any way.                           power cord or extension cord should
 TAMPER-RESISTANT SCREW                                              be at least as great as the electrical
Warning: This appliance is equipped                                  rating of the appliance.
with a tamper-resistant screw to prevent                          b) If the appliance is of the grounded
removal of the outer cover. To reduce                                type, the extension cord should be a
the risk of fire or electric shock, do not                           grounding-type 3-wire cord.
attempt to remove the outer cover. There                          c) The cord should be arranged so that
are no user-serviceable parts inside.                                it will not drape over the countertop
Repair should be done only by authorized                             or tabletop where it can be pulled on
service personnel.                                                   by children or tripped over.
                                                               Note: If the power cord is damaged,
                                                               please contact the warranty department
                                                               listed in these instructions.

 8
                              14

                                          15
                                                                            19
               13                              9
                                          12
                                                                                       21

 1
                                                                                                 17
                                                                    20
 2

     3

                                                                                                      18
         28
                                                           6
                                                       7                   23
                    10   11
                                                                      22          24        25
                                      5

                                                                                            26

                                                   4
GE T T I NG TO KN OW YO UR
HAN D I PR E P EX P R E SS
Congratulations on your purchase of the Black + Decker HandiPrep Express! This
ultimate multi-purpose kitchen tool combines six appliances, giving you all the tools
you need to master your kitchen in one compact system.

MOTOR B AS E                                  FO O D PROCESSOR
1.    Speed Control Dial                      17. Processor Bowl Lid
2.    On/Off Button                               (Part # HB5500-11)

3.    Motor body                              18. 5 cup processing bowl with non-
                                                  slip base (Part # HB5500-12)
4.    Power cord (not pictured)
                                              19. Food Pusher
                                                  (Part # HB5500-13)
HAN D B L EN D E R                            20. Feed Chute
AT TAC HM EN TS                               21. Funnel (Part # HB5500-14)
5.    Immersion blender shaft
                                              22. S Blade
      (Part # HB5500-01)
                                                  (Part # HB5500-15)
6.    Stainless Steel Blade
                                              23. S Blade Cover
7.    Protective guard
                                              24. Emulsifying Disk
8.    Whisk Attachment                            (Part # HB5500-16)
      (Part # HB5500-02)
                                              25. Shredding and slicing disk
9.    Measuring Jar                               (Part # HB5500-17)
      (Part # HB5500-03)
                                              26. Spindle
10. Potato Masher                                 (Part # HB5500-18)
    (Part # HB5500-04)
                                              27. Spindle Base
11.   Potato Masher Blade                         (Part # HB5500-19)
      (Part # HB5500-05)
                                              STO R AGE BASE
                                              28. Storage Base
M IN I C HO P P E R
                                                  (Part # HB5500-20)
12. Plastic storage lid
    (Part # HB5500-06)
13. Chopper bowl
    (Part # HB5500-07)
14. Chopper Lid
    (Part # HB5500-08)
15. Chopper Blade
    (Part # HB5500-09)
16. Chopper Blade protective cover
    (not pictured) (Part # HB5500-10)

                                          5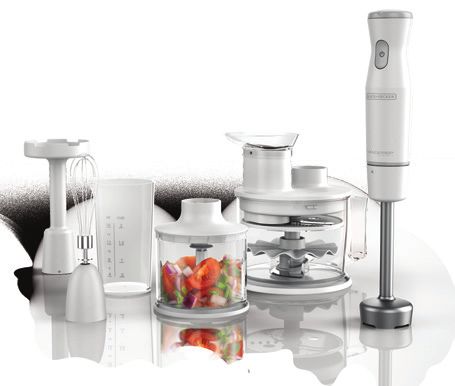
G E T T I NG STARTE D
This product is for household use only.
     • Remove all packing material, any stickers, and the plastic band around the
       power plug.
     • Remove and save literature.
     • Please visit www.prodprotect.com/applica to register your warranty.
     • Wash all removable parts as instructed in the CARE AND CLEANING section of
       this manual. Handle blades carefully, they are very sharp. Ensure all parts are dried
       thoroughly to avoid any water running into the motor body when reattached.

HOW TO U S E
The HandiPrep Express is a versatile appliance with many different attachments.
The motor base operates with the following attachments:

 ATTACHMENT                      USE
 Immersion Blender               Blends liquids such as sauce and smoothies
                                 Mixes batters
                                 Purees fruits and vegetables
 Potato Masher                   Mash cooked vegetables such as potatoes and
                                 cauliflower

 Whisk                           Beat eggs
                                 Make Meringue
                                 Whip cream
 Food Processor                  Chop, mix, blend
                                 Shred and slice fruits, vegetables and cheeses
 Emulsifying Disk                Emulsify dressings and mayonnaise

 Chopper                         Chop nuts, vegetables, bread, crackers (small quantities)

OP E R AT I NG T H E M OTO R B ASE
ON|OF F BUT TON
Plug in the motor base and press and hold the ON|OFF button located on the
motor base to start the motor. Release the button to stop the motor. To pulse,
press and release the ON|OFF button continuously.
IMPORTANT: Never turn the motor on unless attachments are securely attached.

IN STAL L I NG T H E ATTAC HME N TS
1.     Make sure the appliance is unplugged before connecting attachments.
2.     Hold the attachment firmly in one hand.
3.     Align the top of the attachment with the bottom of the motor base. Turn the
       attachment counterclockwise to lock it into place.
4.     To remove, first unplug the appliance. Holding the motor base in one hand, turn the
       attachment clockwise to unlock.

                                               6
SPE E D CON T R O L
The motor base has a variable speed dial. Turn the speed control to the speed
you would like to use.
ATTACHMENT SPEED MAX. OPERATING RESTING USES
TIME BEFORE TIME
RESTING
Immersion Low to 30 seconds 10 Soups
blender high seconds Smoothies
Sauces
Milk shakes
Whisk Start low, 2 minutes 3 minutes Whipping
increase cream
speed as Egg whites for
needed meringues
Gravy
Chopper Low for 30 seconds 30 Nuts
coarse seconds Bread crumbs
chop, Vegetables
High for
fine chop
S Blade High 30 seconds 10 Mixing and
seconds chopping
vegetables
Nuts
Mix spreads
and dips
Emulsifying Low to 90 seconds 90 Mayonnaise
Disk medium seconds Salad
dressings
Slicing Disk Low to 15 seconds 15 Potatoes
medium seconds Cabbage
Shredding Low to 15 seconds 15 Carrots
Disk medium seconds Zucchini
Cheese
Potato Masher Low to 60 seconds 60 Cooked
medium seconds vegetables
Potatoes
Fruit for jam
NOTE: Always ensure attachment and motor handle are dry before attaching
7US IN G T HE I M ME R SIO N B LE N DE R
Ensure the immersion blender shaft is assembled to the motor base as detailed in
the INSTALLING THE ATTACHMENTS section.
1. Place food to be processed in a mixing bowl or the provided measuring jar. The
container should only be ½ full or less when blending liquids or when making a puree
of fruit and/or vegetables to prevent food from overflowing.
Important: Always ensure motor base and immersion blender shaft are properly
assembled and that the power cord is not damaged before use.
2. Plug in and start processing at low speed and increasing to high by turning the
speed control dial at the top of the motor base.
Note: If selecting a higher speed, it is recommended that you start on low speed
and then increase to high speed to avoid splattering and over processing.
3. Immerse the blender as deeply as possible into the jar or bowl and press the ON|OFF
button to turn the immersion blender on.
4. Blend the ingredients by moving the appliance up and down and in a circular motion.
5. After you have completed blending, release the ON|OFF button to stop the motor
and unplug the appliance.
Important: The continuous operating time must be less than 30 seconds. Never
blend hot oil, fat or meat.
6. Ensure the motor has completely stopped before lifting the immersion blender out
of the jar. If the blades get blocked, first stop and unplug before clearing.
7. After processing, unplug and disassemble the immersion blender from the motor
base by turning the motor base counterclockwise and clean the attachment.
TIPS & T RI C KS FOR U S I NG T H E IMME R S IO N B LE NDE R
• The immersion blender blends foods and liquids rapidly, therefore it is easy to
over process. Stop the motor and check food throughout the operation to avoid
over processing.
• When pureeing and blending, cut food into uniform sizes. This will ensure
smooth and consistent results.
• Allow hot food to cool slightly before blending.
• Ensure the body of the appliance and power cord are kept away from any
heat source.
8US IN G T HE P OTATO MASHE R
Note: Attach the potato masher to the motor base as detailed in the INSTALLING
THE ATTACHMENTS section above. The masher is properly locked in the motor
base when the markings on the masher and motor base are aligned.
1. Place food to be mashed into a jar or large mixing bowl/container.
Note: Only use masher with well cooked vegetables or fruits.
2. Plug in the appliance and select the desired speed setting using the dial on top of the
motor base.
3. Immerse the masher completely in the ingredients, press and hold the ON|OFF
button and mash by moving it slowly up and down and in circles until desired texture
is achieved, adding liquids gradually if needed.
Tip: Use the masher at low to medium speed in bursts of 1 or 2 seconds at a time
with a break of at least 1 second between bursts and do not run continuously for
more than one minute. Let rest before running again.
4. Turn off the motor by releasing the ON|OFF button and lift the masher out of the
bowl. Unplug the appliance. Turn the motor base counter clockwise to detach the
masher from the motor base.
Important: Do not operate continuously for more than 60 seconds.
5. If the masher gets blocked, stop and unplug before clearing.
6. Remove the masher blade from the masher by turning clockwise. Carefully remove
the blade when washing and reattach the blade by turning counterclockwise.
Important: Make sure the masher blade has completely stopped before
removing from masher.
US IN G T HE W H ISK
Ensure the whisk is assembled to the motor base as detailed under INSTALLING
THE ATTACHMENTS.
1. Place ingredients to be whisked into a mixing bowl or the provided measuring jar.
Note: to incorporate air into the ingredients when whisking, use a deep and
wide container and move whisk in a gentle up and down motion.
2. Immerse the whisk completely in the ingredients, to the bottom of the container and
select low speed on the speed control dial to prevent splattering.
3. Push and hold the ON|OFF button to turn the motor on. Whisk ingredients by
moving the appliance slowly up and down and in circles. Use low speed to start and
increase speed to high.
4. When completed, release the ON|OFF button and remove whisk from the bowl.
Important: Always ensure the whisk has completely stopped turning before
removing
Important: The continuous operating time must be less than 2 minutes.
Never whisk hot oil, fat or meat.
5. If your whisk gets blocked, first stop and unplug before clearing.
9Note: Do not fill jar above the 500ML mark. The jar can also be used as a
measuring cup.
6. Unplug the appliance, disassemble the whisk from the motor base and
clean appliance.
WHISK TIPS
• For whipping cream, always use fresh chilled cream
• For egg whites, whisk fresh, room temperature eggs in a glass bowl to
achieve greater and more stable volume.
• It is recommended to use the highest speed when whisking egg whites
and cream.
US IN G T HE FO O D P R O C E SSO R BOWL
1. Determine whether you will be using the S Blade, Slicing and Shredding Disk, or
Emulsifying Disk and refer to the appropriate instructions before proceeding.
Note: Always place the blade or disk into the food processor prior to
placing the food into the food processor. See instructions for each blade/
disk in the following steps.
2. Place ingredients directly into the bowl. If you do not put the ingredients into the
bowl before attaching the lid, you can feed ingredients through the funnel after
finishing assembly. Do not exceed the maximum (MAX) marking.
3. If adding ingredients through the funnel, always use the pusher to push ingredients
down, never your hands.
4. Place the processing bowl lid into position and ensure that it is correctly aligned.
Twist the lid counter-clockwise to lock into place.
5. Place the funnel into the feed chute and insert the pusher into the funnel.
6. Insert the motor base into the lid of the food processor and turn clockwise to lock.
7. Plug in the unit and select the processing speed on the speed control dial.
8. Press and hold the ON|OFF button to turn the appliance on and start the processing
action.
9. Slowly add ingredients to the funnel using the pusher as a guide, if using the funnel.
10. When processing has finished, release the ON|OFF button to turn the motor off.
Unplug the appliance.
11. Always precut large chunks of food to fit the funnel opening.
12. If the blade or disks get blocked, stop and unplug the appliance before clearing.
13. Detach the motor base from the food processor lid by turning counter clockwise
and remove the lid from the bowl by twisting clockwise. Carefully remove the disk
or S Blade and use a spatula to remove any excess food from the disks or blades
and to remove processed food from the bowl.
Note: Always switch off and unplug before cleaning.
Important: the continuous operating time must be less than 30 seconds.
10US IN G T HE S BLA DE
1. The S blade is used for mixing and chopping a variety of
foods.
2. Remove protective cover from S blade and place the S
blade on a flat surface. Hold the plastic center tightly in
place and very carefully align the tabs of the spindle with
the S Blade and insert spindle into top of blade (A). Push
down to secure (B).
3. Place S Blade and spindle assembly on center post of
processing bowl, pushing down to lock.
Warning: Blades are sharp; Caution should be taken when
handling the blades.
4. Place food to be processed in the food processor bowl
around the blade. Assemble the food processor lid and
attach motor base to lid as directed in USING THE FOOD PROCESSOR BOWL.
5. Press and hold the ON|OFF button or pulse ON|OFF to process.
6. Once finished processing, unplug the appliance, detach the motor base and
remove the lid from the bowl.
7. To remove the blade from the spindle, place assembly on a flat surface. Hold
the center of the blade tightly against the surface and pull up on the spindle.
US IN G T HE S LIC IN G A N D SHR E DDI NG DI SK
1. Place the spindle on the center post in the food processing bowl, pushing down
to lock.
Note: Make sure the S Blade is removed from the spindle before using the disk.
2. There is a side for shredding and a side for slicing on the slicing and shredding
disk. Place the side desired for food prep UP. Align the hole in the center of the
disk with the top of the spindle and ensure that it is pushed down firmly in place.
3. Assemble the food processor lid and attach motor base to lid as directed in
USING THE FOOD PROCESSOR BOWL. Press and hold the ON|OFF button to
turn the appliance on. Slowly add ingredients to the feed chute or funnel.
4. To disassemble, lift the disk off the spindle.
US IN G T HE E MULSIF YIN G D ISK
1. Hold the emulsifying disk in one hand and the spindle in the other hand. Align
the tabs of the spindle with the tabs of the disk and push down to attach.
2. Place the spindle on the center post in the food processing bowl, pushing down
to lock.
3. Add ingredients to the bowl and attach the lid and motor base to begin
emulsifying.
4. Slowly add oil through the funnel.
5. To disassemble, hold the disk in one hand and pull the spindle out of the disk.
11TIPS WHEN USI N G T H E FO O D P R O C E SS O R
• The bottom of the processing bowl features an anti-slip rubber lid. This keeps the
processing bowl stable, however it is recommended during processing to hold
the motor base with one hand and the processing bowl and lid with the other.
• Do not operate the motor base when the processing bowl is empty.
• When processing, cut food into uniform sizes to ensure quicker, even and more
consistent results.
• DO NOT process hard foods such as ice, coffee, or chocolate in squares in the
processing bowl as damage to the blades may result.
• DO NOT process boiling or hot foods in the processing bowl.
• NEVER remove the blades from the bowl before processing is completed.
US IN G T HE M I N I C HO P P E R
1. Remove the protective cover from the blade of the chopper.
2. Place the chopper blade on the center post of the chopper bowl.
Important: Handle carefully; blades are sharp.
3. Place food to be chopped in mini chopper and attach lid.
Important: Do not chop raw meat. Do not process hard foods including
anything you can’t cut easily with a kitchen knife.
Note: Maximum operating time is 30 seconds. Resting time 30 seconds
4. Attach motor base to lid by turning motor base clockwise to lock it in place.
5. Press and release the ON|OFF button to pulse chop food or hold ON|OFF for
mixing. Release the button to turn off the motor. Unplug the appliance when
finished chopping.
6. If your chopper gets blocked, first stop and unplug before cleaning.
7. After use, unplug and dismantle the motor base and the lid unit in sequence, then
remove the blade from the bowl by pulling the plastic shaft up. Empty food from bowl.
STO R AG E
1. Place storage base on a dry level surface.
2. Position each attachment over a circle in the base and turn each attachment
counterclockwise to lock it onto the base.
3. Place the motor base in the circular cutout and twist clockwise to lock into base.
4. Plug the motor base cord into the storage base for convenient cord
management.
12C A RE AN D C LE A N IN G
1. Unplug the appliance and detach any attachments from the motor base.
Caution: Take care when cleaning the blades and disks as they are
extremely sharp.
2. Wipe motor base and lid with a soft damp cloth. Do not use abrasive cleaners or steel
wool. Never immerse motor base in water or any other liquid. Do not place motor base or
immersion blender in dishwasher.
3. Hand wash all other parts in hot soapy water. Rinse and dry thoroughly
4. You may wash accessory parts and bowls in a dishwasher; top shelf only. If you use a
dishwasher, the harsher environment inside the dishwasher may affect the surface finishes
over time.
5. Quick Wash for accessories: Attach accessory part to motor base and insert into jar
of water. Press on for 5 seconds to remove any food on the blade and continue any
additional processing.
6. When dry, reattach blade covers and store all accessories on the storage base.
TRO UB L ES HO OTIN G
PROBLEM SOLUTION
Blades don’t turn May be too much food in bowl; reduce quantity.
when processing
Pieces of food may be too large, cut to smaller
size.
Ensure the appliance is assembled properly and
locked into place.
Unable to lock lid Spindle may be out of position. Remove lid,
into place straighten spindle and ensure centered on metal
post. Reattach lid.
Food may be stuck underneath any blades
preventing the lid from locking into place. Turn
off the appliance, unplug, and remove the food
with a spatula or utensil and continue.
Shredding disk slows Shredded food has exceeded Max level. Empty
down when in use bowl and continue to shred.
Too much force is being used when shredding.
Reduce force when pushing.
Motor sounds like it Speed may not be correct. Refer to processing
is not able to process guide for correct speeds.
load
Quantity of food may be too much.
If additional assistance is needed, please contact our consumer service team at
1-800-231-9786.
13RE C IP E S
MASHED POTATOES
6 medium potatoes, peeled and quartered 1
⁄4 tsp. pepper
3 Tbsp. butter, softened 1 Tbsp. milk or cream
1
⁄2 tsp. salt
PLACE potatoes in a medium saucepan and cover with water. Bring to a boil. Reduce
heat; cover and cook 15 minutes or until tender. Drain.
PLACE cooked potatoes, butter and cream in medium bowl. Add salt and pepper.
Mash with the potato masher attachment until potatoes are smooth, adding
additional milk if necessary. Do not over mash or potatoes will become “gluey”.
Makes 6 (1⁄2 cup) servings.
BASIC MAYONNAISE
4 egg yolks 1 Tbsp. granulated sugar
2 tsp. dry mustard 1 tsp. salt
2 tsp. lemon juice 1 1/2 c. canola oil or safflower oil
2 tsp. white wine vinegar
PLACE emulsifying disk in food processor bowl. Add first 6 ingredients and process
30 seconds or until egg mixture is light yellow and creamy but not thick.
ADD oil gradually in a steady stream through feed chute with the processor running;
process 1 minute until all oil is incorporated into egg mixture and sticks to the side of
the bowl.
REMOVE disk and transfer mayonnaise into storage container. Keep Refrigerated.
Makes 1 1⁄2 cups
FRESH TOMATO SALSA
6R oma tomatoes, seeded and cut into 1 cup loosely packed fresh cilantro leaves
quarters 2 Tbsp. fresh lime juice
1
⁄2 of a medium red onion, cut into 1- inch 2 tsp. sugar
pieces 2 tsp. salt
3 garlic cloves 1 tsp. ground black pepper
2 jalapeno peppers, seeded, cut into 1-inch
pieces
PLACE all ingredients in food processor bowl with S blade.
PULSE CHOP to desired consistency.
Makes: 2 1⁄2 cups
TIP: S
ubstitute Habanero or Serrano peppers for Jalapenos
WHIPPED CREAM
2 cups heavy cream, chilled 2 tsp. vanilla
1
⁄4 cup sugar
POUR cream, sugar and vanilla in a large glass or
stainless mixing bowl.
WHISK cream starting on low speed to avoid cream from splashing.
BLEND cream 1-2 minutes increasing speed as cream thickens and forms soft peaks.
Makes: 3 1⁄2 cups
14RE C IP E S
BASIC PIZZA CRUST FOR FOOD PROCESSOR
1 pkg. active dry yeast 1 2⁄3 cups all-purpose flour
1 tsp. sugar 1 tsp. salt
2
⁄3 cup warm water 12 tsp. vegetable oil
STIR yeast and sugar into warm water; let stand until foamy, about 10 min.
ADD flour and salt to food processor and with processor running, pour yeast mixture
through feed tube and process 45 seconds or until dough pulls away from sides of
bowl. Add oil through feed tube and run an additional minute.
Note: If dough sticks to sides of bowl, add more flour 1 Tbsp. at a time and process 10
seconds after each addition.
ROLL dough out onto a floured surface to make one (14 inch) or two (9 inch) circles.
Rotate and turn dough often and use enough flour so dough does not stick.
OIL baking pans and sprinkle with cornmeal. Loosely fold pizza dough in half and then
half again to transfer to pizza pan placing the point of the dough in the center of the pan.
Unfold dough and press from the center outward folding edges under to create a rim.
TOP crust with sauce, cheese and your choice of meat and vegetables.
PIE CRUST
1 cup flour 2-3 Tbsp. ice water
1
⁄2 tsp. salt 4 Tbsp. (1⁄2 stick) cold butter, cut in pieces
PLACE flour, salt and butter into food processor with S Blade.
PULSE 10-20 seconds or until mixture forms pea size crumbs. With food processor running,
add water, 1 Tbsp. at a time through the feed chute until dough starts to form a ball.
REMOVE dough from bowl and form into a ball, then press into a disk shape.
WRAP in plastic wrap; chill at least 1 hour before rolling.
BANANA & PINEAPPLE SMOOTHIE
⁄4 cup orange juice
1
⁄2 cup fresh pineapple chunks
1
⁄2 banana, cut into 1 inch pieces
1
⁄4 cup nonfat plain Greek yogurt
1
PLACE all ingredients in mixing container. Insert immersion blender making sure the
protective guard is submerged. Blend, using up and down motions 30-35 seconds or
until ingredients are well mixed.
BASIC VINAIGRETTE
To create your own signature vinaigrette, mix and match your choice of vinegar, mustard and
oil using the chart below.
Vinegar (1⁄4 cup) Mustard (2 tsp) Oil (2⁄3 cup)
Red wine vinegar Dijon mustard Olive oil
White wine vinegar Honey dijon mustard Grapeseed oil
Balsamic vinegar Coarse grain mustard Safflower oil
Apple cider vinegar
PLACE vinegar and mustard in the Mini Chopper bowl. Process a few seconds to
combine.
ADD oil; process until blended.
STORE in refrigerator up to 4 days.
Makes: 1 cup
15WA RR AN T Y AN D C USTO M E R
SE RVI C E I NFO R MATIO N
For service, repair or any questions regarding your appliance, call the
appropriate 800 number listed within this section. Please DO NOT return the
product to the place of purchase. Also, please DO NOT mail product back to
manufacturer, nor bring it to a service center. You may also want to consult
the website listed on the cover of this manual.
Two-Year Limited Warranty
(Applies only in the United States and Canada)
What does it cover?
• Any defect in material or workmanship provided; however, Spectrum Brands,
Inc.’s liability will not exceed the purchase price of product.
For how long?
• Two years from the date of original purchase with proof of purchase.
What will we do to help you?
• Provide you with a reasonably similar replacement product that is either new or
factory refurbished.
How do you get service?
• Save your receipt as proof of date of sale.
• Visit the online service website at www.prodprotect.com/applica, or call toll-free
1-800-231-9786, for general warranty service.
• If you need parts or accessories, please call 1-800-738-0245.
What does your warranty not cover?
• Damage from commercial use
• Damage from misuse, abuse or neglect
• Products that have been modified in any way
• Products used or serviced outside the country of purchase
• Glass parts and other accessory items that are packed with the unit
• Shipping and handling costs associated with the replacement of the unit
• Consequential or incidental damages (Please note, however, that some states do
not allow the exclusion or limitation of consequential or incidental damages, so
this limitation may not apply to you.)
How does state law relate to this warranty?
• This warranty gives you specific legal rights. You may also have other rights that
vary from state to state or province to province.
16Por favor lea este instructivo antes de usar el producto.
INSTRUCCIONES IMPORTANTES
DE SEGURIDAD
Al utilizar cualquier aparato eléctrico siempre deben tomarse precauciones básicas de
seguridad, incluyendo las siguientes:
• Lea y conserve todas las instrucciones. daño severo a las personas o daño al procesador
• A fin de protegerse contra el riesgo de una de alimentos. Una espátula de goma puede ser
descarga eléctrica, no sumerja la base, el cable ni utilizada, pero solo se debe utilizar cuando el
el enchufe en agua ni en ningún otro líquido. No aparato no está en funcionamiento.
utilice el aparato en el baño, cerca del agua o a la • Siempre asegúrese de que la tapa del recipiente de
intemperie. procesamiento esté asegurada en su lugar antes de
• Todo aparato eléctrico utilizado cerca de la utilizar.
presencia de los niños o por ellos mismos, requiere • No procese ni líquidos calientes ni que estén
la supervisión de un adulto. hirviendo en el recipiente del procesador de
• Desenchufe el aparato del tomacorriente cuando no alimentos--permita que los líquidos se enfríen antes
esté en uso, antes de instalarle o retirarle piezas y de colocarlos en el recipiente.
antes de limpiarlo. • No deje el aparato desatendido cuando esté en uso.
• No utilice ningún aparato eléctrico que tenga • No utilice la licuadora con las manos mojadas.
el cable o el enchufe averiado, que presente un • No empuje los alimentos dentro del tubo de
problema de funcionamiento o que esté dañado. alimentación ni con los dedos ni con otros utensilios.
Llame al número de servicio para el cliente que Siempre utilice el empujador de alimentos provisto.
aparece en este manual. • Siempre opere la base del motor con el accesorio
• El uso de accesorios no recomendados o vendidos y/o la tapa cerrada con seguridad en su lugar.
por el fabricante puede ocasionar incendio, • No trate de anular el mecanismo de entrecierre
descarga eléctrica o lesiones. No utilice ningún de la tapa.
accesorio para otro fin que no sea para el que ha • Nunca mezcle ni aceite caliente ni grasa.
sido diseñado. • Nunca añada ingredientes en el recipientes mientras
• Este aparato no es para uso comercial, profesional o la batidora de inmersión esté funcionando.
industrial. Está diseñado y fabricado exclusivamente • No opere el aparato continuamente por más de 2
para uso doméstico. minutos. Deje que el motor descanse por 1 minuto
• No lo coloque sobre ni cerca de una hornilla de gas entre cada uso.
o eléctrica que esté caliente ni adentro de un horno • Nunca mezcle las mezclas secas, espesas y
caliente. pesadas por más de 30 segundos. Detenga el
• No permita que el cable cuelgue del borde de la funcionamiento y revuelva los ingredientes antes de
mesa o del mostrador ni que toque superficies continuar. Deje que el motor descanse por 1 minuto
calientes. entre cada uso.
• No utilice el aparato a la intemperie. • Cuando utilice cargas de ingredientes pesados, el
• No utilice el aparato para otro fin que no sea para el aparato no debe funcionar por más de 15 segundos.
que ha sido diseñado. • La clasificación máxima es basada en el accesorio del
• No toque las piezas móviles, ni los discos ni las procesador de alimentos. La entrada de energía de los
cuchillas. Las cuchillas están afiladas; manéjelas otros accesorios es menos que la desviación permitida.
con cuidado y almacenelas fuera del alcance de los • No retire el motor con el accesorio de los
niños. ingredientes durante el funcionamiento. Asegúrese
• Cuando mezcle líquidos, especialmente líquidos de que el aparato esté apagado y que haya parado
calientes, utilice un recipiente alto o mezcle antes de retirarlo para evitar el contacto con las
cantidades pequeñas cada vez para reducir las cuchillas móviles o el batidor.
salpicaduras. • Mantenga los dedos, las manos, los cuchillos y otros
• Mantenga la manos y los utensilios alejados de las utensilios lejos de las cuchillas y los discos que
cuchillas o discos móviles mientras se procesan están en movimiento.
los alimentos para reducir el riesgo de ocasionar
CONSERVE ESTAS INSTRUCCIONES.
Este aparato eléctrico es para uso doméstico solamente.
17ENCHUFE POLARIZADO (Solamente CABLE ÉLECTRICO
para los modelos de 120V) 1. El producto se debe de proporcionar con un
Este aparato cuenta con un enchufe polarizado (un cable eléctrico corto, a fin de reducir el riesgo de
contacto es más ancho que el otro). A fin de reducir tropezar o de enredarse en un cable más largo.
el riesgo de un choque eléctrico, este enchufe 2. Si se utiliza un cable separable o de extensión,
encaja en un tomacorriente polarizada en un solo a) El régimen nominal del cable separable o del
sentido. Si el enchufe no entra en el tomacorriente, cable de extensión debe ser, como mínimo, igual
inviértalo y si aun así no encaja, consulte con al del régimen nominal del aparato.
un electricista. Por favor no trate de alterar esta
medida de seguridad. b) Si el aparato es de conexión a tierra, el cable de
extensión debe ser un cable de tres alambres de
TORNILLO DE SEGURIDAD conexión a tierra.
Advertencia: Este aparato cuenta con un tornillo c) Uno debe de acomodar el cable más largo de
de seguridad para evitar la remoción de la cubierta manera que no cuelgue del mostrador o de la
exterior del mismo. A fin de reducir el riesgo de mesa, para evitar que un niño tire del mismo o
incendio o de choque eléctrico, por favor no trate que alguien se tropiece.
de remover la cubierta exterior. Este producto no
contiene piezas reparables por el consumidor. Toda Nota: Si el cordón de alimentación es dañado,
reparación se debe llevar a cabo únicamente por en América Latina debe sustituirse por personal
personal de servicio autorizado. calificado o por el centro de servicio autorizado.
8
14
15
19
13 9
12
21
1
17
20
2
3
18
28
6
7 23
10 11
22 24 25
5
26
18CO NOZC A S U
HAN D I PR E P EX P R E SS
¡Felicidades por la compra de su Black+Decker sistema de cocina 6 en 1! El dispositivo
de cocina de mayor versatilidad, combina seis productos en un sistema compacto para
brindarle todas las herramientas necesarias para adueñarse de su cocina.
B ASE D E L M OTO R P R O C E SADOR DE
1. Dial de control de velocidad A LIM E NTOS
2. Botón de encendido/apagado 17. Tapa del recipiente del procesador
(On/Off) (Pieza N° HB5500-11)
3. Cuerpo del motor 18. Recipiente para procesar de 5 tazas
con base antideslizante
4. Cable de alimentación (no ilustrada)
(Pieza N° HB5500-12)
19. Empujador de alimentos
ACC ES O R I OS DE LA (Pieza N° HB5500-13)
B AT ID OR A D E MA N O 20. Tubo de alimentación
5. Eje de la batidora de inmersión 21. Embudo (Pieza N°HB5500-14)
(Pieza N° HB5500-01)
22. Cuchilla S
6. Cuchilla de acero inoxidable (Pieza N° HB5500-15)
7. Cubierta protectora de la cuchilla 23. Tapa de cuchilla S
8. Batidor de huevos 24. Disco emulsionante
(Pieza N° HB5500-02) (Pieza N°HB5500-16)
9. Jarra medidora 25. Disco para rebanar/rallar
(Pieza N° HB5500-03) (Pieza N° HB5500-17)
10. Aplastador de papas 26. Eje (Pieza N° HB5500-18)
(Pieza N° HB5500-04)
27. Base de Eje (Pieza N° HB5500-19)
11. Cuchilla para aplastador de papas
(Pieza N°HB5500-05)
M IN I PI C A D O R B ASE D E
12. Tapa de almacenamiento plástica
(Pieza N° HB5500-06) A LMAC ENAMI ENTO
28. Base de almacenamiento
13. Recipiente del picador
(Pieza N° HB5500-20)
(Pieza N° HB5500-07)
14. Tapa del picador
(Pieza N° HB5500-08)
15. Cuchilla del picador
(Pieza N° HB5500-09)
16. Cubierta protectora de la cuchilla
del picador (no ilustrada)
(Pieza N°HB5500-10)
19PR IME R OS PASOS
Este producto es para uso doméstico solamente.
• Retire todo material de empaque y cualquier etiqueta adherida al producto.
• Retire y conserve la literatura.
• Por favor, visite www.prodprotect.com/applica para registrar su garantía.
• Lave todas las piezas removibles como se indica en la sección CUIDADO Y
LIMPIEZA de este manual. Maneje las cuchillas con ciudado, éstas están muy
afiladas. Asegúrese de que todas las piezas estén completamente secas para
evitar que agua caiga dentro del cuerpo del motor cuando esté reconectado.
C ÓMO USA R
El Sistema Práctico para Preparación de Alimentos Rápida es un producto
versátil con muchos accesorios diferentes. La base del motor funciona con los
siguientes accesorios:
ACCESORIO USO
Batidora de Inmersión Mezcla líquidos como salsa y batidos
Mezcla masas
Hace puré de frutas y vegetales
Aplastador de papa Aplasta vegetales cocinadas como papas y coliflor
Batidor de huevos Bate huevos
Hace merengue
Bate crema
Procesador de Pica, mezcla, licúa
alimentos Ralla y rebana frutas, vegetales y quesos
Disco emulsionante Emulsiona aderezo y mayonesa
Picador Pica nueces, vegetales, pan, galletas (pequeña
cantidades)
C ÓMO O P E R AR LA B ASE D E L MOTOR
BOTÓN D E E N C EN D I DO/APAGADO (O N/O FF)
Enchufe la base del motor y presione y sostenga el botón de encendido/apagado
(On/Off) localizado en la base del motor para activar el motor. Suelte el botón para
detener el motor. Para pulsar, presione y suelte el botón de encendido/apagado
(On/Off) continuamente.
IMPORTANTE: Nunca encienda el motor sin que los accesorios estén
conectados con seguridad.
IN STAL AC I ÓN DE
LOS ACC E S OR IOS
1. Asegúrese de que el aparato esté desenchufado antes de conectar los accesorios.
2. Sujete el accesorio firmemente en una mano.
3. Empuje el extremo de la base del motor dentro del accesorio y gire en dirección a
las manecillas del reloj para asegurar en su lugar. El accesorio está asegurado en su
lugar cuando las marcas en la base del motor y el eje del accesorio están alineados.
4. Para retirar, desenchufe y luego gire la base del motor en dirección contraria a las
manecillas del reloj y tire lejos del eje del accesorio.
20CO NTR O L D E VE LO C IDA D
La base del motor cuenta con un dial de velocidad variable. Gire el control a la
velocidad que desee utilizar.
ACCESORIO VELOCIDAD TIEMPO MÁXIMO TIEMPO DE USOS
DE FUNCIONAMIENTO
ANTES DE DESCANSAR
DESCANSO
Batidora Alta a Baja 30 segundos 10 Sopas
de inmersión segundos Batidos
Salsas
Batidos de
leche
Batidor de Comience 2 minutos 3 minutos Crema para
huevos despacio, batir
aumente la Huevo
velocidad Claras para
según sea merengue
necesario Salsa para
carnes
Picador Baja para 30 segundos 30 Nueces
picar grueso, segundos Migajas de
Alta para pan
picar fino Vegetales
Cuchilla S Alta 30 segundos 10 Para mezclar
segundos y picar
vegetales
y nueces.
Mezclar
pastas para
untar y dips.
Disco Baja a 90 segundos 90 Mayonesa
emulsionante Mediana segundos Aderezos
para
ensaladas
Disco para Baja a 15 segundos 15 segundos Papas
rebanar Mediana Col
Zanahorias
Pepinos
Disco para Baja a 15 segundos 15 segundos Zanahorias
rallar Mediana Calabacín
verde
Queso
Aplastador Baja a 60 segundos 60 Vegetales
Mediana segundos cocinados
Papas
Frutas para
mermelada
NOTA: Siempre asegúrese de que el accesorio y el asa del motor estén secos antes
de conectarlos.
21C ÓMO UT I L I Z AR L A B ATID O R A DE I NMERSI ÓN
Asegúrese de que el eje de la batidora de inmersión esté ensamblado en la base
del motor como es detallado en la sección INSTALACIÓN DE LOS ACCESORIOS.
1. Coloque los alimentos para procesar en la jarra medidora provista, el recipiente para
mezclar o una olla. Para evitar desbordamientos, el recipiente solo debe llenarse a la
mitad o menos cuando mezcle líquidos o cuando haga puré de frutas y/o vegetales.
Importante: Siempre asegúrese de que la base del motor y que el eje de la
batidora de inmersión estén ensamblados correctamente y que el cable no
esté dañado antes de utilizar.
2. Comience procesando a una velocidad baja y gradualmente incremente a una
velocidad alta, girando el dial de control de temperatura localizado en la parte
superior del cuerpo del motor.
Nota: Si selecciona una velocidad alta, se recomienda comenzar a una
velocidad baja e incrementar a una velocidad alta para evitar salpicamientos
y procesar en exceso.
3. Sumerja la batidora lo más profundo posible dentro de la jarra o recipiente y
presione el botón de encendido/apagado (On/Off) para activar la batidora.
4. Mezcle los ingredientes moviendo el aparato hacia arriba y hacia abajo utilizando un
movimiento circular.
5. Una vez que haya terminado de mezclar, suelte el botón de encendido/apagado
(On/Off) para detener el motor y desenchufe el aparato.
Importante: El tiempo de funcionamiento continuo debe de ser menos de 30
segundos. Nunca mezcle aceite caliente, grasa o carne.
6. Asegúrese de que el motor haya parado por completo antes de alzar la batidora
de inmersión fuera de la jarra. Si las cuchillas están obstruidas, primero pare y
desenchufe el aparato antes de eliminar la obstrucción.
7. Después de procesar, desenchufe y desmonte la batidora de immersión de la base
del motor girando la base del motor en dirección contraria a las manecillas del reloj y
limpie el accesorio.
CONSEJOS Y TRUCOS PARA UTILIZAR LA BATIDORA DE INMERSIÓN
• La batidora de inmersión mezcla alimentos y líquidos rápidamente, por lo tanto
es fácil procesar los alimentos en exceso. Pare el motor y supervise los alimentos
a través del funcionamiento para evitar procesarlos en exceso.
• Cuando esté haciendo puré y licuando, corte los alimentos en tamaños
uniformes. Esto asegurará resultados suaves y consistentes.
• Permita que los alimentos se enfríen ligeramente antes de licuarlos.
• Asegúrese de que el cuerpo de la olla y el cable se mantengan lejos de cualquier
fuente de calor.
22C ÓMO UT I L I Z AR E L A P LASTA DOR DE PAPAS
Nota: Conecte el aplastador de papas a la base del motor como es indicado en
la sección INSTALACIÓN DE LOS ACCESORIOS. El aplastador está asegurado
correctamente en la base del motor cuando las marcas en el aplastador están
alineadas con las marcas del motor.
1. Coloque los alimentos para aplastar en una jarra o recipiente/vasija para mezclar
grande.
Nota: solo utilice el aplastador con vegetales o frutas que estén bien
cocinadas.
2. Enchufe el aparato y seleccione el adjuste de la velocidad deseada, utilizando el dial
en la parte superior de la base del motor.
3. Sumerja el aplastador completamente en los ingredientes, presione y sostenga
el botón de encendido/apagado (On/Off) y aplaste los ingredientes moviendolo
lentamente hacia arriba y hacia abajo y en círculos hasta alcazar la textura deseada,
añadiendo líquidos gradualmente, si es necesario.
Consejo: Utilice el aplastador en velocidad baja a alta en intervalos de 1
ó 2 segundos a la vez con un descanso de por lo menos 1 segundo entre
intervalos y no lo haga funcionar continuamente por más de 1 minuto. Deje
reposar antes de hacer funcionar de nuevo.
4. Apague el motor soltando el botón de encendido/apagado (On/Off) y alzando el
aplastador fuera del recipiente. Desenchufe el aparato. Gire la base del motor en
dirección contraria a las manecillas del reloj para desconectar el aplastador de la
base del motor.
Importante: No opere continuamente por más de 60 segundos.
5. Si el aplastador está obstruido, pare y desenchufe el aparato antes de eliminar la
obstrucción.
6. Retire la cuchilla del aplastador girandola en dirección a las manecillas
del reloj. Retire la cuchilla cuidadosamente para lavarla y conecte la cuchilla
girandola en dirección contraria a las manecillas del reloj.
Importante: Asegúrese de que la cuchilla del aplastador haya parado por
completo antes de retirarla del aplastador.
C ÓMO UT I L I Z AR E L B ATID O R D E HUEVOS
Asegúrese de que el batidor de huevos está ensamblado en la base del motor
como es detallado en la sección INSTALACIÓN DE LOS ACCESORIOS.
1. Coloque los ingredientes para batir adentro de la jarra medidora o un recipiente para
mezclar limpio y seco.
Nota: Para incorporar aire en los ingredientes cuando los bate, utilice un
recipiente profundo y ancho y mueva el batidor de huevos suavemente
hacia arriba y hacia abajo.
2. Sumerja el batidor de huevos completamente en los ingredientes, hacia el fondo del
recipiente y seleccione la velocidad baja para evitar salpicamientos.
3. Presione y sostenga el botó de encendido/apagado (On/Off) para encener el motor.
23Bata los ingredientes moviendo el aparato lentamente hacia arriba y hacia abajo y en
círculos. Utilice la velocidad baja para comenzar y luego aumente a la velocidad alta.
4. Cuando haya terminado, suelte el botón de encendido/apagado (On/Off) y retire el
batidor de huevos del recipiente.
Importante: Siempre asegúrese de que el batidor de huevos haya parado de
girar completamente antes de removerlo.
Importante: El tiempo de funcionamiento continuo debe ser menos de 2
minutos. Nunca bata aceite caliente, grasa o carne.
5. Si su batidor de huevos está obstruido, primero pare y desenchufe el aparato antes
de eliminar la obstrucción.
Nota: No llene la jarra medidora pasado de la marca de 500ML. La jarra
también puede ser utilizada como taza de medir.
6. Desenchufe el aparato, desensamble el batidor de huevos de la base del motor y
límpie el aparato.
CONSEJO PARA USAR EL BATIDOR DE HUEVOS:
• Para batir crema, siempre use crema enfriada, fresca.
• Para las claras de huevos, bata huevos frescos a temperatura ambiente, en
un recipiente de vidrio para lograr un volumen mejor y más estable.
• Es recomendado usar la velocidad más alta cuando se baten huevos y crema.
C ÓMO UT I L I Z AR E L R E C IP IE N TE DEL
PR OC E SAD O R DE A LIM E N TOS
1. Determine si va a utilizar la cuchilla S, el disco para rebanar y rallar o el disco
emulsionante y consulte las instrucciones apropiadas antes de proceder.
Nota: Siempre coloque la cuchilla o el disco en el procesador de alimentos
antes de colocar los alimentos en el procesador de alimentos. Consulte las
instrucciones para cada cuchilla/disco en los siguientes pasos.
2. Coloque los ingredientes directamente en el recipiente. Si no coloca los ingredientes
en el recipiente antes de conectar la tapa, puede pasar los ingredientes a través del
embudo después que termine de ensamblar. No exceda la marcade máximo (MAX).
3. Si añade los ingredientes a través del embudo, siempre utilice el empujador de
alimentos para empujar los ingredientes hacia abajo, nunca sus manos.
4. Coloque la tapa del recipiente para procesar en posición y asegúrese de que esté
alineada correctamente. Gire la tapa en dirección contraria a las manecillas del reloj
para asegurarla en posición.
5. Coloque el embudo dentro del tubo de alimentación e inserte el empujador de
alimentos en el embudo.
6. Inserte la base del motor en la tapa de procesador de alimentos y gírela en dirección
a las manecillas del reloj para cerrarla.
7. Enchufe la unidad y seleccione la velocidad de procesamiento marcada en el dial de
control de velocidad.
248. Presione y sostenga el botón de encendido/apagado (On/Off) para activar la
unidad y comenzar la acción de procesamiento.
9. Lentamente añada ingredientes al embudo, utilizando el empujador de alimentos
como una guía, si utliza el embudo.
10. Cuando el procesamiento haya terminado, suelte el botón de encendido/apagado
(On/Off) para apagar el motor. Desenchufe el aparato.
11. Siempre corte con anterioridad trozos grandes de alimentos para acomodar la
abertura del embudo.
12. Si la cuchilla o los discos están obstruidos, pare y desenchufe el aparato antes de
eliminar la obstrucción.
13. Desconecte la base del motor de la tapa del procesador de alimentos girandola en
dirección contraria a las manecillas del reloj y retire la tapa del recipiente girandola
en dirección a las manecillas del reloj. Remueva con ciudado el disco o la cuchilla S
y utilice una espátula para remover cualquier exceso de alimento en los discos o las
cuchillas y para remover alimentos procesados del recipiente.
Nota: Siempre apague y desenchufe el aparato antes de limpiarlo.
Importante: El tiempo de funcionamiento continuo debe ser menos de 30
segundos.
C ÓMO UT I L I Z AR L A C UC HIL LA S
1. La cuchilla S se utiliza para mezclar y picar una variedad de
ailmentos.
2. Retire la cubierta protectora de la cuchilla S y coloque la
cuchilla S sobre una superficie plana. Mantenga el centro
del plástico firmemente en su lugar y con mucho ciudado
alinee las lengüetas en el eje con la cuchilla S e inserte el eje
en la parte superior de la cuchilla. Empuje hacia abajo para
asegurar.
3. Coloque la cuchilla S en el montaje del eje en el poste
central del recipiente para procesar, empujando hacia abajo
para asegurarlo.
Advertencia: Las cuchillas están afiladas. Se debe tomar
precaución cuando se maneje las cuchillas.
4. Coloque los ailmentos que se vayan a picar en el recipiente del procesador de
alimentos alrededor de la cuchilla. Ensamble la tapa del procesador de ailmentos
y conecte la base del motor a la tapa según las instrucciones en CÓMO
UTILIZAR EL RECIPIENTE DEL PROCESADOR DE ALIMENTOS.
5. Presione y sostenga el botón de encendido/apagado (On/Off) o pulse el botón
de encendido/apagado (On/Off) para procesar.
6. Una vez terminado el procesamiento,desenchufe el aparato, desmonte la base
del motor y retire la tapa del recipiente.
7. Para retirar la tapa del eje, coloque la cubierta protectora en la cuchilla y
coloque el conjunto de chuchillas sobre una superficie plana. Mantenga el centro
de la cuchilla firmemente contra la superficie y tire del eje.
25C ÓMO UT I L I Z AR E L DISCO PA R A REBANAR Y
RA L L AR
1. Coloque el eje en el poste central en el recipiente del procesador de alimentos,
empujando hacia abajo para cerrarlo.
Nota: Asegúrese de que la cuchilla S esté removida del eje antes usar el disco.
2. El disco tiene un lado para rallar y un lado para rebanar. Coloque el lado deseado
para preparar los alimentos mirando hacia arriba.. Alinee el agujero en el centro
del disco con la parte superior del eje y asegúrese de que está empujado hacia
abajo firmemente en su lugar.
3. Ensamble la tapa del procesador de alimentos y conecte la base del motor a la
tapa según las instrucciones en la sección CÓMO UTILIZAR EL RECIPIENTE DEL
PROCESADOR DE ALIMENTOS. Presione y sostenga el botón de encendido/
apagado para activar el aparato. Añada lentamente los ingredientes al tubo de
alimentación o al embudo.
4. Para desensamblar, alce el disco fuera del eje.
C ÓMO UT I L I Z AR E L DISCO E M ULSI ONANTE
1. Sostenga el disco emulsionante en una mano y el eje en la otra mano. Alinee
las lengüetas en el eje con las lengüetas del disco y empuje hacia abajo para
conectar.
2. Coloque el eje en el poste central en el recipiente del procesador de alimentos,
empujando hacia abajo para asegurarlo.
3. Añada los ingredientes en el recipiente y conecte la tapa a la base del motor
para comenzar el proceso de emulsión.
4. Lentamente añada aceite a través del embudo.
5. Para desensamblar, sostenga el disco en una mano y tire del eje fuera del disco.
CONSE JOS PA RA U T IL IZA R E L P R O C E SA D O R DE ALIME NTOS
• La parte inferior del recipiente para procesar cuenta con una tapa de goma
antideslizante alrededor de la parte inferior del recipiente. Esto mantiene el
recipiente estable, sin embargo, es recomendado durante el procesamiento,
sostener la base del motor con una mano y el recipiente para procesar con la otra.
• No haga funcionar la base del motor cuando el recipiente para procesar esté
vacio.
• Cuando vaya a procesar, corte los alimentos en tamaños uniformes para asegurar
resultados consistentes, uniformes y más rápidos.
• NO procese ailmentos duros como hielo, café o chocolate en cuadrados en el
recipiente para procesar ya que puede resultar en un daño.
• NO procese alimentos calientes o que estén hirviendo en el recipiente para
procesar.
• NUNCA remueva las cuchillas del recipiente antes que haya terminado el
procesamiento.
26C ÓMO UT I L I Z AR E L MIN I P IC A DOR
1. Retire la cubierta protectora de la cuchilla del picador.
2. Coloque la cuchilla del picador en el poste central del recipiente del picador.
Importante: maneje con cuidado; las chuchillas tienen filo.
3. Coloque los alimentos para picar en el mini picador y conecte la tapa.
Importante: No pique carne cruda. No procese alimentos duros--cualquier
alimento que no pueda cortar fácilmente con un cuchilla de cocina.
Nota: Tiempo de funcionamienito máximo es 30 segundos. Tiempo de
descanso es 30 segundos.
4. Conecte la base del motor a la tapa girando la base del motor en dirección a las
manecillas del reloj para asegurarlo en su lugar.
5. Presione y suelte el botón de encendido/apagado (On/Off) para usar la función de pulso
para picar alimentos o sostenga el botón de encendido/apagado (On/Off) para mezclar.
Suelte el botón para apagar el motor. Desenchufe el aparato cuando termine de picar.
6. Si su picador está obstruido, primero pare y desenchufe el aparato antes de tratar
de eliminar la obstrucción.
7. Después de usar, desenchufe y desarme la base del motor y la tapa en sequencia,
luego retire la cuchilla del recipiente tirando del eje plástico hacia arriba. Vacie el
recipiente de alimentos.
A L M AC E NA M I E N TO
1. Coloque la base de almacenamiento sobre una superficie seca y nivelada.
2. Posicione cada accesorio sobre un círculo en la base y gire cada accesorio
en dirección contraria a las manecillas del reloj para asegurarla en la base.
3. Coloque la base del motor en la abertura circular y gire en dirección a las
manecillas del reloj para asegurar en la base.
4. Enchufe el cable de la base del motor en la base de almacenamiento para
mantener control del cable.
C U IDA D O Y L I M P IE ZA
1. Desenchufe el aparato y desconecte los accesorios de la base del motor.
Precaución: Proceda con cuidado cuando limpie las cuchillas y los discos ya
que están sumamente afilados.
2. Limpie la base del motor y la tapa con un paño suave húmedo. No utilice limpiadores
abrasivos ni lana de acero. Nunca sumerja la base del motor en agua ni en ningún otro
líquido. No coloque la base del motor ni la batidora de inmersión en la máquina lavaplatos.
3. Lave a mano todas las otras piezas con agua caliente jabonosa. Enjuague y seque bien.
4. Usted puede lavar las piezas de los accesorios y los recipientes en una máquina lavaplatos,
rejilla superior solamente. Si utiliza una máquina lavaplatos, el ambiente riguroso que existe
adentro de la máquina, puede afectar el acabado de la superficies con el tiempo.
5. Limpieza rápida para los accesorios: Conecte la pieza del accesorio a la base del
motor e inserte en la jarra con agua. Presione el botón de encendido (On) por 5
segundos para eliminar cualquier alimento pegado en la cuchilla y continue cualquier
procesamiento adicional.
6. Cuando esté seco, reconecte la cubierta de la cuchilla y almacene todos los accesorios en
la base de almacenamiento.
27You can also read