AI BIDDINGCOCKPIT User Manual - Date: September 8, 2020 - AI BIETERCOCKPIT
←
→
Page content transcription
If your browser does not render page correctly, please read the page content below
AI BIDDINGCOCKPIT
User Manual

Date: September 8, 2020
Contents
    ............................................................................................................................................................................

1               Before we get started...                                                                                                                                     5

2               General information                                                                                                                                          6

3               Starting the application                                                                                                                                     7

4               Program window                                                                                                                                               9

5               Menu bar                                                                                                                                                   10

5.1             Menu item - FILE                                                                                                                                           10

5.2             Menu item - EDIT                                                                                                                                           10

5.3             Menu item - INFO                                                                                                                                           11

6               Settings                                                                                                                                                   12

6.1             Platforms                                                                                                                                                  12

6.2             General                                                                                                                                                    15

6.2.1           General settings                                                                                                                                           15

6.2.1.1         Temporary Working Directory                                                                                                                                16

6.2.1.2         Software Certificate                                                                                                                                       17

6.2.1.3         Tendering Files Directory                                                                                                                                  17

6.2.2           Proxy server configuration                                                                                                                                 17

6.2.3           GAEB configuration                                                                                                                                         18

6.2.3.1         wingaeb xml                                                                                                                                                19

6.2.3.2         External software                                                                                                                                          22

6.2.4           Language settings                                                                                                                                          23

6.3             Specification sheets                                                                                                                                       23

6.4             Archive                                                                                                                                                    25

6.5             Messages                                                                                                                                                   26

    ............................................................................................................................................................................
    © Administration Intelligence AG, 2020 - All rights reserved.                                                                                            Page 2 of 88
7               Tenders                                                                                                                                                    30

7.1             Messages                                                                                                                                                   33

7.2             Tendering documents                                                                                                                                        35

7.3             Creating a bid                                                                                                                                             37

7.3.1           Navigating within a bidding file                                                                                                                           39

7.3.2           Insert with Drag & Drop                                                                                                                                    40

7.3.3           Forms                                                                                                                                                      43

7.3.4           Specification sheet                                                                                                                                        44

7.3.5           GAEB specification sheet                                                                                                                                   47

7.3.6           Lot bids and single lot bids                                                                                                                               48

7.3.7           Flexible qualification verification                                                                                                                        49

7.3.8           Implement test signature                                                                                                                                   50

7.3.9           Editing PDF files                                                                                                                                          52

7.3.10          Editing bids with several bidders from one company                                                                                                         52

7.4             Creating a sidebid                                                                                                                                         55

7.4.1           Supplementary bid with complex specification sheet                                                                                                         58

7.4.1.1         Supplementary bid for a primary bid with complex specification sheet                                                                                       58

7.4.1.2         Supplementary bid without main bid with complex specification sheet                                                                                        59

7.4.2           Supplementary bid/variant with external specification sheet                                                                                                61

7.4.2.1         Supplementary bid/variant for a primary bid with an external specification sheet                                                                           61

7.4.2.2         Supplementary bids without main bids with an external specification sheet                                                                                  63

7.5             Digital bid submission                                                                                                                                     64

7.5.1           Bid verification before submission                                                                                                                         66

7.5.2           Qualified signature with smart card                                                                                                                        70

7.5.3           Advanced signature with soft certificate                                                                                                                   71

7.5.4           Withdraw bid                                                                                                                                               73

7.6             Bid submission with external signature                                                                                                                     74

7.6.1           Bid document verfification                                                                                                                                 75

7.6.2           Export table of contents                                                                                                                                   77

    ............................................................................................................................................................................
    © Administration Intelligence AG, 2020 - All rights reserved.                                                                                            Page 3 of 88
7.6.3        Importing a signed table of contents                                                                                                                       79

7.7          Cover sheet procedure                                                                                                                                      81

7.7.1        Bid submission with cover sheet                                                                                                                            82

7.7.2        Bid withdrawal with cover sheet                                                                                                                            83

7.8          Print bid                                                                                                                                                  85

7.9          Exporting bidding documents                                                                                                                                86

7.10         Participation request                                                                                                                                      87

 ............................................................................................................................................................................
 © Administration Intelligence AG, 2020 - All rights reserved.                                                                                            Page 4 of 88
1 Before we get started...
............................................................................................................................................................................

Please note the following:

      • This documentation assumes that you are familiar with your computer and its operating
         system. In case of any questions concerning the operating system consult your operating
         system’s documentation.

      • The menus, menu commands, and program properties described in this documentation
         are based on a full program version with all licensable program modules and administration
         rights.

      • Due to the set license-configuration not all program functions described may be available
         to you.

      • The illustrations in this documentation may differ from the corresponding dialogue fields of
         your current program version. This does not affect your work with the described software,
         however.

The following font styles are used for clarification:

 UPPER CASE LETTERS                                  for menu commands
 S MALLCAPS                                          for tabs, panels, and buttons
 [Square brackets]                                   for keys and key combinations
 Bold lettering                                      for emphasis in the text
 Italics                                             entry values made by the user

The following icons in the margin serve to facilitate your orientation:

                       Special information on software operation.

                       Warnings for actions that could have undesired effects.

                       Useful hints that can make your work easier.

                       Frequently asked questions and problem situations.

............................................................................................................................................................................
© Administration Intelligence AG, 2020 - All rights reserved.                                                                                            Page 5 of 88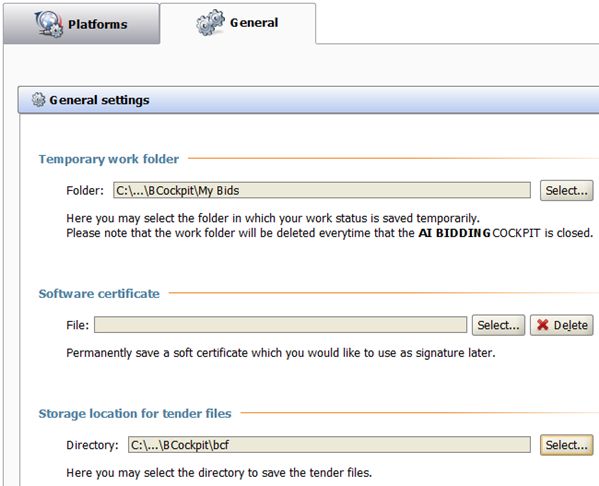
2 General information
............................................................................................................................................................................

The AI BIDDINGCOCKPIT enables simultaneous researching tenders on several platforms.It
also allows you to download and view tendering documents in a single application.

                       AI BIDDINGCOCKPIT is a single workplace solution for editing tendering doc-
                       uments and submitting digital bids. Collaboratively working on a tender is not
                       part of its functionality. For a manual forwarding of already edited tenders, please
                       read the notification on how to E XPORT T ENDERs in chapter Tenders

The software supports you in composing and editing the bidding data and enables you to submit
encoded bids to your client. These are qualified and signed according to the German (and
Austrian) signature law.

For a legal signature you require an advanced electronic signature with a soft certificate or a
qualified electronic signature according to the German signature law and the corresponding PIN
number. Furthermore, you need a card reader and a smart card. You will find a detailed list
of all signature cards and card readers supported by the AI BIDDINGCOCKPIT in the "User
documentation signature card and cardreader" document. Depending on the file format used by
the awarding authority for composing the tendering documents it might become necessary to
visualize these with an according tool that runs independently from the AI BIDDINGCOCKPIT.

Furthermore the application requires a Java runtime environment, as is usually included in
modern Computer-systems by default.

You can also use the AI BIDDINGCOCKPIT for editing and printing tendering documents, of
course.
                       The AI BIDDINGCOCKPIT is also a multiplatform bidding client, which supports
                       the XVergabe standard for bid submission of the eTendering Portal of the Federal
                       government.

Communication via SSL should be possible from the bidder network. A (transparent) proxy
configuration is also possible.

............................................................................................................................................................................
© Administration Intelligence AG, 2020 - All rights reserved.                                                                                            Page 6 of 88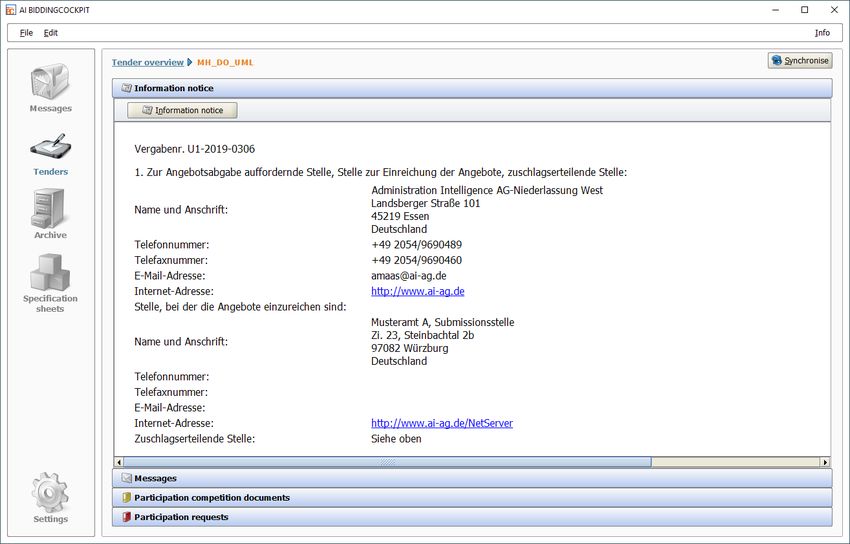
3 Starting the application
............................................................................................................................................................................

Start the AI BIDDINGCOCKPIT directly from the corresponding tendering portal using the O PEN
F ILES IN AI BIDDINGCOCKPIT link.

Figure 3.1: Start the AI BIDDINGCOCKPIT from the Tendering Portal

                       Using the advanced WebStart installation mechanism you are always up to date
                       to the most recent version of the application and can start it comfortably from your
                       desktop.

When you are starting the program for the first time, you first have to confirm the Terms and
conditions. Then, an additional window opens, where you have the possibility to learn about
the latest patches.

Figure 3.2: Display changes in the AI BIDDINGCOCKPIT

............................................................................................................................................................................
© Administration Intelligence AG, 2020 - All rights reserved.                                                                                            Page 7 of 88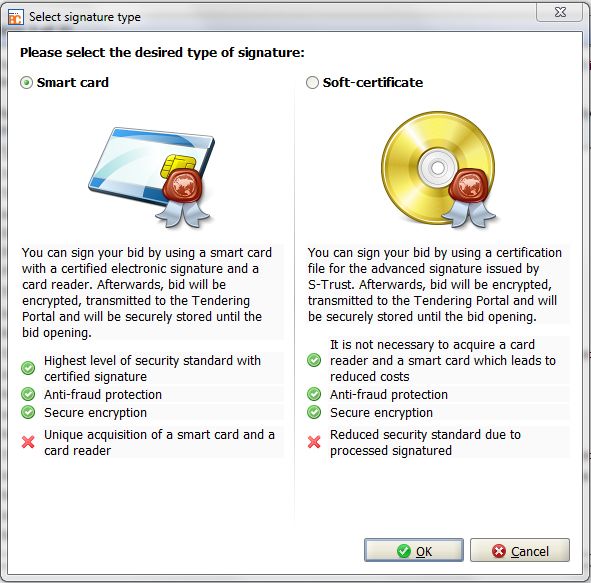
You can access this information at any time using the menu INFO / SHOW
                       ALTERATIONS.

............................................................................................................................................................................
© Administration Intelligence AG, 2020 - All rights reserved.                                                                                            Page 8 of 88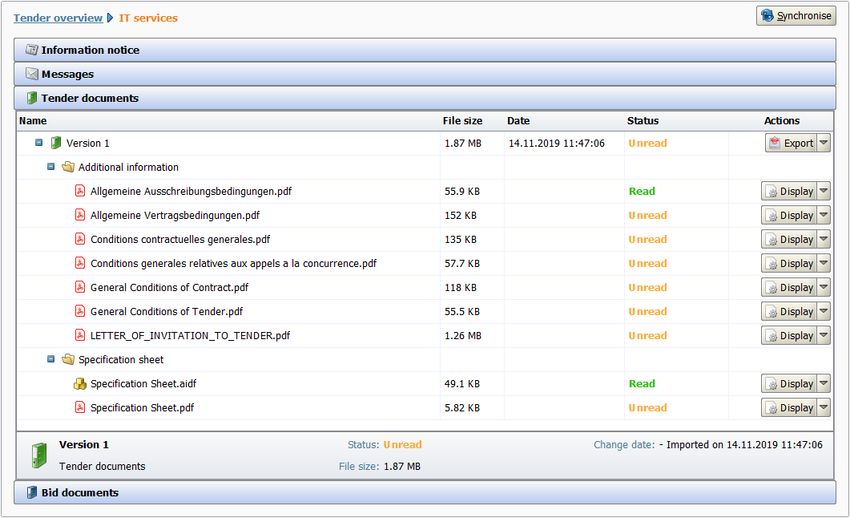
4 Program window
............................................................................................................................................................................

The program window of the AI BIDDINGCOCKPIT contains several areas. Above the window
title, there are M ENU ENTRIES (1) on the left and right. On the left side of the window, six symbols
are assembled which represent the F UNCTIONAL AREAS (2) of the AI BIDDINGCOCKPIT.
Depending on the activated area (blue font), different R EGISTERS (4) are displayed, located
centrally to the right hand side in the application panel (3). You can tell the active register by its
white backgrounded head. Most registries contain a F ILTER BAR(5), which allows you to change
the list of displayed entries. By using the F ILTER bar, you can limit the displayed list. Update the
entries with the S YNCHRONIZE button. Click on D ELETE FILTER ENTRIES to remove the entry in
the F ILTER field.

Figure 4.1: Program window of the AI BIDDINGCOCKPIT

The following chapters describe the functional areas of the AI BIDDINGCOCKPIT in detail.

............................................................................................................................................................................
© Administration Intelligence AG, 2020 - All rights reserved.                                                                                            Page 9 of 88
5 Menu bar
............................................................................................................................................................................

The AI BIDDINGCOCKPIT has only three menu items containing only few entries each. These
can also be selected using keyboard shortcuts. You can press the [ALT] button along with the
underlined letters of the menu names, e.g., [ALT] + [F] and then [ALT] + [I] to open the menu
FILE - IMPORT TENDER.

                       Press [CTRL] and [SHIFT] as well as the underlined letter from the menu to
                       open menu items from anywhere in the AI BIDDINGCOCKPIT application. For
                       example, press [CTRL]+ [SHIFT]+ [R]to create a bug report

In the following, you will find the menu items, their meaning and the existing shortcuts. The
underlined letters correspond to the default setting shortcuts.

5.1 Menu item - FILE

  Menu item                           Symbol               Meaning

  IMPORT TENDER A                                          Opens the window Import file.
                                                           The tendering documents in the *.bcd or *bcf format can be added to the
                                                           current list of tenders if you are a participant of this tender.
                                                           Shortcut: [ALT] + [A] or or [CTRL] + [SHIFT] + [A]
  SAVE ALL                                                 Saves the current data in the local directory.
                                                           Shortcut: [ALT] + [S] or [CTRL] + [SHIFT] + [S]

  GO OFFLINE /                                             Activates the offline or online mode. The O FFLINE status is displayed on
  ONLINE                                                   the upper right hand corner of the window near the INFO menu. A data
                                                           synchronization can optionally be carried out when switching the status.
                                                           Shortcut: [ALT] + [O] or [CTRL] + [SHIFT] + [O]

  CLOSE           APPLICA-                                 Closes the program.
  TION B                                                   Shortcut: [ALT] + [B] or [CTRL] + [SHIFT] + [B]

5.2 Menu item - EDIT

  Menu item                                       Symbol             Meaning

  VERIFY                                                             Opens the Perform compatibility check panel. Here, you can
  SIGNATURE                                                          import a signed file and test whether your card reader and signature
                                                                     card are compatible to the AI BIDDINGCOCKPIT. The results open
                                                                     in a separate window.
                                                                     See chapter Implement test signature.
                                                                     Shortcut: [ALT] + [V]

............................................................................................................................................................................
© Administration Intelligence AG, 2020 - All rights reserved.                                                                                          Page 10 of 88
Menu item Symbol Meaning
IMPORT Opens the Open file panel. You can open a specification sheet
SPECIFICATION from the AI TENDERINGMANAGER, enter values and save them.
SHEET (L) If necessary, you can also export this file.
See also the chapter Specification sheets.
Shortcut: [ALT] + [L]
5.3 Menu item - INFO
Menu item Symbol Meaning
USER MANUAL Opens the user manual in digital form.
Shortcut: [ALT] + [U] or [CTRL] + [SHIFT] + [U]
SUPPORTED SIGNATURE Opens the documentation of signature cards of the AI BID-
CARDS DINGCOCKPIT website. https://www.bietercockpit.de/res/
docs/AI-BC_Signaturkarten_Kartenleser.pdf
Shortcut: [ALT] + [C] or [CTRL] + [SHIFT] + [C]
FREQUENTLY ASKED Opens the FAQ area of the AI BIDDINGCOCKPIT website.
QUESTIONS https://www.bietercockpit.de/bietercockpit/faq.html
Shortcut: [ALT] + [Q] or [CTRL] + [SHIFT] + [Q]
SHOW ALTERATIONS Opens the alterations area of the AI BIDDINGCOCKPIT website.
https://www.bietercockpit.de/bietercockpit/
neuerungen.html
Shortcut: [ALT] + [N] or [CTRL] + [SHIFT] + [N]
CREATE ERROR REPORT With this option, you can document, send an occurred error to the
manufacturer support and save it locally.
Shortcut: [ALT] + [R] or [CTRL] + [SHIFT] + [R]
ABOUT AI BID- Program and manufacturer information.
DINGCOCKPIT Shortcut: [ALT] + [A] or or [CTRL] + [SHIFT] + [A]
............................................................................................................................................................................
© Administration Intelligence AG, 2020 - All rights reserved. Page 11 of 886 Settings
............................................................................................................................................................................
This area contains the registries P LATFORMS and G ENERAL. These allow adjusting the settings,
which are essential for flawlessly operating the AI BIDDINGCOCKPIT.
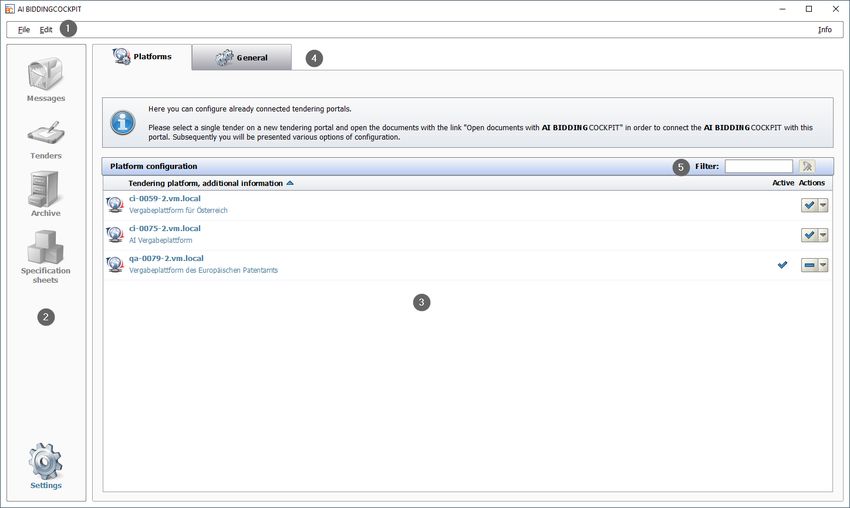
6.1 Platforms
The table P LATFORM CONFIGURATION contains all your configured platforms within the AI
BIDDINGCOCKPIT. They are activated for search by default.
You can adapt the displayed list to your wishes by typing in the F ILTER field. Delete
your entries, if necessary, with the R EMOVE F ILTER button.
Figure 6.1: Settings - Configure platform
Click on the T RIANGLE symbol in the ACTIONS column to display the list of available actions for
the selected platform.
Figure 6.2: Platforms - List of available actions
The first entry in this list is the predefined action, which can also be opened by
double-clicking on the corresponding row in the platform overview. The symbol
on the left of the triangle - CHECKMARK or BAR - shows which action is currently
available.
............................................................................................................................................................................
© Administration Intelligence AG, 2020 - All rights reserved. Page 12 of 88In the following, all available actions and their meanings are listed in one table. The underlined
letters correspond to the pre-set shortcuts and are only active when the list is opened.
Action Meaning
Activate or Deactivate platform Can be changed by double-clicking in the overview. Deactivated platforms
are not included in the data synchronisation.
Shortcut: [ALT] + [A] / [ALT] + [D]
Configure platform Opens the configuration panel, see the explanations below.
Shortcut: [ALT] + [C]
Register on the platform Forwards you to the website of the corresponding platform. Here you can
register as a bidder. The user name does not have to be identical to the users
name on the AI BIDDINGCOCKPIT.
Shortcut: [ALT] + [R]
Delete platform Deletes the corresponding entry from the list.
Shortcut: [ALT] + [D]
Select the action C ONFIGURE PLATFORM to carry out the configuration settings for the selected
platform. An entry panel opens up.
Figure 6.3: Settings - Platforms - Configure platform
Here, you can enter the login details of your platform user and verify the login on the selected
platform with the T EST CONNECTION button.
After a successful connection test an info message is displayed to you.
............................................................................................................................................................................
© Administration Intelligence AG, 2020 - All rights reserved. Page 13 of 88Figure 6.4: Notification after a successful connection test
Activate the checkbox R ETRIEVE TENDERS FROM THIS PLATFORM to see all your tender par-
ticipations on this platform in the T ENDERS area and also to include the platform in the AI
BIDDINGCOCKPIT synchronization.
Select D ISPLAY SEARCH RESULTS FOR THIS PLATFORM, if you would like to include this platform
in your tender research. After you have made your selection, click on S AVE to save your settings.
You can identify an activated platform by the C HECKMARK in the ACTIVE column.
The M AGNIFYING GLASS symbol in the S EARCH column appears if the platform
has been activated the tender research.
If synchronizing a tendering portal becomes necessary due to changes, the following message
is displayed.
Figure 6.5: Notification after finishing the platform configuration
............................................................................................................................................................................
© Administration Intelligence AG, 2020 - All rights reserved. Page 14 of 886.2 General
This registry contains several areas (G ENERAL SETTINGS , P ROXY SERVER CONFIGURATION ,
GAEB CONFIGURATION) which are separated by horizontal bars with different symbols. You
can identify the currently displayed area by the M INUS symbol on the right of the separation bar.
Areas which are currently hidden display a P LUS symbol here.
Switch the displayed area by clicking on the separation bar. The content will be
moved upwards or downwards and will be displayed beneath the separation bar.
6.2.1 General settings
In this area user-specific data can be adjusted.
Figure 6.6: Settings - General settings
............................................................................................................................................................................
© Administration Intelligence AG, 2020 - All rights reserved. Page 15 of 886.2.1.1 Temporary Working Directory
If you are starting the AI BIDDINGCOCKPIT for the first time, a notification dialogue is displayed.
This dialogue informs you about the existence and functionality new temporary workspace or
directory. After this directory is created this note will not be displayed again.
Figure 6.7: Warning: missing temporary workspace
Please note that this directory is cleared each time a tender is closed. Make sure
to edit your files using the functions of the AI BIDDINGCOCKPIT.
You can always change this directory in the T EMPORARY W ORKING D IRECTORY. If the selected
directory cannot be found during the program start, the following notice is displayed:
............................................................................................................................................................................
© Administration Intelligence AG, 2020 - All rights reserved. Page 16 of 88Figure 6.8: Temporary workspace warning
6.2.1.2 Software Certificate
In the general settings of AI BIDDINGCOCKPIT under SOFTWARE CERTIFI-
CATE you can store a signature document in *.p12 or *.pfx format. When signing
your tenders, you will save time by being able to enter the password directly.
6.2.1.3 Tendering Files Directory
Select a directory for saving local files of the AI BIDDINGCOCKPIT under T ENDERING FILES
DIRECTORY . The Cockpit/bcf directory within the repository of the currently logged in user is
pre-set.
In order to change this directory click the S ELECT panel. The Select directory panel opens.
Choose a directory and confirm your selection with O PEN. The changed directory path is
displayed in the text field to the left. Confirm these changes with OK.
6.2.2 Proxy server configuration
In the P ROXY SERVER CONFIGURATION area you can configure your proxy server for the internet
connection in the AI BIDDINGCOCKPIT. The setting D IRECT CONNECTION TO INTERNET is
pre-set.
Select AUTOMATICALLY DETECT P ROXY SETTINGS so that the AI BIDDINGCOCKPIT can auto-
matically use the present configuration on your system.
If you want to manually set up a Proxyserver, activate the control panel C ONFIGURE P ROXY
MANUALLY . Now you can enter the host address and the port. If your proxy server needs an
authentication enter the access data (U SERNAME and PASSWORD) here.
............................................................................................................................................................................
© Administration Intelligence AG, 2020 - All rights reserved. Page 17 of 88Using a proxy exception list, you can define addresses to which the proxy settings
should not apply. It is possible to add a single record or an entire exception list
seperated by commas.
Figure 6.9: Settings - General - Proxy server configuration
6.2.3 GAEB configuration
All tenders abiding to the German Construction Procedures contain a specification sheet in
GAEB format which must be filled in by the bidder and submitted along with the bid.
GAEB stands for the German Gemeinsamer Ausschuss Elektronik im Bauwesen
(Joint Committee for Electronics in Construction). This committee seeks to create
a standardized language for all parties involved in construction processes.
The AI BIDDINGCOCKPIT generally offers two different methods of editing a GAEB file: First,
editing the GAEB file (D83 or X83) directly from the AI BIDDINGCOCKPIT via the GAEB
software wingaeb xml. Second, the use of an external GAEB application (e.g. California Pro,
RIB Arrbiba etc.). Both variants require a different handling in editing the GAEB file and will be
described in more detail in the following chapters.
In S ETTINGS -G ENERAL -G AEB C ONFIGURATION you can specify whether you want to use
wingaeb xml or an external program for editing GAEB files. It is recommended to use wingaeb
............................................................................................................................................................................
© Administration Intelligence AG, 2020 - All rights reserved. Page 18 of 88xml, as the integration in the AI BIDDINGCOCKPIT simplifies the overall process of bid creation
and moreover, the bidder is supported by various test mechanisms.
Figure 6.10: Settings: GAEB configuration
Your selection can be changed at any time. Changes do only apply to tenders
which have been edited after the change.
6.2.3.1 wingaeb xml
wingaeb xml by Schnittstelle BAU is a software for editing specification sheets in GAEB-format
and is provided to you by the AI BIDDINGCOCKPIT free of charge. You can download the most
recent version under http://www.wingaeb.de/.
The use of wingaeb xml for editing GAEB files has some advantages compared to the use of an
external GAEB application:
• It is possible to edit the GEAB file directly from the AI BIDDINGCOCKPIT
• You are supported by various test mechanisms for the correct bid submission
• The GAEB application wingaeb xml is provided free of charge for users of
AI BIDDINGCOCKPIT
............................................................................................................................................................................
© Administration Intelligence AG, 2020 - All rights reserved. Page 19 of 88In order to use wingaeb xml you have to download and install the program. By
clicking the link on the right of D OWNLOAD FROM WINGAEB XML, the download of
the installation file is initiated. Save the file locally to your Computer.
Figure 6.11: Selecting an installation directory for the wingaeb xml installation in the settings
Having installed wingaeb xml you will need to select a directory for the installed software. The
directory selected by default is recommended. Subsequently, wingaeb xml can be used for
editing GAEB-files and can be opened directly from the AI BIDDINGCOCKPIT.
Figure 6.12: Selecting a path for the wingaeb xml installation in the file selection dialog
............................................................................................................................................................................
© Administration Intelligence AG, 2020 - All rights reserved. Page 20 of 88The GAEB-2000-format (P83-file) is not supported by wingaeb xml due to little
distribution on the market. If you need to edit such a file, it is recommended to
use the setting U SE E XTERNAL P ROGRAM F OR E DITING G AEB.
The wingaeb xml software is used internally by the AI BIDDINGCOCKPIT for
various test mechanisms. Therefore, you should neither remove nor uninstall
wingaeb xml if you would like to continue using the validation functionalities of the
AI BIDDINGCOCKPIT.
When creating a new bid, an *.off file is created from the P83/D83/X83 file in the tendering
documents. By double-clicking this file or using the context menu command O PEN FILE in the
ACTIONS column, wingaeb xml is started and the file can be edited.
Figure 6.13: Opening a GAEB file using the context menu
When opening a GAEB file via wingaeb xml for the first time within a bid, a notification is
displayed as a warning not to close the AI BIDDINGCOCKPIT during the editing process of the
GAEB file. You can turn off this notification by clicking on the control panel on the left.
Figure 6.14: Information note while editing a GAEB file via wingaeb xml
After successfully edited the GAEB file, please save the file via wingaeb xml. The AI BID-
DINGCOCKPIT recognises the file automatically as a D84/X84 file and overwrites the place-
holder file. With the correct operation the D84/X84 file finally has the appropriate file size.
............................................................................................................................................................................
© Administration Intelligence AG, 2020 - All rights reserved. Page 21 of 88During the bid submission, wingaeb xml is opened in the background and an automatic
validation of any created bidding files occurs. Potential errors are displayed in step 1 of the
bid verification. For example it is checked, whether the bidding sum equals the sum from the
D84/X84 file.
Figure 6.15: Attention note during tender evaluation in wingaeb xml
The bid submission may occur only after the GAEB file has been edited. Further
steps of the submission are described in the chapter Digital bid submission.
Should any questions regarding program functions arise, use the integrated online
help of wingaeb xml or please contact directly the support of Schnittstelle BAU.
6.2.3.2 External software
If you are already using a GAEB program which enables you to integrate further applica-
tions, you can also use your personal favourite software for editing GAEB files within the AI
BIDDINGCOCKPIT. The verification mechanism which checks the specification sheet for its
completeness is, however, omitted in this case.
Activate the GAEB C ONFIGURATION in register G ENERAL. Now select U SE EXTERNAL PROGRAM
FOR EDITING GAEB FILES.
When you have decided on an external performance recording program within
a Regulations on Contract Awards for Public Works and Constructions (VOB)
procedure, you will have to export the D83/X83 files from the tendering documents
and subsequently open them with the external software in order to save them as
D84/X84 files.
Select the according context menu within the tendering documents in order to export.
............................................................................................................................................................................
© Administration Intelligence AG, 2020 - All rights reserved. Page 22 of 88Figure 6.16: Exporting a GAEB file from the tendering documents When creating a new bid, an empty D84/X84 file is generated as a placeholder from the D83/X83 file which is attached to the tender documents. The placeholder file is recognisable by its missing file size. Please overwrite this placeholder by importing the D84/X84 file into the bid. The D84/X84 file can be opened via an external software after the import. A correction of the GAEB file is possible as well. 6.2.4 Language settings Here you can change the language settings for the AI BIDDINGCOCKPIT to English. After an automatic restart, the entire application will be set to English. This also includes all menu options and the integrated online help. 6.3 Specification sheets In this area, you can edit specification sheets which are saved as software-specific *.aidf files. You can then export them in order to use them in further applications. ............................................................................................................................................................................ © Administration Intelligence AG, 2020 - All rights reserved. Page 23 of 88
Figure 6.17: Specification sheet area

Open a specification sheet by clicking the corresponding button in the separation bar (see red
circle) or use the menu command E DIT - O PEN S PECIFICATION S HEET.

                       After adding a specification sheet, the current storage location of the file is
                       displayed in blue font. Your changes are applied to this location as well. If the
                       storage location of a specification sheet has changed after the import, the list
                       entry is displayed in grey font and you can delete it with the D ELETE command.

The following table contains an overview of all possible symbols, buttons and their meaning.

  Symbol / Action                      Meaning

                                       Opens the Open file window. The file type is *.aidf by default.

                                       Symbol of the specification sheet in the *.aidf format.

                                       Date and time of the last change to the specification sheet.

                                       List of available actions.
                                       The left symbol displays the command which can be executed by double-clicking.
                                       Detail view: Opens the specification sheet for editing. You will find further information
                                       on this subject in the bid creation area of chapter Specification sheets.
                                       Shortcut: [ALT] + [D]

                                       Export: Opens the Save file window. The specification sheet is saved as an *.aidf file.
                                       Shortcut: [ALT] + [E]

............................................................................................................................................................................
© Administration Intelligence AG, 2020 - All rights reserved.                                                                                          Page 24 of 88
Symbol / Action Meaning
Delete: The specification sheet will be removed from this area. This does not affect the
original file on your computer.
Shortcut: [ALT] + [L]
6.4 Archive
You can move every tender from the T ENDERS area via the context menu by right mouse click to
the A RCHIVE. The corresponding notification will be displayed before moving the files.
The archived tenders are not affected by the synchronization of the AI BIDDINGCOCKPIT and
therefore the processing times are shortened. You can still open and search tenders in the
archive or - if necessary - remove them from the archive in order to edit them again in the
T ENDERS area.
Figure 6.18: Archive area
The following table contains an overview over all displayed symbols and buttons as well as their
meanings.
Symbol / Action Meaning
Tender within archive.
Construction services, freelance services, or goods and services tender.
Tender has not yet been synchronized with the Tendering portal nor has it been saved
locally on the computer.
Tender has been synchronized with the Tendering portal or saved locally on the
computer.
The deadline for bid submission is in the future.
The deadline for bid submission has already expired.
............................................................................................................................................................................
© Administration Intelligence AG, 2020 - All rights reserved. Page 25 of 88Symbol / Action Meaning
List of the actions available.
The left symbol displays the command which can be executed by double-clicking.
Opens the tender details in a table.
Open tender Shortcut: [ALT] + [O]
Opens the Save file window. The tender is saved in *.bcf format.
Export tender Shortcut: [ALT] + [X]
The tender is removed from the archive and can be edited again in the T ENDERS area.
Remove tender from Shortcut: [ALT] + [R]
archive
6.5 Messages
In the M ESSAGES area, you will find an overview over messages from all tenders. Update the
message inbox using the S YNCHRONIZE button.
Here, you cannot write new messages but you can reply to messages.
Figure 6.19: Message area
The following table serves as an overview over all possible symbols, buttons and their meanings.
Symbol / Action Meaning
Comparison of messages and the information on the Tendering Portal.
Reset current search filter.
Unread messages.
Read messages.
Received messages.
Message sent.
............................................................................................................................................................................
© Administration Intelligence AG, 2020 - All rights reserved. Page 26 of 88Symbol / Action Meaning
Unsent message (draft).
Attachment to a message.
List of the actions available.
The left symbol displays the command which can be executed by double-clicking. The
number of active commands depends on the message type.
Shortcut: [ALT] + [Letter on the right of the name in the list]
Show Displays message details of a received or sent message.
Shortcut: [ALT] + [S].
Edit Displays message details for editing. Applies to still unsent messages only.
Shortcut: [ALT] + [E].
Delete Deletes an unsent message.
Shortcut: [ALT] + [L].
Reply Creates a message in draft mode. The S UBJECT field and the message text are
preallocated with the entries of the original message. Applies to incoming messages
only.
Shortcut: [ALT] + [R].
Send Sends a message in draft mode.
Shortcut: [ALT] + [D].
After double-clicking a message, the Message details are displayed.
............................................................................................................................................................................
© Administration Intelligence AG, 2020 - All rights reserved. Page 27 of 88Figure 6.20: Messages area - Message details
The blue link on the upper left side takes you back to the message overview. To send a message
from the detail area, use the S END button.
If you do not wish to send the message just yet, you can also S AVE the draft.
Shortcut keys are preset for all buttons. Press the [ALT] button and the button’s
underlined letter at the same time, e.g., [ALT] + [S] for S END MESSAGE.
The BUTTONS in the lower area of the message window have the following functions:
Button Meaning
Send Sends the currently opened message after a security question. Only displayed
for saved messages in draft mode. Shortcut: [Alt] + [S]
Apply Saves the current entries. Displayed only for new messages and messages
in draft mode.
Shortcut: [ALT] + [A]
Cancel Returns to the message overview. The current changes are not saved.
Displayed for messages in draft mode only.
Shortcut: [ALT] + [C]
............................................................................................................................................................................
© Administration Intelligence AG, 2020 - All rights reserved. Page 28 of 88Button Meaning
Delete Deletes the current message. Displayed for saved messages in draft mode
only.
Shortcut: [ALT] + [D]
Close Returns to the message overview. Displayed for sent and received messages.
Shortcut: [ALT] + [C]
Reply Creates a message in draft mode. The S UBJECT field and the message text
are preallocated with the entries of the original message. Is displayed for
received messages only.
Shortcut: [ALT] + [R]
List of the actions available. The number of active commands depends on
the document type.
Open file The attachment’s file content is displayed.
Shortcut: [ALT] + [O]
Delete attachment Deletes the attachment.
Shortcut: [ALT] + [D]
Sign If necessary, add a digital (qualified or advanced) signature in PDF format to
your attachment. The signature will be added at the end of the file on a new
page.
Shortcut: [ALT] + [S]
............................................................................................................................................................................
© Administration Intelligence AG, 2020 - All rights reserved. Page 29 of 887 Tenders
............................................................................................................................................................................
This area supports you in preparing and submitting your bid. Click T ENDERS. The overview over
all tenders which you are participating in is displayed.
Figure 7.1: Tender overview
If necessary, you can reduce the size of the results by using the F ILTER.
When you hover over a tender in the result list without clicking your mouse, a blue note field
(tooltip) with detailed information appears.
The following table contains an overview over all possible symbols or actions and their meanings.
Symbol / Action Meaning
Tender symbol.
Construction services, freelance services, or goods and services tender.
The tender has not yet been synchronized with the tendering portal or has not yet been
saved locally to your computer.
The tender has been synchronized with the tendering portal or saved locally to your
computer.
The bid submission deadline is in the future.
The bid submission deadline has already passed.
The bid opening has not yet been carried out. Bid submission or withdrawal is possible
at any time.
The bid opening has already been carried out. The bid submission or withdrawal are not
possible anymore.
............................................................................................................................................................................
© Administration Intelligence AG, 2020 - All rights reserved. Page 30 of 88Symbol / Action Meaning
The bid opening deadline has already passed. If you try to submit a bid, a warning
message will be displayed. The bid submission is nevertheless possible. The bid will
arrive as late bid.
The symbols of the different tendering portals.
List of all actions available.
The left symbol displays the command which can be executed by double-clicking.
Opens the tender details in a clearly arranged table.
Open tender Shortcut: [ALT] + [O]
Opens the Save file window. The tender will be saved as *.bcf file.
Export tender Shortcut: [ALT] + [X]
The tender will be transferred to the archive. Archived tenders are not synchronized
anymore.
Add to archive Shortcut: [ALT] + [A]
Opens the Reload tender window. Deletes the local data of the tender on your
computer and synchronizes the tender with the platform.
Reset tender Shortcut: [ALT] + [R]
Opens the Import file window. A tender in *.bcd or *.bcf format can be imported to the
AI BIDDINGCOCKPIT.
Delete filter.
Synchronize. Compares the messages with the information on the tendering portal.
In order to open a tender, double-click it in the overview. The Synchronize window will be
opened and the tender details will be displayed in a clearly arranged table. It contains four or
six areas: I NFORMATION NOTICE, M ESSAGES, T ENDERING DOCUMENTS, B IDDING DOCUMENTS,
PARTICIPANT COMPETITION DOCUMENTS, PARTICIPATION REQUESTS. These are separated by
horizontal bars displaying different symbols.
Switch the displayed area by clicking the separation bar. The content is moved
up or down and the content of your chosen area will be displayed below the
separation bar.
............................................................................................................................................................................
© Administration Intelligence AG, 2020 - All rights reserved. Page 31 of 88Figure 7.2: Tender - Information notice When using the I NFORMATION NOTICE button, you will be forwarded to the tendering portal and can view the information notice text on the platform. Figure 7.3: Tenders - Forwarding to tendering portal ............................................................................................................................................................................ © Administration Intelligence AG, 2020 - All rights reserved. Page 32 of 88
7.1 Messages

In the M ESSAGES section, all messages of the current tender are visible at one glance. Update
the message inbox using the S YNCHRONIZE button.

                       Here, you can also send your own requests to a tendering authority. Click the
                       N EW MESSAGE button.

Figure 7.4: Tenders - Messages

The following table contains an overview over all possible symbols or buttons and their meanings.

  Symbol                               Meaning

                                       Synchronization of the messages and the information on the tendering portal.

                                       Opens the form for a new message.

                                       Unopened message.

                                       Opened message.

                                       Received message.

                                       Sent message.

                                       Unsent message (draft).

                                       Attachment to message.

                                       List of the actions available via clicking.
                                       The left symbol corresponds to the preset command which can be executed by
                                       double-clicking on the table row. The number of active commands depends on the
                                       message type.
                                       Shortcut: [ALT] + [Letter on the right of the name in the list]

............................................................................................................................................................................
© Administration Intelligence AG, 2020 - All rights reserved.                                                                                          Page 33 of 88
Symbol Meaning
Displays the message details of a received or sent message.
Show Shortcut: [ALT] + [S].
Displays the message details for editing. Applies to still unsent messages only.
Edit Shortcut: [ALT] + [E].
Deletes an unsent message.
Delete Shortcut: [ALT] + [L].
Creates a message in draft mode. The S UBJECT field and the message text are
preallocated with the entries of the original message. Displayed for received messages
only.
Reply Shortcut: [ALT] + [R].
Sends a message in draft mode.
Send Shortcut: [ALT] + [D].
After double-clicking a message, the details are displayed.
Figure 7.5: Tenders - Message details
The blue links on the upper left hand side take you back to the message or tender overview. To
send a message from the detail area, use the S END button on the upper left hand side, next to
the S UBJECT
Shortcuts are preset for all keys. Press the [ALT] button and the underlined letter
of the button at the same time, e.g., [ALT] + [S] for S END message.
............................................................................................................................................................................
© Administration Intelligence AG, 2020 - All rights reserved. Page 34 of 88The BUTTONS in the lower area of the message window have the following functions:
Button Meaning
Send Sends the currently opened message. Is displayed for new messages with
filled out obligatory fields and draft mode messages.
Shortcut: [ALT] + [D]
Apply Saves the current entries without sending the message. Displayed for new
messages and messages in draft mode.
Shortcut: [ALT] + [A]
Cancel Returns to the message overview. The current changes are not saved.
Displayed for messages in draft mode only.
Shortcut: [ALT] + [C]
Delete Deletes the current message. Displayed for saved messages in draft mode
only.
Shortcut: [ALT] + [D]
Close Returns to the message overview. Displayed for sent and received messages.
Shortcut: [ALT] + [C]
Reply Creates a message in draft mode. The S UBJECT field and the message text
are preallocated with the entries of the original message. Is displayed for
received messages only.
Shortcut: [ALT] + [R]
List of all available actions for attachments. The number of active commands
depends on the document type.
Open file The file content from the attachment is displayed.
Shortcut: [ALT] + [O]
Delete attachment Deletes the attachment.
Shortcut: [ALT] + [D]
Export attachment Exports the attachment.
Shortcut: [ALT] + [E]
7.2 Tendering documents
The tendering documents area is displayed if you click the T ENDERING DOCUMENTS ( FOR
REVIEW ) area in the detailed view of the tender.
............................................................................................................................................................................
© Administration Intelligence AG, 2020 - All rights reserved. Page 35 of 88Figure 7.6: Tenders - Tender documents for goods and services The tendering documents can be displayed, printed or exported, but not be edited. Open a single document by double-clicking. Before opening tendering documents for the first time, all documents have the status “Unread“. After opening the document’s status changes to “Read“. If all files have been opened at least once, the green status “Read“is adapted by the respective version of the tendering documents. If necessary, export single versions of the tendering documents as ZIP archives by selecting the E XPORT menu. If the awarding authority has uploaded an updated version of the documents you will be informed about this by a new window. ............................................................................................................................................................................ © Administration Intelligence AG, 2020 - All rights reserved. Page 36 of 88
Figure 7.7: Tenders - New version of the tendering documents

7.3 Creating a bid

In order to create a bid, you have to switch to the bidding documents area which can be found
in the tender’s detailed view under B IDDING DOCUMENTS. An initial version of the bid will be
created after the tender has been opened for the first time. You can open and edit the bid by
double-clicking it or, if necessary, create further bids by clicking the C REATE button.

                       Already exisiting, but not yet submitted bids are displayed with a green symbol in
                       the AI BIDDINGCOCKPIT. Submitted bids are blue.

............................................................................................................................................................................
© Administration Intelligence AG, 2020 - All rights reserved.                                                                                          Page 37 of 88
Figure 7.8: Tenders - Bid documents - Bid overview
If the bidding documents have been opened for the first time, all forms carry the status “Unedited“.
The status is changed to “Read“ or “Edited“ after the bid has been opened. If all mandatory
fields have been filled out, the status “Finished“ is displayed.
Figure 7.9: Tender details - Status change of the files
Select one of the blue links on top, in order to switch from the form view to the
detailed view of the bids or to another level of tenders.
Figure 7.10: Return to detailed view of bidding documents
The following table contains an overview over all possible symbols or buttons and their meanings.
............................................................................................................................................................................
© Administration Intelligence AG, 2020 - All rights reserved. Page 38 of 88Button Meaning
New version Creates an unedited version of a bid in the B IDDING DOCUMENTS .
Shortcut: [ALT] + [C]
Create new supplementary Creates an unedited version of a supplementary bid/variant in the B IDDING
bid/variant DOCUMENTS area. Only displayed if supplementary bids/variants are enabled.
Shortcut: [ALT] + [S]
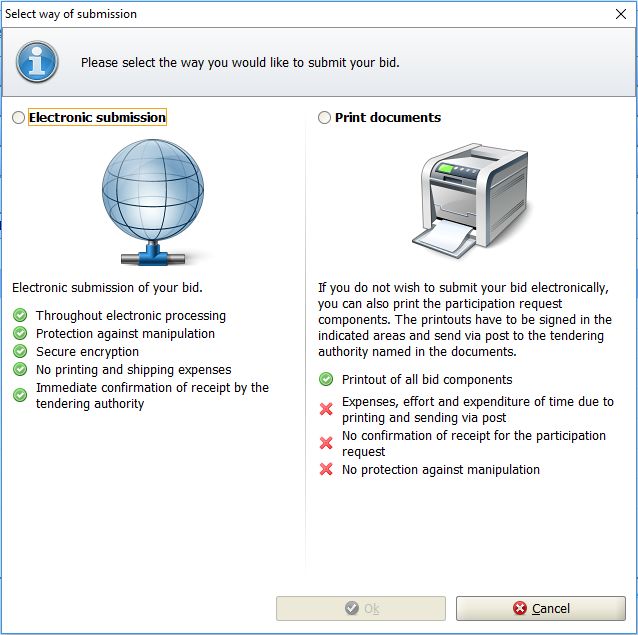
Submit Opens the Select sending type window. You can submit several primary
bids in the AI BIDDINGCOCKPIT if the tendering authority has enabled this
option. For further information, see chapter Qualified signature with smart
card.
Shortcut: [ALT] + [S]
Copy Creates a copy of the selected bid. This way, you can make small changes
without having to create a completely new bid, e.g., when you withdraw an
invalid bid from the Tendering Portal.
Shortcut: [ALT] + [C]
Delete Deletes the selected bid.
Shortcut: [ALT] + [D]
Add supplementary bid/variant Adds a suplementary bid/variant to the selected bid. Only displayed if supple-
mentary bids/variants are enabled.
Shortcut: [ALT] + [A]
Rename Opens the Bid name window. Here, you can change the bid’s title.
Shortcut: [ALT] + [R]
Print Prints all or only single tendering documents.
Shortcut: [ALT] + [P]
History Opens the History window.
Shortcut: [ALT] + [H]
Open Displays the selected file’s content. You can return to the bid’s detailed view
using the link in blue.
Shortcut: [ALT] + [O]
Export Only activated for certain documents, e.g. the Specification sheet acti-
vated. The imported .aidf file can be edited independently from the AI
BIDDINGCOCKPIT. For example with the AI LV COCKPIT. You may then
reimport it to the AI BIDDINGCOCKPIT.
Shortcut: [ALT] + [E]
Import files You can add your own documents to your bidding documents. Select the
desired file in the Import file window and then click I MPORT. The file will
be added to the list of the bidding documents and displayed below the
ATTACHMENTS folder.
Shortcut: [ALT] + [I]
7.3.1 Navigating within a bidding file
When opening the T ENDERING DOCUMENTS for the first time, only the last bid is automatically
unfolded and the S CROLLBAR is displayed on the right hand side.
............................................................................................................................................................................
© Administration Intelligence AG, 2020 - All rights reserved. Page 39 of 88Figure 7.11: Tendering details - Navigation with arrow keys
You can comfortably navigate through the tendering documents using the arrow keys.
• A RROW UP and DOWN select the element
• A RROW LEFT closes the selected element. If the element is already closed or cannot
be closed, the element above it is automatically selected. This way you can close all
directories outside of the tendering documents by repeatedly using ARROW LEFT
• A RROW RIGHT opens the selected element. If the element is already opened or cannot
be opened, the element beneath it is automatically selected. This way you can open all
directories of the tendering documents and view the content documents by repeatedly
using R IGHT ARROW
• By using S PACE, the activated element’s state is reversed. That is "closed" is "opened"
and vice versa.
7.3.2 Insert with Drag & Drop
Using the drag & drop function allows you to comfortably add one or several files to your bids
and participation applications. You can also move bids and participation applications or accept
files for review.
............................................................................................................................................................................
© Administration Intelligence AG, 2020 - All rights reserved. Page 40 of 88A file can be moved with pressed left mouse button to the target object. All objects
open for drag & drop are marked with a P LUS sign next to the cursor
Moving and inserting files is possible in the following cases:
• Within various versions of bids and participation applications
Figure 7.12: Insert files with Drag & Drop - Within the tendering versions
• From any directory on your computer. You can mark any number of external documents
and copy them directly to your desired tender on the AI BIDDINGCOCKPIT
............................................................................................................................................................................
© Administration Intelligence AG, 2020 - All rights reserved. Page 41 of 88Figure 7.13: Insert files with Drag & Drop - directly from your Computer
• From tendering documents or participation application documents. Move the file to the
S EPARATION BAR of the tendering documents or participation application. It will be opened
automatically and you can select the target area for insertion.
Figure 7.14: Insert files with Drag & Drop - from tendering documents
............................................................................................................................................................................
© Administration Intelligence AG, 2020 - All rights reserved. Page 42 of 88You can scroll up and down if you move the cursor to the upper or lower frame of
the window, holding down the left key of your mouse.
7.3.3 Forms
Forms have a light gray background with white entry fields and coloured mandatory fields.
You can identify forms that can be filled out on the screen by the *.aiform ending.
Figure 7.15: Form with mandatory fields
The following field types can occur in the forms:
Form field Example Meaning
Option field Offers one or more options, of which only one can be selected.
The selected option has a green dot in the circle, e.g., Yes/No
field.
Check box Activate (green checkmark) or deactivate (empty box) via click-
ing.
File field Add external attachment files to the form. From left to right:
Attach file, Display file content, Delete file.
............................................................................................................................................................................
© Administration Intelligence AG, 2020 - All rights reserved. Page 43 of 88Form field Example Meaning
Entry field Mandatory fields have a coloured background. Optional fields
have a white background and fields containing display functions
are adjusted to the background colour. Mandatory fields can
also be identified by the red asterisk (*) next to the field name.
The entries can be checked for certain aspects, e.g. numbers
only. When making adjustments to the text field, the number of
characters already entered is displayed. This should prevent too
long texts, which cannot be displayed in the printed version.
Selection list field If there is a magnifying glass symbol right next to the entry field,
a selection list with possible entries can be opened by clicking.
Manual entries are also allowed in this field.
Date field Clicking the symbol to the right opens a monthly calendar, in
which you can navigate through the months or years by using the
arrow buttons. The date can be entered by clicking the calendar
or with direct keyboard entry. Date values in the DD.MM.JJJJ
format are expected.
Selection field Only the selection from this list is possible.
If the form is longer than one screen page, you can move its content up and down with the
SCROLL BAR or the ARROWS on the right side.
Click P RINT FORM on the lower left margin of the form if you wish to print the form
or save the form as a PDF file.
The three buttons on the right can also be selected with key shortcuts, e.g. [ALT] + [S] for S AVE.
Clicking OK checks the entries in the fields and displays any errors.
7.3.4 Specification sheet
Open the specification sheet by double-clicking or using the O PEN action.
The Specification sheet window has its own symbol bar (1) and three different areas: the
structure (2) on the left, the table view (3) on the upper right hand side and the form area (4)
below. These areas can be adjusted in size using the two area separation bars with. They can
also be hidden or shown using the three D ISPLAY buttons (S TRUCTURE, TABLE VIEW, F ORM
VIEW ) in the symbol bar (1).
............................................................................................................................................................................
© Administration Intelligence AG, 2020 - All rights reserved. Page 44 of 88You can also read