AIR Creative Collection - User Guide
←
→
Page content transcription
If your browser does not render page correctly, please read the page content below
AIR® Creative Collection

        User Guide
          English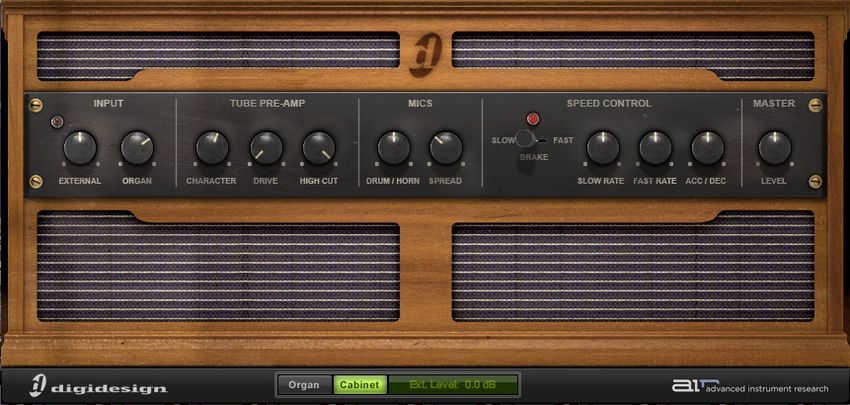
User Guide (English)
Chapter 1: Audio Plug-Ins Overview
Plug-ins are special-purpose software components that provide additional signal processing
® ®
and other functionality to Avid Pro Tools . These include plug-ins that come with Pro Tools, as
well as many other plug-ins that can be added to your system.
Additional plug-ins are available both from AIR and third-party developers. See the
documentation that came with the plug-in for operational information.
AIR Audio Plug-Ins
AIR Creative Collection provides a comprehensive set of digital signal processing tools for
professional audio production with Pro Tools. Other AIR plug-ins are available for purchase
from AIR at www.airmusictech.com.
AIR Creative Collection is included with Pro Tools, providing a comprehensive suite of digital
signal processing effects that include EQ, dynamics, delay, and other essential audio
processing tools.
The following sound-processing, effects, and utility plug-ins are included:
Chorus Ensemble Fuzz-Wah Multi-Delay Spring Reverb
Distortion Filter Gate Kill EQ Non-Linear Reverb Stereo Width
Dynamic Delay Flanger Lo-Fi Phaser Talkbox
Enhancer Frequency Shifter Multi-Chorus Reverb Vintage Filter
The following virtual instrument plug-ins are also included:
Boom Drum machine and sequencer
DB-33 Tonewheel organ emulator with rotating speaker simulation
Mini Grand Acoustic grand piano
Structure Free Sample player
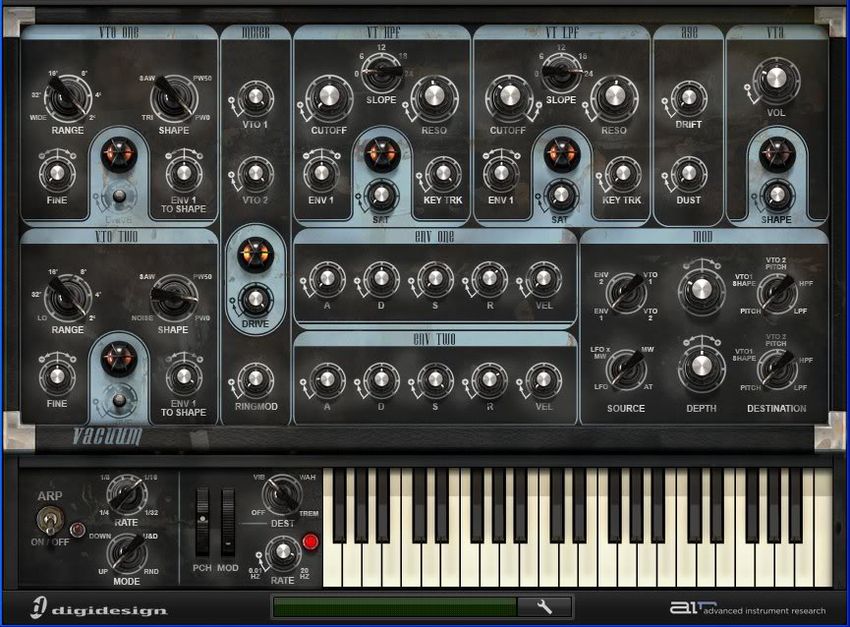
Vacuum Vacuum tube–modeled monophonic synthesizer
2
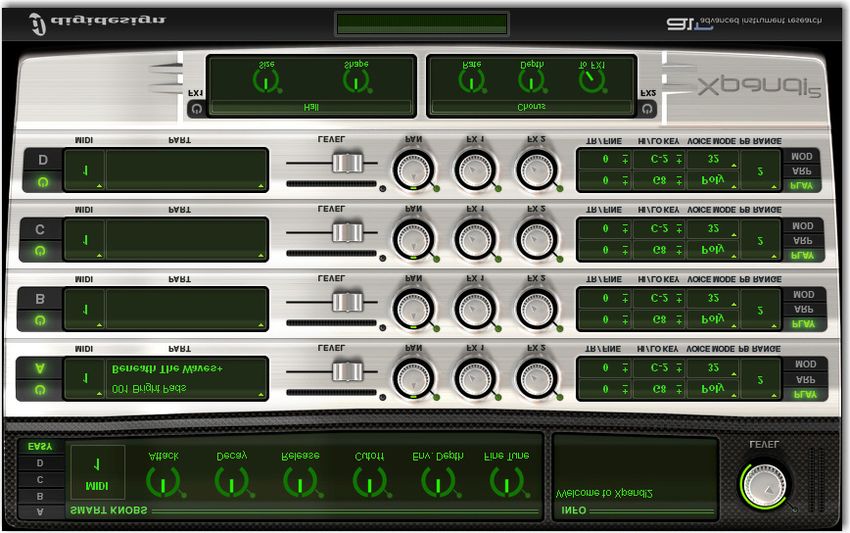
Xpand! Multitimbral synthesizer and sampler workstation
Avid and Pro Tools are trademarks or registered trademarks of Avid Technology, Inc. in the U.S. and other countries.
3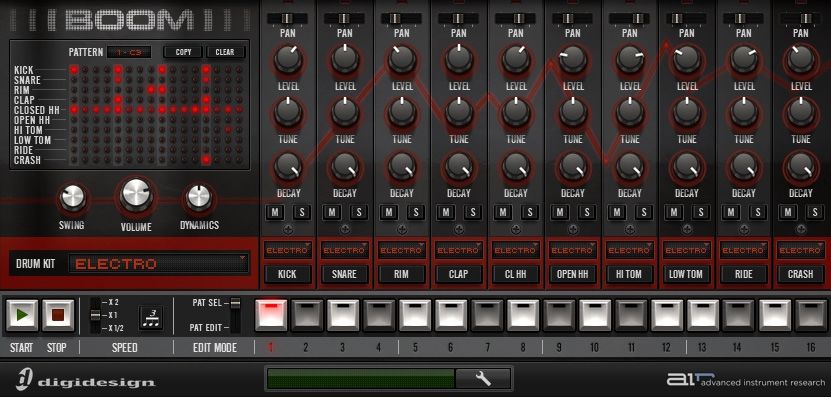
AAX Plug-In Format

AAX (Avid Audio Extension) plug-ins provide real-time plug-in processing using host-based
("Native") or DSP-based (Pro Tools HD with Avid HDX hardware accelerated systems only)
processing. The AAX plug-in format also supports AudioSuite non-real-time, file-based
rendered processing.
AAX plug-in files use the ".aaxplugin" file suffix.

Using Plug-Ins in Pro Tools

Refer to the Pro Tools Reference Guide for information on working with plug-ins, including:
  • Inserting plug-ins on tracks
  • Plug-In Window controls
  • Adjusting plug-in controls
  • Automating plug-ins
  • Using side-chain inputs
  • Using plug-in presets
  • Clip indicators

System Requirements and Compatibility for Plug-Ins

To use these plug-ins, you need the following:
  • Either of the following systems:
        o An Avid-qualified system running Pro Tools, Pro Tools HD, or Pro Tools Express that
          supports the AAX plug-in standard
        o An Avid-qualified system and a third-party software application that supports AAX
          plug-in standards
  • USB Smart Key (iLok), for plug-ins that can be purchased or rented
     The iLok USB Smart Key is not supplied with plug-ins or software options. You can use
     the one included with certain Pro Tools systems or purchase one separately.

Avid can only assure compatibility and provide support for hardware and software it has tested
and approved.
For complete system requirements and a list of Avid-qualified computers, operating systems,
hard drives, and third-party devices, visit: www.avid.com/compatibility.

Third-Party Plug-In Support: For information on third-party plug-ins for Pro Tools systems,
please refer to the documentation that came with your plug-in.

Support

For complete system requirements, compatibility information, and product registration, visit the
support section of the AIR website: www.airmusictech.com/support.

                                                  4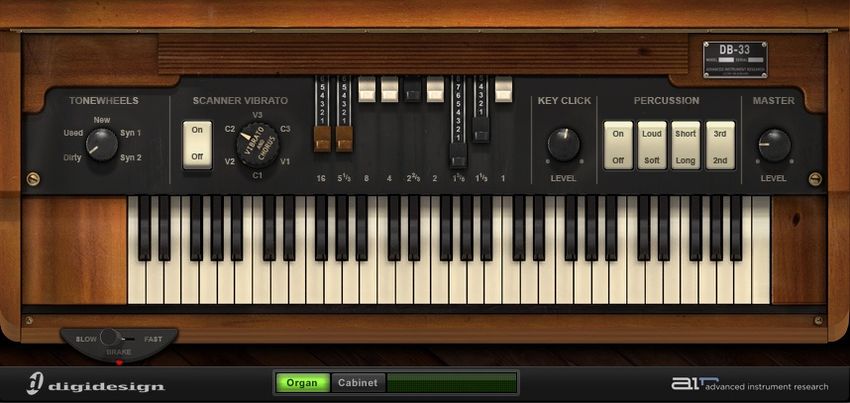
Chapter 2: Installing Plug-Ins

Plug-Ins Included with Pro Tools

A suite of AIR audio effects and virtual instruments plug-ins are included with Pro Tools:
     • AIR Effects: A set of free audio effects plug-ins available separately online.
     • AIR Virtual Instruments: A set of free virtual instrument plug-ins (including 4.4 GB of
       sample content) available separately online.

Installing AIR Creative Collection

To install the plug-ins:
1.     Download the installer for your computer platform from the Avid website, www.avid.com.
       After downloading, you may need to uncompress the installer (.ZIP on Windows or .SIT on
       Mac OS X).
2.     Double-click the plug-in installer application.
3.     Follow the on-screen instructions to complete the installation.
4.     When installation is complete, click Finish (Windows) or Quit (Mac OS X).

The next time you open Pro Tools, you will be prompted to authorize your new plug-ins.

Authorizing Downloaded Plug-Ins for Pro Tools

If you downloaded a plug-in from the Avid Store (www.store.avid.com), you authorize it by
downloading a license from iLok.com to an iLok USB Smart Key.
For more information, visit the iLok website (www.iLok.com).

Removing Plug-Ins for Pro Tools

If you need to remove a plug-in from your Pro Tools system, follow the instructions for your
computer platform.

Windows

To remove a plug-in in Windows:
1.     Choose Start       Control Panel.
2.     Click Programs and Features.
3.     Select the plug-in from the list of installed applications.
4.     Click Uninstall.
5.     Follow the on-screen instructions to remove the plug-in.

Mac OS X

To remove a plug-in on Mac OS X:
1.     Locate and open the Plug-Ins folder on your Startup drive, which will be in this location:
          • Users     Shared      Library     Application Support        AIR Music Technology
2.     Do one of the following:
          • Drag the plug-in to the Trash and empty the Trash.
          • Drag the plug-in to the Plug-Ins (Unused) folder.

                                                    5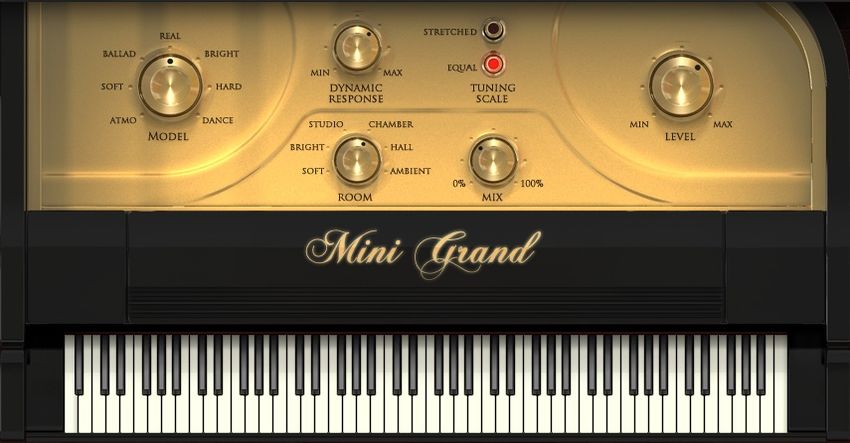
Chapter 3: AIR Chorus
AIR Chorus is an AAX plug-in that lets you
apply a short modulated delay to give depth
and space to an audio signal.

                                                                 Chorus plug-in window

AIR Chorus Controls

The Chorus plug-in provides a variety of controls for adjusting plug-in parameters.

Rate
This controls sets the rate for the oscillation of the LFO in Hertz.

Depth
This control sets the depth of LFO modulation of the audio signal.

Chorus Section
The Chorus plug-in's chorus section's controls let you select the amount of feedback and the
length of pre-delay.

Feedback
Sets the Feedback amount.

Pre-Delay
Delays the chorused signal, in milliseconds.

LFO Section
The Chorus plug-in's LFO section's controls let you select the waveform, phase, rate, and depth
of modulation.

Waveform
Selects either a Sine wave or a Triangle wave for the LFO.

L/R Phase
Sets the relative phase of the LFO's modulation in the left and right channels.

Mix
This control adjusts the Mix between the "wet" (processed) and "dry" (unprocessed) signal. 0%
is all dry, and 100% is all wet, while 50% is an equal mix of both.

                                                  6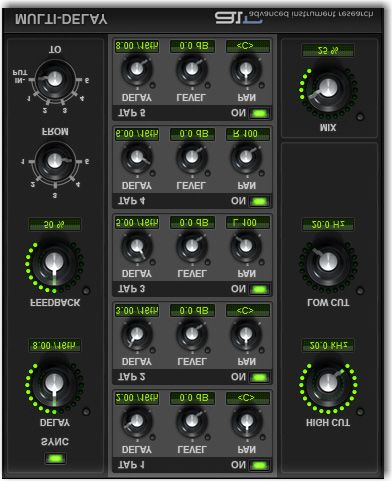
Chapter 4: AIR Distortion
AIR Distortion is an AAX plug-in that adds color
the audio signal with various types and varying
amounts of distortion.

                                                                Distortion plug-in window

AIR Distortion Controls

The Distortion plug-in provides a variety of controls for adjusting plug-in parameters.

Drive
The Drive control lets you increase the drive (input volume) of the signal from 0 dB (no
distortion) to 60 dB (way too much distortion!) Sometimes an increase or decrease of just 1 of 2
decibels can make a big difference on the amount and quality of distortion.

Output
The Output control lets you lower the Output level of the distorted signal from 0–100%. At 0%,
no distorted signal passes through the output. At 100%, the distorted signal passes through the
output at full volume.

Mix
The Mix control lets you balance the amount of dry signal with the amount of wet (distorted)
signal. At 50%, there are equal amounts of dry and wet signal. At 0%, the output is all dry and
at 100% it is all wet.
The Mix control can be used in conjunction with the Output control to find just the right balance
of the distorted signal with the input (dry) signal. For example, with Mix set to 50%, equal
amounts of the dry and wet signal pass to the output. You can then lower the Output control to
decrease the amount of distorted signal being passed to the output until you get exactly the
right mix between the two signals, and just the right overall level.

Stereo
When Stereo is enabled, the left and right channels of the incoming stereo signal are processed
separately. When it is disabled, the incoming stereo signal is summed and processed as mono.
The Stereo button is lit when it is enabled.

                                                7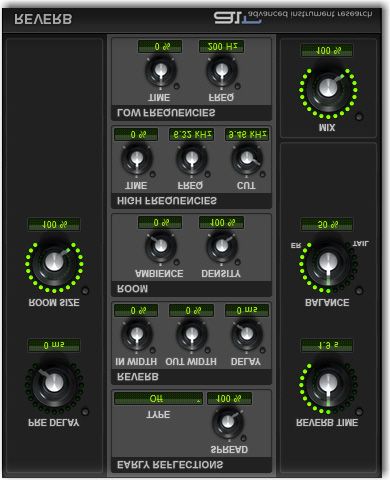
Distortion Tone Selection Controls

The Distortion plug-in's tone controls let you shape the timbral quality of the distortion.

Pre-Shape
The Pre-Shape control lets you increase or decrease a broad gain boost (or attenuation) of
treble frequencies in the processed signal. Pre-Shape is essentially a pre-distortion tone control
that makes the distortion bite at different frequencies.
Set to 0%, the Pre-Shape control doesn't affect the tone at all. Higher settings provide a boost
in the high end of the distorted signal (more treble distortion), while lower setting suppress the
high end, with some mid-range boost, for a darker less distorted tone.

High Cut
The High Cut control lets you adjust the frequency for the High Cut filter. To attenuate the high-
end of the processed signal, lower the frequency.

Distortion Clipping Section
The Distortion plug-in's Clipping controls let you adjust the DC Bias and the threshold.

DC Bias
The DC Bias control lets you change clipping from being symmetrical to being asymmetrical,
which makes it sound richer, and nastier at high settings. The difference is most noticeable at
lower Drive settings.

Threshold
The Threshold control lets you adjust the headroom for the dynamic range of the distorted
signal between –20.0 dBFS and 0.0 dBFS. Rather than using the Drive to adjust the signal level
relative to a fixed clipping level, use the Headroom control to adjust the clipping level without
changing the signal level.

Distortion Mode Selection

Select one of the following options for the Distortion Mode:

Hard
Provides a sharp, immediate distortion of the signal.

Soft
Provides a softer, more gradual distortion of the signal.

Warp
Wraps the waveform back on itself for a complex distortion tone that changes quickly from soft
to harsh.

                                                  8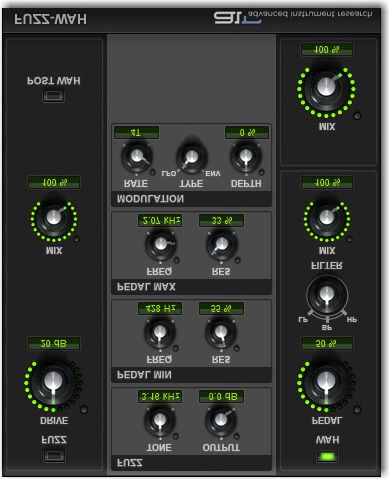
Chapter 5: AIR Dynamic Delay
AIR Dynamic Delay is an AAX plug-in. Use the
Dynamic Delay Plug-In for a delay line that can
synchronize to the Pro Tools session tempo and
be modulated by an Envelope follower.

                                                          Dynamic Delay plug-in window

AIR Dynamic Delay Controls

The Dynamic Delay plug-in provides a variety of controls for adjusting plug-in parameters.

Sync
When Sync is enabled, the delay time synchronizes to the Pro Tools session tempo. When
Sync is disabled, you can set the delay time in milliseconds independently of the Pro Tools
session tempo. The Sync button is lit when it is enabled.

Delay
When Sync is enabled, the Delay control lets you select a rhythmic subdivision or multiple of
the beat (based on the Pro Tools session tempo) for the delay time.

Select from the following rhythmic values:
  • 16 (sixteenth note)
  • 8T (eighth-note triplet)
  • 16D (dotted sixteenth note)
  • 8 (eighth note)
  • 4T (quarter-note triplet)
  • 8D (dotted eighth note)
  • 4 (quarter note)
  • 2T (half-note triplet)
  • 4D (dotted quarter note)
  • 2 (half note)
  • 1T (whole-note triplet)
  • 3/4 (dotted half note)
  • 4/4 (whole note)
  • 5/4 (five tied quarter notes)
  • 6/4 (dotted whole note)
  • 7/4 (seven tied quarter notes)
  • 8/4 (double whole note)

When Sync is disabled, the Time control lets you set the delay time in milliseconds and
seconds (1 ms to 4.00 seconds).

                                               9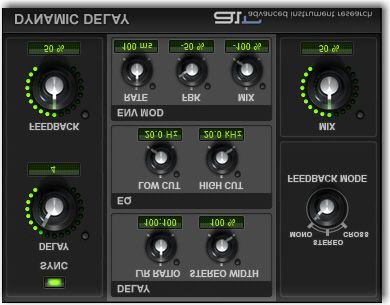
Feedback
The Feedback control lets you adjust the amount of delay feedback. At 0% the delayed signal
repeats only once. As you increase the feedback, the number of times the delay repeats
increases. At 100%, the delay doesn't repeat indefinitely, but it does last a very long time!
Note that each Delay mode produces a different feedback pattern, especially when the L/R
Ratio control is not centred.

Mix
The Mix control lets you balance the amount of dry signal with the amount of wet (delayed)
signal. At 50%, there are equal amounts of dry and wet signal. At 0%, the output is all dry and
at 100% it is all wet.

Dynamic Delay Delay Section

The delay section of the Dynamic Delay plug-in provides L/R Ratio and Stereo Width controls.

L/R Ratio
The Left/Right Ratio control lets you set the ratio of left to right delay times. Move the control all
the way to the left (50:100) and the left channel delay time is half the right channel delay time.
Move the control all the way to the right (100:50) the right channel delay time is half the left
channel delay time.

Stereo Width
The Stereo Width control lets you adjust the width of the delay effect in the stereo field.

Dynamic Delay EQ Section

The EQ section of the Dynamic Delay plug-in provides low and high cut filters.

Low Cut
The Low Cut control lets you adjust the frequency for the Low Cut filter. For less bass, raise the
frequency.

High Cut
The High Cut control lets you adjust the frequency for the High Cut filter. For less treble, lower
the frequency.

                                                 10
Dynamic Delay Env Mod (Envelope Modulation) Section
The Dynamic Delay plug-in provides an Envelope follower that can control various parameters
in real time.
Rate
Adjust the Rate control to determine how quickly the Feedback and Mix parameters respond to
input from the Envelope follower.
Fbk
Adjust the Feedback control to determine how much the Envelope follower affects the
Feedback amount.
Mix
Adjust the Mix control to determine how much the Envelope follower affects the wet/dry mix.
• At 0%, the Envelope follower has no effect on the given parameter.
• At +100%, the parameter's value is increased in direct proportion to the incoming signal's
amplitude envelope.
• At –100%, the parameter's value is decreased in direct proportion to the incoming signal's
amplitude envelope.
Dynamic Delay Feedback Modes
Select one of the following options for the Feedback Mode:
Mono
Sums the incoming stereo signal to mono, then offers separate left and right delay output taps
from that signal.
Stereo
Processes the left and right channels of the incoming stereo signal independently and outputs
the processed signal on the corresponding left and right channels.
Cross
Processes the left and right channels of the incoming stereo signal independently, and feeds
the each side's delayed signal back to the opposite channel.
11Chapter 6: AIR Enhancer
AIR Enhancer is an AAX plug-in that enhances the
low and high broadband frequencies of an audio
signal.
Enhancer plug-in window
AIR Enhancer Controls
The Enhancer plug-in provides a variety of controls for adjusting plug-in parameters.
High Gain
Adjust the High Gain control to boost the high end.
Low Gain
Adjust the Low Gain control to boost the low end.
Output
The Output control lets you lower the Output level from 0.0 dB to –INF dB.
Enhancer Tune Section Controls
The Tune controls let you set the center frequency for low and high-end enhancement.
Low
Adjust the Low control to set the center frequency for the bass boost.
High
Adjust the High control to set the center frequency for the treble boost.
Enhancer Harmonic Generation Section Controls
The Harmonic Generation controls let you generate additional high-frequency harmonics, which
can brighten up dull signals.
Depth
Adjust the Depth control to generate additional high frequency harmonics in the signal (0.0–
12.0 dB).
Phase
Toggle the Phase control to change the polarity of the generated harmonics, changing their
phase relationship with the dry signal.
12Chapter 7: AIR Ensemble
AIR Ensemble is an AAX plug-in that lets you
apply fluid, shimmering modulation effects to
the audio signal.
Ensemble plug-in window
AIR Ensemble Controls
The Ensemble plug-in provides the following controls:
Rate
The Rate control changes the frequency of the modulating LFO (0.01–10.0 Hz).
Depth
The Depth control lets you adjust the amount of modulation applied to the Delay time.
Modulation Section
The Modulation controls let you adjust and/or randomize the delay time.
Delay
The Delay control lets you adjust the Delay time.
Shimmer
The Shimmer control lets you randomize the Delay time, adding texture to the effect.
Stereo Width
The Stereo Width control lets you widen or narrow the effect's stereo field.
Mix
The Mix control lets you balance the amount of dry signal with the amount of wet signal. At
50%, there are equal amounts of dry and wet signal. At 0%, the output is all dry and at 100% it
is all wet.
13Chapter 8: AIR Filter Gate
AIR Filter Gate is an AAX plug-in that you can use to
chop up an audio signal into staccato rhythmic patterns
with variable filtering, amplitude, and panning.
Filter Gate plug-in window
AIR Filter Gate Controls
The Filter Gate plug-in provides a variety of controls for adjusting plug-in parameters.
Pattern
The Pattern control let you select from a number of preset rhythmic patterns that the gate will
follow.
Rate
The Rate selector lets you select the duration, or frequency of the Low Frequency Oscillator
(LFO). The duration of one cycle of the LFO is measured in Steps.
Swing
The Swing control sets the amount of rhythmic swing applied to the chosen gating pattern.
Mix
The Mix control lets you adjust the Mix between the "wet" (filtered) and "dry" (unfiltered) signal.
0% is all dry, and 100% is all wet, while 50% is an equal mix of both.
Filter Gate Gate Section
The Gate controls let you adjust the Attack, Hold, and Release amounts for the Gater step
sequencer pattern. At the maximum settings, the gating provides a smooth morphing effect.
Attack
The Attack control lets you adjust the duration of the attack as a percentage of the step
duration.
Hold
The hold control lets you adjust the duration of the hold (or sustain) as a percentage of the step
duration.
Release
The Release control lets you adjust the duration of the release as a percentage of the step
duration.
14Filter Gate Filter Section
The Filter controls provide controls for the selected filter type.
Mode
The Filter Mode selector lets you select the type of Filter.
Off
Provides no filtering.
LP
Provides a Low Pass filter.
BP
Provides a Band Pass filter.
HP
Provides a High Pass filter.
Phaser
Provides a Phaser.
Cutoff
The Cutoff control lets you adjust the Filter Cutoff frequency.
Res
The Res control lets you adjust the Resonance at the Cutoff frequency.
Filter Gate Modulation Section
Env
The Env control lets you adjust how much an Envelope Follower affects the Cutoff frequency.
Note that the Cutoff is fixed for the duration of each step, so it will not respond to a peak in the
envelope until the start of the next step.
LFO Mod
The LFO Mod control lets you adjust the amount of LFO modulation of the Cutoff frequency.
LFO Steps
Sets the duration of one cycle of the LFO to the selected number of steps. Changes to the Step
Rate consequently affect the durations of cycles of the LFO. When set to Random mode, the
level of the LFO changes randomly every step, for a "sample and hold" waveform.
15Chapter 9: AIR Flanger
AIR Flanger is an AAX plug-in that lets you apply a
short modulating delay to the audio signal.
Flanger plug-in window
AIR Flanger Controls
The Flanger plug-in provides a variety of controls for adjusting plug-in parameters.
Sync
When Sync is enabled, the Flanger Rate control synchronizes to the Pro Tools session tempo.
When Sync is disabled, you can set the delay time in milliseconds independently of the Pro
Tools session tempo. The Sync button is lit when it is enabled.
Rate
When Sync is enabled, the Rate control lets you select a rhythmic subdivision or multiple of the
beat for the Flanger Modulation Rate.
Select from the following rhythmic values:
• 16 (sixteenth note)
• 8T (eighth-note triplet)
• 16D (dotted sixteenth note)
• 8 (eighth note)
• 4T (quarter-note triplet)
• 8D (dotted eighth note)
• 4 (quarter note)
• 2T (half-note triplet)
• 4D (dotted quarter note)
• 2 (half note)
• 1T (whole-note triplet)
• 3/4 (dotted half note)
• 4/4 (whole note)
• 5/4 (five tied quarter notes)
• 6/4 (dotted whole note)
• 8/4 (double whole note)
When Sync is disabled, the Rate control lets you the modulation rate in independently of the
Pro Tools session tempo.
Depth
The Depth control lets you adjust the amount of modulation applied to the Delay time.
16Feedback
The Feedback control lets you adjust the amount of delay feedback for the Flanger. At 0%, the
delay repeats only once. At +/–100%, the Flanger feeds back on itself.
Mix
The Mix control lets you balance the amount of dry signal with the amount of wet (flanged)
signal. At 50%, there are equal amounts of dry and wet signal. At 0%, the output is all dry and
at 100% it is all wet.
The Mix control can be used to create an "infinite phaser" effect between the dry and shifted
signals, which is always rising or always falling (depending on the direction of shift)
Pre-Delay
The Pre-Delay control sets the minimum delay time in milliseconds.
Flanger LFO Section Controls
The LFO section provides controls for the Low Frequency Oscillator (LFO) used to modulate
the Delay time.
Wave
The Wave control lets you interpolate between a triangle wave and a sine wave for the
modulating LFO.
L/R Offset
The L/R Offset control lets you adjust the phase offset for the LFO waveform applied to the left
and right channels.
Retrigger
Click the Retrigger button to reset the LFO phase. This lets you manually start the filter sweep
from that specific point in time (or using automation, at a specific point in your arrangement).
Clicking the Trig button also forces the Mix control up if it is too low while the button is held; this
ensures that the sweep is audible.
Flanger EQ Section Controls
The EQ section provides controls for cutting lows from the Flanger signal, and inverting phase.
Low Cut
The Low Cut control lets you adjust the Low Cut frequency for the Flanger, to limit the Flanger
effects to higher frequencies.
Phase Invert
When Phase Invert is enabled, the wet signal's polarity is flipped, which changes the harmonic
structure of the effect.
17Chapter 10: AIR Frequency Shifter
AIR Frequency Shifter is an AAX frequency-
shifting plug-in. Use the Frequency Shifter plug-
in to shift the audio signal's individual
frequencies inharmonically, creating a unique
effect.
Frequency Shifter plug-in window
AIR Frequency Shifter Controls
The Dynamic Delay plug-in provides a variety of controls for adjusting plug-in parameters.
Frequency
The Frequency control sets the amount of frequency shifting.
Shifter Section
The Shifter section provides control over the direction of frequency shift, and feedback of the
signal through the algorithm.
Mode
The Mode control sets the direction of the frequency shifting effect.
Up
Shifts frequencies up.
Down
Shifts frequencies down.
Up & Down
Shifts frequencies equally up and down, and the two shifted signals are heard simultaneously.
Stereo
Shifts the right channel frequencies up, and the left channel down.
Feedback
The Feedback control lets you run the signal through the pitch shifting algorithm multiple times,
creating a cascading, layered effect.
Mix
The Mix control lets you balance the amount of dry signal with the amount of wet (pitch-shifted)
signal. At 50%, there are equal amounts of dry and wet signal. At 0%, the output is all dry and
at 100% it is all wet.
18Chapter 11: AIR Fuzz-Wah
AIR Fuzz-Wah is an AAX plug-in that lets you add color
to an audio signal with various types and varying
amounts of transistor-like distortion.
Fuzz-Wah plug-in window
AIR Fuzz-Wah Controls
The Fuzz-Wah plug-in provides a variety of controls for adjusting plug-in parameters.
Fuzz
Click the Fuzz button to turn the distortion effect on and off.
Drive
The Drive control sets the level of gain in the Fuzz algorithm.
Mix
The Mix control lets you balance the amount of dry signal with the amount of wet (distorted)
signal. At 50%, there are equal amounts of dry and wet signal. At 0%, the output is all dry and
at 100% it is all wet.
Post Wah
The Post Wah control lets you place the Fuzz section before the Wah section, or vice versa.
Wah
Click the Wah button to turn the wah filter on and off.
Pedal
The Pedal control sweeps the wah center frequency up and down.
Filter
The Filter control switches the wah filter between LP (lowpass), BP (bandpass), and HP
(highpass) modes.
19Mix
The Mix control lets you balance the amount of dry signal with the amount of wet (wah-
processed) signal. At 50%, there are equal amounts of dry and wet signal. At 0%, the output is
all dry and at 100% it is all wet
Mix (Overall)
The overall Mix control lets you balance the amount of fuzz-processed signal with the amount
of wah-processed signal. At 50%, there are equal amounts of fuzz and wah signal. At 0%, the
output is all fuzz, and at 100% it is all wah.
Fuzz-Wah Fuzz Section Controls
The Fuzz section provides tonal and volume control over the plug-in.
Tone
The Tone control lets you change the brightness of the Fuzz algorithm.
Output
The Output control sets the overall output volume of the Fuzz section.
Fuzz-Wah Pedal Min and Pedal Max Section Controls
Freq
Sets the low (Pedal Min) and high (Pedal Max) limits of the wah filter's frequency sweep.
Res
Sets the low (Pedal Min) and high (Pedal Max) limits of the wah filter's resonance.
Fuzz-Wah Modulation Section Controls
The Modulation section provides controls for the Low Frequency Oscillator (LFO) and Envelope
Follower (ENV) that can be used to modulate the wah filter's sweep.
Rate
The Rate control sets either the LFO frequency, or the response time of the envelope follower,
depending on the setting of the Mode control.
Type
The Type control lets you select either the LFO or the Envelope follower as the modulation
source for the wah filter.
Depth
The Depth control sets the amount of modulation sent by the LFO or envelope follower.
20Chapter 12: AIR Kill EQ
AIR Kill EQ is an AAX EQ plug-in. Use the Kill
EQ plug-in to zap out the Low, Mid, or High
broadband frequency range from an audio
signal. This is a popular effect with DJs and is
commonly used in electronic music production
(especially in dance music).
Kill EQ plug-in window
AIR Kill EQ Controls
The Kill EQ plug-in provides a variety of controls for adjusting plug-in parameters.
Kill Switches
The High, Mid, and Low switches toggle their respective frequency bands on and off.
Gain
The Low, Mid, and High gain knobs control the relative volume of the three frequency bands.
Freq
The Low and High freq controls set the crossover frequencies of the low and high pass filters.
The Sweep control changes both the low and high-band cutoff frequencies simultaneously.
When the high and low bands are killed, manipulating this control creates a swept bandpass
filter effect.
Output
The Output control sets the final output volume.
21Chapter 13: AIR Lo Fi
AIR Lo Fi is an AAX plug-in that you can use to
bit-crush, down-sample, clip, rectify, and
mangle an input signal.
Lo Fi plug-in window
AIR Lo Fi Controls
The Lo-Fi plug-in provides a variety of controls for adjusting plug-in parameters.
Sample Rate
The Sample Rate control resamples the audio signal at another sample rate.
Bit Depth
The Bit Depth control lets you truncate the bit depth of the incoming signal from 16 bits all the
way down to 1 bit.
Mix
The Mix control adjusts the Mix between the "wet" (processed) and "dry" (unprocessed) signal.
0% is all dry, and 100% is all wet, while 50% is an equal mix of both.
AIR Lo Fi Anti-Alias Section
The Anti-Alias section provides control over anti-aliasing filters that can be used before and
after downsampling to reduce aliasing in the resampled audio signal.
Pre
The Pre control adjusts the anti-aliasing filter cutoff applied to the audio signal before
resampling. The filter is applied as a multiplier of the sample frequency (Fs) between 0.12 Fs
and 2.00 Fs.
Post
The Post control adjusts the range of anti-aliasing filter cutoff applied to the audio signal after
resampling. The filter is applied as a multiplier of the sample frequency (Fs) between 0.12 Fs
and 2.00 Fs.
On
For a much grittier sound, disable the Anti-Alias filter. The Anti-Alias button is lit when the filter
is enabled.
22AIR Lo Fi LFO Section Controls
The LFO controls let you apply a Low Frequency Oscillator to modulate the Sample Rate.
Rate
When Sync is enabled, the Rate control lets you select a rhythmic subdivision or multiple of the
beat for the LFO Rate. Select from the following rhythmic values:
• 16 (sixteenth note)
• 8T (eighth-note triplet)
• 16D (dotted sixteenth note)
• 8 (eighth note)
• 4T (quarter-note triplet)
• 8D (dotted eighth note)
• 4 (quarter note)
• 2T (half-note triplet)
• 4D (dotted quarter note)
• 2 (half note)
• 1T (whole-note triplet)
• 3/4 (dotted half note)
• 4/4 (whole note)
• 5/4 (five tied quarter notes)
• 6/4 (dotted whole note)
• 8/4 (double whole note)
When Sync is disabled, the Rate control lets you change the modulation rate independently of
the Pro Tools session tempo.
Wave
Select from the following waveforms for the LFO.
Name Description
Sine Provides a sine wave.
Tri Provides a triangle wave.
Saw Provides a saw-tooth wave.
Square Provides a square wave.
Morse Provides a Morse code-like rhythmic effect.
S&H Provides Sample and Hold (S&H) modulation.
Random Provides random modulation.
Depth
The Depth control lets you adjust the amount of modulation applied to the Sample Rate.
Sync
Enable Sync to synchronize the LFO Rate to the Pro Tools session tempo. When Sync is
disabled, you can set the Rate time in Hertz independently of the Pro Tools session tempo. The
Sync button is lit when it is enabled.
23AIR Lo Fi Env Mod Section Controls
The Env Mod (envelope modulation) section provides control over an Envelope follower that
can affect the Sample Rate. This is useful for accentuating and enhancing signal peaks (such
as in drum loops) with artificially generated high-frequency aliasing.
Attack
Adjust the Attack control to set the time it takes to respond to increases in the audio signal
level.
Release
Adjust the Release control to set the time it takes to recover after the signal level falls.
AIR Lo Fi Distortion Section Controls
The Distortion section provides controls for adding dirt and grunge to the signal.
Clip
Adds transistor-like distortion to the signal.
Noise
Adds a buzzy, noisy edge to the signal.
Rectify
Acts as a waveshaper, adding aggressive, harsh distortion to the signal.
24Chapter 14: AIR Multi-Chorus
AIR Multi-Chorus is an AAX plug-in that lets you apply
a thick, complex Chorus effect to an audio signal.
Multi-Chorus plug-in window
AIR Multi-Chorus Controls
The Multi-Chorus plug-in provides a variety of controls for adjusting plug-in parameters.
Rate
The Rate control sets the rate for the oscillation of the LFO in Hertz.
Depth
The Depth control sets the depth of LFO modulation of the audio signal in milliseconds.
Voices
The Voices control sets the number of layered chorus effects that are applied to the audio
signal. The more Voices that are used, the thicker the effect.
Mix
The Mix control lets you adjust the Mix between the "wet" (processed) and "dry" (unprocessed)
signal. 0% is all dry, and 100% is all wet, while 50% is an equal mix of both.
Multi-Chorus Chorus Section Controls
The Chorus section provides control over the low-frequency content and stereo width of the
MultiChorus effect.
Low Cut
The Low Cut control lets you adjust the Low Cut frequency for the Chorus, to limit the Chorus
effects to higher frequencies.
Width
The Width control lets you widen or narrow the effect's stereo field
Multi-Chorus Mod Section Controls
The Mod section controls let you set the Pre-Delay amount, and the waveform of the LFO.
Pre-Delay
Sets the Pre-Delay in milliseconds.
Waveform
Selects either a Sine wave or a Triangle wave for the LFO.
25Chapter 15: AIR Multi-Delay
AIR Multi-Delay is an AAX plug-in. Use the Multi-
Delay plug-in to apply up to six delay lines to the
audio signal.
Multi-Delay plug-in window
AIR Multi-Delay Controls
The Multi-Delay plug-in provides a variety of controls for adjusting plug-in parameters.
Sync
When Sync is enabled, the Delay time synchronizes to the Pro Tools session tempo. When
Sync is disabled, you can set the delay time in milliseconds independently of the Pro Tools
session tempo. The Sync button is lit when it is enabled.
Delay
When Sync is enabled, the Delay control lets you set the main delay length in 16th note lengths
(based on the Pro Tools session tempo).
When Sync is disabled, the Time control lets you the main delay time in milliseconds and
seconds.
Feedback
The Feedback control lets you adjust the amount of delay feedback. At 0% the delayed signal
repeats only once. As you increase the feedback, the number of times the delay repeats
increases. At 100%, the delay doesn't repeat indefinitely, but it does last a very long time!
From and To
The From and To controls let you feed signal from one delay Tap to another, or back to the
main input, to create complex delay/feedback effects.
• From: The From control sets the tap from which signal will be cross-routed.
• To: The To control sets the tap (or the main input) that the cross-routed signal will be
routed to. If the delay time of the "To" tap is greater than the delay time of the "From" tap,
then the result is "feed-forward" rather than feedback, so only one delay repeat will be
heard.
26High Cut
The High Cut control lets you adjust the frequency for the High Cut filter. For less treble, lower
the frequency.
Low Cut
The Low Cut control lets you adjust the frequency for the Low Cut filter. For less bass, raise the
frequency.
Mix
The Mix control lets you balance the amount of dry signal with the amount of wet (delayed)
signal. At 50%, there are equal amounts of dry and wet signal. At 0%, the output is all dry and
at 100% it is all wet.
Multi-Delay Delay Tap Controls
The Multi-Delay provides five Taps (delay lines). Each Tap provides the same set of controls.
Controls for each Tap can be edited independently of the other Taps. Each Tap provides the
following controls:
On
The On button turns the selected tap's signal on or off.
Delay
Adjust the Delay control to set the length of delay for the tap, relative to the main Delay setting.
Level
Adjust the Level control to change the output level of the Tap.
Pan
Adjust the Pan control to pan the audio signal from the Tap left or right in the stereo field.
27Chapter 16: AIR Non-Linear Reverb
AIR Non-Linear Reverb is an AAX plug-in. Use
the Non-Linear Reverb plug-in to apply special
gated or reversed Reverb effects to the audio
signal, creating a synthetic, processed
ambience.
Non-Linear Reverb plug-in window
AIR Non-Linear Reverb Controls
Reverse
The Reverse button turns Reverse mode on and off. In Reverse mode, the tail of the reverb
signal fades up to full volume, then disappears, rather than fading out.
Pre-Delay
The Pre-Delay control determines the amount of time that elapses between the original audio
event and the onset of reverberation.
Dry Delay
The Dry Delay control applies a specified amount of delay to the dry portion of the signal, which
can create a "reverse reverb" effect, where the reverb tail is heard before the dry signal.
Reverb Time
Adjust the Reverb Time to change the length of the reverberation's decay.
Mix
The Mix control lets you adjust the Mix between the "wet" (processed) and "dry" (unprocessed)
signal. 0% is all dry, and 100% is all wet, while 50% is an equal mix of both.
Non-Linear Reverb Reverb Section Controls
The Reverb section provides control over the reverb's diffusion and stereo width.
Diffusion
Adjust the Diffusion control to change the rate at which the sound density of the reverb tail
increases over time. Higher Diffusion settings create a smoother reverberated sound. Lower
settings result in more fluttery echo.
Width
The Width control lets you widen or narrow the effect's stereo field.
28Non Linear Reverb EQ Section Controls
The EQ section provides tonal control over the reverb signal.
Low Cut
The Low Cut control lets you adjust the frequency for the Low Cut filter. For less bass, raise the
frequency.
High Cut
The High Cut control lets you adjust the frequency for the High Cut filter. For less treble, lower
the frequency
29Chapter 17: AIR Phaser
AIR Phaser is an AAX plug-in that applies a
phaser to an audio signal for that wonderful
"wooshy," "squishy" sound.
Phaser plug-in window
AIR Phaser Controls
The Phaser plug-in provides a variety of controls for adjusting plug-in parameters.
Sync
When Sync is enabled, the Phaser Rate control synchronizes to the Pro Tools session tempo.
When Sync is disabled, you can set the Rate in milliseconds independently of the Pro Tools
session tempo. The Sync button is lit when it is enabled.
Rate
When Sync is enabled, the Rate control lets you select a rhythmic subdivision or multiple of the
beat for the Phaser Modulation Rate.
Select from the following rhythmic values:
• 16 (sixteenth note)
• 8T (eighth-note triplet)
• 16D (dotted sixteenth note)
• 8 (eighth note)
• 4T (quarter-note triplet)
• 8D (dotted eighth note)
• 4 (quarter note)
• 2T (half-note triplet)
• 4D (dotted quarter note)
• 2 (half note)
• 1T (whole-note triplet)
• 3/4 (dotted half note)
• 4/4 (whole note)
• 5/4 (five tied quarter notes)
• 6/4 (dotted whole note)
• 8/4 (double whole note)
When Sync is disabled, the Rate control lets you the rate of the Phaser in independently of the
Pro Tools session tempo.
Depth
The Depth control lets you adjust the depth of modulation, which in turn affects the amount of
phasing applied to the audio signal.
30Feedback
The Feedback control feeds the output signal of Phaser back into the input, creating a resonant
or singing tone in the phaser when set to its maximum.
Mix
The Mix control lets you adjust the Mix between the "wet" (effected) and "dry" (unprocessed)
signal. 0% is all dry, and 100% is all wet, while 50% is an equal mix of both.
Low Cut
The Low Cut control lets you adjust the frequency of the Low Cut Filter in the phaser's feedback
loop. This can be useful for taming low frequency "thumping" at high feedback settings.
Phaser Section Controls
The Phaser section provides control over the effect's center frequency and number of phaser
stages (or Poles).
Center
The Center control lets you change the frequency center (100 Hz to 10.0 kHz) for the phaser
poles.
Poles
Select the number of phaser poles (stages): 2, 4, 6, or 8. The number of poles changes the
character of the sound. The greater the number of poles, the thicker and squishier the sound.
Phaser LFO Section Controls
The LFO section provides control over the waveform and stereo offset of the LFO.
Wave
The Wave control lets you interpolate between a triangle wave and a sine wave for modulating
the Phaser.
L/R Phase
The L/R Phase control lets you adjust the relative phase of the LFO modulation applied to the
left and right channels.
31Chapter 18: AIR Reverb
AIR Reverb is an AAX plug-in. Use the Reverb effect
to apply Reverb to the audio signal, creating a sense
of room or space. Typically, you'll want to use Reverb
on one of the Effect Send inserts or Main Effects
inserts. This way you can process audio from multiple
Pro Tools tracks, giving them all a sense of being in
the same space.
Reverb plug-in window
AIR Reverb Controls
The Reverb plug-in provides a variety of controls for adjusting plug-in parameters.
Pre-Delay
The Pre-Delay control determines the amount of time that elapses between the original audio
event and the onset of reverberation. Under natural conditions, the amount of pre-delay
depends on the size and construction of the acoustic space, and the relative position of the
sound source and the listener. Pre-Delay attempts to duplicate this phenomenon and is used to
create a sense of distance and volume within an acoustic space. Long Pre-Delay settings place
the reverberant field behind rather than on top of the original audio signal.
Room Size
Adjust the Room Size control to change the apparent size of the space.
Reverb Time
Adjust the Reverb Time to change the rate at which the reverberation decays after the original
direct signal stops. At its maximum value, infinite reverberation is produced.
Balance
Adjust the Balance control to change the output level of the early reflections. Setting the Level
control to 0% produces a reverb effect that is only the reverb tail.
Mix
The Mix control lets you adjust the Mix between the "wet" (effected) and "dry" (unprocessed)
signal. 0% is all dry, and 100% is all wet, while 50% is an equal mix of both.
32Reverb Early Reflections Section Controls
Different physical environments have different early reflection signatures that our ears and brain
use to localize sound. These reflections affect our perception of the size of a space as well as
where an audio source sits within it. Changing early reflection characteristics changes the
perceived location of the reflecting surfaces surrounding the audio source.
Early reflections are simulated in Reverb by using multiple delay taps at different levels that
occur in different positions in the stereo spectrum (through panning). Long reverberation
generally occurs after early reflections dissipate.
Type
The following Types of Early Reflection models are provided:
Booth
Simulates a vocal recording booth.
Club
Simulates a small, clear, natural-sounding club ambience.
Room
Simulates the center of a small room without many reflections.
Small Chamber
Simulates a bright, small-sized room.
Medium Chamber
Simulates a bright, medium-sized room.
Large Chamber
Simulates a bright, large-sized room.
Small Studio
Simulates a small, live, empty room.
Large Studio
Simulates a large, live, empty room.
Scoring Stage
Simulates a scoring stage in a medium-sized hall.
Philharmonic
Simulates the space and ambience of a large, symphonic, concert hall.
Concert Hall
Simulates the space and ambience of a large concert hall.
Church
Simulates a medium-sized space with natural, clear-sounding reflections.
Opera House
Simulates the space and ambience of an opera house.
33Vintage 1
Simulates a vintage digital reverb effect.
Vintage 2
Simulates a vintage digital reverb effect.
Spread
Controls the length of the early reflections.
Reverb Plug-In Reverb Section
The Reverb section provides control over the stereo width of the reverb algorithm.
In Width
Widens or narrows the stereo width of the incoming audio signal before it enters the reverb
algorithm.
Out Width
Widens or narrows the stereo width of the signal once reverb has been applied.
Delay
Sets the size of the delay lines used to build the reverb effect. Higher values create longer
reverberation.
Reverb Room Section Controls
The Room section offers control over the overall spatial feel of the simulated room.
Ambience
This control affects the attack of the reverb signal. At low settings, the reverb arrives quickly,
simulating a small room. At higher settings, the reverb ramps up more slowly, emulating a
larger room.
Density
Adjust the Density control to change the rate at which the sound density of the reverb tail
increases over time. Higher Density settings create a smoother reverberated sound. Lower
settings result in more fluttery echo.
Reverb High Frequencies Section Controls
The High Frequencies section provides controls that let you shape the tonal spectrum of the
reverb by adjusting the decay times of higher frequencies.
Time
Adjust the Time control to decrease or increase the decay time for mid- to high-range frequency
bands. Higher settings provide longer decay times and lower settings provide shorter decay
time. With lower settings, high frequencies decay more quickly than low frequencies, simulating
the effect of air absorption in a hall.
34Freq
Adjust the Frequency control to set the frequency boundary between the mid- and high-range
frequency bands.
Cut
The High Cut control lets you adjust the frequency for the High Cut filter (1.00–20.0 kHz).
Adjusting the High Cut control to change the decay characteristics of the high frequency
components of the Reverb. To cut the high end of the processed signal, lower the frequency.
35Chapter 19: AIR Spring Reverb
AIR Spring Reverb is an AAX plug-in. Use the Spring
Reverb plug-in for that classic spring reverb sound. Just
don't kick your computer trying to get the springs to
rattle!
The Spring Reverb plug-in models an analog spring
reverb. An analog spring reverb is an electromechanical
device much like a plate reverb. An audio signal is fed
to a transducer at the end of a long suspended metal
coil spring. The transducer causes the spring to vibrate,
which results in the signal reflecting from one end of the
spring to the other. At the other end of the spring is
another transducer that converts the motion of the
spring back into an electrical signal, thus creating a
delayed and reverberated version of the input signal.
Spring Reverb plug-in window
AIR Spring Reverb Controls
The Spring Reverb plug-in provides a variety of controls for adjusting plug-in parameters.
Pre-Delay
The Pre-Delay control determines the amount of time (0–250 ms) that elapses between the
original audio event and the onset of reverberation.
Reverb Time
Adjust the Reverb Time to change the reverberation decay time (1.0–10.0 seconds) after the
original direct signal stops. Shorter times result in a tighter, more ringing and metallic reverb,
such as when walking down a narrow hall with hard floors and walls. Longer times result in a
larger reverberant space, such as an empty, large, concrete cistern.
Mix
The Mix control lets you adjust the Mix between the "wet" (reverbed) and "dry" (non-reverbed)
signal. 0% is all dry, and 100% is all wet, while 50% is an equal mix of both.
Low Cut
The Low Cut control lets you adjust the frequency of the Low Cut Filter (20.0 Hz–1.00 kHz).
Use the Low Cut filter to reduce some of the potential "boomyness" you can get with longer
Reverb Times.
Diffusion
Adjust the Diffusion control to change the rate at which the sound density of the reverb tail
increases over time. Higher Diffusion settings create a smoother reverberated sound. Lower
settings result in more fluttery echo.
Width
Adjust the Width control to change the spread of the reverberated signal in the stereo field. A
setting of 0% produces a mono reverb, but leaves the panning of the original source signal
unprocessed. A setting of 100% produces a open, panned stereo image.
36Chapter 20: AIR Stereo Width
AIR Stereo Width is an AAX plug-in that you can
use to create a wider stereo presence for mono
audio signals.
Stereo Width plug-in window
AIR Stereo Width Controls
The Stereo Width plug-in provides a variety of controls for adjusting plug-in parameters.
Mode
The Mode control lets you specify the method by which the Stereo Width plug-in will create the
artificial stereo field. Choices include the following:
• Adjust: Adjusts the existing stereo width of the signal by M-S encoding, equalizing the S
component with the Low/Mid/High controls and boosting/attenuating it with the Width
control, then M-S decoding back to stereo. The Delay control delays the right signal
relative to the left for an additional widening effect (known as "Haas panning").
• Comb: Adds artificial width to the signal by M-S encoding then adding a delayed version
of the M component to the S component. This creates a comb filtering effect that shifts
some frequencies to the left and others to the right.
• Phase: In this mode the Low/Mid/High controls set the centre frequencies of 3 phase
shifters which shift the relative phase of the left and right channels, giving a much more
subtle effect than Comb mode.
Delay
The Delay control lets you specify the duration of delay used in Phase mode (0–8 ms)
Width
The Width control sets the final width of the generated stereo field.
Process Section Controls
The Process controls boost or cut the Low, Mid and High-frequency bands of the generated
stereo signal.
Stereo Width Trim Section Controls
The Trim controls adjust the perceived center/source of the generated stereo signal.
Level
The Level control sets the volume of the perceived center of the stereo signal.
Pan
The Pan control sets the position left-to-right of the perceived center of the stereo signal
37Chapter 21: AIR Talkbox
AIR Talkbox is an AAX plug-in that lets you add a
voice-like resonances to audio signals.
Talkbox plug-in window
AIR Talkbox Controls
The Talkbox plug-in provides a variety of controls for adjusting plug-in parameters.
Vowel
The Vowel control lets you choose the shape of the formant filter, by the vowel sound that is
simulated (OO/OU/AU/AH/AA/AE/EA/EH /EE/ER/UH/OH/OO).
Env Depth
The Env Depth knob creates a positive or negative offset in the setting of the Vowel control,
effected by the Envelope follower. At its center, the knob has no effect. Turned to the right or
left of center, the Env Depth knob shifts the value of the Vowel control up or down.
When the Envelope follower is triggered, the Vowel parameter moves to its normal setting (in
time with the envelope's attack), then back to the offset value (in time with the envelope's
release).
Formant
The Formant control lets you shift the formant center of the processed audio up or down 12
semitones, changing the harmonic structure dramatically.
Mix
The Mix control lets you adjust the Mix between the "wet" (processed) and "dry" (unprocessed)
signal. 0% is all dry, and 100% is all wet, while 50% is an equal mix of both.
38Talkbox LFO Section Controls
The LFO section provides controls that let you apply a Low Frequency Oscillator to modulate
the Formant setting.
Rate
When Sync is enabled, the Rate control lets you select a rhythmic subdivision or multiple of the
beat for the LFO Rate.
Select from the following rhythmic values:
• 16 (sixteenth note)
• 8T (eighth-note triplet)
• 16D (dotted sixteenth note)
• 8 (eighth note)
• 4T (quarter-note triplet)
• 8D (dotted eighth note)
• 4 (quarter note)
• 2T (half-note triplet)
• 4D (dotted quarter note)
• 2 (half note)
• 1T (whole-note triplet)
• 3/4 (dotted half note)
• 4/4 (whole note)
• 5/4 (five tied quarter notes)
• 6/4 (dotted whole note)
• 8/4 (double whole note)
When Sync is disabled, the Rate control lets you change the modulation rate independently of
the Pro Tools session tempo (0.01–10.0 Hz).
Wave
Select from the following waveforms for the LFO:
• Sine: Provides a sine wave.
• Tri: Provides a triangle wave.
• Saw: Provides a saw-tooth wave.
• Square: Provides a square wave.
• S&H: Provides Sample and Hold (S&H) modulation.
• Random: Provides random modulation.
Depth
The Depth control lets you adjust the amount of modulation applied to the Formant setting.
Sync
Enable Sync to synchronize the LFO Rate to the Pro Tools session tempo. When Sync is
disabled, you can set the Rate time in milliseconds independently of the Pro Tools session
tempo. The Sync button is lit when it is enabled.
39Talkbox Envelope Section Controls
The Talkbox plug-in provides an Envelope follower for modulating the Formant setting. This is
useful for accentuating and enhancing signal peaks in rhythmic material.
Thresh
Adjust the Thresh control to set the amplitude threshold at which the Formant setting begins to
be modulated by the Envelope follower.
Attack
Adjust the Atk (attack) control to set the time (10.0 ms to 10 seconds) it takes to respond to
increases in the audio signal level.
Release
Adjust the Rel (release) control to set the time (10.0 ms to 10 seconds) it takes to recover after
the signal level falls.
40Chapter 22: AIR Vintage Filter
AIR Vintage Filter is an AAX plug-in that applies
a modulating, resonant filter to an audio signal.
Have fun with filter sweeps or give your sounds
that extra-resonant aura.
Vintage Filter plug-in window
AIR Vintage Filter Controls
The Vintage Filter plug-in provides a variety of controls for adjusting plug-in parameters.
Cutoff
The Cutoff control lets you adjust the Cutoff frequency (20.0 Hz to 20.0 kHz) of the filter.
Resonance
The Resonance control lets you adjust the amount filter Resonance (0–100%). The filter can go
into self-oscillation at high values creating a sine wave-like overtone at the Cutoff frequency.
Fat
The Fat control lets you adjust the amount of overdrive in the resonant peak. At lower settings
the signal gets quieter at high Resonance settings for clean distortion. At higher settings the
signal is over-driven at high resonance settings.
Mode
Select one of the following options for the type of filter:
• LP24: Provides a low pass filter with a 24 dB cutoff.
• LP18: Provides a low pass filter with a 18 dB cutoff.
• LP12: Provides a low pass filter with a 12 dB cutoff.
• BP: Provides a band pass filter.
• HP: Provides a high pass filter.
Output
The Output control lets you lower the Output level from 0.0 dB to –INF dB.
41Vintage Filter Envelope Section Controls
The Filter effect provides an Envelope follower for controlling the Cutoff frequency. The
Envelope section offers control over the envelope's shape and depth of modulation.
Attack
Adjust the Attack control to set the time (10.0 ms to 10 seconds) it takes to respond to
increases in the audio signal level.
Release
Adjust the Release control to set the time (10.0 ms to 10 seconds) it takes to recover after the
signal level falls.
Depth
Adjust the Depth control to determine how much the Envelope follower affects the Cutoff
frequency.
• At 0%, the Envelope follower has no effect on the Cutoff frequency.
• At +100%, the Attack ramps up to the Cutoff frequency setting; and the Release starts
from the Cutoff frequency setting and ramps down.
• At –100%, the Attack starts from the Cutoff frequency setting and ramps down; and the
Release ramps up to the Cutoff frequency setting.
Vintage Filter LFO Section Controls
The Filter effect provides a sinusoidal Low Frequency Oscillator (LFO) for modulating the filter
cutoff frequency. The LFO section offers control over the rate, depth and synchronization of the
modulation.
Rate
Adjust the Rate control to increase or decrease the frequency (0.01–100.0 Hz) of the LFO.
Lower settings are slower and higher settings are faster. When Sync is on, the Rate knob
switches from counting in milliseconds, to rhythmic values.
Depth
Adjust the Depth control to increase (or decrease) the amount of modulation (0–100%) of the
Cutoff frequency by the LFO. Lower settings create a slight vibrato (with the rate set high) and
higher settings create a wide sweep of the Cutoff frequency range.
Sync
Click the Sync button to synchronize the LFO with the session tempo.
42Chapter 23: Boom
Boom is a virtual drum machine that features a broad range of electronic percussion sounds,
paired with a simple, drum-machine-style pattern sequencer. Boom is as an AAX plug-in that is
part of the AIR Creative Collection of plug-ins.
Drum patterns can be created from scratch, or adapted from one of the included preset
patterns. Patterns can be triggered and switched in real time with the mouse or using MIDI
data, facilitating the rapid creation of evolving drum patterns.
Boom comes with 10 drum kits inspired by classic electronic drum machines. Each individual
sound in a kit can have its volume, pan, pitch, and decay manipulated and automated in real
time.
Sounds can be shaped to fit the needs of your production, and even given further animation
over time using automation.
Each pattern is one bar long, with sixteen 16th-note steps. Up to 16 patterns, along with kit and
control settings, can be saved with each Preset.
Boom plug-in window, main controls and sections
43Boom Controls
The intuitive control layout for Boom lets you quickly get a feel for various sections within the
interface. Within no time, you'll be well on your way to creating fresh and exciting new drum
parts.
Boom Matrix Display
The Matrix display provides a visual overview of the
current pattern in Boom's sequencer, and is a quick
way to keep track of the pattern's rhythm and velocity,
as well as what step Boom is playing at any given
time.
Each horizontal row corresponds with one of Boom's
10 instrument channels, and each vertical column
represents one of the 16 rhythmic steps that make up
a pattern. Matrix Display
When an LED in the grid is dark, no note is
sequenced to play the indicated instrument on that step.
When an LED in the grid is lit red, the corresponding instrument is sequenced to play at that
step. The brighter the LED is lit, the higher that step's velocity has been set.
You can click each LED directly to add or remove a note on that step. When a dark LED is first
clicked, that step is set to play at high velocity. Clicking it a 2nd or 3rd time will cycle that step
through two levels of lowered velocity, reducing that step's volume. Clicking the LED again will
silence that step, and turn off its light. Right-clicking an LED will toggle its on-off state,
preserving the current velocity setting.
The Pattern display above the Matrix shows which of the 16 patterns in the current preset is
being shown in the Matrix display.
The Copy and Clear buttons above the Matrix are used to copy or erase patterns when in
Pattern Select mode.
For more information on using the Copy and Clear buttons, see "Creating a Drum Pattern Using
Boom" and "Playing with Patterns in Boom."
Boom Instrument Section Controls
Each of Boom's 10 instruments has a set of controls that set its pan
position, volume level, tuning (pitch), and decay (length).
Pan: Sets the current instrument's pan position in the stereo field.
Level: Sets the current instrument's volume.
Tuning: Sets the current instrument's pitch.
Decay: Sets the current instrument's length.
S: Solos the selected instrument, letting it play while temporarily
silencing the other instruments. More than one instrument can be soloed
at a time.
M: Mutes the selected instrument, silencing it until the M button is
pressed again. Boom
instrument strips
Adjuster: Calibrates the sound of the current instrument in varying ways.
Sample Selector: Sets the current instrument's sample (10 samples available for each
instrument).
44You can also read