AnywhereUSB - User Guide - Digi International
←
→
Page content transcription
If your browser does not render page correctly, please read the page content below
AnywhereUSB

User Guide

Revision history—90001085

       Revision Date           Description
       N          August       Updated references to Device Cloud to Remote Manager. Completed various
                  2018         correction of information throughout the document and minor editorial
                               changes.
                               Added troubleshooting tips and additional information about using
                               encrypted AWUSB.

       P          November Updated information about which users can launch the AnywhereUSB
                  2018     Remote Hub Configuration Utility. See Start the AnywhereUSB Remote Hub
                           Configuration Utility.

       R          December Added information about the unique password on the device label, used to
                  2019     access the web UI.
       S          February     Updated instructions for enabling the encrypted AnywhereUSB network
                  2020         service.

       T          May 2020     Updated SNMP configuration section.
                               Updated encrypted network service information.

Trademarks and copyright
      Digi, Digi International, and the Digi logo are trademarks or registered trademarks in the United
      States and other countries worldwide. All other trademarks mentioned in this document are the
      property of their respective owners.
      © 2020 Digi International Inc. All rights reserved.

Disclaimers
      Information in this document is subject to change without notice and does not represent a
      commitment on the part of Digi International. Digi provides this document “as is,” without warranty of
      any kind, expressed or implied, including, but not limited to, the implied warranties of fitness or
      merchantability for a particular purpose. Digi may make improvements and/or changes in this manual
      or in the product(s) and/or the program(s) described in this manual at any time.

Warranty
      To view product warranty information, go to the following website:
      www.digi.com/howtobuy/terms

Send comments
      Documentation feedback: To provide feedback on this document, send your comments to
      techcomm@digi.com.

AnywhereUSB User Guide                                                                                    2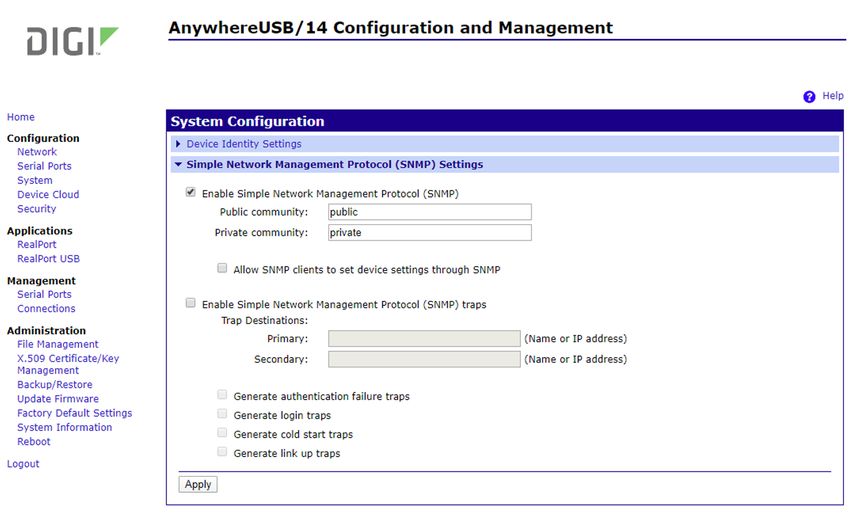
Customer support
      Digi Technical Support: Digi offers multiple technical support plans and service packages to help our
      customers get the most out of their Digi product. For information on Technical Support plans and
      pricing, contact us at +1 952.912.3444 or visit us at www.digi.com/support.

AnywhereUSB User Guide                                                                                   3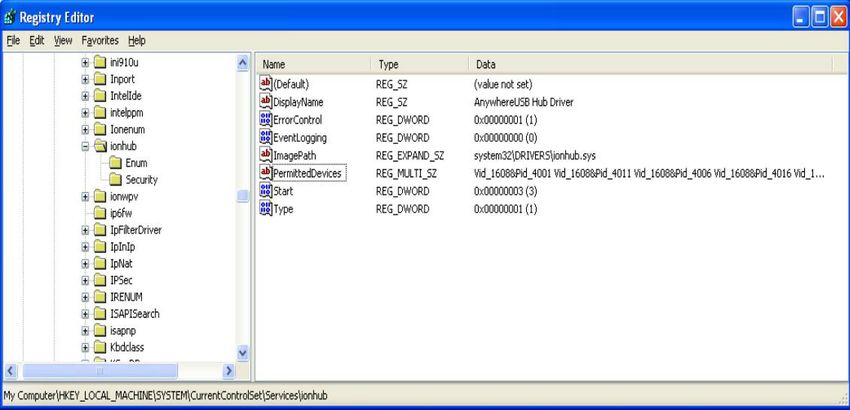
Contents

          AnywhereUSB User Guide
          Configurable features                                    8
             User Interfaces                                       8
             IP address assignment                                 9
             Security                                              9
             Configuration management                              9
          AnywhereUSB/5 (first generation) components              10
          AnywhereUSB/2 components                                 11
          AnywhereUSB/5 (G2 and M models) components               12
          AnywhereUSB/14 components                                13
          AnywhereUSB/TS44 components                              14
          RealPort software                                        15
             Encrypted RealPort                                    15

          Get started
          What’s in the box?                                       17
          Connect the hardware                                     17
          Install the driver software                              17

          Initial AnywhereUSB configuration
          Configure the IP address                                 19
             AnywhereUSB/5 (first generation)                      19
             AnywhereUSB (second generation)                       19

          Connect a host computer to AnywhereUSB
          Connect to the AnywhereUSB                               22

          AnywhereUSB Remote Hub Configuration Utility
          Start the AnywhereUSB Remote Hub Configuration Utility   25
          Remote Hub Configuration Utility window                  25
          Remote Hub Configuration Utility window menu options     26
             File menu: Preferences                                27
             Edit menu: Connection List                            27
             Edit menu: Discovery List                             28
             Command menu: Configure                               28

AnywhereUSB User Guide                                             4
Command menu: Connect                                             29
             Command menu: Web UI                                              29
             View menu: Driver Information                                     29
             View menu: Refresh (F5)                                           30

          Configure AnywhereUSB encryption
          Create and validate the CA certificate                               31
          Install the CA certificate on the AnywhereUSB device                 32
          Enable the Encrypted AnywhereUSB network service                     32
          Install the CA certificate on the host computer                      33
          Install two CA certificates                                          33
          Specify a certificate folder for Encrypted AnywhereUSB connections   34
          Windows Certificate Store support                                    35
          Troubleshoot AnywhereUSB encryption                                  35

          Discover AnywhereUSB devices on other subnets
          Add IP addresses to the Discovery List                               36

          Hardware specifications
          AnywhereUSB/2                                                        39
             Dimensions                                                        39
             Environmental                                                     39
             Power requirements                                                39
             Hardware interface features                                       39
             Network interface features                                        39
          AnywhereUSB/5 (G2), AnywhereUSB/5 M                                  40
             Dimensions                                                        40
             Environmental                                                     40
             Power requirements                                                40
             Hardware interface features                                       40
             Network interface features                                        40
          AnywhereUSB/5 (first generation)                                     41
             Dimensions                                                        41
             Environmental                                                     41
             Power requirements                                                41
          AnywhereUSB TS44                                                     41
             Dimensions                                                        41
             Environmental                                                     41
             Power requirements                                                42
             Hardware interface features                                       42
             Serial interface features                                         42
             Serial port pinouts                                               42
             Network interface features                                        43
          AnywhereUSB/14                                                       43
             Dimensions                                                        43
             Environmental                                                     43
             Power requirements                                                43
             Hardware interface features                                       43
             Network interface features                                        44

AnywhereUSB User Guide                                                         5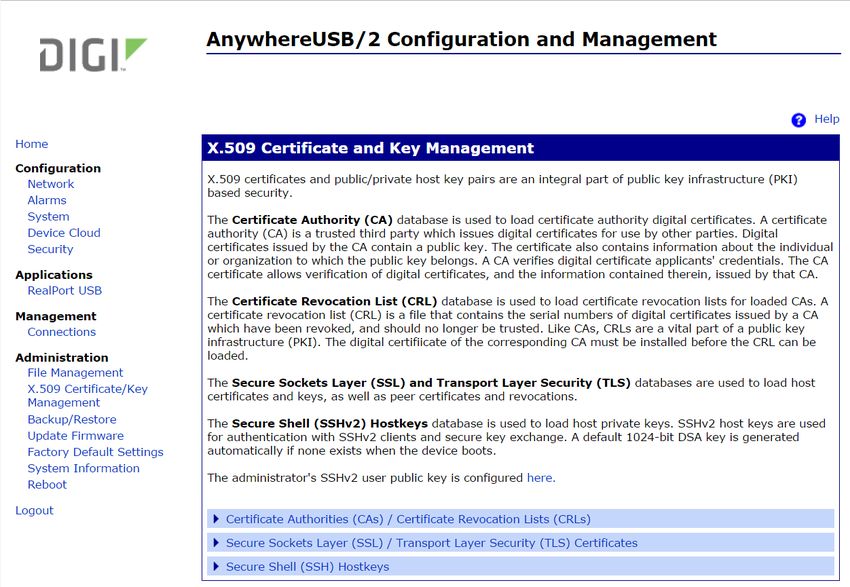
Multi-host connections
          Configure groups                                                     46
             Dynamic group assignment                                          48
          Host computer configuration                                          48

          Configure from the web interface
          Configuration and Management home page                               53
             Access and log in to the web user interface                       53
             Apply and save changes                                            53
             Cancel changes                                                    53
             Log out                                                           53
             Restore the AnywhereUSB to factory defaults                       53
             Online help                                                       54
          Web UI Configuration                                                 54
             Network settings                                                  54
             Serial port settings (AnywhereUSB/14 and AnywhereUSB TS44 only)   57
             System settings                                                   60
             Remote Manager configuration                                      62
             Security settings                                                 68
          Applications (AnywhereUSB/5M and AnywhereUSB/14)                     69
          Management                                                           70
          Administration                                                       70
             X.509 Certificate and Key Management                              71
             Backup/restore settings                                           71
             Update firmware                                                   72
             Factory default settings                                          73
             System information                                                75
             Reboot the AnywhereUSB                                            76

          Configure from the command line
          Access the command line interface                                    78
          Supported commands                                                   78

          Troubleshooting
          Basic troubleshooting steps                                          81
          AnywhereUSB error when connecting on a virtual machine               81
          AnywhereUSB USB device compatibility list                            82
             Compatible USB devices                                            82
             Limited support USB devices                                       82
             Incompatible USB devices                                          83
             USB modems                                                        83
          No remote hubs found                                                 83
          USB license dongle cannot be found                                   84
          Connecting to this computer message                                  85
             Firewall software                                                 85
             Windows New Hardware Wizard                                       85
             AnywhereUSB is connected to a different computer                  86
             Check the network configuration                                   86
             Reinstall the AnywhereUSB software                                86

AnywhereUSB User Guide                                                         6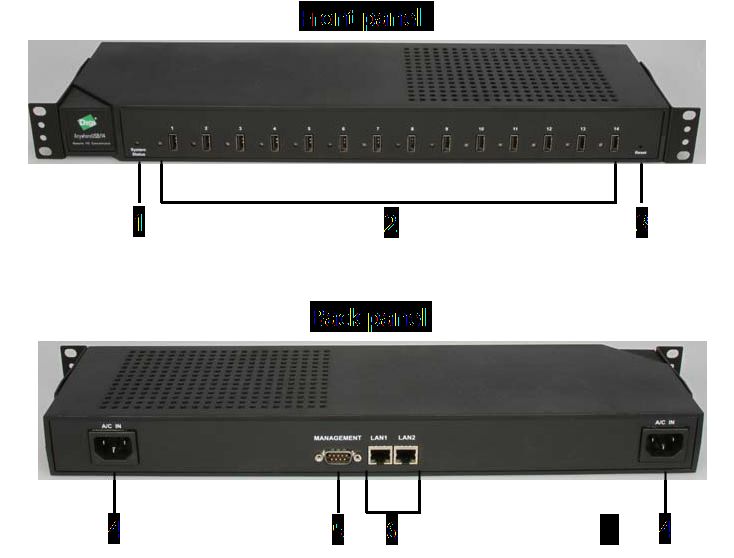
Regulatory and safety information
          GOST certification                                 87
            Safety information                               87
            Transitional CoC No + issuing/expiration dates   87
            Address and phone of service facility            87

          Appendix A: AnywhereUSB permitted device list
          About the permitted device list                    88
          Examples                                           88
          Configure the permitted device list                88

          Appendix B: Understanding hubs
          About hubs                                         92
          Upstream and downstream ports                      92
          Power requirements                                 92
          Series limits                                      93

          Appendix C: Firewall support
          Configure for firewall support                     94

AnywhereUSB User Guide                                       7
AnywhereUSB User Guide
      The AnywhereUSB is the first remote networking solution to utilize USB over IP® technology. Since the
      host computer or server may be located remotely, you can deploy AnywhereUSB devices in harsh or
      non-secure environments, making it ideal for point-of-sale, kiosks, surveillance, industrial automation,
      or any mission-critical enterprise application. This Ethernet-attached solution provides two, four, five,
      or fourteen USB ports to connect peripheral devices such as USB license dongles, barcode scanners,
      receipt printers, as well as Digi Watchport®/V2 or Watchport®/V3 USB Camera and Watchport Sensors.
      The AnywhereUSB product line consists of the following models:
          n AnywhereUSB/5 (first generation) components

          n   Second generation AnywhereUSB models
              The second generation AnywhereUSB devices provide a built-in web server and a command line
              interface (CLI) for additional configuration options.
                  o AnywhereUSB/2 components

                 o   AnywhereUSB/5 (G2 and M models) components
                 o   AnywhereUSB/5 (G2 and M models) components
                 o   AnywhereUSB/14 components
                 o   AnywhereUSB/TS44 components

Configurable features
      This section provides an overview of configurable features for the following products:
          n AnywhereUSB/2

          n   AnywhereUSB/5 (G2)
          n   AnywhereUSB/5 M
          n   AnywhereUSB TS44
          n   AnywhereUSB/14

      User Interfaces
      There are several user interfaces for configuring and monitoring the AnywhereUSB family, including:
         n Digi Device Discovery Utility, used to configure IP settings

          n   Web user interface (UI) for advanced configuring, monitoring, and administration
          n   AnywhereUSB command line interface (CLI)

AnywhereUSB User Guide                                                                                      8
AnywhereUSB User Guide                                                                     Configurable features

          n   Simple Network Management Protocol (SNMP)
          n   AnywhereUSB Configuration Utility, used to connect/disconnect host computers

      IP address assignment
      There are several ways to assign an IP address to an AnywhereUSB:
          n   Static IP: Assign a specific IP address to a device, through the Digi Device Discovery Utility, the
              web UI, or the CLI.
          n   Dynamic Host Configuration Protocol (DHCP): This is enabled by default. Use DHCP to
              automatically assign IP addresses, to deliver TCP/IP stack configuration parameters, such as
              the subnet mask and default gateway, and to provide other configuration information.
          n   Auto Private IP Addressing (APIPA), also known as Auto-IP: A standard protocol that will
              automatically assign an IP address from a reserved pool of standard Auto-IP addresses to the
              computer on which it is installed. The device is set to obtain its IP address automatically from a
              DHCP server. But if the DHCP server is unavailable or nonexistent, Auto-IP will assign the
              device an IP. If DHCP is enabled or responds later or you use ADDP, both will override the Auto-
              IP address previously assigned.

      Security
      Security-related features in AnywhereUSB include:
         n Secure access and authentication to the web UI and CLI.

          n   One password, one permission level.
          n   Selectively enable and disable network services such as ADDP, HTTP/HTTPS, SSH, SNMP, and
              telnet.
          n   Encrypted AnywhereUSB traffic: An optional setting that allows a host computer to confirm the
              AnywhereUSB device authenticity and to encrypt USB-over-IP traffic.

      Configuration management
      After an AnywhereUSB is configured and running, periodically perform any necessary configuration-
      management tasks, such as:
          n Upgrade firmware

          n   Upgrade device driver
          n   Back up device configuration
          n   Reset to factory default settings
          n   Restart the device

AnywhereUSB User Guide                                                                                         9
AnywhereUSB User Guide                                        AnywhereUSB/5 (first generation) components

AnywhereUSB/5 (first generation) components

       Item Name         Description
       1     System      On initial power-up, the System Status LED is orange for two seconds while the
             Status      system initializes and then blinks slow green. If you have enabled DHCP d and the
             LED         device is booting up, the System Status LED is orange while the AnywhereUSB
                         searches for a DHCP server. If it cannot find a DHCP server, it returns to the
                         default configuration to allow the Configuration Utility to assign a static IP
                         address. If the System Status remains red for an extended period of time,
                         contact Digi Technical Support.
       2     USB LEDs    Five USB LEDs; note the following LED patterns:
                             n Green hunting pattern across all 5 USB LEDs: Not connected to a host

                                 computer.
                             n   Orange alternating on ports 1-3-5 and 2-4: Updating image in Flash. Do
                                 not remove power from AnywhereUSB while flash is being updated. Doing
                                 so damages your AnywhereUSB.
                             n   Solid green: The USB ports are connected to a host computer.
                             n   Green over red hunting pattern: Contact Digi Technical Support.

AnywhereUSB User Guide                                                                                    10
AnywhereUSB User Guide AnywhereUSB/2 components
Item Name Description
3 Power Use the included power adapter.
connector
Note The first generation AWUSB/5 uses a center-negative power supply which is
different than the newer AWUSB/5 (G2) and AWUSB/5 M devices. Power-supplies
are NOT interchangeable; use only the power supply that is provided with the
device.
4 Ethernet The left Ethernet LED is green when connected to a network and the right
connector Ethernet LED blinks orange when there is data transmission activity on the port.
Use a standard Ethernet cable.
5 USB ports Five USB ports to connect USB devices.
AnywhereUSB/2 components
Item Name Description
1 System When the device is powered on and during normal operation, the System Status
Status LED blinks slow green. If the System Status light blinks red for an extended
LED period of time, contact Digi Technical Support.
2 USB LEDs Two USB ports with two USB LEDs. The USB LEDs are solid green when any of the
and ports USB ports are connected to a host computer. The USB LEDs are off when any of
the USB ports are not connected to a host computer.
3 Reset Use this button to either restart the device or reset its configuration to factory
button defaults.
4 Power Use the included power adapter.
connector
AnywhereUSB User Guide 11AnywhereUSB User Guide AnywhereUSB/5 (G2 and M models) components
Item Name Description
5 Ethernet The left Ethernet LED is green when connected to a network and the right
connector Ethernet LED blinks orange when there is data transmission activity on the port.
Use a standard Ethernet cable.
AnywhereUSB/5 (G2 and M models) components
The AnywhereUSB/5 (G2) and AnywhereUSB/5 M models have the same controls, ports, and
connectors, as shown in the following image of an AnywhereUSB/5 M.
Item Name Description
1 System When the device is powered on and during normal operation, the System
Status LED Status LED blinks slow green. If the System Status light blinks red for an
extended period of time, contact Digi Technical Support.
2 USB LEDs Five USB LEDs. A USB LED is solid green when its USB port is connected
to a host computer. A USB LED is off when its USB port is not connected
to a host computer.
3 Reset When pressed, the Reset button either restarts the device or resets its
button configuration to factory defaults.
AnywhereUSB User Guide 12AnywhereUSB User Guide AnywhereUSB/14 components
Item Name Description
4 Power Use the included power adapter.
connector
Note The second generation AWUSB/5 (G2 and M) uses an improved
center-positive power supply with a locking barrel connector, which is
different than first generation AWUSB/5 devices. Power-supplies are
NOT interchangeable; use only the power supply provided with the
device.
5 Ethernet The left Ethernet LED is green when connected to a network and the
connector right Ethernet LED blinks orange when there is data transmission
activity on the port. Use a standard Ethernet cable.
6 USB ports Five USB ports to connect USB devices.
AnywhereUSB/14 components
Item Name Description
1 System When the device is powered on and in normal operation, the System Status LED
Status blinks slow green. If the System Status light blinks red for an extended period of
LED time, contact Digi Technical Support.
2 USB LEDs Fourteen USB ports with corresponding LEDs. A USB LED is solid green when a
and ports USB port is connected to a host computer. A USB LED is off when a USB port is
not connected to a host computer.
3 Reset Use this button to either restart the device or reset its configuration to factory
button defaults.
AnywhereUSB User Guide 13AnywhereUSB User Guide AnywhereUSB/TS44 components
Item Name Description
4 Power The AnywhereUSB/14 has two power connectors. When using only one power
connector cable, you can use either of the power connectors. Use the included power
cables.
5 RS-232 Use these serial ports when using RealPort or for console access to the
DB9 serial AnywhereUSB device.
port
6 Ethernet The AnywhereUSB/14 has two Ethernet connectors for redundancy. The left
connector Ethernet LED is green when connected to a network and the right Ethernet LED
blinks orange when there is data transmission activity on the port.
Use the ports as follows:
n LAN1 is the primary Ethernet port. Use this port when connecting only one
Ethernet cable or as the main Ethernet connection when connecting both
Ethernet ports.
n LAN2 is the secondary Ethernet port and is used only for redundancy. Only
connect an Ethernet cable to this port when you are already using LAN1.
Use a standard Ethernet cable.
AnywhereUSB/TS44 components
AnywhereUSB User Guide 14AnywhereUSB User Guide RealPort software
Item Name Description
1 System When the device is powered on and in normal operation, the System Status LED
Status blinks green. If the System Status light blinks red for an extended period of time,
LED contact Digi Technical Support.
2 USB LEDs Four USB ports and corresponding LEDs. A USB LED is solid green when its USB
and ports port is connected to a host computer. A USB LED is off when its USB port is not
connected to a host computer.
3 Reset Use this button to either restart the device or reset its configuration to factory
button defaults.
4 Power Use the included power adapter.
connector
5 Ethernet The left Ethernet LED is green when connected to a network and the right
connector Ethernet LED blinks orange when there is data transmission activity on the port.
Use a standard Ethernet cable.
Note The AWUSB/14 has one network interface that supports one IP address.
For more information, see AnywhereUSB/14 redundancy features in detail
Knowledge Base article at knowledge.digi.com.
6 RS-232 Use these serial ports when using RealPort or for console access to the
RJ45 AnywhereUSB device. For more information about compatible Digi cables and
serial cable adapters, see Serial Cables on www.digi.com.
ports
RealPort software
The AnywhereUSB TS44 and AnywhereUSB/14 use RealPort COM port redirection for Microsoft
Windows environments. RealPort software provides a virtual connection to serial devices, no matter
where they reside on the network. The software is installed directly on the host computer and allows
applications to talk to devices across a network as though the devices were directly attached to the
host. Actually, the devices are connected to a Digi device somewhere on the network.
RealPort is unique among COM port re-directors because it is the only implementation that allows
multiple connections to multiple ports over a single TCP/IP connection. Other implementations
require a separate TCP/IP connection for each serial port. Unique features also include full hardware
and software flow control, as well as tunable latency and throughput.
Encrypted RealPort
AnywhereUSB/14 and AnywhereUSB TS 44 supports RealPort software with encryption. Encrypted
RealPort offers a secure Ethernet connection between the COM port and an AnywhereUSB device.
Encryption prevents internal and external snooping of data across the network by encapsulating the
TCP/IP packets in a Secure Sockets Layer (SSL) connection and encrypting the data using Advanced
Encryption Standard (AES), one of the latest, most efficient security algorithms.
The Digi RealPort with encryption driver has earned Microsoft's Windows Hardware Quality Lab
(WHQL) certification.
Drivers are available for a wide range of operating systems. It is ideal for financial, retail/point-of-sale,
government or any application requiring enhanced security to protect sensitive information.
You can enable or disable access to the Encrypted RealPort service.
AnywhereUSB User Guide 15AnywhereUSB User Guide RealPort software
For details, see the RealPort Installation User Guide on www.digi.com.
AnywhereUSB User Guide 16Get started
This chapter explains what comes with each AnywhereUSB model, how to connect the hardware, and
installing the necessary software.
What’s in the box?
All AnywhereUSB models include the following hardware in the box:
n AnywhereUSB device
n Power supply
Note AnywhereUSB/14 domestic orders include two power cords.
Note A loose label sticker that includes the unique device password may be included in the box. Retain
this label sticker with your hardware records. This default password will be needed if the device is
factory reset and you want to access the web UI on the device or register the device with Digi Remote
Manager®. If the device was already registered with Remote Manager at the time of the factory reset,
you do not need the unique password to access the device in Remote Manager.
Connect the hardware
You need a standard Ethernet cable, your AnywhereUSB device and power supply to complete these
steps.
1. Connect a standard Ethernet network cable to the Ethernet port on the back of the
AnywhereUSB device and the other end to the Ethernet port on a switch.
2. Connect the power supply or power cord (AnywhereUSB/14) to the power connector on the
back of the AnywhereUSB device and the other end into a power outlet.
For the AnywhereUSB/14, you can use either power connector on the back on the device.
Before using the AnywhereUSB, you need to install the driver software, configure the IP address, and
set up security (optional).
Install the driver software
You need a Microsoft Windows computer (host computer) to download and install the AnywhereUSB
driver software from the Digi International Support website. The driver software includes the
AnywhereUSB Remote Hub Configuration Utility.
AnywhereUSB User Guide 17Get started Install the driver software
1. Navigate to https://www.digi.com/support#support-tools.
2. From the Support Downloads section, click Drivers.
3. Find and select AnywhereUSB from the product list.
4. Select your AnywhereUSB model.
5. Select and download the appropriate driver software for your operating system.
6. Install the AnywhereUSB driver on the host computer.
7. Repeat this process for each host computer.
Note “Host computer” refers to a Microsoft Windows-based computer that you use to connect to the
AnywhereUSB. In a virtual environment, the host computer is the Windows-based virtual machine. You
do not need to install the AnywhereUSB drivers on the physical server running the virtual machine
(sometimes called host).
After the driver software installs, the AnywhereUSB Remote Hub Configuration Utility opens. The
utility automatically discovers AnywhereUSB devices on the local subnet and displays configuration
information, including the DHCP address for a device.
AnywhereUSB User Guide 18Initial AnywhereUSB configuration
After connecting the hardware and installing the software, you can connect the device to the network
and configure additional options, such as a static IP address, USB port groups, and encryption.
Configure the IP address
When successfully connected to a network, each AnywhereUSB device gets an IP address. The first
generation AnywhereUSB/5 model has a default static IP address and the second generation
AnywhereUSB/2/5/5M/14/TS44 models have dynamic IP addresses. You can make changes to the IP
address, such as assigning a static IP. Make sure you follow the instructions for your AnywhereUSB
model.
Note The host computer running Digi Device Discovery Utility and the AnywhereUSB device must be
on the same subnet.
AnywhereUSB/5 (first generation)
AnywhereUSB (second generation)
AnywhereUSB/5 (first generation)
By default, first generation AnywhereUSB/5 models support DHCP, but have static IP addresses.
Default IP address configuration:
n IP address: 192.168.254.222
n Subnet mask: 255.255.0.0
To configure a static IP address:
1. Open the AnywhereUSB Remote Hub Configuration Utility, which is included in the driver
software you previously downloaded and installed. See Get started.
2. Select your AnywhereUSB/5 from the list on the left.
3. Click Configure.
4. Type the IP address, subnet mask, and default gateway.
5. Click Update.
AnywhereUSB (second generation)
DHCP is enabled by default on all second generation AnywhereUSB models.
Second generation AnywhereUSB models include:
AnywhereUSB User Guide 19Initial AnywhereUSB configuration Configure the IP address
n AnywhereUSB/2
n AnywhereUSB/5 (G2)
n AnywhereUSB/5 M
n AnywhereUSB TS44
n AnywhereUSB/14
The host computer connects only by using the AnywhereUSB IP address. If the AnywhereUSB IP
address changes, the connection is lost. We recommend assigning a static IP address to make sure
your device always has the same IP address and remains connected to the host computer. You can
use either the web UI or the Digi Device Discovery Utility to configure the IP address.
n Configure the IP address with Digi Device Discovery Utility
n Configure the IP address with the web UI
Configure the IP address with Digi Device Discovery Utility
Use the Digi Device Discovery Utility to:
n View the IP address of an AnywhereUSB device.
n Configure a static IP address when the AnywhereUSB does not obtain an IP address from a
DHCP server (such as when there is no available DHCP server).
Note You must run the Digi Device Discovery Utility from a computer on the same subnet as the
AnywhereUSB. If discovery fails, make sure that the Microsoft Windows Firewall is off. For additional
troubleshooting help, visit the Digi Knowledge Base at knowledge.digi.com.
To configure a static IP address using the Digi Device Discovery Utility:
1. Download and install the Digi Device Discovery Utility:
a. Go to www.digi.com/support#support-tools.
b. From the Support Downloads section, click Drivers.
c. Find and select Device Discovery from the product list.
d. From the Diagnostics, Utilities and MIBs drop-down list, select your operating
system.
e. Download the utility for your operating system and install it.
6. Open the Digi Device Discovery Utility.
7. Right-click your AnywhereUSB device and select Configure network settings.
8. Type the IP address, subnet mask, and default gateway.
9. Click Save.
Configure the IP address with the web UI
Use the AnywhereUSB Configuration and Management web UI to configure the AnywhereUSB with a
static IP address.
To configure a static IP address using the web UI:
1. Open a web browser and type the AnywhereUSB IP address in the URL field. If you do not know
the device IP address, use the Digi Device Discovery Utility or the AnywhereUSB Remote Hub
AnywhereUSB User Guide 20Initial AnywhereUSB configuration Configure the IP address
Configuration Utility to get the IP address or connect directly to the web UI.
2. Log in to the web UI.
n User name: root
n Password: The unique, default password printed on the device label. If the default user
name and password does not work, they may have been changed. Contact your system
administrator for help.
Note If a password is not printed on the label, or the log in screen does not display, password
authentication has not been enabled. See Security settings or contact your system
administrator for help.
3. Select Configuration > Network.
a. Select Use the following IP address.
b. Type the IP address, subnet mask, and default gateway.
3. Clear the Enable AutoIP address assignment check box.
4. Click Apply. The network settings are updated and the web UI refreshes.
AnywhereUSB User Guide 21Connect a host computer to AnywhereUSB
This section explains how to configure the host computer to establish a connection to the
AnywhereUSB device using the AnywhereUSB Remote Hub Configuration Utility.
Connect to the AnywhereUSB
To use the USB devices that are attached to the AnywhereUSB, the host computer must first
establish a connection to the AnywhereUSB.
Note For AnywhereUSB/5M and AnywhereUSB/14 multi-host models, assign groups before connecting
to the host computer through the AnywhereUSB web UI. For details, see Multi-host connections.
1. Log in to a Microsoft Windows computer with an account that has administrative privileges.
2. Select Start > Programs > AnywhereUSB > AnywhereUSB Remote Hub Configuration
Utility.
The utility displays a list of all AnywhereUSB devices on your local subnet and on any subnet
configured in the Discovery List.
AnywhereUSB User Guide 22Connect a host computer to AnywhereUSB Connect to the AnywhereUSB
3. Select an AnywhereUSB device from the device list in the AnywhereUSB Remote Hub
Configuration Utility and then do one of the following:
n Click Connect.
n Right-click and connect to a group.
The host computer then attempts to connect to the AnywhereUSB.
The Connection Status now says Connected to this Host PC.
AnywhereUSB User Guide 23Connect a host computer to AnywhereUSB Connect to the AnywhereUSB
For details about the AnywhereUSB Remote Hub Configuration Utility, see AnywhereUSB Remote Hub
Configuration Utility.
AnywhereUSB User Guide 24AnywhereUSB Remote Hub Configuration Utility
This chapter explains how to use the AnywhereUSB Remote Hub Configuration Utility.
Start the AnywhereUSB Remote Hub Configuration Utility
This section explains how to start the AnywhereUSB Hub Configuration Utility.
Note A basic user (a user without administrative privileges) is not allowed to start the AnywhereUSB
Hub Configuration Utility. If an attempt to start the Utility is made by a basic user, an error occurs and
the Utility will not work as expected. If a basic user must use the Utility, a user with administrative
privileges must log in to the PC on which the Utility is installed, launch the Utility, and connect to the
Hubs to which the basic user is allowed access. Once the basic user is allowed access to a Hub (or
Hubs), that user is able to access and communicate with the USB devices that are attached to the
Hub.
1. Log in to a Microsoft Windows computer with an account that has administrative privileges.
2. Select Start > Programs > AnywhereUSB > AnywhereUSB Remote Hub Configuration
Utility.
After the AnywhereUSB Remote Hub Configuration Utility has been started, it remains in the
Windows system tray. You can open the utility from the system tray by double clicking its icon.
Remote Hub Configuration Utility window
The AnywhereUSB Remote Hub Configuration Utility displays AnywhereUSB devices grouped by their
subnet addresses. The utility automatically discovers AnywhereUSB devices on the local subnet. To
discover devices on other subnets, add those subnet addresses to the Discovery List. For more
information, see Discover AnywhereUSB devices on other subnets.
AnywhereUSB User Guide 25AnywhereUSB Remote Hub Configuration Utility Remote Hub Configuration Utility window menu options
Icon Color Legend:
Icon Description
Green: Available for connection.
Gray with bold text: Connected to this computer.
Gray: In use by another host computer.
(AnywhereUSB/5 first generation only) Red: Updating firmware.
Warning: The IP address is not configured, or this is a multi-host connections-
enabled device that is configured to connect to a non-existent Group.
Remote Hub Configuration Utility window menu options
This section explains the Remote Hub Configuration Utility window menu options.
AnywhereUSB User Guide 26AnywhereUSB Remote Hub Configuration Utility Remote Hub Configuration Utility window menu options
File menu: Preferences
Detect AnywhereUSB Remote Hubs automatically and Frequency of detection in seconds:
Configure how often to query the network for AnywhereUSB devices.
Note AnywhereUSB devices are automatically detected when you open the AnywhereUSB Remote
Hub Configuration Utility. Enabling this setting will make the AnywhereUSB Remote Hub
Configuration Utility re-scan the network for newer AnywhereUSB devices at the configured
frequency.
Detection Timeout: Configures how long the Remote Hub Configuration Utility will wait to hear from
all the AnywhereUSB devices before the Remote Hub Configuration Utility updates the list of devices
in the Main Window.
Use Microsoft Device IDs: Changes how the AnywhereUSB software creates the device ID for
attached USB devices. A device ID consists of three parts: the name of the bus driver, the Product
Identifier, and a unique serial number. For example, a Digi Edgeport USB to Serial converter that is
plugged directly into the USB port of a computer would have a Device ID similar to (where USB
indicates the Microsoft USB bus driver):
USB\VID_1608&PID_0215\A20299384
When attaching devices to an AnywhereUSB device, the bus driver name is AWUSB. Therefore the
same device plugged into an AnywhereUSB device would have a Device ID of:
AWUSB\VID_1608&PID_0215\A20299384
Some USB class drivers expect to see the bus driver name as “USB”, and as a result will not operate
unless the Use Microsoft Device IDs checkbox is checked.
Edit menu: Connection List
The Connection List displays the IP addresses of the AnywhereUSB device to which the host computer
will try to connect. When an IP address is added to this list, the host computer immediately tries to
connect to the AnywhereUSB device. If an IP Address is deleted from the Connection List, the
AnywhereUSB device will disconnect from the host computer and return to an “Available for Host
Connection” state.
AnywhereUSB User Guide 27AnywhereUSB Remote Hub Configuration Utility Remote Hub Configuration Utility window menu options
Select an AnywhereUSB and click Connect to add the selected AnywhereUSB IP address to the
Connection List. We advise to connect using this method but you can also manually add the
AnywhereUSB IP address to the Connection List. Use the manual method when the AnywhereUSB
device has a known IP address but is not discoverable or when the AnywhereUSB is behind a router or
firewall.
If an AnywhereUSB is behind a router or firewall, and you are using port forwarding, add the router's
public-facing IP address to the Connection List. Port 3422 TCP (or port 3423 for encrypted
connections) should be used for port forwarding.
Note Use Group 0 when you are manually adding an AnywhereUSB device that does not support multi-
host connections.
Edit menu: Discovery List
The Discovery List Manager displays a list of subnet addresses of remote networks or IP addresses
of individual devices where the Remote Hub Configuration Utility will search for AnywhereUSB
devices.
For details, see Discover AnywhereUSB devices on other subnets.
Command menu: Configure
The options in the Configure dialog depend on the model of the selected AnywhereUSB device.
AnywhereUSB User Guide 28AnywhereUSB Remote Hub Configuration Utility Remote Hub Configuration Utility window menu options
AnywhereUSB/5 (first generation)
The Remote Hub field at the top-left is the friendly name for the first generation AnywhereUSB/5 that
appears on the left side of the AnywhereUSB Remote Hub Configuration Utility.
For the first generation AnywhereUSB/5, you can configure IP address settings in this window only.
AnywhereUSB/2 and AnywhereUSB/5 (G2) and AnywhereUSB TS 44
Use the Configure button to enable encryption for these AnywhereUSB models.
n For details about configuring AnywhereUSB IP settings, see Initial AnywhereUSB configuration.
n For details about AnywhereUSB encryption, see Configure AnywhereUSB encryption.
n For details about configuring the AnywhereUSB device name, see System settings.
AnywhereUSB/5 M and AnywhereUSB/14
For the multi-host capable AnywhereUSB models, use the Configure button to configure the Group
Number that the host computer should connect to.
n For details about multi-host connections, see Multi-host connections.
n For details about configuring AnywhereUSB IP settings, see Initial AnywhereUSB configuration.
n For details about AnywhereUSB encryption, see Configure AnywhereUSB encryption.
n For details about configuring the AnywhereUSB device name, see System settings.
Command menu: Connect
Use the Connect command to add the IP address of the selected AnywhereUSB device to the
Connection List.
Command menu: Web UI
The web UI command opens the web interface for the selected device.
Note The first generation AnywhereUSB/5 does not have a web UI.
When you open the web UI, you are required to log in.
n User name: root
n Password: The unique, default password printed on the device label. If the default user name
and password does not work, they may have been changed. Contact your system
administrator for help.
Note If a password is not printed on the label, or the log in screen does not display, password
authentication has not been enabled. See Security settings or contact your system administrator for
help.
View menu: Driver Information
Use the Driver Information window to see AnywhereUSB driver version numbers and to uninstall older
AnywhereUSB drivers. To uninstall current AnywhereUSB drivers, use Microsoft Windows Programs
and Features.
AnywhereUSB User Guide 29AnywhereUSB Remote Hub Configuration Utility Remote Hub Configuration Utility window menu options
View menu: Refresh (F5)
The Refresh command updates information for discovered AnywhereUSB devices listed in the utility’s
main window.
AnywhereUSB User Guide 30Configure AnywhereUSB encryption
You can encrypt AnywhereUSB traffic by installing a digital certificate on the device. This is an optional
setting that allows a host computer to confirm the AnywhereUSB device authenticity and to encrypt
USB-over-IP traffic. This digital certificate must be signed by a Trusted Certificate Authority (CA). Since
an AnywhereUSB is not publicly accessible, an enterprise CA can self-sign the digital certificate.
The installation process you use depends on whether you have one or two certificates.
One certificate: Follow this process to configure and enable encryption:
1. Create and validate the CA certificate
2. Install the CA certificate on the AnywhereUSB device
3. Enable the Encrypted AnywhereUSB network service
4. Install the CA certificate on the host computer
Two certificates: Follow this process to configure and enable encryption:
n Install two CA certificates
Create and validate the CA certificate
Use OpenSSL tools to generate a CA certificate and then use it to sign device certificates.
1. Download the OpenSSL command line app from openssl.org.
2. Create a CA certificate (cacert.crt) and its private 2048-bit RSA key (cakey.pem) and store
cakey.pem in a safe place.
openssl req -nodes -new -newkey rsa:2048 -x509 -extensions v3_ca -keyout cakey.pem -out
cacert.crt -days 3650 -subj "[your email information]"
Use the following email information string as an example:
/C=US/ST=MN/L=Townname/O=Companyname/OU=Department/emailAddress=email@compan
y.com/
You will install cacert.crt on your host computer in a following step.
3. Generate a private 2048-bit RSA key for the server and store server.key in a safe place.
openssl genrsa -out server.key 2048
4. Generate a Certificate Signing Request file server.csr. For example:
openssl req -new -key server.key -out server.csr -subj "[your email information]"
Example email information string:
AnywhereUSB User Guide 31Configure AnywhereUSB encryption Install the CA certificate on the AnywhereUSB device
/C=US/ST=MN/L=Townname/O=Companyname/OU=Department2/emailAddress=email@compa
ny.com/
Note The Organizational Unit (OU) in this step must be different than the OU used in step 2.
5. With server.csr, generate the actual certificate (server.crt).
openssl x509 -req -days 3650 -CA cacert.crt -CAkey cakey.pem -set_serial 001 -in server.csr -out
server.crt
6. Validate the certificates to each other. If this command is successful, the server.crt: OK
message appears. If this command fails, an error message appears.
The private CA key is not used in this step.
openssl verify -CAfile cacert.crt server.crt
7. After successfully completing certificate validation in the previous step, concatenate server.crt
and server.key to create server.pem.
copy server.crt server.pem
type server.key >> server.pem
Install the CA certificate on the AnywhereUSB device
Upload the CA certificate to the AnywhereUSB device using the AnywhereUSB web UI:
1. Access and log in to the web user interface.
2. Select Administration > X.509 Certificate/Key Management.
3. Click Secure Sockets Layer (SSL)/Transport Layer Security (TLS) Certificates.
4. Click Identity Certificates and Keys.
5. Click Choose File and browse to the server.pem file.
6. Click Upload.
Enable the Encrypted AnywhereUSB network service
You must enable the encrypted AnywhereUSB network service:
1. Access and log in to the web user interface.
2. Select Configuration > Network.
3. Click Network Services Settings.
4. Select the Enable Encrypted AnywhereUSB check box.
Note Ensure the Encrypted AnywhereUSB service is running on port 3423. If a different port
number is shown, contact Digi Technical Support for assistance.
AnywhereUSB User Guide 32Configure AnywhereUSB encryption Install the CA certificate on the host computer
5. Clear the Enable AnywhereUSB check box, if it is selected.
Note Enable AnywhereUSB is selected (enabled) by default. Make sure to select (enable) only
the Enable Encrypted AnywhereUSB option. If both of the AnywhereUSB network services
are enabled, you risk having unencrypted connections on the device.
6. Click Apply.
Install the CA certificate on the host computer
Use the AnywhereUSB Remote Hub Configuration Utility to install the CA certificate on the host
computer.
1. Open the AnywhereUSB Remote Hub Configuration Utility.
2. Select your AnywhereUSB device.
3. Click Configure.
4. Select the Encrypt Connection check box.
Note Tunnel connections is automatically selected when you select Encrypt connection.
5. Browse to or type the path of the CA certificate (cacert.crt) in the Digital Certificate field.
6. Click Update.
Install two CA certificates
You can upload two CA certificates (Root CA and an Intermediate CA) to the host computer and the
device.
The following requirements must be met:
n Both CAs are in DER format with a .cer file extension.
n OpenSSL must be installed.
To upload two CA certificates:
1. Convert both CAs from DER format to PEM format:
openssl x509 -inform der -in intermediate-ca.cer -out intermediate-ca.pem
openssl x509 -inform der -in root-ca.cer -out root-ca.pem
2. Combine the CAs into a single file that is in PEM format, with .crt file extension:
copy intermediate-ca.pem + root-ca.pem certchain.crt
3. On the host computer, launch the AnywhereUSB Configuration Utility interface.
a. Select AnywhereUSB.
b. Click Configure.
c. In the Digital Certificate section, browse for: certchain.crt
d. Click Update.
AnywhereUSB User Guide 33Configure AnywhereUSB encryption Specify a certificate folder for Encrypted AnywhereUSB connections
4. On the device, open the AnywhereUSB web interface.
a. Select Administration > X.509 Certificate/Key Management.
b. Click Secure Sockets Layer (SSL)/Transport Layer Security (TLS) Certificates.
c. Click Identity Certificates and Keys.
5. Upload the end user certificate, which is the .pem file, signed by the Intermediate CA.
a. If necessary, convert the CA from DER format to PEM format.
b. Click Choose File and browse to the .pem file.
c. Click Upload.
6. Upload the private key associated with the end user certificate.
a. Click Choose File and browse to the private key file.
b. Click Upload.
Specify a certificate folder for Encrypted AnywhereUSB
connections
You can specify a certificate folder instead of a certificate file when setting up Encrypted
AnywhereUSB connections. You can specify the folder from the AnywhereUSB Configuration Utility
(AwUsbCfg.exe) or the console application (AwConsole.exe), following the same process you would use
to specify a file.
Note To use this feature, you must have the v3.90.223 AnywhereUSB driver or higher installed.
To use a folder, each certificate must be renamed after the subject hash. For example, you have a
folder named c:\my-certs that contains two certificates: CertA.crt and CertB.crt. You need to rename
each certificate.
To rename a certificate:
1. Download an OpenSSL installer for Windows.
Note You must download version 1.0 or newer, as pre-1.0 versions use an older hash which
does not work with AnywhereUSB.
2. Open a command prompt from your certificate folder:
c:\my-certs
3. Create a subject hash:
c:\my-certs> openssl x509 -hash -in CertA.crt -noout
The output is an 8-digit hash, such as bc35a2e5.
4. Rename (or copy) your certificate file with the hash as its base and the zero character as its
extension:
c:\my-certs> copy CertA.crt bc35a2e5.0
AnywhereUSB User Guide 34Configure AnywhereUSB encryption Windows Certificate Store support
5. Repeat this process for any additional certifications.
Windows Certificate Store support
Users can import CA certificates to the Windows Certificate Store to authenticate server certificates.
The CA certificate must be installed on the "Local Computer" in the Trusted Root Certification
Authorities store. This requires the AnywhereUSB driver v3.95 or newer.
Troubleshoot AnywhereUSB encryption
See the following troubleshooting tips for issues with configuring AnywhereUSB encryption:
n Ensure the Encrypted AnywhereUSB service is enabled, and port 3423 is in use.
n If an Encrypted connection attempt fails, attempt to connect to the AnywhereUSB with
Tunneling enabled and with Encryption disabled, within the Configuration area of the
AnywhereUSB Configuration Utility.
l If a Tunneled/Unencrypted connection works, the problem is likely to be related to the
certificates.
l If a Tunneled/Unencrypted connection fails, the problem is not likely to be related to the
certificates, but instead related to the network; for example, port 3423 being blocked.
n Ensure that the Digi AnywhereUSB Network Service is running on the host computer. You can
verify that the service has been started and is running in the Windows Services console
(services.msc) or Windows System Configuration (msconfig) within the Services tab.
n The certificate for the CA that is used within the AnywhereUSB Configuration Utility must have
a ".crt" file extension that must be in the PEM format. If the certificate for the CA instead has a
".cer" file extension (which is in the DER format), it must be converted from .cer to .crt using
OpenSSL.
AnywhereUSB User Guide 35Discover AnywhereUSB devices on other subnets
This section explains how to enable the AnywhereUSB Remote Hub Configuration Utility to discover
AnywhereUSB devices on additional IP subnets.
Add IP addresses to the Discovery List
By default, the AnywhereUSB Remote Hub Configuration Utility scans the local subnet for
AnywhereUSB devices. To discover AnywhereUSB devices on other subnets, add their IP address or
subnet to the Discovery List in the Discovery List Manager Dialog box.
1. Select Edit > Discovery List.
2. Type the subnet address or the IP address of the individual device in the IP Address field.
For example, to add the Class C network 192.168.2.x, enter 192.168.2.255. For a Class B
network 145.75.x.x, enter 145.75.255.255 (configure the router to forward subnet broadcasts).
3. Click Add.
4. Click Close to get back to the AnywhereUSB Remote Hub Configuration Utility main window.
5. Select View > Refresh. The device appears in the AnywhereUSB Remote Hub Configuration
Utility device list.
Note If discovery fails, make sure that the Microsoft Windows firewall is off. For additional help, see
No remote hubs found.
AnywhereUSB User Guide 36Discover AnywhereUSB devices on other subnets Add IP addresses to the Discovery List AnywhereUSB User Guide 37
Hardware specifications
      This section provides the physical dimensions, environmental, and power requirements of the
      AnywhereUSB.

      AnywhereUSB/2                                                                                 39
      AnywhereUSB/5 (G2), AnywhereUSB/5 M                                                           40
      AnywhereUSB/5 (first generation)                                                              41
      AnywhereUSB TS44                                                                              41
      AnywhereUSB/14                                                                                43

AnywhereUSB User Guide                                                                              38
Hardware specifications AnywhereUSB/2
AnywhereUSB/2
Dimensions
Length: 2.38 in (6.04 cm)
Width: 3.9 in (10 cm)
Height: 1.0 in (2.54 cm)
Weight: 5 oz. (142 g)
Environmental
Operating temperature: 32° F to 131° F (0° C to 55° C)
Relative humidity: 0% to 95% (non-condensing)
Power requirements
The AnywhereUSB uses a 120/230 VAC 50/60 Hz power adapter that supplies 5 V DC to the device. It
is recommended that only the enclosed power supply be used with the AnywhereUSB. However,
power is supplied to the AnywhereUSB by a UL-Listed Direct Plug-In Power device or Information
Technology Equipment Rated Power device rated 5 V DC, at least 3.0 A, if used in the U.S. and Canada
or a power supply with similar rating and approved by your local safety code if it is used elsewhere.
For polarity, see the following diagram:
Hardware interface features
The device provides 2 USB ports (standard A-type receptacles). The downstream ports support Low,
Full, and High Speed downstream devices.
Memory: 64 MB RAM
Network interface features
Standards: IEEE 802.3, 802.3i (10Base-T), 802.3u (100Base-TX), 802.3x (full duplex and flow control),
HP Auto-MDIX (auto-detection of straight-through or crossover cabling)
Physical layer: 10/100 Mbps in half- or full-duplex mode, with auto-negotiation of speed and duplex
Ethernet connector: RJ-45
AnywhereUSB User Guide 39Hardware specifications AnywhereUSB/5 (G2), AnywhereUSB/5 M
AnywhereUSB/5 (G2), AnywhereUSB/5 M
Dimensions
Length: 4.35 in (11.05 cm)
Width: 7.20 in (18.29 cm)
Height: 1.03 in (2.61 cm)
Weight: 10.00 oz. (283.5 g)
Environmental
Operating temperature: 32° F to 131° F (0° C to 55° C)
Relative humidity: 0% to 95% (non-condensing)
Power requirements
The AnywhereUSB uses a 120/230 VAC 50/60 Hz power adapter that supplies 5 V DC to the device. It
is recommended that only the enclosed power supply be used with the AnywhereUSB. However,
power is supplied to the AnywhereUSB by a UL-Listed Direct Plug-In Power device or Information
Technology Equipment Rated Power device rated 5 V DC, at least 3.0 A, if used in the U.S. and Canada
or a power supply with similar rating and approved by your local safety code if it is used elsewhere.
For polarity, see the following diagram:
Note The power supplies between the AWUSB/5 first and second generation (G2) models are not
interchangeable. Use the power supply provided with the device.
Hardware interface features
The device provides 5 USB ports (standard A-type receptacles). The downstream ports support Low,
Full, and High Speed downstream devices.
Memory: 128MB RAM
Network interface features
Standards: IEEE 802.3, 802.3i (10Base-T), 802.3u (100Base-TX), 802.3x (full duplex and flow control),
HP Auto-MDIX (auto-detection of straight-through or crossover cabling)
Physical layer: 10/100 Mbps in half- or full-duplex mode, with auto-negotiation of speed and duplex
Ethernet connector: RJ-45
AnywhereUSB User Guide 40Hardware specifications AnywhereUSB/5 (first generation)
AnywhereUSB/5 (first generation)
Dimensions
Length: 4.35 in (11.05 cm)
Width: 7.20 in (18.29 cm)
Height: 1.03 in (2.61 cm)
Weight: 10.00 oz. (283.5 g)
Environmental
Operating temperature: 32° F to 131° F (0° C to 55° C)
Relative humidity: 0% to 95% (non-condensing)
Power requirements
Power to this product many be supplied by a UL Listed Direct Plug-In Power device marked “Class 2"
or a UL listed power supply rated with a minimum rating of 5 V DC 2.5 A if used in the U.S. and Canada
or a power supply with similar rating and approved by your local safety code if it is used elsewhere.
For polarity, see the following diagram:
Note The power supplies between the AWUSB/5 first and second generation (G2) models are not
interchangeable. Use the power supply provided with the device.
AnywhereUSB TS44
Dimensions
Length: 4.35 in (11.05 cm)
Width: 7.20 in (18.29 cm)
Height: 1.03 in (2.61 cm)
Weight: 10.00 oz. (283.5 g)
Environmental
Operating temperature: 32° F to 131° F (0° C to 55° C)
Relative humidity: 0% to 95% (non-condensing)
AnywhereUSB User Guide 41Hardware specifications AnywhereUSB TS44
Power requirements
The AnywhereUSB uses a 120/230 VAC 50/60 Hz power adapter that supplies 5 V DC to the device. It
is recommended that only the enclosed power supply be used with the AnywhereUSB. However,
power is supplied to the AnywhereUSB by a UL-Listed Direct Plug-In Power device or Information
Technology Equipment Rated Power device rated 5 V DC, at least 3.0 A, if used in the U.S. and Canada
or a power supply with similar rating and approved by your local safety code if it is used elsewhere.
For polarity, see the following diagram:
Hardware interface features
The device provides 4 USB ports (standard A-type receptacles) and 4 serial ports. The downstream
ports support Low, Full, and High Speed downstream devices.
Memory: 128MB RAM
Serial interface features
n 10-pin serial ports
n EIA-232 interface
n Throughput up to 230,400 bps
n 5, 6, 7, 8 data bits
n 1, 1.5, 2 stop bits
n Mark/space/even/odd parity
n Hardware and Software Flow Control
Serial port pinouts
Pin Number Signal
Pin 1 RI
Pin 2 DSR
Pin 3 RTS
Pin 4 Ground
Pin 5 TxD
Pin 6 RxD
AnywhereUSB User Guide 42Hardware specifications AnywhereUSB/14
Pin Number Signal
Pin 7 Signal Ground
Pin 8 CTS
Pin 9 DTR
Pin 10 DCD
Network interface features
n Standards: IEEE 802.3, 802.3i (10Base-T), 802.3u (100Base-TX), 802.3x (full duplex and flow
control)
n Physical layer: 10/100 Mbps in half- or full-duplex mode, with auto-negotiation of speed and
duplex
n Ethernet connector: RJ-45AnywhereUSB TS44
AnywhereUSB/14
Dimensions
Length: 4.97 in (12.62 cm)
Width: 17.00 in (43.18 cm)
Height: 1.74 in (4.42 cm)
Weight: 40.00 oz. (1134 g)
Environmental
Operating temperature: 32° F to 131° F (0° C to 55° C)
Relative humidity: 0% to 95% (non-condensing)
Power requirements
The AnywhereUSB/14 uses single or dual 120/230 VAC 50/60 Hz power input(s) through the rear IEC
60320 inlet(s). Redundant (dual) supply enables it to support mission critical applications where
uninterrupted powering is a must. In case of redundant (dual) powering, both supplies provide power
to the device. When one of the supplies fails the other will provide the complete power to the device.
In case of single powering, use the left side inlet (rear view). The maximum power requirement of the
AnywhereUSB/14 is 45 W.
Hardware interface features
The device provides 14 USB ports (standard A-type receptacles). The downstream ports support Low
Speed, Full Speed, and High Speed downstream devices.
The device supports two Ethernet connectors (dual RJ-45) LAN1 & LAN2 for mission critical
applications (redundant Ethernet). The device can switch from LAN1 to LAN2 and vice-versa if any of
them fails. The primary input is LAN1.
AnywhereUSB User Guide 43Hardware specifications AnywhereUSB/14
The device also provides an RS232 UART Management port via a DB9 connector at the rear next to the
network connectors.
Network interface features
Standards: IEEE 802.3, 802.3i (10Base-T), 802.3u (100Base-TX), 802.3x (full duplex and flow control),
HP Auto-MDIX (auto-detection of straight-through or crossover cabling)
Physical layer: 10/100 Mbps in half- or full-duplex mode, with auto-negotiation of speed and duplex
AnywhereUSB User Guide 44Multi-host connections
This section describes the multi-host connections feature exclusively available on the
AnywhereUSB/14 and AnywhereUSB/5 M models. The multi-host connections feature allows multiple
host computers to establish concurrent connections with the AnywhereUSB device. Each host
computer requests a different group of USB ports, where the group assignments have been previously
configured on the AnywhereUSB device.
Requirement: Older AnywhereUSB driver and firmware versions may not support multi-host
connections.
Configure groups 46
Host computer configuration 48
AnywhereUSB User Guide 45Multi-host connections Configure groups
Configure groups
This procedure explains how to assign the AnywhereUSB device's physical USB port to groups.
After a group has been assigned, you can change group assignments without restarting the device.
For details, see Dynamic group assignment.
1. Access and log in to the web user interface.
2. Select RealPort USB.
2. Click Apply and reboot the AnywhereUSB for group configuration changes to take effect.
The options on this page allows the user to select which physical USB ports on the
AnywhereUSB device are assigned to which group. By default, all the USB Ports are assigned
to Group 1. Therefore, a host computer requesting Group 1 takes ownership of all of the
physical USB ports on the AnywhereUSB device.
In the AnywhereUSB/14 configuration example below, a host computer requesting Group 1 is
granted access only to physical USB ports 1 through 4. A host computer requesting Group 2 is
granted access to physical USB ports 5 through 7. A host computer requesting Group 6 is given
access to physical USB port 11, and so on. The USB ports 12 through 14 are unassigned, and as
a result do not support any attached USB devices.
AnywhereUSB User Guide 46Multi-host connections Configure groups
In the example below, the AnywhereUSB/14 device has been configured to have 14 groups, each
providing access to a single physical USB port.
After a group has been assigned, you can change group assignments without restarting the device.
For details, see Dynamic group assignment.
AnywhereUSB User Guide 47Multi-host connections Host computer configuration
Dynamic group assignment
The AnywhereUSB/14 device allows you to change group assignments without restarting the device
using Dynamic Group Assignment (DGA). Making group changes using DGA does not disrupt unaffected
USB ports. For example, if you enable DGA and make changes to USB ports 1, 2 and 3, then USB ports
4-14 remain connected without any interruption.
To enable DGA and make group changes:
1. Select the Enable Dynamic Group Assignment (DGA) check box.
2. Click Apply and restart the device.
Note Enabling or disabling DGA requires you to restart the device.
3. Access and log in to the web user interface.
4. Xlick RealPort USB.
5. Change groups for USB ports as needed.
6. Click Apply. Group changes take effect immediately.
Host computer configuration
In the AnywhereUSB Remote Hub Configuration Utility, you must specify the group number that each
host computer should connect to. Each host computer may only connect to one group. When the host
computer connects to the AnywhereUSB, it takes ownership of the associated USB ports.
AnywhereUSB User Guide 48You can also read