Artisan Fire Pizza Oven - USE AND CARE GUIDE
←
→
Page content transcription
If your browser does not render page correctly, please read the page content below
Artisan Fire Pizza Oven
                 U S E   A N D   C A R E   G U I D E

1.800.868.1699                                         1
2 KalamazooGourmet.com
Important Safety Warnings
This appliance is FOR OUTDOOR USE ONLY. It is not to be used inside a garage, other
building or any type of enclosed area.

WARNING: Failure to follow the information in this Use and Care Guide exactly may result
in fire or explosion, causing property damage, personal injury or death. Read and follow all
warnings and instructions before assembling and using the appliance.

WARNING: This appliance is not intended to be installed in or on a boat or recreational
vehicle.

     		 DANGER: IF YOU SMELL GAS:
     1. Shut-off gas to the appliance.

     2. Extinguish any open flame.

     3. Open grill hood.

     4. If odor continues, keep away from the appliance and immediately call your
        gas supplier or fire department.

     Failure to follow these instructions could result in fire or explosion which could
     cause property damage, personal injury or death.

     		 WARNING: FOR YOUR SAFETY:
     1. Do not store or use gasoline or other flammable liquids or vapors in the
        vicinity of this or any other appliance.

     2. An LP cylinder not connected for use shall not be stored in the vicinity of this
        or any other appliance.

     3. Improper installation, adjustment, alteration, service or maintenance can
        cause property damage, injury or death. Read the installation, operating
        and maintenance instructions thoroughly before installing or servicing this
        equipment.

    IMPORTANT: Damage caused by a failure to heed the warnings or
    follow the safety instructions and practices described in this Use and
    Care Guide is not covered by the warranty.

1.800.868.1699                                                                                 1
Thank you for choosing Kalamazoo
                                    Outdoor Gourmet cooking equipment.

                                    Because of the high performance nature
                                    and unique design of the Artisan Fire
                                    Pizza Oven, we recommend familiarizing
                                    yourself with this book before using your
                                    pizza oven for the first time. Your Use and
                                    Care Guide contains important safety
    This Use and Care Guide         information as well as helpful guidance
    contains important              for successful cooking experiences and
    information necessary for the   care. Following the guidance of this book
    proper assembly and safe use    will help ensure many years of outdoor
    of the pizza oven.              cooking enjoyment.
    Read and follow all warnings    Should you ever have any questions about cooking
    and instructions before         with or caring for your Artisan Fire Pizza Oven, we are
                                    here to help. Contact Kalamazoo Outdoor Gourmet
    assembling and using the        Customer Service at:
    pizza oven.
                                    1.800.868.1699
    Follow all warnings and
                                    or
    instructions when using the     customerservice@KalamazooGourmet.com
    pizza oven.
                                    Please have your model number and serial number
    Keep the Use and Care Guide     ready or include it in your email.
    for future reference.
                                    Model Number
                                         FF AFPO-C-NG
                                         FF AFPO-C-LP
                                         FF AFPO-C-BLK-LP
                                         FF AFPO-X-NG
                                         FF AFPO-X-LP
                                         FF AFPO-X-BLK-LP

                                    Serial Number

    Version 18.12.2013

2                                                                      KalamazooGourmet.com
Table of Contents
                 Safe Operation                     4

                 Liquid Propane Tank Safety         6

                 Liquid Propane Gas Requirements    8

                 Natural Gas Requirements           9

                 Bulk Propane Gas Requirements     10

                 Leak Testing                      11

                 Locating the Pizza Oven           12

                 Required Clearances               12

                 Initial Assembly                  13

                 Pizza Oven Controls               14

                 Lighting Your Pizza Oven          16

                 Burner Adjustments                17

                 Cooking with Your Pizza Oven      21

                 Recipes                           25

                 Caring for Your Pizza Oven        50

                 Troubleshooting                   53

                 Installation Checklist            54

                 Packing List                      55

                 Dimensions                        56

                 Warranty                          57

                 About Kalamazoo Outdoor Gourmet   61

1.800.868.1699                                      3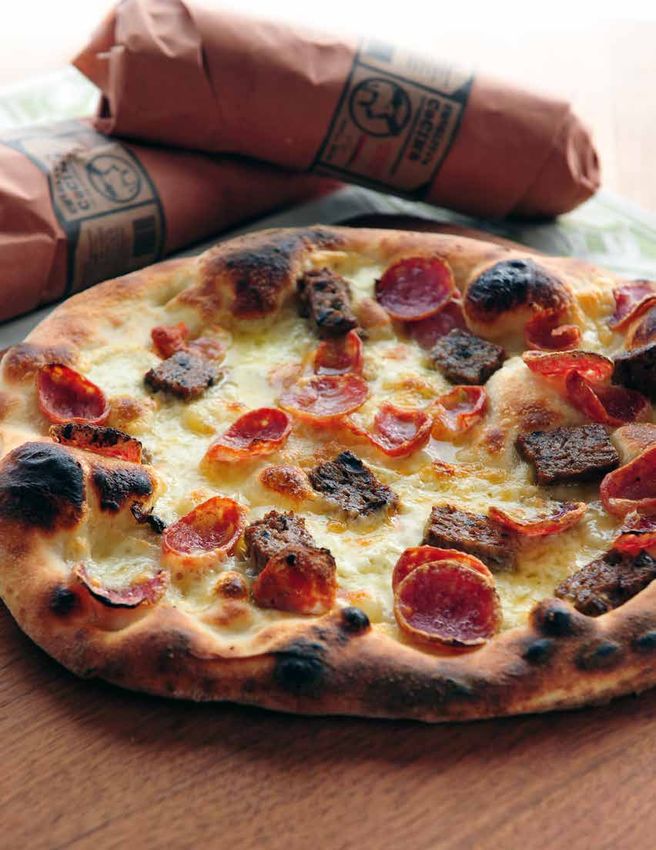
Safe Operation
WARNING: When in use, portions of your pizza oven get hot enough to cause
severe burns. Children and pets should never be left alone or unattended in
the area where the pizza oven is being used. Never allow children to sit, stand
or play on or around the pizza oven.
IMPORTANT: Improper use or installation is dangerous. Because this
pizza oven produces intense heat, the risk of accidents or potential injuries
is increased. Extreme care must be taken. Carefully follow all instructions,
including the following:
To reduce the risk of fire, burns or other injury, read this Use and Care Guide thoroughly. Begin by ensuring
proper installation and servicing. Do not repair or replace any part of the pizza oven yourself unless it is
specifically recommended in this Use and Care Guide. All other service must be carried out by a qualified
gas technician.
Never allow children to operate the pizza oven. Do not store items of interest to children in or around the
pizza oven.
Do not heat unopened food containers in the pizza oven. The build up of pressure resulting from the heat
may cause the container to burst.
Never lean on any part of the pizza oven. When lighting the pizza oven, always pay close attention to what
you are doing. Make sure you are aware of which burner you are lighting and can see whether or not it is
lit. Make sure you have ready access to the ignition button and burner valves when you are lighting the
burner. Make sure you are pushing the ignition button when you attempt to light the burner.
When the burners are on or the oven is still hot, do not touch the cooking deck, any part of the oven’s
interior or any surface near the open front of the pizza oven. These areas become extremely hot and may
cause severe burns. Likewise, do not touch any part of the pizza oven roof, especially near the “chimney”
at the back of the roof.
Do not use any cleaner, including water, on a hot pizza oven. Never use any liquids when cleaning the
cooking deck.
Be sure all control knobs are in the OFF position and the pizza oven is cool before using any aerosol
cleaner on it or near it. The chemical used for aerosol propellant could ignite in the presence of heat.
Never use aerosol cleaner on the cooking deck.
Always use dry pot holders or gloves on hot surfaces or cooking tools: moist or damp pot holders or
gloves may cause steam burns. Never use a towel or bulky cloth in place of pot holders. Do not let pot
holders touch hot portions of the pizza oven or allow them to get near the open flame.
Do not operate the pizza oven under an unprotected combustible construction. Use only in a well-
ventilated area. The oven is for outdoor use only.
4 KalamazooGourmet.com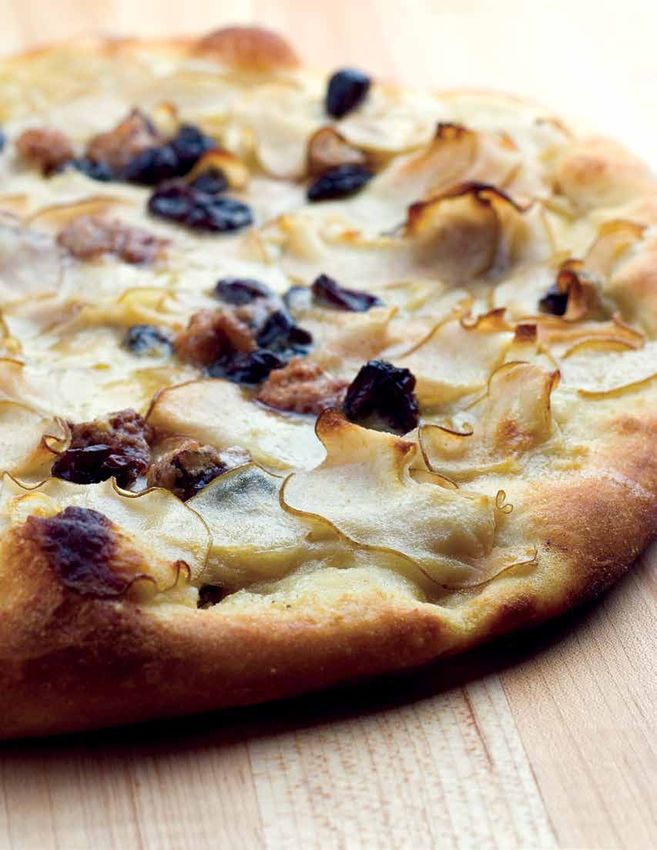
Safe Operation CONTINUED
Do not obstruct any of the openings on the pizza oven or otherwise obstruct the flow of combustion and
ventilation air. Do not build the pizza oven into any structure that is closer than 6 inches from the sides,
back and top.
Keep all gas hoses away from the hot surfaces of the pizza oven, including all external surfaces of the unit.
Keep all electrical cords away from the hot surfaces of the pizza oven.
Ensure proper installation and servicing by following all instructions in this Use and Care Guide and any
other instructions or markings provided with this product. Have your pizza oven installed by a qualified
technician. Have the installer show you where the gas supply shut off valve is located and instruct you in its
operation so that you can shut off the gas to the pizza oven.
If you smell gas, there is likely a problem with the installation. If the connections are not perfectly sealed,
you can have a small leak resulting in the faint smell of gas -- even if the pizza oven appears to be working
properly. Close the gas supply shut off valve and call a qualified technician to locate and resolve the leak.
California Proposition 65 Warning:
The burning of gas cooking fuel generates some by-products that are on the
list of substances which are known by the State of California to cause cancer
or reproductive harm. California law requires business’s to warn customers
of potential exposure to such substances. To minimize exposure to these
substances, always operate the pizza oven according to this Use and Care
Guide and ensure you provide good ventilation when cooking with gas.
1.800.868.1699 5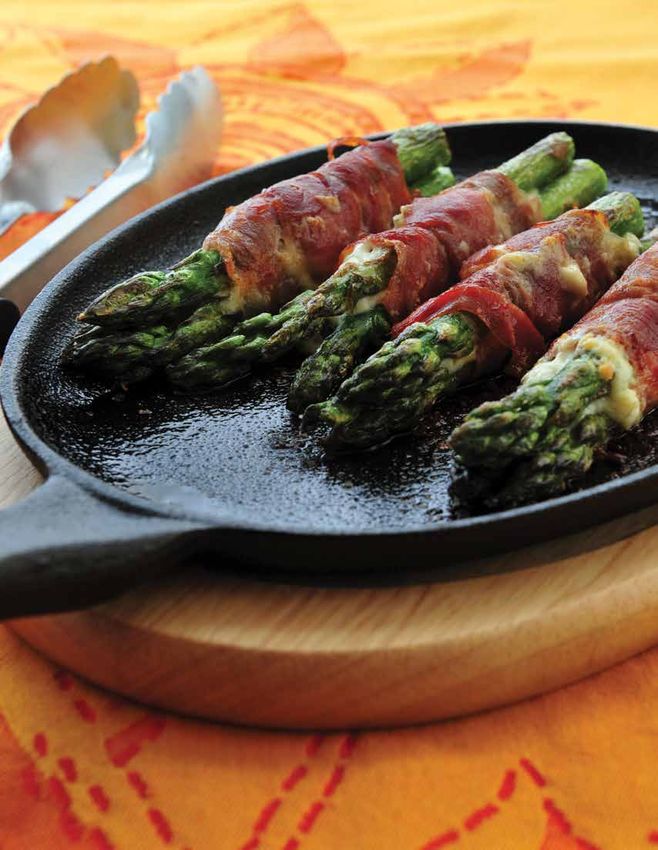
Important LP Tank Safety Information
A liquid propane cylinder should never be “overfilled” beyond the cylinder
filling capacity. “Overfilling” may create a dangerous condition.
“Overfilled” tanks can build up excess pressure. The standard safety device on
tanks is the safety relief valve. This valve vents propane gas vapors to relieve
excess pressure. These vapors are combustible and can be ignited.
To avoid risk of fire or explosion, take the following safety precautions:
Never replace the liquid propane regulator or hose with a different type than the model supplied.
Never use a dented or rusty LP tank.
Never connect the pizza oven to anything other than the fuel source indicated on the serial plate. Factory
conversion kits are available for switching fuel sources. Contact Kalamazoo Outdoor Gourmet or an
authorized dealer for details. Conversion kit installation must be done by a qualified technician.
The LP-gas cylinder must include a collar to protect the cylinder valve from damage.
Ensure proper ventilation of the cylinder. The cylinder supply system must be arranged for vapor
withdrawal.
DANGER:
A. Do not store a spare LP-gas cylinder under or near this appliance;
B. Never fill the cylinder beyond 80 percent full; and
C. If instructions A and B are not followed exactly, a fire causing
death or serious injury may occur.
6 KalamazooGourmet.com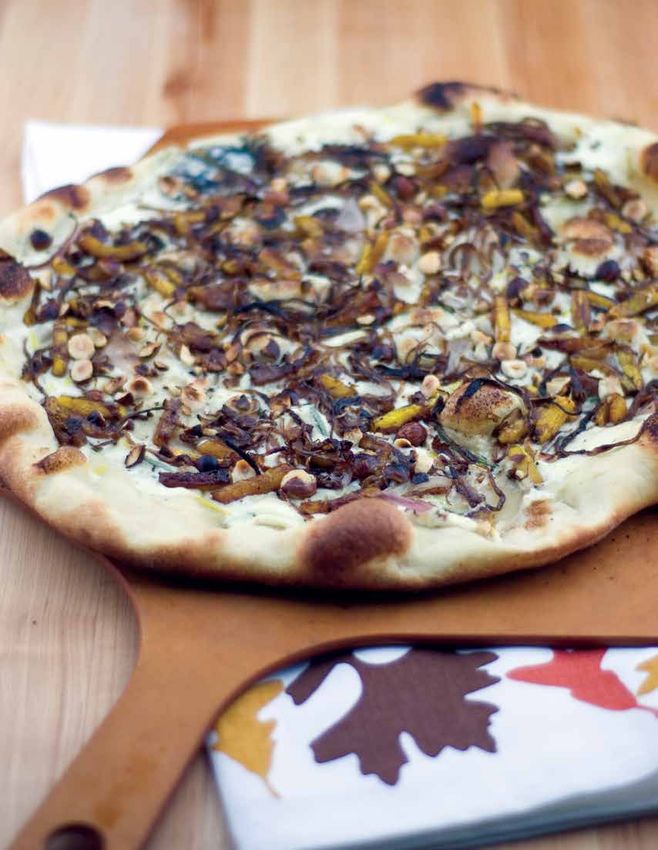
LP Tank Safety Information CONTINUED
The LP-gas supply cylinder to be used must be constructed and marked in accordance with the
specifications for LP-gas cylinders, U.S. Department of Transportation (DOT) or the standard for Cylinders,
Spheres and Tubes for the Transportation of Dangerous Goods, CAN/CSA-B339.
When the pizza oven is not in use, the gas must be turned off at the supply cylinder.
The pizza oven may be stored indoors, but only if the cylinder is disconnected and removed from the oven.
An LP cylinder MUST NEVER BE STORED INDOORS.
Cylinders must be stored outdoors out of the reach of children and must not be stored in a building,
garage or any other enclosed area.
The pressure regulator and hose assembly supplied with the pizza oven must be used. Replacement
pressure regulators and hose assemblies must be the type specified by Kalamazoo Outdoor Gourmet. For
replacement parts, contact Kalamazoo Outdoor Gourmet customer service at 1.800.868.1699.
DANGER: FIGURE 1
Do not route the gas supply
hose or locate a propane
cylinder in a way that may
create a tripping hazard.
Tripping over, or getting
caught on, a gas supply
hose may pull a pizza oven
off the counter or tip it over
creating serious risk of injury
and fire.
1.800.868.1699 7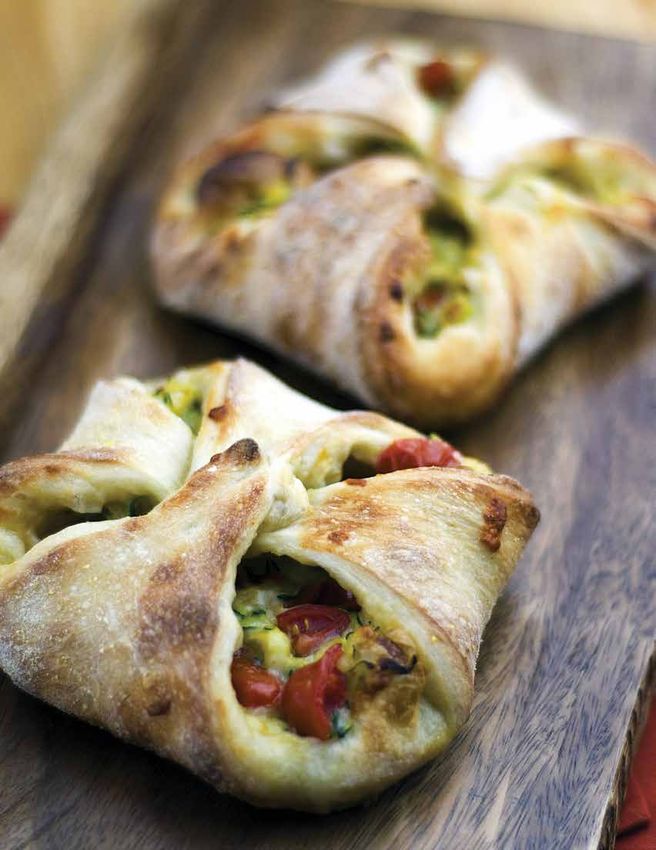
Liquid Propane Gas Requirements
(20-Pound Cylinder)
Verify the type of gas your pizza oven has been configured for by the factory
by checking the serial plate on the back of the oven. Pizza ovens configured for
liquid propane (LP) gas are orificed differently than ovens configured for natural
gas (NG). Pizza ovens configured for use with 20-pound LP cylinders (Type 1)
are shipped with an LP regulator hose assembly attached.

Connection: LP regulator hose assembly (included) connects to the pizza oven
via 0.5" NPT male with a 0.375" flare adapter (included).

Operating Pressure: 11.0" W.C.
To connect the LP regulator hose assembly to the LP tank, first make sure the main valve on the tank is
completely closed. Make sure also that the control valves on the front of the pizza oven are OFF.

Thread the regulator inlet over the tank valve. Use care to ensure proper alignment of the threaded coupler
and avoid cross-threading or damaging the coupler. Turn the black coupler clockwise until tightened up, but
do not over-tighten.

IMPORTANT: Always close the main valve on the            FIGURE 2
tank before disconnecting or transporting the tank.
IMPORTANT: After connecting a fresh LP tank,
you may need to purge air from the system. Before
lighting, open the main valve on the tank. Turn
the control valves on the pizza oven to the HIGH
position for about 15 seconds to purge air from the
system. Turn the control valves on the pizza oven
OFF and wait 5 minutes for any gas to clear. Finally,
continue with the normal lighting procedure.
The installation must conform with local codes. In
the absence of local codes, the installation must
conform with the National Fuel Gas Code, ANSI
Z223.1/NFPA 54; Storage and Handling of Liquefied
                                                           MAIN                   LP REGULATOR HOSE
Petroleum Gases, ANSI/NFPA 58; Natural Gas and
                                                           VALVE                  ASSEMBLY PROVIDED
Propane Installation Code, CSA B149.1; or Propane
Storage and Handling, CSA B149.2.

Cylinder Requirements: Never use                                                  TYPE 1 REGULATOR
a dented or rusty LP tank. Never
use a cylinder with a damaged
valve. Always check for leaks after                                               20-POUND LP TANK
                                                                                  (NOT INCLUDED)
connecting an LP tank.

8                                                                                          KalamazooGourmet.com
Natural Gas Requirements
Verify the type of gas your pizza oven has been configured for by the factory
by checking the serial plate on the back of the oven. Pizza ovens configured for
natural gas (NG) are orificed differently than ovens configured for liquid propane
(LP) gas. Pizza ovens configured for use with natural gas are shipped with a gray
hose with a quick-connect fitting.
Connection: Quick-connect hose assembly (included) connects to the pizza oven
via 0.5" NPT male with a 0.375" flare adapter (included). The quick-connect
fitting (included) threads onto a 0.375” male NPT connection point (not included).
Operating Pressure: 7.0" W.C.
FIGURE 3
IMPORTANT: Always close gas supply shutoff valve
before disconnecting the pizza oven gas supply hose.
IMPORTANT: An installer-supplied safety shutoff valve
MUST be installed on the natural gas supply line for the
pizza oven. The valve should be easily accessed and
located between 3 and 20 feet away from the oven.
All gas connections should be made by a qualified
technician. The installation and all installer-supplied
parts must conform to local codes. In the absence
of local codes, the installation and all parts should
conform to the National Fuel Gas Code, ANSI Z223.1/
GAS HOSE
NFPA 54 or Natural Gas and Propane Installation Code,
ASSEMBLY
CSA B149.1. PROVIDED
All pipe sealants must be an approved type.
INSTALLER-SUPPLIED
Artisan Fire Pizza Oven BTUs: 52,000 SHUTOFF VALVE MUST
BE EASILY ACCESSIBLE
IMPORTANT: Diameter and length of the gas supply
pipe may limit the pressure and BTU delivery of gas to
the oven. The installer must ensure proper delivery to
the pizza oven or it will not operate properly.
The appliance and its individual shutoff valve must be
disconnected from the gas supply piping system during
any pressure testing of that system at pressures in
excess of 1/2 psi (3.5 kPa).
During any pressure testing of the gas supply piping
system at test pressures equal to or less than 1/2 psi
(3.5 kPa), the appliance must be isolated from the
system by closing its individual manual shutoff valve.
1.800.868.1699 9Bulk Supply Liquid Propane Gas
Requirements
Verify the type of gas your pizza oven has been configured for by the factory
by checking the serial plate on the back of the oven. Pizza ovens configured for
liquid propane (LP) gas are orificed differently than ovens configured for natural
gas (NG). Pizza ovens configured for use with bulk LP tanks are shipped with a
gray hose with a quick-connect fitting.
Connection: Quick-connect hose assembly (included) connects to the pizza
oven via 0.5" NPT male with a 0.375" flare adapter (included). The quick-
connect fitting (included) threads onto a 0.375” male NPT connection point
(not included).
Operating Pressure: 11.0" W.C.
A step down regulator MUST be used on an LP hose system to reduce the pressure down to 11.0" W.C. for the
pizza oven.
IMPORTANT: Always close gas supply shutoff valve FIGURE 4
before disconnecting the pizza oven gas supply
hose.
IMPORTANT: An installer-supplied safety shutoff
valve MUST be installed on the gas supply line for
the pizza oven. The valve should be easily accessed
and located between 3 and 20 feet away from the
oven.
All gas connections should be made by a qualified
technician. The installation and all installer-supplied
parts must conform to local codes. In the absence
of local codes, the installation and all parts should
conform to the National Fuel Gas Code, ANSI GAS HOSE
Z223.1/NFPA 54; Storage and Handling of Liquefied ASSEMBLY
Petroleum Gases, ANSI/NFPA 58; Natural Gas and PROVIDED
Propane Installation Code, CSA B149.1; or Propane
Storage and Handling, CSA B149.2.
INSTALLER-SUPPLIED
All pipe sealants must be an approved type. SHUTOFF VALVE MUST
BE EASILY ACCESSIBLE
10 KalamazooGourmet.comLeak Testing
Although gas connections on the pizza oven are leak tested at the factory
prior to shipment, a complete test must be performed after installation due to
possible mishandling during shipping or installation.
Periodic checks are also recommended. Immediately check for leaks if you
smell gas.
Never use an open flame to look for leaks.
Before Testing: Extinguish all open flames. Do not smoke.
You will need a spray bottle, a brush or a rag. For LP units using a 20-pound cylinder, a full cylinder should be
used.
IMPORTANT: Homeowners should only check for leaks on the gas connections that are external to the pizza
oven. If the valves or other internal connections need to be checked, please call a qualified technician or
Kalamazoo Outdoor Gourmet customer service at 1.800.868.1699.
To Conduct the Test:
Make a soap solution of one part liquid dish soap and one part water.
Make sure both pizza oven control valves are in the OFF position. Turn the gas supply ON. Use a spray bottle,
brush or rag to apply the mild soap solution to all connections from the supply line or LP cylinder to the
connection on the back of the pizza oven. Check all connections. Soap bubbles will appear at any connections
with a leak. Turn OFF the gas supply and tighten any leaky connections. Recheck, applying more mild soap
solution.
IMPORTANT: Do not use the pizza oven until all connections have been
checked and do not leak.
1.800.868.1699 11Pizza Oven Location
The Artisan Fire Pizza Oven is designed for easy placement on an outdoor
countertop. It may also be used on a suitable table or cart. It is recommended
that the pizza oven be placed on a non-combustible surface.
Choosing a Location: Important consideration for pizza oven placement
include exposure to wind, proximity to foot traffic and areas where people
congregate, and access to the gas supply.
Do not place the pizza oven in a location where the door opening is likely to be exposed to strong wind.
Do not place the pizza oven where it is likely to be bumped into or inadvertently touched by passers by. It is
recommended that the countertop or other surface extend 9 inches beyond the sides and back of the pizza
oven as a safety clearance to protect people from injury.
Do not place the pizza oven on a table or cart that is unable to safely support the 100-pound weight of the
pizza oven or may topple or tip over.
Do not place the pizza oven on any surface that allows the pizza oven to slide easily or inadvertently change
position.
Never place the pizza oven where the gas hose creates a safety hazard (see Figure 1). Tripping over an exposed
gas hose may create a gas leak, pull the pizza oven off the counter or create other serious safety hazards.
Never locate the pizza oven in a building, breezeway, shed or other such enclosed areas.
The pizza oven is not intended to be installed in or on a boat or recreational vehicle.
IMPORTANT: Do not build the pizza oven into any type of enclosure.
Proper air circulation in and around the pizza oven is critical to its
operation. Maintain at least 6 inches of clearance around the sides and
back of the pizza oven, and 12 inches above the top. Do not obstruct
the open space below the pizza oven. NEVER place the pizza oven
underneath an overhead combustible surface. The pizza oven must be
placed on top of a non-combustible surface.
For ease of use and safe operation, it is recommended the surface on which
the pizza oven sits be at least 36 inches high (counter-height) and not more
than 42 inches high (bar-height).
12 KalamazooGourmet.comInitial Assembly
For easier care and service, your Artisan Fire Pizza Oven stacks together. No
tools are required for initial assembly.
A. Place BASE UNIT A in the desired location, 6 inches away from any combustible surface on the sides,
back and front. The pizza oven may NOT be placed underneath any overhead combustible surface.
B. Insert HEAT DIFFUSERS B into BASE UNIT A. These will be positioned between the lower burner and
the cooking decks.
C. Remove COOKING DECKS C from the cardboard box. Remove any stickers from the cooking deck.
Carefully insert the cooking decks into BASE UNIT A. Sudden impact will crack the cooking decks, so
use caution.
D. Place MID BODY D onto BASE UNIT A, aligning the holes in the bottom of MID BODY D with the
small posts on BASE UNIT A. MID BODY D should sit flat and be positively located by the posts.
E. Insert CEILING STONE E into the top opening of MID BODY E. Remove any tape that may have been
used during shipping.
F. Place ROOF F onto MID BODY D. The large opening at the top should face rearward. This is the
exhaust “chimney.”
G. If not already on the unit, mount CONTROL FIGURE 5
KNOBS G & H on the valve posts. Be sure
the flat side of the opening in the knob
casting is aligned with the flat side of the F
valve stem (see Figure 11). The metal tab
welded into the knob opening is placed
against the round side of the valve stem.
E
I. Insert CRUMB TRAY I into the opening on
the front of the unit below the main shelf. It
sits on a ledge. Crumbs can be brushed off
the cooking deck down into the gap at the D
front of the stone, falling into the crumb tray.
WARNING: The crumb tray will become hot
during operation. To avoid burns, be certain
the oven is cool before touching the tray, or
use an appropriate cooking mitt. C
J. The pizza oven DOOR J sits in the C
doorway. B
WARNING: Never operate the B
oven with the door in place.
K. MANUAL IGNITION WAND K is A
for use in manually igniting the
oven. It may be stored on the
ledge on the underside of the side
shelf on BASE UNIT A.
J I
G H K
1.800.868.1699 13Pizza Oven Controls
A. Lower Burner Control: Controls the height of the flame on the burner below the cooking deck.
B. Upper Burner Control: Controls the height of the flame on the burner at the rear of the cooking deck. On
HIGH, this flame is visible above the Cooking Deck Backstop E.
C. Electronic Ignition Button: Depress to trigger the electronic ignition. Unscrew and remove to replace the
ignition system battery.
D. Lower Burner Viewport: Allows visual confirmation of lower burner status. Use as manual ignition port for
manual lighting procedure (SEE LIGHTING YOUR PIZZA OVEN).
E. Cooking Deck Backstop: Prevents pizzas from falling off the back of the cooking deck and into the upper
burner area. For manual lighting procedure, a match must be extended past this backstop to light the
upper burner (SEE LIGHTING YOUR PIZZA OVEN).
FIGURE 6
A E D B C
14 KalamazooGourmet.comBefore You Cook
A quick safety check should be performed before each time you use the
pizza oven.
1. Clean and inspect the gas hose. If there is evidence of abrasion, wear, cuts or leaks, do not use the
pizza oven. The hose must be replaced prior to using the pizza oven. Replace the hose assembly with
the exact type specified by Kalamazoo Outdoor Gourmet.
2. Ensure the gas hose is clear of the pizza oven. Keep the fuel supply hose away from any heated
surface(s).
3. Check that the area near the pizza oven is clear of combustible materials and vapors, including alcohol,
gasoline, aerosol containers and dry goods. Keep electrical cords from being in contact with the pizza
oven.
4. Check that nothing is interfering with the safe operation of the oven by obstructing the ventilation
around and under the unit. The pizza oven requires 6 inches of clearance to the left, right and back of
the unit with no obstructions above.
5. Do not use the oven with overly loose-fitting clothing, especially loose sleeves that may come in
contact with the hot surfaces inside the oven or near the door.
6. Have insulated gloves with long cuffs ready and available.
While You are Cooking
1. Never move the pizza oven while it is in use or when it is hot.
2. The use of alcohol, prescription or non-prescription drugs may impair your ability to properly assemble
or safely operate the pizza oven.
3. Do not touch the top of the pizza oven, the front shelf or any surfaces inside or near the door opening
while the oven is hot. These surfaces can cause serious burns.
4. Be very careful transporting hot pizzas. The toppings can cause serious burns to yourself or those
around you.
5. Only use a long-handled brass bristle brush to clean the cooking deck. The handle must be long
enough that your hands stay safely outside of the oven.
6. Never empty the crumb tray while the oven is hot. The tray and its contents become very hot while the
oven is in use.
Follow all warnings and instructions when using this appliance.
This appliance is not intended for and should never be used as a heater.
This appliance is not intended for commercial use.
1.800.868.1699 15Lighting Your Pizza Oven
Before lighting your pizza oven, be sure you have followed the instructions in
this Use and Care Guide regarding proper setup, placement, gas connections,
leak testing and safe operation, all of which precede this page.
IMPORTANT: Do not use the pizza oven if the odor of gas is present at any time. Follow leak testing
procedures before using the pizza oven.
IMPORTANT: Your pizza oven is equipped with safety valves that prevent the flow of gas unless the integrated
sensors detect the heat of a flame. To light each burner, you must bypass the sensor by pressing in on the
control knob until the flame from the lit burner has sufficiently heated the sensor. The lower burner/control
knob and upper burner/control knob each has its own separate sensor.
Standard Lighting Procedure:
1. Remove the pizza oven door and set aside. DO NOT OPERATE THE PIZZA OVEN WITH THE DOOR INSTALLED.
2. Make sure the LOWER BURNER and UPPER BURNER control knobs are in the OFF position.
3. Turn the main gas supply on.
4. If lighting both burners, light the LOWER BURNER first. Keeping your face well away from the unit,
sight through the lower burner viewport (see Figure 6:D). Push inward on the LOWER BURNER
control knob (see Figure 6:A) and rotate to the HIGH/START position. While continuing to hold in the
control knob, press the ELECTRONIC IGNITION BUTTON (see Figure 6:C). You should hear clicking
and ignition should take place within 4 to 5 seconds. Watch through the lower burner viewport to
confirm ignition. If the burner does not light within this time, turn the knob to the OFF position and
wait 5 minutes for the gas to dissipate before trying again. If you do not hear clicking, refer to the
troubleshooting section of this Use and Care Guide. Once the burner is lit, continue pressing in the
control knob for at least 10 seconds until the safety valve sensor has detected the heat of the
flame.
5. To light the UPPER BURNER, you can look through the open door of the pizza oven, keeping your
face well away from the opening. Push inward on the UPPER BURNER control knob (see Figure 6:B)
and rotate to the HIGH/START position. While continuing to hold in the control knob, press the
ELECTRONIC IGNITION BUTTON. You should hear clicking and ignition should take place within
4 to 5 seconds. If the burner does not light within this time, turn the knob to the OFF position and
wait 5 minutes for the gas to dissipate before trying again. If you do not hear clicking, refer to the
troubleshooting section of this Use and Care Guide. Once the burner is lit, continue pressing in the
control knob for at least 10 seconds until the safety valve sensor has detected the heat of the flame.
Manual Lighting Procedure:
FOLLOW THE STANDARD LIGHTING PROCEDURE, but utilize a paper match inserted into the clip on the end
of the provided manual ignition wand rather than the electronic ignition.
To light the LOWER BURNER, insert the lit match and wand through the lower burner viewport (see Figure 6:D)
to a position above the lower burner. To light the UPPER BURNER, use the wand to hold the lit match at the
rear of the oven above the upper burner.
Light and position the match BEFORE turning on the corresponding control knob. If the burner does not light
immediately, turn the knob to the OFF position and wait 5 minutes for the gas to dissipate before trying again.
Once the burner is lit, continue pressing in the control knob for at least 10 seconds until the safety valve
sensor has detected the heat of the flame.
16 KalamazooGourmet.comBurner Adjustments
Every burner is tested and adjusted at the factory for proper performance. If
a burner is not operating properly, it may be due to variations in the local gas
supply or because of an obstructed air shutter or orifice. Flames should be
stable without lifting from the burner. The flames should burn cleanly without
creating any sooty residue.
Upper Burner Flame Characteristics:
The flame should be predominantly orange and clearly visible at the back of the oven. The flame
diffuser on the burner is designed to create a more visually appealing flame for your oven. It diffuses
the gas coming out of the ports, making it so that there are not individual flames with individual cones.
The inner cone should be
approximately 3 inches high in
FIGURE 7
average.
The outer cone should not touch the
ceiling inside the pizza oven. If the
tips of the outer cone are making
contact with the ceiling, the flames
OUTER CONE
are too high.
UPPER BURNER INNER CONE
AIR SHUTTER
LOCK SCREW
LOWER BURNER OUTER CONE
INNER CONE
Lower Burner Flame Characteristics:
The flame should be blue and stable with
only a small amount of orange, if any, at
AIR SHUTTER
the tips. There should be little noise and no
lifting.
The inner cone should be 1/4 inch high. LOCK SCREW
The outer cone should be 5/8 inch high.
Visually compare the flames in your pizza oven and adjust if necessary, using the instructions on the
following pages.
1.800.868.1699 17Burner Adjustments CONTINUED IMPORTANT: A sooty flame is usually caused by dirt, debris or spider nests blocking the air shutter or orifice. This is a dangerous condition. The pizza oven should NOT be used until the problem is rectified. If you are not comfortable addressing the issue yourself, please hire a qualified technician or contact Kalamazoo Outdoor Gourmet Customer Service at 1.800.868.1699. To Clean the Air Shutter: It is possible to visually inspect the air shutter from below without dismantling the unit. The air shutter is located directly behind the control valve for that burner (See figure 8, air shutters A and E). Turn off the gas supply shutoff valve or close the main valve on the LP cylinder. Ensure the pizza oven control knobs are in the OFF position. CAREFULLY rotate and move that corner of the pizza oven to extend no more than 6 inches off the edge of the countertop (See figures 9 and 10). Use a flashlight to view the screened openings of the air shutter from below. Remove any obvious obstructions from the screen protecting the air shutter. To Adjust the Air Shutter: It is possible to adjust the air shutter from below without dismantling the unit. The air shutter is located directly behind the control valve for that burner (See figure 8). Turn off the gas supply shutoff valve or close the main valve on the LP cylinder. Ensure the pizza oven control knobs are in the OFF position. CAREFULLY rotate and move that corner of the pizza oven to extend no more than 6 inches off the edge of the countertop (See figures 9 and 10). Use a screwdriver to loosen the lock screw (Figure 8: B, F). Be careful not to remove the lock screw. Once loose, you can rotate the air shutter to adjust the amount of air entering the venturi. Visually inspect that the gas hose has not been stressed, dislodged or otherwise affected by moving the pizza oven. If it is safe to do so, and with the pizza oven control knobs in the OFF position, turn on the gas supply valve or open the main valve on the LP cylinder. Light the burner to be adjusted following the lighting procedure on page 16. LIGHT ONLY THE BURNER TO BE ADJUSTED. Rotate the air shutter to adjust the amount of air entering the venturi. For a lifting flame, progressively close the air shutter until the flame no longer lifts from the burner. For a sooty flame, progressively open the air shutter until the flame burns cleanly. Once adjusted to a stable flame that burns cleanly and does not lift, turn the pizza oven control knob to the OFF position. Tighten the lock screw. Re-light and confirm the adjustment is good. Turn the pizza oven control knob to the OFF position. Turn off the gas supply shutoff valve or close the main valve on the LP cylinder. Return the pizza oven to its normal position on the countertop. Once again, visually inspect that the gas hose has not been stressed, dislodged or otherwise affected by moving the pizza oven. IMPORTANT: If the flame from the upper burner is contacting the ceiling inside the pizza oven, contact Kalamazoo Outdoor Gourmet Customer Service. You may have higher than normal gas pressure and may need a smaller orifice for this burner. 18 KalamazooGourmet.com
FIGURE 8 (BOTTOM VIEW)
                                                            A. Air shutter
                                                            B. Lock screw
                  D                H
                                                            C. Lower burner body
A                                                     E     D. Brass orifice
                                                            E. Air shutter
B                                                     F     F.   Lock screw
                                                            G. Upper burner body
C                                                    G      H. Brass orifice

    IMPORTANT: Always ensure brass orifices (D and H above) are inserted into
    the holes in the ends of the air shutters (A and E above) and centered.

FIGURE 9                                 FIGURE 10

1.800.868.1699                                                                     19
20 KalamazooGourmet.com
Cooking with Your Pizza Oven
IMPORTANT: The Artisan Fire Pizza Oven is a high-performance piece of
equipment that gets very hot. Use caution when working with the oven and do
not leave the oven unattended. Use insulated gloves with a long cuff to protect
your hands and forearms from heat.
Essential Equipment
Leather insulated gloves with long cuffs to protect your hands and forearms.
Long-handled brass brush, preferably “push broom” style, for cleaning the cooking deck
Heat-resistant pizza peels for transferring pizzas into the oven and rotating pizzas while cooking
Aluminum pizza screen to slow down the cooking of the crust when needed
Check out Kalamazoo’s Pizza Master’s Essentials Kit for the best pizza peels available
(see page 58).
Other Helpful Accessories
Dough divider/scraper
Large-diameter pizza cutting wheel
Heavy-gauge deep dish pizza pan
Cast iron skillet and/or fajita pans
Digital scale
Artisan Fire Pizza Oven Cover
IMPORTANT: Before cooking, become familiar with all the information in
this Use and Care Guide regarding safe operation of your pizza oven.
Preheating
The Artisan Fire Pizza Oven is ready to cook in as little as 20 minutes, however,
we recommend at least 45 minutes of preheating for optimum performance.
IMPORTANT: Always remove the door before operating the pizza oven.
The door is for use only when the pizza oven is OFF. It is not intended
for cooking. It is intended only for keeping foreign objects out of the
oven when it is not in use.
1.800.868.1699 21General Operating Tips
Thin Crust Pizza
Crust formed to less than 1/8” thick IMPORTANT: Never put greasy,
Upper burner on HIGH oily or buttery foods directly on
Lower burner on LOW the cooking deck. For cookies,
Cook for approximately 3 minutes
meats and other items, use a
Rotate pizza 3 to 4 times during cooking
pan or cast iron skillet.
Medium Crust Pizza
Crust formed to 1/4” thick
Upper burner on MEDIUM Temperature Range
Lower burner turned OFF a couple of When the oven is fully pre-heated, with
minutes before putting pizza in the oven both burners on HIGH, the Artisan Fire Pizza
after preheating on LOW Oven is capable of intense heat in excess of
800ºF. The heat is most intense at the rear
Cook for approximately 8 minutes
of the cooking deck and least intense at the
Rotate pizza 3 to 4 times during cooking front. Once you are familiar with cooking in
the oven, you will be able to use this to your
Deep Dish Pizza advantage in turning out perfect pizzas. Only
Use heavy-gauge aluminum pizza pan the thinnest of pizzas with a reserved amount
of toppings should be cooked at the upper
Upper burner on MEDIUM end of the temperature range. Specialty flours
Lower burner MEDIUM may be needed to avoid burning the dough.
Cooling rack placed between pan and When the upper burner is set to LOW and the
cooking deck lower burner is LOW or OFF, the oven cooks
Cook for approximately 40 minutes at a very low and slow speed. Temperatures
can be as low as 300ºF.
Rotate pizza every 5 to 8 minutes
Why no Thermometer?
Calzones
With the intense and dynamic heat
Upper burner on MEDIUM characteristics of the Artisan Fire Pizza
Lower burner turned OFF a couple of Oven, we have found that a thermometer is
minutes before putting calzones in the oven misleading at best, resulting in poorly-cooked
after preheating on LOW pizzas. After hundreds of tests, we have
Cook for approximately 7 minutes developed the guide on the left for basic
burner settings. We recommend you learn to
Rotate calzones once during cooking trust your eyes and experiences to determine
how quickly a pizza is cooking and when it
Roasted Meats or Vegetables has reached perfection.
Upper burner on HIGH
Lower burner LOW
Preheat cast iron skillet in the oven Cook with your pizza oven a few
Cook food in preheated skillet times to learn the ropes before
Rotate skillet for even roasting hosting your first pizza party.
22 KalamazooGourmet.comAdditional Cooking Tips
Use corn meal or flour between the dough and the peel to help slide the pizza off the peel. Be sure the
dough is floured enough so that it is not sticky on the bottom.
Do not leave an assembled pizza on the countertop or the peel longer than absolutely necessary. This can
lead to the pizza sticking to the surface.
Cook thin to medium crust pizzas directly on the cooking deck.
Use multiple, smaller “flicking” gestures to coax the pizza off the peel into the oven. Trying to do it with
one, larger gesture is more likely to dislodge pizza toppings.
Do not overload a thin-crust or medium-crust pizza with too much toppings. This will most often lead to a
soggy center crust. When in doubt, less is more.
If the pizza sticks to the cooking deck, the deck was probably not hot enough before the pizza was put
onto the deck.
Do not put a frozen pizza on the cooking deck. It is almost certain to stick and to become burned before it
releases.
Rotate pizzas for even cooking. The oven is hottest at the back.
Brush burnt cornmeal or flour off the cooking deck and into the crumb tray before cooking the next pizza.
If you have any difficulty rotating the pizza inside the oven using a peel, try using a smaller pizza peel
designed for turning. Or try long-handled grill tongs to do the job. You can also use the tongs to lift the
edge of the pizza to check on the bottom of the crust.
Avoid letting the pizza contact the cooking deck backstop (Figure 6:E). This is a very hot surface that will
quickly burn the crust.
1.800.868.1699 2324
Recipes
Pizza making is the perfect opportunity for creative expression. It is relatively
casual, so there is less pressure, and follows a simple structure within which you
can try a host of variations.

Pizza making is also great for communal cooking. People can gather to make a
variety of pizzas using their own toppings. The short cooking time offers instant
gratification and encourages experimentation.

Following are a selection of recipes we’ve created over the years. Sure, some
of them are pretty “out there,” but they are all delicious. We encourage you to
give them a try — and to come up with your own. We’d be especially grateful
if you shoot us a note to share your creations and experiences.

Two thoughts may help you on your way...

Use the freshest and best ingredients you can. Making your pizzas with
seasonal ingredients grown locally can be very rewarding. Try artisan cheeses.
Keep a log of the ingredients you like best and what you did with them.

And, keep your pizzas on the simple side, using only three or four main
ingredients. Once you establish a few combinations as your favorites, start
riffing on those for new creations.

Most importantly of all, enjoy yourself and eat well!

    Your pizza oven can cook more than just pizzas and bread. In this section,
    we share quick recipes for roasted asparagus and a grilled cheese
    panini. You can also roast meats — just be sure to do it in an appropriate
    roasting pan and never directly on the cooking deck.

1.800.868.1699                                                                   25
26
White Wine Pizza Dough
    Making pizza dough from scratch really isn’t a lot of work. You don’t need to
    dig out the mixer and use the dough hook for kneading. Try kneading the
    dough by hand right in the mixing bowl, and you may find yourself making
    dough from scratch more often.

    This dough is easy to work with and appropriate for a wide variety of pizza
    styles and calzones.
    Yields 28 ounces of dough                 Directions
    ¾ cup warm water                          Put 6 tablespoons of the lukewarm (100° to 110°F) water, sugar and
    Pinch of sugar                            yeast in a small bowl, mix well and set aside for 5 minutes or until
                                              frothy.
    3 teaspoons active dry yeast
                                              In a large bowl, whisk together the remaining water with the white
    1/4 cup white wine, at room               wine, salt and 2 tablespoons olive oil. Use a wooden spoon to stir in 1
    temperature                               cup of the flour, creating a batter. Stir the honey and the yeast mixture
    1¼ teaspoons kosher salt                  into the batter.
    2 tablespoons olive oil, plus extra for   Add the remaining flour and continue stirring with the wooden spoon
    coating                                   for a few minutes. Knead the mixture in the bowl until smooth and
                                              relatively firm. Clean the sides of the bowl, oil the dough with a little
    3 cups bread flour
                                              more olive oil and cover the bowl with a towel.
    2 teaspoons honey
                                              Let rise for 45 minutes. A good tip is to run a load of dishes in the
                                              dishwasher while the dough rises right above the washer door. The
                                              warm, moist air helps with the rising.
                                              After 45 to 60 minutes, punch the dough down, split in half or
                                              quarters, knead again briefly and let rest 15 minutes more before
                                              rolling into pizza crusts. Unused dough may be frozen..
                                              Makes enough dough for two 14-inch round pizzas or 4 individual
                                              pizzas. For more pizzas, make the dough 1 batch at a time rather than
                                              multiplying the recipe.

1.800.868.1699                                                                                                        27
28
Artisan Fire Pizza Dough
    This Neapolitan-inspired pizza dough utilizes a blend of bread flour and Tipo
    '00 flour — the Italian flour used by Neapolitan pizza restaurants because of its
    high burning point. We have optimized this dough recipe for use in the Artisan
    Fire Pizza Oven when making Neapolitan-style pizzas. The flour blend yields
    good overall color and the desired leapording.

    This dough is a little more difficult to handle than the White Wine Pizza Dough
    and is intended for use only with sparse toppings in the Neapolitan style.

    Yields 7 10-ounce Dough Balls            Directions
    (about 2kg dough)
                                             Dissolve the honey in the warm water. Stir in the yeast. Let sit for 5
                                             minutes to activate. It should become quite frothy.
    50ml luke-warm tap water
                                             Combine the yeast mixture with the cold water and ’00 flour in a large
    2 teaspoons honey                        bowl. Stir well to create a batter. Add half of the bread flour (400g)
    5 grams active dry yeast                 and stir well to combine. Add the remaining half of the bread flour
                                             and the salt. Work these into the dough, then remove from the bowl
    700ml cold tap water
                                             onto a clean work surface. Knead until the dough is evenly combined
    450g Caputo Tipo 00 flour                and has a consistent texture, about 8 minutes.
    800g unbleached bread flour              Return the dough to the mixing bowl and cover tightly. Let the dough
    45g kosher salt                          rest for 1 hour.
                                             Divide the dough into 7 equal, 10-ounce (284g) parts, working each
                                             part into a smooth ball and tucking in any corners or edges. Coat
    NOTES                                    each ball in olive oil and place them into covered dough boxes or on
    For an interesting flavor and texture    baking sheets. Cover tightly and refrigerate for 12 to 24 hours.
    alternative, try substituting 300g of    Remove the dough boxes from the refrigerator and let the dough rest
    rye flour for 300g of bread flour.       at room temperature for 2 to 4 hours before making pizzas.
                                             To form the pizza crusts, work the dough gently with your hands.
    All ingredients are measured by          Never use a rolling pin or pinch the dough too firmly. This will “bruise”
    weight. Metric measurements are          the dough. Start with the dough ball on a floured work surface. Press
    used for added precision (1 gram =       gently outward toward the edges with your fingers, rotating the dough
    0.035 ounces) and to make it easier to as you work your way around to create a disk. Lift the disk from the
    calculate the hydration (ratio of wet to surface and begin to gently stretch it. Once it is about 7 inches in
    dry ingredients by weight).              diameter, let gravity begin to help you shape the dough. Hold the disk
                                             from the top with both hands. Try to use the flats of your fingers rather
                                             than your fingertips. Sway the dough back and forth to stretch it, and
                                             shuffle your hands along to rotate the dough as you sway back and
                                             forth. You can also stretch the dough across the backs of your fists.
                                             Combine these techniques in the manner that suits you best.
                                             When the dough is ready for toppings, it should be about 1/8-inch
                                             thick and roughly 12 inches in diameter. Do not create a lip for the
                                             perimeter. The dough should be an even thickness from edge to
                                             edge. The lip should rise around the edge in the oven (keep the
                                             toppings ¾ inch from the edge).

1.800.868.1699                                                                                                        29
30 KalamazooGourmet.com
Charcuterie Pizza
    This pizza is amazing! Cheese and cured meats are not new to pizza
    (think pepperoni pizza), but great cheese and great cured meats can
    elevate pizza to another level. In particular, the buttery and nutty Campo
    de Montalban makes an incredible contribution. The pork pate exterior
    becomes mouth-wateringly crisp from the high heat of the pizza oven.
    You can follow these specific ingredients, or use the leftovers from almost
    any meat and cheese board.
    Yields a 10 inch pizza                  Directions
    1 Artisan Fire Pizza Dough ball,        Preheat the pizza oven for cooking with the upper burner control on
    10 ounces                               HIGH and the lower burner control on LOW.
    Caputo '00 flour for dusting            Lightly dust the work surface and the dough ball with ‘00 flour.
    1 ounce triple cream French cheese (I   Gently form the dough into a 10 inch crust about 1/8 inch thick.
    used Délice de Bourgogne)               Top the dough with dabs of the triple-cream cheese, plus the Campo
    1 ounce Campo de Montalban,             de Montalban and meats. Drizzle with olive oil.
    cut into 1/2-inch cubes (this is a      Transfer the assembled pizza onto a pizza peel dusted with ‘00 flour.
    Manchego-like cheese, but made
    from a blend of sheeps’, cows’ and      Transfer to the pizza oven directly on the cooking deck and bake for 2
    goats’ milk)                            to 3 minutes until the crust is crisp and the cheese is browned. Rotate
                                            several times for even baking.
    1/2 ounce wild boar salami (I used
    Creminelli brand)                       Remove, let rest for a minute or two, slice and serve.

    1/2 ounce truffle sausage (I used
    Charlito’s Cucina)
    1 ounce pork pate
    Extra virgin olive oil

1.800.868.1699                                                                                                      31
32
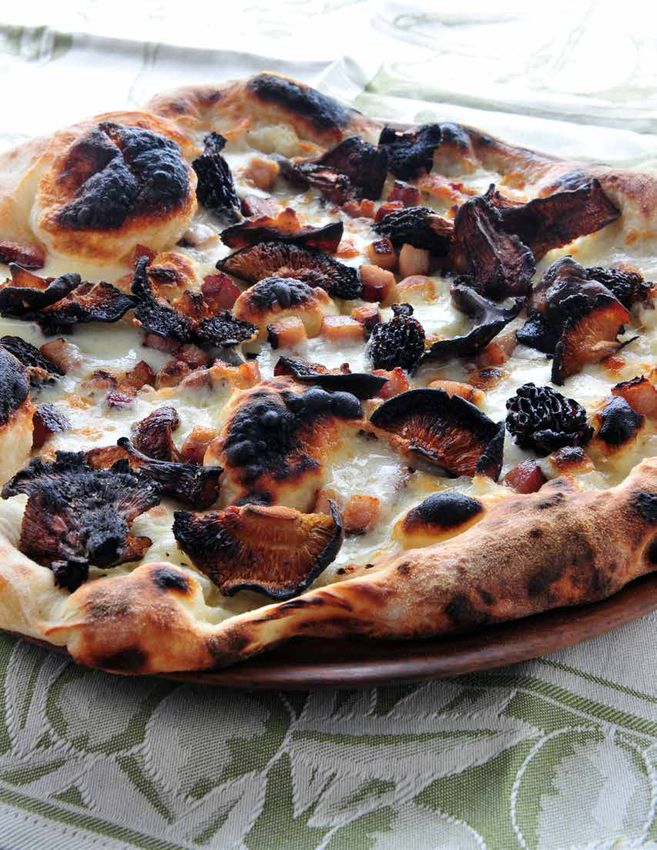
Roasted Mushrooms and Bacon Pizza
    Using wild mushrooms makes a remarkable difference in the taste of a pizza.
    We roast shiitake, morel and chanterelle mushrooms before putting them on
    the pizza to concentrate the earthy flavors and really make them the stars of
    this pie. Creamy, rich sottocenere cheese adds the assertive and indulgent
    flavor of truffles while smoky bacon rounds things out.

    Yields 2 10 inch pizzas                    Directions
    2 Artisan Fire Pizza Dough balls,          Preheat the pizza oven for cooking with the upper burner control on
    10 ounces                                  HIGH and the lower burner control on LOW.
    1/4 pound slab bacon, cut into 1/4         Cook the bacon in a skillet until done but not crisp. Reserve.
    inch cubes (I used a bourbon maple         Toss the mushrooms in olive oil and season liberally with salt and
    bacon made from Berkshire pork             pepper. Either place them in the pizza oven on a fajita skillet and roast
    belly)                                     until browned, about 5 minutes; or grill them directly over a hot fire
    1 ounce morel mushrooms                    on the grill for about the same amount of time. Remove from heat and
    2 ounces chanterelle mushrooms, cut        reserve.
    in half                                    Form one dough ball to a 10- to 12-inch pizza crust. Depending
    3 ounces shitake mushrooms                 on your personal preference, place the dough on a pizza peel with
                                               enough flour or corn meal beneath to allow the pizza to slide easily
    Extra virgin olive oil                     — or assemble your pizza on the work surface and then slide the peel
    Fine sea salt                              underneath at the last minute. Either way, the less time the dough
    Coarsely-ground black pepper               spends on the peel, the less likely it is to stick.

    4 ounces sottocenere cheese                Top the dough with half of each type of cheese, half the mushrooms
    (a medium-soft Italian cheese laced        and half the bacon.
    with truffles and with an ash rind), cut   Transfer to the pizza oven directly on the cooking deck and bake for 2
    into smallish pieces                       to 3 minutes until the crust is crisp and the cheese is melted through.
    4 ounces Quadrello di Bufala cheese        Rotate several times for even baking.
    (similar to Taleggio but with a less       Repeat for the second pizza.
    intense odor and more milky taste),
    cut into smallish pieces

1.800.868.1699                                                                                                        33
34 KalamazooGourmet.com
Avocado, Goat Cheese and Heirloom
    Tomato Appetizer Pizza
    This appetizer pizza is light and refreshing on a warm and sunny day. Mild
    goat cheese and buttery avocado are complimented by the bright flavors of
    fresh tomato and tart lemon juice.

    Yields a 14 inch pizza                Directions
    1/2 batch White Wine Pizza Dough,     Preheat the pizza oven for cooking with the upper burner control on
    about 14 ounces                       HIGH and the lower burner control on LOW.
    Freshly-squeezed juice of ½ lemon     Form the dough into a 14 inch crust about 1/8 inch thick.
    1 ½ medium avocados, ripe (see note) Transfer the dough to a pizza prep peel dusted with cornmeal.
    1 teaspoon fine sea salt              Squeeze the lemon juice into a glass or other non-reactive bowl. Slice
    2 teaspoons extra virgin olive oil    the avocados into the bowl and stir immediately to coat the avocados.
                                          The citric acid will help prevent the avocados from browning. Add the
    1 large heirloom tomato, sliced (I    salt and olive oil to the mixture and mash until it is the consistency of
    used a Paul Robeson variety, or       guacamole.
    substitute about 1 cup halved sweet
    grape tomatoes)                       Spread the avocado mixture onto the pizza dough and then top with
                                          the sliced tomatoes. Add pieces of goat cheese in the spaced between
    2 ounces soft goat cheese             the tomatoes.
    Freshly cracked black pepper          Transfer to the pizza oven directly on the cooking deck and bake for
                                          about 3 minutes until the crust is crisp and browned around the edges.
                                          Rotate several times for even baking.
                                          Slice and serve.

                                          Note: The best tip I know for selecting ripe avocados comes from Chef
                                          Rick Bayless. The color of an avocado is a good clue to how ripe it is
                                          (Haas avocados are usually turning black when they are ripe), but not
                                          always reliable. To select perfect avocados, press your thumb gently
                                          into the base of the avocado. The avocado should yield somewhat
                                          but resist enough that it doesn’t feel mushy. Because the base of the
                                          avocado is the last to ripen, one that yields to gentle pressure is ready
                                          to use right away without being overripe.

1.800.868.1699                                                                                                   35
36
Zucchini Pizza Pinwheels
    A lot like a calzone, but with a beautiful presentation, these pizza pinwheels are
    wonderful starters for parties. Fresh zucchini melds with Spanish cheese and
    sweetened tomatoes.

    Yields 4 pinwheels                 Directions
    1 batch White Wine Pizza Dough,    Preheat the pizza oven for cooking with the upper burner control on
    about 28 ounces                    MEDIUM and the lower burner control on LOW.
    1 cup grape tomatoes, quartered    Stir together the grape tomatoes with the brown sugar in a small bowl
    1 tablespoon light brown sugar     and let sit for at least 15 minutes.

    1 cup shredded zucchini (1 fresh   Spread the shredded zucchini out on a large cutting board and let it
    zucchini should provide enough)    air-dry for 15 minutes.

    1 cup shredded manchego cheese     Discard the liquid in the tomato bowl and combine the tomatoes,
                                       zucchini, cheese and salt in a large bowl.
    1/2 teaspoon fine sea salt
                                       Roll out the pizza dough into a square about 15 inches to a side. Trim
    1 egg, beaten                      the large dough into four smaller, perfect squares, then roll those
                                       thinner until they are each roughly 8 inches to a side.
                                       Start with one square. Stretch the corners to elongate them, making
                                       the dough into a four-pointed star. Transfer to a pizza prep peel
                                       dusted with cornmeal. Spoon the zucchini filling onto the dough in
                                       a square shape that is on a diagonal to the four-pointed star. Lift two
                                       opposing corners of the star to the middle, folding over the filling and
                                       firmly press them together between your fingers to join at the middle.
                                       Repeat with the other two corners and then press the four corners
                                       together at the middle.
                                       Repeat to make a total of four pinwheels on your pizza prep peel.
                                       Optionally, for more golden tops, lightly brush the top areas of the
                                       dough with the beaten egg.
                                       Turn the lower burner control to OFF.
                                       Transfer the pinwheels to the pizza oven, directly onto the cooking
                                       deck, and bake until golden brown on top and cooked through, about
                                       7 minutes.

1.800.868.1699                                                                                                37
38
Caramelized Squash and Red Onion Pizza
    with Hazelnuts and Ricotta
    This pizza is not one of the most beautiful creations, but it is one of the tastiest.
    A thin crust is topped first with a mixture of ricotta cheese, olive oil and lemon
    zest, and then with red onions and butternut squash caramelized with balsamic
    vinegar. Roasted hazelnuts provide the perfect finish.

    Yields a 14 inch pizza                  Directions
    1/2 batch White Wine Pizza Dough,       Preheat the pizza oven for cooking with the upper burner control on
    about 14 ounces                         MEDIUM and the lower burner control on LOW.
    1/2 butternut squash, sliced ¼” thick   Spread the onion and squash in a single layer on a cookie sheet
    and then cut into ¼” strips             covered in parchment. Drizzle with balsamic vinegar and olive oil and
    1/2 red onion, thinly sliced            sprinkle with salt. Roast in the pizza oven until caramelized, about
                                            15 to 20 minutes, turning once and rotating the cookie sheet once.
    Extra virgin olive oil                  Reserve.
    Balsamic vinegar                        Turn the upper burner control on the pizza oven to HIGH.
    Sea salt                                With a cooktop burner, toast the hazelnuts in a small pan over medium
    1/3 cup cracked hazelnuts               heat until browned and crunchy. Toss with a little sea salt and reserve.
    1/2 cup ricotta cheese                  In a small bowl, combine the ricotta, lemon zest and rosemary leaves
    Finely grated zest of ½ lemon           with a little olive oil and salt to taste.

    About 20 very fresh (soft) rosemary     Form the dough into a 14 inch crust about 1/8 inch thick.
    leaves                                  Transfer the dough to a pizza prep peel dusted with cornmeal.
                                            Spread the cheese mixture over the dough. Sprinkle the caramelized
    You will also need a cookie sheet and   squash and onions over the cheese and then add the hazelnuts.
    parchment.                              Transfer to the pizza oven directly on the cooking deck and bake for
                                            about 3 minutes until the crust is crisp and the cheese is browned.
                                            Rotate several times for even baking.
                                            Remove, let rest for a minute or two, slice and serve.

1.800.868.1699                                                                                                     39
40
Pear Dessert Pizza with Prailine Pecans
    This wonderful dessert pizza is a perfect finale for a Fall pizza party. The
    combination of fresh pears, creme fraiche and praline pecans is not too heavy,
    not too sweet, and very satisfying. Slicing the pears to a paper-thin thickness of
    half a millimeter allows them to just cook through without losing their texture.

    Yields a 14 inch pizza                  Directions
    1/2 batch White Wine Pizza Dough,       Preheat the pizza oven for cooking with the upper burner control on
    about 14 ounces                         HIGH and the lower burner control on LOW.
    4 ounces creme fraiche                  Combine the creme fraiche and sugar in a bowl.
    4 teaspoons light brown sugar           Core the pears and slice paper-thin (a Kyocera ceramic-bladed
    1 ½ d’anjou pears                       mandolin does a great job at this) to help them cook quickly. You can
                                            peel them first, but I prefer to leave the skins on.
    ¼ cup raisins
                                            Form the dough into a 14 inch crust about 1/8 inch thick.
    1/3 cup praline pecans, very coarsely
    chopped                                 Transfer the dough to a pizza peel dusted with cornmeal.
                                            Layer the pear slices on the pizza, loosely folding each slice over
                                            on itself for a more airy pizza. Add the raisins and pralines and then
                                            drizzle creme fraiche mixture over the top.
                                            Transfer to the pizza oven directly on the cooking deck and bake for
                                            about 3 minutes until the crust is crisp and the cheese is browned.
                                            Rotate several times for even baking.
                                            Remove, let rest for a minute or two, slice and serve.

1.800.868.1699                                                                                                       41
42
Grape and Ricotta Pizza
    Thyme, bacon and honey add complexity to this savory and sweet appetizer.
    Yields a 14 inch pizza                    Directions
    2 thick slices of bacon (I like Black     Preheat the pizza oven for cooking with the upper burner control on
    Forest bacon)                             HIGH and the lower burner control on LOW. Preheat a cast iron fajita
    1/2 batch White Wine Pizza Dough,         pan in the oven.
    about 14 ounces                           Cook the bacon in the fajita pan until nearly crisp, flipping as often as
    1/4 cup high-quality ricotta cheese (it   needed. Remove the bacon and cool on paper towels.
    should be easy to spread)                 Form the dough into a 14 inch crust about 1/8 inch thick.
    1 teaspoon fresh thyme leaves             Transfer the dough to a pizza prep peel dusted with cornmeal.
    Honey                                     Spread a thin layer of the ricotta cheese onto the dough.
    Pinch of sea salt                         Sprinkle thyme leaves all over.
    12 large, red seedless grapes, halved     Drizzle with honey. A little will go a long way. Start with just a couple
                                              of teaspoons or so.

    You will also need a cast iron fajita     Sprinkle with sea salt all over.
    pan or skillet.                           Cut the bacon into squares and distribute on top.
                                              Grapes can be added now, cut-side down and cooked as shown. For a
                                              fresher flavor, add the grapes after the pizza comes out of the oven.
                                              Transfer to the pizza oven directly on the cooking deck and bake for
                                              about 3 minutes until the crust is crisp and the cheese is browned.
                                              Rotate several times for even baking.
                                              Remove, let rest for a minute or two, slice and serve.

1.800.868.1699                                                                                                            43
You can also read