Beginner s Auto Maintenance & Repair - Jeff Crawford - TThhee Guide to - WV Department of ...
←
→
Page content transcription
If your browser does not render page correctly, please read the page content below

Th e

          Guide to

  Beginner s Auto
Maintenance & Repair

       Jeff Crawford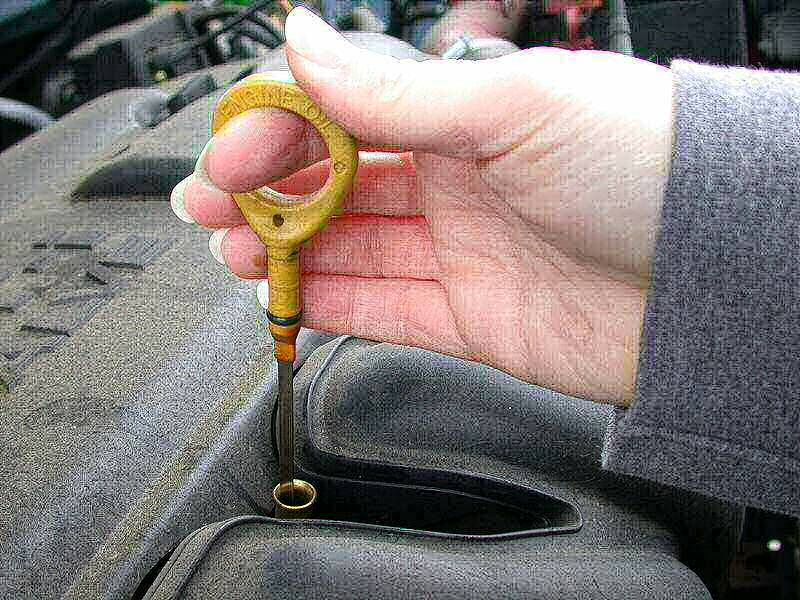
Presented by:

About the Author: Jeff Crawford has over 20 years of experience as a mechanic and
auto technician. He has seen all aspects of the auto repair industry from small shops to
large dealerships. He is the co-owner of Crawford s Auto Repair in Mesa, Arizona
85210. www.CrawfordsAutoService.com.
The Crawford s Auto Repair Guide to Beginner s Auto Maintenance & Repair

By Jeff Crawford, Crawford s Auto Repair

Contributing Author: Rex Kimball, Mirex Marketing

Text copyright © Jeff Crawford, Rex Kimball

All rights reserved for printed and all digital formats. The following license is granted in
PDF:

This book is available in PDF for free, and it can be reproduced, shared and sold for
profit royalty-free in PDF, but it a cannot be changed or adapted in content or format
without the authors consent. Go go http://www.crawfordsautoservice.com/crawfords-
auto-repair-guide-free-ebook/ to download for free.

Many of the images in this book are protected by copyright as cited. Some images are
in the creative commons with free use licenses. Some are in the public domain or
presumed to be in the public domain. Claims of any inaccuracies should be brought to
the authors attention to have the images in question removed from this book.

Crawford s Auto, Crawford s Automotive, Crawfords Auto Service, Crawford s Auto
Repair, CrawfordsAutoService.com, and the Crawford s Auto Repair log are trademarks
of Crawford s Auto Repair in Mesa, AZ 85210

Mirex Marketing and MirexMarketing.com are trademarks of Mirex, LLC in Arizona.

All other copyrights and trademarks are property of their respective owners.

This book is for informational purposes only. The authors are not liable for any accident
or injury that may occur when working with motor vehicles. By proceeding to read this
book, you agree to these terms.
This book is intended for a general audience. Also, Boy Scouts will find it useful for
completing the Automotive Maintenance merit badge. Boy Scouts are welcome to come
to the shop for assistance. This is not an official publication of the Boy Scouts of
America.

The content in this book is also taught as live lessons to the local community in Mesa,
AZ. Go to http://crawfordsautoservice.com/free-automotive-classes/ for details.
Contents:
Chapter 1: Safety Rules & Introduction to Tools . . . . . . . . . . . . 2
Chapter 2: General Maintenance . . . . . . . . . . . . . . . . . . . . . . .15
Chapter 3: Dashboard Indicator Lights . . . . . . . . . . . . . . . . . . 27
Chapter 4: Tires . . . . . . . . . . . . . . . . . . . . . . . . . . . . . . . . . . . 32
Chapter 5: The Internal Combustion Engine & Engine Oil . . . . .43
Chapter 6: Cooling System . . . . . . . . . . . . . . . . . . . . . . . . . . . 46
Chapter 7: Fuel System . . . . . . . . . . . . . . . . . . . . . . . . . . . . . .49
Chapter 8: Electrical System . . . . . . . . . . . . . . . . . . . . . . . . . .52
Chapter 9: Drive Train . . . . . . . . . . . . . . . . . . . . . . . . . . . . . . 56
Chapter 10: Brakes . . . . . . . . . . . . . . . . . . . . . . . . . . . . . . . . .64
Chapter 11: The Auto Repair Industry . . . . . . . . . . . . . . . . . . .67
Chapter 12: How to Buy a Car . . . . . . . . . . . . . . . . . . . . . . . . .71

Crawford s Guide to Beginners Auto Maintenance & Repair www.CrawfordsAutoService.com
Chapter 1: Safety Rules & Introduction to Tools
Automotive Maintenance Safety:
Automobiles are big and heavy with lots of mechanical moving parts. In the right
environment a vehicle can be maintained and repaired safely and effectively. However,
in the wrong environment repairing a vehicle can be dangerous. Follow the tips in this
chapter to stay safe.
Basic Shop Rules:
Never work alone
Wear eye protection
Avoid loose clothing or hair
Stay clear of moving parts of a running vehicle
Be aware of hazardous chemicals and keep a flushing station nearby for eyes
and skin (at home this could be a bathroom sink or shower).
Keep proper clean up materials in case of an accidental spill (see below)
Don t mix your work space with other cluttering materials such as home storage,
garden tools and other items.
Never go under a vehicle that is elevated improperly (the jack to change the tire
is NOT sufficient, see more details below)
Know where the fire extinguisher is and have a planned exit route. The fire
extinguisher should be kept in working order and in a place with easy access.
Keep an emergency response number handy and posted clearly where others
can see it.
Keep an emergency kit in your vehicle for roadside emergencies or repairs.
Consult your vehicle owner s manual for specific safety rules regarding your
vehicle
Proper Clothing and Hair:
Always wear safety goggles for eye protection. Vehicle repair involves the use of many
types of fluids which can splatter and eye contact should be avoided.
Eye protection
Image credit: CC-BY-Glenn McKechnie
2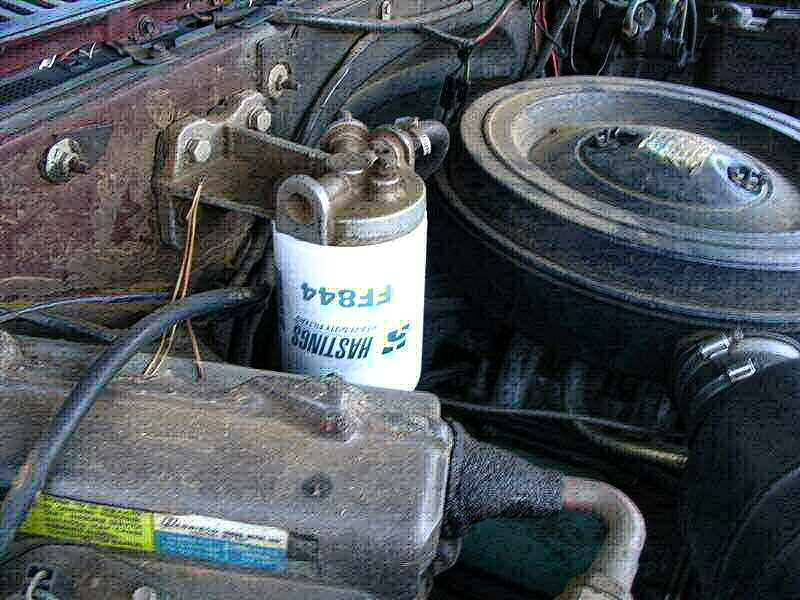
Crawford s Guide to Beginners Auto Maintenance & Repair       www.CrawfordsAutoService.com

One of my first bosses didn't have any feeling sensation in his right hand. He couldn t
feel touch or pain in that hand. He was working alone one night and his hand got caught
in the fan belt while the engine was running. He was conscious long enough to get the
engine to stop running with his other hand, but his right was stuck and he couldn t get
out on his own. He eventually lost consciousness and lay there bleeding for three hours
by himself. Bleeding this long could easily have resulted in death. Luckily he only lost
his fingers. While it was his hand and not a piece of clothing that got caught, the same
principle applies. If a piece of clothing or hair gets caught it won t be long before a hand
or face gets dragged in with it.

Do not wear ties or any loose, hanging clothing. Do not let pony tails down or leave any
loose strands of hair. Bundle your hair up if it s long. Do not wear necklaces, rings or
other jewelry. Some may remember Mr. T, the Mohawk-bearing muscle man from the
1980s sitcom The A-Team. He often wore about 50 lbs. of jewelry and frequently
worked on motor vehicles. This was a blatant violation of mechanic safety rules. Only a
person who can get thrown out of an airplane, flip a jeep, and come out of machine gun
fire without a scratch can work on engines that way.

Ideally the best clothing for performing automotive maintenance and repairs is a
mechanic s jumpsuit. It s durable, comfortable, there are pockets for tools, and there is
nothing loose that can get caught and pulled into moving parts.

Avoid slips, falls and hazardous chemicals:

Hazardous chemicals can include gasoline, oil, coolant, and other vehicle fluids. Avoid
contact with eyes and mouth. If you ever have contact with eyes then flush with cool
water for several minutes. Some car fluids can be acidic, such as battery fluid. If you
ever start to feel burning, then flush with cool water for several minutes. If burning
continues then seek medical attention.

Proper clean up materials include shop rags and oil dri , which is simply kitty litter
without the fragrance. When a spill occurs you should spread enough oil dri over the
spill to absorb the entire spill. Then sweep it up with a broom and dustpan and throw it
away.

                                               3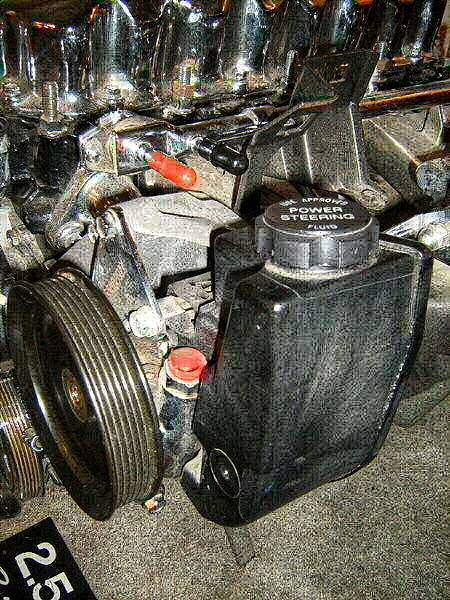
Crawford s Guide to Beginners Auto Maintenance & Repair        www.CrawfordsAutoService.com

                                            Oil Dri

Avoid clutter in your workspace that can act as fall hazards. Keep storage and non-
automotive tools in other areas. Also, clean up tools after you re finished.

Proper Lifting Points:

A motor vehicle is a 4,000+ pound piece of machinery that could fall on top of you.
Never go under a vehicle that is not elevated properly. If the vehicle is elevated properly
then there should not be any problem.

Vehicles should only be lifted at their proper lifting points. The proper lifting points on a
vehicle are the locations on the vehicle where you place the jack to lift the vehicle and
where the jack stands are placed to keep the vehicle elevated. Lifting points are
different on every vehicle. The owner s manual will specify where the lifting points are
for your specific vehicle. Often vehicles have lift points marked on the running board or
rocker panel. There are a couple of disastrous events that can happen during an
attempt to raise a vehicle without using the proper lifting points. The weight of the car
pressing down and the jack pressing up can damage the body of the vehicle. Or worse,
the jack could tip or slide while a person is underneath the vehicle.

                                               4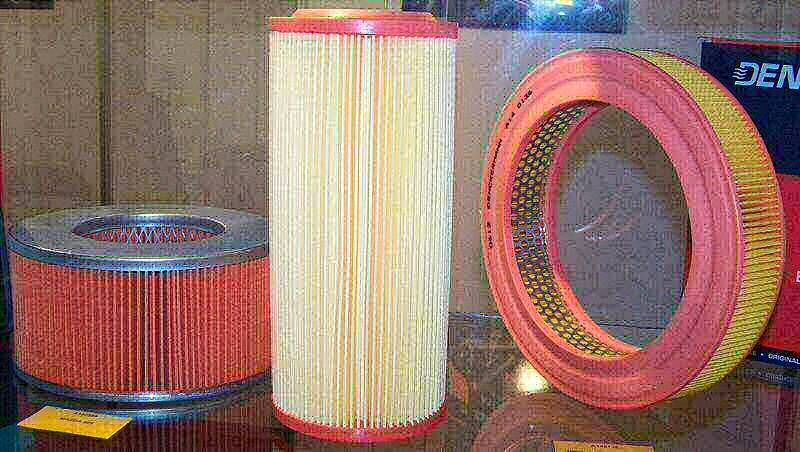
Crawford s Guide to Beginners Auto Maintenance & Repair                 www.CrawfordsAutoService.com

An illustration which demonstrates vehicle lift points for a sample vehicle; consult the owner s manual for
                                   the lift points of a specific vehicle.

Any vehicle that has a frame can be lifted by the frame. When the front is lifted the jack
is usually placed under the suspension cross member. When lifting the rear the jack is
placed under the axle if it has a solid axle. If it doesn t have a solid axle then it should
be lifted by the factory recommended lift points.

Vehicles should always be on firm, level ground. If the ground is not level then the car
may roll and tip the jack. A jack or a jack stand can also slip out or fail to hold the
vehicle in an elevated position when the ground is not firm, such as on a dirt road or
when there is ice or snow.

There are different types of jacks and jack stands. A jack is used to raise the vehicle
either by hydraulic pumping or hand cranking. A jack stand is used to keep the vehicle
elevated and has a firm square base. One type of jack that people are most familiar with
is the one that is included with the spare tire kit. This is to be used only for changing the
tire and it is not sufficient for keeping a vehicle elevated when working under the
vehicle. The jack used for changing tires often has a four point rectangular base. This is
not as stable as a square base.

                               Hydraulic jack with hand-pump mechanism

                                                    5
Crawford s Guide to Beginners Auto Maintenance & Repair www.CrawfordsAutoService.com
When minor repairs are being performed, such as changing a tire, it is permissible to
raise just one corner of the vehicle, or the front or the rear. The vehicle is first raised
with a jack and then placed on jack stands. (Do not go under the vehicle while it is
elevated by a jack). The vehicle should be equally balanced on the jack stands.
A mechanic s shop may have industry jacks or hydraulic lifts. These can be used to
raise the vehicle and keep it elevated. These lifts can raise the entire vehicle at the
same time. When lifting the entire vehicle the center of gravity should be positioned
evenly with the lifting hoist arms. This is evident when the vehicle is raised and all tires
lift off the ground at the same time. Most vehicles are front-heavy due to the engine
block. However, many work trucks are balanced to have the center of gravity in the
middle.
Hydraulic lift with hoist arms that raise the vehicle on its lifting points. The lift consists of two vertical blue
beams and four white hoist arms. Two white hoist arms on the other side of the vehicle are not seen in
the pictures.
Image credit: CC-BY-ANT Berezhnyi on Wikipedia
Another hydraulic lift that raises the car on its tires
More instructions will be given for lifting a corner of the vehicle to replace a spare tire in
Chapter 4. The owner s manual should be consulted any time when lifting the vehicle.
6Crawford s Guide to Beginners Auto Maintenance & Repair www.CrawfordsAutoService.com
Emergency Preparedness and Response:
In an emergency, preparedness and a quick response can save a life. Although it is
relatively rare, a fire can occur when working on motor vehicles. Some vehicle fluids are
flammable. They can combust with excess heat or when a faulty electrical wire creates
a spark. Keep a working fire extinguisher in an accessible place. All shop workers
should know where the fire extinguisher is. An ABC or tri-class fire extinguisher is
appropriate for auto repair shops. Also, have a plan for an emergency escape if a fire
becomes uncontrollable.
Keep an emergency response number posted clearly where everyone can see it.
Keep a first aid kit handy for minor injuries, like superficial cuts and scratches.
Have a flushing station nearby for any vehicle fluid contact with eyes and mouth, or with
skin if the fluid is acidic.
Introduction to Tools Used by Mechanics:
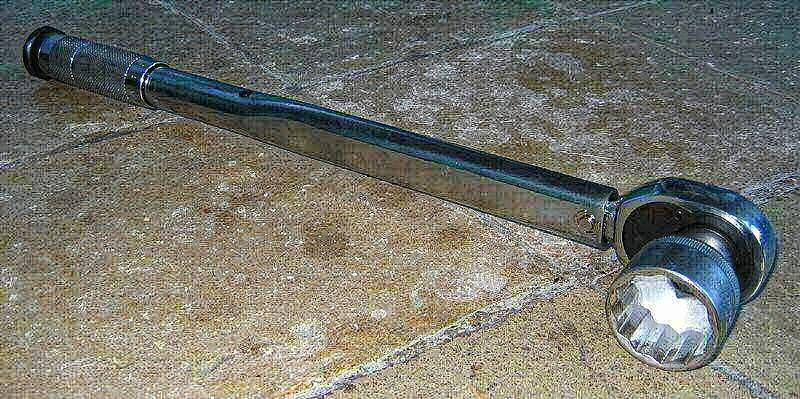
A commercial mechanic s shop will usually have industry-standard tools, such as a
torque wrench, hydraulic lifts, pneumatic (air-operated) tools, and electronic devices that
connect with the vehicle s computer to receive diagnostics. However, a startup repair
shop or a highly proficient mechanic at home could get most jobs done with a $200 set
of tools if needed.
The most common tools in a mechanic s set include the following:
Flashlight. A flashlight is one of the most-used tools in an auto repair shop. It helps the
mechanic see anywhere for visual inspections, maintenance and repairs.
Flashlight
Socket sets and wrenches. These have two different measurement systems. One is
metric and one SAE (or standard). The metric system has measurements in millimeters
(mm). SAE has measurements in inches or fractions of inches (1/4, 5/16, etc.).
Wrenches often have an open end and an opposite box end.
7Crawford s Guide to Beginners Auto Maintenance & Repair www.CrawfordsAutoService.com
Socket Ratchet Wrench
Image credit: CC-BY-SA-Heron2 on Wikipedia
Wrench set
These wrenches have an open end and a box end
Image credit: CC-BY-SA-Ildar Sagdejev on Wikipedia
Pneumatic (air-powered) wrench
Image credit: CC-BY-SA-Bushytails on Wikipedia
8Crawford s Guide to Beginners Auto Maintenance & Repair www.CrawfordsAutoService.com
Oil Filter Wrench
Has a prying mechanism like other wrenches but one end has a belt that wraps around the object being
unscrewed, which is much bigger in diameter than the regular bolts and hex-head screws that other
wrenches are used for.
Image credit: CC-BY-SA-Three-quarter-ten on Wikipedia
4-way lug wrench
Image credit: CC-BY-SA-Steffen Heinz Caronna
Screwdrivers, both Philips head (the cross-section looks like a cross or plus sign) and
flat tipped (or slotted). When using screwdrivers, try to match the size of the screwdriver
head with the screw. Also try to avoid stripping the head of the screw (this has occurred
when you can firmly turn the screwdriver against the head of the screw continually and
the screw never rotates).
Screwdriver set
9Crawford s Guide to Beginners Auto Maintenance & Repair www.CrawfordsAutoService.com
Screwdriver tips showing Philips (left) and flat or slotted (right)
Jacks. These are used to lift the vehicle. Some are rotated by hand. Other higher-end
jacks are pumped. Some are hydraulic.
Hydraulic jack
Image credit: CC-BY-SA-Nerijp on Wikipedia
Spare tire kit with a spare tire, lug wrench and tire jack. The tire jack is already placed under the lifting
point and partially cranked.
Image credit: CC-BY-Kurt Nordstrom
10Crawford s Guide to Beginners Auto Maintenance & Repair www.CrawfordsAutoService.com
Jack Stands. These are used to keep the vehicle elevated after it has been raised with
the jack. They have a wide square base and come to an apex where the car rests on
them.
Two jack stands, the lever shown on these stands is not used to raise the vehicle but to adjust the height
of the stands to keep the vehicle raised.
Pry bar. This can occasionally be used to tension a belt.
Two pry bars, different sizes
Hammer. This can be any type of hammer and it is used on occasion, such as when
freeing a stuck drum or rotor from its hub.
Hammer
11Crawford s Guide to Beginners Auto Maintenance & Repair www.CrawfordsAutoService.com
Test Light. This used to test fuses (see Chapter 2).
Test light
Funnel. Used to fill vehicle fluids.
Funnel (yellow) for car fluids
Image credit: CC-BY-SA-Dvortygirl on Wikipedia
12Crawford s Guide to Beginners Auto Maintenance & Repair www.CrawfordsAutoService.com
Drain Pan. Used to collect vehicle fluids when changing fluids and filters or flushing
systems.
Draining oil
Tire Pressure Gauge. Used to measure tire pressure.
Tire pressure gauge.
Battery Tester. Used to check the battery to see if it is charged.
Battery tester
13Crawford s Guide to Beginners Auto Maintenance & Repair www.CrawfordsAutoService.com
Computer Scanner. Connects to the vehicle computer to receive diagnostic trouble
codes (DTCs)
Auto scanner which receives DTCs from the vehicle s computer
Image credit: CC-BY-SA-Florian Schaffer
There are many other tools that can be used. But these are the most basic.
Now that we ve reviewed safety rules and gone over the tools used in a mechanic s
shop, you re ready to continue to the next chapter -- General Maintenance.
14Crawford s Guide to Beginners Auto Maintenance & Repair www.CrawfordsAutoService.com
Chapter 2: General Maintenance
This chapter on general maintenance may be one of the most applicable for the
average person to care for his or her own vehicle. We ll discuss the vehicle owner s
manual, vehicle fluids, fuses, belts and hoses, vehicle lighting, and the air filter.
Vehicle Owner s Manual
All vehicles are different and the owner s manual for each make and model is the most
useful reference for maintenance and repair of that specific vehicle. Despite the fact that
it can often look thick, complicated, and boring on the surface, vehicle owners should
become familiar and comfortable with the owner s manual. They re not so bad once
they re finally opened. Almost any topic regarding your vehicle s maintenance can be
found in the index.
Owner s Manual
The owner s manual will have a maintenance chart. The chart will include such
information as when to change the oil, rotate tires, replace the air filter, inspect fuel cap
and lines, change other fluids (transmission fluid, etc.) and other maintenance issues.
Your vehicle may have different maintenance requirements at 30,000 miles, 90,000
miles, 150,000 miles and at other intervals as indicated specifically in your owner s
manual.
Being familiar with the maintenance chart in your owner s manual can help you save
money when taking your car to the mechanic for maintenance checks. Sometimes the
repair shop will suggest additional services that aren t necessary.
15Crawford s Guide to Beginners Auto Maintenance & Repair www.CrawfordsAutoService.com
If you don t have the owner s manual for your car then you may be able to find one
online by using Google or another search engine. Search the website for the make of
the vehicle. You could also try your local library.
Vehicle Fluids:
Vehicle fluids include brake fluid, engine oil, coolant, power steering fluid, windshield
washer fluid, transmission fluid and battery fluid. Fluid level information and the location
of each fluid reservoir can be found in the owner s manual for your particular vehicle.
(Any images in this chapter are illustrative of one example and your vehicle may look
different).
Brake Fluid: On most vehicles the reservoir for brake fluid is clear. You can check the
fluid without removing the cap. There will be a marking on the reservoir that indicates
minimum and maximum level. You ll want to make sure that the level is between those
two marks. This fluid should never need to be topped off during maintenance. Low fluid
is an indication of a problem. If the fluid is low then you may want to bring it to a
mechanic, depending on your own skill level. Most vehicles have a dashboard light that
illuminates when the brake fluid is low. (In Chapter 3 we ll go over all the dashboard
lights, and in Chapter 10 we ll go over brakes).
A brake fluid reservoir. Notice the MAX and MIN markings.
Image credit: CC-BY-Frettie on Wikipedia
16Crawford s Guide to Beginners Auto Maintenance & Repair www.CrawfordsAutoService.com
Engine Oil. Engine oil should be checked each time the vehicle is refueled (i.e. each
time you go to the gas station). Most engines, but not all, have a dipstick to indicate the
oil level. Typically the handle is yellow. Follow these steps to check the oil:
Turn the engine off.
Remove the dipstick.
Wipe off the end of the dipstick with a rag or paper towel.
Put the dipstick back in.
Take it out to look at the level at the tip
The stick will have marks on it. The add mark typically indicates one quart low. If an
engine is leaking oil then the price of repairs can vary depending on which repair is
needed and the make and model of the vehicle.
Oil dipstick (above) and oil level on a dipstick (below)
Image credits: both CC-BY-SA-Dvortygirl on Wikipedia
17Crawford s Guide to Beginners Auto Maintenance & Repair www.CrawfordsAutoService.com
Coolant: Never open the cooling system if the engine is hot. If you ve just been
driving then don t open it. After you think the engine has cooled then you can lightly
touch the radiator cap to test it. If it s still hot, then don t open it. Opening the radiator
cap while the engine is still hot can shoot a six-foot geyser into the air and burn any skin
it contacts. The best time to check the coolant is in the morning before the car is driven.
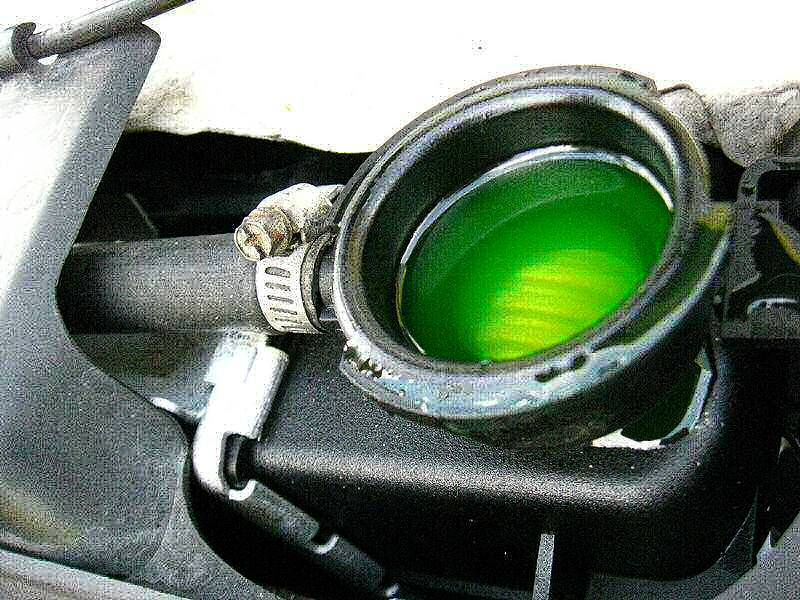
Coolant. Notice the green color; coolant can actually be any color (pink, orange, transparent, red, etc.)
Image credit: CC-BY-EvelynGiggles on Wikipedia
A low coolant level indicates a possible leak which should be investigated. A very small
amount of evaporation of coolant can occur over time. As a rule, if you need more than
one quart of coolant, that indicates a problem.
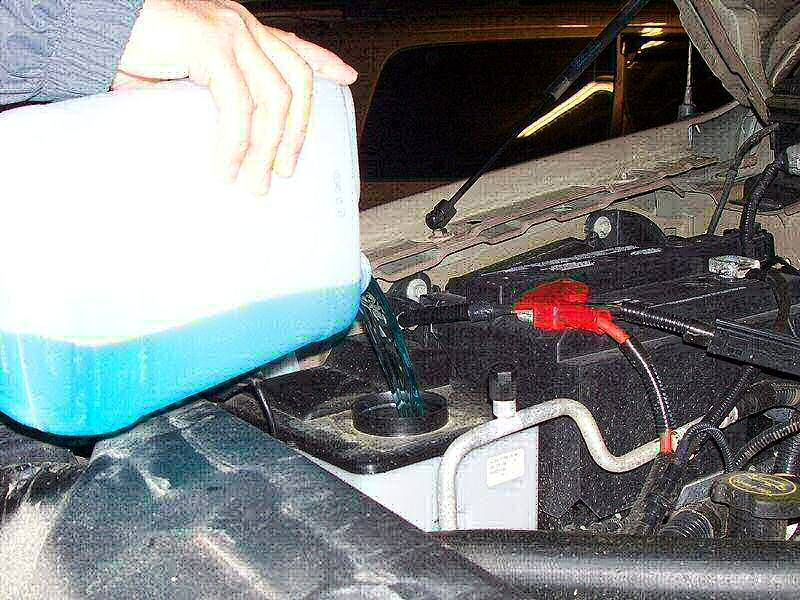
If the coolant is low then it needs to be replenished with the proper type of coolant and
mixture. Consult the owner s manual for the proper type of coolant. The proper mixture
is a 50/50 ratio of coolant and distilled water. It is important to use distilled water
because the impurities in other water would circulate through the system and ruin the
system over time. Coolant can be purchased pre-mixed in a 50/50 solution if desired.
18Crawford s Guide to Beginners Auto Maintenance & Repair www.CrawfordsAutoService.com
50/50 pre-diluted coolant. Image credit: CC-BY-dno1967 on Wikipedia
Power Steering Fluid: There may be a clear reservoir for power steering fluid. If there
is, then it can be checked the same way as the brake fluid described above. If the
power steering fluid is not in a clear reservoir then it will have a dipstick. Refer to the
owner s manual for the location of the reservoir and the type of fluid that should be
used. Low power steering fluid is an indication of a leak and it should be investigated. At
that point the driver may also notice changes in steering performance.
Power steering reservoir (black tank). Notice how the cap is labeled.
19Crawford s Guide to Beginners Auto Maintenance & Repair www.CrawfordsAutoService.com
Windshield Washer Fluid. There may be a clear reservoir or a dipstick for windshield
washer fluid. Refer to the owner s manual for the location. If you live or travel in cold
climates, below 32 degrees, you need to make sure that you use washer fluid with
antifreeze.
Windshield washer fluid
Image credit: CC-BY-SA-Hamedog on Wikipedia
Transmission Fluid. Refer to the owner s manual for the location of the transmission
fluid. Some vehicles have a dipstick but many new vehicles do not have one. In some
vehicles you have to go underneath the vehicle to check this fluid. If the fluid is low, then
there is a leak and it should be investigated. The fluid should also be red. If it is black
and/or has a burnt smell then there is a problem with the transmission.
New transmission fluid, red in color
20Crawford s Guide to Beginners Auto Maintenance & Repair www.CrawfordsAutoService.com
Battery Fluid and Terminals: If the battery is clear then you can look at the level of the
fluid. Most modern vehicles do not have clear batteries. Any corrosion or signs of leaks
around the battery are indications of a problem. Corrosion can be a green or white
powdery substance. Don t ever allow corrosion to come in contact with the skin or eyes
because this is an acid and it will burn. If corrosion is present at all, the battery may
need to be replaced or there could be a problem with the charging system. Excessive
discharging of the battery without the engine running (i.e. listening to the radio, keeping
the cab lights on or using any accessory with the engine off) can cause the battery to
overheat, which leads to early battery failure and leakage of battery acid. If the battery
fluid is low, only use distilled water to refill it. Never add acid to a battery.
The presence of corrosion indicates a problem that should be addressed. However, as
a temporary fix, you can clean off the corrosion to get the car started. Start by rinsing off
the corrosion with the garden hose. Then disconnect the terminals starting with the
negative terminal first, then the positive terminal. Use a mixture of baking soda and
water or battery terminal cleaner to rinse off the terminals and battery posts. You ll see
the baking soda reacting with the corrosion to form fizz and bubbles. Use a wire brush
or scraper (depending on the type of terminal) to clean the inside of the terminal and
battery posts. Then rinse again with more water. Once the terminals and battery posts
are clean, reattach the terminals starting with the positive terminal first, then the
negative terminal. It is not sufficient just to clean off the corrosion. Again, the presence
of corrosion indicates a problem that should be addressed.
Car battery
21Crawford s Guide to Beginners Auto Maintenance & Repair www.CrawfordsAutoService.com
Fuses
Consult the owner s manual to locate the fuse boxes in your vehicle. They can be
anywhere in the vehicle. Modern vehicles use blade type fuses. The part of the fuse that
you ll see initially is plastic and color-coded. When the fuse is removed it can have a
similar shape to a square letter C with the arms of the C being metal and the back of
the C being the color-coded plastic. The color coding system for fuses has been used
since the early 1980s. Older fuses are made of glass tubes. The color coding for
modern fuses is universal and indicates the amperage of the fuse.
Violet 3 Amp
Pink 4 Amp
Orange - 5 Amp
Red - 10 Amp
Blue - 15 Amp
Yellow - 20 Amp
Clear - 25 Amp
Green - 30 Amp
Orange 40 Amp
(and many others)
Blade type fuses used in modern vehicles. Most of them have a C shape (or E shape, facing down in
the image). In a blown fuse, the S or upside down V s in the middle will be broken (called the element).
The image shows the top view of each fuse just above each side view; notice that each top has metal
contacts that are not covered by colored plastic.
Image credit: CC-BY-SA-Havarhen on Wikipedia.
Glass tube fuse used in older vehicles
Image credit: CC-BY-SA-Aka on Wikipedia
22Crawford s Guide to Beginners Auto Maintenance & Repair www.CrawfordsAutoService.com
There are two ways to test the fuse: one is by removing the fuse to look at it and the
other is to use a test light.
When testing it by removing it, simply pull it directly out and look through the color-
coded plastic to see if the element (connection in the center) is intact. If it s open, then
the fuse is burnt out. Sometimes you ll also see a black singe that makes the
transparent plastic more opaque. Never remove more than one fuse at a time. This
helps to keep track of where the fuse was pulled from and permits easy replacement of
the fuse in the correct place. If multiple fuses happen to get pulled at the same time
then the size and placement of each fuse can be found in the owner s manual.
An easier and faster way to test the fuses is with a testing light since the fuses don t
have to be removed. The testing light looks like an electric screwdriver with a pointed
tip. The wire end, or black end of the testing light must be grounded to a clean,
unpainted metal surface of the vehicle. If you can t find a place on the body of the
vehicle, then you can always ground it to the negative terminal of the battery. The point
of the testing light is placed on the metal contacts of the fuse. There is a metal contact
on each side of the fuse s color-coded plastic (on the back of the C ). Upon contact the
display will indicate if the fuse is still good.
Test light
Not all fuses have power all the time. So the test should be performed with the key
turned to the on position in the ignition and the headlights turned on (the engine does
not need to be running). Even with the key and headlights turned on, there is one other
fuse that will not have power, which is the crank fuse. The crank fuse only has power
when the key is turned to the crank position while starting the engine. This particular
fuse does not need to be tested unless the vehicle won t crank.
23Crawford s Guide to Beginners Auto Maintenance & Repair www.CrawfordsAutoService.com
Belts & Hoses
Two hoses and a belt are seen in this image
Image credit: CC-BY-SA-Kolossos on Wikipedia
If a belt squeals after starting the engine or while driving then this indicates a problem
with belt tension. Most modern vehicles have automatic belt tensioners which keep the
belt at the appropriate tension. Checking the belt tension varies by make and model.
Modern vehicles only have one belt, but older vehicles have an individual belt for each
accessory of the engine (i.e. power steering, air conditioning, and alternator). Consult a
workshop manual for the proper methods for checking belt tension. (The workshop
manual or service manual is different from the owner s manual and may be found at the
local public library or ordered online). Belts can also be checked by visual inspection
and touch for signs of cracking, fraying, or glazing. Glazing means the drive surface of
the belt will be shiny.
Hoses can be checked visually and by touch for signs of cracking, swelling, or leaks. If
the engine is cool, then squeeze the hose to check for softness. If there is any variation
from hose to hose within the same vehicle then that could indicate a problem.
A cooling system pressure tester can be a useful tool to pressurize the cooling system
and check for leaks or swollen hoses. This tool be rented from an auto parts store and
should come with instructions for use. You ll attach it in place of the radiator cap and
hand-pump it as you watch the gauge. Never exceed the indicated pressure that is
written on the top of the radiator cap. Most modern cars have a limit of 16 psi. Again, do
not open the radiator cap if the engine is still hot. (See also Chapter 6 for more
information on the cooling system).
Vehicle Lighting
Vehicle lighting includes instrument panel lighting, warning indicator lights, left and right
turn signals, brake lights, hazard lights (which have a distinct circuit from the turn
signals even though the display is in the same place), headlights and tail lights, front
marker lights, the license plate light, and lights for the cab and trunk. Checking vehicle
lighting goes quicker and smoother with two people, and in the case of the brake lights
two people are required.
24Crawford s Guide to Beginners Auto Maintenance & Repair www.CrawfordsAutoService.com
The instrument lighting is all of the backlighting for the instrument cluster (all the
gauges, speedometer, fuel gauge and others). The instrument lighting can be checked
by turning on the headlights at night or in a dim garage. Check to see that all the
gauges are clearly visible. There should not be any dark spots on the cluster.
Dashboard showing gauges and warning indicator lights
Image credit: CC-BY-SA-Tagaz Vega
The warning indicator lights on the dashboard include the brake light, oil light, check
engine light, anti-lock brake (ABS) light, airbag light, tire pressure monitor, engine
temperature light, and others -- all of which can be found in the owner s manual. All of
the warning indicator lights will turn on for a set amount of time (about a minute, but
varies per vehicle) when you turn the key to the on position without cranking the
engine. Once the engine is running, none of these lights should be on (even the seat
belt light should be off, indicating that you re wearing your seat belt). If one is on, then it
indicates a problem with its correlating system. The number of lights and types of lights
will vary by make and model. Some vehicles have features that others don t, such as
traction control. (We ll discuss indicator lights in detail in Chapter 3).
Exterior lighting is checked with the key turned to the on position in the ignition (or with
the engine running, but it s not necessary to have the engine running just to check the
lights). Turn on the headlights. Check all four corners of the vehicle. On both sides (right
and left, or driver side and passenger side) the same number of bulbs should be
illuminated. There should be two front marker lights that are orange, two tail lights, and
a license plate light.
Rear lights of a vehicle with the brake lights illuminated.
Image credit: CC-BY-SA-Paultantk on Wikipedia
25Crawford s Guide to Beginners Auto Maintenance & Repair www.CrawfordsAutoService.com
Turn the left turn signal on. Check the left front and left rear of the vehicle for blinking
lights. Some vehicles have more than one bulb for the turn signal and some even
include a signal in the side rearview mirrors. Be sure every applicable bulb is
illuminating. Some vehicles have a cornering lamp, which is a clear lamp on the front of
the vehicle which illuminates corners while turning. This should be illuminated but it will
not blink.
Turn the right turn signal on. Check the right front and right rear of the vehicle for
blinking lights. Be sure all applicable bulbs are illuminating. Check the cornering lamp if
applicable.
When the turn signal is on and the indicator is blinking fast or not blinking at all, these
are indicators of a failed bulb.
Brake lights require two people for inspection. One person presses the brake pedal
while the other person checks the rear of the vehicle to make sure all the brake lights
are illuminating, including the high mount brake light in the rear window if the vehicle is
equipped with one.
Activate the hazard switch. Check to make sure that there are flashing lights with an
equal number of bulbs on all four corners. The hazard lights are wired separately from
the turn signals, so it is important to check the hazard lights even if the turn signals have
been checked.
Air Filter
Consult the owner s manual for the location of the air filter. Remove the air filter. Inspect
for visual signs of dirt and debris. Hold the filter up to a fluorescent light; you should be
able to see light coming through the filter. If there is any doubt then change it. It s cheap
preventative maintenance and it helps preserve fuel economy. (The air filter is
discussed more in Chapter 7).
Various air filters.
Image credit: CC-BY-SA- Maly LOLek on Wikipedia
26Crawford s Guide to Beginners Auto Maintenance & Repair www.CrawfordsAutoService.com
Chapter 3: Dashboard Indicator Lights
The instrument panel on your dashboard has multiple gauges and indicators. These
may include the fuel gauge, speedometer, tachometer, oil pressure, and engine
temperature. Most are self-explanatory-- the speedometer measures your speed, etc.
The one that may not be self-explanatory is the tachometer, which indicates engine
speed in revolutions per minute (RPM). It often has a red zone which you should never
exceed.
In the previous chapter we checked all the vehicle lighting which included the
dashboard symbols. Now we ll discuss what these symbols mean. As always, a better
resource to learn the meaning of each dashboard symbol for a specific vehicle is the
owner s manual for that vehicle. The ones that are included in each vehicle will vary by
make and model.
Dashboard lights can be red, orange (or yellow) and blue. Generally when a red light
comes on while driving, it means you should immediately pull over safely and call a tow
truck. However there are some exceptions some lights which are generally red can be
yellow or orange, and some red lights can be fixed immediately (seat belt light put
your seat belt on, door ajar light close all the doors). Orange or yellow lights generally
indicate that there is a problem with your vehicle, but it is safe to drive to a repair facility
or your home residence to investigate further. This also has some exceptions. It is
always best to consult the owner s manual for a particular vehicle.
The following are the general symbols:
Airbag Light or Supplemental Restraint Warning Light: Red, Orange or Yellow.
Whenever this light illuminates the air bag system senses a problem, which could be a
safety issue. It doesn t necessarily mean that the airbags will not work. The airbags
might or might not still deploy during an accident. The light means that there is a part of
the airbag system that may not work.
Anti-Lock Brakes Light: Orange or yellow light. This indicates a failure in the anti-lock
brake (ABS) system and anti-lock brakes are disabled. The purpose of the ABS is to
allow steering control of a vehicle while braking and to avoid skidding during a panic
stop. If this light is on, then normal conventional brake function will continue. If it s on in
the event of a panic stop then the vehicle will skid. Have the vehicle serviced.
27Crawford s Guide to Beginners Auto Maintenance & Repair www.CrawfordsAutoService.com
Brake Light: Red light, immediately pull over safely and have the vehicle towed (or
disengage the parking brake if applicable). This light indicates that there is something
wrong with the brakes. There could be a low brake fluid level, there could be a hydraulic
brake failure, or the parking brake is engaged.
Change Oil Soon. Orange or yellow light. This light indicates that routine oil change and
maintenance is due. It s based on revolutions of the crankshaft, which is even more
accurate than basing routine oil changes on mileage.
Check Engine Light: Red or yellow light. There is a problem with the vehicle emissions
and the vehicle s computer will have diagnostic trouble codes (DTCs) which will be
retrieved when the vehicle is inspected. The light may come on and then off. If there are
any performance issues with the way the vehicle is driving, then pull over and have it
towed. If the light comes on and stays on, or comes on and then flashes during
acceleration, then immediately pull over safely and have it towed to a shop. Don t
confuse the check engine light with the service vehicle soon light below.
Door Ajar Indicator Light: Red light. One of the vehicle doors is open. Close the open
door before proceeding to drive. There may also be a separate light for the trunk.
Glowplug Indicator Light: This light is only seen in vehicles with diesel engines. The
glow plug is a device that is used to help get the diesel engine started.
High Beam Indicator or Brights. Usually blue, but can be red on older vehicles. This
indicates that your brights are on.
28Crawford s Guide to Beginners Auto Maintenance & Repair www.CrawfordsAutoService.com
Low Coolant Level Light: Red, Orange or yellow light. This light indicates that the engine
coolant level is low, which could be due to a leak. It is still safe to drive as long as the
engine temperature light is not on. In some vehicles the first symbol above, the
thermometer symbol, can also be a temperature light. (Remember from Chapter 2 that
the coolant level should not be checked while the engine is hot). Some vehicles can
have a blue thermometer symbol. Consult the owner s manual for its description.
Low Fuel Light: Yellow or Orange. This light indicates that fuel is low. It could also be a
simple round light that illuminates when the fuel gauge is nearing empty.
Low Oil Level Light: Yellow or Orange. The oil level is low. Refill the oil as soon as
possible and bring the vehicle to a shop to see why it was low.
Low Oil Pressure or Engine Oil Pressure Light: Red light (immediately pull over safely).
Once you pull over you could check your oil level and add oil if it s low. If the light
continues illuminated then you should have your vehicle towed to a facility. Catastrophic
engine failure will occur if the oil pressure is low. Repairs for these damages can be
very expensive.
Parking Brake Light: Red light. The parking brake is engaged or not fully released.
Release it completely before driving.
Service Vehicle Soon: Yellow light. This light may be used in conjunction with other
lights. Depending on which other lights are illuminated, there may be a problem with the
anti-lock brakes (ABS), brake hydraulic system, traction control system (TCS), or the
29Crawford s Guide to Beginners Auto Maintenance & Repair www.CrawfordsAutoService.com
electronic suspension system. Don t confuse with the Service Engine Soon light, which
is one of the possible check engine lights shown above.
Temperature Light (or Hot Light). Red light (immediately pull over safely, turn off the
engine, and have it towed). This light means engine temperature has exceeded
maximum parameters. Severe engine failure will result if you continue to drive. For a
few extra moments while you re finding a safe place to pull over, you can turn on the
heater to high, which dissipates heat from the engine. If the heater does not work, it is
an indication that the coolant level is low, and that the vehicle should not be driven. The
dashboard may also have a temperature gauge which has a thermometer symbol.
Throttle Control Warning Light: Yellow or orange. In some vehicles the throttle has an
electronic control system. These lights indicate that there is a problem with the system.
Have the vehicle serviced as soon as possible. In some makes and models the wrench
light can be for other purposes. Be sure to consult the owner s manual.
Tire Pressure Warning Light: Yellow or orange. This light indicates that one or more of
the tires has fallen below 25% of the recommended pressure. Have the tires checked
soon.
Turn Signals and Hazard Light Display: These will only illuminate when a turn signal
(left or right) or the hazard lights (both simultaneously) are turned on. If one stays on
instead of blinking in rhythm or blinks slower or quicker than usual then there is a
problem. One of the bulbs may need to be replaced or there is something wrong with
the circuit.
Voltage Light. Red Light (pull over safely and get it towed). If this particular light
illuminates while you re on the freeway then you may be able to proceed to the next
30Crawford s Guide to Beginners Auto Maintenance & Repair www.CrawfordsAutoService.com
exit. This light indicates that voltage is below the minimum specification and your
vehicle will stop running once the battery dies. Safely pulling over and having the
vehicle towed is even more important at night since you ll lose the use of your
headlights, which tend to drain the battery even quicker. Some of the samples are
yellow; in this case you should still treat it as a red light.
Security Light. Red, Orange or Yellow. This indicates that there is a problem in the theft
deterrent system. Sometimes the vehicle will not run if this light illuminates or blinks.
Seat Belt Light. Red light. This means that the driver and/or passenger do not have their
seat belts fastened. Put on your seatbelts before continuing to drive. There is a reason
why they show videos of people in car accidents to Driver s Ed students. They want you
to understand that when you get behind the wheel you re potentially putting people in
danger. Ideally, seat belts would be more like the harnesses used in roller coasters,
which include two shoulder straps and a middle fastening device at the chest. The
cross-over shoulder strap isn t very effective in comparison. It is designed that way for
commercial purposes and to account for common human behavior. It s easier and
quicker to have one buckle where the belt can be pulled over and fastened in one quick
motion while the person is just getting into the car. While the conventional seat belt isn t
100% efficient, it is potentially the most important safety feature of the vehicle because
it keeps the body harnessed and kept in the seat. Wear your seat belt!
Traction Control Light or Low Track Light: Yellow, orange or blue light. This indicates
drive wheel speed is higher than the coasting wheel speed. For example, if you have
front wheel drive, then the front wheel speed is higher than the rear wheel speed. This
can be useful on ice, dirt or any low-traction condition. Be careful while driving in these
conditions, especially when turning.
Once again, this is just a sample list. Your particular make and model could have other
lights and/or it won t include all the lights listed above. Consult the owner s manual.
More detailed information on warning indicator lights can be found at http://repairpal.com/warning-lights-
chart. Most of the images/symbols in this chapter were taken from this web page and are believed to be
in the public domain due to the universality of these symbols. Some were taken from
http://commons.wikimedia.org/wiki/Category:Dashboard_icons and other pages of Wikipedia.
31Crawford s Guide to Beginners Auto Maintenance & Repair www.CrawfordsAutoService.com
Chapter 4: Tires
This chapter is all about tires. There may be more to these rubber doughnuts than many
people realize. In this chapter we ll discuss tire specifications, how to check tire
pressure, wheel alignment, the wear bar, how to change a tire, and old tire disposal.
Tire Specifications
There are two specification sets for tires including the tire manufacturer specifications
and the vehicle manufacturer specifications. Whenever you take your car to a tire shop
to get the tires changed, they have to meet these specifications by law. You can get a
tire that goes above these specifications, but never below.
The vehicle manufacturer s specifications include speed rating, load and size. It is
located on a sticker in the driver s door jamb of the vehicle and in the vehicle owner s
manual. When buying a new tire you ll want to stick with a tire that meets the
manufacturer s specifications because that s the kind of tire that the vehicle was built to
use.
Vehicle Manufacturer specifications in the driver s door jamb of a vehicle. This indicates that the tires for
this vehicle should be inflated to 30 PSI, except the spare which is 60 PSI.
32Crawford s Guide to Beginners Auto Maintenance & Repair www.CrawfordsAutoService.com
The tire manufacturer specifications include the tire size, load, pressure, temperature,
speed rating and tread wear. The tire manufacturer specifications indicate what the tire
is made to withstand. These specifications can be found on the wall of the tire itself.
Tire manufacturer specifications on the tire wall which include various tire codes.
Image credit: CC-BY-Flanker on Wikipedia
Unless you become a tire technician, you don t have to know all the numbers on the tire
or on the sticker/owner s manual because every time you get your tires replaced, the
tire shop will make sure you at least have a tire that meets the required specifications.
Probably the most important number for the common person to recognize is the
recommended tire pressure on the vehicle manufacturer s specifications on the driver s
door jamb sticker. (The tire manufacturer s specifications on the tire itself include the
maximum pressure that the tire can have, yet the maximum pressure isn t necessarily
the best pressure for the vehicle).
33Crawford s Guide to Beginners Auto Maintenance & Repair www.CrawfordsAutoService.com
How to Check the Tire Pressure
In order to check tire pressure you ll need a tire pressure gauge. Gauges can be
purchased at auto parts stores and service stations (sometimes a little as $1, but could
be $3-$7). They re usually about the size of a large pen, but can come in other forms.
Sometimes a gauge is included with the air hose of the air dispensing stand at the gas
station.
Pen-sized tire pressure gauge
Air dispensing hose at a gas station with built-in pressure gauge
Round tire pressure gauge and hose
Follow these steps to check and correct the tire pressure:
Remove the valve cap of each tire
Align the gauge up to the valve
Press the gauge onto the valve with firm direct pressure and then release. You ll
see the measuring stick get pushed out of the other side of the gauge (on a pen
gauge).
Fill the tire with air, recheck the pressure, then repeat as needed until the desired
pressure is obtained.
Replace the valve cap
34Crawford s Guide to Beginners Auto Maintenance & Repair www.CrawfordsAutoService.com
Tire pressure is measured in PSI (pounds per square inch) or KPA (Kilopascals) which
are simply units of measurement for pressure. (Pressure is a force distributed over
surface area)
Checking the tire pressure
Wheel Alignment
Tires can wear rapidly if they are not aligned properly, or the vehicle can pull to one side
while driving. There are three angle measurements that are used in tire alignment:
camber, toe, and caster. Knowing these angles is necessary for any tire technician. In
addition, knowing these angles can be helpful for anyone trying to communicate with tire
technicians.
In order to understand these angles one must consider the planes of the vehicle, which
are ways of dividing the vehicle in each of its three dimensions (length, width and
height). The horizontal plane, often depicted in math as the X plane, divides the vehicle
into top and bottom parts. The vertical plane, often depicted in math as the Y plane,
divides the vehicle into right and left parts (or driver s side and passenger side). A
second vertical plane which intersects the first vertical plane at 90 degrees is often
depicted in math as the Z plane, and it divides the vehicle into front and rear parts.
These three images show a model of a vehicle from the front, side and top views and the three
dimensional planes that are used to describe tire alignment angles.
Images by Rex Kimball, www.MirexMarketing.com
35Crawford s Guide to Beginners Auto Maintenance & Repair www.CrawfordsAutoService.com
The camber angle lies on the Z plane. (Imagine looking at the tires from the front of the
vehicle). A camber angle of zero is when the wheel is vertical. If there is any camber,
then the wheel is deviating from the vertical plane, or the Y plane. In many vehicles the
camber should be zero, but some may deviate by 2-3 degrees.
Image shows an outward camber. Notice how a tire in this alignment would wear quicker on the outside. If
it had an inward camber then it would wear more on the inside of the tire
Image by Rex Kimball, www.MirexMarketing.com
A wheelchair with an inward camber as seen on many athletic wheelchairs.
The toe angle lies on the X plane and deviates from the Y and Z planes. (Imagine the
vehicle from a bird s eye view or a top view). A toe angle of zero is when the wheels are
36Crawford s Guide to Beginners Auto Maintenance & Repair www.CrawfordsAutoService.com
parallel on the Z and Y planes. This isn t quite how the wheels should be, at least not
the front wheels. When thinking of toe, consider either the front wheels as a pair or the
rear wheels as a pair. The distance between the front of each pair of wheels is
measured and the rear of each pair (i.e. the distance between the front of the front
wheels and the rear of the front wheels when considering the pair of front wheels).
When the front wheels are properly aligned the front of the front wheels will actually be
slightly closer together than the back of the front wheels, meaning the front wheels
should have a slight inward toe. When the rear wheels are properly aligned they will be
parallel (i.e. the distance between the front of the rear wheels is the same as the
distance between the rear of the rear wheels).
Image shows an inward toe of the front passenger tire.
Image by Rex Kimball, www.MirexMarketing.com
Measuring the distance between the front and back of the front tires as a pair and the rear tires as a pair.
In this illustration, line a is shorter than line b, indicating an inward toe of one or both tires (both in this
image). Lines c and d are equal in length, indicating a toe angle of zero.
Image by Rex Kimball, www.MirexMarketing.com
37Crawford s Guide to Beginners Auto Maintenance & Repair www.CrawfordsAutoService.com
If a right wheel is turned inward while the left wheel is straight, or if both wheels are
turned too far inward, or both are turned outward, etc., then there is an abnormal toe
angle present and the wheels are not aligned. (Technically when you steer the vehicle
and the front wheels turn to the left or right, they are deviating from the Y and Z planes,
but they stay parallel to each other with only a slight variation to account for the fact that
one wheel is on the outside and one is on the inside while turning).
The caster angle is an angle which lies on the Y plane and deviates from the Z plane.
(Imagine looking at the vehicle from the side). Most devices with steering capability do
not have a caster angle of zero. When the deviation is towards the rear, the caster is
considered positive. When the deviation is towards the front, the caster is considered
negative. On motor vehicles the caster is usually positive, (the higher ball joint will be
closer to the rear than the lower ball joint). This helps the vehicle to drive straight even
when the steering wheel is hands-free. Since the view of the caster is blocked by the
wheel on vehicles with four wheels, it is most easily visible on motorcycles and bicycles.
Think of the two braces that come down on both sides of the front wheel. Notice how
the handlebars are closer to the rear than the center point (fulcrum) of the front wheel.
This is a clearly visible positive caster. The front wheels of shopping carts have a
negative caster. The physics of a negative caster allows for the front wheels to turn
counter clockwise as the cart is turning clockwise so that the cart is easier to maneuver
throughout the store.
Image shows a positive caster. Motor vehicles have positive casters which help the vehicle drive straight
even with a hands-free steering wheel.
Image by Rex Kimball, www.MirexMarketing.com
38Crawford s Guide to Beginners Auto Maintenance & Repair www.CrawfordsAutoService.com
A positive caster is easily seen on the front wheels of motorcycles and bicycles.
Image adapted, original credit: CC-BY-SA-Yesterdays Antique Motorcycles on Wikipedia
Negative caster on a cart
Image adapted, original credit: CC-BY-SA-DMahlko on Wikipedia
39Crawford s Guide to Beginners Auto Maintenance & Repair www.CrawfordsAutoService.com
Wear Bar
The wear bar is a horizontal bar molded into the tire between the treads. The wear bar
indicates safe tread depth. It is usually about 1/16 of an inch measured from the valley
of the tread, but not as high as the tread itself when the tire is new. As the tread wears
down, the wear bar becomes more visible. When the tread is even with the wear bar the
tires should be changed. Tires should be rotated with each oil change and kept in
alignment to ensure even tread wear.
Tire with arrows pointing to the wear bars between the treads.
How to Change a Tire
Knowing how to change a tire is mostly helpful in case you get a flat while driving on the
road. Every other time your tires get removed, rotated and/or replaced it will be by a tire
technician.
Every vehicle has instructions for using the jack and other tools as necessary to change
the tire. Some of the details can vary by make and model, such as the storage location
for the jack and spare tire. Consult the owner s manual of the vehicle. Also, there will
often be a sticker with instructions located with the jack and spare tire.
40Crawford s Guide to Beginners Auto Maintenance & Repair www.CrawfordsAutoService.com
Standard spare tire kit with spare tire, lug wrench, and tire jack. This particular kit does not include chocks
for the other tires. Notice how the spare tire is smaller than the regular tire. It is only meant to be used to
get the vehicle to a repair shop.
Image credit: CC-BY-Kurt Nordstrom
Here are some general guidelines for changing a tire (in order):
Make sure the vehicle is on level ground (see Chapter 1, Safety, proper lifting
points)
Apply the parking brake
Remove the spare tire and tools from the vehicle
Use wheel chocks to block the wheels opposite of the wheel you re changing (i.e.
if you re changing a rear tire, then put the chocks in front of the front wheels).
o Wheel chocks are similar to triangle-shaped door stoppers. When chocks
are included with the tire changing kit, then they should be used. However,
they are not present with every vehicle. Cases where they re not present
may include vehicles with a rear parking brake and front wheel drive.
When changing a rear wheel in these vehicles the front wheel drive keeps
the vehicle stable, and when changing a front wheel in these vehicles the
rear parking brake keeps the vehicle stable.
Loosen the lug nuts before lifting the vehicle, but do not remove
Pump or crank the jack to lift the vehicle using the proper lift points (see Chapter
1, Safety, proper lifting points)
Remove the lug nuts
Remove the flat tire
Place the spare tire
Replace the lug nuts snug
Lower the vehicle
41Crawford s Guide to Beginners Auto Maintenance & Repair www.CrawfordsAutoService.com
Torque the lug nuts (tighten them as much as possible after the vehicle has been
lowered)
Replace the tools in the appropriate location for future use.
Carry the flat full-size tire to the tire shop with you.
Spare tires are often smaller than the full-size tires that are regularly driven on. Spare
tires are only meant to transport the vehicle to a tire shop when needed and should be
changed as soon as possible. They should not be driven on regularly.
Tire Disposal
Any time you purchase a tire, the tire shop is responsible for charging a disposal fee
and disposing the old tire properly. If for some reason you have to dispose of the tires
yourself, you can take them to the city dump. The dump may charge you a fee. You can
try taking it to a tire recycling facility where you might be able to dump them for free or
even get paid for them.
42You can also read