Black Cat v. White Tiger - The First Battle of Bishenpur
←
→
Page content transcription
If your browser does not render page correctly, please read the page content below
Imphal: The Turning Point
             Black Cat v. White Tiger
                       The First Battle of Bishenpur
                                                 8th May 1944
                                          A Scenario for Battlefront: WWII
                                                By R Mark Davies

Historical Background
Following their distraction operation (Operation Ha-Go) in the Arakan coastal strip of Burma in the opening weeks of
1944, the Japanese opened their main offensive (Operation U-Go) against India in early March 1944. Their plan was
to surround and destroy the Indian IV Corps at the city of Imphal while the rest of the Commonwealth 14th Army was
still bogged down in the Arakan.

When the attack came, the 17th, 20th and 23rd Indian Infantry Divisions, along with the 50th Indian Parachute Brigade
and 254th Indian Tank Brigade were still widely scattered along the border hills and were taken completely by
surprise. Fighting desperate rearguard actions, the three divisions fought their way back toward Imphal. The Indian
Paras meanwhile, fought to the last man at Sangshak, giving the 23rd (‘Fighting Cock’) Division time to form a defence
line north and east of the city. Most critically, the Paras’ sacrifice allowed time for other units to form a defensive ‘box’
at the critical depot of Kohima, mid-way along the Dimapur-Imphal road.

In the south, the 17th (‘Black Cat’) Division once again found itself fighting its old adversaries – the elite Japanese
33rd (‘White Tigers’) Infantry Division. Fighting grimly all the way, the 17th Division withdrew from the Chin Hills,
through Tiddim, Singgel and back across the Indian border until they finally reached the high Imphal Plain. Here, in
the flat, open paddy surrounding the marshy Logtak Lake, the British and Indian troops could bring their full combat
power to bear on the Japanese. Each village on the plain was like a forested island, surrounded by a sea of flat,
featureless dry paddy fields. If the villages were strongly held, the near-featureless plain between could be turned into
a killing ground. Unfortunately however, this could work both ways.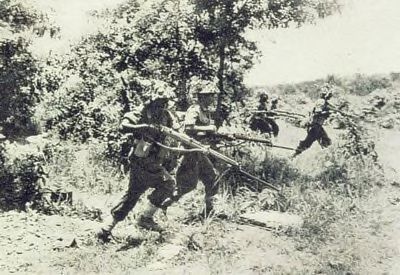
1st Assam

                                      50th Indian
                                      Para Brigade

                                       23rd Indian
                                                             4/5th
                                       Division              Mahratta                31st Division
                                                             50th Indian
                                                             Para Brigade
                  IV Corps
                                                         254th Indian
                                                         Tank Brigade

                                      20th Indian
                                      Division                                  15th Division
                                             20th Indian
                                               Division

                                                                                                    15th
                                                                                                    Army

                                               17th Indian
                                               Division

                                                                        14th Tank
                                                                        Regiment

                                                              33rd Division

In mid-April, Brigadier MacKenzie’s 32 Indian Brigade, temporarily transferred from 20th Division, was holding the
plain while 17th Division regrouped following their retreat. The villages of Potsangbam and Bishenpur were strongly
held, while the flanks were covered by mountains on the right and the marshy basin of Logtak Lake on the left. The
village of Bishenpur was critical to the battle, as it guarded the point at which the ‘Silchar Track’ (the only supply route
from Imphal to the west) exited the mountains to meet the plain.

However, the Japanese were making some headway in pushing back MacKenzie’s outposts in villages on the plain
and on the surrounding mountain tops. In the mountains, a Japanese raid also succeeded in destroying a suspension
bridge on the Silchar Track, making that route unusable. However, even though the Silchar Track had been cut, the
Bishenpur position was virtually the last line of defence south of Imphal and MacKenzie was ordered to hold his
ground.
On 18th April, the Japanese launched their first major assault against the Bishenpur position: while two columns
moved to outflank Bishenpur via the mountains, a third Japanese column was formed under one Lieutenant Colonel
Taguchi, comprising Taguchi’s own 4th Independent Engineer Regiment, Major Isagoda’s 2nd Battalion of the 213th
Infantry Regiment (less two companies), two anti-tank gun companies and most esoterically, a company of 320mm
heavy spigot mortars carried by elephants. However, Taguchi failed to take Potsangbam and Bishenpur with his first
assault, but succeeded in driving the Indians out of Ningthoukong, which lay a short way to the south.

                                                                               Bishenpur
           Kha Aimol                                              Chothe
                                                                               Point 2614

            Awang Khunou             Upokpi
                                                          Destroyed
                                                          Bridge
                                                                                                         Khoijuman

                                                                              Kwa Sipahi
                     Embanked
                     Road
                                                               Potsangbam

   Ningthoukong

                                                                                                              N
                                Logtak Lake
                                (more marsh than lake)

With the arrival of reinforcements on the 19th, MacKenzie decided to attempt to seize the initiative back from the
Japanese; on 22nd April the 9th Battalion, 14th Punjab Regiment was ordered to mount a reconnaissance in force
against Ningthoukong. However, the village was already strongly held by the Taguchi Group (‘Taguchi-Butai’) and the
Punjabis suffered 85 casualties, while the 150th RAC lost one of their tanks to a direct hit from a 320mm spigot
mortar.

With the reconnaissance done and despite the casualties suffered by the Punjabis, Brigadier MacKenzie ordered 1/4th
Gurkhas into the attack on the 25th. Following a heavy barrage and softening up by Vengeance dive-bombers, the
Gurkhas attacked Ningthoukong from the west, successfully penetrating the village’s defences. However, the
supporting tanks were not so fortunate: coming under close-range fire from anti-tank guns, the squadron suffered two
tanks knocked out and six more damaged. The squadron was forced to withdraw and the Gurkhas had to follow.
Exploiting this success, the Japanese moved forward and occupied Potsangbam on 29th April.

Over the next week, Commonwealth and Japanese patrols contested the villages of Potsangbam, Kwa Sipahi and
Khoijuman. Khoijuman was finally cleared of Japanese on 6th May and the 9/14th Punjabis even managed to capture
four anti-tank guns, one of them being the Type 1 47mm gun, which had never before been seen by the Allies. The
Japanese Army Air Force was also active during this week; mounting four raids on the ‘Gun-Box’ at Bishenpur. The
Gun-Box suffered the loss of two guns and seven trucks, but few personnel. The Japanese meanwhile, lost eleven
aircraft to British anti-aircraft guns.

The Japanese were by now absolutely determined to take Bishenpur, which represented the last major obstacle to be
overcome before reaching Imphal. While Taguchi-Butai fought its battle in the plain, their comrades in the 214th &
215th Infantry Regiments were fighting an increasingly bitter battle in the forested hills and ridges to the west, some
3,000 feet above the plain. The Japanese plan was for 215th Regiment to attack Bishenpur from the west, via
Wireless Hill, while 214th Regiment hooked around through the hills, to assault Bishenpur from the north and cut the
Bishenpur-Imphal road. Taguchi-Butai meanwhile, was to continue its ‘village-hopping’ attack, with the intention of
maintaining the pressure in the plain to the south of Bishenpur. Once Bishenpur was taken, a fresh wave of
reinforcements including the remainder of 213th Infantry Regiment and the 14th Tank Regiment, as well as several
fresh artillery battalions, would spearhead the final assault on Imphal. In the meantime, Taguchi was determined to
preserve Potsangbam and Ningthoukong as firm-bases for the coming assault and his men fortified their positions,
using their customary skill to carefully place machine-gun bunkers, mines, anti-tank guns and booby-traps.
A Japanese Type 97 Te-Ke tankette of 33rd Infantry Division advances at Bishenpur, 1944
The impending threat to Bishenpur was becoming increasingly apparent to the Allies and once again, the indefatigable
Brigadier MacKenzie, now controlling seven battalions, plus a sizeable armour and artillery contingent and fighting a
battle on several fronts, once again attempted to wrest the initiative from the Japanese. During the night of 7/8th May,
American B-24 Liberators plastered the whole area with High Explosives, followed at first light by three squadrons of
Vengeance dive-bombers. Covered by the tanks of 3rd Carabiniers, the infantry of the 9/14th Punjab regiment crept
forward across the open paddy in the pre-dawn gloom.
As dawn broke, the massed British and Indian artillery opened up on Potsangbam and the Punjabis advanced…
Indian Infantry attack at Bishenpur, 1944Briefing for Brigadier D A L MacKenzie
Situation – Chothe, near Bishenpur, Dawn, 8th May 1944
32 Indian Brigade, comprising the 1st Northamptonshires, 9/14th Punjabis and 2/8th Gurkhas, was until March,
manning an outpost line in the Kabaw Valley to the east. Then came the surprise Japanese attack and the brigade
was forced, with the rest of 20th Indian Division, to mount a fighting retreat back to Imphal, to concentrate with the rest
of IV Corps.
Upon arrival at Imphal, 32 Brigade was ordered south, to cover the Tiddim Road and its junction with the Silchar Track
at Bishenpur. The Silchar Track is only a minor Jeep track to the west, but since the Japanese cut the main Imphal-
Dimapur road on 28th March, the track was IV Corps’ only remaining supply route.
During early April, the battered 17th Indian Division fell back through your positions. They have had the hardest
retreat of all, fighting over 100 miles from Fort White and Tiddim. Nevertheless, they have held their own and are in
good spirits. However, the Japanese are hard on their heels and are working their way up through the villages of the
plain in front of you and through the Watershed Mountains on your right.
On the 15th a Japanese unit succeeded in destroying a suspension bridge in the hills, thereby cutting the Silchar
Track and completely cutting Imphal and IV Corps off from even that meagre source of supply. IV Corps is now totally
dependent upon its own stocks and whatever supplies can be flown in by the RAF and USAAF. Nevertheless, 32
Brigade was ordered to hold its ground regardless and was reinforced with the addition of the 1/4th Gurkha Rifles and
4/12th Frontier Force Regiment from 17th Division, as well as tanks from 254th Indian Tank Brigade and a growing
artillery group at Bishenpur.
This defensive line proved its worth on the 18th as the first major Japanese attack was stopped short of Bishenpur
and Potsangbam (known generally as “Pots & Pans”). However, the Japs soon dug themselves in deep at
Ningthoukong and on 22nd April, 9/14th Punjab were ordered to mount a reconnaissance-in-force against the village.
Unfortunately, the two companies engaged suffered heavy losses for little gain. Following this reconnaissance, 1/4th
Gurkhas attacked Ningthoukong on the 25th and initially made some headway, but were forced to withdraw following
the loss of their tank support.
Since the Gurkhas’ repulse from Ningthoukong, the Japanese have made further gains – taking and fortifying
Potsangbam and even pushing outposts into Kwa Sipahi and Khoijuman, where they have skirmished with your
patrols. Other Japanese units are meanwhile making steady progress along the high ridges to the west and are
threatening to outflank Bishenpur.
32 Brigade is consequently in a desperate situation and 17th Division has reinforced it with another two battalions –
the 1st West Yorkshires and 7/10th Baluchs, which means that you now have seven battalions, plus supporting arms,
under your command. General ‘Punch’ Cowan, commanding 17th Division, has stressed that it is absolutely
imperative therefore, that 32 Brigade continues to make local counter-attacks to keep the enemy off-balance and to
prevent them from launching a coordinated attack on Bishenpur. He assures you that he is cooking up something with
48 (All-Gurkha) Brigade, which should take the pressure off you within a few days.
Mission
You are to assault the enemy position at Potsangbam, with the intention of preventing the village from being
used as a firm-base for an attack on Bishenpur.
Execution
General Outline
4/12th Frontier Force Regiment will provide a firm base and security for the Bishenpur Box.
9/14th Punjab, preceded by extensive air and artillery preparation and supported by a half-squadron of tanks
from ‘C’ Sqn, 3rd Carabiniers, are to infiltrate forward during darkness and assault Potsangbam at first light.
The remaining half of ‘C’ Sqn, with 2 Independent Bridging Troop RAC and 92 Field Company, Bombay
Sappers & Miners riding on the tanks, will follow up the advance at first light. The engineers will assist with
breaching obstacles, destroying bunkers and with the bridging tanks, will create crossings over the nullah
bisecting the village. Once a foothold has been gained in Potsangbam, 1st West Yorks, with a troop of 7th Light Cavalry and a
detachment from 82 AA/AT Regt in support, will pass through 9/14th Punjab positions to consolidate the
objective.
Once Potsangbam is completely cleared, you may exploit using the reserve battalion (4/12th Frontier Force
Regiment) as you see fit, to exploit the enemy’s disarray. A company from 1/4th Gurkhas will arrive at Point E
to take over their positions (this need not be included in the game).
Deployment
A G
Bishenpur
E
Kha Aimol Chothe
Point 2614
B
Known
Japanese
Strongpoints
Awang Khunou Upokpi
Destroyed
Bridge
Khoijuman
Kwa Sipahi
Embanked
Road
Potsangbam D
Ningthoukong C
Logtak Lake
(more marsh than lake)
N
The 4/12th Frontier Force Regiment is holding the high ground west of Line A-B, including the Bishenpur
‘Gun-Box’ (marked ‘G’). All elements are dug-in.
HQ 32 Indian Brigade and the Bishenpur Gun Box forces marked in your order of battle (minus a section each
of Bofors LAA Guns and 2pdr AT Guns, which will arrive as reinforcements) are dug-in within the Gun Box
(Area G).
Up to one company of 4/12th Frontier Force Regiment, plus battalion attachments, may be deployed in
Khoijuman (Area D), in Improved Positions.
The 9/14th Punjab Regiment has infiltrated forward under cover of darkness and may therefore be deployed
anywhere north of Line A-C. Sub-units of 9/14th Punjab may be deployed as close as six inches to enemy
positions in Potsangbam and Kwa Sipahi, but no closer. They not be deployed in improved positions, but
heavy weapons may be emplaced and ready to fire.
One Half-Squadron of ‘C’ Squadron, 3rd Carabiniers is deployed in support of 9/14th Punjab, west of Line A-
B.
The other half-squadron of ‘C’ Squadron, 3rd Carabiniers is deployed in column on the main road in
Bishenpur (Area G). Half of 92 Field Squadron, Bombay Sappers & Miners, Indian Engineers, is mounted as
tank-riders, while the remainder may be mounted in soft-skinned transport at the rear of the column. Forward Air Controllers and Forward Observers may be attached to any Allied Manoeuvre Element and may
be deployed anywhere north of Line A-C.
36 inches of barbed wire and/or punjis (the same thing in game terms) may be deployed anywhere west of
Line A-B or within Area D.
12 inches of mixed minefield, plus 12 inches of dummy minefield may be deployed anywhere west of Line A-B
or within Area D. These may not be deployed on roads
Reinforcements
Turn 6: The 1st West Yorkshire Regiment, with a section each of 40mm Bofors LAA Guns and 2pdr AT Guns
attached, will arrive on the road at Point E.
Turn 8: A troop of ‘B’ Squadron, 7th Indian Light Cavalry, will arrive on the road at Point E.
4/12th Frontier Force Regiment must remain in place until Potsangbam and Kwa Sipahi have both been
completely cleared of the enemy. It will then be released to the British player.
Friendly Forces
Your Brigade order of battle is detailed at Annex A below. Essentially, 32 Indian Brigade has been
temporarily transferred from 20th Indian Division to 17th Indian Division.
There are no friendly forces on your left, as your left flank is covered by the swampy and impassable Logtak
Lake.
On your right, other elements of the brigade are engaged in a confused battle for the peaks of the Watershed
Mountains.
The 4/12th Frontier Force Regiment, 1/4th Gurkhas and 1st West Yorks are classed as Veteran. All other
BGs, MEs and Attachments are classed as Experienced except for 92 Field Company, Royal Bombay
Sappers & Miners, who are classed as Trained.
Enemy Forces
The exact composition, strength and location of enemy forces are uncertain. However, the enemy has been
identified as the élite 33rd Infantry Division – the ‘White Tigers’. Their antipathy with 17th Indian Division goes
all the way back to 1942.
The enemy has been present in Ningthoukong in at least battalion strength since 19th April and in
Potsangbam since 28th April. Further advances by the enemy in the plain – to Kwa Sipahi and Khoijuman –
have largely been beaten off, though Kwa Sipahi remains contested ground.
From documents recovered by fighting patrols, it seems that elements of the 213th Infantry Regiment and the
4th Independent Engineer Regiment are fighting in the plain – apparently as a joint regimental group.
Enemy artillery units encountered thus far have been primarily light mortars and 105mm howitzers, with the
occasional 320mm heavy spigot mortar also being encountered (one was captured at Potsangbam on 25th
April). The long range of the Japanese 105mm has frustrated counter-battery efforts thus far, but long-ranged
3.7-inch Heavy AA guns have been brought forward by the Royal Artillery to assist with the counter-battery
effort.
The enemy appears to have Chothe under observation, as sporadic 105mm fire has been directed against
movement in that area.
The enemy is well-served by anti-tank guns, including their newest type – the Type 1 47mm gun. One
example of this weapon was captured at Kwa Sipahi two days ago.
Light tanks have been encountered by 23rd Indian Division in the east, but no enemy tanks have been
reported here yet. However, tanks were encountered by 17th Indian Division, during the early days of the
retreat, near Tiddim. Consequently, it is only a matter of time before the Japanese bring those tanks up the
Tiddim Road. The RAF, while having air superiority, has not yet won air supremacy and the Japanese Army Air Force does
still mount the occasional air attack. However, these Japanese air attacks do tend to be directed more at
logistics and artillery positions rather than in support of the tactical battle.
Air Support
American B-24 Liberators have been bombing enemy positions throughout the night. However, it is
impossible to gauge what their effect on the enemy has been (the Japanese player will resolve these losses).
Three squadrons of Vengeance Dive-Bombers will conduct a series of air-strikes, each comprising a squadron
of x4 Vengeance dive-bombers (BR-P85), will attack enemy positions, starting at H minus10 (i.e. in the Air
Support Phase of British Turns 1, 2 and 3).
Once the Japanese player has deployed all his hidden unit markers, you are to select twelve targets for the
dive-bombers. As mentioned above, you may only attack four targets per turn, so you must specify the turn(s)
in which a target is to be attacked.
Any Japanese unit that conducts anti-aircraft fire will count as Suspected.
From Turn 5, further aircraft will form a ‘cab-rank’ for tactical air support. Every time a successful call is made
for air support, roll a D10 to determine the aircraft type: 1-7 = Hurricane Mk IIc with bombs, 8-9 = Vengeance
Mk I, 10 = Vengeance Mk II.
There are two Forward Air Controllers attached to 32 Indian Brigade. However, only one close air support
mission may be called per turn (though the previous turn’s aircraft may return to perform a strafe if it was not
Suppressed or Disordered). Both FACs must declare their attempt to call air support at the start of the turn,
but if both are successful, only one mission may be carried out. A FAC who calls for air support may not
move or conduct other tasks in that turn, even if they were unsuccessful.
Note that artillery missions may not be directed into areas that have been hit by air-strikes in the same turn.
Artillery Support
All Royal Artillery and Indian Artillery Fire Support Elements may be given a pre-programmed fire plan once
the Japanese player has deployed all his hidden unit markers. The fire plan may continue for a maximum of
ten turns. This plan may be interrupted at any time by the Forward Observers calling for fire on spotted or
suspected targets of opportunity. The fire plan may not be resumed once a FO has called for fire.
311 Field Battery, 31 Mountain Battery and the section from 8 Medium Regiment are firing as Direct Fire
Support and have FOs who may be attached to HQs or MEs as you see fit (two FOs each for 311 Field
Battery and 31 Mountain Battery – one for each Troop – and one for 8 Medium Regiment).
Each FO may call for their own Troop (i.e. half-battery) or the whole battery, provided that the other Troop is
not already firing at another target.
Each battery may be used as General Fire Support to thicken a concentration fired by the other battery (i.e. a
‘Mike Target’). However, note that Fire Support Elements consisting of only one gun model (e.g. 8 Medium
Regiment and each Troop of 31 Mountain Battery) may not be used in this manner as it is not possible for
them to fire concentrations.
A single Troop from 20 Field Battery is available in General Support to thicken concentrations fired by 311
Field Battery or 31 Mountain Battery. It may also be used to fire any sort of mission in the opening barrage.
‘C’ Squadron, 3rd Carabiniers (or any portion of it) may also be included in the preparatory fire-plan. They
may fire indirectly at any target within direct line-of-sight, regardless of range, provided each tank firing
indirectly is placed within 2-inches of its neighbour – as per the rulebook.
Tanks firing indirectly use a Small IDF template, with -1 vV and 0 vTGsV.
The tanks must stop firing indirectly once ANY tanks in the ME become KO’d, Suppressed or Disordered or
start moving or engaging targets of opportunity.
Battalion 3-inch Mortar Platoons are classed as Direct Fire Support unless they are called by their Battalion
Commander, in which case they are Organic Fire Support. 2-inch mortars have unlimited smoke, but it always counts as dispersing smoke.
The Field Artillery and the battalion 3-inch Mortar Platoons have only two rounds of smoke apiece. No other
fire support elements have smoke.
You may mark six Artillery Target Reference Points on your map. An artillery mission fired onto these
locations will not require direct line-of-sight from a Forward Observer.
Game Sequence
The Commonwealth player has the first turn.
The game lasts for 25 turns.
Victory Conditions
1 VP for each enemy Manoeuvre Element with greater than 25% casualties OR each knocked out gun,
aircraft or armoured vehicle.
2 VP for each enemy Manoeuvre Element with greater than 50% casualties.
3VP for each enemy Manoeuvre Element with greater than 75% casualties.
5VP for possession of Bishenpur.
2VP for possession of each of the following: West Ningthoukong, East Ningthoukong, West Potsangbam or
East Potsangbam.
1 VP for possession of any other village or Point 2614.
Total Victory – for having 5+ VPs more than the enemy.
Partial Victory – for having 1-4 VPs more than the enemy.BATTLEGROUP
32nd Indian Infantry Brigade, 20th Indian Infantry Division
Brigadier D A L MacKenzie
Command
HQ x1 Commander 14A-18
Transport
x1 Jeep (no MG) 14A-10 20th Indian
Division
x4 Infantry 14A-17
BATTLEGROUP
1st Battalion, The Northamptonshire Regiment
Lieutenant Colonel Taunton
BATTLEGROUP 9/14P
9th Battalion, 14th Punjab Regiment
Lieutenant Colonel J R Booth
BATTLEGROUP
3rd Battalion, 8th Gurkha Rifles
Lieutenant Colonel E V Whitehead
MANOEUVRE ELEMENT
92nd Field Company, Royal Bombay Sappers & Miners, Indian Engineers
Major J C Clark 17th Indian
ATTACHED BATTLEGROUPS FROM 17 TH INDIAN DIVISION Division
BATTLEGROUP 1/4GR
1st Battalion, 4th (Prince of Wales’ Own) Gurkha Rifles, 63rd Indian Infantry Brigade
Lieutenant Colonel William H B Oldham
BATTLEGROUP 1WY
1st Battalion, The West Yorkshire Regiment, HQ 17th Indian Division
Lieutenant Colonel Hunt
BATTLEGROUP 4/12FFR
4th Battalion (Sikhs), 12th Frontier Force Regiment, HQ 17th Indian Division
Lieutenant Colonel McLeod
BATTLEGROUP
7th Battalion, 10th Baluch Regiment, HQ 17th Indian Division
Lieutenant Colonel Lindsay
ATTACHED ELEMENTS FROM 254 TH INDIAN TANK BRIGADE
MANOEUVRE ELEMENT
‘C’ Squadron, 3rd Carabiniers
MANOEUVRE ELEMENT
Troop, 7th Indian Light Cavalry
254th Indian
MANOEUVRE ELEMENT Tank Brigade
2nd Independent Bridging Troop, Royal Armoured Corps
ROYAL & INDIAN ARTILLERY ELEMENTS FROM 17 TH & 20TH INDIAN DIVISIONS
FIRE SUPPORT ELEMENT
The Bishenpur ‘Gun Box’
RAF FORWARD VISUAL CONTROL PARTIES
On-Table Attachments
x2 Forward Observer 14A-20
Transport
x2 Jeep (no MG) 14A-10BATTLEGROUP
9th Battalion, 14th Punjab Regiment
Lieutenant Colonel J R Booth (a)
Command
HQ x1 Commander 14A-18
Transport 20th Indian
x1 Jeep (no MG) 14A-10 Division
x3 Infantry 14A-17
MANOEUVRE ELEMENTS
‘A’ Company
Command
HQ x1 Commander 14A-18
x6 Infantry (1 with PIAT) 14A-17
(a) All elements of 9/14th Punjab are rated as ‘Experienced’.
x1 2-inch Mortar (d) 14A-24
(b) These elements may be directly attached to the infantry companies
or to 9/14th Punjab Battalion HQ.
‘B’ Company (c) These Bren Gun sections represent the dismounted Carrier Platoon.
Command
(d) The 2-inch Mortars have unlimited smoke, but it always counts as
HQ x1 Commander 14A-18
dispersing smoke.
x6 Infantry (1 with PIAT) 14A-17 (e) The Punjabi 3-inch Mortar Platoon has only two rounds of smoke.
x1 2-inch Mortar (d) 14A-24
‘C’ Company
Command
HQ x1 Commander 14A-18
x9 Infantry (1 with PIAT) 14A-17
x1 2-inch Mortar (d) 14A-24
MANOEUVRE ELEMENT
92 Field Company, Royal Bombay
‘D’ Company Sappers & Miners, Indian Engineers
Command Major J C Clark (a)
HQ x1 Commander 14A-18
Command
HQ x1 Commander 14A-18
x9 Infantry (1 with PIAT) 14A-17
Transport
x1 Jeep (no MG) 14A-10
x1 2-inch Mortar (d) 14A-24
x18 Assault Pioneers (3 flame) (b) 14A-17
ATTACHMENTS
Transport
x2 Assault Pioneers (2 flame) (b) 14A-19 x3 CMP 15ct Truck (bc) 14A-11
Organic Fire Support (a) All elements of 92 Field Company are designated ‘Trained’.
x3 3-inch Mortars (e) 14A-25
Transport (b) Half of the company starts the scenario mounted on the tanks of 3rd
x3 Pack Mules Carabiniers. The remainder may follow on in trucks.
Recon (c) For this scenario, the transport capacity of the CMP 15cwt trucks is
x4 Bren LMG (bc) 14A-22 increased to 3T. Similarly, the Lee-Grant tanks of 3rd Carabiners may
also carry 3T as tank-riders.
x2 Vickers Medium Machine Gun (b) 14A-23BATTLEGROUP
4th Battalion (Sikhs), 12th Frontier Force Regiment
Lieutenant Colonel McLeod (a)
Command
HQ x1 Commander 14A-18
Transport
x1 Jeep (no MG) 14A-10
x3 Infantry 14A-17
MANOEUVRE ELEMENTS
‘A’ Company 17th Indian
Division
Command
HQ x1 Commander 14A-18
x9 Infantry (1 with PIAT) 14A-17
x1 2-inch Mortar 14A-24
‘B’ Company
Command
HQ x1 Commander 14A-18
x9 Infantry (1 with PIAT) 14A-17
(a) All elements of 4/12th Frontier Force Regiment are rated as ‘Veteran’.
x1 2-inch Mortar 14A-24
(b) These elements may be directly attached to the infantry companies
or to 4/12th FFR HQ.
‘C’ Company
(c) These Bren Gun sections represent the dismounted Carrier Platoon.
Command
HQ x1 Commander 14A-18
x9 Infantry (1 with PIAT) 14A-17
x1 2-inch Mortar 14A-24
‘D’ Company
Command
HQ x1 Commander 14A-18
x9 Infantry (1 with PIAT) 14A-17
x1 2-inch Mortar 14A-24
ATTACHMENTS
x2 Assault Pioneers (b) 14A-19
Organic Fire Support
x3 3-inch Mortars 14A-25
Transport
x3 Pack Mules
Recon
x4 Bren LMG (bc) 14A-22
x2 Vickers Medium Machine Gun (b) 14A-23BATTLEGROUP
1st Battalion, The West Yorkshire Regiment (Prince of Wales’ Own)
Lieutenant Colonel Hunt (a)
Command
HQ x1 Commander 14A-18
Transport
x1 Jeep (no MG) 14A-10
x3 Infantry 14A-17
MANOEUVRE ELEMENTS 17th Indian
Division
‘A’ Company
Command
HQ x1 Commander 14A-18
x9 Infantry (1 with PIAT) 14A-17
x1 2-inch Mortar 14A-24
‘B’ Company
Command
HQ x1 Commander 14A-18
x9 Infantry (1 with PIAT) 14A-17
(a) All elements of 1st West Yorks are rated as ‘Veteran’.
x1 2-inch Mortar 14A-24
(b) These elements may be directly attached to the infantry companies
or to 1/4th Gurkhas HQ.
‘C’ Company
(c) These Bren Gun sections represent the dismounted Carrier Platoon.
Command
HQ x1 Commander 14A-18
x9 Infantry (1 with PIAT) 14A-17
x1 2-inch Mortar 14A-24
‘D’ Company
Command
HQ x1 Commander 14A-18
x9 Infantry (1 with PIAT) 14A-17
x1 2-inch Mortar 14A-24
ATTACHMENTS
x2 Assault Pioneers (b) 14A-19
Organic Fire Support
x3 3-inch Mortars 14A-25
Transport
x3 Pack Mules
Recon
x4 Bren LMG (bc) 14A-22
x2 Vickers Medium Machine Gun (b) 14A-23BATTLEGROUP
1st Battalion, 4th (Prince of Wales’ Own) Gurkha Rifles
Lieutenant Colonel William H B Oldham (ab)
MANOEUVRE ELEMENT
‘A’ Company
Command
HQ x1 Commander 14A-18 17th Indian
Division
x9 Infantry (1 with PIAT) 14A-17
x1 2-inch Mortar 14A-24
x1 Vickers Medium Machine Gun 14A-23
(a) The Gurkhas here are defending the Brigade HQ and Gun Box at
Bishenpur. Given the fluid nature of the war with Japan, front-lines were
rarely as clear-cut as in other theatres of war. As a consequence,
Headquarters, artillery positions and logistical elements were never
without sizeable defence elements.
(b) All elements of 1/4th Gurkhas are designated as ‘Veteran’.
Attached Elements, 254th Indian Tank Brigade
254th Indian
Tank Brigade
BATTLEGROUP
3rd Carabiniers (Prince of Wales’ Own Dragoon Guards)
Lieutenant Colonel Younger
MANOEUVRE ELEMENT
‘C’ Squadron, 3rd Carabiniers (a)
Command
x1 Lee 37mm/75mm Medium Tank 14A-03
x5 Lee 37mm/75mm Medium Tank 14A-03
(a) The squadron is deployed as two half-squadrons, each of x1 Command Lee and x2 Lee.
(b) For this scenario, each Lee may carry 3T as tank-riders.
BATTLEGROUP
7th Indian Light Cavalry
Lieutenant Colonel Barlow
MANOEUVRE ELEMENT
Troop, ‘B’ Squadron, 7th Indian Light Cavalry
Command
x1 Stuart III 37mm Light Tank 14A-01
x1 Stuart III 37mm Light Tank 14A-01
MANOEUVRE ELEMENT
2nd Independent Bridging Troop, Royal Armoured Corps
Command
x1 Valentine Bridgelayer BR-P12FIRE SUPPORT ELEMENT
The Bishenpur ‘Gun Box’
Command
HQ x1 Commander 14A-18
Transport
x1 Jeep (no MG) 14A-10
FIRE SUPPORT ELEMENT
MANOEUVRE ELEMENT
311 Field Battery, 129 Field Regt,
Mixed Battery, 82 AA/AT Regt,
Royal Artillery, 17th Indian Division (ab)
Royal Artillery, 17th Indian Division (c)
Command
HQ x1 Commander 14A-18 Command
HQ x1 Commander 14A-18
Transport
Transport
x1 Jeep (no MG) 14A-10
x1 Jeep (no MG) 14A-10
On-Table Attachments
x2 Forward Observer 14A-20 x3 6pdr Anti-Tank Gun 14A-13.1
Transport
x2 Universal Carrier (no MG) 14A-08 x1 2pdr Anti-Tank Gun 14A-12
Direct Fire Support
x4 25pdr Field Gun 14A-15 Transport
x4 CMP 15ct Truck 14A-11
Transport
x4 Quad Field Artillery Tractor BR-45 x2 40mm Bofors Light Anti-Aircraft Gun 14A-14
Transport
x2 Morris CDSW Gun Tractor use 14A-11
FIRE SUPPORT ELEMENT
Troop, 20 Field Battery, 9 Field Regt,
FIRE SUPPORT ELEMENT
Royal Artillery, 20th Indian Division (bf)
Section, 8 Medium Regt, Royal Artillery,
(under direct command of OC Gun Box)
General Fire Support
IV Indian Corps (d)
(under direct command of OC Gun Box)
x2 25pdr Field Gun 14A-15
On-Table Attachments
Transport
x1 Forward Observer 14A-20
x2 Quad Field Artillery Tractor BR-45
Transport
x1 Jeep (no MG) 14A-10
Direct Fire Support
FIRE SUPPORT ELEMENT x1 5.5-inch Gun BR-P83
31 Mountain Battery, 23 Mountain Regt,
Transport
Indian Artillery, 20th Indian Division (ab) x1 AEC Matador Heavy Gun Tractor BR-P81
Command
HQ x1 Commander 14A-18 MANOEUVRE ELEMENT
On-Table Attachments Troop, 67 Heavy Anti-Aircraft Regt,
x2 Forward Observer 14A-20 Royal Artillery, IV Indian Corps (e)
Direct Fire Support (under direct command of OC Gun Box)
x2 3.7-inch Mountain Howitzer 14A-16
x1 3.7-inch Heavy Anti-Aircraft Gun BR-P80
Transport
x2 Pack Mules Transport
x1 AEC Matador Heavy Gun Tractor BR-P81
(a) Forward Observers belonging to 31 Mountain Battery or 311 Field Battery may each call for a Troop fire mission (i.e. a half-battery) or for
the whole battery as Direct Fire Support. Obviously, if a Battery mission is being called by one FO, the other FO must cease fire.
(b) All 25pdr Field Guns and 3.7-inch Mountain Howitzers may be combined in a ‘Mike Target’ as General Fire Support.
(c) The 2pdr Anti-Tank Section and one of the 40mm Bofors sections are attached to 1st West Yorks, ready to move forward once
Potsangbam is secured.
(d) As there is only one 5.5-inch Gun model present, it may not in game terms fire a concentrated fire mission and may not therefore be used
to thicken concentrations.
(e) The 3.7-inch Heavy Anti-Aircraft Troop was used for long-range counter-battery work, as well as anti-aircraft defence. However, this rather
falls outside the scope of this game. It may not be used for indirect fire on-table.
(f) The troop from 20 Field Battery may be used in the initial barrage and/or as General Support to thicken 25pdr or 3.7-inch concentrations.Briefing for Lieutenant Colonel Taguchi, Commanding Taguchi-Butai
Situation – Ningthoukong, Dawn, 8th May 1944
Your 4th Independent Engineer Regiment has been attached to General Yanagida’s 33rd Division for Operation U-Go:
the ‘March on Delhi’, to provide additional engineering support. Good military engineering is vital in a region such as
this with poor roads, mountainous terrain, deep gorges and few bridges or ferries.
For the last few weeks, 33rd Division has pursued the British-Indian 17th Division over 100 miles – all the way from
the Kabaw Valley in Burma, through Tiddim and up to the Imphal Plain, high in the mountains of India’s Manipur
province. The British are now at bay in the city of Imphal; they are surrounded by our victorious divisions and will
soon be crushed. The road to India will then be wide-open and the Emperor’s forces will liberate that oppressed
country and will bring its inhabitants into the Greater Japan Co-Prosperity Sphere.
However, the British and their Indian slave-soldiers are fighting much harder than they have in previous campaigns.
They are only delaying our inevitable victory, but nonetheless, they continue to fight hard and have inflicted heavy
casualties on Yanagida’s infantry. As a consequence, General Yanagida seems to be advancing more cautiously now
than in the earlier part of the campaign, while support elements such as your own regiment, are being brought up to
supplement the infantry.
Now that we have reached the Imphal Plain, the leading elements of the division have been split into three columns:
The 214th and 215th Infantry Regiments are attacking through the mountains to the west, attempting to circumvent
the enemy position at Bishenpur. They also have the task of cutting the Silchar Track, which is the last remaining
open British supply route. Your own regiment meanwhile, forms the core of the third column, designated ‘Taguchi-
Butai’. You have also been given command of Major Isagoda’s 2nd Battalion of 213th Infantry Regiment (less two
companies) and a battery of heavy mortars carried by elephants. As your column will be operating on the open plain,
you have also been allocated a large contingent of anti-tank guns from 1st Independent Anti-Tank Battalion.
After numerous skirmishes on the plain, you finally came up against the main enemy defence line on the 18th. You
put a strong attack in against the villages of Bishenpur and Potsangbam, but the enemy held fast. General Yanagida
has therefore ordered you to hold fast while the other two columns outflank the Bishenpur position.
Your battlegroup spent a few days digging in at Ningthoukong. This paid off on the 22nd, when Major Isagoda’s
battalion beat off an enemy probe. A more determined attack was launched on the 25th, this time spearheaded by the
enemy’s fearsome Gurkha warriors, but they were forced to withdraw once your anti-tank guns had beaten off their
tank support. Following that battle, you exploited your success by driving on into Potsangbam, which you have also
now fortified. Further outposts were established in Kwa Sipahi and Khoijuman, but the enemy has managed to force
your men back out of Khoijuman, while Kwa Sipahi remains contested ground.
Our Army Air Force has bombed the enemy artillery positions at Bishenpur four times this week, but seemingly to no
effect, as their guns have never stopped shelling you.
General Yanagida informs you that the 214th and 215th Regiments, up in the hills to the west, will soon be in a
position to attach Bishenpur from the west and north. 14th Tank Regiment is also coming up the Tiddim Road, with
further infantry and artillery reinforcements. When that moment comes, you must stand ready to launch a
simultaneous assault on the town from the south. It is therefore imperative that you maintain control of Potsangbam
and Ningthoukong, in order to have a ‘firm-base’ from which to launch that assault. It would be even better if you
could in the meantime, establish your firm-base even closer to Bishenpur – in Kwa Sipahi, Khoijuman or Chothe.
However, it seems that the enemy is about to make the first move. Your positions have been bombarded by enemy
heavy bombers during the night and now dive-bombers are screaming down on your front-line positions. Your forward
observation posts are also reporting the sound of tanks out in front.
They are coming.
Mission
You are to hold the villages of Potsangbam and Ningthoukong against all enemy attacks, with the intention of retaining
them as a jumping-off point for attacks against Bishenpur.
Execution
General Outline
Your battlegroup has heavily fortified the villages of Ningthoukong and Potsangbam and to a lesser extent, the
villages of Awang Khunou and Kwa Sipahi.Deployment
Bishenpur
Kha Aimol Chothe
Point 2614
Enemy
Positions
Awang Khunou Upokpi
Destroyed
Bridge
Khoijuman
A
Kwa Sipahi
Embanked
Road
C Potsangbam
B
Ningthoukong
N
Logtak Lake
(more marsh than lake)
Your battlegroup is dug in, with the main bastions of defence being the villages of Ningthoukong and
Potsangbam. Major Isagoda is responsible for the forward positions at Potsangbam, while your headquarters
is situated in Ningthoukong.
You may swap an ME between 4th Independent Engineer Regiment and Major Isagoda’s battalion if you so
wish.
Support elements and MEs may be assigned to either battlegroup. As you see fit.
You may place up to one ME, plus attachments, in each of the smaller villages within your deployment area,
defined by Line A-B. However, note that only Awang Khunou and Kwa Sipahi are fortified to any degree.
No units may start the game deployed outside the villages in your possession.
Ningthoukong and Potsangbam may each have eight infantry/MG bunkers – treat as concrete pillboxes.
These may be inter-linked by trenches and open-topped infantry fighting positions. Guns may also be dug-in.
Awang Khunou and Kwa Sipahi may each have two bunkers and sufficient trenches and infantry fighting
positions for a single infantry company.
Units deployed in any other villages may be in Improved Positions.
You may deploy 20 Dummy Unit Markers.
You may deploy 24 inches of wire and/or punji stakes (the same thing in game terms) and 12 inches of anti-
personnel mines, plus 12 inches of dummy mines – none of which may be deployed on roads.
Your HMGs may use the optional Grazing Fire rules (see website Optional Rules section).Reinforcements
Turn 5: Part of the 33rd Division Tankette Company and 11th Company, 214th Infantry Regiment, arrive at
Point C.
Friendly Forces
Your forces are detailed at Annex A below.
The bulk of Yanagida’s 33rd Division is working its way up through the mountains on your left, though
reinforcements, including the tanks of 14th Tank Regiment, continue to move up the Tiddim Road in your rear.
Your right flank is secured by the impassable swamp of Logtak Lake.
All elements of your force are classed as Veteran except for the armour, who are classed as Experienced.
Enemy Forces
The enemy appear to have at least a brigade of three battalions defending the line from the mountains to
Logtak Lake, with the centre of the line at Bishenpur.
The enemy is well-supported by tanks, with at least a battalion in close support of the defence line.
The enemy is well-supported by artillery, with at least two batteries of guns dug-in at Bishenpur. Our air force
has been ordered to attack these guns and you intend to launch a raid with your engineers, under cover of
darkness, to destroy at least some of them.
The enemy air forces, while they do not have air supremacy, do certainly have air superiority. They range at
will over the battlefield and our air forces seem to do little to stop them.
Air Support
Our air forces are mainly concerned with hitting enemy logistics and artillery positions. They have shown little
interest in supporting the Army in the tactical battle and so cannot be relied upon to provide support to you
here. However, you have been informed that a raid consisting of x5 Ki-51 Type 99 Assault Aircraft (JA-29) is
on the way to hit enemy artillery positions at Bishenpur. From Turn 5, roll a D10 – the raid will arrive on a roll
of ‘0’ and the odds will improve by 1 each turn (i.e. a roll of 9 or 0 will be required on Turn 6. A roll of 8, 9 or 0
will be required on Turn 7, etc). When the aircraft arrive, they must be allocated to artillery guns in the
Bishenpur Box.
Any aircraft that are not KO’d, Suppressed or Disordered following the attack on Bishenpur may return during
the following turn and may strafe any enemy units on the table. However, note that KO’d aircraft count toward
Victory Points.
Artillery Support
You have the 105mm howitzers of 18th Independent Heavy Artillery Regiment firing in Direct Support from off-
table. The battalion’s FOs must be attached to HQs or MEs on the table. The battalion may not concentrate
its fire. The 2nd Battery of 33rd Mountain Artillery Regiment, equipped with 75mm guns, is also in Direct Support of
Taguchi-Butai. This may be deployed on-table if desired. The FO again must be attached to an HQ or ME.
One company of 320mm spigot mortars from an Independent Heavy Mortar Battalion is deployed forward with
Major Isagoda. These weapons, while extremely powerful, have a cripplingly short range and a slow rate of
fire. They may only fire on every other turn – mark them with a puff of smoke when they fire and remove the
smoke during the turn in which they reload. They may not fire if the smoke-puff is still on the model. The two
mortars may only fire shelling missions and may not concentrate their fire. However, their elephant transports
give them reasonably good mobility in poor terrain.
Major Isagoda has an organic 70mm Infantry Gun Platoon.
Your indirect fire support elements may each pre-register a Defensive Fire target reference point within 12
inches of the defended perimeter. Mark these pre-registered targets on your map prior to the British player’s
deployment.
An observer in the Watershed Mountains to the west has Chothe and Point 2614 under good observation.
Any enemy units making a Move action within Chothe or Point 2614, or within 2 inches of the edge of these
features, will automatically become a Suspected target. ONE 105mm Battery FO per turn may attempt to call
for a Random Shelling mission on a suspected target within this observed area, even if the FO does not have
direct line-of-sight (i.e. he is being given target and fire correction information by the observer in the hills).
Game Sequence
The Commonwealth player has the first turn.
The game lasts for 25 turns.
Victory Conditions
1 VP for each enemy Manoeuvre Element with greater than 25% casualties OR each knocked out gun,
aircraft or armoured vehicle.
2 VP for each enemy Manoeuvre Element with greater than 50% casualties.
3VP for each enemy Manoeuvre Element with greater than 75% casualties.
5VP for possession of Bishenpur.
2VP for possession of each of the following: West Ningthoukong, East Ningthoukong, West Potsangbam or
East Potsangbam.
1 VP for possession of any other village or Point 2614.
Total Victory – for having 5+ VPs more than the enemy.
Partial Victory – for having 1-4 VPs more than the enemy.BATTLEGROUP
‘Taguchi-Butai’ (‘Taguchi Group’)
Lieutenant Colonel Taguchi (a)
Command
HQ x1 Commander JA-19
x1 Riflemen JA-17
BATTLEGROUP BATTLEGROUP
4th Independent Engineer Regiment 2nd Battalion (-), 213th Infantry Regiment
Lieutenant Colonel Taguchi Major Isagoda
Command
Manoeuvre Element HQ x1 Commander JA-19
1st Company
x1 Riflemen JA-17
Command
HQ x1 Commander JA-19
Manoeuvre Element
x8 Combat Engineers (1 flame) JA-24 5th Company (b)
x4 Type 99 Antitank Mine Team JA-23 Command
HQ x1 Commander JA-19
Manoeuvre Element x9 Riflemen JA-17
2nd Company
x3 Type 89 Grenade Discharger JA-25
Command
HQ x1 Commander JA-19 x1 Type 97 20mm Antitank Rifle JA-23
x8 Combat Engineers (1 flame) JA-24
Manoeuvre Element
x4 Type 99 Antitank Mine Team JA-23 6th Company (b)
Command
Manoeuvre Element HQ x1 Commander JA-19
3rd Company
x9 Riflemen JA-17
Command
HQ x1 Commander JA-19 x3 Type 89 Grenade Discharger JA-25
x8 Combat Engineers (1 flame) JA-24
x1 Type 97 20mm Antitank Rifle JA-23
x4 Type 99 Antitank Mine Team JA-23
Manoeuvre Element
(Attachments & Fire Support Elements on Pages 2 & 3) 7th Company (absent) (b)
(a) Lt Col Taguchi was put in command of a combined battlegroup formed Manoeuvre Element
from his own 4th Independent Engineer Regiment, 2/213th Infantry 8th Company (absent) (b)
Regiment (less two companies), two antitank companies from 1st
Independent Antitank Battalion and a Heavy Mortar Company.
Manoeuvre Element
(b) There is no record as to exactly which two companies were detached 2/213th Battalion MG Company
from 2/213th, so the numbering shown here is a guess.
Command
HQ x1 Commander JA-19
(c) The normal strength of the MG Company would be x6 MG Sections,
though two MG Sections would probably have been detached with the two
x4 Type 92 Heavy Machine Gun (c) JA-21
detached companies. Note that an MG Section may be directly attached to
each Infantry Company, leaving the MG Company as only x2 MG sections
strong. ATTACHMENTS
Organic Fire Support
x1 Type 92 Daitai-Ho 70mm Btn Gun (e) JA-10
Transport
x1 Pack Mules(Continued from previous page)
(a) There is no record as to exactly which two companies were
Elements, 1st Independent present from 1st Antitank Battalion, so I have arbitrarily given them
Antitank Battalion (a) 1st & 2nd Company designations.
Manoeuvre Element (b) The Antitank Companies may alternatively be split up as
1st Company (ab) individual attachments to the battalion’s Rifle Companies or
Headquarters Element.
Command
HQ x1 Commander JA-19 (c) May replace limbers for 37mm guns with:
Pack Mule
x3 Type 94 37mm Antitank Gun JA-13
(d) May replace limbers for 47mm guns with:
Transport Type 94 Ko-Otsu Medium Truck JA-P06
x3 Horse Limber (c) JA-28
(e) I have no information on the identity of this unit, nor how Heavy
Manoeuvre Element Mortar Companies equipped with 320mm Spigot Mortars were
organised. It is highly likely that they had fewer weapons than those
2nd Company (ab) equipped with the far more typical Type 94/97 90mm Mortar, but the
Command figure given here of x2 weapons is simply a semi-educated guess.
HQ x1 Commander JA-19
x3 Type 1 47mm Antitank Gun JA-14
Transport
x3 Horse Limber (d) JA-28
Manoeuvre/Fire Support Element
Independent Heavy Mortar Company
Command
HQ x1 Commander JA-19
On-Table Attachment
x1 Forward Observer JA-20
Fire Support
x2 Type 98 320mm Spigot Mortar (e) JA-P23
Transport
x2 Pack Elephants JA-P26
Elements, 3rd Battalion, 214th Infantry Regiment
Manoeuvre Element
11th Company, 214th Infantry Regiment
Command
HQ x1 Commander JA-19
x9 Riflemen JA-17
x3 Type 89 Grenade Discharger JA-25
x1 Type 97 20mm Antitank Rifle JA-23
x1 Type 92 Heavy Machine Gun JA-21
Manoeuvre Element
Elements, 33rd Division Tankette Company
Command
x1 Type 97 Te-Ke 37mm Tankette JA-02
x1 Type 97 Te-Ke 37mm Tankette JA-02Fire Support Elements Assigned to Taguchi-Butai
Elements, 1st Battalion,
33rd Mountain Artillery Regiment (a)
Direct Fire Support Element
2nd Battery (bc)
Command
HQ x1 Commander JA-19
On-Table Attachment
x1 Forward Observer JA-20
Fire Support
x1 Type 94 75mm Mountain Gun use JA-12
Transport
x1 Pack Mules
General Fire Support Element
1st Battalion,
18th Independent Heavy Artillery Regiment (d)
Direct Fire Support Element
1st Battery
On-Table Attachment
x1 Forward Observer JA-20
Fire Support
x2 Type 91 105mm howitzer no card
Direct Fire Support Element
2nd Battery (c)
On-Table Attachment
x1 Forward Observer JA-20
Fire Support
x1 Type 91 105mm howitzer no card
Direct Fire Support Element
3rd Battery (c)
On-Table Attachment
x1 Forward Observer JA-20
Fire Support
x1 Type 91 105mm howitzer no card
(a) The rest of the 1st Battalion, 33rd Mountain Artillery Regiment,
is detached along with the remainder of 213th Infantry Regiment.
However, 2nd & 3rd Battalions are relatively nearby, in Direct
Support of 214th or 215th Infantry Regiments respectively. Some
additional batteries might therefore occasionally become available.
(b) Mountain Batteries may either be deployed as off-table FSEs
(though note the limited range of the 75mm Mountain Howitzer), or
as on-table Fire Support/Manoeuvre Elements.
(c) In common with the majority of fire support elements in 15th
Army, the batteries of 33rd Mountain Artillery Regiment and most
batteries of the 18th Independent Heavy Artillery Regiment were
halved in strength in order to increase mobility and ammunition-
carrying capacity.
(d) The 1st & 3rd Battalions of 18th Independent Heavy Artillery
Regiment were supporting 33rd Division, with 2nd Battalion (minus
4th Battery) joining the regiment on 1st June. Only one battery
from 1st & 3rd Battalions was at full-strength (I have arbitrarily
designated this as 1st Battery), though all batteries of 2nd Battalion
were at full strength (which possibly explains why they were so late
arriving). Taguchi’s Group at Bishenpur received very strong
support from 105mm guns, so I have allocated a full battalion here.Terrain Effects
Mobility
Terrain Concealment Cover Troops Tracked or Half- Wheeled Vehicle
Tracked Vehicle or Gun
Open (1) Nil Nil Full Speed Full Speed Full Speed
Dense Woods Dense Area Soft Full Speed Half Speed & Bog Half Speed & Bog
Villages (2) Dense Area Soft Full Speed Half Speed & Bog Half Speed & Bog
Built-Up Area Dense Edge Soft Full Speed Impassable Gun: Half Speed
(Wooden) (3) Veh: Impassable
Shallow Gully Sparse Edge Hard Half Speed Breach Breach & Bog
Deep Gully (4) Sparse Edge Hard Breach Impassable Impassable
Wide & Deep Sparse Edge Hard Breach Impassable Impassable
Gully (5)
Paved Road (6) Nil Nil Double Speed Double Speed Double Speed
Unpaved Road Nil Nil Full Speed Full Speed Full Speed
(6)
High Road Sparse Edge Hard Half Speed Breach Breach & Bog
Embankment (Blocks LOS)
Logtak Lake Nil Nil Impassable Impassable Impassable
Terrain Effects Notes
1. This was mainly dry paddy, with very little cover. However, there are occasional Low Banks dividing some
paddy fields from the next (see above).
2. The villages were scattered affairs, with each family farmstead surrounded by earth banks, hedges, orchards
and spice trees. Rather than make these terrain areas very complicated, it is easier to class the whole area
as one terrain type: As Dense Woods (with underbrush) plus one further caveat - No Rapid Advance
permitted within villages
3. Wooden buildings, often built of very flimsy materials, but the locals would often surround them with banks
and hedges and would even dig air raid shelters beneath them. Many of these were converted into bunkers
by the Japanese. These are rambling settlements, so there is no ‘Street’ terrain type in between them
4. Deep Gullies such as those running through Potsangbam and Ningthoukong, may be bridged by a Valentine
Bridgelayer. See Engineering rules below.
5. Wide & Deep Gullies such as the one running through Bishenpur and Khoijuman, may not be bridged by a
Valentine Bridgelayer.
6. The Tiddim-Imphal Road is Paved. All other roads are unpaved. Aside from the high-banked road in
Ningthoukong (see below), all roads run along Low Banks (as paddy dykes, above
Special Rules
“May The Emperor Live For a Thousand Years! Banzai!”
Any Disordered Japanese Commander, Riflemen, Combat Engineer, Anti-Tank Mine, Grenade-Discharger or
Forward Observer unit suffering a Panic or Fall-Back Manoeuvre result may instead opt to launch an
immediate Rapid Advance (while Disordered) against the nearest Spotted or Suspected enemy unit.
If there are no Spotted or Suspected enemy units within reach, the unit will conduct a Panic or Fall Back as
normal.
Exception: A Japanese Troop or Gun unit of any type occupying a BUA, bunker or dug-in position suffering a
Panic or Fall-Back Manoeuvre result, may instead opt to doggedly stay in its position (Disordered).
Sustained Fire MG Grazing Fire
Only emplaced British Vickers Medium Machine Guns and Japanese Type 92 Heavy Machine Guns may
conduct Grazing Fire.
To use Grazing Fire, the MG must be emplaced in an Improved Position or Dug In. The Grazing Fire Template may only be placed within a 90-degree arc off the unit’s front facing (i.e. up to 45
degrees off the centerline). Targets outside this arc, but within the normal 180-degree front arc, may be
engaged normally using the normal Fire procedure.
The template can be placed in offensive, defensive, or during opportunity fire against any target that lies within
the 90 degree arc. It also may be placed at the beginning of the enemy maneuver phase instead of defensive
fire even if even if no targets are available. Once placed, it remains in place until the end of the current player
turn and may not be moved. Note that the designated target must lie within the arc, even though that it is
possible for targets slightly outside the 90 degree arc to be affected by the fire if they lie within the template.
The effect of the template does not pass through dense area terrain. It will affect units on the edge of dense
area terrain, but not deep or behind it. [Alternative rule: May allow Grazing Fire to pass through inches of
dense area terrain].
All units, enemy and friendly, which have an aiming point within the template are attacked with a additional -1
modifier. The effect of the template is similar to that of an artillery interdiction fire (p.43). If a unit moves into or
through the template, it is immediately attacked.
Light Mortar Targeting
Through play-testing, we have found that light mortars and grenade dischargers such as the British 2-inch
Mortar and the Japanese 50mm Grenade Discharger, don’t really inflict their historical effect in close terrain,
due to the requirement to have line of sight on a target. Therefore, we have devised the following alternative
rule, which seems to work rather well:
o Light Mortars or Grenade Dischargers organic to an ME may fire indirectly without calling for fire at
targets that have been Spotted by units of the same ME.
o Units performing such fire automatically apply the modifier for Random Shelling.
Engineering
A Valentine Bridgelayer carrying a bridge cross-country may only move at half-speed.
A Shallow Gully or Deep Gully can be bridged by a Valentine Bridgelayer, taking one action to do so while
conformed to the ditch.
Once used, a vehicle-launched bridge may not be re-used.
Engineers and Assault Pioneers may breach a bank for Troops if they successfully 'Improve Position' while
conformed to the bank. To breach it for Vehicles will require three adjacent 'Improve Positions' (some sort of
marker will be required for this). To completely breach a gully required the engineers to breach both banks.
The demolished bridge in Potsangbam may be repaired by Engineers or Assault Pioneers:
o To make the bridge passable by Troops, an Engineer or Assault Pioneer unit must successfully
Improve Position on each end of the bridge.
o To make the bridge passable by Vehicles, Engineers or Assault Pioneers must successful make three
adjacent ‘Improve Positions’ on each end of the bridge.
Any troops crossing a deployed Valentine bridge or repaired bridge may do so at full speed. Vehicles and
Guns do so at half speed.
A breach that has been created in a Deep Gully or Deep & Wide Gully by Engineers/Pioneers is classed as a
Shallow Gully at that point.
Tanks may clear KO’d vehicles from defiles, taking one action to do so.
Clearing Minefields with Engineers or Assault Pioneers:
o Engineers/Assault Pioneers may clear up to 1 inch of minefield per movement action.
o ‘Rapid Advance’ (i.e. two actions per turn) is not permitted.o For each inch of the minefield, roll on the Improve Position Table with a +3 modifier. If the
Engineer/Assault Pioneer section succeeds on the ‘Improve Position’ table, the Assault Pioneer
section moves forward 1 inch and clears a safe path wide enough for one unit of any type to pass
through. Mark the safe path on the table using thread or wire.
o Ordinary (i.e. non Pioneer-trained) Troop elements may also attempt to clear mines using this
method, but do so without applying the +3 modifier. However, Veteran and Elite troops may apply a
+1 modifier.
o Engineers/Assault Pioneers may conduct Defensive Fire as normal while attempting to clear mines
(we’ve all seen Kelly’s Heroes!).
o If the minefield is in terrain that requires a bog-down test, conduct the bog-down test before
attempting to clear the minefield. A ‘Bog’ or ‘Displace’ result will prevent the unit from clearing mines
for that action.
o Once a safe path has been cleared through a minefield, units may only pass through in single file and
may not perform a Rapid Advance through the breach.
o Engineers and Assault Pioneers may always attempt to rapidly cross the minefield as normal, rolling
on the Minefield Passage Table for every inch of mines crossed. As they are equipped and trained to
detect mines, they will apply a +1 modifier on the Minefield Passage Table. Any Troop units following
the same route may also then gain the +1 Minefield Passage bonus, but the route will not be safe for
anything larger. Note that this method is a lot quicker, but it’s risky and it will not create a safe route
for vehicles.
Scenario Balancing Options
Favouring the Commonwealth
Add an additional x1 5.5-inch Medium Gun to the detachment from 8 Medium Regiment.
Replace 9/14th Punjab Regiment with 1/4th Gurkha Rifles – same organisation but classed as ‘Veteran’.
Favouring the Japanese
Allow tactical air support missions to be flown by Ki-51 ‘Sonia’ light bombers: Called in by Regiment/Battalion
Commanders as Direct Fire Support. Only one mission allowed per turn.
Add x1 or x2 Light (13mm or 20mm) Anti-Aircraft Guns to each Anti-Tank Company.
Designer’s Notes
This scenario was designed as a demonstration ‘mega-game’ for our annual July get-together at The Tank Museum,
Bovington in 2011. As a consequence, I have ‘fiddled’ a few aspects of the historical engagement:You can also read