BRONZE MEDALLION LEARNER GUIDE - Royal Life Saving WA
←
→
Page content transcription
If your browser does not render page correctly, please read the page content below
BRONZE MEDALLION
    LEARNER GUIDE

1
BRONZE MEDALLION
    LEARNER GUIDE
    This Learner Guide has been produced by The Royal Life Saving Society Western Australia Inc. to aid participants in the
    Bronze Medallion course.

    This learner guide is not to be reproduced or copied without prior authorisation by Royal Life Saving Society Western
    Australia Inc.

    All information refers to the Royal Life Saving Society “Swimming and Lifesaving: water safety for all Australians”
    manual (6th edition).

    All information is true and correct at time of publication.

    Learner Guide Version History
    Date                                      Version No.                             Comments
    June 2012                                 1.0                                     First Print
    June 2013                                 2.0                                     Second Print
    October 2013                              1.0                                     First Print
    May 2014                                  1.0                                     First Print
    September 2016                            1.0                                     First Print
    April 2020                                1.0                                     First Print

2
ASSESSMENT S

EXAMINER ASSESSED
    Assessment   Topic                       Assessment Type

        1        Theory Examination          Answer multiple choice questions and written questions (100% pass mark).

                 Primary Survey –
        2                                    Demonstrate initiative in dealing with a non-breathing person.
                 Resuscitation Initiative

        3        Rescues – Reach             A non-swimmer is in difficulty 2 mt from safety.Demonstrate a reach rescue.

                                             A person is in difficulty 10 mt from safety. Perform a throwing rescue and
        4        Throw – unweighted rope
                                             secure a person at a point of safety
                                           Dressed in clothes (any of which may be discarded as desired) Rescue
        5        Timed Tow – 3mins/15 secs an unconscious breathing person who is 50m from safety. Approach the
                                           casualty and tow them 50 mt back to safety
                                             Dressed in swimwear, swim continuously 400m: 100m freestyle,100m
        6        400m swim – 13 minutes
                                             survival backstroke, 100m sidestroke and 100m - breaststroke

                                             Demonstrate survival skills dressed in swimwear, trousers and long sleeved
        7        Survival Skills
                                             shirt.
                 Accompanied Rescue
                                             Rescue a weak swimmer in difficulty with a floatation aid.
                 and Wade
        8                                    Enter the water, wade 5 to 8 mt and rescue a swimmer in difficulty back to
                 (if possible,depending on
                                             safety
                 enviroment)
                                             A weak or injured swimmer is in difficulty in deep water 25 metres from
        9        Tow                         safety, swim to the person and while returning to safety use an appropriate
                                             non-contact tow
                                             Apply the vice grip for immobilisation of a spinal injury and then wade
       10        Spinal Injury
                                             with the casualty for 5m (water no deeper than 1.2 mt)

                 Defensive & Escape          Dressed in swimwear, trousers and long sleeved shirt perform 2 techniques
       11
                 Techniques                  in deep water.

       12        Search and Rescue           Demonstrate a search pattern in approximately 2m of water.

                                             Identify a submerged casualty in water, recover and resuscitate the casualty
       13        Recovery and Resuscitate
                                             in 2m of water.
                                             Demonstrate initiative in effecting a rescue of 2 people who are in
       14        Rescue Initiative           difficulty up to 15m from safety and whose conditions are unrevealed.
                                             Complete a written incident report.

3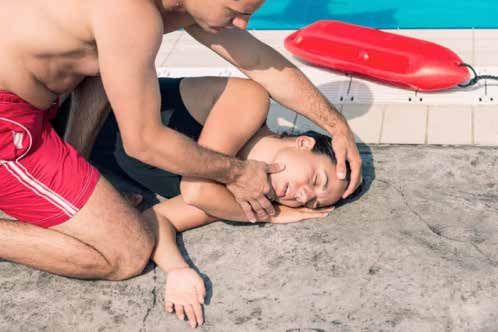
ASSESSOR
    The assessor will be an approved Royal Life Saving assessor holding a current Aquatic Trainer award, and relevant
    qualifications at the level being assessed, or higher.

    DESCRIPTION OF TASK
    Candidates must satisfactorily complete practical water rescue and resuscitation scenario, identification of the use of a
    defibrillator, as well as theory examination.

    DURATION
    The Bronze Medallion assessments must be completed within class time. The current nominal allotted time for both
    training and assessment is 14 hours.

    ACCESS AND EQUITY
    Royal Life Saving has a Building Diversity Policy that ensures that people from all groups, such as aboriginal people,
    people with a disability, people from culturally and linguistically diverse backgrounds, people from rural and remote
    areas, mature aged people, and women, have equal opportunity to get successfully into Vocational Education and
    Training to gain skills and knowledge that equips them for a reasonable working life.

    COMPLAINTS GRIEVANCES AND APPEALS POLICY
    Complaints
    All participants in any training or assessment activity conducted by Royal Life Saving have the right to seek redress if they
    believe that they have been treated unfairly or if they are not satisfied with any process or relevance of the training or
    assessment activity.

    Grievance Mechanism
    Royal Life Saving has developed a Grievance Policy to ensure that participants and clients have access to a fair and
    equitable process for dealing with grievances.

    Appeals Process
    Royal Life Saving has developed an Appeals Policy to ensure that participants and clients have access to a fair and
    equitable process for dealing with complaints regarding final assessment outcomes. Any appeal on an assessment
    decision must be made by the participant within 10 working days after the participant was notified of the result.

4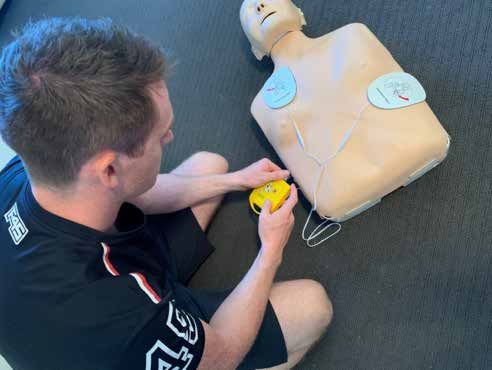
COURSE OUT LINE

BRONZE MEDALLION PROGRAM

                      Theory / Practical                                                   Topic

                                                                                      Introduction

                           Theory                                                 Culture of Lifesaving

                           Theory                                        How to Call for help in an Emergency

                           Theory                                       Water Safety and Hazard Identification

                           Theory                                                Aquatic Environments

                  Demonstration / Practical                           Recovery of a breathing unconscious casualty

                  Demonstration/Practical                                 Adult, child and infant Resuscitation

                                                               Cardiac arrest, choking, hypothermia, shock and bleeding,
                           Theory
                                                                                     bites and stings
                                                                  Automated External Defibrillator (demonstration, if
                      Practical/Theory
                                                                                     possible)

                           Theory                                         Communicable Diseases and Hygiene

                           Theory                                         Rescue Principles – Steps in a Rescue

                          Practical                                             400m Swim (13 minutes)

                   Demonstration/Practical                                      Types of Entries and exits

                  Theory / Demonstration                                 Characteristics of a Person in Difficulty

                                                                Rescue Techniques: talk, reach, throw, wade, row, swim,
              Theory / Demonstration/Practical
                                                                                          tow

                          Practical                                         Timed Tow unconscious(3.15 sec)

                                                                  Search Patterns in deep water(deepest part of your
                      Theory/Practical
                                                                           environment no more than 2 mt)
                                                               Recover and Resuscitate (simulate recover of unconscious
                  Demonstration/Practical
                                                                    casualty from deep water and tow to safety)

                          Practical                                                   Survival Skills:

              Theory / Demonstration/Practical                                    Spinal Management

                           Theory                                      Alcohol and Recreational Aquatic Activity

                           Theory                                                   Emergency Care

                      Theory/Practical                                           Accident Report Forms

Please Note: The Swimming and Lifesaving manual is the benchmark publication for the teaching of water safety,
swimming, survival, lifesaving and rescue skills. It provides a complete guide for the knowledge and skills required to
achieve all of Royal Life Saving’s lifesaving awards. The Swimming and Lifesaving manual can be purchased through
Royal Life Saving office.

5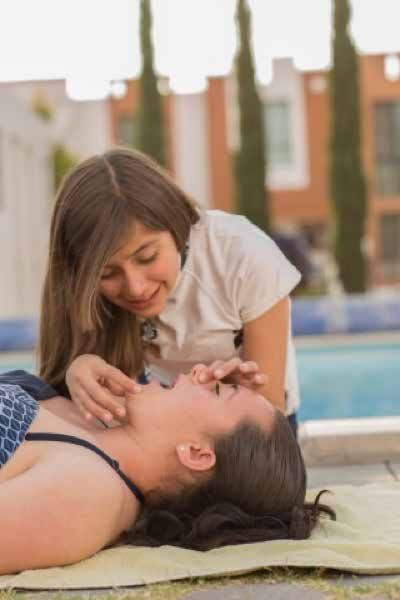
HISTORY OF RLSS AUSTRALIA                                     THE CULTURE OF LIFESAVING
    AND WESTERN AUSTRALIA                                         The Bronze program has been successfully running in
    The Royal Life Saving Society of Australia (RLSSA) is a not   Australia for over 105 years. By completing one of the
    for profit benevolent organisation and has developed          awards in this strand, you will join the millions of other
    into the leading water safety education organisation in       Australians who have achieved the skills, judgement and
    Australia. Its roots foundation stems from the United         initiative to perform successful aquatic rescues.
    Kingdom, where William Henry commenced water safety
    education in 1891 and this spread to Australia in 1894.       Central to the role of the lifeguard or rescuer is the
                                                                  safeguarding of life. This inherently includes both the
    In 1924, the RLSSA was granted a Royal Charter by             life of the casualty in distress and the life of the rescuer.
    King George V and the official RLSSA was formed in            Therefore, self-preservation is of the utmost importance
    1934. Many aspects of the Society’s operations were           and rescue techniques should in no way expose the
    managed from the United Kingdom until 1957. In 1959 a         rescuer to danger.
    supplemental Charter was granted by Queen Elizabeth II
    and this formally established the National Branch of the      As with most physical skills, lifesaving skills deteriorate
    Society in Australia. A permanent national secretariat        without regular practice. With this in mind, the focus
    was established in 1978.                                      for the society today is on participation. The Royal Life
                                                                  Saving Society would like to encourage all Australian’s
    In 1984, the Society incorporated as a public company         to undertake regular water safety activity. In the very
    limited by guarantee.                                         least, Royal Life Saving encourages the development
                                                                  and continuance of water safety knowledge as the
    The Western Australian Society was formed in 1909 by          foundation on which all aquatic activity should be based.
    a Police Sergeant in Kalgoorlie who conducted water
    safety education programs for people who travelled to
    the coast for holidays.

    What is our purpose?
    Empowering our community to be safe when they are
    in, on, or around water and leading efforts to reduce the
    impact of drowning.

6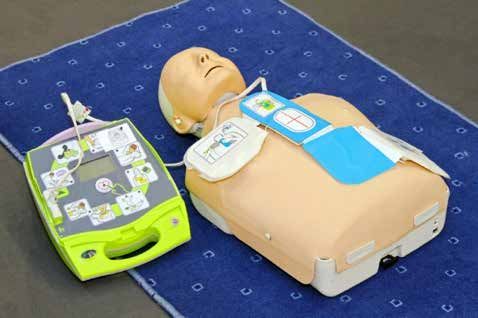
AWARENESS - RECOGNISING EMERGENCIES                         ASSESSMENT – MAKING INFORMED JUDGEMENTS
Recognising an emergency is the first step when             Whatever the degree of skill of a person who recognises
responding to an emergency.                                 the emergency, correct assessment of the situation
                                                            is vital. Wrong actions may result in the rescuer also
It is essential to recognise an emergency before any        getting into difficulty. Following assessment the rescue
action can be taken by emergency personnel. Before you      should develop a plan of action.
try to assist anyone in an emergency, first check for any
danger. This also means danger to yourself, as YOU are      Once you are certain it is safe to act, plan what to do.
most important in any emergency situation. Tragically,
many people have died trying to rescue others because
they didn’t look for danger first or consider whether       ACTION – DEVELOPING A PLAN
they were capable of performing the rescue.                 It’s important to take action and not wait for someone
                                                            else to take control.
You may become aware of an emergency because of
certain things you observe:                                 Every second counts in an emergency. But remember, do
                                                            not put yourself in danger
Unusual Noises
• Screaming/yelling/crying/groans                           Self-preservation
• Boating incidents /motor sounds                           Number of people in difficulty
                                                            Priorities if rescue
• Shouts for help
                                                            Environmental conditions
                                                            Available assistance/selecting rescue aids
Unusual Smells                                              Effecting the rescue
• Non recognisable or strange odours
• Water quality
                                                            AFTER CARE – CALL FOR HELP
• Odours that can be tasted / alcohol
                                                            Either call Triple Zero (000) yourself or get someone
• Fire/ smoke/fumes                                         else to do so immediately. Stay on the line to help
                                                            direct emergency services to where you are. Give aid
Unusual Sights                                              to the casualty as required; that may mean performing
                                                            resuscitation until medical services arrive.
• Crowds gathering
• Location of person
• Surfboard and no surfer
• Murky / disturbed water

Unusual signs & symptoms of behaviour
• Unconsciousness
• Noisy or laboured breathing
• Clutching at chest or throat
• Slurred, confused or hesitant speech
• Drowsiness, irritability, confusion
• Profuse sweating for no reason
• Unusual skin colour or limb position
• Obvious deformity to body parts
• Person waving in the water
• Person going under water regularly

7
RESPONDING TO EMERGENCIES                                     MANAGE EMERGENCIES
Barriers to Action                                            Communicable diseases
At times people recognise an emergency but are                Communicable diseases are those diseases that can be
reluctant to act.                                             spread from one person to another such as:
                                                              • Colds
People have various reasons for hesitation:
                                                              • Influenza
                                                              • Measles
Presence of bystanders
                                                              • Mumps
The presence of bystanders can cause confusion at an
emergency scene. It may not be easy to see casualties         • Glandular Fever
or to identify if anybody is assisting the injured. Often,    • HIV
if there are a lot of bystanders observing the accident,      • Tuberculosis
the first aider can be reluctant to step forward and give
                                                              • Some forms of Meningitis
emergency care to the injured.
                                                              • Some skin infections
At the scene of an emergency, you may need to ask             • Hepatitis A, B & C
bystanders to stand back so that emergency personnel
can reach the injured. Bystanders can also be useful -
                                                              How these diseases can be passed on to the first aider by:
they can give you information about how the accident
happened, assist you with first aid or call an ambulance.     • Blood
                                                              • Saliva
Uncertainty about the casualty                                • Vomit
Most accidents occur in or around the home so you are         • Pus
more likely to give first aid to a family member or friend    • Urine
than a stranger. If you do not know the casualty you may
feel uncomfortable touching them. The casualty may            • Faeces.
be a different age, race or gender. These things should
not stop you from giving care - think of yourself in the      These may enter the First Aider’s bloodstream through
casualties’ position.                                         cuts, grazes or the mucous membranes.

Nature of the injury or illness                               Steps to take before management of casualty
At the scene of an emergency you may be confronted by         Whenever possible:
disturbing sights. The presence of blood, vomit, burning      • Cover exposed cuts and grazes with waterproof
skin, or unpleasant odours may initially prevent you            dressing
from giving first aid. It is important that you assess the    • Wear disposable plastic or rubber gloves
situation and determine where you can help. If you feel       • Goggles
that you cannot assist the injured due to the severity
of their injuries, there are still many things you can do     • Use antiseptic hand gel
to help. These include removing dangers or bystanders,        • Wash hands with warm soapy water for 15 seconds
calling an ambulance and reassuring casualties involved         before and after
in the emergency.                                             • Cover exposed skin

Fear of doing something wrong
                                                              Steps to take after management of casualty
Everybody responds in different ways to the anxiety of
performing first aid. Whether trained or untrained some       1.   If splashed by blood or other body fluids, skin should
of us are afraid that we will perform first aid incorrectly        be washed thoroughly with soap and running tap
and make the situation worse. If you are unsure of what            water, and alcoholic hand gel if available.
to do, call an ambulance.                                     2.   If skin is punctured by a sharp object, which may be
                                                                   contaminated, wash the area thoroughly with soap
                                                                   and running tap water, or hand gel and seek medical
                                                                   advice as soon as possible.
                                                              3.   If a mask is used, soak for 30 mins in bleach or
                                                                   disinfectant, and then wash with detergent and dry
                                                                   it. Dispose of any contaminated materials (such as
                                                                   bandages) and replace first aid kit with new ones.

8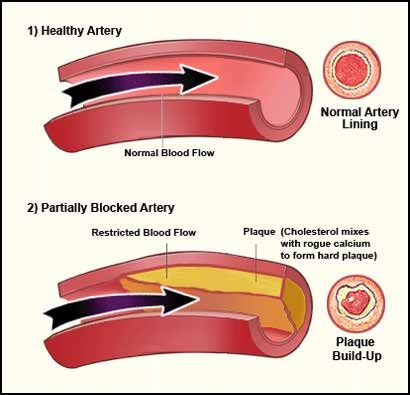
LEGAL CONSIDERATIONS
    Consent                                                       Recording
    Consent should be sought from the casualty whenever           In the event of any dispute, it will be helpful to the
    possible prior to applying first aid. Treatment given         first aider to have a record made at the time of the
    without the person’s consent could be constituted as          incident. The importance of accurately recording and
    assault.                                                      retaining written facts cannot be underestimated. When
                                                                  authorities investigate serious accidents, all written
    Consent can be implied or expressed:                          details are carefully examined. Such records are referred
    • It is implied when a person attends a first aid room for    to and used as evidence at inquests and court cases.
      treatment
                                                                  The following guidelines may be of assistance in the
    • Consent is expressed when oral or written permission
                                                                  preparation of a first aid report:
      is given
                                                                  • Write in ink only
    In some circumstances a person cannot give consent for        • Sign and date any alterations
    treatment:                                                    • Do not use correction fluids
    • If the casualty is unconscious                              • Keep the contents strictly confidential, clear and
    • Severe intellectual disability                                concise
    • Where injury or illness has affected the person’s ability   • Make sure that the record is factual and based on
      to make an informed choice                                    your observations
                                                                  • Write the word “draft” on the document prior
    In these cases, consent is not required and a qualified         to submitting so that changes can be made if the
    person may administer any necessary treatment to save           incident is taken further
    the person’s life or to prevent serious illness or further
                                                                  • Cross out and initial any blank spaces
    injury

    • When treating children or persons under the age of 18
      consent is required from the parent or legal guardian
      where able. This will depend on the situation and
      condition of casualty.

    Duty of Care
    In the case of an emergency, the law does not require a
    first aider to render assistance unless that person already
    owes a duty of care to the injured or ill (for example a
    school teacher responsible for their students). Once first
    aid is commenced, a duty of care has been assumed. If
    a person in your care becomes ill or injured, you must
    help them by doing something within the scope of
    your training that assists that person. The first aider,
    who owes a duty, must apply their first aid skills and
    knowledge in a responsible and reasonable manner.

9
DRSABCD FLOWCHART

10
PRIMARY SURVEY

DRSABCD

D – DANGER                                                R – RESPONSE
Check for danger and hazards to yourself, bystanders      Begin to assess the casualty for a response as you walk
and the casualty before approaching or touching the       towards them. Example: are they making eye contact,
casualty.                                                 are they crying and asking for help.

• Assess the scene for danger to yourself first. If you   Types of response
  end up injured, you may be unable to help the other     Conscious - Person respond normally to your questions,
  casualties.                                             makes eye contact, obeys commands (eg take a deep
• Are there bystanders who could be injured? Ask them     breath for me)
  to move away from the scene if you can’t use them to
  assist you.                                             Semi-conscious - May respond with some sounds,
• Is there danger to the casualty?                        inappropriate answers, may respond slowly to commands

                                                          Unconscious - No response from casualty verbally or
                                                          physically

                                                                                     respond to your voice,
                                                                                     may have some confusion,
                                                            A           alert        disorientated and will have
                                                                                     motor body function
                                                                                     makes some type of
                                                                                     response when you talk
                                                            V          voice         to them, grunt, moan or a
                                                                                     movement of limb
                                                                                     response to pain stimulus,
                                                             P          pain         or squeezing fingers/
                                                                                     shoulders
                                                                                     “unconscious” is recorded if
                                                                                     the casualty does not give
                                                            U     unresponsive       any eye, voice or motor
                                                                                     response

11
S – SEND FOR HELP A – AIRWAY
When possible, the person with the best first aid DO NOT HEAD TILT WHEN CHECKING THE AIRWAY
knowledge should stay with the casualty while someone
else calls for the emergency assistance. • Open the mouth and look inside for any foreign
matter
1. To call for the Ambulance, Police or Fire Service, use • Roll onto side if foreign matter is seen, then remove
000 from all phones, including mobiles. (Mobiles just by scooping downwards with fingers
need to have a signal and do not need credit to be • If no foreign matter is detected, then open the airway
able to dial 000.) by giving a head tilt/chin lift
2. When the emergency operator answers, state clearly • The most common cause of airway obstruction is the
which service is required. tongueIf a casualty has been removed from the water,
they should be positioned on their back to assess
airway and breathing
3. Stay calm and speak clearly to convey the message.
Be ready to answer any questions.
4. Know the following:
• The exact address or location with any clear
landmarks or closest street cross reference
• An outline of the emergency
• The number of casualties involved
• Any information about the condition of the
casualty(s)
• Any hazards relevant to the area, such as fire,
chemical, spill, fumes
• The telephone number where the caller can be
contacted in case further information is needed
5. Wait until the operator tells you to hang up.
6. Ask someone to stay in a prominent position to
direct the emergency service vehicle to the correct
area.
If possible, ensure you send for help prior to entering
the water
Water Police 9442 8600
Marine emergencies 131 444
Download the EMERGENCY app
12B – BREATHING
HEAD TILT AND JAW SUPPORT The following techniques can be applied to provide
Once you have cleared any foreign material from rescue breathing to a casualty
the airway, a head tilt should be applied to open the • Mouth to Mouth – Open the casualty’s mouth and
airways. This can be achieved by placing one hand at cover it with your mouth. Seal the nose with your
the top of the head (hair line) and the other on the chin cheek, or with a nose pinch.
(pistol grip), and gently tilting the head back. • Mouth to Mask – Use a resuscitation mask to provide
a barrier. Ensure correct head tilt is maintained and
• Infants (12 months and under) head is kept in a apply adequate pressure on the mask to maintain a
neutral position when assessing and providing complete seal.
breaths. Provide breaths as puffs – air that is in your • Mouth to Nose – Close the casualty’s mouth using the
cheeks pistol grip and seal the nose with your mouth. Apply
rescue breathing as normal.\
• Mouth to Stoma – Certain people, due to previous
surgery, breathe through an opening or stoma in the
trachea that opens onto neck.
• A casualty who is unconscious on their back and
breathing must be placed in the recovery position
Check for breathing: Look, Listen, Feel for 10 seconds
• Look down the chest, listen for breath and feel it on
your cheek. Rest your hand on the person’s diaphragm
and feel for breathing.
• Minimum of 2 Breaths need to be recognised for
Normal Breathing within 10 Secs.
• If Normal Breathing is NOT present, Start CPR
ABNORMAL BREATHING
• Excessively fast or slow
• Bubbling, gurgling or absence of breathing
• Shrill, harsh, wheezing, high pitched
• Agonal breathing- The body is trying to draw oxygen
into the lungs, the person is not breathing normally.
This is commonly seen as the last few breaths a
person may take. It is generally seen in cardiac arrest
casualties.
13COMPLICATIONS OF RESCUE BREATHING C - COMPRESSIONS
If the chest does not rise, check:
• The location of the compression point is in the centre
• Head tilt and jaw support of the chest or lower half of the sternum. This can
• Mouth and nose seal be found by direct visualisation compressions should
• Any obstruction of the airway always be 1/3 of the depth of the chest of the casualty
• Adequate volume of inflation
• Compression rate is approximately 2 compressions
every second or 100 – 120 per minute
• 30 compressions :2 breaths
• Complete approximately 5 rounds of 30:2 in 2 minutes
If a casualty begins to vomit or regurgitate:
• If another first aider is available complete a maximum
• Vomiting is an active process, often indicative of
of 2 minutes of compressions and swap over. Continue
recovery
swapping every 2 minutes to ensure compressions
• Regurgitation is a passive process involving the remain effective
outflow of stomach contents
• Presence of foam
Two Operator Resuscitation
• Turn the casualty on their side If a second person is available to assist with resuscitation,
• Clear the mouth using a finger sweep you should first instruct them to call for help (if not
• Check for breathing already done), and locate a Defibrillator (if in an area
likely to have one). Once the second rescuer returns:
• If no breathing is present, continue CPR
• Continue 1 operator CPR as you instruct them how to
If there is air in the stomach: perform the compressions
• It may be caused by a partially blocked airway or over • Guide their hand placement and help them count /
inflation obtain a rhythm
• Check the head tilt, jaw support and reduce the • Once competent, 2 operator CPR can be performed
volume and force of inflation with one person completing each role (i.e. one
delivering rescue breaths, and one delivering
compressions).
Recovery Position
– one method to perform recovery position
Casualty on their back
1. The direction you are rolling the casualty, extend
their arm to 90°. (Image 3)
2. The arm closest to you, place across the casualty
chest (Image 3)
3. The leg closest to you, lift the casualty knee (Image 3)
4. Place your hand under the casualty shoulder and on
the bent knee and push the casualty away from you
until they are in the position (Image 4)
5. Bring the casualty leg up and tilt the head back to
open the airway
Resuscitation during Pregnancy
When resuscitating a casualty believed to be pregnant,
complications may occur resulting from pressure on the
stomach, diaphragm and lungs from the baby. To provide
an optimal situation for resuscitation, padding should be
placed under the right buttock of the casualty, to create
a ‘left lateral tilt’, ensuring reduced pressure on blood
vessels and therefore unrestricted flow of blood back to
the heart.
14D – DEFIBRILLATION PAD PLACEMENT
• An electric shock delivered across the heart • 0– 1 Years - No defibrillation is recommended,
• A process designed to resume the coordinated rhythm commence CPR, call 000 and follow their directions
and pumping action of the heart • 1 - 8 years - Paediatric pads and an AED with a
• The effective treatment for Ventricular Fibrillation paediatric capability should be used (50 joules).
(VF) and Pulseless Ventricular Tachycardia (VT) The AED when analysing infants or children will
automatically calculate and adjust the shock voltage
to suit the patients’ weight and chest wall thickness
VENTRICULAR TACHYCARDIA - is rapid heart rhythm If the AED does not have a paediatric mode or
that originates in one of the ventricles of the heart. It is paediatric pads then the standard adult AED and pads
a life-threatening arrhythmia. It may lead to ventricular can be used as per the ARC guidelines. Ensure the
fibrillation, asystole, and sudden death. pads do not touch each other on the child’s chest
• 8 years plus - Standard adult AEDs and pads are
VENTRICULAR FIBRILLATION is a cause of cardiac arrest suitable for use in children older than 8 years (150
and sudden death. The ventricular muscle twitches joules) If the pads are too large use in the front-back
randomly, rather than contracting in a coordinated position (antero-posterior): one pad is placed on the
fashion. upper back (between the shoulder blades) and the
pad on the front of the chest, if possible slightly to the
• Do not stop CPR to place the AED on the casualty left
• Move Jewellery if possible, place pad under pace
maker / internal defib or 10cm away
• Cut all clothing off the top half including bras. Be
mindful of dignity for patient and cover their chest if
able
• Dry the casualty if they have been removed from the
water
• Dry to wipe away sweat / sunscreen
• AED can be used on wet surface, metal surface and
pregnant casualty
15RESUSCITATION CHART CARDIAC ARREST AND THE CHAIN OF SURVIVAL
The following chart is a guide of the technique and Cardiac arrest is caused when the heart’s electrical system
timings required to resuscitate adults, children and malfunctions. In cardiac arrest death results when the
infants. heart suddenly stops working properly. This may be
caused by abnormal, or irregular, heart rhythms called
Adults & arrhythmias (irregular heart beat)
Infants
Children
The chain of survival describes the sequence of critical
Head Tilt FULL NEUTRAL
intervention stages in the initial care of a Cardiac Arrest
Hand Placement CENTRE OF CHEST Patient.
Ratio 30:2 30:2 The critical stages are:
Compressions • Early Call for Help
100 - 120
per min It is essential to attend the casualty and call for help as
Compression soon as possible.
1/3 OF CHEST
Depth • Early CPR
Technique 2 HANDS 2 FINGERS This will increase the casualty’s chance of survival by
encouraging oxygenated blood flow to the brain.
Breaths Full – 1/2 Puff • Early Defibrillation
The restoration of an adequate heart rhythm is
When can you stop CPR? necessary for the casualty to survive a cardiac arrest.
CPR should be continued until: • Post Resuscitation Care
• Casualty begins Normal Breathing Transportation of the casualty to hospital by
• When an ambulance arrives and an officer instructs ambulance should not be delayed to enable further
you to stop or takes over treatment and monitoring of their condition.
• To continue will place yourself in danger
• You physically cannot continue eg exhausted
16CHOKING SHOCK
Sudden airway obstruction may be either mild or severe. Shock is a loss of effective circulation which leads to
If the obstruction is severe/complete the person may a lack of oxygen and nutrients being delivered to the
soon become unconscious. The conscious choking person tissues and can lead to organ failure.
may have a partial or complete airway obstruction.
Some of the main causes of shock are:
Mild Airway Obstruction – Depending on the severity
of the blockage, air flow may still pass in and out, the
casualty may be able to talk Loss of blood volume (Hypovolemic shock)
• Severe blood loss
Signs and Symptoms • Burns
• Difficulty breathing • Excessive sweating and Dehydration
• Coughing or gasping • Diarrhoea and vomiting
• Clutching at throat • Major or multiple fractures or trauma
• Red face and watering eyes
• Anxiety and agitation Cardiac (Cardiogenic shock)
• Heart attack
What to do for a Mild Airway Obstruction
• Assess severity
Abnormal dilation of blood vessels (distributive shock)
• If an effective cough is present, encourage coughing
• Severe infections
• Rest & reassure
• Allergic reaction
• Call an ambulance if they are unable to cough object
• Severe brain/spinal injuries
out
Severe Airway Obstruction - there is no airflow in or out Signs and symptoms include:
and they are unable to talk
• Pale, cold & clammy skin
• Restlessness
Signs and Symptoms
• Dizziness
• Silent
• Nausea
• Clutching at throat
• Anxiety
• Frantic or quiet
• Thirst
• No air is getting into the body
• Rapid but shallow breathing
• May collapse
• Change in body temperature (typically feeling too
cold)
What to do if conscious
• Change in conscious state
• call 000
• 5 back blows
Management for a casualty suffering from shock:
• 5 chest thrusts
• If unconscious follow basic life support procedures
• Alternate if unsuccessful
• Treat the cause (e.g. bleeding, fracture, burn, fluid
loss)
If Unconscious
• Protect the casualty from extremes of temperature
• call 000 • Call for ambulance
• Commence CPR • Legs placed in the supine position
17BLEEDING COLD INDUCED ILLNESS
External Bleeding HYPOTHERMIA
Blood is lost from the blood vessels through a break in Hypothermia occurs when the body temperature drops
the skin barrier
Signs and Symptoms
Recognition
External bleeding is usually obvious. Bleeding also • Shivering (may stop in later stages)
produces paleness, sweating, faintness and/or anxiety • Slow, irregular pulse or breathing
• Irritable, irrational or confused behaviour
Management • Apathy and decreasing levels of consciousness
• Rest the casualty and apply direct pressure to the • Abnormal coordination
wound • Coldness, numbness, cramps
• Have the casualty apply pressure directly onto wound
using a sterile pad
What to do
• Apply a pressure bandage over the pad & bandage
toward the heart • Move to warm, dry place is possible
• Check circulation by applying pressure to the nail bed • Warm casualty gradually
and watch colour return • Give warm fluids if conscious
• Continue to monitor the casualty and treat for shock • Seek medical attention urgently
• Seek medical attention if blood loss is severe or is • Stay with casualty
continuous • DO NOT give alcohol
• DO NOT rewarm too quickly
Internal Bleeding and abdominal injuries • DO NOT rub or massage the casualty
Blood is lost from the blood vessels into the open spaces
of the body.
Body Temperature Chart
26 Hypothermia
Recognition
29 Very cold (Stop shivering)
• Rapid and weak pulse
• Rapid and gasping breaths 32 Cold
• Signs of internal bleeding could be frothy red blood 35 Normal
coughed up from the lungs, red or rust-coloured urine 37 Fever
or dark faeces (like tar) 37-39 High fever
• Pain, tenderness and discolouration at site
39+ Unconscious
• Anxiety or restlessness
42 Unconscious
• Nausea or vomiting
• Bruising and/or swelling to site
Management
• Rest and Reassure the casualty, call 000
• Lay down
• Cover the casualty
• Monitor conscious state
18BITES AND STINGS Stingray/spined fish:
A poison is any substance which damages tissue or Specific signs/symptoms:
cause illness. Those poisons which are made by living • Intense pain, leading to irrational behaviour.
organisms are called toxins. Toxins which are introduced • Swelling, sometimes grey/blue discolouration.
into the casualty by injection (e.g. via fang or sting) are
• Open wound, bleeding.
called venoms.
• Embedded barb.
Signs and Symptoms (general, inc. snake and spider bites):
Management:
• Nausea, vomiting and diarrhoea.
• Seek medical aid.
• Headache.
• Leave embedded objects in the wound; pad and apply
• Double vision.
pressure around the object.
• Drowsiness.
• Bathe the area in water as hot as the casualty can
• Pain or tightness in the chest or abdomen. tolerate, being careful not to burn the area.
• Giddiness or faintness.
• Bruising.
• Sweating.
• Breathing difficulties.
Blue-ringed octopus and cone shell:
Specific signs/symptoms:
• A painless bite site. Jellyfish:
• Numbness of lips and tongue. The following information relates to jellyfish:
• Progressive weakness of muscles Tropical: jellyfish (chironex) and the irukandji. See ARC
used for breathing. Guidelines (for treatment use vinegar if available).
Non-Tropical: blue bottle, jumbles (WA stinger).
Management:
• Seek medical aid immediately. Generally, jellyfish stings outside the tropics can be
treated in the following manner:
• Rest and reassure the person, monitor ABC.
• Rest and reassure the casualty; monitor.
• If breathing difficulties develop, commence rescue
breathing. • If there are tentacles on the skin, gently pick them off
the tweezers or fingers, or wash off with water.
• Use the Pressure Immobilisation Techniques on the
area if possible. • Apply cold packs over the stung area.
Continue until pain is relieved.
• Do not rub the area.
• In severe cases seek medical aid.
General management table:
Use: Heat Ice Vinegar P.I.T
To treat • Stone fish • Red back • Box Jellyfish • Funnel web
bites/stings from: • Stingray • White tail • Irukandji • Snakes
• Bull rout • Bees • Blue ringed
• Blue bottle • Centipede • All jellyfish stings • Cone shell
• Cobbler • Scorpion above the tropics
• Sea urchin • Jellyfish
(below the tropics)
• Anything with spines
Primary goal: Pain management Stop swelling, pain Preserve life To slow down poison,
management preserve life
19CARDIAC EMERGENCIES
HEART ATTACK
A person suffering from heart attack usually complains
of pain,tightness or heaviness in the chest, and may be
pale, sweaty and breathless. The pain may spresd to the
shoulder, arm, throat or jaw.
Management
• Call 000
• Reassure the casualty
• Loosen the casualty’s clothing around their neck and
chest
• Support the casualty in a comfortable position
• Encourage the casualty to remain calm
• Cardiac arrest is always a possibility, so be ready to
perform CPR if required
20SECONDARY SURVEY
Once a Primary Survey has been carried out and the WATER SAFETY AND HAZARD IDENTIFICATION
breathing, circulation and severe bleeding has been When swimming, it is important to remember to
controlled a secondary survey is required. maintain safety for yourself, others around you and the
environment you’re swimming in.
A Secondary Survey is designed to determine if the
casualty is suffering from any other injuries that The following factors will contribute to your safety when
require treatment. Complete a full secondary survey in an aquatic environment:
of a casualty before treating the injuries so you can
prioritise them from most life threatening to least life • A concern for yourself
threatening injuries. • A concern for others
• Awareness of dangers
• Always wear rubber gloves and check your hands • Minimising risks
regularly for blood or fluid. • Preventing accidents
• Do not allow the casualty to move during the survey • Knowing when and how to act in an emergency
• Speak calmly and reassuringly to the casualty and ask
them or a bystander (if known to the casualty: The prevention of emergencies depends on your
• History: What happened & previous injuries (this will understanding of, and ability to apply simple water
give an indication to possible new injuries) safety measures. To help you do this, Royal Life Saving
• Allergies: What are they allergic to, record this has developed three easy-to-remember rules known as
information; the Aqua code.
• Medical alert bracelet / necklace or even a tattoo
• Medications: What medications are they taking or
check the pulse rate and note the breathing rate and GO TOGETHER
characteristics. When playing in, on or
near water always make
Ensure that you check the casualties back for injuries and sure someone is with
bleeding as well you.
If rolling a casualty into the recovery position, ensure that
you have removed keys and other objects out of their
pockets so that damage or further injury is not caused.
General After care
• If the incident occurs the casualty may need protection STAY AFLOAT AND WAVE
from the weather If in trouble in the
• No food or drink should be given to the casualty water, try to relax, roll
on your back, hold onto
• If necessary, keep the casualty warm with blankets or
something if available,
other coverings
and wave one arm to
• If sign of life disappears, recommence CPR attract attention.
REACH TO RESCUE
If someone needs help,
don’t get into the water.
Lie down and reach out
with a stick or a rope.
21FOUR A’S OF A RESCUE
Steps in a Rescue Awareness
The steps in any rescue may be summarised • Recognition of an emergency/hazard
as ‘the four As’.
1. Awareness Hazards can be found in ALL water environments: rivers,
2. Assessment dams, beaches, harbours, lakes, pools, waterholes.
Examples: currents, rips, mud, slippery bottom,
3. Action
submerged objects, deep water, cold water, watercraft,
4. Aftercare no barrier or fencing, etc
If a person is to perform or assist in a rescue, there are
two things that must occur:
• Early recognition of a problem
• Interpretation of the event as an emergency that
requires urgent action
Assessment
• Making informed judgments
• Do you have the knowledge, fitness, skill and
judgement to do the rescue?
• Is it safe to conduct the rescue?
• Accepting responsibility
The time spent on assessment may vary from making an
instant judgement – for example, reaching out with an
aid to help someone- to making a deliberate plan, such
as performing a rescue
Action
• Perform a safe, efficient and effective rescue
Before you act, check for any danger. Self-preservation is
vital.
Ex. Can you reach the person? Can you throw something
out to them that floats?
Or toss them a rope? Safe entry into the water / a safe
exit point established before water entry
Aftercare
• Aid given until medical help arrives
• If the incident occurs outdoors the casualty may need
protection from the weather
• Monitoring and reassuring the casualty
• Reporting the incident
• Comply with Duty of Care requirements
22STANDARD WATER SAFETY SIGNS
Regulatory Signs
Are signs with a red border and bar on a white background. These signs contain instruction that must be complied with,
failure to do so is a criminal offence.
Warning Signs
Are signs with a black border on a yellow background. These signs advise of a particular hazard or hazardous conditions,
or that an activity is not recommended.
Informative and Permissive Signs
These signs always have a white border and a blue background and provide information about water safety features or
indicate a location where a particular activity is permitted.
Beach Emergency Number Signs – BEN sign
When visiting the beach, take note of the closest BEN sign
location and information. This will help emergency services
accurately pinpoint the location in case of the emergency
Each BEN sign has a unique code based on an area prefix
followed by a one to four digit number. This code is linked to
the coordinates for the sign’s location. The official location
name (if there is one), the address, suburb and nearest
intersection are also on each sign.
In an emergency, dial triple zero and quote the unique code
and location information on the nearest BEN sign.
Where possible, someone should wait at the BEN sign until
emergency service crews arrive.
23AQUAT IC ENVIRONMENT S
Swimmers must have knowledge of potential dangers Lakes and Dams
in different aquatic environments. An understanding The flat, still appearance of lakes and dams often
of what constitutes safe, responsible behaviour around gives a false impression of safety. Strong winds can
water will help to ensure enjoyment and safety. Weather produce short, choppy, dangerous waves and reduced
conditions may change rapidly, potentially creating temperatures.
dangerous aquatic activities.
Dangers and Hazards:
Rivers
• River entry and exit points
Rivers, creeks and waterholes can be very dangerous and
• Cold water
are often close to populated areas.
• Waves
Dangers and Hazards:
Stay safe at the lake:
• Crumbling banks – can result in a person accidentally
falling into the water • Never go alone.
• Uneven and unsafe river beds – can cause difficulty for • Only participate in activities such as swimming or
people wading or swimming canoeing in designated recreational areas.
• Submerged obstacles - such as trees, branches, rocks, • Read and obey all signs in the area.
rubbish can be dangerous when diving, swimming or • If you are unsure about the conditions, ask a local.
even falling in accidentally • Scan carefully for any potential dangers such as
• Currents – unpredictable and can be caused by factors other water users/ water craft, water quality, waves,
like flooding, projecting headlands or winding river or obstacles before you consider entering the water
course safely.
• Passing boats
• Changes in water temperatures
• Changes in water quality
• Tides - High tide means deep water, under current
and faster moving water. Low Tide means –
submerged objects are a bigger risk, also spinals are a
higher risk.
Stay safe at the river:
• Never go alone
• Only participate in activities such as swimming or
canoeing in designated recreation areas
• Read and obey all signs in the area
• Always check the water carefully before entering
safely
• Enter cold water slowly
• Watch out for, and stay away from, boat areas
24The Beach and Ocean Stay safe at the beach:
Going to the beach is a popular pastime in Australia. The • Always swim at a patrolled beach.
ocean can be a fun place to spend summer days but it • Read and obey the signs and the lifeguards.
can also be a dangerous place.
• Always swim between the red and yellow flags.
Waves: • Always swim with another person – never alone.
• Plunging wave - this wave breaks with great force and • If you have any doubts about your ability to cope with
is capable of pushing swimmers to the bottom. These the conditions, you should not enter the water.
are sometimes called dumpers. • Beware of digging deep holes, as the sides can
• Spilling wave - this type of wave occurs when its crest become unstable and collapse.
tumbles down its front or face. Spilling wave can form
tunnels and tubes
• Surging wave - this is the wave which seldom breaks Swimming Pool
as it nears the water edge. Water beneath the wave The local public swimming pool, a theme park or a hotel
is very deep and the wave therefore does not slow pool are popular places to enjoy a swim.
down or gain height. Surging waves can knock
swimmers down and carry them out to deep water Dangers and Hazards:
• Large crowds with young children, elderly people or
Currents: inexperienced swimmers
• Tidal currents are caused by the rise and fall of the • Slippery surfaces around the edges
tide these currents don’t always flow into and out
• A varied depth of the water
from shore/ they may flow across or at an angle to the
shore. This often occurs at the entrance to bays, inlets
Stay safe at the pool:
and river mouths
• Read and obey notices giving advice to swimmers.
• Runback currents are caused by the back wash of
waves and are usually strongest where the beach is • Obey the pool lifeguards.
steep. Inshore or side currents are produced by waves • Check the depth markings on the pool side to see
breaking over a sandbank or by waves breaking at an where it is best to swim or dive.
angle to the beach or both. • Stay clear of deep water unless you can swim.
• Make sure the water is clear before jumping in.
Rips
Rips are fast flowing runback currents that are very
dangerous for swimmers in the sea. Water always finds
its own level so after waves break onto the beach the
water flows out in the direction that causes the least
resistance-this is a rip.
How to recognise a rip:
• Discoloured water, brown in colour due to sand stirred
off the bottom
• Foam on the surface that extends beyond the
breaking wave
• A ripple appearance when the water around is
generally calm
• Debris floating with the current
• Waves breaking larger and further out on both sides
of the rip
25The Home
Although the home may seem to be a relatively safe
place, it has many potential dangers, particularly for very
young children.
Dangers and Hazards
Some of the water dangers in and around the home
include:
• Unfenced home pool
• Gates and barriers left open allowing easy access to a
pool
• Fish-ponds in gardens which may attract youngsters
• Uncovered spa bath
• Filled paddling pools which are not in use
• Buckets filled with liquids
• Eskies with melted ice
• Bath filled with water or plug left in
• Washing machines with open lids
• Toilets with open or accessible lids.
• Dams
• Water bodies
Stay safe in and around the home:
• Fence home pools and include self-closing gates.
• Keep the bathplug out of reach of small children.
• Keep liquid-filled buckets out of reach of children.
• Empty children’s paddling pools as soon as they have
finished using them.
• Close top-loading washing machines.
• Keep fish ponds covered.
• Install rigid covers over spas.
• Remove climbing objects from around the exterior
area of the pool.
26ROCK FISHING ROCK FISHING SAFETY: KEY MESSAGES
DON’T PUT YOUR LIFE ON THE LINE Tell someone:
Always let friends know where you are going, when
you’ll be back and if your plans change.
A ROCK FISHING SAFETY MESSAGE FROM Recfishwest
• Wear a life jacket Never fish alone:
Always fish with a buddy; if you get into any trouble,
• Never fish alone
they can help. If you’re new to rock fishing, go with an
• Observe first, fish later experienced fisher.
• Wear appropriate footwear
Know the area, know the conditions:
Read all the safety signage – it’s been placed there for
a reason. Check swell, tide and wind conditions before
your trip.
Wear appropriate clothing:
Light clothing such as shorts and a spray jacket will allow
you to swim more freely if you are washed in. Wear
appropriate footwear with non-slip soles or cleats suited
to the surface you plan to fish from.
Wear a Life Jacket:
Wear a life jacket or buoyancy vest at all times.
Observe first, fish later:
Spend time (at least 20 minutes) watching your intended
fishing spot to get an idea of the conditions over a swell/
wave cycle.
Plan your escape:
Scan the area and look for the safest place to come
ashore should you be swept in. Decide on a quick
getaway route from your fishing spot, well above the
high tide line should you see a large wave coming.
Use appropriate Public Safety Equipment:
Know how to correctly utilise rock anchor points if they
are in place at your fishing location. Know where the
nearest public safety equipment is – and know how to
use it.
Stay alert:
Don’t ever turn your back on the ocean – if the waves,
weather or swell threaten your fishing spot then leave
immediately.
If you go in…
Stay calm, swim away from the rocks and remove any
heavy or waterlogged clothing. Float on your back and
await rescue, or if you’re capable, swim ashore to the
safe area you identified from your initial observations.
If you see someone else go in…
Do not jump in if someone is washed into the water.
Use your rope or something that floats to help rescue
the person. If there’s public safety equipment nearby,
know how to use it. Dial 000 or the local Sea Rescue to
get help.
For more information, please visit
www.recfishwest.org.au
27DROWNING:DEFINITION AND PROCESS CATEGORIES OF PERSONS IN DIFFICULTY
Drowning is the process of experiencing respiratory Priorities of Rescue
impairment from submersion or immersion in a liquid.
When more than one person is in difficulty, the rescuer
must consider who to help first. Normally, attention
The most important consequence of drowning is
should first be given to securing and supporting
interruption of the oxygen supply to the brain.
conscious people. Of these, non-swimmers should
be given top priority because they are in danger of
Drowning outcomes are classified as:
losing consciousness. However, it may be possible to
• Mortality - fatal drowning – resulting in death provide early support to other people quickly and
• Morbidity - non-fatal drowning – resulting in serious easily without significantly delaying the rescue of non-
health outcomes swimmers. Attention can then be given to unconscious or
• No Morbidity - non-fatal drowning – no adverse submerged people.
health outcomes as a result of the incident
When rescuing multiple swimmers in difficulty, the
following swimmers should be rescued in the order
shown below (the precise order of rescues will however
POSSIBLE SEQUENCE OF EVENTS be determined by the nature of the emergency).
• Immersion of the face in water (or other liquid).
Water entering the mouth is spat out, swallowed or 1. Non-swimmer
aspirated.• Breath-holding, usually lasting no more Non-swimmers will panic when experiencing difficulty
than a minute. in the water. They are often doing what is referred to
as “climbing the ladder”. The swimmer will be vertical
in the water and appear to be climbing a vertical ladder.
• Vigorous breathing efforts. These may continue,
The swimmer will have minimal or non-supportive leg
even after loss of consciousness. Some amount of
action. They may submerge and may or may not be
water is aspirated into the airways causing coughing
facing the shore. A non-swimmer may attempt to grab
and sometimes laryngeal spasm, which temporarily
the rescuer.
prevents further water entering the lungs.•
Swallowing of air and water, often in large amounts.
2. Weak swimmer
This usually causes vomiting or regurgitation of
Weak swimmers may be able to use their arms and legs
stomach contents, which may be aspirated into the
for support. The swimmer will be angled in the water
lungs.
(approximately 45o) and may attempt to grasp the
rescuer or a floatation aid. Head position will be tilted
• Respiratory impairment causes brain hypoxia, leading up and back and the head will usually be turned to
to unconsciousness and cessation of breathing efforts. safety or help.
3. Injured Swimmer
• The heart rate initially increases with exercise and
An injured swimmer will typically grasp the injured body
panic. With hypoxia, the heart rate and blood
part and be calling for help. They may be in an awkward
pressure begin to fall, progressing finally to a cardiac
position, but will be able to use a floatation device if
arrest, requiring CPR.
provided.
How long does it take to drown? 4. Unconscious
The whole drowning process, from submersion or The unconscious person may be at any level of the
immersion to cardiac arrest, usually occurs in seconds pool, depending of the length of time they’ve been
to a few minutes, but in unusual situations, such as unconscious. The individual may be face-up or face-
hypothermia or drowning in ice water, this process can down in the water, but will not be moving.
last for an hour.
28RESCUE TECHNIQUES TYPES OF ENTRIES
Remember: Self-preservation! For all entries and exits remember to:
The key to any rescue is SELF PRESERVATION! A dry • carefully assess the area to determine the best method
rescue is the best rescue. Rescues that can be performed of entry and exit
without getting wet are the safest. Do not put yourself • choose an entry that offers complete safety
in danger. To ensure maximum safety, any rescuer should
• always consider the depth when entering
consider using, in priority order, the following methods
of rescue.
DRY RESCUES Entry When to use it
Non-swimming rescues: Method
• Talk Slide In The depth of water and state of the
bottom are unknown. This entry is
• Reach
controlled and safe, allowing the feet
• Throw and an aid to feel for unseen obstacles
• Wade below the surface.
• Row Wade In The water is shallow and the conditions
are unknown. The entry is controlled and
WATER RESCUES safe, allowing the feet and an aid to feel
for unseen obstacles below the surface.
Swimming rescues:
• Swim (Accompanied) Step In The water is clear, the depth known
and the bottom free from obstacles.
• Tow (non-contact and contact) The entry is most appropriate for areas
where the entry point is not much higher
Talk The person in trouble is conscious, than the water level.
capable of responding to instructions Compact An entry is required from a height of
and is close enough to the rescuer for Jump more than one metre into known deep
them to see their gestures and hear their water. A feet-first entry is safer than
voice. a head-first entry, especially when the
Reach The person in difficulty is near the edge; water has debris floating on it. This entry
for example, having fallen in the water. is primarily used in emergencies.
Throw The person in difficulty is too far away Standing The water is known to be deep and free
to carry out a reach rescue. The purpose and Shallow of obstacles.
of throwing a buoyant aid is to provide Dive
the swimmer in difficulty with support Stride A rescuer needs to watch the person in
until removal from the danger area is difficulty and entry is to be made from a
possible. low height into water known to be free
Wade Attempts to reach and throw have been of obstacles.
unsuccessful and the depth, current and Accidental A fall into the water occurs unexpectedly
temperature of the water permit a safe Fall In and requires the person to protect the
entry. The technique brings the rescue head
nearer to the person in difficulty and
may enable a reach or throw rescue to
be attempted.
Row It is not possible to perform reach or
throw rescues and a wade rescue is
not possible because of the depth of
the water. This is an effective and safe
technique because the rescuer remains
clear of the water and the person in
difficulty can be made secure quickly
and safely. Be aware of the craft and its
limitations.
Swimming Rescuers should use a swimming rescue
Rescues only when all land-based rescues have
either failed or are not appropriate.
Tow (non- If a swimming rescue is to be used,
contact and always attempt an accompanied rescue
contact) first. However, a non-contact tow can be
used when an accompanied rescue is not
possible or has proven ineffective.
29CONTACT TOWING TECHNIQUES DEFENSIVE TECHNIQUES
An effective contact tow must: A situation may arise where a rescuer will need to use
defences to avoid contact with a person in difficulty. For
• Keep the person’s mouth above water at all times.
example, in a boating incident, you may find yourself in
• Enable the rescuer and the person being towed to a range of a panicked person. At all times it is essential
be as horizontal as possible to keep resistance to a to maintain a safe distance from a person in trouble and
minimum. therefore defensive positions may need to be adopted.
• Allow freedom for the rescuer’s swimming
movements. Defensive Position
• Make only reasonable demands upon the rescuer’s This position allows the rescuer to reverse away quickly
stamina and strength consistent with the water should this be necessary.
conditions and distance to be covered.
• Maintain a safe distance from the person in difficulty.
• Control the unconscious person’s head position so that
• Tuck the legs rapidly under the body.
the airway can be kept open and water does not wash
over the face. • Push the legs forwards.
• Make a final assessment from this safe position.
The following contact rescue techniques may be used to
carry out a rescue Reverse
The person in difficulty attempts to grasp the rescuer.
Tow When to use it • Tuck the legs rapidly under the body and push them
Cross Chest Conditions are rough. forwards as in the defensive position.
Head Tow A firm hold of the unconscious casualty’s • Kick away vigorously.
head is required • Readopt the defensive position.
Clothing The unconscious person is clothed and
Tow the conditions are calm. Blocking
Double An entry is required from a height of The person in difficulty lunges suddenly at a rescuer
more than one metre into known deep before it is possible for the rescuer to move away. While
water. A feet-first entry is safer than a description of blocking has been provided, the safest
a head-first entry, especially when the way to perform a rescue is to keep a safe distance
water has debris floating on it. This entry between the rescuer and the person difficulty.
is primarily used in emergencies.
Armpit Tow It is necessary to control the body • Raise a leg or aid to block the person.
position of the unconscious person and • Push against the person’s body, preferably in the chest
the rescuer does not have the swimming area.
power to perform a cross chest tow.
• Swim away or submerge if necessary.
Double It is necessary to maintain a higher head
Shoulder elevation of the unconscious person. It is
Two People Locked Together
Tow of benefit in rough water although more
propulsive power on the part of the A situation may arise when poor swimmers grasp each
rescuer is required. other in an attempt to remain on the surface. This is a
very dangerous situation where the following procedure
Vice Grip The person in difficulty has a suspected is recommended:
Tow spinal injury.
Support This technique is particularly useful Cooperative swimmers
Tow for those who are unconscious and
not breathing, as it supports the head, • Place a buoyant aid between the two people.
allowing it to be kept clear of the water. • One or both people may hold the aid (depending on
Wrist Tow The person in difficulty is conscious, the size of the aid).
entirely cooperative, and all other rescue • Tow the people to safety, singly or together.
methods are unsuccessful.
Non-cooperative swimmers (If they will not grab the aid)
NEVER use a wrist tow with an
unconscious swimmer. A wrist tow does • Come from behind one of the swimmers, place the aid
not maintain an open airway. in the centre of the two swimmers, and use force to
pull the swimmers off each other, by holding onto one
Armpit Tow The person in difficulty is entirely swimmer under the armpits and using the defensive
cooperative, and all other rescue position to push off the other swimmers chest.
methods are unsuccessful.
• The person who you are holding onto tells them to
calm down, the other swimmer should be holding
onto the aid provided, use an accompanied rescue
whilst towing the other swimmer in to safety.
30You can also read