Coffee Bean Roaster - Use/Care Guide Model CR-1000 Series
←
→
Page content transcription
If your browser does not render page correctly, please read the page content below
Coffee Bean Roaster

NEVER LEAVE ROASTER UNATTENDED WHILE IN OPERATION!

Use/Care Guide
Model CR-1000 Series
CONGRATULATIONS!
Congratulations on the purchase of your new NESCO® Coffee Bean Roaster!
Please spend a few minutes reviewing this booklet. By doing so, you will learn
how to get the most out of your NESCO® Coffee Bean Roaster. Enjoy your
roasting with our compliments.

                               TABLE OF CONTENTS:

 IMPORTANT SAFEGUARDS . . . . . . . . . . . . . . . . . . . . . . .                         3
 SAVE THESE INSTRUCTIONS . . . . . . . . . . . . . . . . . . . .                            3
 WELCOME TO COFFEE BEAN ROASTING . . . . . . . .                                            4
 GET TO KNOW YOUR COFFEE BEAN ROASTER . .                                                   5
 CONTROL PANEL . . . . . . . . . . . . . . . . . . . . . . . . . . . . . . . . . .          6
 BEFORE YOU BEGIN . . . . . . . . . . . . . . . . . . . .. . . . . . . . . . . .            7
 ROASTING INSTRUCTIONS . . . . . . . . . . . . . . . . . . . . . . .                        7-10
 CARING FOR YOUR ROASTER . . . . . . . . . . . . . . . . . . . .                            10-11
 HANDLING/STORAGE OF ROASTED COFFEE . . .                                                   11-12
 TROUBLESHOOTING . . . . . . . . . . . . . . . . . . . . . . . . . . . . .                  12-14
 WARRANTY . . . . . . . . . . . . . . . . . . . . . . . . . . . . . . . . . . . . . . . .   15

NESCO® is a registered trademark of The Metal Ware Corporation.

The Metal Ware Corporation
1700 Monroe St., P.O. Box 237
Two Rivers, WI 54241-0237
Phone: (800) 288-4545
FAX: (920) 794-3164
                                                                         C      UL
                                                                                 R          US
Visit our website at http://www.nesco.com                                    LISTED
2007 ©The Metal Ware Corporation
Printed in U.S.A.

2                                                                                www.nesco.com
IMPORTANT SAFEGUARDS
When using electrical appliances, basic safety precautions should always be
followed including the following:
1. READ ALL INSTRUCTIONS.
2. Do not touch hot surfaces.
3. Do not place on or near hot electric or gas burners, or in a heated oven.
4. To protect against electric hazards, do not immerse cord, plug, or base of this appliance in water
or other liquid.
5. This appliance should not be used by children. Close supervision is necessary when any
appliance is used near children.
6. Unplug unit when not in use and before cleaning. Allow to cool before putting on or removing
parts.
7. Do not operate any appliance with damaged cord or plug, or after appliance malfunctions, or has
been damaged in any manner. Return the appliance to the nearest authorized service facility for
examination, repair or adjustment.
8. Do not let the cord hang over the edge of a table or touch hot surfaces.
9. Do not leave the appliance unattended while in use.
10. Do not remove bottom cover. There are no serviceable parts inside. Only authorized service
personnel should attempt repair.
11. Do not move the appliance while it is running.
12. Do not use outdoors.
13. Do not use the appliance for other than intended use.
14. This appliance is for household use only, designed to process normal household quantities. It is
not suitable for continuous operation.
15. Only roast green coffee beans or coffee beans that have gone through a decaffeinated process.
16. Do not set hot roasting vessel on a wet or cold surface.
17. Do not remove top cover while appliance is in operation.
18. Throw away roasting vessel if glass becomes cracked or broken.
19. Prior to starting appliance, make sure all seals, Chaff Cup and Cover are in place and seated
correctly.
20. Use plastic handle when handling the roasting vessel.
21. Do not operate appliance without the roasting vessel in place and seated.
22. The use of an accessory not evaluated for use with this appliance or sold by the manufacturer
may cause injuries, fire or electric shock.
23. Do not clean plastic parts with abrasive cleaning materials.
SAVE THESE INSTRUCTIONS
THIS APPLIANCE IS INTENDED FOR HOUSEHOLD USE ONLY
Short Cord Instructions
CAUTION: A short power supply cord is provided to reduce the risk resulting from becoming
entangled in or tripping over a long cord. Longer extension cords are available and may be used if care
is exercised in their use. If an extension cord is used, the marked electrical rating should be at least as
great as the electrical rating of the appliance, and the cord should be arranged so that it will not drape
over the counter top or tabletop where it can be pulled on by children or tripped over unintentionally.
Polarized Plug
This appliance has a polarized plug (one blade is wider than the other). To reduce the risk of electric
shock, this plug is intended to fit into a polarized outlet only one way. If the plug does not fit fully
into the outlet, reverse the plug. If it still does not fit, contact a qualified electrician. Do not attempt
to modify the plug in any way.
CR-1000 Series Coffee Bean Roaster 3Welcome to the
World of Home Coffee Bean Roasting!
Congratulations on your purchase of a new NESCO® Professional Coffee Bean
Roaster! You will be able to create the greatest tasting cup of coffee in the world
at a fraction of the price you’d pay in a gourmet coffee shop.
WARNING
NEVER LEAVE ROASTER UNATTENDED WHILE IN OPERATION.
With the NESCO® name, you can be assured of a quality appliance, and we’ll
provide tips and suggestions on how to roast your own coffee beans to perfection
in your own home. We provide easy to understand instructions on how to roast
and store your coffee beans, all in the comfort of your own home kitchen. Un-
like many other coffee bean roasters, your NESCO® Professional Coffee Bean
Roaster is one of the quietest machines on the market today, and features a
unique Catalytic Converter and ceramic filter system that reduces the odor and
smoke associated with coffee roasters.
Roasting coffee beans at home allows you to roast coffee beans exactly as
you like them... light or dark, and with your own special blend of beans if you
choose. YOU have complete control of the freshness and flavor of your cup of
coffee.
Five Reasons to Roast Your Own Coffee Beans:
Freshness - If you use store-bought coffee, chances are it will be stale by the
time you brew it. Imagine what it’s like to drink a cup of coffee made with
beans roasted a few minutes ago, not weeks ago.
Flavor - You’ll be able to select a number of distinct flavors and aromas from
genuine fresh coffee.
Fun - NESCO® makes roasting coffee beans fun and convenient – as easy as
popping a bowl of popcorn.
Creative - Roasting at home allows you to create your own special blends.
Create your own favorite ‘signature’ blend of coffee beans.
Savings - Home roasting can save you up to 50% on every pound of gourmet
coffee you drink.
With your NESCO® Professional Coffee Bean Roaster, you’ve taken the first
step towards a truly fresh cup of coffee. Get ready to enjoy the best cup of
coffee you ever tasted!
4 www.nesco.comGet to Know Your NESCO®
Professional Coffee Bean Roaster
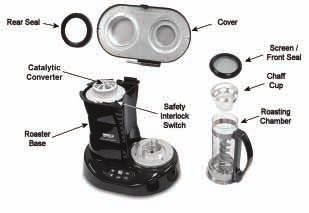
Fig. 1
Roaster Base contains the control panel, heating elements, Catalytic Converter
and mounting base for roasting chamber. A two-speed fan directs the heated air
through the green coffee beans in the ‘roast’ cycle and blows cool air through the
roasted beans, during the ‘cooling’ cycle, to stop the roasting process.
Roaster Chamber holds up to 5 oz. of green coffee beans and features a unique
auger drive mechanism that mixes the coffee beans so they roast evenly.
Chaff Cup collects the ‘fluffy’ chaff generated when roasting coffee beans.
Screen / Front Seal: The stainless steel Screen fits inside the Front Seal and
prevents fine chaff particles from entering the Catalytic Converter. The Front
Seal keeps smoke and odor inside the machine.
Rear Seal prevents smoke and odor from leaking out at the Catalytic Converter.
Cover directs the smoke and odor from the Roasting Chamber to the Catalytic
Converter where it is virtually eliminated. It is conveniently hinged to the
Roaster Base and activates the Safety Cutoff Switch when the Cover is latched.
Safety Cutoff Switch allows the roaster to operate only when the Cover is
properly latched. It will turn the roaster off if the Cover is accidentally opened
during a roast cycle.
A patented Catalytic Converter removes the smoke and most of the odor
associated with roasting coffee. No other home coffee roaster has this feature.
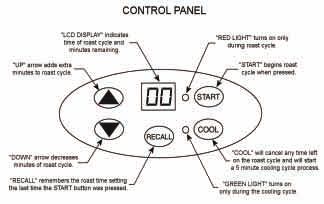
CR-1000 Series Coffee Bean Roaster 5Control Panel
Your NESCO® Professional Coffee Bean Roaster features an easy to use Control
Panel that includes five large keypads, large digital display and two indicator
lights.
Fig. 2
NOTE: The screen must be cleaned between EVERY use to ensure proper and
safe operation of your roaster (see Caring For Your Roaster).
CAUTION: Failure to clean the filter screen or operating the appliance
without proper installation of the filter screen may cause your roaster to
malfunction. Roaster issues caused by leaving out the screen will NOT be
covered by the warranty.
IMPORTANT: Make sure the Chaff Cup is inserted in the glass cylinder of
Roasting Chamber before the Front Seal / Screen is installed. Remember, all
metal surfaces become EXTREMELY HOT during the roasting process and
should never be handled or touched during or directly following a roasting cycle.
6 www.nesco.comBefore You Begin
Before using your NESCO® Professional Coffee Bean Roaster the first time:
1. Unpack your new coffee bean roaster completely. Remove all packing
materials and make sure all parts are included. (Fig 1).
2. Wash Cover, Chaff Cup and Roasting Chamber in hot soapy water to
eliminate any residue from the packing that will affect the flavor of your
first roast. Rinse in clean water and dry thoroughly. All removable parts
are dishwasher safe.CAUTION: NEVER IMMERSE THE ROASTER
BASE IN WATER OR ANY OTHER LIQUID, AND NEVER PLACE
IT IN A DISHWASHER.
3. Make sure all parts are completely dry before reassembling your roaster.
NOTE: Set Cover on end to allow excess water to drain.
4. Select your favorite green coffee beans and get ready to roast your first
batch!
Operating Instructions
1. Place Roasting Chamber on Drive Shaft and lower it onto heat shield.
Align the Guide Slots with Locator Pins, and Roasting Chamber will drop
into position on Heat Shield (Fig. 3).
2. Fill Roasting Chamber up to either “FILL LINE” or “DARK ROAST”
line with your choice of green coffee beans. NOTE: Do not over fill the
Roasting Chamber, as this could damage the roaster.
3. Insert Chaff Cup into top of Roasting Chamber.
4. Slide the Screen / Front Seal on top of Roaster Chamber and Chaff Cup,
making sure the ribbed-end of seal fits over end of the glass cylinder.
CR-1000 Series Coffee Bean Roaster 75. Make sure Rear Seal fits securely over metal rim of larger opening in Cover
(Fig. 4).
6. Align the metal hinge pin of Cover with the matching hole in the Roaster
Body and slide together until the pin is fully seated.
7. Gently press Cover down until it latches in place. NOTE: If the cover is
not securely latched, the Safety Cutoff Switch will not allow the roaster to
operate.
8. Plug roaster into a standard 120-volt outlet. The display will show 20
minutes the first time your roaster is used. This is a default setting and
will produce a ‘light’ roast. We don’t recommend roasting less than 20
minutes. We suggest a roast time of 25 minutes minimum as a starting point.
Experiment with roasting times and have fun!
9. Adjust roast time using the “UP” arrow (on Control Panel) to add minutes
or “DOWN” arrow to subtract minutes from the roast cycle. The longer
roast time, the darker the roasted beans will be.
Note: The maximum roast time is 30 minutes. However, during a roasting cycle, you may add
up to 5 additional roasting minutes by pressing the UP Arrow while the red light is ‘on’ and the
remaining roast time is between 6 and 24 minutes. The roaster will not allow you to add more
than 5 minutes to a roast cycle, so the maximum allowable roasting time is 35 minutes. Once
the 5-minute ‘cooling’ cycle has started and the green light turns ‘on’, you can no longer add
more roasting time.
10. Press the RECALL button to display the previous ‘roast time’ used when
the START button was pressed. Your roaster stores this number even if the
roaster is unplugged between roast cycles. This feature helps you roast
coffee beans more consistently.
NOTE: The RECALL button will not remember additional minutes added
after the START button is pressed.
8 www.nesco.com11. After you select the time for the roasting cycle, press the START button.
The auger will begin to turn the coffee beans and the fan will start.
The red light will glow, indicating the heating element is turned ‘ON’
and the roasting cycle started.
CAUTION: If the auger does not begin rotating after the START button is
pressed, a small coffee bean may be trapped under the auger inside the Roast
Chamber. STOP THE ROASTING CYCLE IMMEDIATELY by unplugging
the roaster. Allow the roaster to cool if it is hot. Open the Cover and empty
the beans from the Roasting Chamber, making sure none are under the auger.
Rotate the auger by hand to make sure it is free to turn. Install the Roasting
Chamber with the Heat Shield and lower chamber in place. Reload the beans
and start the roast cycle again.
WARNING! NEVER LEAVE ROASTER UNATTENDED WHILE OPERATING
Note: If you roast consecutive batches of coffee beans, they may roast faster after the first cycle,
because the roaster may still be hot. Adjust roast time settings accordingly.
Roasting Guidelines
Light Roast 20 - 22 minutes
Medium Roast 23 - 26 minutes
Dark Roast 27 - 30+ minutes
Note: Roast times may vary due to ambient room temperature, power/voltage, bean
variety or amounts used in each batch. Adjust time settings accordingly.
12. As the roasting cycle continues, you will notice the beans increase in size
and gradually change from a pale green to a chocolate brown color. You
also notice the pleasant aroma of the beans as they begin to roast.
13. Five minutes before the end of the roast cycle, the ‘cooling’ cycle will
automatically start and begin blowing cool air over the roasted beans. The
red light will turn ‘OFF’, the green light will glow and the fan switches to
a higher (faster) speed.Note: Pressing the COOL button at any time during
a roasting cycle will stop the roasting and begin the 5 minute ‘cooling’
process.
14. When your roaster has completed the roasting/cooling cycle, the appliance
will turn itself off automatically. Note: We recommend you let the appliance
cool down for 10 minutes before removing the freshly roasted coffee beans.
CAUTION: Metal parts of your roaster WILL STILL BE VERY HOT.
Use caution when handling this appliance.
15. Unplug the roaster from the outlet.
CR-1000 Series Coffee Bean Roaster 916. After the roaster has cooled for 10 minutes, open the roaster Cover by
pulling the plastic tab towards you while lifting up. CAUTION: Please use
caution when opening or removing Cover, as all metal parts may still be
hot after the roasting cycle.
17. Remove Screen/Front Seal and brush chaff particles from Screen into the
trash. Slowly remove Chaff Cup and discard chaff into the trash.
18. Grasp the plastic handle of the Roasting Chamber and remove from Roaster.
CAUTION: Do not touch glass or metal base of Roasting Chamber as these
parts may still be hot after the roasting cycle.
19. Pour the fresh-roasted beans into an airtight container or coffee grinder.
Allow the roasted beans to ‘rest’ (see p. 12) for a few hours before grinding.
20. Grind your fresh roasted beans in a blade or burr grinder.
21. Brew and enjoy the best cup of coffee you’ve ever tasted!
Caring for Your Roaster
1. Your coffee bean roaster must be cleaned after every use. This will ensure
the safe operation of the appliance, longevity and assure optimal roasting
results. WARNING: It is very important that the screen be in place before
you start the roaster. If the screen is not in place it will cause your roaster to
malfunction. Roaster issues caused by leaving out the screen will NOT be
covered by the warranty.
2. Make sure the roaster has cooled before removing parts.
3. Empty the Chaff Cup in the trash. Brush or rinse the chaff flakes off the
Chaff Cup and Screen/ Front Seal. To facilitate cleaning, the Screen can be
easily removed by stretching back the top ‘lip’ of the rubber seal and pulling
it out.
4. Wash Chaff Cup, Screen/Front Seal, Roasting Chamber and Cover with
warm soapy water and rinse. Set parts aside to drain and let them air dry
thoroughly before re-assembling roaster. NOTE: The Cover, Roasting
Chamber, Screen/Front Seal and Rear Seal are all dishwasher safe.
5. When dried, insert Screen into groove provided at the top of the Front Seal.
CAUTION: Not cleaning these parts or operating the appliance without proper installation
will shorten the life expectancy of the roaster and can create a condition where the roaster may
overheat and malfunction. Make sure all washable components are completely dry before using.
6. Set Cover on end, after washing, to allow excess water to drain out.
7. Wipe Roaster Body with a damp cloth or sponge and set aside to dry. DO
NOT IMMERSE ROASTER BASE IN WATER OR OTHER LIQUID.
10 www.nesco.com8. Examine the slots surrounding the ‘Drive Shaft’ (Fig. 3) and remove any
debris with a damp towel or small brush. This surface must be free of debris
before beginning the next roast cycle.
9. The screen of the Screen/Front Seal is a very fine mesh stainless steel and
requires special attention after every roast cycle. Fine particles of chaff
lodge in the fine screen of the filter. Remove particles of chaff with a brush
and running water. If necessary, the screen can be separated from the rubber
seal for easier cleaning.
NOTE: A standard oven cleaner may be used to remove heavy build up of
coffee oil residue from the screen that may accumulate after several months of
steady use. Use caution when using oven cleaners. READ DIRECTIONS ON
CONTAINER BEFORE USING.
To remove stains on inside of Cover, pour equal amounts of water and household
ammonia into the opening of Cover and let stand for several minutes. Wash
parts normally, then rinse and dry thoroughly.
10. It may be helpful to record the results of ‘roasts’ for future reference. This
will help you learn about the many and varied coffee types, flavors, blends
and roast colors.
Have fun with your NESCO® Professional Coffee Bean Roaster
and enjoy the experience!
Handling and Storage of Roasted Coffee Beans
Since the primary reason for roasting coffee at home is to experience the aroma
of truly fresh coffee, you need to handle and store your freshly roasted coffee
beans with care. Green coffee beans keep very well, but after roasting begin a
slow decline and lose their freshness and flavor rapidly.
Coffee beans reach their peak flavor a few hours to a day after roasting. Two
days after roasting, a good part of the aroma starts to deteriorate due the affect of
the oxygen in the air (staling). After one week the taste is compromised, and in
two weeks the aroma has virtually vanished and the taste has lost its distinctive
characteristics.
Here are some steps to take to preserve and maximize the fragrance of your
home-roasted coffee:
• Roast small quantities of coffee more often.
• Allow freshly roasted beans to rest for a day, uncovered. Then transfer them
to a suitable, air-tight container and store in a cool, dry place, away from
direct sunlight. Caution: Do not fill a tight-sealing canister or jar more than
halfway with just-roasted coffee beans that have not been rested for a day or
so. Freshly roasted beans generate gases that will exert considerable pressure
on the walls and lid of the filled, tightly sealed container.
• Allow roasted coffee beans to ‘rest’ for a few hours to a day before grinding.
This will assure peak flavor and aroma.
CR-1000 Series Coffee Bean Roaster 11• Resist the urge to refrigerate roasted beans. Don’t store coffee in a refrigerator;
it is damp inside and dampness compromises the flavor and aroma.
• Grind your coffee immediately before brewing. The purpose of grinding
coffee is to break open the coffee bean and make the flavor oils available
to hot water and then to our palates. Unfortunately, breaking open the bean
also exposes flavor oils to oxygen or “staling.” Grinding should be done
only moments before brewing to maximize the flavor and aroma.
• Freeze coffee only when you have an oversupply of roasted coffee beans you
can’t consume within a week. Put the beans in a ‘zip lock’ freezer bag and
squeeze as much air out as possible before sealing. If you own a vacuum
sealing machine, this is an excellent way to preserve excess roasted beans in
bags provided or in plastic storage containers supplied by the manufacturer.
• Drink your coffee immediately after brewing. It does little good to roast,
grind and brew a superb fresh cup of coffee, only to let it stand in the pot
on a hot plate where the aroma and flavor evaporate away in the air. If you
can’t drink the freshly brewed coffee, transfer it to a pre-heated, insulated
carafe, which will preserve the taste and aroma for later consumption.
Troubleshooting
Problem Cause and Solution
Digital display is blank. • Roaster not plugged in. Plug into wall outlet.
Unit will not turn on. • The Safety Cutoff Switch will turn off
power to the roaster if the cover is open or
not properly closed. Make sure the Roasting
Chamber is correctly seated on the Roaster
Base and the Cover properly aligned and
latch closed.
The roasting times are not • The household voltage changing - this
consistent. changes roast characteristics.
• Different varieties of green coffee beans
require different roasting times.
• Similar green coffee beans from other countries
contain different amounts of moisture and
require different roasting times.
• Decaffeinated beans take less time to roast
than regular beans. Trial and error are the rule
of thumb when roasting coffee beans. It may
be helpful to keep notes about roasting times
for specific types of coffee beans.
12 www.nesco.comProblem Cause and Solution
Smoke is emitted and auger • The Screen/Front Seal or Rear Seal not
is turning. properly installed, damaged or missing.
Reposition as needed.
• Screen is blocked. Make sure screen is
cleaned and open before operating.
Smoke is emitted but auger • There may debris lodged under auger.
is NOT turning. Unplug the roaster immediately. ALLOW
UNIT TO COOL BEFORE REMOVING
OR PARTS. Remove beans. Inspect auger and
remove all debris underneath.
Unit is operating with • Roasting Chamber not seated correctly.
correct amount of green Unplug roaster from outlet. Open Cover,
beans but the auger is NOT make sure Roasting Chamber is fully seated
turning. on heat shield of Roaster Base.
Unit speeds up with five • This condition is normal. The roaster
minutes remaining in roast automatically shifts to a 5-minute cool-down
cycle period at the end of each roasting cycle.
Roasted coffee beans are • Roasting time is too short. Add extra minutes
not dark enough after going to roast time after roasting cycle has started
through the maximum 30- and before the cooling cycle has started.
minute roasting cycle. Each press of the ‘UP’ arrow adds 1 minute
to the roast cycle. Up to 5 extra minutes can
be added.
• For darker roasts use less than the
recommended 5 oz. load of beans for each
cycle.
Excessive amount of chaff • Screen/Front Seal is not installed correctly,
escaping near top of roaster. damaged or missing. Replace or install seal
correctly onto top of Roasting Chamber.
Make sure Screen is inserted into groove of
Front Seal.
Auger turns but beans are • Roasting Chamber is very dirty and needs
not circulating. to be cleaned. See ‘Caring for your Roaster’
section. The oily residue on the glass prevents
the beans from circulating when the auger
is turning.
• Roasting chamber may be wet on the inside.
The water droplets create a drag on the beans
preventing them from circulating. Dry the
Roasting Chamber thoroughly before adding
green coffee beans.
CR-1000 Series Coffee Bean Roaster 13Problem Cause and Solution
With Roasting Chamber • Roasting Chamber not seated correctly. Unplug
clean and empty, auger roaster from outlet. Open Cover, make sure
does not turn after pressing Roasting chamber is fully seated on the heat
START button. shield of Roaster Base.
• Auger drive mechanism may be damaged.
Return to our factory for servicing (see One
Year Limited Warranty).
When roaster is running, • This is a normal condition when roasting or
the keypads do not work. cooling. Only two buttons are active while the
roaster is running. These are the ‘UP’ arrow
button (increases roasting time) and COOL
button.
• You have already added 5 extra minutes,
so the ‘UP’ and ‘DOWN’ arrows will not
function. Only the COOL button functions at
this time.
The roasted beans are too • This may be normal. Different varieties
dark. of beans may roast darker than others.
Try grinding some and brew a pot of coffee.
They may taste better than they look.
• Roasting time is too long. Decrease roasting
time (press ‘DOWN’ arrow).
• Make sure you’ve roasted the recommended
amount of beans per load. Fill Roasting
Chamber up to the FILL LINE (5 oz.).
I want to stop the roasting • If you are watching the roast cycle and the
process when the beans color of the beans is correct, press the COOL
change color. button to stop the roasting cycle. The roasting
stage will stop and cooling stage will begin
immediately. The machine will turn off
automatically after the 5-minute cooling
cycle.
NOTE: If this troubleshooting chart does not provide a solution to a problem
you’re experiencing with your roaster, contact our Customer Satisfaction
Department at 1-800-288-4545 for assistance. Read the Limited Warranty
section for details.
14 www.nesco.comONE YEAR LIMITED WARRANTY
This appliance is warranted for one year from date of original purchase against defects in material
and workmanship. This warranty does not cover transportation damage, misuse, accident or similar
incident. This warranty gives you specific legal rights and you may have other rights, which vary
from state to state. This product is intended for household use only, not for commercial use.
Warranty does not cover commercial use.
Your new NESCO® appliance comes equipped with numerous safety features. Any attempt to
interfere with the operation of these safety features makes this warranty null and void. In the event
we receive an appliance for service that has been tampered with, we reserve the right to restore it to
its original state and charge for the repair.
Defective products may be returned, postage prepaid, with a description of the defect to: The Metal
Ware Corporation, 1700 Monroe Street, Two Rivers, Wisconsin 54241, for no-charge repair or
replacement at our option. Must include proof of purchase or copy of original bill of sale when
returning product for warranty service.
Please call Customer Satisfaction at 1-800-288-4545 to obtain a Return Authorization before
shipping.
For service in warranty, follow instructions set forth in warranty. When ordering new parts, make
sure that you always mention the model number of the product.
1. Call us on our toll free number, 1-800-288-4545 and tell us about your problem.
2. If we instruct you to send all or part of your appliance to us for repair or replacement, the
Customer Satisfaction representative will provide a Return Authorization number (this number
notifies our receiving department to expedite your repair). Pack your unit carefully in a sturdy
carton with sufficient padding to prevent damage because any damage caused in shipping is not
covered by the warranty.
3. Print your name, address and Return Authorization number on the carton.
4. Write a letter explaining the problem. Include the following: your name, address and telephone
number and a copy of the original bill of sale.
5. Attach the sealed envelope containing the letter inside the carton. Insure the package for the
value of the NESCO® appliance and ship prepaid to:
Attn: Factory Service Dept.
The Metal Ware Corporation
1700 Monroe Street
Two Rivers, WI 54241
CR-1000 Series Coffee Bean Roaster 15WEBSITE: www.nesco.com ©2007, The Metal Ware Corporation #64902
You can also read