Debt Repayment Order Supervisors - OASIS User Manual - Updated March 2021 - Insolvency and Trustee ...
←
→
Page content transcription
If your browser does not render page correctly, please read the page content below

Updated March 2021

                Debt Repayment Order
                        Supervisors

                     OASIS User Manual

                           Page 1 of 37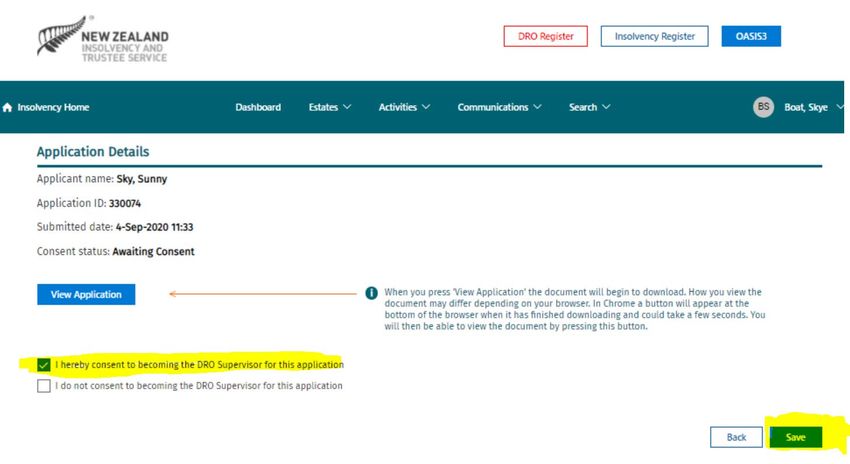
Updated March 2021

Contents:
Roles and Responsibilities of a Debt Repayment Order Supervisor            Page 3

Before you Begin                                                           Page 4

What does a Debt Repayment Supervisor do online?                           Page 4

                            •   Consenting to Act                          Page 5
                            •   Your Estates & Searching                   Page 7
                            •   Managing Tasks                             Page 10
                            •   Notifications from the Official Assignee   Page 14
                            •   Assets                                     Page 15
Creditor Claims:
                            •   Creditor Claims                            Page 16
                            •   Receiving evidence                         Page 18
                            •   Viewing & Linking evidence to a claim      Page 18
                            •   Vetting claims                             Page 22
                            •   Withdrawing claims                         Page 26
                            •   Rejected, Suspended and In Error claims    Page 27

Keeping OASIS up to date                                                   Page 28

Emailing or adding notes to OASIS                                          Page 30

Trust Account and Dividend Worksheets

                            •   Viewing Transactions and Balances          Page 31

Dividend Worksheets

                            •   Worksheet Approval (Second Approval)       Page 33

Useful Tools and reference points                                          Page 36

                                                   Page 2 of 37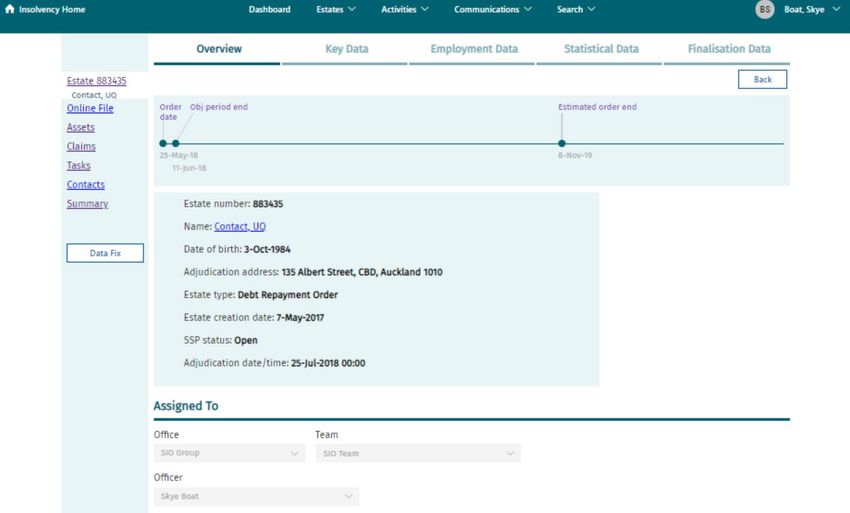
Updated March 2021
Role of a Debt Repayment Order Supervisor

The Insolvency Act 2006 requires the appointment of a suitable and willing person to supervise the debtor’s
compliance with the order.

Summary of Supervisors’ Responsibilities:

Prior to consenting to the Order, the DRO supervisor must ensure the applications is complete and the suggested
payments are viable in relation to the debtor’s income and expenditure.

    The Insolvency Act 2006 states the responsibilities of the DRO Supervisor as outlined below:

    •   Supervise the debtor’s compliance with the terms of the Order, including any special requirements
        stipulated in the individual Order.
    •   Liaise with the debtor, and communicate any non-compliance to the Official Assignee once identified.
    •   Direct employers to pay all or part of the debtor’s earnings to the Official Assignee’s Trust account and in
        accordance with the Order.
    •   Liaise with creditors, manage and vet claims and supporting evidence to ensure validity of claims which are
        included in the Order.
    •   Liaise directly with the Official Assignee (OA) where admitted claims vary from the debt levels included in the
        order.
    •   Check and approve dividend payments to creditors including costs and fees.
    •   Regularly monitor the debtors file and act on any outstanding tasks in a timely manner.

Supervisors must fulfil these responsibilities and record their actions in the debtors’ online OASIS file in order to
satisfy audit requirements.

Conflicts of Interest

You must not consent to supervise a person with whom you have a business or personal relationship without
checking any possible conflicts of interest with the Official Assignee. Conflicts of interest may arise where you are a
creditor in the DRO, a relative of a creditor or a relative of the debtor. If you are unsure whether there may be a
conflict of interest with an Order, please discuss this with the Official Assignee before consenting to act as Supervisor
for an applicant.

                                                      Page 3 of 37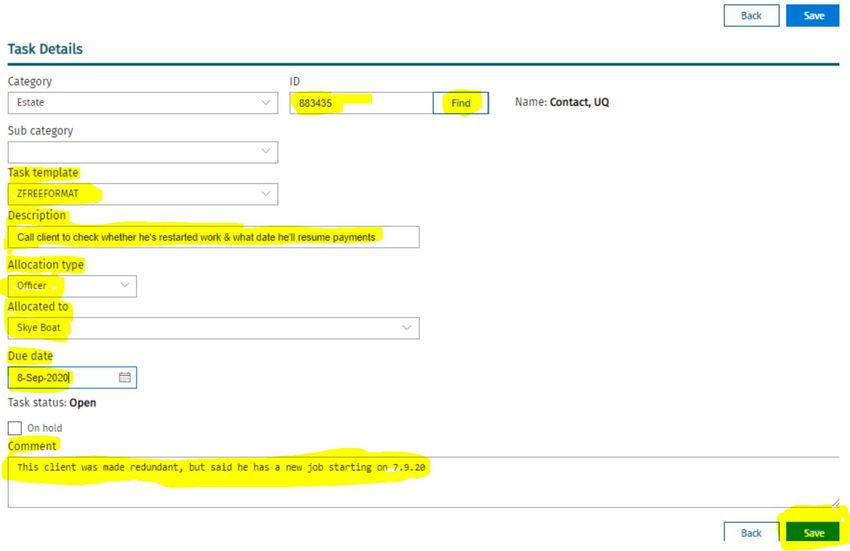
Updated March 2021
Before you begin:

You will need to be approved by the Insolvency and Trustee Service (ITS) in order to become a Supervisor, prior to
seeking consent to supervise a specific order. Please see the website for more details if you have not completed this
process already.

You will need a RealMe login to access OASIS, which is the Official Assignee’s online system. Once you have been
approved as a Supervisor, ITS will arrange for you to be given the correct permissions on your RealMe login to enable
you to access OASIS.

What does a Debt Repayment Order Supervisor do online?

Once logged on using your RealMe login, you will be presented with the OASIS Dashboard and you will be able to
access all the tools you need to manage and maintain orders you have consented to be Supervisor in order to fulfil
your obligations.

At the top of the screen you will be see any applications where a DRO applicant has nominated you at their Supervisor
& the application is awaiting your review & Consent. To review the application, select ‘View’, then select View
Application. This will open the Statement of Affairs as a PDF document in a separate window.

                                                    Page 4 of 37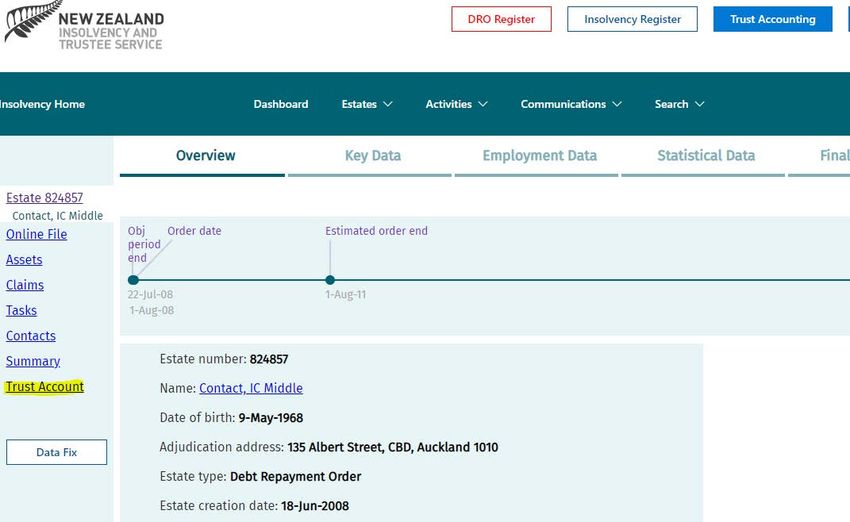
Updated March 2021
Consenting to Act
Before consent to act, you must review the application to check that all the information provided is correct, that the
budget is accurate and ensure that the Proposal offered is appropriate.

To consent to act, tick the checkbox ‘I hereby consent to becoming the DRO Supervisor for this applicant’ and
confirm by selecting Save.

If you are unable to consent for any reason, select the ‘I do not consent to becoming the DRO Supervisor’ option.
Inform the client of your decision advising the reasoning behind it. Please also make sure to send a copy of the
communication to oasis3@insolvency.govt.nz and DRO@insolvency.govt.nz so that the Official Assignee is aware of

                                                    Page 5 of 37
Updated March 2021
the circumstances and a note is placed on the online file. Clients should be advised to select another supervisor or
apply for another insolvency option depending upon the individual circumstances.

Best Practice Tip

By consenting to act as Supervisor, you are confirming that you have fully reviewed and verified the application; that
all budget information is correct and realistic, and that the Proposal offered is appropriate.

Important note:

Remember, you must not consent to supervise a person with whom you have a business or personal relationship
without checking any possible conflicts of interest with the Official Assignee.

Applications you’ve consented to will remain under the ‘Pending Consents’ section, but will display as ‘Awaiting
Vetting’. This means the application is waiting to be vetted by OA staff. Once OA staff have started to vet the
application, the estate details will be move from your ‘Pending Consents’ list:

                                                     Page 6 of 37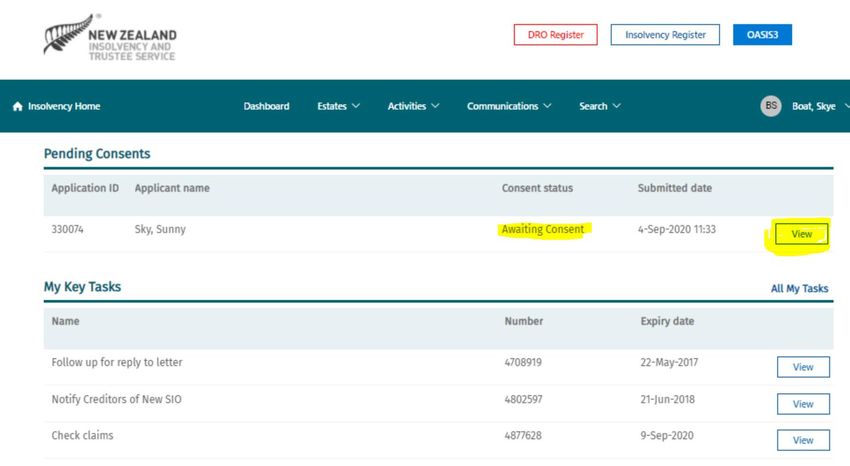
Updated March 2021

Withdrawing Consent to supervise

If you wish to withdraw your consent at any stage, please contact the Official Assignee at DRO@insolvency.govt.nz.

Your Estates & Searching

Further down the screen, you’ll see ‘My Recent Work’ which will show a list of estates you’ve recently worked on. You
can select ‘All My Estates’ to the right of this to bring up a list of all the open Orders you’re currently acting for:

                                                     Page 7 of 37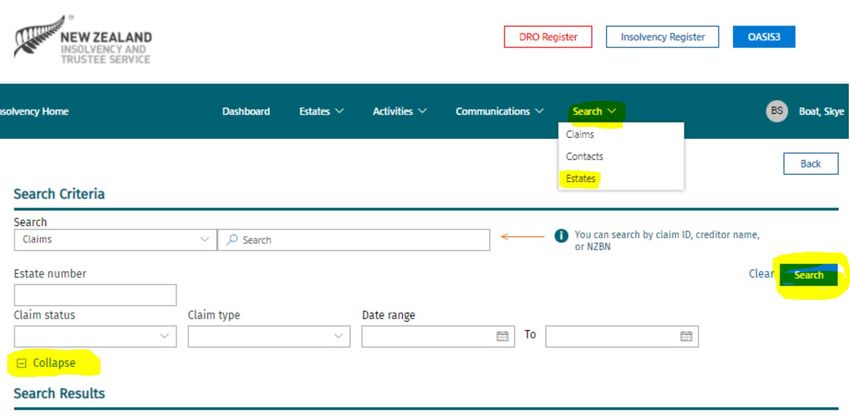
Updated March 2021
For all search options you can select to expand or collapse the search criteria to refine your search:

To view the details of an estate click on View:

                                                      Page 8 of 37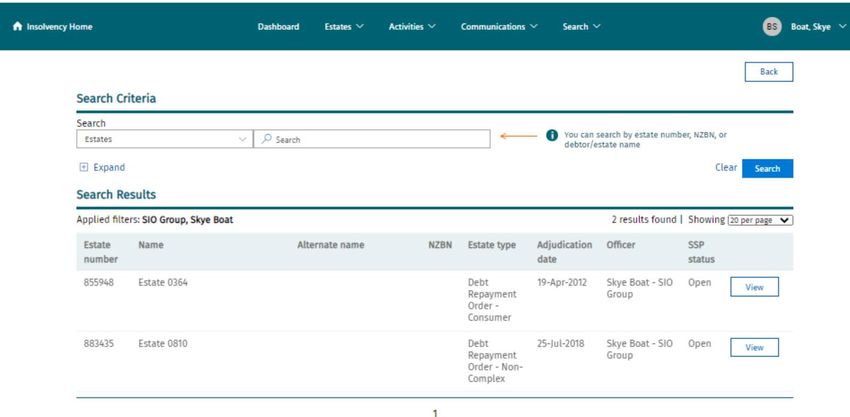
Updated March 2021

You can also search by using the ‘Search’ button at the top of the screen to search for Estates, Claims and Contacts.
Select ‘Expand’ to refine your search

                                                    Page 9 of 37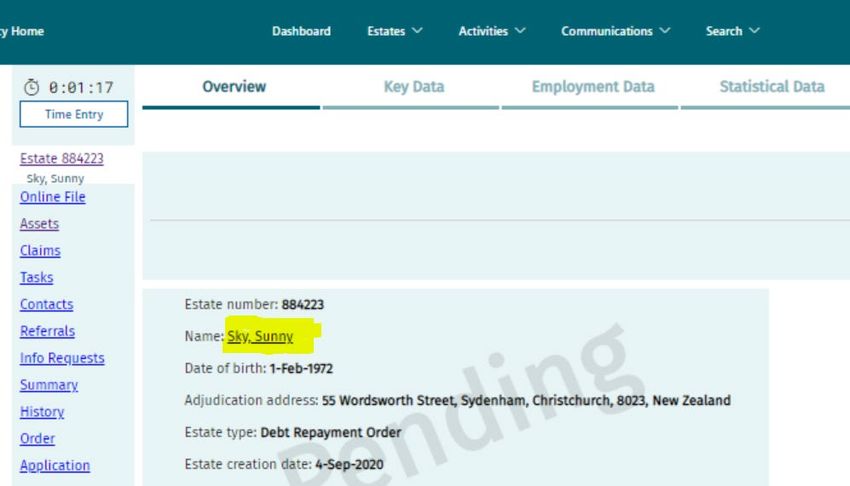
Updated March 2021
Managing Tasks

OASIS assists the administration of DRO estates through the use of tasks. Some of these tasks need to be responded
to or reviewed by supervisors. To view your tasks, towards the middle of your Dashboard you will see ‘My Key Tasks’
or select ‘All My Tasks’ to view a list of all your open tasks. You can use the search boxes to specify the type of tasks
you’d like to view.

                                                     Page 10 of 37
Updated March 2021
To view any particular task, click on ‘View’ to the right of the relevant task:
This Task will outline the issue, what is needed to resolve the matter and the date the task needs to be completed by
(usually 3 working days).
Once the issue has been resolved, close the task by making a comment in the ‘Comments’ field giving brief details of
any action taken and then selecting the ‘Complete’ button.
When you use the Back button, you will be taken back to the task list. You will see that the task you just completed
no longer appears in the task list.
Page 11 of 37Updated March 2021
All outstanding tasks must be completed by the ‘Due Date’.
The three automated tasks for Supervisors are:
• Follow up Missed Payment: This is generated when a debtor has missed a payment & is a prompt for this to
be followed up
• Review the claims lodged against this SIO estate: This is generated 3 months after an Order has been made
and is a reminder to follow up any remaining potential creditors to register their claims
• Approve SIO Dividend Worksheet: This is a prompt to review and give final approval to a worksheet. You
will also have received an email from OA staff about this. (Refer to information on Worksheet approvals on
page 34)
Adding a Task to an estate
You can add tasks to remind yourself to complete things on a specific day.
Select ‘All my Tasks’, then select the ‘Add’ button.
Page 12 of 37Updated March 2021
This will open a ‘Task Details’ page. Locate the estate number you want to add the task to and select ‘Find’. In the
‘Task Template’ section select 2FREEFORMAT from the drop down list. Enter a description of your task in the
‘Description’ field. Select ‘Allocation type’ and choose ‘Officer’. In the ’Allocated to’ field, select your own name. In
the ‘Due date’ field, enter the date you want to be notified of the task. You can enter any additional comments in
the ‘Comment’ field. To save the task, Select the ‘Save’ button:
The task will pop up on your ‘My Key Tasks’ list on the due date.
Best Practice Tip
Make sure that as soon as you log on to OASIS, you check any outstanding tasks. It’s very important that Supervisors
regularly check their tasks and keep in touch with their clients to ensure their orders are not falling behind.
Managing and completing these tasks in a timely manner reduces the number of reminders the OA has to send to
you.
Page 13 of 37Updated March 2021
To return to your Dashboard, select the ‘Dashboard’ heading at the top of the screen:
Notifications from the Official Assignee
• Notification of accepted application
Once a Debt Repayment Order application is accepted, the OA will notify all creditors and the nominated
Supervisor by sending a letter known as a ‘Summary for Creditors’ notice. This notice gives the debtor,
supervisor and creditors 10 working days within which to make any comments or representations (objections)
to the application. During this time the status of the application will show as ‘Objection Period’.
Any comments or representations are received via post or email to the OA. These will be loaded into OASIS
and the OA will make the final decision on the acceptance of the comments or representations and will notify
the outcome.
• Notification when a Debt Repayment Order is made
Once a Debt Repayment Order is made, a copy of the sealed Order is sent to the Supervisor and the debtor.
The OA also sends a notice to creditors advising them that the Order has been made, together with a copy of
the sealed Order.
The notice to creditors advises that they need to cease any further recovery action and register their claim in
the Order within 15 days. The DRO Register will be updated to show details of the DRO as soon as the Order
is made.
Page 14 of 37Updated March 2021
Assets
Any assets which are included in a debtor’s Statement of Affairs are entered into OASIS. Supervisors can view these
assets by selecting the Assets link on the left hand menu of the estate as below, but you cannot update any details.
If the realisation of an asset is part of a Debt Repayment Order, once the funds have been received into the Official
Assignee’s trust account, OASIS will show this.
If a supervisor notices any asset details that are incorrect, please inform the Assignee by emailing
DRO@insolvency.govt.nz.
Page 15 of 37Updated March 2021
Creditor Claims
Claim details advised by the applicant are entered into OASIS when the application is submitted. Creditors can make
a claim online once the Order has been made. Claims can be added or modified by the OA if further information
becomes available.
All creditors listed in the application, including any secured creditors, will receive the creditor notifications mentioned
in the ‘Notifications for the Official Assignee’ section so that they have the opportunity to register their claims once
the Order Is made.
Where possible creditor claims must be registered online directly from the Creditors Dashboard. Appropriate evidence
is uploaded and will be attached to the online claim for supervisors to vet accordingly. Please destroy any manual
claim forms you have and do not email forms directly to creditors.
If creditors need assistance with the online claim registration process, refer creditors to the Help and Support section
of the website or to our Service Centre on Freephone 0508-467-658.
Claims filed online
The fastest way for a creditor to file a claim is from their Dashboard. When a creditor files their claim online they must
include evidence to support the claim they have made.
You will receive a ‘Task’ which advises that there has been a claim filed which needs to be reviewed. The claim will
show in ‘Claims’ located in the left hand menu.
.
When selected a list of claims will show. Locate the correct claim and View.
Page 16 of 37Updated March 2021
The full details of the claim will show with the supporting evidence attached:
Page 17 of 37Updated March 2021
Receiving Claims/evidence
If Supervisors receive evidence for claims, this should be saved to the online file by scanning and emailing into OASIS
- the email address is oasis3@insolvency.govt.nz. As with all communications submitted into OASIS, the details in the
subject line must be clear and include:
o the estate number, immediately followed by a semi-colon (;)
o a meaningful subject heading
It is important to remember that the subject heading will appear on the Online File in OASIS. If the Subject
heading does not explain what the communication relates to, it will be confusing for anyone reading through
the online file. This could mean more work when you are trying to locate a specific document in future.
Viewing & Linking evidence to a claim
Once the evidence has been added to the online file as outlined above, it should be linked to the correct claim. From
the left hand menu of the estate in OASIS, select ‘Claims’.
.
This will take you to the full list of the claims which have been entered to the estate. Select ‘View’ next to the
relevant claim. Select ‘View’ next to the relevant claim:
Page 18 of 37Updated March 2021
This will take you to the details of the claim:
Page 19 of 37Updated March 2021
Select the ‘Add Link’ button in the lower right hand corner of the page:
Then select ‘Folio’ under the ‘Link type’ heading & select ‘Search”:
This will take you to the list of documents which have been added to the online file. Select the correct evidence by
choosing ‘Select’ to the right of the relevant document, then select ‘Save’.
Page 20 of 37Updated March 2021
If you have made a mistake, the evidence can be removed by selecting ‘Remove’ next to the incorrect document,
then ‘Save’
Evidence for claims registered by the creditor online will be shown at the bottom of the screen under ‘Supporting
Evidence’. Click on the hyperlink to the evidence to open it:
Page 21 of 37Updated March 2021
Vetting Creditor Claims
Claims must be registered by creditors online. Please destroy any manual claim forms you have and do not email forms
directly to creditors.
If creditors need assistance with the online claim registration process, refer creditors to the Help and Support section
of the website or to our Service Centre on Freephone 0508-467-658.
Important Note
This is a very important step in the process which must be checked thoroughly!
In all cases, creditors must provide evidence that shows the actual value of their debt at the date the Order is made,
and must not contain any amount owed after the date of the Order.
Creditors are required to register their claim online only. Please dispose of any manual claim forms and please do
not send these to creditors.
To begin the claim vetting process, view the claim details and review the evidence the creditor has provided. The
details in both must match. When you are satisfied that the claim is supported by appropriate evidence which matches
the claim details, you can record that you have vetted the claim in OASIS by changing the Claim status to ‘Vetted’,
which will open the ‘Admitted Value’ box. Add the amount you are admitting the claim for and you will also be
prompted to add a comment in the ‘Reason for Change’ field. Enter something relevant, eg “Vetting’’ here, then select
‘Save’:
Page 22 of 37Updated March 2021
Page 23 of 37Updated March 2021
Once you are completely satisfied that the claim is from the correct creditor, has a value equal to the amount owing
at the date of the Order and is fully evidenced, then you can admit the claim by changing the ‘Status’ from ‘Vetted’
to ‘Admitted’, add a comment in the ‘Reason for Change’ field, then select ‘Save’:
Page 24 of 37Updated March 2021
Important Vetting Claim Information
• Evidence supporting the amount claimed must accompany every claim. All evidence must be saved to the
online file of the estate and linked to the claim, as mentioned above.
• Where there is a significant difference between the amount notified by the debtor and the amount claimed
by the creditor, this needs to be investigated and backed up with evidence to explain the difference.
o For example; if a debt collection agency claims for a higher amount than notified by the debtor, the
debt collection agency needs to provide evidence to show what additional fees/costs have been added
and at what dates. Remember only to admit the debt to the value as at the date of the Order.
• If a creditor registers a claim with any ‘Claim Type’ other than “Unsecured Creditor with POD”, this will need
to be corrected before the claim is vetted or admitted. EG some creditors occasionally register a claim with
‘Preferential unsecured creditor’ claim type in error.
So that this can be corrected, please send an email to the DRO Admin Team who will make the correction..
Once this change has been made, you will then be able to vet/admit the claim.
• Occasionally a creditor may file a separate claim to the one that was created with the application. Where
there are two or more claims listed for the same creditor, these should be checked to determine whether
these are duplicate claims, or for different debts.
o If they are for the same debt, the claim that does not have a status of ‘Received’ should have its status
changed to ‘Duplicate’:
o In particular, care must be taken where debts have been passed to a debt collection agent to ensure
that they are not also claimed by the original creditor. In all cases where a debt collection agency has
Page 25 of 37Updated March 2021
filed a claim, you must verify who the original creditor was and ensure that the claim has not been
duplicated.
In cases where creditors state that there is no debt owed, it is a good idea to check that the debt is not listed in one
of the debtor’s alternative names.
Withdrawing Claims
You are able to withdraw a claim if a creditor advises that a debt has been paid in full or they no longer wish to
receive any further dividends. Evidence of this advice must be saved to the online file in OASIS.
In such cases you must add the reason for the withdrawal in the ‘Reason for change’ field on the claim screen and
link the evidence of the advice to the claim. This reduces future risk if the creditor or a debt collection agency later
registers another claim for the amount.
If a claim is withdrawn in error, it is not possible to re-instate the claim. In such cases, please advise the OA of the
error and we will be able to re-enter the claim onto the estate.
Page 26 of 37Updated March 2021
Rejected, Suspended and In Error claim status
In some cases a claim may be loaded to an incorrect estate or it is discovered that a debtor is not the debtor the
creditor has a claim against. In these cases the claim ‘Status’ should be changed to ‘In Error’ with an appropriate
explanation added to the ‘Comment’ field, with any documents/evidence saved to the online file and linked to the
claim in OASIS.
There may be times when you may need to suspend the payment of further dividends to a creditor due to
investigations or an after adjudication debt that you have agreed to include (these are not paid till after the creditors
who had debts at the date of the order have been paid). In these cases you can change the claim ‘Status’ to
‘Suspended’, with an appropriate explanation added to the ‘Comment’ field and any documents saved to the online
file and linked to the claim.
There may also be cases where you have decided that the claim is not appropriate and so you wish to reject it. In
these cases you have the option to change the Claim Status’ to ‘Rejected’ with an appropriate explanation added to
the ‘Comment’ field and any documents saved to the estate ‘Online File’ and linked to the claim.
If a claim has been rejected, the supervisor is required to notify the creditor in writing of their decision. Please
ensure to include the following in your correspondence; ‘If you wish to appeal this decision, please apply to the
Official Assignee in writing within 15 working days of this notification to have this decision reviewed’.
Important Tip
In all of these cases, it is important that you leave clear and concise notes in the comments section so that there is a
record of the reasoning behind the change in status.
Page 27 of 37Updated March 2021
Keeping the OASIS online file up to date
It is important that all client records are up to date and any documents are added to the Online File to provide a full
record on the individual estate. Some of these records will be viewable on the public register. With this in mind, please
be mindful of professionalism in any communications you upload to OASIS – any documents received into the system
may be requested as part of an Official Information or Personal Information Request by interested parties.
Updating debtor’s contact details in OASIS
To update your client’s contact information in OASIS select the debtors ‘Name’ hyperlink on the front page of the
estate:
Select ‘Add Contact Details’, then select the Address type you wish to add and add the new address, then select ‘Save’:
Page 28 of 37Updated March 2021
Important note
DO NOT over write any existing address. A new entry for each address must be added to show the history of
changes for auditing purposes.
Add Address:
Select ‘Add Contact Details’ then select the address type and start typing the address into the address box. When
the address you require shows up, select it, then hit ‘Save’. There are two further boxes which should be ticked
where appropriate.
• Address for Correspondence should be ticked if this is to be the clients main correspondence address
• Advised by Debtor should be ticked if the debtor has advised you of this change themselves.
Page 29 of 37Updated March 2021
When adding a new address, also select “Edit’ next to the old address and select the ‘Previous’ button at the top of
the screen and add an appropriate explanation in the ‘Reason for change’ field explaining why the address has been
changed. This will move the old address into the ‘Previous’ Contact Details for the estate.
If the preferred correspondence address is changing, ensure the ‘For Correspondence’ box is checked. This can be
seen in the ‘Correspondence’ column as below or the ‘Address for correspondence’ in the ‘Maintain Address’ screen.
This is important to ensure that any further correspondence being sent to the debtor will go to the correct
correspondence address.
Important note
It is important to include an email address as the main correspondence address as this is the fastest method of
communication.
Emailing updates or adding notes to OASIS
As mentioned earlier in the Evidence section, it is important that all file notes are added to the online file in OSIS. To
update the online file, send an email to (oasis3@insolvency.govt.nz). As with all communications submitted into
OASIS, the details in the subject line must be clear and include:
• the estate number with no gaps before it, followed immediately by a semi-colon (;)
• a meaningful subject heading after the semi-colon
For example, ‘Email to dr re missed payment’ or ‘Note of call to creditor BNZ’. The subject heading you enter will be
the title of the entry that will be seen on the online file. Therefore, to avoid confusion, it’s important to give a brief
but meaningful description of what the entry contains.
Important note:
If you are responding to an email which has been sent via OASIS, when you hit respond the subject line of your email
will have RE: before the estate number - this email will not automatically be sent to the online file as the subject line
no longer incudes the required information as out lined above.
To overcome this, ensure that the RE: is removed from the line when you are sending your response.
Page 30 of 37Updated March 2021
Trust Account
As a DRO Supervisor you are able to view payments your client has made into their estate. You can check the
account balance and transaction history for an individual estate at any time. This is helpful to ensure that your client
is maintaining the agreed payments and that the Order is on track.
Viewing Transactions and Balances
When you’re in an estate, select ‘Trust Account’ on the left hand menu of the estate. This will take you to the
Account Details screen for the estate you are in, which will open in a separate tab (1a).
This will take you to the Account Details screen showing the details of the estate including the current balance. You
can return to the main Overview screen at any time by selecting the Case Management button. This will however
open a new tab.
Page 31 of 37Updated March 2021
Transaction History
Select the Transaction History button to view all the processed transactions made on the estate.
You are able to export the transaction history if needed by selecting the Export button and following the onscreen
prompts.
Account Balances
To view the account balance select the Account Balance button.
Page 32 of 37Updated March 2021
This shows the full details of the account including the current balance of the client’s account.
Worksheet Approval (Final Approval)
By regulation, distributions to creditors must be completed six monthly. The OA will calculate the distribution taking
into account the application fee, Supervisor’s commission and Official Assignee’s commission. The OA will check the
dividend worksheet calculation and complete a first approval before requesting that you, as Supervisor, complete the
Final/Second Approval.
Final Approval involves checking & agreeing with the distribution and calculation of the worksheet. You will receive an
email as well as a task on your Dashboard when you have a worksheet to approve.
Viewing the Dividend Worksheet for Approval
From the home page of OASIS you can click on the blue Trust Accounting button at the top right hand corner of the
screen. This will take you to a landing page which says ‘Hello from Trust Accounting’.
From the dropdown list under ‘Dividends’ select ‘Search worksheet’.
Page 33 of 37Updated March 2021
Enter the estate number and select Search.
The Dividend Worksheet will be displayed. This will include details of the calculations the OA has already completed
in the Frist Approval.
You must check the following:
• Check all creditor payments are correct, using the Work Trans screen In the drop down list (as shown below)
• All deductions such as the application fee have been taken correctly.
• All claims have been entered correctly and ‘Admitted’ for the correct amount.
• The OA commission of 2.5% of receipts is calculated.
• The Supervisor commission of 7.5% receipts has been calculated correctly.
Example of the Work Trans Screen:
Page 34 of 37Updated March 2021
Approving the Workksheet.
When you are happy that the worksheet is correct, change the ’Worksheet status’ to ‘Final Approval’ from the
dropdown list. To complete the process select the Save button from the corner of the screen.
By approving the dividend worksheet you are taking responsibility for the fact that the distribution is correctly
calculated and the creditors are being paid the correct amounts.
Page 35 of 37Updated March 2021
Useful Tools and Reference Points for Supervisors
• Budget Calculator: This tool assists you to calculate a household’s weekly or monthly surplus or shortfall. The
categories in the budget tool are more detailed than the categories contained in the budget section of the
Statement of Affairs, which can be very useful in some circumstances.
• DRO Calculator: This tool assists you to calculate the costs and fees to be paid under the Order, based on the
percentage of payments to creditors. By adjusting the % of debt to pay, the amount of weekly payments or
the number of weekly payments, it’s possible determine the appropriate proposal to submit to creditors,
based on the debtor’s circumstances and financial capacity.
o The DRO calculator requires a weekly payment amount to be entered. When converting the monthly
amounts to weekly amounts, the monthly amounts must be multiplied by 12 then divided by 52 (not
divided by 4)
• DRO Dividend Check Spreadsheet: The DRO dividend check spreadsheet can be used to work out balances, to
calculate variation options or to check whether an Order is on track. A copy of this will be sent to you when you
are accepted to be a supervisor.
Below is an example of the spreadsheet & instructions on which fields to complete, along with a few notes on
particular issues that may cause discrepancies in the total calculations.
Cell B4 – From the Summary tab of the estate in OASIS3 (see below) you need to enter the Total Payments figure.
Cell B5 – From the Summary tab of the estate in OASIS3 you need to enter the Balance of funds on hand
Cell B6 – From the Summary tab of the estate in OASIS3 you need to enter the Admitted figure
Then enter following data:
• Cell B9 – Cents in the dollar of the Order
• Cell B10 – The instalment amount (amount paying each week / fortnight or month)
• Cell B11 – payments per year (eg 52 (Weekly) 26 (Fortnightly) or 12 (Monthly)
• Cell B12 – order end date
• Cell B15 – enter the total of all potential (non-joint) claims
Page 36 of 37Updated March 2021
• Cell B16 – enter the amount of any joint claims - This spreadsheet does not calculate the payments being made
or percentage by the partner.
Important note
Supervisors must check claims and manually add any potential and suspended claims to the Admitted figure in Cell B6.
Also any withdrawn claims that have received a dividend will need the dividend amount plus 10% to be removed from
the Total payment figure in Cell B4. A comment to explain each of these entries should be added to the spreadsheet.
If you have any queries or need any assistance, please call our Service Centre on Freephone 0508-467-658 or email
our DRO Team at dro@insolvency.govt.nz
Page 37 of 37You can also read