Decision Support Tool User Guide - Streamlined Contracting with NGOs - May 2014 Version 2.0
←
→
Page content transcription
If your browser does not render page correctly, please read the page content below
Streamlined Contracting with
           NGOs

Decision Support Tool
     User Guide

                           May 2014
                          Version 2.0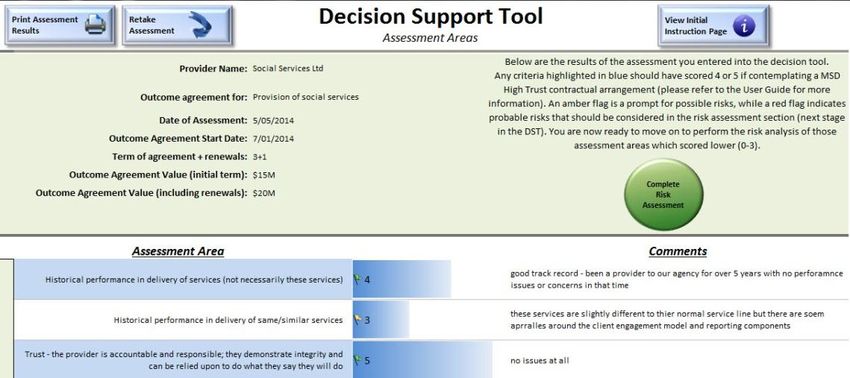
Government Procurement Branch | Ministry of Business, Innovation and Employmen t
PO Box 1473 | Wellington | New Zealand | http://www.mbie.govt.nz | http://www.procurement.govt.nz
Crown            This work is licensed under the Creative Commons Attribution-Non-commercial-Share Alike 3.0 New Zealand
                 License. In essence you are free to copy, distribute and adapt the work non-commercially, as long as you
Copyright
                 attribute the work to the Crown and abide by the other licence terms. To view a copy of this license, visit
                 http://www.creativecommons.org.nz Please note that no departmental or governmental emblem, logo or Coat
                 of Arms may be used in any way that infringes any provision of the Flags, Emblems, and Names Protection Act
                 1981. Attribution to the Crown should be in written form and not by reproduction of any such emblem, logo or
                 Coat of Arms.

                                                                                                                            1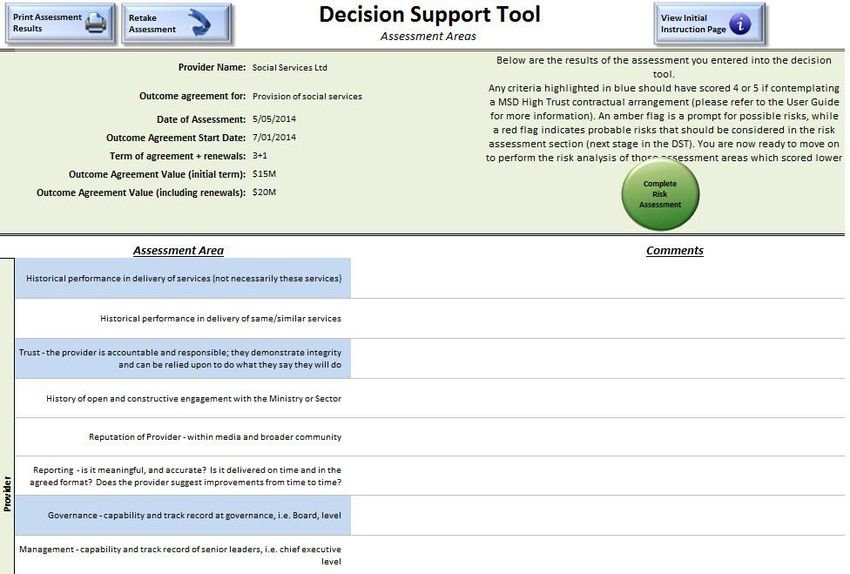
Contents

   Introduction ........................................................................................ 3

   The Decision Support Tool ................................................................. 3

   Navigating within the Decision Support Tool ...................................... 4

   Getting started ................................................................................... 5

   Completing a risk assessment ........................................................... 5

   Printing the risk assessment ............................................................ 11

   Approaches to using the DST .......................................................... 12

   Sharing your DST analysis with the NGO......................................... 14

                                                                                                             2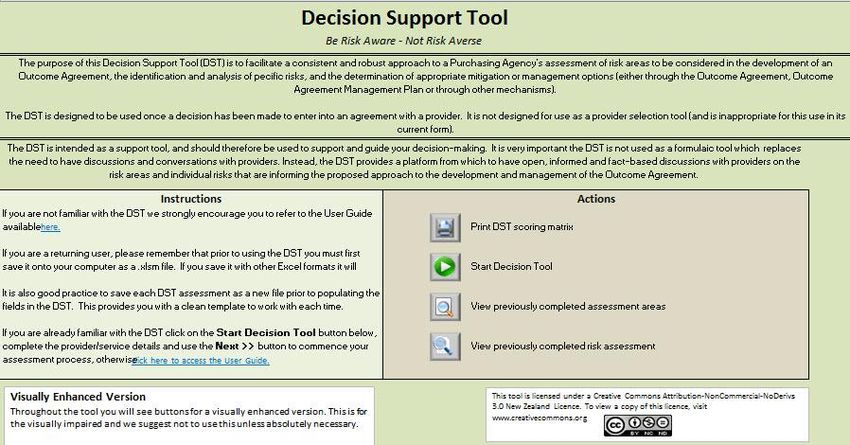
Introduction
The Decision Support Tool (DST) is a risk assessment tool developed as part of
the Streamlined Contracting with NGOs contracting framework. The DST is
intended to support and guide contract managers in identifying, evaluating and
managing/mitigating risks associated with the provision of services by a non-
government organisation (NGO) provider.
The DST should be used as the first step in the development of an outcome
agreement and/or outcome agreement management plan with an NGO.
It is particularly important to note the DST is not designed for, and is not suitable
for use in the evaluation or selection of an NGO provider to undertake a service.
Accordingly it should not be used for that purpose.
As matter of good practice, the outcome of a DST assessment should be shared
with the NGO. Not only is it a useful aid in demonstrating a rigour and
objectivity to the contracting and contract management approach being planned
by the agency, it also provides the basis for an open and informed discussion
with the NGO regarding the identified risks and the planned management
actions or mitigations.
The Decision Support Tool
Introduction The DST is an excel based tool that consists of three work sheets. These are:
Decision Support Tool
DST_Assessment,
Risk_Assessment, and
DST Scoring Guide.
You are able to move between these work sheets by clicking on the different
tabs at the bottom of the screen
or
by using the navigation built into the tool. Navigation and functions within the
DST are described in the following sections of this User Guide.
There are different approaches that may be taken when using the DST in
practice, particularly when looking to use it in a group situation. Some guidance
on these different approaches and how to get the most out of the DST is
provided in the section Approaches to using the DST.
3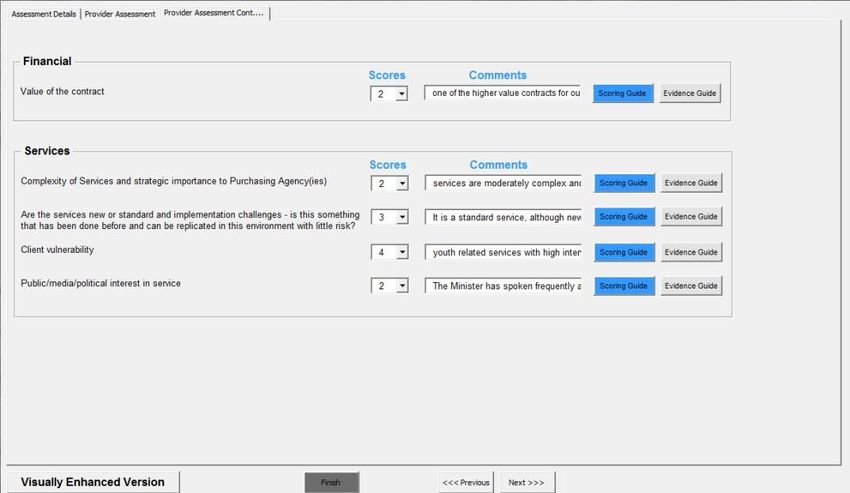
Navigating within the Decision Support Tool

Introduction   The following buttons are used throughout this tool:

                       Action Button                               Description
                                                 Start Decision Tool button takes you to the
                                                 Decision Support Tool window

                                                 Print DST Scoring Guide prints an A3 copy of the
                                                 scoring descriptors for each assessment area.
                                                 The print button automatically prints to your
                                                 default printer

                                                 View Previously Completed Assessment Areas
                                                 button takes you to the DST_Assessment sheet.
                                                 Note: If you have previously undertaken an
                                                          assessment your scores and comments
                                                          will be shown
                                                 View Previously Completed Risk Assessment
                                                 button takes you to the Risk_Assessment sheet.
                                                 Note: If you have previously undertaken a risk
                                                          assessment the details will be shown
                                                 Next takes you to the next tab within the sheet
                                                 you are currently completing
                                                 Previous takes you to the previous tab within the
                                                 sheet you are currently completing
                                                 Finish submits the data you have entered and
                                                 closes the sheet
                                                 Visually Enhanced Version button can be used
                                                 for people who are visually impaired.
                                                 Note: Some navigation functionality is lost
                                                          when using this mode
                                                 Scoring Guide button provides you with a
                                                 guideline on scoring your assessment
                                                 Evidence Guide button provides suggestions on
                                                 source documents or prior knowledge that will
                                                 support your assessment
                                                 Complete Risk Assessment button takes you to
                                                 the Risk Assessment window

                                                 Print Assessment Results button prints a user
                                                 friendly version of the sheet displayed

                                                 Retake Assessment button enables you to
                                                 access and make changes to the sheet you are
                                                 working on
                                                 View Initial Instruction Page takes you to the
                                                 Decision Support Tool sheet

                                                 View Assessment Areas Page takes you to the
                                                 DST_Assessment sheet

                                                                                                   4
Getting started
How to The DST can be downloaded from the Government Procurement website by
access the clicking here. Prior to using the tool you must first save it onto your computer as
DST a xlsm file. If you save it with other Excel formats it will affect the functionality.
It is also good practice to save each risk assessment as a new file prior to
populating the fields in the DST. This provides you with a clean template to
work with each time.
Completing a risk assessment
Steps Follow these steps to complete a risk assessment for an NGO provider.
1. To commence a risk assessment, open the DST template document and
click on the Start Decision Tool button in the Decision Support Tool
sheet.
Result: The Assessment Details tab in the Decision Support Tool
window is displayed.
2. Complete the following fields:
Provider name
Outcome agreement for
Date of assessment
Outcome agreement start date
Term of agreement + renewals
Outcome agreement value (initial term)
Outcome agreement value (inc renewals)
Continued on next page
5Completing a risk assessment, Continued
Click the button.
Result: The Provider Assessment tab of the Decision Support Tool
window is displayed.
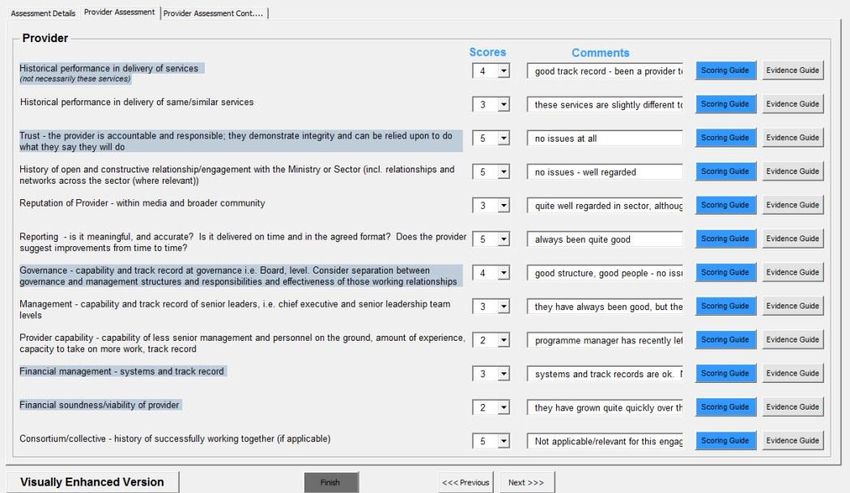
3. For each provider statement select an initial assessment score and
provide comments to support your score. To assist when completing click
on the and buttons.
Continued on next page
6Completing a risk assessment, Continued
Note: The five highlighted statements relate directly to the High Trust
Contracting Model currently in use at the Ministry of Social
Development. To be considered a High Trust Provider the initial
assessment scores for each highlighted statement should be at
least a 4 or 5. An Outcome Agreement with a High Trust Provider
would typically reflect reduced monitoring/reporting
frequency/obligations, possibly upfront payment and a more open
and trusting relationship. I.e. the provider can be relied upon to pick
up the phone if there is a problem or issue, even if it is of their
making.
Click the button.
Result: The Provider Assessment Cont…. tab of the Decision
Support Tool window is displayed.
4. For each financial and services statement select an initial assessment
score and provide comments to support your score. To assist when
completing click on the and buttons.
Click the button.
Result: A Microsoft Excel dialog box is displayed.
5. Click the button.
Result: The DST_Assessment sheet is displayed.
Continued on next page
7Completing a risk assessment, Continued
6. Coloured flags ( ) are used alongside the initial assessment scores to
highlight possible (amber flag) and probable (red flag) risk areas. Any
assessment areas which scored 0-3 should be considered in the Risk
Assessment section.
7. Print a copy of this sheet (DST_Assessment sheet) for referring to
during the next step. To print click on the Print Assessment Results
button.
The print button automatically prints to your default printer.
8. Click the Complete Risk Assessment button.
Result: The Risk Assessment - Provider Page 1 tab in the Risk
Assessment window is displayed.
9. For each Risk Area complete the following:
Include? – select Yes or No from the drop-down box to specify
whether this risk area is to be included in the assessment
Continued on next page
8Completing a risk assessment, Continued
Risk Description – type in the risk description including what might
happen for that risk
Note: The template contains example text to guide you in your
structuring of the risk description. When describing a risk it
is important to include the elements of cause (because of
….), effect (there is a risk that …) and impact (which
results in ….) in your risk description
Likelihood – select the likelihood of the risk occurring from the drop-
down box
Impact – select the impact of the risk from the drop-down box
Risk Rating – the risk rating (low, medium or high), is automatically
calculated based on the likelihood and impact selected Refer to the
Risk Matrix tab to see the full risk rating matrix.
Mitigation/Management in relation to the Outcome Agreement –
specify the mitigation and management of the risk. These should be
considered in more detail in the relevant sections of the OA, e.g.
monitoring and reporting, payment preconditions, etc.
Mitigation/Management in relation to the Outcome Agreement
Management Plan – specify the mitigation and management of the
risk. These should be considered in more detail in the relevant
sections of the OAMP, e.g. meeting agenda/frequency,
communications plan, etc
Click the button on completion of each risk area page.
Result: The next Risk Assessment tab is displayed.
10. Repeat Step 9 for the remaining tabs.
Note: The Additional Risks tab (highlighted below) enables you to add
any further risks that are not covered in the predefined risk areas
(e.g. intellectual property), or if you had a second risk associated
with one of the predefined risk areas you would also add it here.
Click the button.
Result: A Microsoft Excel dialog box is displayed.
Continued on next page
9Completing a risk assessment, Continued
Click the button.
Result: The Risk_Assessment sheet is displayed.
11. Save the Risk Assessment as a xlsm spreadsheet.
10Printing the risk assessment
How to print To print the Assessment Areas click on the DST_Assessment sheet tab and
the risk click on the Print Assessment Results button.
assessment
To print the Risk Assessment click on the Risk_Assessment sheet tab and
click on the Print Assessment Results button
The print buttons automatically print to your default printer.
If you wish to print to a PDF output, simply use the normal Excel print functions
and select PDF as your printer option.
11Approaches to using the DST
Using the DST Using the DST in an individual setting would typically mean stepping through the
as an assessments, entering the information directly onto your PC.
individual
The outputs of the assessment can then be printed as stand-alone documents
or embedded into another document using standard Microsoft copy and paste
commands.
Using the DST One of the key benefits of the DST is as a “thought alignment” tool when used
in a group with a group of agency personnel. This “thought alignment” comes from
setting working through the assessment and risk analysis process in a structured and
logical way, using objective and fact based information to form a collective view
as to the risks that exist, including their probability and impact of occurrence.
Of course consensus cannot always be achieved, in which case suggested
approaches for dealing with this scenario are at step 3 on page 12.
When using the DST with a group it is most effective when the facilitator or lead
person has worked through the DST in advance and done some preliminary
thinking on the assessment areas and some of the issues or views that are
likely to be raised during the workshop.
Group The following is a suggested approach when working through the DST as a
approach group:
guideline
1. Fill out the header information for the assessment, ensuring the remainder
of the template is blank.
2. Print out the Assessment sheet and give a copy to each workshop
attendee.
Talk through the content of the header information, ensuring each
attendee has a good understanding of the services, term, contract
volumes and contract value.
Note: This discussion is important because it provides the context for the
assessment exercise.
Continued on next page
12Approaches to using the DST, Continued
3. Work through each of the assessment areas as a group, capturing
comments and scores.
Note: The facilitator’s role here is to test and challenge comments, to
ensure they are factual, objective and relevant. It is also important
the facilitator looks to draw out comments from quieter members of
the workshop. The facilitator should also test the currency of
comments, e.g. are they based on a 5-year old experience or more
recent experience?
Once the discussion on each assessment area has been concluded a
score can be allocated. This should be done on the master sheet held by
the facilitator (either using a hard copy or, if available, a pc/laptop and
data projector).
When initially asking for scores, use statements such as “what would
be your starter score? This send the message that the score is not a
‘stake in the ground’ (from which people can be reluctant to move), but
just a starting position, from which movement is expected.
If you are not able to reach a consensus then record the majority
score in the score section and note the non-consensus score in the
comments section, along with the relevant supporting comment. If
the scoring position is evenly split, then enter the lowest score,
recognising the lower scores are a prompt for more detailed
consideration of applicable risks, i.e. a low score is not in itself ‘bad’ or
‘a problem’.
It is also important the word picture in the comments section aligns
with the allocated score.
Note: This step would typically take about 30 minutes to work through.
4. Identify and agree those assessment areas/scores which require more
detailed analysis of risks. (This is where the data projector helps, as you
can quickly key in the scores and show the graph.)
5. Using a whiteboard, workshop the risk descriptions, likelihood,
consequence overall risk ratings and mitigations/management options.
Note: The facilitator should be familiar with the range of
mitigation/management options that exist, e.g. frequency of
monitoring, reporting, auditing, reporting detail, payment profile,
additional conditions, etc and be prepared to propose these
mitigations/management options where appropriate.
Remember, when looking to describe a risk you should include the three
elements of cause, effect and impact. One simple way to do this is to
write your risk descriptions as follows:
Because of ……. there is a risk that ….….. which results in ……..
6. At the end of the workshop your whiteboard output can be written into the
DST for saving/printing and circulation to each attendee for their records.
13Sharing your DST analysis with the NGO
Why you Once you have used the DST to lead you through the structured objective
should share assessment of risks and intended management or mitigation options you are
the DST strongly encouraged to share the output of the DST analysis and the resulting
analysis with influence on the content of the outcome agreement and outcome agreement
the NGO management plan with the NGO.
Sharing the output of the DST analysis will demonstrate the rigour and
objectivity the agency is taking to the contracting and contract management
approach being planned. It also provides the basis for a more open and
informed discussion with the NGO regarding the identified risks and the planned
management actions or mitigations. Having these discussions and the results
of them should deliver a better shared understanding of the risks and
opportunities and more effective service delivery.
14You can also read