DGC-2020ES Digital Genset Controller - Quick Start Instruction Manual - Basler Electric
←
→
Page content transcription
If your browser does not render page correctly, please read the page content below
DGC-2020ES
                              Digital Genset Controller
                                                      Quick Start Instruction Manual

12570 Route 143 • Highland, Illinois 62249-1074 USA                  Publication
Tel +1 618.654.2341 • Fax +1 618.654.2351                         9469200993, Rev B
www.basler.com • info@basler.com
                                                                    November 2019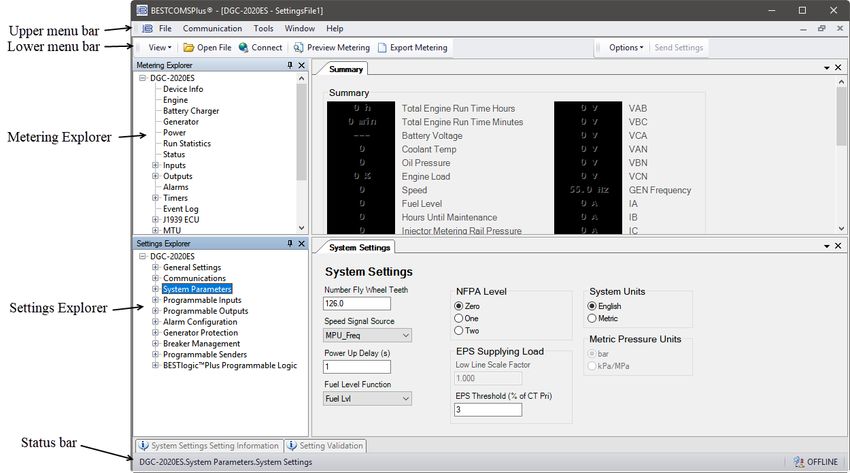
WARNING: California's Proposition 65 requires special warnings for
products that may contain chemicals known to the state of California to
cause cancer, birth defects or other reproductive harm. Please note that
by posting this Proposition 65 warning, we are notifying you that one or
more of the Proposition 65 listed chemicals may be present in products
we sell to you. For more information about the specific chemicals found
in this product, please visit https://www.basler.com/Prop65.
9469200993                                                                                             i

Preface
This instruction manual provides basic installation and setup information for the DGC-2020ES Digital
Genset Controller. To accomplish this, the following information is provided:
    • Mounting
    • Terminals and connectors
    • Typical applications
    • BESTCOMSPlus® software
    • Configuration
    • BESTlogic™Plus
    • Controls and indicators

Conventions Used in this Manual
Important safety and procedural information is emphasized and presented in this manual through
Warning, Caution, and Note boxes. Each type is illustrated and defined as follows.

                                              Warning!

                 Warning boxes call attention to conditions or actions that may cause
                 personal injury or death.

                                               Caution
                 Caution boxes call attention to operating conditions that may lead to
                 equipment or property damage.

                                                 Note
                 Note boxes emphasize important information pertaining to Digital
                 Genset Controller installation or operation.

DGC-2020ES Instruction Manual Catalog
Available instruction manuals for the DGC-2020ES are listed in Table 1.
                                       Table 1. Instruction Manuals
                         Part Number                        Description
                     9469200993              Quick Start (this manual)
                     9469200994              Installation
                     9469200995              Configuration
                     9469200996              Operation
                     9469200997              Accessories

DGC-2020ES                                                                                       Preface
ii 9469200993
12570 State Route 143
Highland IL 62249-1074 USA
www.basler.com
info@basler.com
Tel: +1 618.654.2341
Fax: +1 618.654.2351
© 2019 by Basler Electric
All rights reserved
First printing: April 2017
Warning!
READ THIS MANUAL. Read this manual before installing, operating, or maintaining the DGC-2020ES.
Note all warnings, cautions, and notes in this manual as well as on the product. Keep this manual with
the product for reference. Only qualified personnel should install, operate, or service this system.
Failure to follow warning and cautionary labels may result in personal injury or property damage.
Exercise caution at all times.
Basler Electric does not assume any responsibility to compliance or noncompliance with national code, local code,
or any other applicable code. This manual serves as reference material that must be well understood prior to
installation, operation, or maintenance.
For terms of service relating to this product and software, see the Commercial Terms of Products and Services
document available at www.basler.com/terms.
This publication contains confidential information of Basler Electric Company, an Illinois corporation. It is loaned for
confidential use, subject to return on request, and with the mutual understanding that it will not be used in any
manner detrimental to the interests of Basler Electric Company and used strictly for the purpose intended.
It is not the intention of this manual to cover all details and variations in equipment, nor does this manual provide
data for every possible contingency regarding installation or operation. The availability and design of all features
and options are subject to modification without notice. Over time, improvements and revisions may be made to this
publication. Before performing any of the following procedures, contact Basler Electric for the latest revision of this
manual.
The English-language version of this manual serves as the only approved manual version.
Preface DGC-2020ES9469200993 iii
Revision History
A historical summary of the changes made to this instruction manual is provided below. Revisions are
listed in reverse chronological order.
Visit www.basler.com to download the latest hardware, firmware, and BESTCOMSPlus® revision
histories.
Instruction Manual Revision History
Manual
Change
Revision and Date
B, Nov-19 • Removed Rev Letter from all pages
• Changed sequential numbering to sectional numbering
• Moved Instruction Manual Revision History into Preface
• Removed standalone Revision History chapter
A1, Apr-2019 • Added Prop 65 warning on back of cover page
A, Sep-2018 • Updated Revision History chapter
—, Apr-2017 • Initial release
DGC-2020ES Contentsiv 9469200993 Contents DGC-2020ES
9469200993                                                                                                                                                     v

Contents
Introduction................................................................................................................................................. 1-1
Mounting..................................................................................................................................................... 2-1
Terminals and Connectors ......................................................................................................................... 3-1
Typical Connections ................................................................................................................................... 4-1
BESTCOMSPlus® ...................................................................................................................................... 5-1
Configuration .............................................................................................................................................. 6-1
BESTlogic™Plus ........................................................................................................................................ 7-1
Controls and Indicators .............................................................................................................................. 8-1
Troubleshooting ......................................................................................................................................... 9-1

DGC-2020ES                                                                                                                                         Contents
vi         9469200993

Contents   DGC-2020ES
9469200993                                                                                               1-1

1 • Introduction
This manual provides basic installation and setup information for the DGC-2020ES Digital Genset
Controller. For complete information, refer to the appropriate DGC-2020ES instruction manual.

                                               Caution
                 This Quick Start manual is intended for use by qualified personnel
                 only.

Default Settings
Each DGC-2020ES is delivered with default settings that are based on average values and may not be
appropriate for your application. All settings must be properly configured for your application before
running the engine-generator set.

                                              Warning!
                 Do not place the DGC-2020ES controller into service until all settings
                 have been properly configured.

Features and Functions
The DGC-2020ES Digital Genset Controller provides integrated engine-genset control, protection, and
metering in a rugged and economical package. Its features set make the DGC-2020ES ideal for
standalone genset applications where paralleling or load sharing is not required. Microprocessor based
technology allows for exact measurement, setpoint adjustment, and timing functions. Front panel controls
and indicators enable quick and simple DGC-2020ES operation. Basler Electric communication software
(BESTCOMSPlus®) allows units to be easily customized for each application. Because of the low sensing
burden in the DGC-2020ES, dedicated potential transformers (PTs) are not required. A liquid crystal
display (LCD) with backlighting can be viewed under a wide range of ambient light and temperature
conditions.
The DGC-2020ES Digital Genset Controller has the following features:
   • Generator Control
   • Engine and Generator Protection
   • Automatic Transfer Switch Control (Mains Failure)
   • Automatic Generator Configuration Detection
   • Programmable Analog Engine Senders
   • Seven Programmable Contact Inputs
   • Programmable Logic
   • Exercise Timer
   • ECU Communications via SAE J1939
   • Additional contact input/output module available to expand the capabilities of the DGC-2020ES
DGC-2020ES Digital Genset Controllers perform the following functions:

Generator Protection and Metering
Multifunction generator protection guards against generator overvoltage, undervoltage, reverse power,
loss of excitation, underfrequency, overfrequency, and overcurrent. Each generator protection function
has an adjustable pickup and time delay setting.
Metered generator parameters include voltage, current, real power (watts), apparent power (VA), and
power factor (PF).

DGC-2020ES                                                                                   Introduction
1-2 9469200993
Engine Protection and Metering
Engine protection features include oil pressure and coolant temperature monitoring, overcrank protection,
ECU specific protection elements, and diagnostic reporting.
Metered engine parameters include oil pressure, coolant temperature, battery voltage, speed, fuel level,
engine load, coolant level (from ECU), ECU specific parameters, and run-time statistics.
Event Recording
An event log retains a history of system events in nonvolatile memory. Up to 30 event types are retained
and each record contains a time stamp of the first and last occurrence, and the number of occurrences for
each event.
Contact Inputs and Outputs
DGC-2020ES controllers have seven programmable contact inputs. All contact inputs recognize dry
contacts. The programmable inputs can be configured to initiate a pre-alarm or alarm. An input can be
programmed to receive an input from an automatic transfer switch. Inputs can also be programmed to
override DGC-2020ES alarms and protection functions. Each input can be assigned a user-defined name
for easy identification at the front panel display and in fault records.
Output contacts include three dedicated relays for energizing an engine’s glow plugs, fuel solenoid, and
starter solenoid. Four additional user-programmable output contacts are provided.
Additional contact inputs and output contact requirements can be accommodated with an optional CEM-
2020 (Contact Expansion Module). Contact Basler Electric for ordering information.
Automatic Transfer Switch Control (Mains Failure)
The DGC-2020ES can detect a mains failure via a single- or three-phase bus input. A mains failure is
established when any one of the following conditions are met:
• Any phase of bus voltage falls below dead the bus threshold
• Any phase of bus voltage is unstable due to overvoltage or undervoltage
• Any phase of bus voltage is unstable due to overfrequency or underfrequency
At this time, the DGC-2020ES will start the genset and when ready, apply power to the load via the
genset. The DGC-2020ES implements open transitions to and from the mains. When the mains returns
and is considered stable, the DGC-2020ES will transfer the load back to the mains.
Communication
DGC-2020ES communication features include a standard USB port for local (and temporary)
communication, SAE J1939 interface for remote communication, and RS-485 interface for communication
with an optional Remote Display Panel.
USB Port
The USB communication port can be used with BESTCOMSPlus software to quickly configure a DGC-
2020ES with the desired settings or retrieve metering values and event log records.
CAN Interface
The CAN interface provides high-speed communication between the DGC-2020ES and the engine
control unit (ECU) on an electronically controlled engine. This interface provides access to oil pressure,
coolant temperature, and engine speed data by reading these parameters directly from the ECU. When
available, engine diagnostic data can also be accessed. The CAN interface supports the following
protocols:
• SAE J1939 Protocol - Oil pressure, coolant temperature, and engine speed data are received
from the ECU. In addition, DTCs (Diagnostic Trouble Codes) help diagnose any engine or related
failures. The engine DTCs are displayed on the front panel of the DGC-2020ES and may be
obtained using BESTCOMSPlus® software.
Introduction DGC-2020ES9469200993 1-3
• MTU Protocol - A DGC-2020ES connected to a genset equipped with an MTU ECU receives oil
pressure, coolant temperature, and engine speed data from the engine controller, along with
various alarms and pre-alarms that are MTU specific. In addition, the DGC-2020ES tracks and
displays the active fault codes issued by the MTU engine ECU.
Style Number
Standard-order DGC-2020ES controllers are identified by a style number which consists of a combination
of letters and numbers that define the controller’s electrical characteristics and operational features. The
model number, together with the style number, describes the options included in a specific controller.
Figure 1-1 illustrates the DGC-2020ES style number identification chart.
Figure 1-1. DGC-2020ES Style Chart
For example, a DGC-2020ES with style number 5A2, has the following characteristics and features.
5 5 Aac Current Sensing Inputs
A Analog Senders
2 Mains Failure Detection
Optional Features and Capabilities
CEM-2020 (Contact Expansion Module)
The optional CEM-2020 provides 10 additional contact inputs and 18 or 24 additional output contacts
(depending on module type) to the DGC-2020ES. The CEM-2020 communicates with the DGC-2020ES
through a CAN interface. Refer to the CEM-2020 chapter in the Accessories manual for more information.
Remote Display Panel
The optional Remote Display Panel provides remote indication of many pre-alarm and alarm conditions.
The DGC-2020ES communicates with the Remote Display Panel through an RS-485 interface. Refer to
the Communication chapter in the Configuration manual for more information.
DGC-2020ES Introduction1-4 9469200993 Introduction DGC-2020ES
9469200993                                                                                                   2-1

2 • Mounting
DGC-2020ES controllers are delivered in sturdy cartons to prevent shipping damage. Upon receipt of a
unit, check the part number against the requisition and packing list for agreement. Inspect for damage,
and if there is evidence of such, immediately file a claim with the carrier and notify the Basler Electric
regional sales office or your sales representative.
If the device is not installed immediately, store it in the original shipping package in a moisture- and dust-
free environment.

Hardware
The front panel is resistant to moisture, salt fog, humidity, dust, dirt, and chemical contaminants. DGC-
2020ES controllers are mounted using the four permanently attached 10-24 studs. The torque applied to
the mounting hardware should not exceed 20 inch-pounds (2.2 newton meters).

Dimensions
Panel cutting and drilling dimensions are shown in Figure 2-1. Overall dimensions are shown in Figure
2-2. All dimensions are shown in inches with millimeters in parenthesis.

                                                            7.635 (194.0) max
                                                            7.615 (193.4) min
    0.218 (5.5) diameter                                    7.433 (188.8) max
                                                            7.393 (187.8) min                      0.242 (6.2) max
                                                                                                   0.182 (4.6) min

           5.433 (138) max
           5.393 (137) min

                                                             CUTOUT
5.635 (143.2) max
5.615 (142.6) min

                                                                                                   0.320 (8.1) max
                                                                                                   0.280 (7.1) min

                                                                                          45°
                    0.242 (6.2) max
                    0.182 (4.6) min                                                                        P0067-98

                                      Figure 2-1. Panel Cutting and Drilling Dimensions

DGC-2020ES                                                                                            Mounting
2-2 9469200993
Figure 2-2. Overall Dimensions
Mounting DGC-2020ES9469200993 3-1
3 • Terminals and Connectors
All DGC-2020ES terminals and connectors are located on the rear panel. DGC-2020ES terminals consist
of a mini-B USB socket and plug-in connectors with spring clamp terminals.
Figure 3-1 illustrates the rear panel terminals. Locator letters in the illustration correspond to the terminal
block and connector descriptions in Table 3-1.
Figure 3-1. Rear Panel
DGC-2020ES Terminals and Connectors3-2 9469200993
Table 3-1. Rear Panel Terminal and Connector Descriptions
Locator Description
A The majority of external, DGC-2020ES wiring is terminated at 8- or 15-position
connectors with spring clamp terminals. These connectors plug into headers on the
DGC-2020ES. The connectors and headers have a dovetailed edge that ensures
proper connector orientation. Each connector and header is uniquely keyed to ensure
that a connector mates only with the correct header. Spring clamp terminals accept a
maximum wire size of 12 AWG.
B The mini-B USB socket mates with a standard USB cable and is used with a PC
running BESTCOMSPlus® software for local communication with the DGC-2020ES.
Note
Be sure that the DGC-2020ES is hard-wired to earth ground with no
smaller than 12 AWG copper wire attached to the chassis ground
terminal (terminal 16) on the rear of the controller.
Operating power from the battery must be of the correct polarity.
Although reverse polarity will not cause damage, the DGC-2020ES will
not operate.
For the DGC-2020ES to correctly meter power factor, the generator
must be rotating clockwise (A-B-C).
Terminals and Connectors DGC-2020ES9469200993 4-1
4 • Typical Connections
Typical connection diagrams are provided in this chapter as a guide when wiring the DGC-2020ES for
communication, mechanical senders, contact inputs and outputs, sensing, and control power.
Connections for Typical Applications
Typical connections for applications using three-phase wye, three-phase delta, single-phase AB, and
single-phase AC generator voltage sensing are shown on the following pages.
Figure 4-1 illustrates typical three-phase wye generator voltage sensing connections.
GEN CKT MAINS CKT
BKR L BKR
L1
O A
GENERATOR L2 A B
≤ 480V
L3 D
C
N
N
1 1 1
38 37 36 35 34 33 45 43 41 40 46 48 50
M 2
P
IA+
IA–
IB+
IB–
IC+
IC–
GEN VA
GEN VB
GEN VC
GEN VN
BUS VA
BUS VB
BUS VC
P0071-48
U
32 MPU+
25
31 MPU–
OUT 1 26
52 OIL OUT 2 27
3
Analog 53 COOLANT
Senders
1 FUEL 28
2 SENDER COM DGC-2020ES OUT 3 29
4
OUT 4 30
9 INPUT 7
GLOW PLUGS
5
8 INPUT 6 PRE 24 6
To ECU
7 INPUT 5 23 Power or
Key-on
Terminal
6 INPUT 4
Mini-B FUEL
5 INPUT 3 RUN 22
USB SOLENOID
5
4 INPUT 2 21
485 SHIELD
RDP TxD +
RDP TxD –
3
CHASSIS
7 Emergency Stop INPUT 1
SHIELD
BATT+
BATT–
CAN H
CAN L
START
START 20 SOLENOID
5
13 14 15 10 11 12 16 17 18 19
6
To ECU
CAN bus
12/24V
1 Current inputs are 1A or 5A, depending on style. 5 If component is under ECU control, do not connect to DGC-2020ES.
Bus sensing inputs are optional, depending on style. Connect to the ECU on an electronically controlled engine when the
2 6 DGC-2020ES has the J1939 CAN interface option (style xCx).
Oil pressure and coolant temperature senders are only available when Labels indicate the functions assigned by the default programmable
3 7
the DGC-2020ES has the Analog Senders option (style xAx). The fuel logic to the contact inputs.
sender is always available.
4 Connect near engine block (negative battery terminal) side of senders.
Figure 4-1. Three-Phase Wye Connections for Typical Applications
DGC-2020ES Typical Connections4-2 9469200993
Figure 4-2 illustrates typical three-phase delta generator voltage sensing connections.
GEN CKT MAINS CKT
BKR L BKR
L1
O A
GENERATOR L2 A B
≤ 480V
L3 D
C
N
N
1 1 1
38 37 36 35 34 33 45 43 41 40 46 48 50
M 2
P
IA+
IA–
IB+
IB–
IC+
IC–
GEN VA
GEN VB
GEN VC
GEN VN
BUS VA
BUS VB
BUS VC
P0071-49
U
32 MPU+
25
31 MPU–
OUT 1 26
52 OIL OUT 2 27
3
Analog 53 COOLANT
Senders
1 FUEL 28
2 SENDER COM DGC-2020ES OUT 3 29
4
OUT 4 30
9 INPUT 7
GLOW PLUGS
5
8 INPUT 6 PRE 24 6
To ECU
7 INPUT 5 23 Power or
Key-on
Terminal
6 INPUT 4
Mini-B FUEL
5 INPUT 3 RUN 22
USB SOLENOID
5
4 INPUT 2 21
485 SHIELD
RDP TxD +
RDP TxD –
3
CHASSIS
7 Emergency Stop INPUT 1
SHIELD
BATT+
BATT–
CAN H
CAN L
START
START 20 SOLENOID
5
13 14 15 10 11 12 16 17 18 19
6
To ECU
CAN bus
12/24V
1 Current inputs are 1A or 5A, depending on style. 5 If component is under ECU control, do not connect to DGC-2020ES.
Bus sensing inputs are optional, depending on style. Connect to the ECU on an electronically controlled engine when the
2 6 DGC-2020ES has the J1939 CAN interface option (style xCx).
Oil pressure and coolant temperature senders are only available when Labels indicate the functions assigned by the default programmable
3 7
the DGC-2020ES has the Analog Senders option (style xAx). The fuel logic to the contact inputs.
sender is always available.
4 Connect near engine block (negative battery terminal) side of senders.
Figure 4-2. Three-Phase Delta Connections for Typical Applications
Typical Connections DGC-2020ES9469200993 4-3
Figure 4-3 illustrates typical single-phase A-B generator voltage sensing connections.
GEN CKT L MAINS CKT
BKR BKR
L1 O
A
L2
A
GENERATOR
≤ 480V D B
N
N
1 1
38 37 36 35 34 33 45 43 41 40 46 48 50
M 2
P
GEN VA
GEN VB
GEN VC
GEN VN
IA+
IA–
IB+
IB–
IC+
IC–
BUS VA
BUS VB
BUS VC
P0071-50
U
32 MPU+
25
31 MPU–
OUT 1 26
52 OIL OUT 2 27
3
Analog 53 COOLANT
Senders
1 FUEL 28
2 SENDER COM DGC-2020ES OUT 3 29
4
OUT 4 30
9 INPUT 7
GLOW PLUGS
5
8 INPUT 6 PRE 24 6
To ECU
7 INPUT 5 23 Power or
Key-on
Terminal
6 INPUT 4
Mini-B FUEL
5 INPUT 3 RUN 22
USB SOLENOID
5
4 INPUT 2 21
485 SHIELD
RDP TxD +
RDP TxD –
3
CHASSIS
7 Emergency Stop INPUT 1
SHIELD
BATT+
BATT–
CAN H
CAN L
START
START 20 SOLENOID
5
13 14 15 10 11 12 16 17 18 19
6
To ECU
CAN bus
12/24V
1 Curren t inputs ar e 1A or 5A, dep ending on style. 5 If co mp onent is unde r E CU co ntro l, do not con nect to DGC-202 0ES.
Bus se nsin g i nputs are optiona l, dep ending on style. Conne ct to th e E CU on an electro nica lly controlled en gine when the
2 6 DGC-202 0ES has the J193 9 CAN in terface option (style xCx).
Oil pressure and coolan t te mp erature se nders a re only availab le whe n Lab els ind icate th e functions a ssigne d b y th e d efa ult prog ramma ble
3 7
the DG C-202 0ES has the An alog Sen ders op tio n (style xA x). The fue l logi c to the co nta ct in puts.
sender is a lwa ys ava ilable.
4 Conne ct n ear engine bl ock (neg ative batte ry terminal) side of sende rs.
Figure 4-3. Single-Phase A-B Connections for Typical Applications
DGC-2020ES Typical Connections4-4 9469200993
Figure 4-4 illustrates typical single-phase A-C generator voltage sensing connections.
GEN CKT L MAINS CKT
BKR BKR
L1 O
A
L3
A
GENERATOR
≤ 480V D C
N
N
1 1
38 37 36 35 34 33 45 43 41 40 46 48 50
M 2
P
GEN VA
GEN VB
GEN VC
GEN VN
IA+
IA–
IB+
IB–
IC+
IC–
BUS VA
BUS VB
BUS VC
P0071-51
U
32 MPU+
25
31 MPU–
OUT 1 26
52 OIL OUT 2 27
3
Analog 53 COOLANT
Senders
1 FUEL 28
2 SENDER COM DGC-2020ES OUT 3 29
4
OUT 4 30
9 INPUT 7
GLOW PLUGS
5
8 INPUT 6 PRE 24 6
To ECU
7 INPUT 5 23 Power or
Key-on
Terminal
6 INPUT 4
Mini-B FUEL
5 INPUT 3 RUN 22
USB SOLENOID
5
4 INPUT 2 21
485 SHIELD
RDP TxD +
RDP TxD –
3
CHASSIS
7 Emergency Stop INPUT 1
SHIELD
BATT+
BATT–
CAN H
CAN L
START
START 20 SOLENOID
5
13 14 15 10 11 12 16 17 18 19
6
To ECU
CAN bus
12/24V
1 Curren t inputs ar e 1A or 5A, dep ending on style. 5 If co mp onent is unde r E CU co ntro l, do not con nect to DGC-202 0ES.
Bus se nsin g i nputs are optiona l, dep ending on style. Conne ct to th e E CU on an electro nica lly controlled en gine when the
2 6 DGC-202 0ES has the J193 9 CAN in terface option (style xCx).
Oil pressure and coolan t te mp erature se nders a re only availab le whe n Lab els ind icate th e functions a ssigne d b y th e d efa ult prog ramma ble
3 7
the DG C-202 0ES has the An alog Sen ders op tio n (style xA x). The fue l logi c to the co nta ct in puts.
sender is a lwa ys ava ilable.
4 Conne ct n ear engine bl ock (neg ative batte ry terminal) side of sende rs.
Figure 4-4. Single-Phase A-C Connections for Typical Applications
Typical Connections DGC-2020ES9469200993 4-5
CAN Connections
Typical CAN connections are shown in Figure 4-5 and Figure 4-6.
Note
1. If the DGC-2020ES is providing one end of the J1939 bus, a
120 ohm, ½ watt terminating resistor should be installed across
terminals 14 (CANL) and 13 (CANH).
2. If the DGC-2020ES is not providing one end of the J1939 bus, the
stub connecting the DGC-2020ES to the bus should not exceed
914 mm (3 ft) in length.
3. The maximum bus length, not including stubs, is 40 m (131 ft).
4. The J1939 drain (shield) should be grounded at one point only. If
grounded elsewhere, do not connect the drain to the DGC-
2020ES.
CEM-2020
(Optional)
Stub Bus
CAN-H
DGC-2020ES Engine
CAN-L
P0067-85
120 ohm 120 ohm
Termination Other Termination
Devices
Figure 4-5. CAN Interface with DGC-2020ES Providing One End of the Bus
CEM-2020
(Optional)
Stub Bus
CAN-H
Other
Engine
Devices
CAN-L
P0067-86
120 ohm 120 ohm
Termination Termination
DGC-2020ES
Figure 4-6. CAN Interface with Other Devices
DGC-2020ES Typical Connections4-6 9469200993
CEM-2020 Connections
The CEM-2020 (Contact Expansion Module) is an optional module that may be installed with the DGC-
2020ES. It is a remote auxiliary device that provides additional contact inputs and outputs for the DGC-
2020ES. This module interfaces to the DGC-2020ES via CAN, thus the CAN terminals are the only
common connections (Figure 4-7) between the DGC-2020ES and CEM-2020. Refer to the CEM-2020
chapter for more information.
Refer to Terminals and Connectors for details on DGC-2020ES CAN connections.
GND
CANH DGC-2020ES
CANL
GND/SHIELD
GND
CANH
CANH CEM-2020
CANL
CANL
P0067-87
Figure 4-7. DGC-2020ES and CEM-2020 CAN Connections
Installation for CE Systems
For CE compliant systems, it may be required to route ac voltage and current sensing wires separately
from other wires.
Installation in an Ungrounded System Application
When the DGC-2020ES is controlling equipment that is part of an ungrounded system, it is recommended
that potential transformers be employed on the voltage sensing inputs to provide full isolation between the
DGC-2020ES and monitored voltage phases.
Typical Connections DGC-2020ES9469200993 5-1
5 • BESTCOMSPlus®
BESTCOMSPlus provides the user with a point-and-click means to set and monitor the DGC-2020ES.
BESTCOMSPlus uses plugins, allowing the user to manage several different Basler Electric products.
The DGC-2020ES plugin must be activated before use. The plugin can be activated automatically by
connecting to a DGC-2020ES, or manually by requesting an activation key from Basler Electric.
Figure 5-1 illustrates the typical user interface components of the DGC-2020ES plugin with
BESTCOMSPlus.
Figure 5-1. Typical User Interface Components
Installation
Note
Do not connect a USB cable until setup completes successfully.
Connecting a USB cable before setup is complete may result in errors.
Download BESTCOMSPlus
DGC-2020ES controllers are delivered with a CD-ROM that contains BESTCOMSPlus software and
instruction manuals. If a CD-ROM is not available, use the following procedure to download
BESTCOMSPlus from the Basler Electric website.
1. Navigate to https://www.basler.com/Downloads.
2. Select DGC-2020ES from the model drop down menu.
3. Under the Software heading, click the download link for BESTCOMSPlus.
4. Sign in or create an account to continue with the download.
DGC-2020ES BESTCOMSPlus®5-2 9469200993
Install BESTCOMSPlus from CD
When BESTCOMSPlus installation is complete, a Basler Electric folder is added to the Windows
programs menu. This folder is accessed by clicking the Windows Start button and then accessing the
Basler Electric folder in the Programs menu. The Basler Electric folder contains an icon that starts
BESTCOMSPlus when clicked.
Activation of the DGC-2020ES Plugin
The DGC-2020ES plugin is a module that runs inside the BESTCOMSPlus shell. The DGC-2020ES
plugin contains specific operational and logic settings for only the DGC-2020ES. Uploading settings to the
DGC-2020ES is possible only after activating the DGC-2020ES plugin.
The DGC-2020ES plugin can be activated automatically or manually. Automatic activation is achieved by
using a USB cable to establish communication between the DGC-2020ES and BESTCOMSPlus. Manual
activation is initiated by contacting Basler Electric for an activation key and entering the key into
BESTCOMSPlus. Manual activation is useful if you want to create a settings file prior to receiving your
DGC-2020ES. Refer to Manual Activation of DGC-2020ES Plugin.
Connect a USB Cable
The USB driver was copied to your PC during BESTCOMSPlus installation and is installed automatically
after powering the DGC-2020ES. USB driver installation progress is shown in the Windows taskbar area.
Windows will notify you when installation is complete.
Connect a USB cable between the PC and your DGC-2020ES. Apply control power to the DGC-2020ES.
Wait until the boot sequence is complete.
Start BESTCOMSPlus® and Activate the DGC-2020ES Plugin Automatically
To start BESTCOMSPlus, click the Windows Start button, point to Programs, Basler Electric, and then
click the BESTCOMSPlus icon. During initial startup, the BESTCOMSPlus Select Language screen is
displayed (Figure 5-2). You can choose to have this screen displayed each time BESTCOMSPlus is
started, or you can select a preferred language and this screen will be bypassed in the future. Click OK to
continue. This screen can be accessed later by selecting Tools and Select Language from the menu bar.
Figure 5-2. BESTCOMSPlus Language Selection Dialog
The BESTCOMSPlus platform window opens. Select New Connection from the Communication pull-down
menu and select DGC-2020ES. See Figure 5-3. The DGC-2020ES plugin is activated automatically after
connecting to a DGC-2020ES.
BESTCOMSPlus® DGC-2020ES9469200993 5-3
Figure 5-3. Communication Pull-Down Menu
The DGC-2020ES Connection screen, shown in Figure 5-4, appears.
Figure 5-4. DGC-2020ES Connection Dialog
Select COM Port. The USB drivers are installed automatically during the BESTCOMSPlus installation
process. To select the correct COM Port, open the Windows Device Manager and expand the Ports
(COM & LPT) branch. Locate the device named CP2101 USB to UART Bridge Controller (COMx). The
COM Port number will be displayed in parenthesis (COMx). Be sure control power is applied to the DGC-
2020ES and the USB cable is connected before opening the Device Manager. See Figure 5-5.
Figure 5-5. Device Manager
The DGC-2020ES plugin opens indicating that activation was successful. You can now configure the
DGC-2020ES communication ports and other settings.
DGC-2020ES BESTCOMSPlus®5-4 9469200993
Installing the USB Driver if Automatic Installation Fails
To install the USB driver for the DGC-2020ES:
1. Apply control power to the DGC-2020ES and wait for the boot sequence to complete.
2. Connect a USB cable between the PC and DGC-2020ES.
3. The Found New Hardware Wizard dialog box appears.
4. Select “No, not this time” and select Next to continue.
5. Choose to “Install from a list or specific location (Advanced)” and select Next to continue.
6. Insert the CD-ROM labeled BESTCOMSPlus into the PC CD-ROM drive.
7. Navigate to C:\Program Files\Basler Electric\BESTCOMSPlus\USBDeviceDrivers\ and select
Next to continue.
When installation of the driver is complete, you may be asked to restart your computer.
Manual Activation of the DGC-2020ES Plugin
Manual activation of the DGC-2020ES plugin is required only if your initial use of BESTCOMSPlus will be
on a PC that is not connected to a DGC-2020ES. Manual activation is described in the following
paragraphs.
Requesting an Activation Key
When initially running the DGC-2020ES plugin, the Activate Device Plugin pop-up appears. You must
contact Basler Electric for an activation key before you can activate the DGC-2020ES plugin. You can
request an activation key through email or the Basler Electric website. Click either the Website or Email
button. Click the Activate button when you are ready to enter the activation key you received from Basler
Electric. The Activate Device Plugin pop-up appears. Refer to Figure 5-6.
Entering an Activation Key
Select DGC-2020ES from the Device pull-down menu. Enter your Email Address and Activation Key
provided by Basler Electric. If you received an email containing the Activation Key, you can select all of
the text in the email and copy it to the Windows clipboard using normal Windows techniques. The Get
Data button will extract the Device, Email Address, and Activation Key from the Windows clipboard and
paste it into the appropriate fields. Click the Activate button to continue. The Activate Device Plugin
screen is also found by selecting Activate Device from the Tools pull-down menu of the BESTCOMSPlus
main screen.
Figure 5-6. Activate Device Plugin
BESTCOMSPlus® DGC-2020ES9469200993 5-5
Establishing Communication
Communication between BESTCOMSPlus and the DGC-2020ES is established by clicking on the
Connect button on the DGC-2020ES Connection screen (see Figure 5-4) or by clicking on the Connect
button on the lower menu bar of the main BESTCOMSPlus screen (Figure 5-1). Download all settings
and logic from the DGC-2020ES by selecting Download Settings and Logic from the Communication pull-
down menu. BESTCOMSPlus will read all settings and logic from the DGC-2020ES and load them into
BESTCOMSPlus memory. See Figure 5-7.
Figure 5-7. Processing, Please Wait…
Advanced Properties
Click the Advanced button on the Connection screen to display the Advanced Properties dialog. Default
settings are shown in Figure 5-8.
Figure 5-8. Advanced Properties Dialog
DGC-2020ES BESTCOMSPlus®5-6 9469200993 BESTCOMSPlus® DGC-2020ES
9469200993                                                                                               6-1

6 • Configuration
The DGC-2020ES must be properly configured for operation with a specific application prior to running.
An incomplete list of basic settings to consider when configuring the DGC-2020ES is provided below with
their locations in BESTCOMSPlus and the front panel. Ensure that all settings required for your
application are configured in accordance with the generator/engine manufacturer(s) recommendations,
authority having jurisdiction, and customer requirements. For detailed information on all settings, refer to
the Configuration manual.

Basic Settings
For front panel interface components, refer to the Controls and Indicators chapter. For BESTCOMSPlus
interface components, refer to the BESTCOMSPlus Software chapter.

System Settings
    BESTCOMSPlus Navigation Path: Settings Explorer, System Parameters, System Settings
    Front Panel Navigation Path: Settings > System Parameters > System Settings

CAN Bus Setup
    BESTCOMSPlus® Navigation Path: Settings Explorer, Communications, CAN Bus, CAN Bus Setup
    Front Panel Navigation Path: Settings > Communication > CAN Bus 1 (I/O) Setup and CAN Bus 2
    (ECU) Setup

ECU Setup
    BESTCOMSPlus® Navigation Path: Settings Explorer, Communications, CAN Bus, ECU Setup
    Front Panel Navigation Path: Settings > Communication > CAN Bus 2 (ECU) Setup > ECU Setup

Rated Data
    BESTCOMSPlus Navigation Paths:
       Settings Explorer, System Parameters, Rated Data, Generator Rated Data
    Front Panel Navigation Paths:
       Settings > System Parameters > Rated Data, Gen

Remote Module Setup
    BESTCOMSPlus Navigation Path: Settings Explorer, System Parameters, Remote Module Setup
    Front Panel Navigation Path: Settings > System Settings > Remote Module Setup

Crank Settings
    BESTCOMSPlus Navigation Path: Settings Explorer, System Parameters, Crank Settings
    Front Panel Navigation Path: Settings > System Parameters > Crank Settings

Relay Control Settings
    BESTCOMSPlus Navigation Path: Settings Explorer, System Parameters, Relay Control
    Front Panel Navigation Path: Settings > System Parameters > Relay Control

Engine Sender Characteristic Curves Setup: Fuel, Temperature, and Oil
    BESTCOMSPlus® Navigation Path: Settings Explorer, Programmable Senders
    Front Panel Navigation Path: Not available through the front panel

Contact Inputs
    BESTCOMSPlus Navigation Path: Settings Explorer, Programmable Inputs, Contact Inputs
    Front Panel Navigation Path: Settings > Programmable Inputs > Contact Inputs

DGC-2020ES                                                                                     Configuration
6-2 9469200993
Programmable Functions
BESTCOMSPlus Navigation Path: Settings Explorer, Programmable Inputs, Programmable
Functions
Front Panel Navigation Path: Settings > Programmable Inputs > Programmable Functions
Programmable Output Configuration
BESTCOMSPlus® Navigation Path: Settings Explorer, Programmable Outputs, Contact Outputs
Front Panel Navigation Path: Settings Explorer > Programmable Outputs > Contact Outputs
Configurable Elements
BESTCOMSPlus® Navigation Path: Settings Explorer, Programmable Outputs, Configurable
Elements
Front Panel Navigation Path: Settings Explorer > Programmable Outputs > Configurable Elements
Generator Breaker Settings
BESTCOMSPlus® Navigation Path: Settings Explorer, Breaker Management, Breaker Hardware
Front Panel Navigation Path: Settings Explorer > Breaker Management > Breaker Hardware
Mains Breaker Settings
BESTCOMSPlus® Navigation Path: Settings Explorer, Breaker Management, Breaker Hardware
Front Panel Navigation Path: Settings Explorer > Breaker Management > Breaker Hardware
Generator Protection
BESTCOMSPlus Navigation Path: Settings Explorer, Generator Protection
Front Panel Navigation Path: Settings Explorer > Generator Protection
Saving Settings
Front Panel
When settings are configured through the front panel interface, they are automatically saved.
BESTCOMSPlus®
After the desired settings are configured in BESTCOMSPlus, the settings must be uploaded to a
connected DGC-2020ES. Refer to the following procedure to upload settings via BESTCOMSPlus.
1. Ensure that communication between a PC running BESTCOMSPlus and the DGC-2020ES is
established.
2. In the Upper Menu Bar, Click Communications > Upload Settings to Device
3. You are prompted to enter the password. The default password is “OEM”.
4. Press Enter or click Log In and the settings are uploaded to the connected DGC-2020ES.
Configuration DGC-2020ES9469200993 7-1 7 • BESTlogic™Plus BESTlogicPlus Programmable Logic is a programming method used for managing the input, output, protection, control, monitoring, and reporting capabilities of Basler Electric's DGC-2020ES Digital Genset Controller. BESTlogic™Plus Composition There are three main groups of objects used for programming BESTlogicPlus. These groups are I/O, Components, and Elements. For details on how these objects are used to program BESTlogicPlus, see the paragraphs on Programming BESTlogicPlus, later in this chapter. Logic Schemes A logic scheme is a group of logic variables written in equation form that defines the operation of a DGC- 2020ES Digital Genset Controller. Each logic scheme is given a unique name. This gives you the ability to select a specific scheme and be confident that the selected scheme is in operation. One logic scheme is configured for typical control applications and is the default active logic scheme. Only one logic scheme can be active at a given time. In most applications, preprogrammed logic schemes eliminate the need for custom programming. Preprogrammed logic schemes may provide more inputs, outputs, or features than are needed for a particular application. This is because a preprogrammed scheme is designed for a large number of applications with no special programming required. Unneeded logic block outputs may be left open to disable a function or a function block can be disabled through operating settings. When a custom logic scheme is required, programming time is reduced by modifying the default logic scheme. The Active Logic Scheme Digital Genset Controllers must have an active logic scheme in order to function. All Basler Electric DGC- 2020ES units are delivered with a default, active logic scheme pre-loaded in memory. If the function block configuration and output logic of the default logic scheme meets the requirements of your application, then only the operating settings (power system parameters and threshold settings) need to be adjusted before placing the DGC-2020ES in service. Copying and Renaming Preprogrammed Logic Schemes Copying a saved logic scheme to the active logic and assigning a unique name is accomplished by loading the saved logic scheme into BESTCOMSPlus and then typing over the logic scheme's name. Changes are not activated until the new settings have been saved and uploaded to the device. Sending and Retrieving Logic Schemes To retrieve settings from the DGC-2020ES, it must be connected to a computer through a communications port. Once the necessary connections are made, settings can be downloaded from the DGC-2020ES by selecting Download Settings and Logic on the Communication pull-down menu. To send settings to the DGC-2020ES, it must be connected to a computer through a communications port. Once the necessary connections are made, settings can be uploaded to the DGC-2020ES by selecting Upload Settings and Logic on the Communication pull-down menu. DGC-2020ES BESTlogic™Plus
7-2 9469200993
Caution
Always remove the DGC-2020ES from service prior to changing or
modifying the active logic scheme. Attempting to modify a logic
scheme while the DGC-2020ES is in service could generate
unexpected or unwanted outputs.
Modifying a logic scheme in BESTCOMSPlus does not automatically
make that scheme active in the DGC-2020ES. The modified scheme
must be uploaded into the DGC-2020ES.
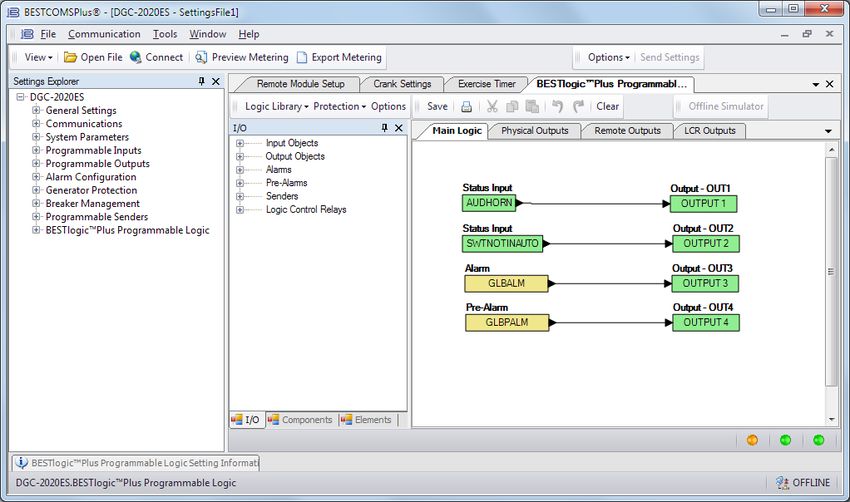
Programming BESTlogic™Plus
Use BESTCOMSPlus to program BESTlogicPlus. Using BESTCOMSPlus is analogous to physically
attaching wire between discrete DGC-2020ES terminals. To program BESTlogicPlus, use the Settings
Explorer within BESTCOMSPlus to open the BESTlogicPlus Programmable Logic tree branch as shown
in Figure 7-1.
Figure 7-1. Settings Explorer, BESTlogicPlus Programmable Logic Screen
The drag and drop method is used to connect a variable or series of variables to the logic inputs, outputs,
components, and elements. To draw a wire/link from port to port (triangles), click the left mouse button on
a port, pull the wire onto another port, and release the left mouse button. A red port indicates that a
connection to the port is required or missing. A black port indicates that a connection to the port is not
required. Drawing wires/links from input to input or output to output is not allowed. Only one wire/link can
be connected to any one output. If the proximity of the endpoint of the wire/link is not exact, it may attach
to an unintended port.
If an object or element is disabled, it will have a yellow X on it. To enable the element, navigate to the
settings page for that element. A red X indicates that an object or element is not available per the style
number of the DGC-2020ES.
The view of the Main Logic, Physical Outputs, Remote Outputs, and LCR Outputs can be automatically
arranged by clicking the right mouse button on the window and selecting Auto-Layout.
The following must be met before BESTCOMSPlus will allow logic to be uploaded to the DGC-2020ES:
BESTlogic™Plus DGC-2020ES9469200993 7-3
• A minimum of two inputs and a maximum of four inputs on any multi-port (AND, OR, NAND,
NOR, XOR, and XNOR) gate.
• A maximum of five logic levels for any particular path. A path being an input block or an output
side of an element block through gates to an output block or an input side of an element block.
This is to include any OR gates on the Physical Output or Remote Output tab/pages, but not the
matched pairs of Physical Output blocks or Remote Output blocks.
• Only 20 gates per logic level. All output blocks and input sides of element blocks are at the
maximum logic level of the diagram. All gates are pushed forward/upwards in logic levels and
buffered to reach the final output block or element block if needed. A maximum of 50 gates
allowed per diagram.
• At all levels there can only be 64 used link/wired or endpoints. Endpoints being inputs, outputs,
both sides of element blocks.
Three status indicators are located in the lower right corner of the BESTlogicPlus window. These
indicators show the Logic Save Status, Logic Diagram Status, and Logic Layer Status. Table 7-1 defines
the colors for each indicator.
Table 7-1. Status Indicators
Indicator Color Definition
Logic Save Status Amber Logic has changed since last save.
(Left Indicator) Green Logic has NOT changed since last save.
Logic Diagram Status Red Requirements NOT met as listed above.
(Center Indicator) Green Requirements met as listed above.
Logic Layer Status Red Requirements NOT met as listed above.
(Right Indicator) Green Requirements met as listed above.
Offline Logic Simulator
The offline logic simulator allows you to change the state of various logic elements to illustrate how that
state travels through the system. Before running the logic simulator, you must click the Save button on
the BESTlogicPlus toolbar to save the logic to memory. Changes to the logic (other than changing the
state) are disabled when the simulator is enabled. Colors are selected by clicking the Options button on
the BESTlogicPlus toolbar. By default, Logic 0 is red and Logic 1 is green. Using your mouse, double-
click on a logic element to change its state.
An example of the offline logic simulator is shown in Figure 7-2. Output 1 is Logic 0 (red) when Virtual
Switch 1 is Logic 0 (red) and Fixed 1 is Logic 1 (green).
DGC-2020ES BESTlogic™Plus7-4 9469200993
Figure 7-2. Offline Logic Simulator Example
BESTlogic™Plus Examples
Example 1 - GENBRK Logic Block Connections
Figure 7-3 illustrates the GENBRK logic block, three input logic blocks, and two output logic blocks.
Output 3 is active while the GENBRK is sending an “open breaker” command and Output 4 is active while
the GENBRK is sending the “close breaker” command.
Figure 7-3. Example 1 – GENBRK Logic Block Connections
Example 2 - AND Gate Connections
Figure 7-4 illustrates a typical AND gate connection. In this example, Output 11 will become active when
the Low Fuel alarm AND the Low Oil Pressure alarm are true.
Figure 7-4. Example 2 – AND Gate Connections
Example 3 - Multiple Logic Connections
In this example, there are two comment boxes, which may be placed on the logic diagram. Double-click a
comment box to modify the inside text. Output 3 becomes true when the 27TRIP is true. Output 1
BESTlogic™Plus DGC-2020ES9469200993 7-5
becomes true when the High Coolant Temp is true. Output 2 becomes true when the DGC-2020ES is in
RUN mode (RUN Mode true). Refer to Figure 7-5.
Figure 7-5. Example 3 – Multiple Logic Connections
DGC-2020ES BESTlogic™Plus7-6 9469200993 BESTlogic™Plus DGC-2020ES
9469200993 8-1
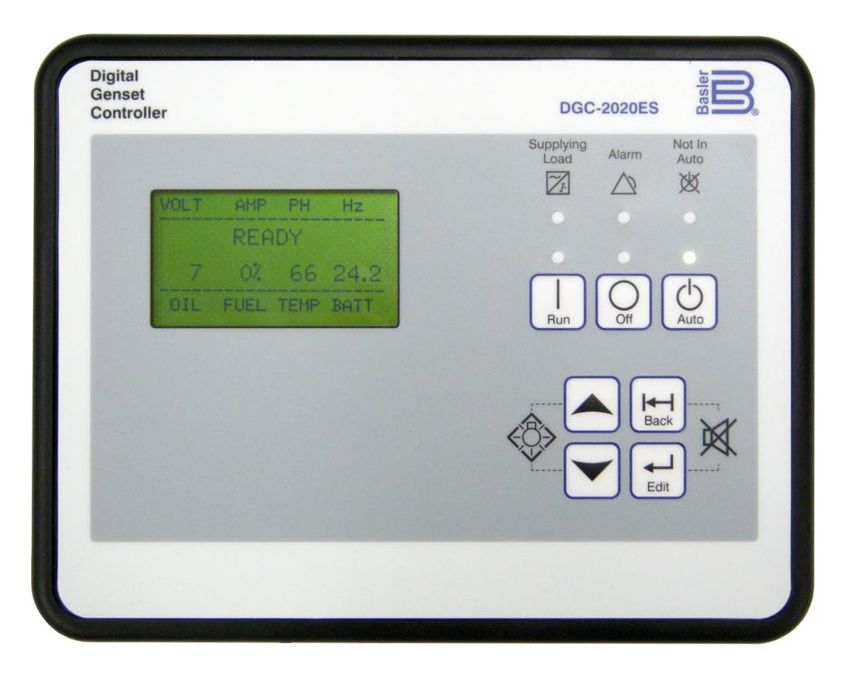
8 • Controls and Indicators
DGC-2020ES controls and indicators are illustrated in Figure 8-1. Lettered locators in Figure 8-1
correspond to the control and indicator descriptions of Table 8-1.
Figure 8-1. Front Panel
Table 8-1. Front-Panel HMI Descriptions
Locator Description
A Liquid Crystal Display. The backlit, 64 by 128 pixel LCD serves as the local information
source for metering, alarms, pre-alarms, and protective functions. Display operation is
maintained at −40°C.
B Supplying Load Indicator. This green LED lights when the generator current is greater
than Emergency Power Supply (EPS) threshold current.
C Alarm Indicator. This red LED lights continuously during alarm conditions and flashes
during pre-alarm conditions.
D Not in Auto Indicator. This red LED lights when the DGC-2020ES is not operating in Auto
mode. When the DGC-2020ES is operating in Run or Off mode, this LED is on.
DGC-2020ES Controls and Indicators8-2 9469200993
E Run Pushbutton and Mode Indicator. Pressing this button places the DGC-2020ES in
Run mode. The green Run mode LED lights when Run mode is active.
F Off Pushbutton and Mode Indicator. Pressing this button places the DGC-2020ES in Off
mode. The red Off mode LED lights when the DGC-2020ES is in Off mode. This button
also resets the Breaker Management Pre-Alarms and all MTU ECU Alarms.
G Auto Pushbutton and Mode Indicator. Pressing the Auto button places the DGC-2020ES
in Auto mode. The green Auto mode LED lights when Auto mode is active.
H Back Pushbutton. This button is pressed to cancel a settings editing session and discard
any settings changes. When navigating through menus, pressing this button moves
upward a level. When pressed momentarily, this button also resets the Breaker
Management Pre-Alarms and all MTU ECU Alarms. This button is also used to reset the
Maintenance Interval when pressed for 10 seconds while viewing Hours Until
Maintenance or Maintenance Due Pre-Alarm.
I Alarm Silence Pushbutton Combination. Simultaneously pressing both the Back and Edit
buttons opens the relay output programmed as the horn output.
J Edit Pushbutton. Pressing this button starts an editing session and enables changes to
DGC-2020ES settings. At the conclusion of an editing session, the Edit pushbutton is
pressed again to save the setting changes. When navigating through menus, pressing
this button moves downward one level. When entering a string, such as a password, this
button locks the selected character and moves to the next position. When finished, press
Edit twice to submit the string.
K Arrow Pushbuttons. These two buttons are used to navigate through the front-panel
display menus and modify settings. Within a level, the up- and down-arrow buttons are
used to move among items within the menu level. Pressing the down-arrow button moves
to items lower in the list. Pressing the up-arrow button moves to items higher in the list.
During a settings editing session, the up- and down-arrow buttons are used to raise and
lower the value of the selected setting.
L Lamp Test Pushbutton Combination. Simultaneously pressing both the Up- and Down-
arrow buttons tests the DGC-2020ES indicators by exercising all LCD pixels and lighting
all LEDs for as long as both buttons are held.
Controls and Indicators DGC-2020ES9469200993 9-1
9 • Troubleshooting
If you do not get the results that you expect from the DGC-2020ES, first check the programmable settings
for the appropriate function. Use the following troubleshooting procedures when difficulties are
encountered in the operation of your genset control system.
Communications
USB Port Does Not Operate Properly
Step 1. Verify that the proper port of your computer is being used. For more information, refer to the
Communication chapter in the Configuration manual.
CAN Communication Does Not Operate Properly
Step 1: Verify that there is a 120-ohm termination resistor on each end of the bus section of the wiring,
and that there are not any termination resistors at any node connections that are on stubs from
the main bus.
Step 2: Check all CAN wiring for loose connections and verify that the CAN H and CAN L wires have
not gotten switched somewhere on the network.
Step 3: Verify that the cable length of the bus section of the wiring does not exceed 40 meters (131
feet), and verify that any stubs from the main bus do not exceed 3 meters (9.8 feet) in length.
Step 4: If the engine is equipped with a Volvo or MTU ECU, verify that the ECU Configuration setting is
set to match the actual ECU configuration.
Inputs and Outputs
Programmable Inputs Do Not Operate as Expected
Step 1. Verify that all wiring is properly connected. Refer to the Typical Connections chapter in the
Installation manual.
Step 2. Confirm that the inputs are programmed properly.
Step 3. Ensure that the input at the DGC-2020ES is actually connected to the BATT– terminal (17).
Programmable Outputs Do Not Operate as Expected
Step 1. Verify that all wiring is properly connected. Refer to the Typical Connections chapter in the
Installation manual.
Step 2. Confirm that the outputs are programmed properly.
Metering/Display
Incorrect Display of Battery Voltage, Coolant Temperature, Oil Pressure, or Fuel Level
Step 1. Verify that all wiring is properly connected. Refer to the Typical Connections chapter in the
Installation manual.
Step 2. Confirm that the SENDER COM terminal (2) is connected to the negative battery terminal and
the engine-block side of the senders. Current from other devices sharing this connection can
cause erroneous readings.
Step 3. If the displayed battery voltage is incorrect, ensure that the proper voltage is present between
the BATT+ terminal (18) and the SENDER COM terminal (2).
Step 4. Verify that the correct senders are being used.
DGC-2020ES Troubleshooting9-2 9469200993
Step 5. Use a voltmeter connected between the BATT– terminal (17) and the SENDER COM terminal
(2) on the DGC-2020ES to verify that there is no voltage difference at any time. Any voltage
differences may manifest themselves as erratic sender readings. Wiring should be corrected so
that no differences exist.
Step 6: Check the sender wiring and isolate sender wiring from any of the ac wiring in the system. The
sender wiring should be located away from any power ac wiring from the generator and any
ignition wiring. Separate conduits should be used for sender wiring and any ac wiring.
Incorrect Display of Generator Voltage
Step 1. Verify that all wiring is properly connected. Refer to the Typical Connections chapter in the
Installation manual.
Step 2. Ensure that the proper voltage is present at the DGC-2020ES voltage sensing inputs (40, 41,
43, and 45).
Step 3. Verify that the voltage transformer ratio and sensing configuration is correct.
Step 4. Confirm that the voltage sensing transformers are correct and properly installed.
Incorrect Measurement or Display of Generator Current
Step 1. Verify that all wiring is properly connected. Refer to the Typical Connections chapter in the
Installation manual.
Step 2. Ensure that the proper current is present at the DGC-2020ES current sensing inputs 33, 34, 35,
36, 37, and 38.
Step 3. Verify that the current sensing transformer ratios are correct.
Step 4. Confirm that the current sensing transformers are correct and properly installed.
Incorrect Display of Engine RPM
Step 1. Verify that all wiring is properly connected. Refer to the Typical Connections chapter in the
Installation manual.
Step 2. Verify that the flywheel teeth setting is correct.
Step 3. Verify that the prime mover governor is operating properly.
Step 4. Verify that the measured frequency of the voltage at the MPU input (31 and 32) is correct.
Step 5. If the MPU is shared with the governor, verify that the polarity of the MPU input to the governor
matches the polarity of the MPU input to the DGC-2020ES.
DGC-2020ES Indicates Incorrect Power Factor
Check the rotation of the machine and the labeling of the A-B-C terminals. The machine must be rotating
in the same phase sequence as dictated by the generator phase rotation setting for correct power factor
metering. A power factor indication of 0.5 with resistive load present is a symptom of incorrect phase
rotation.
LCD is Blank and all LEDs are Flashing at Approximately Two-Second Intervals
This indicates that the DGC-2020ES does not detect that valid application firmware is installed. The unit
is running its boot loader program, waiting to accept a firmware upload.
Step 1. Start BESTCOMSPlus®. Use the top pull-down menu and select FILE > NEW > DGC-2020ES.
Step 2. Select COMMUNICATIONS > UPLOAD DEVICE FILES and select the device package file that
contains the firmware and language you want to upload.
Step 3. Check the boxes for DGC-2020ES Firmware and DGC-2020ES Language Module. Click the
UPLOAD button to start the upload process.
Troubleshooting DGC-2020ES9469200993 9-3
Ground Faults Detected in Ungrounded System Applications
Step 1: Verify that there is no connection from the neutral connection of the generator to the system
ground.
Step 2: Perform insulation resistance tests on the system wiring to check for insulation integrity in the
overall system.
Step 3: If ground faults are detected on a DGC-2020ES in an ungrounded system application, it is
recommended that potential transformers be employed on the voltage sensing inputs to provide
full isolation between the DGC-2020ES and monitored voltage phases.
Step 4: If potential transformers are in place, remove the connectors from the DGC-2020ES one at a
time. If removal of a connector removes the ground fault, check the system wiring to that
connector and out into the system to verify that connections are secure and all wiring insulation
is in good condition.
Generator Breaker and Mains Breaker
Generator Breaker Will Not Close to a Dead Bus
Step 1: Review the description of how the generator breaker logic element functions contained in the
GENBRK logic element description in the BESTlogic™Plus chapter in the Configuration
manual.
Step 2: Review the section on breaker close requests in the Breaker Management chapter in the
Configuration manual.
Step 3: Navigate to the SETTINGS > BREAKER MANAGEMENT > BREAKER HARDWARE > GEN
BREAKER screen and set DEAD BUS CL ENBL to ENABLE.
Step 4: Verify that the Generator status is stable. The breaker will not close if the generator status is
not stable. Check status by using the Metering Explorer in BESTCOMSPlus and verify that
when the generator is running, the GEN STABLE status LED is lit. If necessary, modify the
settings on the SETTINGS > BREAKER MANAGEMENT > BUS CONDITION DETECTION
screen.
Step 5: Verify the bus status is DEAD. Check status by using the Metering Explorer in BESTCOMSPlus
and verify that when the generator is running, the BUS DEAD status LED is lit. If necessary,
modify the settings on the SETTINGS > BREAKER MANAGEMENT > BUS CONDITION
DETECTION screen.
Step 6: Verify the connections in BESTlogicPlus Programmable Logic to the generator breaker logic
element. The Status input must be driven by an “A” or normally open contact from the generator
breaker. The OPEN and CLOSE command inputs on the left side of the logic block are inputs
for open and close commands. These can be wired to physical inputs if it is desired to have
open and close command switches. If they are wired, they must either be pulsed inputs, or
some logic must be employed so that the open and close command inputs are never driven at
the same time. If these are both driven at the same time, the breaker is receiving open and
close commands simultaneously. The breaker will not change state if it is being commanded to
open and close at the same time.
Step 7: Verify the breaker is receiving a close command. Breaker close command sources are:
• The DGC-2020ES itself when the automatic mains fail transfer (ATS) feature is enabled.
• The DGC-2020ES itself when the RUN WITH LOAD logic element receives a Start pulse in
the programmable logic.
• The DGC-2020ES itself when started from the Exercise Timer and the Run with Load box
is checked in the Generator Exerciser settings.
• Manual Breaker Close Input Contacts applied to the Open and Close inputs on the left side
of the Generator Breaker logic element in the programmable logic.
DGC-2020ES TroubleshootingYou can also read