DIY Golden Turquoise Wrap Bracelet
←
→
Page content transcription
If your browser does not render page correctly, please read the page content below
DIY Golden                  Turquoise              Wrap
Bracelet
Design this fancy Golden Turquoise Wrap Bracelet with memory
wire, Czech beads, Swarovski® crystals, cork cord and curve
tube with loop.

What you’ll need to make bracelet:

     5mm Cork Cord – CH00881 (16 Inches)
     5mm Gold Cord End – Z006380 (8 pieces)
     Gold Memory Wire – WR00126
     9x6mm Czech Rondelle – Item in bracelet Z011353
     8mm Swarovski Briolette Beads – Item in bracelet SW02236
     (12 pieces)
     10mm Gold Wavy Disc – Z018416 (5 packs)
     6mm Gold Wavy Disc – Z018412
     50mm Curve Tube with Loop – Z011737 (2 pieces)
     5mm Gold Jump Ring – A011519
     11mm Antique Gold Ethnic Dart Drop Charm by TierraCast –
     TC02440
     Tassel with Gold Cap – Item in bracelet Z013767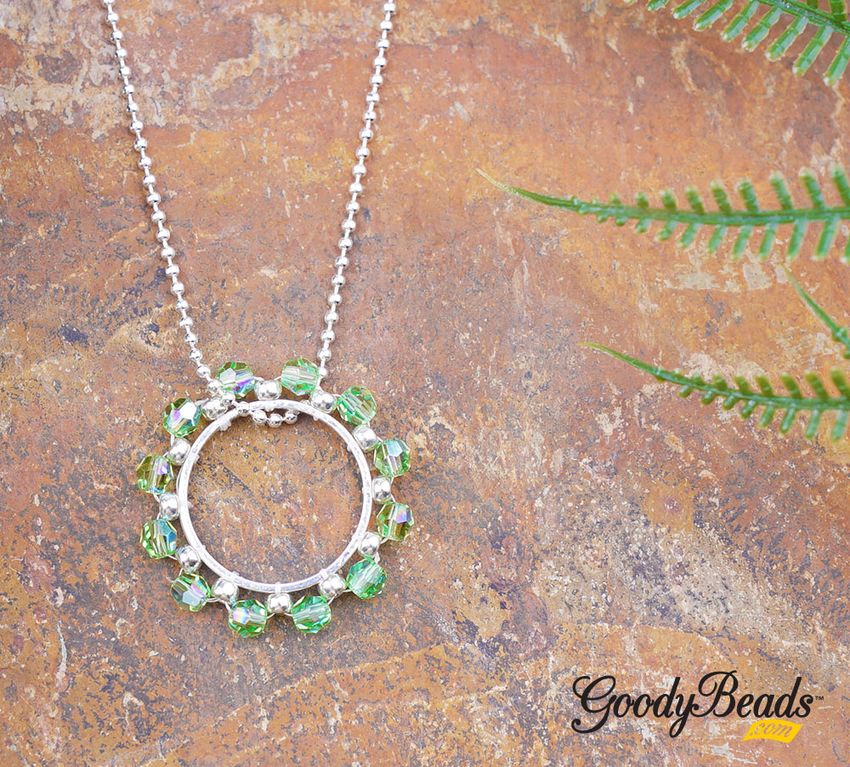
Directions

   1. Make a coiled loop at one end of the memory wire with
      Memory Wire Finishing Pliers.
   2. Cut cork cord into 4 pieces, measured at about 4 inches.
   3. Slide the following sections onto the memory wire:
      a. End cap, cork piece and end cap.
      b. Czech Bead, TWO 10mm wavy discs (one concave in and
      the other concave out). Repeat 5 more times (omitting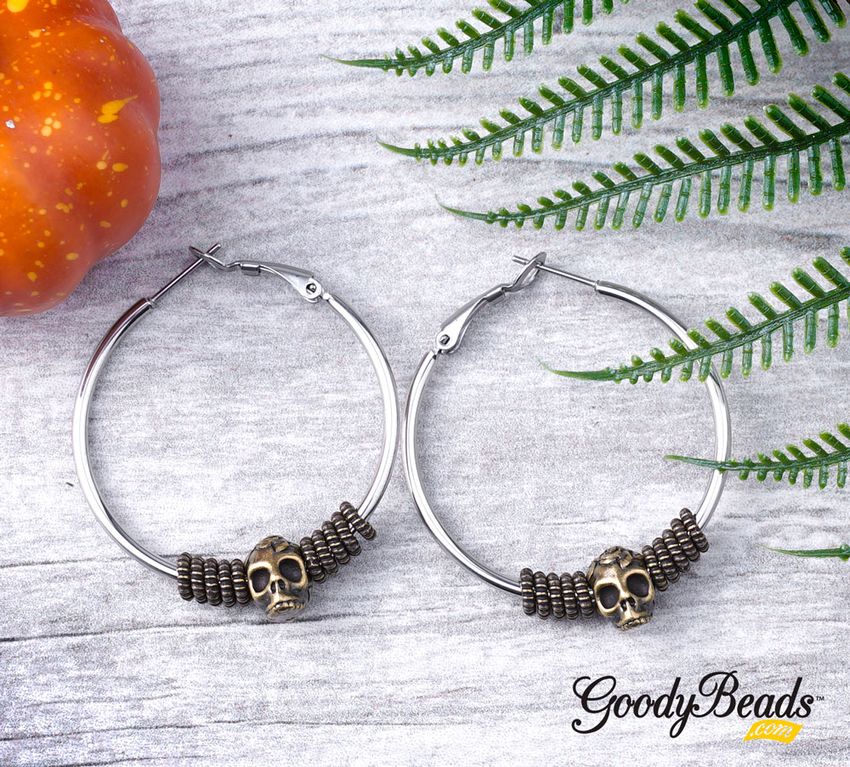
the last 2 wavy discs).
   c. TWO 6mm wavy disc (one concave in and the other
   concave out), THREE crystals, TWO 6mm wavy disc, THREE
   crystals, TWO 6mm wavy disc.
   d. Repeat Step 3b.
   e. End cap, cork piece, end cap, curve tube with loop,
   end cap, cork piece and end cap.
   f. TWO 6mm wavy disc, THREE crystal beads and TWO 6mm
   wavy disc.
   g. Czech Bead, TWO 10mm wavy discs (one concave in and
   the other concave out). Repeat 11 more times (omitting
   the last 2 wavy discs).
   h. TWO 6mm wavy disc, THREE crystal beads and TWO 6mm
   wavy disc.
   i. Curve tube with loop, end cap, cork piece and end
    cap.
 4. Cut memory with Memory Wire Cutters leaving half an inch
   end. Coil and make a simple loop.

Pantone 2020 Color                           of      the
Year: Classic Blue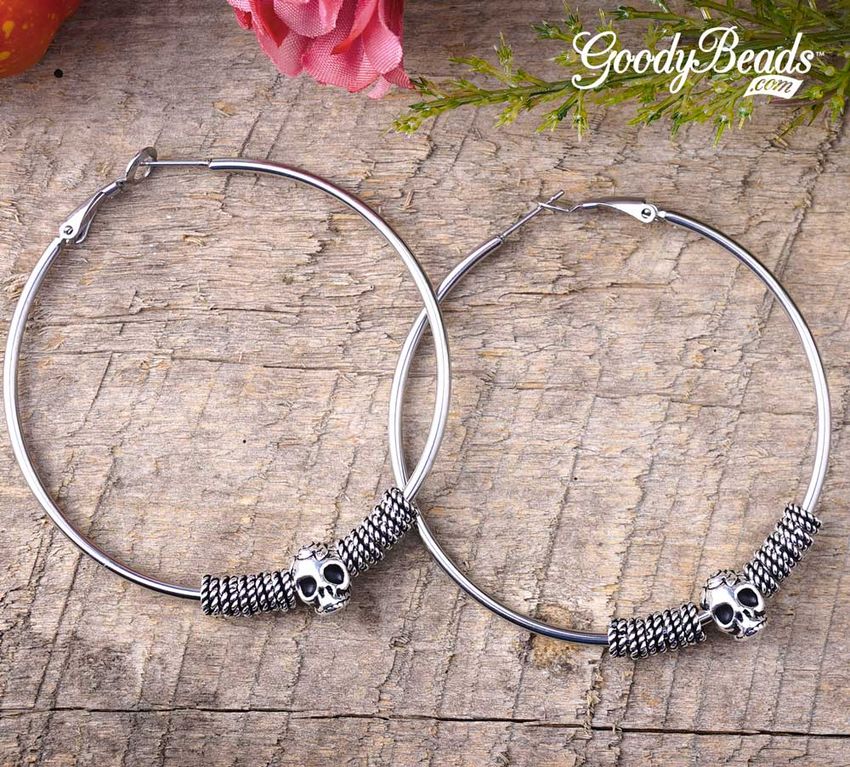
Pantone has chosen the spotlight color for 2020. Classic Blue.
It is a ‘solid and dependable blue hue we can always rely
on.’ Here is how Classic Blue is characterized:

Because Pantone has continuously given us variations of blue
hues in the past, it can be safe to say that blue is a
reliable and dependable color that we all find ourselves
designing with and wearing through the years. And it is
definitely a bold color. Here are some items to get you
inspired with the classic blue:

     Blue Hematite
     Blue Druzy
     Majestic Blue Swarovski® Crystal
     Blue Tassel
     Lapis Gemstone
     Dumortierite Gemstones
     Sodalite Gemstones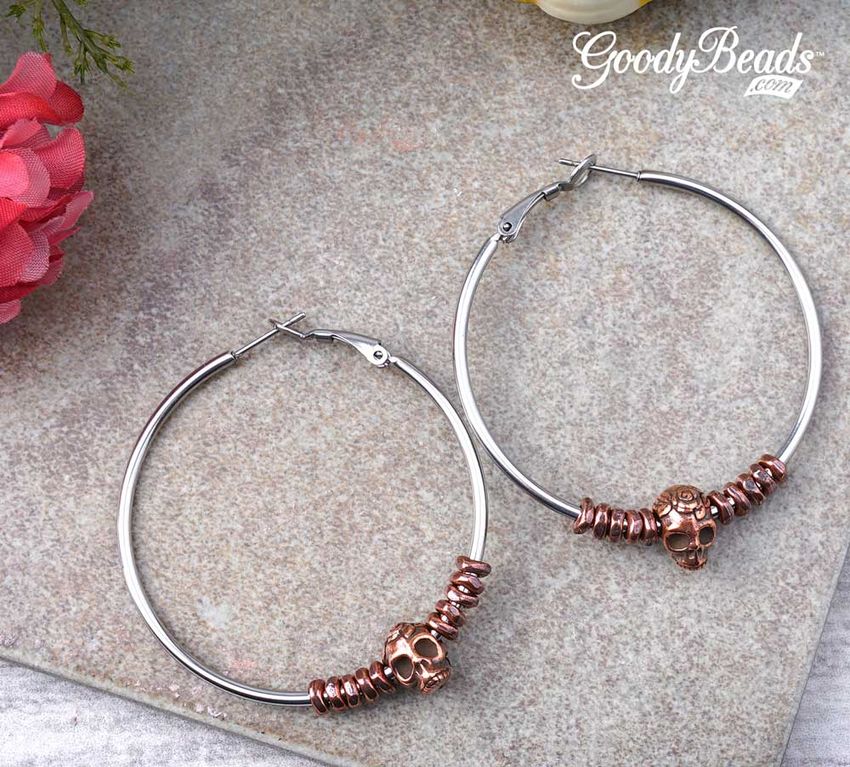
Items in image: A008060, Z007741, TC02545, Z006089, SW01800,
SW02259, Z015066, SW01736, Z020677, Oval Druzy, HEMMB4RL-F,
DAG8RD-BLU-F-8

Here are some easy DIY earrings to get your 2020 started.

Blue Glass Glowing Earrings
We combined some of favorite beads like glass, miracle and
Swarovski, tied together with some gold findings! Plus, we
just love the gold flakes in the glass bead.

Items used in earrings: SW01726, A019696, A014931, Z018412,
SB00107, A019605, Z015066 & A014108

Directions:

1. On a headpin, slide the following beads and make a
    simple loop:
    3mm Swarovski bicone bead, wavy disc, miracle bead and
    seed bead.
 2. Open eyepin loop and slide on bead dangle from step 1.
    Close loop.
 3. On the eyepin slide on the following and make a simple
    loop:
    Seed bead, glass bead and seed bead.
 4. Open earwire, and slide on your dangle and close loop.
 5. Repeat all steps for other earring.

Majestic Blue Drop Earrings
We don’t use much of the kidney earrings, but love them all
the same. They work great with a simple drop crystal or charm,
as the kidney drapes and elongates the earring itself.

Items used in earrings: (2) SW01840, (2) SW01820, Z003274 &
SW01830/TL00264.

Directions:

   1. Follow the instructions from our Epoxy Blog Post of
mixing your epoxy solution.
 2.   Add a small dot of mixed epoxy to your glue-in setting.
 3.   Place your oval crystal stone in the setting, firmly
      pressed in there.
 4.   Repeat steps 2 & 3 for other crystal and setting.
 5.   Let pieces dry or cure for a few hours or until it’s
      dry.
 6.   Slide dangle through your kidney earring, through to the
      loop. Using your round nose, pinch the opening of the
      loop to cinch loop, gently.

Blue Blue Golden Tassel Earrings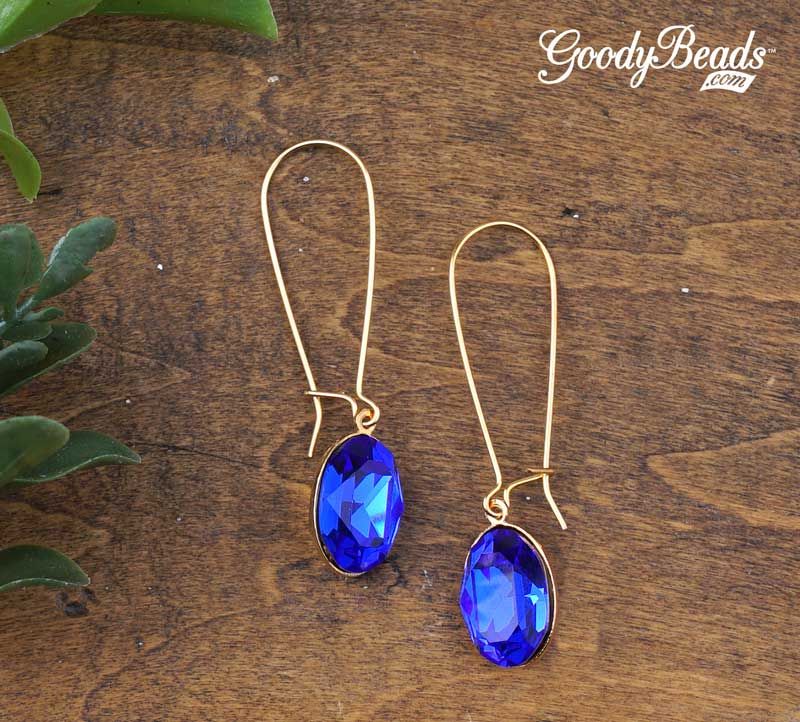
One highlight of our 2019 are tassels and love how this pair
of earrings combines our love of tassels and connector/links
components!

Items used in earrings: (2) SW00734, (2) Z016742, SB00107,
A019605, TCZ0139 & Z006091

Directions:

   1. Twist the loop on the tassel 90 degrees so that loop run
across the other way.
2. Open tassel loop, slide through hole of half circle
connector (curved side). Close loop.
3. Open eyepin and slide through other hole of half circle
connector. Close loop.
4. On the eyepin slide on a seed bead, pearl and see bead.
Make a simple loop.
5. Open earwire loop and slide on your pearl/tassel dangle.
Close loop.
6. Repeat all steps for other earring.
Swarovski® Ruby Jewelry
Tutorials
We’ve got THREE easy projects using December’s Swarovski
Psychology of Color: Ruby. Design jewelry with this bold hue!
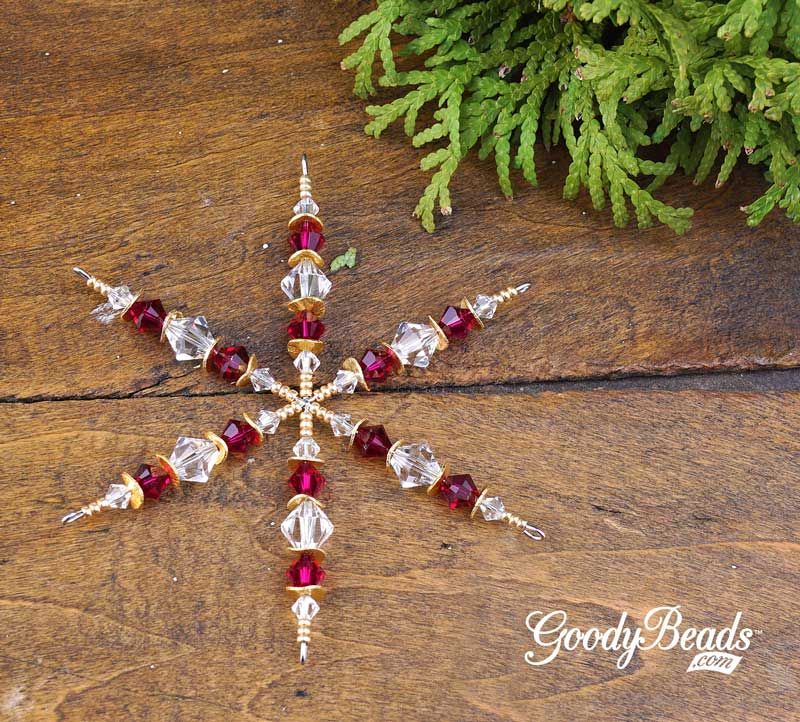
Ruby Snowflake Ornament
Fitting for the holiday season is making snowflake ornaments!
Here’s our version using Ruby crystals, clear crystals and
wavy discs.Items used in ornament: SW00131 (12), SW00102 (12), SW00104
(6), Z018412, SB00423 & A006240
Directions:
1. On a prong, slide on the following and make a simple
loop with memory wire finishing pliers:
1. 3 seed beads, 4mm crystal, disc, ruby crystal,
disc, 8mm crystal, disc, ruby crystal, disc, 4mm
crystal, 3 seed beads.
2. Repeat the same sequence of beads to each prong.Ruby Hoop Earrings
Make this pair of trendy hoop earrings!
Items used in earrings: SW00131 (10), TC00278 (4), Z001052 &
A015821.
Directions:
1. Slide through the hoop:
1. bead cap, 5 ruby crystals and bead cap.
2. To the top of the last bead cap, add a small dot of
glue. Let this dry for a few minutes to keep bead cap in
place with the hoop earrings.3. Repeat all steps for other earring. Ruby Rockestar Earrings These beautiful Ruby crystals really standout next to these grey/black diamond crystals. Items used in earrings:SW00131 (2), SW02072 (2), TC00278 (2), SB00422, TC00055 (2), A007499 & A001495 Directions: 1. Open eyepin loop, slide on star charm and close eyepin. 2. On the eyepin, slide a seed bead, Ruby crystal, bead
cap, 4mm black diamond crystal, and seed bead. Make
      simple loop.
   3. Open dangle loop and slide on post earring loop. Close
      loop.
   4. Repeat all steps for other earring.

Swarovski   Psychology                                 of
Color: Emerald
For November, Swarovski’s Psychology of Colors is Emerald.
Check out how powerful and grounding this hue is!
Embrace your own life balance with this month’s color,
Emerald. When you design with Emerald, its elegant hue is
refreshing. Emerald is a color loved by many through the ages.
Here are some Swarovski colors to match this statement hue:
Emerald
Eden Green Pearls
Erinite
Crystal Iridescent Green
Crystal Iridescent Tahitian LookRoyal Green
Fern Green
Check out our other blog post with designs using Swarovski
Emerald!
Swarovski Psychology of Color: Emerald
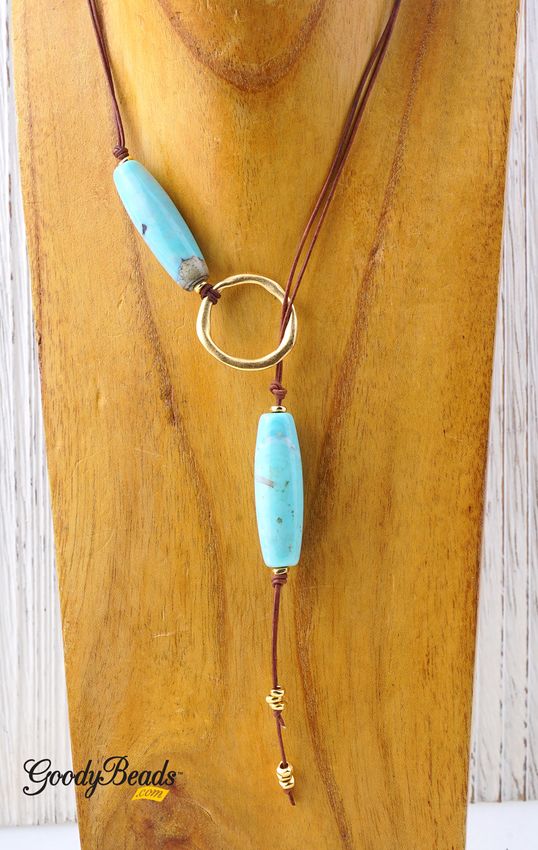
Terra Agate & Leather Lariat
Necklace
We’re still seeing lariat necklaces everywhere and it
certainly will trend for a while because of it’s organic look!
You wear it long or short, depending on how you dress it. In
our DIY project today, is a lariat necklace using 1mm leather
cord, brass beads and some gorgeous Terra Agate gemstones!
What you’ll need for necklace:
14×40 Terra Agate Barrel Gemstone – TRAG14x40BRL1mm light brown leather cord – Z015514 Brass Bead A022201 OR 5mm TierraCast TC01490 (10) 30mm Organic Hoop by Nunn Design – Z004552
Directions:

   1. Start with 2 meters of leather cord. Fold in half and at
      the loop, make a lark’s head knot through the Organic
      Hoop.
   2. On both leather cords, slide on a gold bead, Terra Agate
      bead and another gold bead.
   3. Make an overhand knot with both leather cords close to
      the last gold bead.
   4. Wrap your piece around your neck to determine where you
      would like the lariat gemstone dangle to hang from and
      the length of your necklace. Make an overhand knot
      there.
   5. Slide on both leather cords another gold bead, Terra
     Agate bead and gold bead. Make an overhand knot close to
     the last gold bead you added.
   6. On one leather cord end, slide on 3 gold beads and make
      an overhand knot about 2 inches below the Terra Agate
      bead. Cut off excess.
   7. On the other leather cord end, slide on 3 gold beads and
     make an overhand knot about 1.5 inches below the Terre
     Agate bead. Cut off excess.

Colorful Straw Earrings
Complete your large statement earrings collection with these
Woven Straw Earrings.

What you’ll need:

     Woven Straw Pendant/Connector
     Crimp End from TierraCast Finishing Collections
Earrings Findings
Beadalon Nylon Pliers (TL00223 OR A012924)
Flat Nose Pliers
Marrakesh Straw Earrings
Items using in earrings: Z016792, TC02714 (2), TC02430,
Z011500
Directions:
1. Using the flat nose pliers, gently pry the crimp endwider so that the straw piece in between.
2. Slide crimp end over the straw component.
3. Using nylon pliers, crimp the crimp end over snug over
the straw.
4. Open jump ring and slide on crimp end loop and earring
loop. Close jump ring.
5. Repeat all steps for other earring.
Blues Straw Earrings
Items using in earrings: Z016790, Z011158, Z002858, TC02360(2)
Directions:
1. Cut 4″ of leather.
2. Make a lark’s head knot with the leather through the
straw connector. (Make sure to keep ends flushed
together when making the knot.)
3. Slide crimp end over both ends of the leather and crimp
it with nylon pliers.
4. Open earwire loop and slide on crimp end loop. Close
loop.
5. Repeat all steps for other earring.
Mulberry Pearl and Acetate
Earrings
The new Swarovski pearl color, mulberry, is a bold and fall-
suitable hue! We paired it with some colorful acetate
components, to make a fun pair of earrings!
Items used in earrings: SW02201 (2), A019612, Z020493, TC02297Directions:
1. Open eyepin and slide on earwire loop. Close eyepin
loop.
2. On the eyepin, slide on pearl and make a simple loop.
(Make a larger loop to fit round acetate.)
3. Open loop and slide on acetate ring. Close loop.
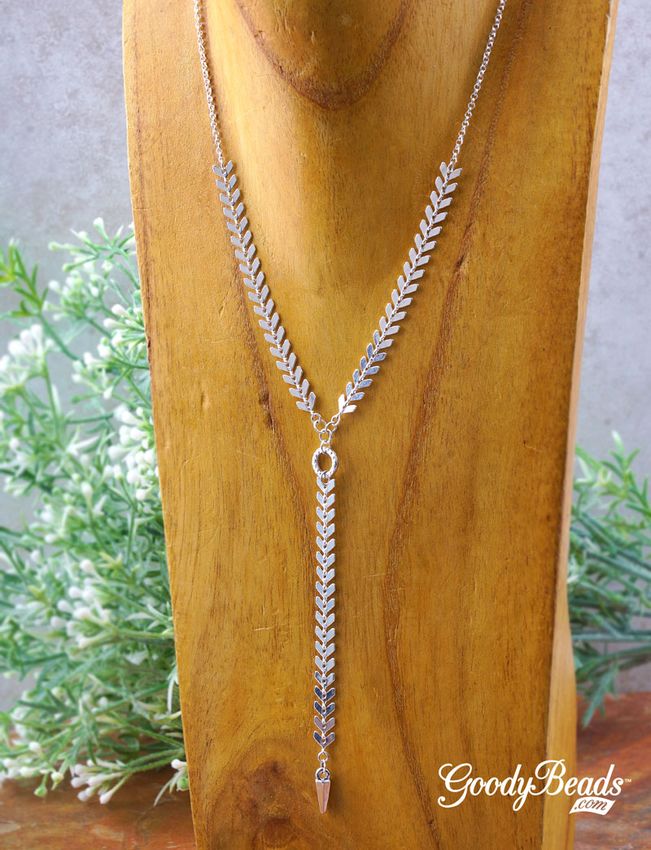
4. Repeat all steps for earring.Chevron Chain Necklace
Chevron is one of those trendy shapes that probably won’t ever
go out of style. And with our chevron chain, you can easily
make this stunning silver chevron chain necklace.
What you’ll need for necklace:
1 foot of Chevron Chain (Silver or Gold)
3mm Jump Rings (Silver or Gold)
5mm Jump Rings (Silver or Gold)
Adjustable Rollo Chain Necklace Double Sliding Clasp
(Silver or Gold)
13mm TierraCast Ring – TC00425
Items used in necklace: A001528, CH00800, Z007856,
Z010755, TC00425 & TC02445.Directions: 1. Cut chevron chain to 3 inches or 18 links. Cut 3 pieces.
2. Open 3mm jump ring, slide on dagger charm, close jump
      ring.
   3. Open another 3mm jump ring, slide through jump ring in
      Step 2 and through pointed loop on one of your chevron
      chain. Close jump ring.
   4. Open 5mm jump ring, slide through other loop of your
      chain in Step 3 and through Hammer Ring. Close jump
      ring.
   5. Open another 5mm jump ring, slide through hammer ring
      and close jump ring.
   6. Open another 5mm jump ring, slide through jump ring step
      5 and close jump ring.
   7. Open a 3mm jump ring, slide through pointed loop on your
      second chevron chain and close jump ring. Repeat for the
      third chain.
   8. Open a 5mm jump ring, side through a 3mm jump ring in
      step 7 and through 5mm jump ring in step 6. Close jump
      ring.
   9. Repeat Step 8 with third chain.
  10. Open jump ring loop on adjustable necklace chain and
      slide through other end of the second chevron chain.
      Close jump ring.
  11. Repeat Step 10 with other end of adjustable necklace
     chain and third chevron chain.

Silver Acorn Hoop Earrings
It’s fall-mania with these cute cute cute pair of earrings
with an acorn charm! All you need to do is taking your jump
ring and connecting the acorn charm to a lovely Semi Hoop
Earring (Z019973).
Items used in earrings: Z019973, A007703 (2), A008799 Amazonite and Leather Wrap Design this wrap bracelet with Amazonite large-hole faceted gemstones and Deertan Lace leather. It’s also adjustable with a sliding clasp and easy to make!
What you’ll need:

     Amazonite Large-Hole Gemstones – AMZ8RLLH-8
     Or You can use other Large-Hole Gemstones
     3mm Saddle Deertan Lace – Z015557
     Or other colors of ‘Deertan Lace’
     Grooved Large Hole Bead – TC00210

Directions:
   1. Cut a 36′ piece of deertan lace.
   2. Slide 7 gemstones onto the leather. (Cut ends at and
      angle to help push leather through.)
3. Take both of your leather ends and slide through
TierraCast bead.
4. Make a knot at each leather end.
Skull Hoop Earrings
DIY spooky skull earrings for Halloween or skull lovers!
Get this easy tutorial today.
It’s the first day of October and what a good way to
start this DIY month with some skull earring for Halloween!
These earring are also perfect for skull lovers, like our
Designer Heidi. She designed these earrings using hoop
earrings in three different sizes (60mm, 50mm, 40mm) as the
base, TierraCast skull beads and various metal beads.
What you’ll need:
Hoop Earrings (60mm / 50mm / 40mm)
TierraCast Skill Beads w/ Horizontal Hole (Ant.
Copper/Ant. Silver/Ant. Brass / Ant. Gold)
Metal Beads or TierraCast Beads
Directions:
1. Open earwire’s hinge and slide the following onto the
hoop earring:
5 metal beads, skull bead and 5 metal beads.
2. Repeat for other earring.Beaded Skull Hoop Earrings Items used in 40mm Hoop Earrings: Z017100, TC01315 (20)& TC01099 (2)
Items used in 50mm Hoop Earrings: A014110, TC01489 (20) &
TC01098 (2)
Items used in 60mm Hoop Earrings: A014111, A003562 (2pks)
& TC00196 (2)

Fancy Stripe Earrings with
Cymbal Kolympos
We’re continuing our love for Cymbal components with these
FANCY Stripe Earrings made with the Cymbal Kolympos bead
ending. Check out this FREE pattern from our designer, So
Vang.

If you haven’t yet seen the Cymbal components that just came
out a few month ago, you’re missing out on some great
components and findings for your bead stitching patterns. Here
is a simple pair of earrings you can make using the Cymbal
Kolympos bead ending.

Though this pattern was intended and can be used for a
bracelet pattern, we’ve shorten the pattern to make some
statement earrings instead!

What you’ll need for earrings:

     Cymbal Kolympos (Silver or Gold)
     Czech Honeycomb Beads
     Czech DiamonDuo Beads
     Czech O-Beads
     Miyuki 8/0 Seed Beads
     Earring Findings
     Fireline Beading Thread and Needle
     AND
     Download PDF Pattern for Fancy Stripe Earrings

Items used for earring example: Z013596, SB03303, SB00107,
SB01916, Z004589, A006587, A015211 and TCZ0139 Memory Wire Wrap Bracelets with Swarovski Fine Rocks Beads Mix up shiny Swarovski crystals and natural gemstone beads in an easy memory wrap bracelet.
Mixing up different types beads makes for a modern and even
edgy DIY jewelry, especially when you use Swarovski Fine Rocks
Tube beads and round Dakota Stones gemstone beads. And to
bring even a more edgy look, we’ve added some beautiful Star
Cut Crystal Quartz gemstone.

What you’ll need for project:

     6mm Round Gemstones
     6mm Crystal Quartz Star Cut Beads
     30mm Swarovski Fine Rocks Tube Crystal Bead
7mm Nugget Spacer (TC00034)
Extra Heavy Duty Round Bracelet Memory Wire
(Silver/Gold/Rose Gold)
OR Heavy Duty Memory Wire (Silver/Gold)
Tools: Memory Wire Shears and Memory Wire Finishing
Pliers
Minimal Fine Rocks Bracelet
Items used in bracelet: SW01736 & WR00131
Nothing like a simplistic DIY jewelry! Here, we used Extra
Heavy Duty Memory Wire, cut a 1.25 coil and slide on the Fine
Rocks Tube. The trick to getting the crystal tube curve is to
gently curve the tube while sliding it on the memory wire.
Center the tube and make a loop to both memory wire ends withthe Memory Wire Finishing Pliers. The thick memory wire gives
a hearty substance to a minimalistic design, without covering
the whole wire!
Sparkly Starry Wrap with Gemstones
Items used in Onyx bracelet: WR00121, CRY6RD-SC, TC00034 (4),
SW01736 (2) & ONX6RD-8.
Items used in Howlite bracelet: WR00121, CRY6RD-
SC, TC00034 (4), SW01740 (2) & WHT6RD-8.
In these two bracelets are 6mm round gemstones and 6mm Crystal
Quartz star cut beads. The star cut and fine rocks tube bead
are both a compliment to an edgy and even punk-ish vibe!
1. Cut a coil and a half of heavy duty memory wire.
2. Make a loop to one end of your memory wire with memory
wire finishing pliers.
3. Slide the following onto the memory wire:
9 gemstone beads, nugget spacer, fine rocks tube, nugget
spacer, 5 Crystal Quartz star cut beads, nugget spacer,
fine rocks tube, nugget spacer and 9 gemstone beads.4. Cut excess wire, leaving a 3/8 inch end. Make a loop. Video Tutorial Check out our previous Facebook LIVE episode, where Tory demonstrates how to easily create one of these wrap bracelets! Swarovski® Peridot Jewelry Tutorials We have three exciting projects using September’s Swarovski Psychology of Color: Peridot. See how to energize yourself with this natural hue! Peridot Wheel Pendant with Ball Chain Necklace
We designed a simple beaded wheel with round Peridor Shimmer
crystals. Check out the simple TUTORIAL and all you need to
make this Peridot Wheel Pendant on a a ball chain necklace!

What you’ll need:

     4mm Round Crystal – SW02058 (12)
     8/0 Silver Seed Bead – SB00106 (1 tube or 12 8/0 seed
     bead)
     20mm Quick Link Rings – Z010632
     Crystal Fireline Beading Thread (Z006587/Z006585)
     Needle
     1.5mm Ball Chain (2-3 feet)
     Silver Ball Chain Connector (Z004792)
     AND
     Peridot Wheel Pendant PDF Downloaded Tutorial
Brushed Peridot Earrings
Make your Peridot colors POP with brushed silver beads and
components!
Items used in earrings: SW02060 (2), SW02058 (2), Z018411,
A019694, A019606, Y018086 and TC02297.
1. On a headpin, slide on a 4mm crystal, 8 wavy disc
(alternating them so it creates a wavy look) and an 8mm
crystal. Make a simple loop.
2. Open eyepin loop, slide on loop from step 1, close
eyepin loop.
3. On eyepin, slide on brushed silver bead and make asimple loop.
4. Open earwire loop and slide on brushed silver loop.
Close loop.
5. Repeat all steps for other earring.
Swarovski: Peridot Passion
This sample and tutorial comes from our friends at Swarovski:
Create Your Style, called Peridot Passion. You see how
stunning Peridot looks with brass findings!
What you’ll need for necklace:
SW02060 (13)
SW02059 (7)Vintaj Pattern Leaf in Natural Brass
4mm Cable Chain in Natural Brass (Our recommendation
CH00514 or A008181)
TC00710 (8)
Z016115
TC01256 (7)
TC00547 (1)
Z006523
Instructions
1. Cut the chain into fifteen 1 ½” pieces and set aside.
2. Using one eye pin slide on one 6mm Crystal, one 8mm
Crystal and one 6mm Crystal and make a simple loop.
Repeat this step 5 more times and set aside.
3. Using one eye pin slide on one 6mm Crystal and make a
simple loop. Set aside.
4. Using one head pin slide on one 8mm Crystal and make a
simple loop. Set aside.
5. Using the leaf pendant attach seven of the 5mm jump
rings across the top of the opening.
6. Using the 1st jump ring on the left of the top of the
leaf pendant attach one piece of chain, then attach one
9mm jump ring, then attach another piece of chain. Now
attach one component made in Step 2 and to the other
side of the component attach another piece of chain.
Repeat this pattern two more times and then attach the
lobster clasp with a 5mm jump ring.
7. Using the last jump ring on the right of the top of the
leaf pendant attach one piece of chain, then attach to
the 7.25mm jump ring already on the left of the
necklace, then attach another piece of chain. Now attach
one component made in Step 2 and to the other side of
the component attach another piece of chain. Repeat this
pattern two more times and then attach one 9mm jump
ring.8. Using the component made in Step 3 attach one end of
this component to the bottom middle of the 9mm jump ring
hanging above the leaf pendant. Now attach the component
made in Step 4 to the bottom of the 6mm bead.
Macramé Leather Bracelet with
Square Knots
Macramé is back. Here is a simple bracelet braided with
Macramé square knots using Chinese knotting cord and 1.5mm
leather cord.
With the boho, fiber and minimalistic trend, macramé is making
its comeback to wall decor and even jewelry making. Like our
Macramé Leather Bracelet, we used Chinese knotting cord and
made square knots on two strands of leather for a simple
bracelet. The contrast of the white Chinese knotting cord
still brings out the natural colors of the leather!
What you’ll need:
1mm Chinese Knotting Cord (Item used in example:
A018859)
1.5mm Leather Round Cord (Item used in example: Z019114)
Button (Item used in example: TC00897)
Macramé Board or Clipboard
T-Pins or general pins.
Scissors and Lighter
You can use 2mm Chinese knotting cord or leather for this
tutorial also!Tutorial Step 1: Cut a 2 foot piece of 1.5mm leather cord. Slide leather through button hole, center it and make an overhand knot with both leather cords close to the button. Step 2: Anchor your button with a t-pin on the Macramé board or clipboard.
Cut a 6 feet long piece of Chinese knotting cord. Center the
cord behind the two leather cords.

Step 4: Bring your right cord over the leather.
Step 5: Take your left cord, lay over your right cord, loop
under right cord and two leather and up over the right loop.

Step 6: Pull your knotting cord gently to bring your half
square knot in place.
Step 7: Bring your left cord over the leather.

Step 8: Take your right cord, lay over your left cord, loop
under left cord and two leather and up over the left loop.
Step 9: Pull your knotting cord gently to bring your full
square knot in place.

Step 10: Repeat steps 4-9 until you’ve knotted the length of
your wrist length.
Step 11: Cut the knotting cord with a 1/8 inch end and using a
lighter, carefully burn your ends. Repeat to other cord end.

Step 12: Make two leather knots.
Step 13: Done!
Let’s get knotting!
You can also read