Dual Red or Green Electronic Dot Sight - Instruction Manual
←
→
Page content transcription
If your browser does not render page correctly, please read the page content below
Dual Red or Green
Electronic Dot Sight

Instruction Manual

       ©2007 VisionPlus®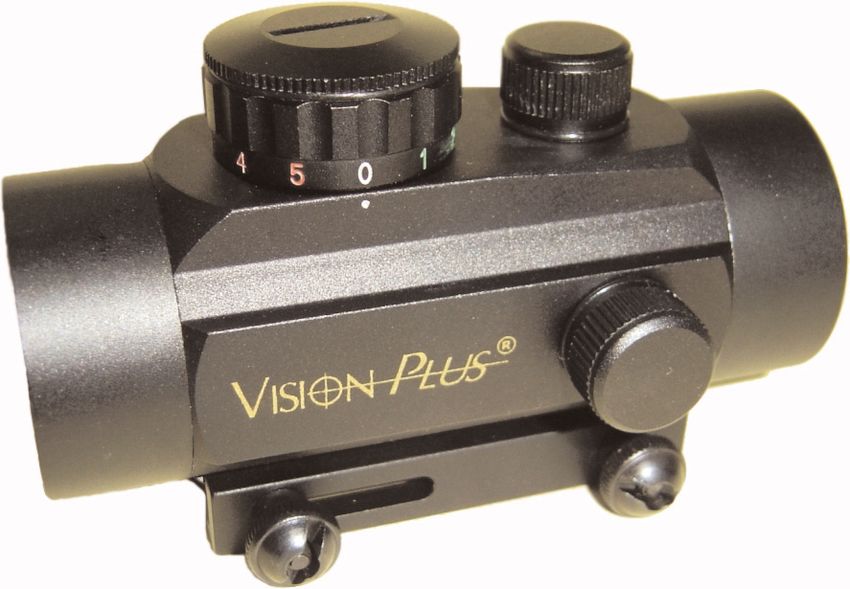
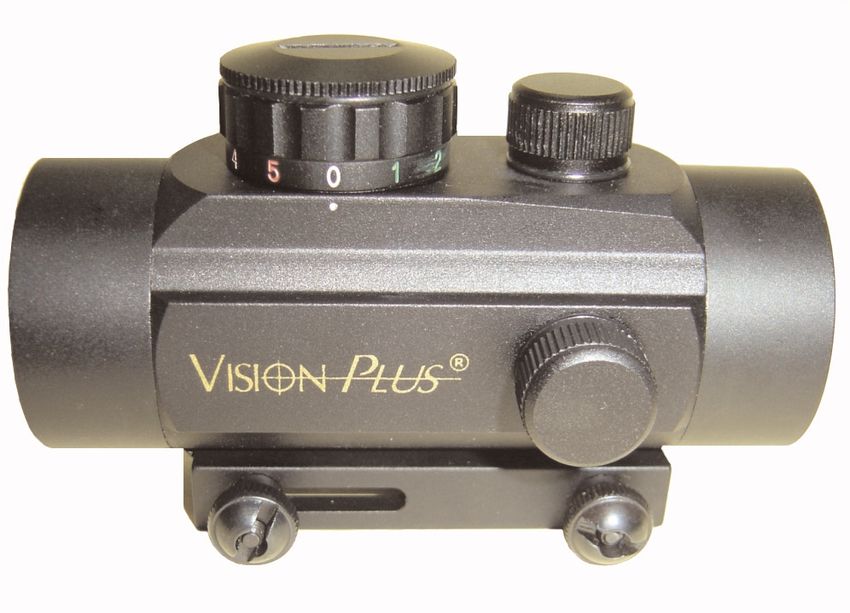
INTRODUCTION: Congratulations on your purchase of a VisionPlus® Dual Red/Green
Electronic Dot Sight. This is a quality product engineered to give you long service life and
enhanced shooting enjoyment. This manual contains instructions to enable you to use
your new sight properly. Please read this manual thoroughly and in its entirety to ensure
you understand all the instructions contained herein before you begin to use your new
electronic dot sight.

MOUNTING: Your new electronic sight can be mounted on any firearm (handgun, rifle or
shotgun) containing a Weaver-style mount or Picatinny rail. If your firearm does not have
either of these mounting options, consult a qualified gunsmith to have one of these
mounting systems installed on your firearm.

Your electronic dot scope is equipped with a built-in mounting rail. To use, loosen the two
screws on the mounting rail with a properly-sized screwdriver. Position the sight with the
rheostat (the large numbered dial) closest to you and slide the sight onto the firearm’s
rail, ensuring that both sides of the sight’s mounting rail engage the slots on your firearm’s
mount. Position the sight on your firearm to allow at least 3-inches of eye relief (the
distance between the scope and your eye when holding the gun in the firing position).

WARNING! Heavier recoiling firearms may require an eye relief greater than 3-inches to
ensure there is no contact between the sight and your eye to avoid injury.

Once you have determined the correct mounting position for the scope on your firearm,
tighten the screws on the sight’s mounting rail. Note: For additional security, you can add
a drop of thread-locking compound, such as Loctite® (available in hardware stores), to
the bottom of the screw heads’ bases to ensure the sight does not loosen during use.

INSTALLING THE BATTERY: Your sight is powered by a CR2032 3-volt “coin-style”
lithium battery. To install the battery, using a properly-sized screwdriver or coin, carefully
unscrew the slotted cap on the top of the rheostat’s adjustment knob to reveal the battery
compartment. Insert the battery with its positive side (marked with a “+” symbol) facing
up, or towards you. Replace the battery cover and tighten it using the screwdriver or coin.
Check the battery’s function by turning the adjustment knob on the rheostat to a number
other than “0”. Look through the sight and if you see that the reticle is dim or does not
light at all, replace the battery.

ZEROING THE SIGHT
WARNING! Since the zeroing process involves the actual firing of live ammunition, it
must be done at an approved range or equally safe area. Be sure to use eye and ear
protection when shooting.

The sight is equipped with both red and green illuminated reticles. Your choice of which
reticle to use depends on the lighting conditions at the time of use. To activate the
illuminated reticle, turn the rheostat knob to one of the red colored numbers (on the
rheostat’s base) to activate the red reticle or to one of the green colored numbers to
activate the green dot reticle. The higher numbers produce a larger, brighter reticle while
the lower numbers result in a dimmer, smaller reticle. The “0” position is used to turn the
unit off and conserve battery power.

Page 2                   VisionPlus® Dual Red/Green Sight Instruction Manual

Rest the firearm on a solid support and remove the windage and elevation adjustment
screw caps at the sight’s top and side. Turn the sight on and look through it at a paper
target (with a safe backstop) 50 to 100 yards away. Using a screwdriver or coin, adjust
the windage (to adjust horizontal bullet impact) and elevation adjustment (vertical bullet
impact) dials to align the lighted reticle with the target.

The elevation click adjustment is marked with the word “UP” and an arrow to indicate
clockwise turning will raise the bullet’s point-of-impact on the target. Consequently, turning
counter-clockwise will lower point-of-impact.

The windage click adjustment is marked with the letter “R” and an arrow to indicate
clockwise turns will move the bullet’s point of impact to the right. Counterclockwise turns
of the click adjustment will result in moving the point-of-impact to the left.

Fire three rounds at the target. Note the points-of-impact on the target. Adjust the
windage and elevation dials to bring the illuminated reticle in alignment with the center of
the three-round group fired. Fire another three rounds at the target and note the points-of-
impact. Adjust the windage and elevation knobs as necessary to bring the illuminated
reticle in alignment with the center of the fired group. You may have to repeat this
procedure several times until the scope is zeroed to your satisfaction.

When finished firing, shut off the sight to conserve battery power by turning the rheostat
until the number “0” is aligned with the stamped dot mark at the rheostat’s side.
Replacement batteries are readily available from many local retailers such as hardware
and jewelry stores. Request CR2032 3-volt “coin-style” lithium battery.

SIGHT CARE: Store your VisionPlus® sight in a clean, dry and ventilated area away
from corrosive material. If you will not use your sight for some time, it is a good idea to
remove the battery as batteries can sometimes leak acidic material which will ruin your
sight. Clean the lens surface with a lens cloth. Never try to disassemble your sight as this
can only be done by a qualified service station.

        Red or Green Dot Sight Specifications
     Power (magnification)                        1x
     Objective Diameter                           30 mm
     Tube Diameter                                39.5 mm
     Weight                                       206 g
     Length                                       103 mm
     Click Value                                  3/4 in
     Reticle                                      5 M.O.A. Red/Green Dot

                       VisionPlus® Dual Red/Green Sight Instruction Manual              Page 3
A B C D E F
G H
PARTS LEGEND: A. Eyeball B. Objective End C. Rheostat with Light Intensity
Adjustments D. Battery Compartment E. Elevation Adjustment Knob F. Windage
Adjustment Cap G. Screws with Locking Nuts H. Mounting Base
Your VisionPlus® Dual Dot Red or Green Sight comes with a
limited 3 year warranty against manufacturer defect.
VisionPlus® Dual Red/Green Electronic Sight
Distributed by:
Century International Arms, Inc.
236 Bryce Boulevard
Fairfax, VT 05454
www.centuryarms.com
Sales: 1-800-527-1252
Tel: 1-561-998-1997
Page 4 VisionPlus® Dual Red/Green Sight Instruction ManualYou can also read