ENDNOTE X8 INTRODUCTORY GUIDE - JANUARY 2018 - MASSEY UNIVERSITY
←
→
Page content transcription
If your browser does not render page correctly, please read the page content below
EndNote™ X8
Introductory Guide
This guide is a comprehensive introduction to using EndNote at Massey University Library.

January 2018

Table of Contents
What is EndNote? ........................................................................................................................................ 1
Creating an EndNote Library ........................................................................................................................ 1
     EndNote Synchronisation ....................................................................................................................... 1
The Library Window ..................................................................................................................................... 1
Entering and Viewing References
     Manual Entry........................................................................................................................................... 2
     Working With a Selected Reference ....................................................................................................... 4
     Bibliographic Styles ................................................................................................................................ 4
Getting Book Records via the Library Catalogue
     Using EndNote........................................................................................................................................ 5
Saving References from Article Databases into EndNote
    Discover/EBSCO Databases .................................................................................................................. 6
    Scopus .................................................................................................................................................... 7
    Web of Science ....................................................................................................................................... 7
    Google Scholar ....................................................................................................................................... 8
    PubMed................................................................................................................................................... 8
    SciFinder ................................................................................................................................................. 8
    ProQuest Databases ............................................................................................................................... 9
    Import Filters ........................................................................................................................................... 9
Managing Your Library
     Backing Up Your Library ....................................................................................................................... 10
     Searching Your Library ......................................................................................................................... 10
     Groups .................................................................................................................................................. 10
Full Text Management
     Automatic Find Full Text for an Existing Reference .............................................................................. 11
     Manually Attaching PDFs (or Other Files) to an Existing Reference ..................................................... 11
     Import PDFs Where There is no Existing Reference ............................................................................ 12
     Activating the MasseyLink Panel .......................................................................................................... 12
     Viewing the Full Text ............................................................................................................................. 12
     Removing a PDF (or Other File) From an EndNote Reference ............................................................. 12
     Display Defaults .................................................................................................................................... 12
Cite While You Write
     Toolbars/Tabs ....................................................................................................................................... 13
Word 2016/2013/2010/2007
     Setting Field Shading in Word .............................................................................................................. 14
     EndNote Tab ......................................................................................................................................... 14
     Inserting EndNote Citations into a Word Document .............................................................................. 14
     Formatting Citations and Bibliographies ............................................................................................... 15
     Changing the Formatting of Your Bibliography ..................................................................................... 15
     Editing citations ..................................................................................................................................... 15
     Removing and Moving Citations ........................................................................................................... 16
Mac Word 2011 (For Mac Word 2016—see from page 15, or the QuickStart Guide for Mac)
     Setting Field Shading in Word .............................................................................................................. 17
     EndNote Menu/Toolbar ......................................................................................................................... 17
     Inserting EndNote Citations into a Word document .............................................................................. 17
     Formatting Citations and Bibliographies ............................................................................................... 17
     Changing the Formatting of Your Bibliography ..................................................................................... 18
     Editing Citations .................................................................................................................................... 18
     Removing and Moving Citations ........................................................................................................... 19
Getting Help ......................................................................................................................................... 19-20
   Massey Profile Installer for Endnote ....................................................................................................... 20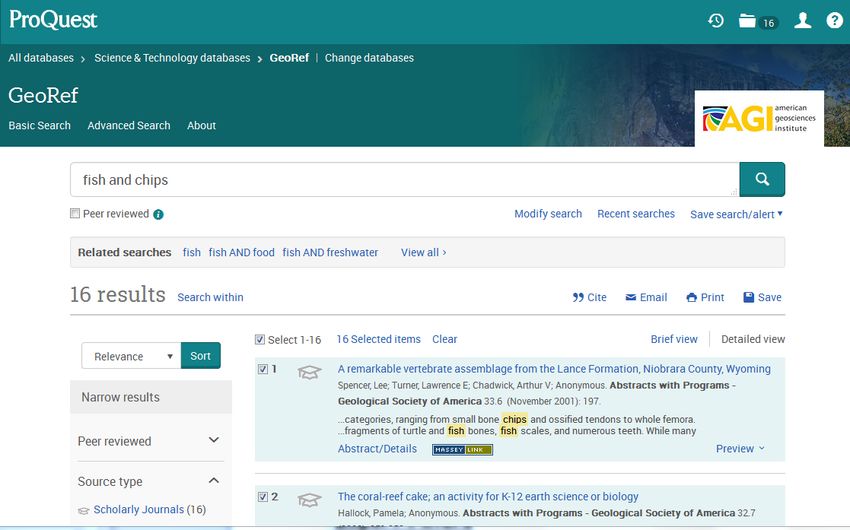
What is EndNote?
EndNote is a reference management programme that allows you to create, Note for Mac Users
The instructions should generally
store and manage your references and citations. Reference information can
be similar, except use the Apple
be added manually, and/or imported from article databases and catalogues. Command (⌘) key in place of Ctrl,
The records stored in your personal EndNote Library can be used to create and for right-clicking on a single-
bibliographies instantly in a variety of bibliographic styles, and citations can button mouse use Control-click.
be inserted into Word documents. You can also put PDF documents or other
files into your EndNote Library.
Creating an EndNote Library
1. Open the EndNote program from your Programs list.
2. Select File/New. This will open a box, you will need to name your new Library and choose where
you want to save it. EndNote may default to saving it in your My Documents folder.
3. Your new (empty) Library will appear on your screen.
EndNote Synchronisation
EndNote lets you have an online version of your library as an automatic backup, which also allows you
to synchronise and share your library across different computers. You can also access your library on
machines without EndNote, or allow shared access to groups/people via your EndNote account:
https://www.myendnoteweb.com.
The first time you synchronise your Library it will prompt for your
EndNote account login. If this does not happen automatically,
force it by clicking Sync Library on the menu bar (or if
you have not registered, click Sign Up) and follow any prompts.
Note: As you can only Sync one Endnote Library, use
Groups to arrange within your libraries (see pages 11-12).
Libraries must have identical names if Syncing multiple
machines.
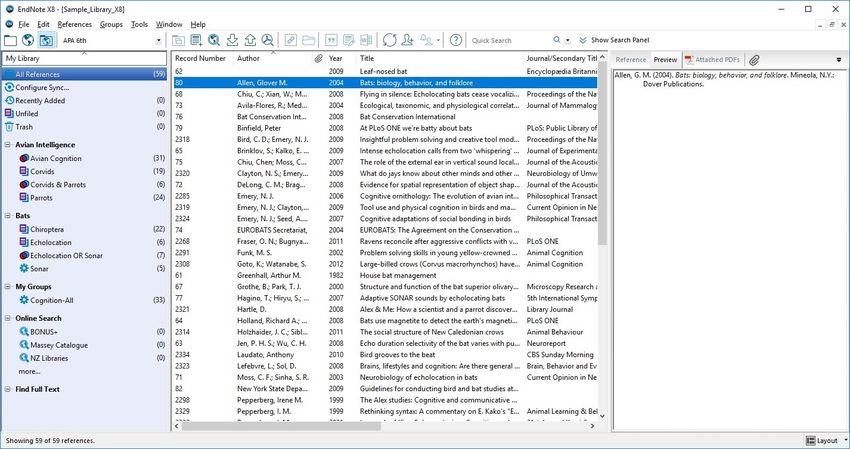
The Library Window
The Library window includes three panes:
1. The Groups pane lists
various groups of references
for easy retrieval. 1: Groups pane
2. The References pane
2: References pane
3. The Tab pane displays a 3:Tab pane
Preview tab to view how your
references will cite according
to the selected style, a
References tab for editing,
and a PDF view tab.
Tip:
Click on the Layout option to adjust the
arrangement for smaller screens
Massey University Library EndNote Introductory Guide (January 2018) 1
Tip: Hover your mouse
          The EndNote Toolbar                                                                           over the toolbar icons to see
                                                                                                        what they are.
Windows

                       Bibliographic Style Menu

                Integrated Mode            Find Full                  Sync                 Search Box               Tab Pane:
               must be selected for          Text                                                                 Preview/PDF/
                 full functionality                                                                               Reference Edit

                                                                                         Layout
 Mac

                                                                          Bibliographic Style
                                                                             (in preview pane)

          Entering and Viewing References

          Manual Entry
          There is no limit to the number of references you can add to a single EndNote Library.

          To manually add a new reference:
          1.   Select References/New Reference (Crtl-N). This will
               open a new reference template. The default reference
               type template is ‘Journal article’.

          2.       From the Reference Type drop-down box, select an
                   appropriate reference type template. EndNote will
                   configure your bibliography based on the reference type
                   you select here, therefore it is important to select the
                   most appropriate template you can find. Think carefully
                   about what you want to reference before you select the                           2: Reference Type menu
                   reference type template (e.g. is it a book, an edited book
                   or a book section/chapter?
                   Note: For published conference papers use Book
                   Section (or Journal Article if with volume no.s)

          3.       Once you have selected the appropriate template you
                   can add the reference information you have. There are
                   no compulsory fields and additional information can be
                   added later.

          4.       Close the reference window once you have finished using
                   the close (and save) button (the lower X in the top right
                   corner), or using Crtl-W.

          5.       You can see how the reference will appear in a
                   bibliography by looking at the Tab Pane with the Preview
                   tab selected. The reference will be formatted according to
                   the bibliographic style selected in the drop-down box at
                   the top left of the screen (see page 4 for adding relevant
                   bibliographic styles to this drop-down box).
          Massey University Library EndNote Introductory Guide (January 2018)                                                           2
EndNote Reference Window
Reference Type Change Case Close & Save
menu Button this reference
Previous & Next
Reference buttons
Edit any text as needed in the
appropriate fields.
You can also edit references us-
ing the Reference option in the
Tab Pane (however the edit
toolbar is not available in that
mode).
Notes:
Punctuation
Do not add extra punctuation or text styles to the reference information (e.g. parentheses around the year,
bold, italics). EndNote will add punctuation and formatting when it formats a bibliography if it is required by
your selected style.
Authors
Author names can be entered First Middle Last or Last, First Middle (e.g.
Carol Margaret Jacobs or Jacobs, Carol Margaret).
Multiple Authors/Editors
Each individual author must be entered on a separate line (press Enter to get a new line).
Organisational Authors
Enter with a comma at the end e.g. World Health Organisation,
Autocomplete
As you enter author names, titles, and keywords EndNote will supply possible words based on previous
entries. New entries in these fields will initially appear in red font. You can select the supplied word by
pressing Enter or Tab.
Titles
Enter these in the correct case for your bibliographic style (e.g.: Sentence case for article or book titles; or
Title Case for journal titles. Check a style manual if you are unsure. Use the Change Case button options to
fix.) You must also enter the punctuation required within the title (e.g. a colon before a subtitle). Enter italics or
other formatting when required (such as for Species Names). Some titles may import with ALL CAPS which
will need correcting if citing.
Massey University Library EndNote Introductory Guide (January 2018) 3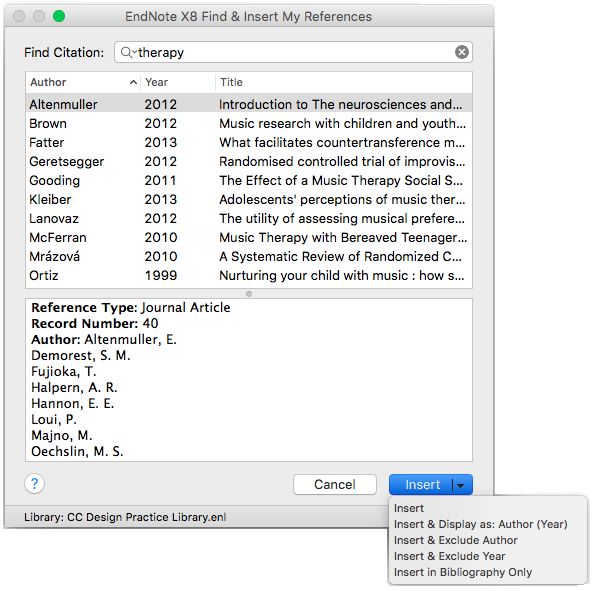
Notes and/or Research Notes
These fields can be used to add your own comments to the reference. They are searchable fields, and will not
appear in your bibliography.
Record Numbers
As you enter references into your EndNote Library (either manually or by importing from
databases) each record is allocated a Record Number.
This number is allocated in the order in
which the records were first added to the
Library, and it does not change even if
previous record numbers are deleted. If
you display the record numbers in your
Library you can use these to help identify
any problematic references in your Word
document.
Working with a Selected Reference
To work with an individual record, select it by double-clicking on it. A Reference Window will appear showing the
full record. This is where you edit information associated with a reference. As discussed above, each record is
based on a Reference Type template, with a series of fields which contain the information. None of the fields are
compulsory, and information can be added over a period of time e.g. you can use the notes field later to
annotate the reference.
1. To close and save the Reference click on the lower X in the top right corner (or
1
use Crtl-W). Tick the box if you do not wish to be prompted each time you
save.
2. You can toggle hiding or showing empty fields using the Show Empty Fields tick
box in the top right hand corner. This can save scrolling to find information.
2
Tip: Reference Updating
You can check for database updates to a reference by highlighting the one you wish to check, then go
to the References menu (or right-click) and select Find Reference Updates…
Bibliographic Styles
EndNote comes with around 500 of the most popular bibliographic styles preinstalled.
A drop-down box on the toolbar shows which ones you have selected for use. When
you click on the Preview tab in the tab pane the reference highlighted will be
formatted according to the bibliographic style selected in this drop-down box.
To select other bibliographic styles you want to use:
1. Click on Select another style from the drop-down box. The EndNote Styles
window will appear.
2. Pick the style you want, highlight it, and select Choose. The new style will
appear in the drop-down box.
3. Click the Preview tab in the Tabs pane to see how references will format
Massey University Library EndNote Introductory Guide (January 2018) 4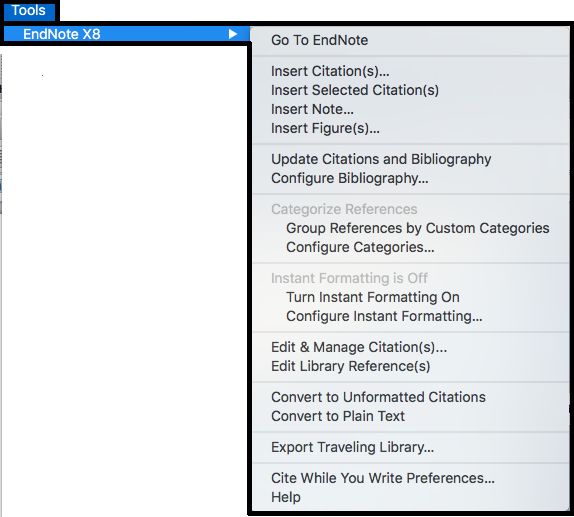
To preview and select preinstalled styles:
1. Click on Edit/Output Styles/Open Style Manager.
2. Tick the box for the styles you want
3. When finished, close the window with the X in the top right
corner. The selections will be automatically saved to the drop-
down box on the toolbar.
Find by is used to search by subject.
Click on the Style Info/Preview button to toggle between an
explanation and a preview of a style.
Tip: Loading Other Styles
A further 6,000+ are available from the Endnote website: http://
endnote.com/downloads/styles.
Once you have downloaded the style you want, to load it:
1. Click on it to open it.
2. Go to the File menu in Endnote and select Save as.
3. A box will appear – save it as StyleName (ie: delete the COPY bit).
4. Quit out of the style.
5. You can now choose Select Another Style… on the style menu to
access it.
Getting Book Records via the Library
Online Search Using EndNote
Online searches import records directly from library catalogues and other sources. The Online Search in the Groups
pane lists your "favourite" sources for searching. This method of importing can be used for the Massey University
Library (Discover) and BONUS+ databases.
1. Under Online Search, select a source to search from. If the resource you want to search is not listed click on
More. (If it is not on this list, download and run the Massey Profile
Installer - available from: http://www.massey.ac.nz/massey/research/library/
help-and-instruction/endnote/endnote_home.cfm.)
2. When the connection has been established, the Search tab will appear and you
can enter your search (such as an ISBN number, keywords, or title, etc. If
needed, use the drop-down menu in the search box).
3. Click on Search. A box will appear at the top of the references pane with the number of retrieved records. Click
OK to retrieve the references to your EndNote library.
Search tips:
You can extract individual records by searching on the ISBN number or other keyword(s) distinctive to that
record.
Truncation is mostly accepted on search terms ( usually * or ?)
If a search returns multiple records, delete any records you do not want in your library by
selecting them and click-and-drag them to the trash, or using the Delete key
Massey University Library EndNote Introductory Guide (January 2018) 5
Saving References from Article Databases into EndNote
Most databases allow you to directly export the results of your searches to your EndNote Library. The
method used depends on the database. Instructions for each of the major Massey University databases
can be found below. For other instructions contact your Subject Librarian.
When records are imported they will initially appear in an Imported Reference group. They will also
automatically be added to your EndNote Library as part of the All References group. Delete any records
you do not want in your library by selecting them and pressing the Delete key, or click-and-dragging them to
the Trash.
Notes:
The quality of the imported results varies between databases. You will need to check the references
in EndNote, and you may need to edit them. Look out for: data appearing in incorrect fields; incorrect
formatting of the title field (e.g. capitalisation); incorrect reference type template selected, no spaces
between author initials, etc.
Internet Browser Compatibility
Mozilla Firefox performs best, followed by Google Chrome and Internet Explorer or Edge. You may
be unable to direct export using Safari or other browsers.
Mac Users
When following the instructions below the EndNote Library may not open automatically. You may
instead be prompted to select an application and/or the relevant Endnote Library.
Internet Explorer/Edge Users
IE’s security may block or save the file download. Click the security bar, or Save, to then open the
file. You may also be prompted to select the Endnote Library to put the references into.
Discover/EBSCOHost Databases
(e.g. Discover, Academic Search Premier, Business Source Complete, CINAHL, EconLit, ERIC, Historical
Abstracts, MasterFILE Premier, Philosophers Index, PsychInfo, RILM, SPORTDiscus, etc)
Go to your database, do a search and click the folder+ icon for the records you want to save.
1. When ready - go to the folders icon on the top right of the Discover page.
2. Select the records you want to export to EndNote (selecting none exports everything).
3. Click the Export icon. 4. Mark the radio button Direct Export in RIS Format
5. Click Save. EndNote should open automatically.
(A box may appear prompting for the EndNote Library you want to deposit the records into, and/or
asking you to Open or Save the file - click Open. You may also be prompted with a list of filters to
choose from. If so - choose the RefMan RIS filter.)
Note:
The records will need checking. Books may be more cleanly imported using Online Search (see p5)
Massey University Library EndNote Introductory Guide (January 2018) 6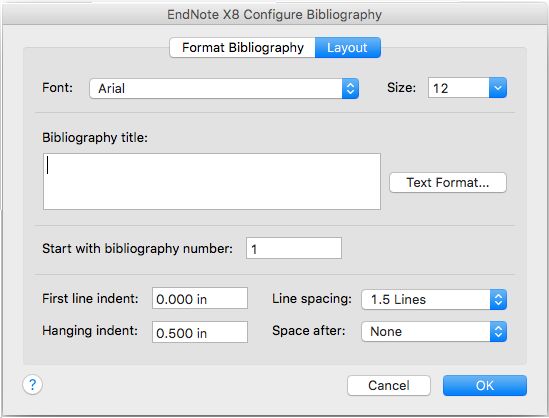
Scopus
    Go to your database, do a search and select the record(s) you wish to export by ticking the relevant box
    (es), then:

    1.       Click on Export.
    2.       Choose RIS format (eg: EndNote, Reference Manager)
    3.       From the boxes select the information you want to export.

                                                    2

         3

    4.    Click Export.
    EndNote should open automatically. A box may appear prompting you to select the EndNote Library you
    want to deposit the records into, and/or asking you to Open or Save the file - click Open.

Web of Science
(e.g. Web of Science, CAB Abstracts, Biological Abstracts, MEDLINE, FSTA, Current Contents,)

After searching, you can select the reference(s) you wish to export by ticking the relevant box(es).

From the Results screen:
1.    Select the records you want to save (or select none if you wish to specify a range)
2.    Scroll to the top or bottom of the results list and select the Save to EndNote… menu  and select Save to
      Endnote desktop.
3.    A box will appear. Select the options you want and click Send.
      (Your browser may prompt you to select the EndNote Library you want to deposit the records into, and/or
      asking you to Open or Save the file - click Open.)

                  2                     3

Tip: Exporting an Individual Record From a Database
When viewing an individual record in most databases, you can click on the Save to EndNote... or
relevant Export option to immediately export that record in full record format.

Massey University Library EndNote Introductory Guide (January 2018)                                              7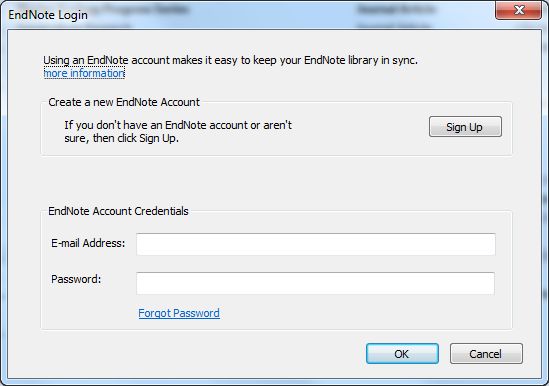
Google Scholar
 Google Scholar records must be exported individually - there is no way to export a set of results. The records
 will not contain any abstracts or keywords, as Google Scholar exports only citations.

 1.    In Google Scholar, click on the             link on the top of the Scholar homepage.
 2.    From the Bibliography Manager section, select Show links to
       import citations into, and pick EndNote from the drop-
       down box. Click on Save.
 3.    Do a search in Google Scholar. Click on the Import into
       EndNote under the result you want to save to EndNote.
       EndNote should open automatically. You can only export one result at a time.
       (A box may appear prompting you to select the EndNote Library you want to deposit the records into,
       and/or asking you to Open or Save the file - click Open. The records will need checking and editing.)

                                                                             3

PubMed
(i.e. MEDLINE - public version)

Go to PubMed and do a search.
1.    On the results page, tick the records you want
      to export.
2.    Click on Send To at the top of the results list.
3.    Select Citation Manager from the menu.
4.    Click on Create File to send to EndNote.

SciFinder
(i.e.: Chemical Abstracts, MEDLINE)

When you have a list of references in SciFinder
1.   Click on Export on the top right
2.   Confirm what you want to Export
3.   The default is set already, so just click Export

(A box may appear prompting you to select the
EndNote Library you want to deposit the records into,
and/or asking you to Open or Save the file - click
Open.)

 Tip: Abbreviated Journal Titles (PubMed, SciFinder)
 These databases may bring in abbreviated journal titles instead of full. A fix for journal title
 abbreviations is at: http://endnote.com/kb/82228. Or you can search for these references on
 other platforms (eg: Scopus, Web of Science).

Massey University Library EndNote Introductory Guide (January 2018)                                               8
ProQuest Databases
(e.g. ARTbibliographies Modern, Design & Applied Arts Index, GeoRef, Linguistics & Language Behavior
Abstracts , Proquest Dissertations, Social Services Abstracts, Sociological Abstracts, etc)
Go to your database and do a search.
1. Tick the records you want to save.
2. Click Save and choose RIS (works with EndNote, Civati, etc)
2
1
3. Confirm the options in the box that appears, and click Continue.
(A browser box may appear prompting you to select the EndNote
Library you want to deposit the records into, and/or asking you to open or
Save the file - click Open.)
Import Filters
Sometimes EndNote prompts you to select an import filter to allow it to import the references into your End-
Note Library. EndNote comes with some of these filters already installed, allowing you to import references
from most databases.
To view all the installed import filters, open EndNote and:
1. Select Edit/Import Filters/Open Filter Manager.
2. Once you have finished marking the filters you are likely to use, close the screen with the lower X in
the top right corner.
Your selections will be automatically saved.
Note:
Some databases have multiple providers, so it is important to select the provider that Massey University
Library uses. For help, contact your Subject Librarian (see page 21).
In some cases the exact filter for your database may not be installed by default into EndNote.
Most databases have filters available, and new filters are constantly under development for those
databases that will support them. A range of the latest filters can be downloaded from the EndNote
website: http://endnote.com/downloads/filters
Massey University Library EndNote Introductory Guide (January 2018) 9To add a new filter to your Endnote programme:
1. Download your desired filter
2. Double-click on the file to open it.
3. Go to the File menu and select Save as.
4. A box will appear – save it as Filter Name (ie: delete the COPY bit).
5. Quit out of the filter.
6. In Endnote, go to menu and select File/Import/File. You can now change the Import option to Other
Filters… to access your filter.
If you need any help with filters please contact your Subject Librarian (see page 20).
Managing Your Library
Backing Up Your Library
Automatically: Syncing you Library (see page 1) automatically updates a copy of your Library using
your EndNote account. However you can still do occasional backups of your Library as a precaution.
Manually: EndNote allows you to save your complete Library to a single compressed file (.enlx). The
compressed file includes the Library (.enl file) along with its accompanying data folder (.data). Saving this
way minimises the danger of loosing your PDF links and other problems. To save a compressed Library
file, open the Library:
1. Go to File/Compressed Library.
2. Select what you want to save (the default saves the whole library) and click Next.
3. Choose where you want to save it to.
Clicking on the .enlx file will make EndNote open and recreate the .enl library file and .data folder.
Searching Your Library
It is possible to search All References in your EndNote Library by using the Quick Search box in the menu
bar - just enter a keyword(s) and press Enter.
For a more sophisticated, or group-specific search:
1. Select the Group you wish to search
2. Click on Show Search Panel in the menu bar, enter the search criteria and select from
the drop-down boxes the fields you want to search.
Groups (see Groups pane)
The Hide/Show Groups command can be found under Groups on the Menu Bar.
Permanent (Automated) Groups
All References
Click to view all of the references in the current Library.
Trash
To move references to the Trash select highlight them and press the Delete key. You will be
prompted to empty the trash whenever you close the Library.
Massey University Library EndNote Introductory Guide (January 2018) 10Temporary (Automated) Groups
Duplicate References
Displays the results of duplicate detection in an EndNote library. These can be searched for using
References/Find duplicates for any group. EndNote will prompt for you to select which record to
Keep, or click Cancel if you want the default selection (latest record added). These will be
highlighted so you can click the Delete key to remove.
Find Full Text
Displays the last group of references for which EndNote inserted either the full text file or a URL - or has
not found. When you close the library, this group is deleted.
Imported References
Displays the last group of references imported into the library. When you close the library, the group is
deleted.
Search Results
Displays the most recent search results. When you close the library, the group is deleted.
User Created Groups
Up to 5000 Groups or Group Sets can be created. These appear in the left-hand Groups pane. For group
functions, use the Groups menu on the toolbar, or right-click on the Groups Pane.
1. Custom Groups are updated only when you add or remove
references by dragging them into the group. Custom Groups can be
renamed and references in a group remain in the All References Group.
2. Smart Groups use keyword(s) to match references in your
library. As more references are added to your library the Smart Groups
automatically update.
3. Individual groups can be placed into Group Sets for easier
management.
4. From Groups combine results from other groups
Full Text Management
EndNote is capable of storing PDFs and other files. When linked to the relevant EndNote reference they are
placed in the Library’s accompanying data folder e.g.:
and automatically synced to your EndNote online account.
There are 3 ways to get PDFs into your Library:
1) Automatic Find Full Text for an Existing Reference
Highlight one or more references and click the Find Full Text icon on the menu bar. (Off campus and
wireless users will be prompted to enter their Massey login.) If EndNote is able to find the full text, it will down-
load and attach it to the reference(s) as a file attachment.
2) Manually Attaching PDFs (or Other Files) to an Existing Reference
To manually attach a PDF to an existing reference - resize your EndNote window so that you can see the file
required (e.g. on your desktop) and then ‘click, drag and drop’ the PDF onto the reference in your EndNote
library.
Massey University Library EndNote Introductory Guide (January 2018) 113) Import PDFs Where There is no Existing Reference
1. Go to File/Import. Select Folder for multiple PDFs.
2. Choose the file or folder to import.
3. For folder, tick the desired options. (The Group Set option
creates a group (pdfs) that you can rename.)
4. Make sure the Import Option is set to PDF.
5. For the Duplicates option—select Discard
Duplicates to ignore records already in your Library.
6. Click Import.
EndNote will create a reference for the PDF where it can extract information from it. For the rest it creates a
record with the filename as the title.
Tip: Activating Access
Full text will be retrieved for only a portion of the articles which you can access electronically. You can
check the remaining articles by highlighting a reference and right-clicking and selecting URL/OpenURL
Link. This activates the panel in your browser to further check for a link, and also offers a link
to the catalogue to check whether the journal is held.
To View the Full Text:
Select a reference with an attachment symbol and click the PDF tab in the Tab pane to view the file in
EndNote’s pdf previewer. To open your pdf in an external pdf reader, click the Open PDF icon on the
toolbar.
Removing a PDF (or Other File) From an EndNote Reference
This process cannot be undone, so ensure you have a backup of the original file f you want to keep it.
1. Open the relevant reference in your EndNote Library.
2. Scroll down to the File Attachments field.
3. Highlight the file icon(s) you want to remove and press your Delete key. The document will now have
been removed from the accompanying .data folder and synced library.
Display Defaults
The default display of the EndNote Library can be altered. To select which fields you want to display:
1. Select Edit/Preferences (or Endnote:Preferences on a Mac).
2. Click on Display Fields from the list on the left.
3. Use the drop-down boxes to select the Field and Heading you want to display in each column.
4. Click on Apply.
Clicking on a Display Field heading sorts the records by that field
Notes:
You will need the Journal/Secondary title selected to see the titles of journals displayed
It is useful to display the Record Number field and the File Attachments field.
To re-sort the columns click on the relevant column heading that you want to sort by e.g.
clicking on Year will sort the Library by ascending year, clicking again for descending year.
Massey University Library EndNote Introductory Guide (January 2018) 12Cite While You Write (Microsoft Word)
The EndNote menu and toolbar in Microsoft Word differs between Word 2016/2013/2010/2007 and Mac
Word 2011. ( Note: Some commands have been rearranged - see below.).
Mac Word 2011 Menu
Also applies to:
OpenOffice 3
Mac Pages
1. Go to EndNote
2. Insert Citation(s)… [by searching]
3. Insert Selected Citation(s)
4. Edit & Manage Citation(s)
5. Insert Note
6. Update Citations and Bibliography
7. Configure Bibliography
8. Turn Instant Formatting Off
9. Edit Library Reference(s) Mac Word 2011 Floating Toolbar
10. Convert to Unformatted Citation(s)
11. Convert to Plain Text
12. Export Travelling Library
13. Cite While You Write Preferences
14. Help 1 2 2-5 Style Menu 6-8 9-14
Word 2016/2013/2010/2007 Tab
2-3 Configure Bibliography
Massey University Library EndNote Introductory Guide (January 2018) 13Word 2016/2013/2010/2007
Tip: Setting Field Shading in Word
It is important to set the field shading in Microsoft Word to highlight your EndNote citations to
minimise accidental deletion. The highlighting will not print.
1. Word 2016/2013/2010: Click on the File tab in the top left corner of your Word window and
select Options.
Word 2007: click on the round multicoloured Microsoft Office icon
in the top left corner of your Word window and select Word Options.
2. Click on Advanced.
3. Go about half way down the page, and set the Field Shading drop-down box to Always.
4. Click OK.
EndNote Tab Menu
The EndNote menu is usually the final tab (right-hand) tab on the menu bar. (See the bottom of page 13 for
an illustration.)
Inserting EndNote Citations into a Word Document
Inserting a citation to a reference from an EndNote Library is relatively
straightforward.
1. Open your EndNote Library, and the Microsoft Word document you want to
cite in.
2. Place your cursor in the Word document where you want the citation to
appear.
3. Switch to your EndNote Library, and locate and highlight the relevant
reference(s) you want to cite. (For multiple references —hold down the Ctrl
key when you click them.)
4. Click Insert Citation on the Endnote toolbar, or switch to Word, go to the EndNote tab and click on
the bottom half of the Insert Citation button and choose Insert Selected Citation(s).
Tip: Inserting Searched References
If you have a larger library, you can use
the Search facility to find your
reference(s). In Word, go to the
EndNote tab and click on in the
upper half of the Insert Citation icon/
button.
This opens the search box
where you can enter the author or
other term(s) to find your reference(s).
Highlight the one(s) you wish to insert
and click the Insert button.
Massey University Library EndNote Introductory Guide (January 2018) 14Formatting/Updating Citations and Bibliographies
By default, EndNote is set to allow instant formatting - which means your newly inserted citation will be
formatted immediately according to the selected citation style and it will be added to your reference list/
bibliography at the end of your Word document. Sometimes in long documents this can be a slow process.
To turn On or Off:
2
3
Configure
Bibliography
1. In Word, click on the EndNote tab.
2. Click Instant formatting Is On to toggle it On and Off.
If you do not have instant formatting enabled you will need to manually update your bibliography in order to
appropriately format your citations and generate a bibliography.
1. In Word, click on the EndNote tab.
2. Select the appropriate bibliographic style from the drop-down box Style. If the style you want does
not appear in this list, select Choose Another Style… If the style is still not listed, you will need load it
manually (see the Tip box on page 5).
3. Click on Update Citations and Bibliography.
Tip: Copying References Directly to Word Without Using Cite While You Write
1. Select the style you wish the references to be in.
2. In EndNote, select the reference(s) you wish to copy (hold the ctrl key while clicking).
3. Right-click: Copy Formatted and paste the reference(s) into Word.
Changing the Formatting of Your Bibliography
1. Click the Configure Bibliography box (bottom right of the
‘Bibliography’ section - see above)
2. Select the relevant tab and make changes as appropriate:
Format bibliography – this allows you to change the
document being formatted and bibliographic style
selected.
Layout –lets you give your bibliography a title; change
the font, line spacing etc.
3. Click OK when finished.
Editing Citations
You can edit your in-text citations, once your bibliography is formatted, e.g. to insert page numbers for
direct quotations, exclude the author or year from the display, add prefix or suffix comments.
To edit a citation:
1. In Word, place your cursor on the citation you want to edit.
2. Right-click: Edit Citation/More..., or go to the EndNote tab in Word and click on Edit & Manage
Citation(s).
Massey University Library EndNote Introductory Guide (January 2018) 153. Highlight the citation to modify it. Enter page numbers,
prefixes or suffixes as needed in the boxes. (Click on the
Help button for explanations.)
4. Click on OK. The changes will now show in the citation in
your Word document.
Tip:
From the Format box you can select Author (Year) format
or other options as desired. Alternatively, right click on a
citation and select Edit Citation(s).
Removing and Moving Citations
Do NOT delete references from your Word document by highlighting and cutting or using the delete button on the
keyboard, particularly if there are multiple in-text citations in the same parentheses – e.g. (Smith, 2000; Jones,
2001; Mathers, 2005). In some instances the reference will reappear when the bibliography is next formatted, in
other cases it can cause corruptions to occur in the document.
The correct way to remove or move an in-text citation is to remove it using the Edit Citation tools.
To Delete or Move Individual Citations
1. In Word, place your cursor on the citation you want to remove/
move.
2. Right-click: Edit Citation/More..., or go to the EndNote tab in Word
and click Edit & Manage Citation(s).
3. In the left hand column ensure the reference(s) you want to delete
is selected.
4. Click on the Edit Reference dropdown and select Remove Citation.
5. When you have removed all the references you want to delete,
click OK.
To move a reference: remove (as above) then reinsert it at its new location in the Word document.
To Delete or Move a Block of Text With Multiple Citations
1. Highlight the text you wish to delete or move (or
select nothing to do the whole document).
2. Unformat the citations by clicking on Convert
Citations and Bibliography and select Convert
to Unformatted Citations.
3. Delete or move the entire block of text (including
the citations) using Word.
4. Click Update Citations and Bibliography to
reformat your bibliography.
Note:
When you unformat in a document it may turn off the Instant Formatting. Hence your next citation may
insert with brackets {...}. If this happens, turn the Instant Formatting back on (see the top of p15).
Massey University Library EndNote Introductory Guide (January 2018) 16Mac Word 2011
(Note: For Word 2016 see pages 14-16, or the QuickStart Guide for Mac)
Tip: Setting Field Shading in Word
It is important to set the field shading in Microsoft Word to highlight the EndNote citations to
minimise accidental deletion. The highlighting will not print. In Word:
1. go to Word/Preferences and select the View tab.
2. set the Field Shading drop-down box to Always and click OK.
EndNote Menu/Toolbar
The EndNote menu can be accessed via the Word Tools menu, or via the EndNote toolbar. Click on Tools/
EndNote X8 and follow the right arrow to access the EndNote menu.
Inserting EndNote Citations into a Word Document
Inserting a citation to a reference from an EndNote Library is relatively straightforward.
1. Open your EndNote Library, and the Microsoft Word document you want to cite in.
2. Place your cursor in the Word document where you want the citation to appear.
3. Switch to your EndNote Library, and locate and highlight the relevant reference(s) you want to cite. (For
multiple references - hold down the Command key when you click them.)
4. Click Insert Citation on the Endnote menu bar, or
switch to Word, go to the EndNote toolbar—Citations:
Insert Selected Citation(s).
Tip: Inserting Searched References
If you have a larger library, you can use the search
facility to find your reference(s). In Word, go to the
EndNote toolbar and click the Search icon.
This opens the search box where you can enter the
author or other term(s) to find your reference(s).
Highlight the one(s) you wish to insert and click the
Insert button.
Formatting Citations and Bibliographies
By default, EndNote is set to allow Instant formatting - which means your newly inserted citation will be format-
ted immediately according to the selected citation style and it will be added to your reference list/bibliography at
the end of your Word document. Sometimes in long documents this can be a slow process. To turn on or off, in
Word, go to the EndNote toolbar and toggle Bibliography: Turn Instant Formatting Off/On.
Massey University Library EndNote Introductory Guide (January 2018) 17If you do not have instant formatting enabled you will need to manually format your bibliography in order to
appropriately format your citations and generate a bibliography.
1. In the Endnote toolbar, select the
appropriate bibliographic style from the
drop-down box. If the style you want does not appear in this list , click Select Another Style… or
return to your EndNote Library to load it if it isn’t on this longer list (see page 5.)
2. In the Word Endnote toolbar, click on Bibliography: Update Citations and Bibliography or select
Tools/EndNote X8/Update Citations and Bibliography.
Tip: Copying References Directly to Word Without Using Cite While You Write
1. Select the style you wish the references to be in.
2. In EndNote, select the reference(s) you wish to copy (hold the ctrl key while clicking).
3. control-click: Copy Formatted and paste the reference(s) into Word.
Changing the Formatting of Your Bibliography
1. On the EndNote toolbar in Word, choose Bibliography:
Configure Bibliography.
2. Select the relevant tab and make changes as appropriate.
Format Bibliography – this allows you to change the
document being formatted and bibliographic style
selected.
Layout – this allows you to give your bibliography a
title, change the font, line spacing etc.
3. Click OK when finished.
Editing Citations
You can edit your in-text citations, once your bibliography is formatted, e.g. to insert page numbers for
direct quotations, exclude the author or year from the display, add prefix or suffix comments.
To edit a citation:
1. In Word, place your cursor on the citation you want to
edit.
2. In the EndNote toolbar in Word, click on Citations: Edit
and Manage Citation(s)
3. Highlight the citation to modify it. Enter page numbers,
prefixes or suffixes as needed in the boxes. (Click on the
Help icon for explanations.)
4. Click on OK. The changes will now show in Word.
Tip:
From the drop-down box you can select Author (Year)
or other options as desired.
Massey University Library EndNote Introductory Guide (January 2018) 18Removing and Moving Citations
Do NOT delete references from your Word document by highlighting and cutting or using the delete button
on the keyboard, particularly if there are multiple in-text citations in the same parentheses – e.g. (Smith,
2000; Jones, 2001; Mathers, 2005). In some instances the reference will reappear when the bibliography is
next formatted. In other cases it can cause corruptions in the document.
The correct way to remove or move an in-text citation is to remove it using the Edit Citation tools.
To Delete or Move Individual Citations
1. In Word, place your cursor on the citation you want to remove.
2. Go to the Endnote toolbarin Word and select Citations: Edit & Manage Citation(s)
3. In the list of citations, ensure the reference you want to delete is selected.
4. Click on ▼ and select Remove Citation.
5. Remove all the references you want to delete, click OK
If you want to move the citation, you can now reinsert your citation elsewhere.
To Delete or Move a Block of Text with Multiple Citations
1. Highlight the text in the Word document you want to delete or move. (Selecting nothing unformats the
whole document.)
2. In the EndNote toolbar in Word - use Tools: Convert to Unformatted Citations
3. Delete or move the entire block of text (including the citations) using Word.
4. Click on the toolbar Bibliography: Update Citations and Bibliography to update changes into your
document. (You may be prompted to resolve any problematic citations.)
Note: When you unformat a document it may turn off the Instant Formatting. Hence your next
citation may insert with brackets {...}. If this happens, turn the Instant Formatting back on (see bottom of pg
17).
Getting Help
EndNote Help
EndNote comes with a help facility which can be searched or browsed. You can find this inside the End-
Note programme – select Help on the toolbar or on the EndNote menu.
EndNote Support Page
EndNote provides a range of online resources for Windows and Mac (http://clarivate.libguides.com/
endnote_training/users/enx8), including links to tutorials, handout downloads and user manuals.
Other EndNote Sites
The EndNote website also offers FAQs and general software support.
http://www.endnote.com
http://www.endnote.com/support/faqs/
EndNote Online help: http://www.myendnoteweb.com/help/en_us/ENW/help.htm
Massey University Library EndNote Introductory Guide (January 2018) 19Massey University Library Support
Visit Massey Library’s Endnote webpage http://www.massey.ac.nz/?ea2525342e
Massey EndNote Profile Installer
QuickStart Video tutorial
In-depth introduction to EndNote PDF
Register for an Endnote class (face-to-face or online)
FAQs
EndNote@Massey Blog
Contact a librarian:
Phone 0800 MASSEY (0800 627 739) and ask for the Library
Email library@massey.ac.nz
Referencing Styles
EndNote is designed to assist you with storing and formatting your references; however you should still be
familiar with the bibliographic style you are using. If you are uncertain how a citation should appear in your
bibliography you should check an appropriate bibliographic style manual. Copies of most manuals are avail-
able in the Library, and some information can be found online. Check the Massey University Library cata-
logue.
Massey University Online Writing and Learning Link (OWLL): Referencing
http://owll.massey.ac.nz/main/referencing.php
Massey University Library EndNote Introductory Guide (January 2018) 20You can also read