Escritorio Movistar Latam - for Windows Legal Notice | Telefónica Móviles España
←
→
Page content transcription
If your browser does not render page correctly, please read the page content below

Escritorio Movistar Latam
              for Windows®

    Legal Notice | Telefónica Móviles España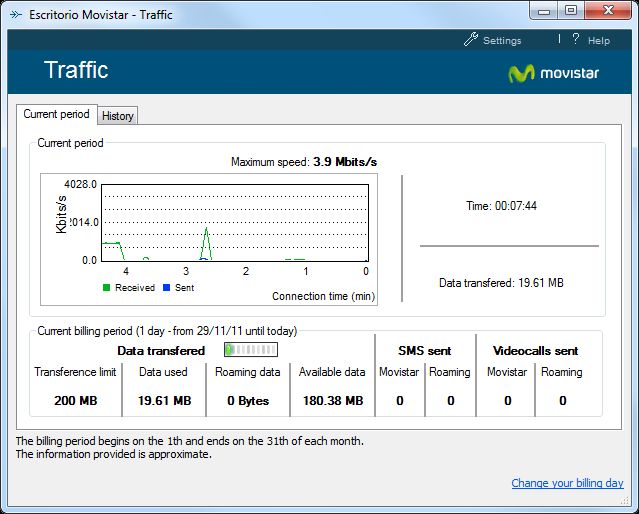
Escritorio Movistar Latam for Windows - User Manual

                                                                      Contents
1.          WHAT IS ESCRITORIO MOVISTAR LATAM? .................................................................................. 4
2.          ESCRITORIO MOVISTAR LATAM INSTALLATION ........................................................................... 5

     2.1.          REQUIREMENTS FOR INSTALLATION .................................................................................................... 5

     2.2.          INSTALLATION PROCESS ................................................................................................................... 5

3.          DEVICE CONNECTION INSTALLATION ........................................................................................... 7

     3.1.          REQUIREMENTS FOR INSTALLATION .................................................................................................... 7

     3.2.          MOBILE INTERNET DEVICE................................................................................................................ 7

4.          HOW TO USE ESCRITORIO MOVISTAR LATAM ............................................................................. 9

     4.1.          HOW TO START UP ESCRITORIO MOVISTAR LATAM ............................................................................... 9

     4.2.          COMPOSITION OF GRAPHIC INTERFACE ............................................................................................. 10

5.          ESCRITORIO MOVISTAR LATAM SERVICES ................................................................................. 15

     5.1.          SMS .......................................................................................................................................... 15

     5.2.          CONTACTS .................................................................................................................................. 18

     5.3.          FAVOURITES ................................................................................................................................ 19

     5.4.          VIDEOCALL .................................................................................................................................. 19

     5.5.          WI-FI AREAS ............................................................................................................................... 20

     5.6.          MOVISTAR SHIELD ........................................................................................................................ 21

6.          SETTINGS ................................................................................................................................... 22

     6.1.          OPTIONS .................................................................................................................................... 22

     6.2.          DISPLAY ...................................................................................................................................... 23

     6.3.          DEVICES ..................................................................................................................................... 24

     6.4.          MY INTERNET CONNECTIONS .......................................................................................................... 24

     6.5.          SERVICES .................................................................................................................................... 27

     6.6.          ALERTS ....................................................................................................................................... 29

7.          TRAFFIC ..................................................................................................................................... 30
8.          ESCRITORIO MOVISTAR LATAM HELP ........................................................................................ 32

                                                                                                                                                 Page 2 of 46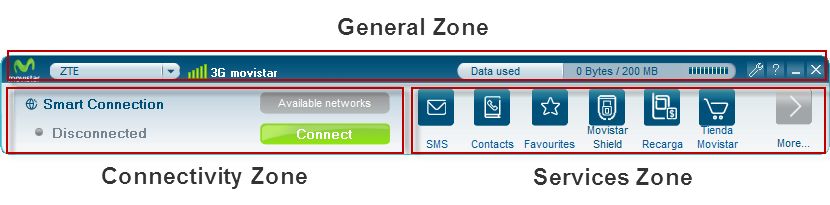
Escritorio Movistar Latam for Windows - User Manual

9.          UPDATES ................................................................................................................................... 33

     9.1.          ESCRITORIO MOVISTAR LATAM UPDATES .......................................................................................... 33

     9.2.          MOBILE INTERNET DEVICE UPDATES ................................................................................................. 33

10.         ESCRITORIO MOVISTAR LATAM UNINSTALLATION .................................................................... 35
11.         FREQUENTLY ASKED QUESTIONS (FAQ’S) .................................................................................. 36
12.         TROUBLESHOOTING .................................................................................................................. 38
13.         GLOSSARY OF TERMS ................................................................................................................ 42
APPENDIX ............................................................................................................................................ 46

     ACCESIBILITY OPTIONS ................................................................................................................................. 46

                                                                                                                                            Page 3 of 46
Escritorio Movistar Latam for Windows - User Manual

1.    WHAT IS ESCRITORIO MOVISTAR LATAM?

Escritorio Movistar Latam is a free software that provides a smart manage of your Wi-Fi or WWAN
connections and gain mobile access to data services such as Internet, corporate Intranets or E-mail and
Movistar services with the same speed as a fixed workstation.

Movistar provides mobile access at speeds equivalent to DSL through the use of UMTS/3G technology
and the new 3.5G/3.5G+/HSPA+ technology, while ensuring maximum coverage of the GPRS/EDGE
network.

The aim of this guide is to summarize the basic concepts for installing, setting up and using Escritorio
Movistar Latam in its editions for Microsoft Windows 7, Windows Vista and Windows XP.

                                                                                            Page 4 of 46
Escritorio Movistar Latam for Windows - User Manual
2. ESCRITORIO MOVISTAR LATAM INSTALLATION
2.1. Requirements for installation
The minimum requirements for your computer in terms of Operating System to be compatible with the
service Escritorio Movistar Latam for Windows are as follows:
- Microsoft Windows 7, all flavors (Service Pack 1).
- Microsoft Windows Vista, all flavors (Service Pack 2).
- Microsoft Windows XP, Professional or Home Edition (Service Pack 3)
To use videocalling functions, you must have the 9.0b version or higher of Microsoft DirectX, as well as
a correctly installed image capture device (webcam) with drivers under the Microsoft WDM standard. If
you do not have this version of DirectX, you can download it from the Microsoft website.
In order to use Escritorio Movistar Latam you must be a client of Movistar and be activated in the
GPRS/3G service. To find out about this, you can call toll-free to Movistar Customer Hotline.
2.2. Installation Process
Insert your SIM card into the Mobile Internet Device and then plug it into the USB port 2.0 and
the installation program will run automatically. If not, open an Explorer window, look up the
connection device, double click on it to open and double click again on the file Autorun.exe.
Select a language for installation (spanish, or english) and click on OK. Now select your country
and click on Next to start the installation process.
Then the welcome window for the Escritorio Movistar Latam installation program will appear.
Now you must read and accept the Terms of License. To do so, you must check then I Agree on
the terms of license box. Once it's checked, the Next button will become active again and you
can continue the process.
If you already have the software installed and operating on your computer, a window will pop
up telling you this and the installation will cancel automatically. To continue, close the
application by right clicking on the Escritorio Movistar Latam icon on the task bar and click on
Exit. Then start up the installation again.
If you have a version of Escritorio Movistar Latam already installed, a window will pop up telling
you this and recommending that you uninstall the previous version. If you enable the option
Page 5 of 46Escritorio Movistar Latam for Windows - User Manual
Uninstall and click on Next, the installation program will first uninstall the old version and then
continue with the installation of the most recent version (in this case, you have to click on
Finish to continue). If you disable the option Uninstall, the installation program will overwrite
the previous version with the data of the new version. We recommend the first option to avoid
possible conflicts.
Now, you can select the type of Installation: Basic or Custom. If you select the Basic
Installation, Escritorio Movistar Latam will be installed with the default settings. If you are an
advanced user, maybe you wish select Custom Installation, where you can choose which
modules of application will be installed.
If you have selected Basic Installation, Now you have to select the type of connection device
you will use with Escritorio Movistar Latam. The program will install the right drivers for your
device.
Depending on the connection device you selected in the previous step, you will have several
options:
Mobile Internet Device: If you select this device, you will see a window for selecting one of
the available brands of the Mobile Internet Device you will use to connect. Then click on
Next.
Laptop with integrated 3G/3.5G: select this option if you have a laptop/netbook with a
integrated 3G/3.5G module. Then click on Next.
We recommend that you install only the Mobile Internet Device that you wish to use, since you may
select new Mobile Internet Devices at any time once Escritorio Movistar Latam application has been
installed.
After selecting your device, the installation program is ready to begin copying files. You can
press Show details button to see the copying process detail. Once finished, you can press Next
button to continue.
If you have selected Custom installation, you can select the services you want to have available
in Escritorio Movistar Latam. The basic application is obligatory and its selection cannot be
modified. Now select the services you wish to install and then click on Next. By default, the
program offers an installation folder: Program Files\Movistar. To install the application in a
different folder, click on Browse and select a folder. Click on Next button to continue. Now,
after selecting the components and devices to be installed, the installation program is ready to
begin copying files. You can press Show details button to see the copying process detail. Once
finished, you can press Next button to continue.
Once the installation is complete, the program will offer to Create a shortcut to Escritorio
Movistar Latam on the desktop and Start Escritorio Movistar when you finish the installation.
By default, both options are selected. You can also indicate whether you want Escritorio
Movistar Latam to start up whenever you turn on your computer by selecting the option
Launch Escritorio Movistar Latam when Windows starts.
When the installation process is over, we recommend re-starting the system so that the changes made
can take effect.
Page 6 of 46Escritorio Movistar Latam for Windows - User Manual
3. DEVICE CONNECTION INSTALLATION
Before installing and setting up the device connection, make sure you have the Escritorio Movistar
Latam software correctly installed. This is necessary to enable recognition of the connection devices by
the system. This installation is detailed in Escritorio Movistar Latam Installation.
3.1. Requirements for Installation
In order to install the Internet Mobile Device, you need the following hardware:
PC or compatible computer.
Free USB 2.0 port for Mobile Internet USB Devices.
Mobile Internet Device.
SIM card activated in the Movistar GPRS/3G service.
3.2. Mobile Internet Device
Once the software has been installed, and whenever you start up Escritorio Movistar Latam, the
operating system will automatically detect the insertion of a Mobile Internet Device in your system.
However, if you use an Escritorio Movistar Latam not self-installing version, you will need to install the
device drivers manually.
1. Insert the Movistar SIM card into your Mobile Internet Modem.
2. Open Escritorio Movistar Latam and go to Settings >> Devices. Click on Install, then Install
Mobile Internet Devices… and select the manufacturer that matches with your device. Then
click Install and wait to complete the process.
3. Insert the Mobile Internet Device into the USB 2.0 port.
4. Escritorio Movistar Latam automatically detects the presence of a Mobile Internet Device and
begins the initialization process.
5. After initialization, you have to register the SIM card in the Movistar network. Enter the PIN
code for your SIM card when the system asks you to do so.
To enter the PIN code, you have only 3 tries, so be careful when entering these numbers.
6. The Mobile Internet Device indicates that it is initializing when a LED lights up.
7. By default, the Mobile Internet Device tries to register on the same network on which it
registered the last time.
Page 7 of 46Escritorio Movistar Latam for Windows - User Manual
When this process is complete, the Mobile Internet Device is now correctly installed and working.
The color and status of the LEDs on the Mobile Internet Device varies according to the model. Generally,
these colors will change according to the processes being performed by the Mobile Internet Device.
Take into account the installation process may vary slightly, depending on the model modem you use.
Also, the method of inserting the SIM card in the Mobile Internet Device will also depend on the model.
Page 8 of 46Escritorio Movistar Latam for Windows - User Manual
4. HOW TO USE ESCRITORIO MOVISTAR LATAM
4.1. How to start up Escritorio Movistar Latam
There are two ways you can start up Escritorio Movistar Latam:
You can go to the Start >> All programs >> Movistar >> Escritorio Movistar Latam.
If you selected Create a shortcut to Escritorio Movistar Latam on the desktop option, you can
directly access the application by double clicking on the Escritorio Movistar Latam icon.
Figure 1. Escritorio Movistar Latam desktop icon.
Windows Vista and Windows 7 have a security feature that is activated by default called User Account
Control (UAC) that allows users to perform common tasks without administrator privileges.
If you use Escritorio Movistar Latam with Windows Vista or Windows 7, actions such as the installation
of drivers for the connection device and the enabling/disabling of the option Launch Escritorio Movistar
Latam when Windows starts require administrator privileges.
You can do this in one of two ways:
To start installation with full administrator rights as an exception, right click on the program
icon and select Run as administrator. Once you have authorized “raising the privileges,” the
program will restart and will run with complete user privileges.
You can also permanently raise privileges by right clicking on the program icon and selecting
the tab Compatibility in the section Privilege levels and activate the box Run this program as
an administrator.
First time you start Escritorio Movistar Latam, Wi-Fi profiles that you have stored on your computer will
be imported, and if there are data from a previous version such as configuration options, connections,
contacts, SMS, the application will prompt you for confirmation to keep or remove such data.
For statistical purposes, Telefónica Móviles España, S.A.U. processes anonymous user details related to
the use of Escritorio Movistar Latam services, operating system and software versions, for the sole aim
of identifying possible improvements in the services and enhancing user-friendliness. No personal
details are processed under any circumstances.
Page 9 of 46Escritorio Movistar Latam for Windows - User Manual
4.2. Composition of Graphic Interface
Escritorio Movistar Latam main window is composed of three different zones:
Figure 2. Escritorio Movistar Latam main window.
General Zone. This zone shows the device connection, traffic meter with used and available
data, and Settings and Help buttons.
Services Zone: Here you can access all the available services and features offered by Escritorio
Movistar Latam.
Connectivity Zone: Here you can connect and check information on the active connection.
A series of pop-up messages will appear whenever something happens; for example, whether you
receive a videocall or SMS, whether the preset WWAN traffic level has been reached or whether there
has been a problem establishing the connection or it has ended unexpectedly.
General Zone
Figure 3. General zone detail.
General zone is placed on top of main window of Escritorio Movistar Latam; from here you can to access
to general options. Into General zone, there are distinct zones: Device zone, Traffic data meter and
Settings and Help buttons.
Device zone: in this place, you can see a button with the device brand, an icon that shows the
GPRS/EDGE/3G/3.5G/3.5G+ or HSPA+ coverage level and the carrier/operator. If you are in
roaming mode, you can see an icon triangle.
Page 10 of 46Escritorio Movistar Latam for Windows - User Manual
By clicking on the button with the device brand, a contextual menu shall appear. This menu
shall offer you the following options:
o PIN Management
Deactivate/Activate PIN: Here you can decide whether the program should
request the PIN code for your SIM card or not, every time you connect. To do
this you simply need to enter your current PIN.
If you deactivate the PIN code on your SIM card, when you insert the SIM card into another
telephone, the PIN code will remain deactivated.
Change PIN: To change the PIN code on your SIM card you simply enter the
old PIN for your SIM card and then you also enter the new PIN that you want
to set up.
o Network technology selection: The option we recommend the most, which is set up
by default, is Automatic, but you can program Escritorio Movistar Latam to only
connect to the type of network you want (UMTS/3G only, UMTS/3G preferred,
GPRS/2.5G only, GPRS/2.5G preferred).
o Operator selection: Escritorio Movistar Latam automatically connects to the Movistar
network, but can to select the operator you are going to connect with, press Manual.
After performing the search, you simply choose the operator you want from the list
the program provides and press Select.
o Turn on/off the device.
Traffic data meter: In this zone you can see your traffic data used and available. Check Traffic
section for further information.
Settings: Here you can configure all the options of Escritorio Movistar Latam. See Settings
options for further information.
Help: Here you can see what version of the application you are using, and get help on how to
use Escritorio Movistar Latam correctly. See the section on Help in this document.
Page 11 of 46Escritorio Movistar Latam for Windows - User Manual
Services Zone
Service zone is located on a horizontal strip to the right and contains icons that give access to the
services provided by Escritorio Movistar Latam.
Figure 4. Services zone detail.
SMS. You can send and receive SMS from your computer with the SMS service if you connect
with a Mobile Internet Device. If you connect using a telephone, you may only send messages.
Contacts. This service allows managing information about your contacts, whether they have
been imported from different applications or services as well as all the contacts you have
registered in Escritorio Movistar Latam.
Favourites. This service consists in a series of preconfigured accesses to Movistar services and
access to the applications and services defined by the users.
Videocall. This service allows you to make and receive videocalls with Escritorio Movistar
Latam. The service is available only if you connect through the Mobile Internet Device.
Wi-Fi areas. With Wi-Fi areas service you can connect to Movistar Wi-Fi Hotspot for free and
with no limits, according your rate.
Movistar Shield. Provides a security solution in order to have a safe navigation in your mobile
broadband connections with your computer.
Clicking on More button you can access to additional services and features offered by Escritorio
Movistar Latam.
The different services and settings of Escritorio Movistar Latam are available depending on the place
where you are accessing them, not all are available in all locations.
Page 12 of 46Escritorio Movistar Latam for Windows - User Manual
Conectivity Zone
Figure 5. Connectivity zone detail.
In this zone the application window shows tags with general information on the connection you are
using. This information is updated automatically. The following data is shown:
Connection: Once connected, shows the name of the active connection you are now using to
connect to Escritorio Movistar Latam, its status (connected o disconnected), strength of the
signal and its speed.
Available networks: By clicking on this button, a list of the available networks ready to connect
shall be shown. The signal quality is represented by an icon to the left. If it's a WWAN network,
its name appears next to your network technology (GPRS, EDGE, 3G…). If it's a Wi-Fi, to the
right is an icon indicating their level of safety (secure network or unprotected network). Select
the network you want to connect and then click on Connect button.
Connect. By clicking on Connect button you can establish a connection through the smart
connector manager, preferably in the order set out therein. Check My Internet connections
further information.
Escritorio Movistar Latam lets you connect to through different types of connections.
WWAN: Allows connection through the different Movistar network technologies
(GPRS/EDGE/3G/3.5G/3.5G+ or HSPA+).
Wi-Fi: Allows you to make a wireless connection to any of the Wi-Fi networks within reach at
the time. You can use Mobile Internet Devices with this functionality built-in or the Wi-Fi
technology on your computer.
Escritorio Movistar Latam uses the Native Wi-Fi support of Windows Vista and Windows 7, so the
protocols supported by the application on this platform are limited to those supported by the operating
system itself.
Page 13 of 46Escritorio Movistar Latam for Windows - User Manual
LAN: Detects if you have an IP address assigned by your Internet service provider and uses it so
that you can access the services of Escritorio Movistar Latam. If the application finds that a LAN
connection is available, this will let you use the services through a LAN wherever possible.
For further information on how to Create or Remove a connection, see the section My Internet
Connections.
Pop-up Messages (Toasters)
When you have a Mobile Internet Device selected as connecting device, and is properly registered on
the network, Escritorio Movistar Latam will display a popups at the bottom reporting you of certain
events, such as:
Incoming SMS
Carrier messages (e.g. billing period).
If a problem is detected when the connection is lost or if it unexpectedly.
If you have established traffic alerts, when you reach the limit of data transfer volume set.
In some cases, these messages you receive will be clickable and doing click on them with the mouse will
open an Escritorio Movistar Latam service (e.g. receive a message that includes a phone number and can
add to the Contacts service) or directly opens the Internet browser.
Page 14 of 46Escritorio Movistar Latam for Windows - User Manual
5. ESCRITORIO MOVISTAR LATAM SERVICES
Depending on the services you selected in the installation process, these will be available in the service
area of Escritorio Movistar Latam.
Uninstalled services are hidden. Clicking on More button, placed on the right of the dock-main window,
you can see more services installed.
The different services and settings of Escritorio Movistar Latam are available depending on the place
where you are accesing them, not all are available in all locations.
5.1. SMS
This service allows you to send messages to the contacts in your Contacts address book and store all of
the sent and received messages you wish. Escritorio Movistar Latam supports sending and receiving
concatenated messages, which permit writing much longer texts by combining six text messages.
If Mobile Internet Device is not available, you can only write messages; they will remain unsent. As soon
as one of the connection devices is active, your pending messages will be sent automatically, and you
will be warned by an alert.
If you close Escritorio Movistar Latam when a message is still unsent, the application will ask you if you
would like to Save pending messages as drafts and close or Delete pending messages and close.
SMS application is arranged in two tabs: Traditional mode or Conversational mode.
Traditional mode
In traditional mode view, SMS application have four tabs at the left side: New message, Inbox, Sent and
Drafts
New message
In the New message tab to have available a box To: where you can list the recipients of your
message. As you type the name or contact phone number is on the march will show the
matches found in the contacts you have stored on the Address Book (note that the match
begins to run from the first character you type). To add multiple contacts, click Add receivers
either write the phone numbers separated by a comma [,]
Write in the box Message: the text you want to send, while you writing it, you'll see how it
counted how many characters to show you are available and the number of messages to be
sent eventually. The message is saved as a draft by clicking the Save button, or automatically
every 30 seconds.
Page 15 of 46Escritorio Movistar Latam for Windows - User Manual
To send the message you have written, click on Send. The sent message will be automatically
saved to the Sent folder.
If you want to receive an alert when the message is delivered to the recipient, you can activate
Send notification. You can configure this option to operate automatically, so you will always be
notified, or manually, only when you specify it.
Inbox
Under the Inbox tab, you can see the inbox with a list of all the messages, ordered
chronologically in inverse order; that is, you will see the most recent messages first; note that if
you click on any of the columns, you can reorder the messages in ascending or descending
order. If you have any messages yet to be read, it will be shown in bold.
Under the same tab, next to Inbox, a number may be shown, indicating the number of unread
messages that you have.
Under the list of messages Inbox you will see a panel with details on the message selected. The
details will contain the body of the message and the data of the recipient and the time of
reception. If the telephone number belongs to a contact in your Escritorio Movistar Latam
Contacts service , you will see the name instead of the number.
Clicking the secondary mouse button on the body of the message will enable the Use details
option. Tick the message detail of your interest and then select the action what you want
(depending of its content): Send Message, Start Videocall, Add to contacts list, Assign to
contact, Open URL, Add to Favourites or Send an e-mail.
If you want to reply a the message, click on Replay and New message tab will open, with the
number of the sender in the box To:. You can also Forward the selected message, adding the
recipients you want by clicking on Add receivers either write the phone numbers separated by
a comma [,]
To remove one or more messages, select them by checking it on the checkboxes and then click
on Delete Selected button. If you want select all contacts click the checkbox next to the From
column head. Note its necessary to mark the checkbox of the message(s) you want to delete to
enable the Delete Selected button.
Sent
The Sent tab will show of a list of the sent messages in inverse chronological order (that is, you
will always see the most recent ones first). You can select the messages so that you can read
their content in the detailed box at the bottom.
Under the same tab, next to Sent, you will see a number indicating how many unsent messages
you have.
Page 16 of 46Escritorio Movistar Latam for Windows - User Manual
If a message was not sent due to lack of connectivity or because the Mobile Internet Device was
disconnected, a notice will appear at the top of the window in bold until the message is sent
and the word Pending will be shown in the date column.
When you select a message, the Edit, Forward and Delete Selected buttons will be activated. In
the former case, if you click on Edit, a New message tab will open with the content of the
message sent and in the box To: the original recipients will be seen. In the latter case, you can
click Forward to forward the message to others that you select using the Add receivers either
write the phone numbers separated by a comma [,]. Finally, click on Delete selected to remove
all the messages you've checkboxes ticked from the sent messages list, to select all click the
checkbox next to the To column head.
Drafts
Under the tab Drafts, you will see a list of the saved messages but not sent.
When you select a message in this folder, you will see its content in the detail panel and the
Edit button will be activated. Upon editing a message in this folder, the tab New message will
open with the content of the fields To: and Message: of the draft mode message. After editing
the draft mode message, press Save in order to save changes or press Send.
Conversational mode
In conversational mode you can find the messages that you have exchanged with your contacts,
organized so that you can follow up on them in order.
Contacts pane, located on the left will show you the contacts you've exchanged messages. If you have a
contact registered on Escritorio Movistar Latam's Contacts service, the application will display its name
instead the phone number. This list can be sorted by name either phone contact, or by the most recent
date of the message exchanged. New messages received are highlighted in bold.
Messages pane, located on the right will show you the messages and the date of receipt/sending the
message in question. By default, it will display the newest messages at the end.
To aid in talks interpretation, Escritorio Movistar Latam shows messages in different colors, depending
on whether they are incoming messages or sent messages.
When you select a message, will be enable Forward, Delete and Use details buttons.
- Forward: body message is copied into the Messages pane, then type the recipients desired in
the To: pane or click Add receivers.
- Delete: you can to delete the message(s) selected from Messages pane.
- Use details: you can tick message details of your interest and then select the action associated
with it you want to do (depending of its content): Send Message, Start Videocall, Add to
contacts list, Assign to a contact, Open URL, Add to Favourites or Send an e-mail.
Page 17 of 46Escritorio Movistar Latam for Windows - User Manual
To start a new thread (new message) conversation click New conversation and then select the contacts
you want to send the message, by typing the contact's name (provided you have registered contact in
Contacts) or directly to your phone the To: or by clicking on the Add receivers button, type the text of
the message and click Send. If you do not want to send immediately, click Save button to store it in the
Drafts tab.
To reply to a message, select the contact you want in the Contacts panel and automatically will be
added to the To: field; you can add more contacts pressing the Add button and selecting the recipients
you want to include. Then type in the message you want and click on Send.
You can delete entire conversations or individual messages. In the first case, if you want to delete all
messages received either sent to one or more contacts, click on the contact checkbox from the Contacts
pane and press Delete conversations; in the second case, select the messages you want from the
Messages panel (you can use or keys to select multiple messages) and then click the
Delete button.
Drafts tab will show you a list of saved messages. You can edit and delete messages you have stored
here in a similar way as described above for the traditional view mode.
5.2. Contacts
This service allows managing information about your contacts, whether they have been imported from
different applications or services as well as all the contacts you have registered in Escritorio Movistar
Latam.
Contacts service window has two distinct areas: contact list and detailed view of selected contact.
Contact list appears in alphabetical order, with reference to the contact name; in the same list
are also the main phone number and an image or avatar that represents it.
From the contact list you can add new contacts directly by clicking Add Contact button or by
clicking Import button, if you want to add from another application. Similarly, clicking on any
contact list with the right mouse button will access a contextual menu where you can Send
SMS, Start Videocall, Send Email, Import, Export, or Delete the selected contact.
In the detailed view of the contact, you can view data such as its name and last name, its image
or avatar that represents their phone numbers (you can enter up to three numbers) and email
(you can enter up to two email addresses). Clicking the Edit button you can change the data
you want the selected contact. Remember that you can sort your contacts individually by the
field "last name" ticking the Sort by last name option.
If the contact has multiple phone numbers capable of receiving messages or video calls, a drop
down menu appears in the SMS and Videocall options allowing you to select which one you
want to use to perform such actions.
If you want to Add (or Change) the contact picture, press the proper button and select an
image from which you have in your image library. You can use images in PNG, JPG, JPEG, GIF or
BMP format. Also, you too can remove the picture assigned clicking by the [x] button.
Page 18 of 46Escritorio Movistar Latam for Windows - User Manual
You can import your contacts from others applications Outlook 97 or higher and Lotus Notes and they
can be used with Escritorio Movistar Latam; you can also import contacts from your SIM card itself. To
do this press the Import button and follow the wizard.
Similarly you can export your contact data to other applications. You can do this in two ways: from the
contact list, select the contacts you want (for multiple selection of contacts you can use the or
Ctrl> keys), then click the right mouse button and then press Export button. Or, from the detailed view,
click the Export button to export the data of the selected contact. The exported data is saved in vCard
format.
You can use the tool Search to quickly and easily find any contact, as the results of the search are
filtered in the contact list, showing you while in progress the coincidences in all fields (note that the
coincidence starts to operate from the first character you write). If you click on the red [x] you will
delete the content of the field of the Search.
For the “telephone” field, the preference in import order from E-mail applications will be: 1) mobile, 2)
office, 3) home.
5.3. Favourites
Favourites is a quick way of finding and using your Internet address or favorite applications in Escritorio
Movistar Latam. Clicking on Favourites you will enter to the service window where you can see all
accesses configured by default. Here you can add new favourites and edit its settings.
5.4. Videocall
The videocall service is available only for Mobile Internet Device registered to the 3G network.
This service can make and receive videocalls using a Mobile Internet Device and, as an option, it allows a
camera and a microphone to be connected to your computer.
In order to receive calls, the Mobile Internet Device must support connections to UMTS/3G network. If
the Mobile Internet Device is connected to the GPRS network or if it is being used for another data
connection, any incoming videocalls will not be detected.
Making a videocall with Escritorio Movistar Latam is a simple as dialing the number for the videocall or
selecting a contact in the Contacts list and then clicking on Call button
To end the videocall, click on Hang button
Clicking on Videocalls List you can see the list of videocalls that have been missed, Inbox or sent, or
access the general listing of all the videocalls, as well as access information on their duration.
Page 19 of 46Escritorio Movistar Latam for Windows - User Manual
Once you have accessed the listing, you can delete logged videocalls if you like, by using the button
Delete all at the bottom of the list windows.
You can also make another videocall with a number from the list by double clicking with the mouse on
the relevant entry or by selecting it and clicking on Call.
Videocall service has the following options:
Settings: This option opens the window for configuring the service.
Help: This option opens a user manual to the videocalls section.
When the videocall service starts up, the window with the image sent will show a preview of the local
capture or the first frame of the multimedia file selected. To toggle back and forth between them, select
each of them in the tab Advanced options from Settings >> Services >> Videocall.
During a videocall, you can control the volume of sending and reception of audio with the volume
controls for the microphone and speakers.
If you want to activate the reception/transmission of audio, just click on one of the icons; if you click on
one of the icons again, you will activate once again the reception/transmission.
You can also control the sending of a local image, just enable the option Do not send image, which is
below the local image window.
Once the videocall is in progress, you can send a video or audio file if you like, instead of your own
image and voice. To do this, click on below the image being sent and a window will open where
you can select the file or image you want to send. You can send the image or file again, or stop it just be
clicking on or
Under the window for the Inbox image, you will see a message with the number of missed videocalls.
5.5. Wi-Fi areas
With Wi-Fi areas service you can connect to Movistar Wi-Fi Hotspot for free and with no limits,
according your rate.
With Wi-Fi areas service, you can find out a Movistar Wi-Fi hotspot in the directory typing your Location
and pressing Search button. You can make an advanced search by selecting from the different criteria
appear on the screen.
To establish a Wi-Fi connect, Escritorio Movistar Latam allows for the use of Mobile Internet Devices
with Wi-Fi technology built-in or any other type of Wi-Fi support your computer is equipped with.
Page 20 of 46Escritorio Movistar Latam for Windows - User Manual
5.6. Movistar Shield
The different services and settings of Escritorio Movistar Latam are available depending on the place
where you are accessing them, not all are available in all locations.
Movistar Shield provides a security solution in order to have a safe navigation in your mobile broadband
connections with your computer. Movistar Shield consists of a series of products covering all security
needs.
Movistar Shield is available for your computer and your smartphone.
Movistar Security PC. Within the security package for your computer, you'll find: Antivirus,
Antispam, Firewall, Anti Spyware, Parental Control and Protection in navigation.
Movistar Backup PC. Make a copy of any information that you select on your machine with
unlimited capacity.
For more information about Movistar Shield, visit the Movistar website of your country.
Page 21 of 46Escritorio Movistar Latam for Windows - User Manual
6. SETTINGS
You can personalize Escritorio Movistar Latam by clicking on Settings, located at the right-upper bar of
the main application window.
Figura 6. Settings button.
6.1. Options
Escritorio Movistar Latam
Start Up. By default, Escritorio Movistar Latam does not start whenever Window starts up. If
you wish to activate this, just check the option Launch Escritorio Movistar Latam when I start
up my computer. If you are using Windows Vista or Windows 7, remember that you must have
administrator privileges to use this feature. See the section How to start up Escritorio Movistar
Latam for further information.
Connection. If the option Automatically reconnect when the connection is lost, Escritorio
Movistar Latam will automatically try to recover the last connection that was active if the
connection is lost. You also have the option of connecting automatically when you launch
Escritorio Movistar Latam by activating Connect to the Internet when I open Escritorio
Movistar Latam.
Updates. Select the option Automatically check for updates and news when I connect to
activate the service of automatic notifications that can show information on application
upgrades or news. Click on See updates and news button to view new updates. Further
information you can read Updates section.
Language. Escritorio Movistar Latam also includes multi-language (english and spanish). During
the installation process, Escritorio Movistar Latam allows you to select a language other than
the default one (the one being used by the operating system). To change the language you
selected in the process of installing the application, just select one of the languages available in
the drop-down list and click on Change. You need not restart the application to make the
change.
Page 22 of 46Escritorio Movistar Latam for Windows - User Manual
Networks and SIM card
PIN Management
o Deactivate/Activate PIN: Here you can decide whether the program should request the
PIN code for your SIM card or not, every time you connect. To do this you simply need to
enter your current PIN.
o Change PIN: To change the PIN code on your SIM card you simply enter the old PIN for
your SIM card and then you also enter the new PIN that you want to set up.
If you deactivate the PIN code on your SIM card, when you insert the SIM card into another telephone,
the PIN code will remain deactivated.
Network technology selection: The option we recommend the most, which is set up by default,
is Automatic, but if you want you can program Escritorio Movistar Latam to only connect to the
type of network you want clicking on Manual (UMTS/3G only, UMTS/3G preferred, GPRS/2.5G
only, GPRS/2.5G preferred).
Operator selection: Escritorio Movistar Latam automatically connects to the Movistar network,
but if you would like to select the operator you are going to connect with, clicking on Manual.
After performing the search, you simply choose the operator you want from the list the
program provides and press Select.
6.2. Display
Visibility
In this tab you can set configure options related to main window placement and its behaviour:
Always visible: main window it is always visible.
Auto-hide Escritorio Movistar: invoke main window by taking the cursor to the hiding
side of the screen.
Services
You can check those services that will be ready in the Services zone of Escritorio Movistar Latam
main window. Have in mind that the first four will be shown, but the rest will be displayed under
the menu displayed after clicking the More button.
You can sort the order of your services using the arrow buttons; besides you can also select a
service with your mouse and drag it and drop to the place you want.
Page 23 of 46Escritorio Movistar Latam for Windows - User Manual
6.3. Devices
Here you can select the preferred Mobile Internet and Wi-Fi devices that you want to use to connect to
Escritorio Movistar Latam. To do this, double click on the device that you want to connect or click on it
and then press Select.
You can Install drivers for Mobile Internet Device by pressing Install. Select the Mobile Internet Device
and press Install button. At the end a screen will be displayed indicating that the driver was installed
correctly.
Mobile Internet Device Simlock
You can unlock your Mobile Internet Device by clicking on the Unlock device button. In order to
get the unlock code you can call toll free Movistar Customer Service.
Depending on the manufacturer, the unlock code entry is limited to a certain attempts. Be
careful when entering this code, because for once the maximum possible attempts, the Mobile
Internet Device may become unusable.
The unlock of Mobile Internet Devices can be made as long as possible due to the different technical
characteristics of the devices.
6.4. My Internet connections
From here you can create new WWAN or Wi-Fi connections and change their parameters.
Escritorio Movistar Latam includes some predefined WWAN connections in order you can connect to
Internet quickly. Remember that connections preconfigured cannot be deleted or modified.
The connection management area displays a list (ordered by preference) of the WWAN and Wi-Fi
connections that are saved in Escritorio Movistar Latam. By default, the order of preference will be
established as follows:
1. LAN connection.
2. Wi-Fi connections created from Windows and imported by Escritorio Movistar Latam.
3. WWAN connections from early versions and imported by Escritorio Movistar Latam.
4. Operator connections, Wi-Fi connections remain a priority on WWAN connections.
5. Connections created by user.
You can change the order of the list by selecting a connection and then clicking the up or down arrows,
or by using the mouse to drag and drop the connection to the desired position. If you have a wired
network, LAN connection will show on the list and as priority connection, unable to be removed or to be
modified.
If you lose your established connection for any reason Escritorio Movistar Latam will first try to
reestablish that connection, and if that is not possible, it will begin the reconnecting process according
to the order of preference of your defined connections. This reconnecting process will not be initiated if
you have a specific connection selected for the Escritorio Movistar Latam service that you were using
when you were disconnected, since it would only try to reconnect with the specified connection, and
Page 24 of 46Escritorio Movistar Latam for Windows - User Manual
would cancel the process if it were not successful. You can activate this feature on Reconnect when
connection is lost option, accessible from Settings >> Options >> Escritorio Movistar.
By checking the Activate connection log option, you will generate a file that holds the connection data.
This file is stored in My Documents folder. Press on Open to see the file in text format. If it's necessary,
you can send via e-mail the connection log to Technical Assistance Service clicking on Send button.
Sending of connection log requires you have installed and configured on your computer a compatible e-
mail client (e.g. Outlook Express, Windows Mail or Mozilla Thunderbird).
How to add or change a WWAN connection
You can define new connections using the New WWAN connection button. Keep in mind that
the predefined connections cannot be deleted or modified.
You will always have the option of configuring the connections you want, and you can always
recover the pre-configured parameters if something does not work correctly afterwards. This
option is available in the WWAN connections.
Press the Modify button to change a connection. Settings parameters are grouped into
different tabs:
Identification: You need to specify a descriptive name for the connection, as well as a
Username and Password for network authentication. The Request a password when
connecting option means the password is requested at connection, so it is not stored
on Escritorio Movistar Latam (if it is sensitive information, for example).
Connection details: In this tab you can select the profile or APN.
Network Settings: You can modify the following options:
o Internet Access Proxy: The option by default is Do not use proxy in the
connections. However, here you can configure the proxy parameters that you
want. If you do not know some of the details requested, you need to ask the
network administrator.
o Domain name server (DNS): If you choose the Server addresses assigned by
the network option, it is assumed that the domain name service is
automatically configured in the connection process.
o Advanced options: In this window you can configure the WINS addresses, the
authentication modes in the connection process as well as attaching DNS
suffices. In general, you need to check with the network administrator to
determine which connection modes are suitable for a specific Intranet.
Internet Explorer browser reads the Settings indicated by Escritorio Movistar Latam correctly in this
window, which is Do not use proxy by default. If you want to use the proxy with one of the browsers
Page 25 of 46Escritorio Movistar Latam for Windows - User Manual
that does not read the Escritorio Movistar Latam Settings, such as Firefox, you can configure them
manually using the options for these web browsers.
In the event that you access through a corporate Intranet or another type of network, contact your
network administrator for this information.
How to add or change a Wi-Fi connection
You can define new connections by pressing New Wi-Fi connection.
Remember that you always have available the option of configuring the connections you want
by pressing Modify. The pre-configured connections cannot be deleted.
If you want to connect to a Wi-Fi network, you should first press New Wi-Fi connection and
then press Select network. A list will appear with all the networks you have coverage for. You
should only choose the one you want and press Select. IF the network is hidden, enter the SSID
and select Wi-Fi network hidden option.
In the Network Settings section, you can select the supported Encryption (Disabled, WEP, AES
or TKIP) and Authentication (open, shared, WPA (PEAPv0), WPA-PSK and WPA2 (PEAPv0) and
WAP2-PSK) modes. Note that the possible Encryption options will drop down, depending on
the Authentication mode selected.
In the IEEE 802.1X Authentication section you can select the different authentication modes
that are supported. Keep in mind that the different options may be available or not, depending
on the modes selected in the Network Settings section.
You can also see the password characters that you enter by deactivating the Hide password
characters option.
Wi-Fi network access may require additional information, such as a password. You should contact your
network administrator to find out this information.
How to export connections
Export connections allow you to generate a file with an .tgcm extension with the details on the
connection selected. You can use this on another computer with Escritorio Movistar Latam by
applying the Import option.
Go to Settings >> My Internet connections, select a connection from the list and press the
Export button. Then enter the name and place in which you want to save the file and press
Save. This will generate a file that you can subsequently recover at any time.
Page 26 of 46Escritorio Movistar Latam for Windows - User Manual
How to import connections
Import connection allows you to add new connections to Escritorio Movistar Latam from the
files with .tgcm extension.
Go to Settings >> My Internet connections, press the Import button and a new window will
open so that you can select the place that the file you want to import is located. You can also
import by directly opening the file with an .tgcm extension. This file will hold the information
needed to configure an Escritorio Movistar Latam connection.
The files that you can import and export by default for Escritorio Movistar Latam have the extension
.tgcm.
By default, Windows hides file extensions. In order to activate the feature that displays the extensions,
go to Control Panel >> Folder Options. Make sure that the Hide the file extensions for known file types
box is not checked on the See tab.
6.5. Services
In this section you can Install or Uninstall services available in Escritorio Movistar Latam. Changes made
here by installing or uninstalling services affect to the main window Services zone of Escritorio Movistar
Latam.
If you want to uninstall a service, press Uninstall service. Remember that you can install the service
again at any time clicking on Install service button.
SMS
By activating the Use the following Short Message Center you can specify a different short
message center (SMSC) from the default one.
Favourites
You can add new Favourites, in addition to those that are already configured, by clicking on
New and filling out the form.
In addition, you can modify or delete your Favourites by clicking on one of these buttons
located to the right of the Favourites screen.
Page 27 of 46Escritorio Movistar Latam for Windows - User Manual
Videocall
Use the Devices tab to select and configure the image and sound devices that you are going to
use during the videocall.
If you try to receive or make a videocall without a camera or sound card or if they are incorrectly
installed or configured on your computer, an alert message will appear that will take you to the settings
window.
If you have various audio and video capturing devices correctly installed on your system, you
can select that one you want to use for the Videocall service.
By pressing the Advanced button you can select the appropriate recording source for the
device you have selected for audio reception.
From Advanced options tab you will can select:
The default file to send instead of the local capture. Once selected it, you can send the
entire file or just the video or audio portion only.
The incoming videocall ringbone melody (by defect it will be the Movistar melody) or if
you want, you can mute it.
If you want to see the duration of the videocall once it is established, this information
appears in the lower part of the Inbox image window.
The videocall service is only available if you have a Mobile Internet Device.
Page 28 of 46Escritorio Movistar Latam for Windows - User Manual
Internet
You can configure the Internet service and choose to open the navigator or not when you
connect. You can also choose the connection to be used among the ones you have configured.
You can also configure the homepage by filling in the text field provided for this option.
6.6. Alerts
The Alerts section allows notifying you when you have reached the specific level of WWAN traffic that
you determined previously, for the Movistar network or for roaming. By default, Alerts are enabled.
To set an Alert, select the volume of data you want from the dropdown list and then check the boxes to
receive alerts when you reach the percentage of consumed data volume you want. Once established
target range click OK to be effective.
The alerts will be showed through a pop-up message (toaster).
Page 29 of 46Escritorio Movistar Latam for Windows - User Manual
7. TRAFFIC
The different services and settings of Escritorio Movistar Latam are available depending on the place
where you are accesing them, not all are available in all locations.
By clicking on the Traffic zone, located in the Escritorio Movistar Latam main window upper zone, Traffic
window will open.
Figure 7. Traffic zone detail.
Traffic window contains two tabs: Current Period and History.
Figure 8. Traffic.
Page 30 of 46Escritorio Movistar Latam for Windows - User Manual
Current Period tab shows you the speed connection (in Kbits/s), connection time (in minutes) and the
traffic data that was sent and received and the connection time (in minutes). In the same tab, you can
see the Current Billing Period section which shows information on the total data transferred in the
current billing period, Transference limit, Data used and Available data. It also indicates the number of
SMS sent and Videocalls made. It shows information about data used in roaming traffic as well.
You can choose the day you start your billing cycle by clicking Change your billing period.
History tab shows graphically the total data transferred in the last 6 months, national and roaming and
the transference data limit. Note that the History is associated to the SIM card therefore you will only
see the accumulated data traffic for the specific SIM card you are using at a particular moment.
Note that the counters for transferred traffic per connection, maximum speed and connection time are
automatically set to zero when you disconnect. Press Reset button to remove the accumulated traffic
information.
Keep in mind the traffic measurement is approximate and it is just an estimation of the amount of data
transferred.
Page 31 of 46Escritorio Movistar Latam for Windows - User Manual
8. ESCRITORIO MOVISTAR LATAM HELP
You can access the user guide from this window by clicking on the Help Topics button. Also if you want
more information, you can go to the Movistar Customer Services web link of your country.
This window also displays information about the Mobile Internet Device, manufacturer, firmware
version and IMEI. You can also find information on Wi-Fi module built-in your computer
Escritorio Movistar Latam is owned by Telefónica Móviles España © 2012. All rights reserved.
Escritorio Movistar Latam was designed by Indra Sistemas, S.A.
Some of the registered trademarks are owned by their respective manufacturers.
Mobile Internet Devices drivers may be copyrighted by their respective manufacturers.
SyncML C Reference Toolkit Copyright © Ericsson, IBM, Lotus, Matsushita Communication Industrial Co.,
Ltd., Motorola, Nokia, Openwave Systems, Inc., Palm, Inc., Psion, Starfish Software, Symbian, Ltd.
(2001-2002).
For more information about Movistar in your country and its associated products go to
http://www.movistar.com
Page 32 of 46You can also read