My Passport Ultra Portable Hard Drive User Manual - My Passport Ultra User Manual
←
→
Page content transcription
If your browser does not render page correctly, please read the page content below
External Portable
                           ®
My Passport Ultra™
Portable Hard Drive
User Manual

My Passport Ultra User Manual
WD Service and Support
Should you encounter any problem, please give us an opportunity to address it before returning
this product. Most technical support questions can be answered through our knowledge base
or email support service at http://support.wdc.com. If the answer is not available or if you prefer,
please contact WD® at the best telephone number shown below.
Your product includes 30 days of free telephone support during the warranty period. This 30-
day period starts on the date of your first telephone contact with WD Technical Support. Email
support is free for the entire warranty period and our extensive knowledge base is available 24/
7. To help us keep you informed of new features and services, remember to register your
product online at http://register.wdc.com.

Accessing Online Support
Visit our product support website at http://support.wdc.com and choose from these topics:
    • Downloads—Download drivers, software, and updates for your WD product.
    • Registration—Register your WD product to get the latest updates and special offers.
    • Warranty & RMA Services—Get warranty, product replacement (RMA), RMA status, and
      data recovery information.
    • Knowledge Base—Search by keyword, phrase, or answer ID.
    • Installation—Get online installation help for your WD product or software.
    • WD Community—Share your thoughts and connect with other WD users.

Contacting WD Technical Support
When contacting WD for support, have your WD product serial number, system hardware, and
system software versions available.
North America                                Europe (toll free)* 00800 ASK4 WDEU
    English            800.ASK.4WDC                              (00800 27549338)
                       (800.275.4932)        Europe              +31 880062100
    Spanish            800.832.4778          Middle East         +31 880062100
                                             Africa              +31 880062100
Mexico                 001 8002754932        Russia              8 10 8002 335 5011

South America                                Asia Pacific
    Chile              1230 020 5871             Australia       1800 42 9861 / +800 2275 4932
    Colombia           009 800 83247788          China           800 820 6682
    Venezuela          0800 100 2855             Hong Kong       +800 6008 6008
    Peru               0800 54003                India           1800 419 5591 / 1800 200 5789
    Uruguay            000 413 598 3787          Indonesia       +803 852 9439
    Argentina          0800 4440839              Japan           00531 65 0442 / 0120 994 120
    Brazil             0800 7704932              Korea           02 703 6550
                       0021 800 83247788         Malaysia        1800 88 1908 / +800 6008 6008 (Telekom Malaysia)
                                                 New Zealand     0508 555 639 / +800 2275 4932
                                                 Philippines     1 800 1441 0159
                                                 Singapore       1800 608 6008 / +800 6008 6008 (Singtel)
                                                 Taiwan          0800 666 290 / +800 6008 6008 (Chunghwa)
                                                 Thailand        001 800 441 0570

* Toll free number available in the following countries: Austria, Belgium, Denmark, France, Germany, Ireland, Italy,
 Netherlands, Norway, Spain, Sweden, Switzerland, United Kingdom.

                                                                                                                       ii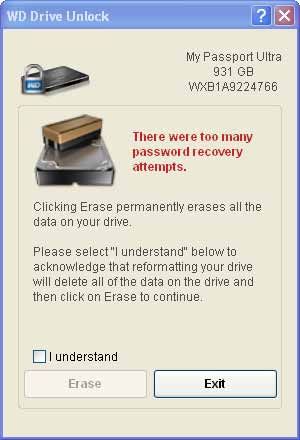
MY PASSPORT ULTRA
                                                                                                                              USER MANUAL

Table of Contents
    WD Service and Support . . . . . . . . . . . . . . . . . . . . . . . . . . . . . . . . . . . . . . . . . . . . . . . . . . . ii
             Accessing Online Support . . . . . . . . . . . . . . . . . . . . . . . . . . . . . . . . . . . . . . . . . . . . . . . . . . . . . ii
             Contacting WD Technical Support. . . . . . . . . . . . . . . . . . . . . . . . . . . . . . . . . . . . . . . . . . . . . . . ii

1   About Your WD Drive . . . . . . . . . . . . . . . . . . . . . . . . . . . . . . . . . . . . . . . . 1
    Features . . . . . . . . . . . . . . . . . . . . . . . . . . . . . . . . . . . . . . . . . . . . . . . . . . . . . . . . . . . . . . . . 1
    Kit Contents . . . . . . . . . . . . . . . . . . . . . . . . . . . . . . . . . . . . . . . . . . . . . . . . . . . . . . . . . . . . . 2
    Optional Accessories . . . . . . . . . . . . . . . . . . . . . . . . . . . . . . . . . . . . . . . . . . . . . . . . . . . . . . 2
    Operating System Compatibility. . . . . . . . . . . . . . . . . . . . . . . . . . . . . . . . . . . . . . . . . . . . . . 3
    Disk Drive Format . . . . . . . . . . . . . . . . . . . . . . . . . . . . . . . . . . . . . . . . . . . . . . . . . . . . . . . . . 3
    Physical Description . . . . . . . . . . . . . . . . . . . . . . . . . . . . . . . . . . . . . . . . . . . . . . . . . . . . . . . 3
             Power/Activity LED. . . . . . . . . . . . . . . . . . . . . . . . . . . . . . . . . . . . . . . . . . . . . . . . . . . . . . . . . . . 4
             USB 3.0 Interface . . . . . . . . . . . . . . . . . . . . . . . . . . . . . . . . . . . . . . . . . . . . . . . . . . . . . . . . . . . . 4
    Registering Your Drive . . . . . . . . . . . . . . . . . . . . . . . . . . . . . . . . . . . . . . . . . . . . . . . . . . . . . 4
    Handling Precautions . . . . . . . . . . . . . . . . . . . . . . . . . . . . . . . . . . . . . . . . . . . . . . . . . . . . . . 4

2   Connecting the Drive and Getting Started . . . . . . . . . . . . . . . . . . . . . . 5
    Connecting the Drive . . . . . . . . . . . . . . . . . . . . . . . . . . . . . . . . . . . . . . . . . . . . . . . . . . . . . . 5
    Getting Started with the WD Software . . . . . . . . . . . . . . . . . . . . . . . . . . . . . . . . . . . . . . . . . 6

3   WD SmartWare Software Functional Overview . . . . . . . . . . . . . . . . . . 15
    Home Tab Display . . . . . . . . . . . . . . . . . . . . . . . . . . . . . . . . . . . . . . . . . . . . . . . . . . . . . . . 16
    Backup Tab Displays . . . . . . . . . . . . . . . . . . . . . . . . . . . . . . . . . . . . . . . . . . . . . . . . . . . . . 23
    Retrieve Tab Displays . . . . . . . . . . . . . . . . . . . . . . . . . . . . . . . . . . . . . . . . . . . . . . . . . . . . . 25
    Settings Tab Display . . . . . . . . . . . . . . . . . . . . . . . . . . . . . . . . . . . . . . . . . . . . . . . . . . . . . . 28
    Help Tab Display. . . . . . . . . . . . . . . . . . . . . . . . . . . . . . . . . . . . . . . . . . . . . . . . . . . . . . . . . 29

4   Backing Up Files . . . . . . . . . . . . . . . . . . . . . . . . . . . . . . . . . . . . . . . . . . 31
    How the Backup Function Works . . . . . . . . . . . . . . . . . . . . . . . . . . . . . . . . . . . . . . . . . . . . 31
    Backing Up Files. . . . . . . . . . . . . . . . . . . . . . . . . . . . . . . . . . . . . . . . . . . . . . . . . . . . . . . . . 31

5   Retrieving Files . . . . . . . . . . . . . . . . . . . . . . . . . . . . . . . . . . . . . . . . . . . . 39
    How the Retrieve Function Works . . . . . . . . . . . . . . . . . . . . . . . . . . . . . . . . . . . . . . . . . . . 39
    Retrieving Files . . . . . . . . . . . . . . . . . . . . . . . . . . . . . . . . . . . . . . . . . . . . . . . . . . . . . . . . . . 39

6   Locking and Unlocking the Drive . . . . . . . . . . . . . . . . . . . . . . . . . . . . . 44
    Password Protecting the Drive . . . . . . . . . . . . . . . . . . . . . . . . . . . . . . . . . . . . . . . . . . . . . . 44
    Unlocking the Drive . . . . . . . . . . . . . . . . . . . . . . . . . . . . . . . . . . . . . . . . . . . . . . . . . . . . . . 45
             Unlocking the Drive with the WD Security or WD Drive Utilities Software . . . . . . . . . . . . . . . . 46
             Unlocking the Drive with the WD SmartWare Software . . . . . . . . . . . . . . . . . . . . . . . . . . . . . . 47
             Unlocking the Drive with the WD Drive Unlock Utility . . . . . . . . . . . . . . . . . . . . . . . . . . . . . . . 48

                                                                                                                     TABLE OF CONTENTS – iii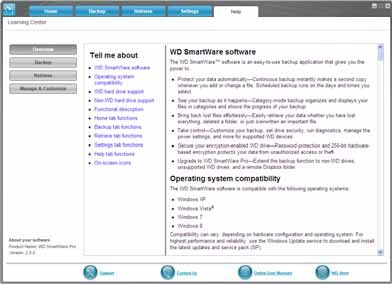
MY PASSPORT ULTRA
                                                                                                                            USER MANUAL

     Changing Your Password . . . . . . . . . . . . . . . . . . . . . . . . . . . . . . . . . . . . . . . . . . . . . . . . . . 49
     Turning Off the Drive Lock Feature. . . . . . . . . . . . . . . . . . . . . . . . . . . . . . . . . . . . . . . . . . . 50

7    Managing and Customizing the Drive . . . . . . . . . . . . . . . . . . . . . . . . . 51
     Using the WD Quick View Icon. . . . . . . . . . . . . . . . . . . . . . . . . . . . . . . . . . . . . . . . . . . . . . 51
             Opening the WD SmartWare Software. . . . . . . . . . . . . . . . . . . . . . . . . . . . . . . . . . . . . . . . . . .                 51
             Checking Drive Status . . . . . . . . . . . . . . . . . . . . . . . . . . . . . . . . . . . . . . . . . . . . . . . . . . . . . . .    52
             Safely Disconnecting the Drive. . . . . . . . . . . . . . . . . . . . . . . . . . . . . . . . . . . . . . . . . . . . . . . . .        52
             Monitoring Icon Alerts . . . . . . . . . . . . . . . . . . . . . . . . . . . . . . . . . . . . . . . . . . . . . . . . . . . . . . .   52
     Setting the Drive Sleep Timer . . . . . . . . . . . . . . . . . . . . . . . . . . . . . . . . . . . . . . . . . . . . . . . 53
     Registering the Drive . . . . . . . . . . . . . . . . . . . . . . . . . . . . . . . . . . . . . . . . . . . . . . . . . . . . . 53
     Checking Drive Health . . . . . . . . . . . . . . . . . . . . . . . . . . . . . . . . . . . . . . . . . . . . . . . . . . . . 54
     Erasing the Drive. . . . . . . . . . . . . . . . . . . . . . . . . . . . . . . . . . . . . . . . . . . . . . . . . . . . . . . . . 56
             Using the Drive Erase Function . . . . . . . . . . . . . . . . . . . . . . . . . . . . . . . . . . . . . . . . . . . . . . . . 56
             Using the WD Drive Unlock Utility . . . . . . . . . . . . . . . . . . . . . . . . . . . . . . . . . . . . . . . . . . . . . . 57
     Restoring the WD Software and Disk Image . . . . . . . . . . . . . . . . . . . . . . . . . . . . . . . . . . . 59

8    Managing and Customizing the Software . . . . . . . . . . . . . . . . . . . . . . 60
     Specifying the Number of Backup Versions . . . . . . . . . . . . . . . . . . . . . . . . . . . . . . . . . . . . 60
     Specifying a Different Retrieved Content Folder . . . . . . . . . . . . . . . . . . . . . . . . . . . . . . . . 60
     Checking for Software Updates . . . . . . . . . . . . . . . . . . . . . . . . . . . . . . . . . . . . . . . . . . . . . 61
     Configuring a Remote Dropbox Account . . . . . . . . . . . . . . . . . . . . . . . . . . . . . . . . . . . . . . 61
     Uninstalling the WD Software . . . . . . . . . . . . . . . . . . . . . . . . . . . . . . . . . . . . . . . . . . . . . . . 63
             Uninstalling on Windows XP. . . . . . . . . . . . . . . . . . . . . . . . . . . . . . . . . . . . . . . . . . . . . . . . . . . 63
             Uninstalling on Windows Vista, Windows 7 or Windows 8 . . . . . . . . . . . . . . . . . . . . . . . . . . . 63

9    Using the Drive with a Mac . . . . . . . . . . . . . . . . . . . . . . . . . . . . . . . . . . 64
     Reformatting the Drive . . . . . . . . . . . . . . . . . . . . . . . . . . . . . . . . . . . . . . . . . . . . . . . . . . . . 64
     Restoring the WD Software and Disk Image . . . . . . . . . . . . . . . . . . . . . . . . . . . . . . . . . . . 64

10   Troubleshooting . . . . . . . . . . . . . . . . . . . . . . . . . . . . . . . . . . . . . . . . . . . 65
     Installing, Partitioning, and Formatting the Drive . . . . . . . . . . . . . . . . . . . . . . . . . . . . . . . . 65
     Frequently Asked Questions. . . . . . . . . . . . . . . . . . . . . . . . . . . . . . . . . . . . . . . . . . . . . . . . 65

A    Installing the SES Driver . . . . . . . . . . . . . . . . . . . . . . . . . . . . . . . . . . . . . 67
     Installing on Windows XP Computers . . . . . . . . . . . . . . . . . . . . . . . . . . . . . . . . . . . . . . . . 67
             Installing the Driver Automatically . . . . . . . . . . . . . . . . . . . . . . . . . . . . . . . . . . . . . . . . . . . . . . 67
             Installing the Driver Manually . . . . . . . . . . . . . . . . . . . . . . . . . . . . . . . . . . . . . . . . . . . . . . . . . . 69
     Installing on Windows Vista Computers . . . . . . . . . . . . . . . . . . . . . . . . . . . . . . . . . . . . . . . 71
             Installing the Driver Automatically . . . . . . . . . . . . . . . . . . . . . . . . . . . . . . . . . . . . . . . . . . . . . . 71
             Installing the Driver Manually . . . . . . . . . . . . . . . . . . . . . . . . . . . . . . . . . . . . . . . . . . . . . . . . . . 72
     Installing on Windows 7 and Windows 8 Computers . . . . . . . . . . . . . . . . . . . . . . . . . . . . . 74

                                                                                                                   TABLE OF CONTENTS – iv
MY PASSPORT ULTRA
                                                                                                                            USER MANUAL

B   Compliance and Warranty Information . . . . . . . . . . . . . . . . . . . . . . . . . . 76
    Regulatory Compliance . . . . . . . . . . . . . . . . . . . . . . . . . . . . . . . . . . . . . . . . . . . . . . . . . . . 76
            FCC Class B Information . . . . . . . . . . . . . . . . . . . . . . . . . . . . . . . . . . . . . . . . . . . . . . . . . . . . . 76
            ICES-003/NMB-003 Statement . . . . . . . . . . . . . . . . . . . . . . . . . . . . . . . . . . . . . . . . . . . . . . . . 76
            Safety Compliance . . . . . . . . . . . . . . . . . . . . . . . . . . . . . . . . . . . . . . . . . . . . . . . . . . . . . . . . . . 76
            CE Compliance For Europe . . . . . . . . . . . . . . . . . . . . . . . . . . . . . . . . . . . . . . . . . . . . . . . . . . . 77
            KC Notice (Republic of Korea only) . . . . . . . . . . . . . . . . . . . . . . . . . . . . . . . . . . . . . . . . . . . . . 77
    Environmental Compliance (China). . . . . . . . . . . . . . . . . . . . . . . . . . . . . . . . . . . . . . . . . . . 77
    Warranty Information . . . . . . . . . . . . . . . . . . . . . . . . . . . . . . . . . . . . . . . . . . . . . . . . . . . . . 77
            Obtaining Service . . . . . . . . . . . . . . . . . . . . . . . . . . . . . . . . . . . . . . . . . . . . . . . . . . . . . . . . . . . 77
            Limited Warranty . . . . . . . . . . . . . . . . . . . . . . . . . . . . . . . . . . . . . . . . . . . . . . . . . . . . . . . . . . . 78
    GNU General Public License (“GPL”) . . . . . . . . . . . . . . . . . . . . . . . . . . . . . . . . . . . . . . . . . 78

    Index . . . . . . . . . . . . . . . . . . . . . . . . . . . . . . . . . . . . . . . . . . . . . . . . . . . . . . 79

                                                                                                                   TABLE OF CONTENTS – v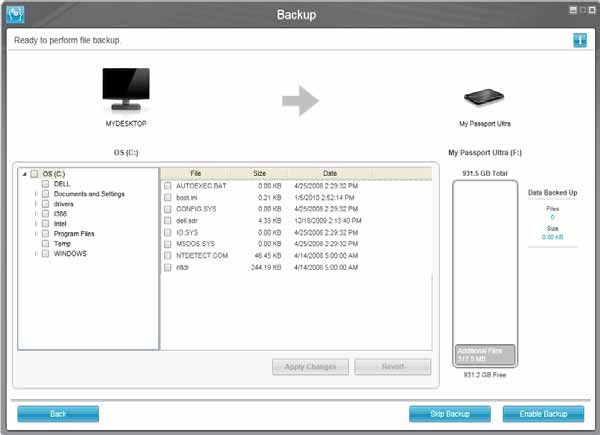
MY PASSPORT ULTRA
                                                                                      USER MANUAL

     About Your WD Drive
11   Welcome to your My Passport® UltraTM portable hard drive. This drive offers high
     capacity in a sleek portable device. It features ultra-fast USB 3.0 connectivity, local and
     cloud backup, and password protection with hardware encryption to help protect your
     files from unauthorized use.

     This introductory chapter includes the following topics:
        Features
        Kit Contents
        Optional Accessories
        Operating System Compatibility
        Disk Drive Format
        Physical Description
        Registering Your Drive
        Handling Precautions

     Features
     With a compact design, high capacity, and your choice of local or cloud backup, My
     Passport Ultra fits perfectly into the busy life of anyone with an on-the-go digital life.

     Ultra-fast transfer rates—When connected to a USB 3.0 port, My Passport Ultra lets
     you access and save files with blazing speed. Reduce transfer time by up to three times
     when compared to USB 2.0 transfer time.*
        *Performance may vary based on your hardware and system configuration.

     Automatic, continuous backup software—The WD SmartWareTM Pro automatic
     backup software works quietly in the background to help protect your data using
     minimal PC resources. Select automatic, continuous backup to instantly back up your
     files. Or select the scheduled backup option to back up your files on your schedule and
     take control of your backup.

     Local and cloud backup—The WD SmartWare Pro software lets you choose where you
     back up your files. Back up files to your My Passport Ultra drive or back up files to the
     cloud using Dropbox.*
        *A Dropbox account is required for cloud backup. Cloud services can be changed,
        terminated, or interrupted at any time and can vary by country.

     Works great with Windows® 8—The WD Windows 8 app makes it easy to discover the
     digital media stored on your My Passport Ultra drive with your Windows 8 computer.
     Your content is automatically displayed and organized so you can easily locate and enjoy
     your photos, videos, and music.

     Ultra-sleek design with high capacity—At just 12.8 mm, this ultra-sleek drive is thin
     and fast with plenty of capacity for your important digital content.

     USB 3.0 and USB 2.0 compatibility—With this single drive you get compatibility with
     the latest USB 3.0 devices and backward compatibility with USB 2.0 devices as well.

                                                                            ABOUT YOUR WD DRIVE – 1
MY PASSPORT ULTRA
                                                                                     USER MANUAL

WD SecurityTM software—Set password protection and hardware encryption for your
drive to help protect your files from unauthorized use or access.

WD Drive UtilitiesTM software—Register your drive, set the drive sleep timer, run
diagnostics, and more using the WD Drive Utilities software.

Durable enclosure protects the drive inside—We know your data is important to you.
So we build the drive inside to our demanding requirements for durability, shock
tolerance, and long-term reliability. Then, we protect the drive with a durable enclosure
designed for beauty.

USB-powered—Powered directly from the USB port on your PC. No separate power
supply is needed.

Important: For the latest WD product information and news, visit our website at http://
www.westerndigital.com. For the latest software, firmware, and product documentation
and information, go to http://support.wdc.com/downloads.

Kit Contents
As shown in Figure 1, your My Passport Ultra drive kit includes the following:
     • My Passport Ultra portable hard drive, with the WD Drive Utilities, WD Security,
       and WD SmartWare software plus the WD Smartware Pro software upgrade
     • USB 3.0 cable
     • Quick Install Guide

Optional Accessories
For information about optional accessories for WD products, visit:

US                 http://www.shopwd.com or http://www.wdstore.com
Canada             http://www.shopwd.ca or http://www.wdstore.ca
Europe             http://www.shopwd.eu or http://www.wdstore.eu
All others         Contact WD Technical Support in your region. For a list of Technical Support
                   contacts, visit http://support.wdc.com and see Knowledge Base answer
                   ID 1048.

          USB 3.0 Cable                             My Passport Ultra      Quick Install Guide
                                                   Portable Hard Drive
Figure 1. My Passport Ultra Drive Kit Components

                                                                           ABOUT YOUR WD DRIVE – 2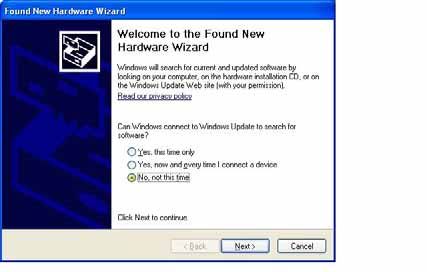
MY PASSPORT ULTRA
                                                                           USER MANUAL

Operating System Compatibility
Your My Passport Ultra drive and the WD Drive Utilities and WD Security software are
compatible with the following operating systems:
Windows®                                   Mac OS X
   • Windows XP                                • Leopard
                            ®
    • Windows Vista                            • Snow Leopard
    • Windows 7                                • Lion
    • Windows 8                                • Mountain Lion
The WD SmartWare software is compatible with the following operating systems:
Windows
   • Windows XP
    • Windows Vista
    • Windows 7
    • Windows 8
Compatibility can vary, depending on hardware configuration and operating system.

For highest performance and reliability, always install the latest updates and service
pack (SP). For Windows computers, go to the Start menu and select Windows Update.
For Mac computers, go to the Apple menu and select Software Update.

Disk Drive Format
Your My Passport Ultra drive is formatted as a single NTFS partition for compatibility
with all updated Windows operating systems. If you want to use the drive with a Mac
computer, see “Reformatting the Drive” on page 64 and “Troubleshooting” on page 65.

Physical Description
As shown in Figure 2, the My Passport Ultra drive has:
    • A power/activity LED indicator
    • A USB 3.0 interface port

            USB 3.0 Interface Port

                    Power/Activity LED

Figure 2. My Passport Ultra Drive

                                                                  ABOUT YOUR WD DRIVE – 3
MY PASSPORT ULTRA
                                                                              USER MANUAL

Power/Activity LED
The power/activity LED shows the drive’s power state as follows:
LED Appearance                                    Power State/Activity
On steady                                         Idle
Fast flashing, approximately 3 times per second   Activity
Slow flashing, approximately every 2.5 seconds    System standby

USB 3.0 Interface
USB 3.0 supports data transfer rates up to 5 Gb/s. USB 3.0 is backward compatible
with USB 2.0. Connection to a USB 2.0 port transfers data at the port speed—up to
480 Mb/s.

Registering Your Drive
Always register your My Passport Ultra drive to get the latest updates and special offers.
You can easily register your drive using the WD Drive Utilities software, as described in
“Registering the Drive” on page 53. Another way is to register online at http://
register.wdc.com.

Handling Precautions
WD products are precision instruments and must be handled with care during unpacking
and installation. Rough handling, shock, or vibration can damage drives. Always observe
the following precautions when unpacking and installing your external storage product:
   • Do not drop or jolt the drive.
   • Do not move the drive during activity.

                                                                    ABOUT YOUR WD DRIVE – 4
MY PASSPORT ULTRA
USER MANUAL
Connecting the Drive and Getting Started
12 This chapter provides instructions for connecting the drive and installing the WD Drive
Utilities, WD Security, and WD SmartWare software on your computer. It includes the
following topics:
Connecting the Drive
Getting Started with the WD Software
Connecting the Drive
1. Turn on your computer.
2. Connect the drive to your computer as shown in Figure 3.
3. Verify that the drive appears in your computer's file management utility listing.
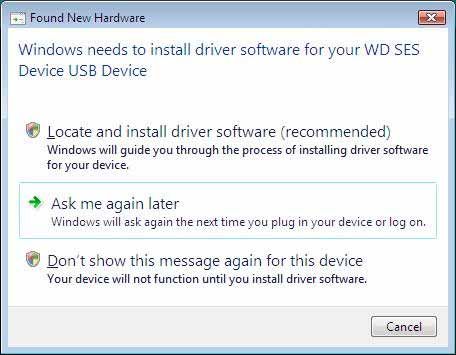
4. If a Found New Hardware screen appears, click Cancel to close it. The WD software
installs the proper driver for your drive.
Your My Passport drive is now ready to use as an external storage device. You can
enhance its capabilities by installing the WD software that is on the drive:
• WD Drive Utilities
• WD Security
• WD SmartWare
Figure 3. Connecting the My Passport Drive
CONNECTING THE DRIVE AND GETTING STARTED – 5MY PASSPORT ULTRA
USER MANUAL
Getting Started with the WD Software
1. Double-click the WD Apps Setup file that appears in the listing for the drive in your
computer’s file management utility to display the WD Apps Setup Wizard:
2. Click Next to display the End User License Agreement.
3. Read the license agreement and select the I accept the terms... check box to
accept the agreement and activate the Next button.
4. Click Next to display the Custom Setup dialog:
5. On the Custom Setup dialog:
a. Select an application name to see a brief description of the application:
• WD Drive Utilities
• WD Security
• WD SmartWare
b. Clear the check box for any application that you do not want to install.
c. Clear the check box for any installation option that you do not want to implement:
• Create Desktop Shortcut
• Launch Application
d. Click Next to install the selected applications and options.
CONNECTING THE DRIVE AND GETTING STARTED – 6MY PASSPORT ULTRA
USER MANUAL
6. Wait for the installation to complete:
7. When the installation completes, click Finish to exit the WD Apps Setup Wizard:
8. Depending on your selections:
• Installing the WD Drive Utilities software with the Launch Application option
displays the WD Drive Utilities screen (see Figure 4 on page 8 and “Managing
and Customizing the Drive” on page 51).
• Installing the WD Security software with the Launch Application option displays
the WD Security screen (see Figure 5 on page 8 and “Locking and Unlocking the
Drive” on page 44).
• Installing the WD SmartWare software displays the Upgrade to WD SmartWare
Pro screen for activating your free software upgrade (see Figure 6 on page 9 and
proceed to step 9).
CONNECTING THE DRIVE AND GETTING STARTED – 7MY PASSPORT ULTRA
USER MANUAL
Figure 4. WD Drive Utilities Screen
Figure 5. WD Security Screen
CONNECTING THE DRIVE AND GETTING STARTED – 8MY PASSPORT ULTRA
USER MANUAL
Figure 6. Upgrade to WD SmartWare Pro Screen
9. The WD SmartWare Pro software upgrade extends the backup function to non-WD
drives, unsupported WD drives, and a remote Dropbox folder. Activating your free
upgrade installs the WD SmartWare Pro software on this computer and provides
email delivery of an activation code that you can use to install it on two other
computers.
a. Type your first name in the First Name box.
b. Type your last name in the Last Name box.
c. Type your email address in the Email Address box.
d. Click Activate to complete the upgrade and display the Activation Result
message:
CONNECTING THE DRIVE AND GETTING STARTED – 9MY PASSPORT ULTRA
USER MANUAL
e. Click OK to display the Select Backup Devices screen:
Note: At this point, the WD SmartWare Pro software is installed. If you want to
skip the setup procedure for your initial backup for now, click the X close
window icon in the upper-right corner of the Select Backup Devices
screen. Otherwise proceed to step 10.
10. In the Backup Source area of the Select Backup Devices screen, select the device
that has the files you want to back up:
a. Use the backup source selector to specify whether you want to back up files
from a local hard drive or from a remote Dropbox folder:
• By default, the computer option is selected and the computer icon signifies
that the backup source device will be either an internal hard drive or drive
partition, or a local direct-attached external hard drive:
• Selecting the Dropbox option displays the Dropbox Login Required dialog for
configuring your Dropbox account for access by the WD SmartWare Pro
software:
You must configure your Dropbox account for access by the WD SmartWare
Pro software before you can use it as a backup source device. See step 4 of
“Configuring a Remote Dropbox Account” on page 62.
CONNECTING THE DRIVE AND GETTING STARTED – 10MY PASSPORT ULTRA
USER MANUAL
• After configuring your Dropbox account for access by the WD SmartWare Pro
software, the Dropbox icon signifies that the backup source device will be
your remote Dropbox folder:
b. If the selected backup source has more than one internal hard drive or drive
partition, or external hard drives, use the backup source device selector to select
the one that you want to back up:
11. In the Backup Target area of the Select Backup Devices screen:
a. If you have more than one backup target device connected to your computer,
select the one that you want to back up files to:
b. Verify that a light-blue highlight surrounds the selected device.
c. If you select Dropbox as your backup target device, use the Dropbox Login
Required dialog for configuring your Dropbox account for access by the
WD SmartWare Pro software:
You must configure your Dropbox account for access by the WD SmartWare Pro
software before you can use it as a backup target device. See step 4 of
“Configuring a Remote Dropbox Account” on page 62.
d. If the selected backup target device has more than one drive partition or network
share, use the backup target device selector under the device icon to select the
one that you want to use:
CONNECTING THE DRIVE AND GETTING STARTED – 11MY PASSPORT ULTRA
USER MANUAL
12. Click Next on the Select Backup Devices screen to display the Select Backup Plan
screen:
13. On the Select Backup Plan screen:
a. Select the option for the type of backup that you want to run:
• Category Backup—Finds and backs up all of the files of the selected
categories on the backup source device.
• File Backup—Backs up files or folders that you select from a folder view of
the backup source device.
b. Click Next to display the initial Select Backup Frequency screen:
CONNECTING THE DRIVE AND GETTING STARTED – 12MY PASSPORT ULTRA
USER MANUAL
14. On the initial Select Backup Frequency screen:
a. Select the option for when you want to scan the backup source device and
automatically back up any existing file that is changed or new file that is added:
• Continuous Backup—Runs all the time
• Scheduled Backup—Runs only on specified days at specified times
b. If you selected the Scheduled Backup option, select the Hourly, Daily, or
Monthly option and use the check boxes and selection boxes to schedule your
backups:
Selecting . . . Performs a backup . . .
Hourly Every hour, on the hour.
Daily On the selected days of the week, at the selected time:
a. Select or clear the Days check boxes to specify the days
of the week that you want to run your backup.
b. Use the at selection box to specify the time of day that
you want to run your backup.
Monthly On the selected day of the month, at the selected time:
a. Use the Every selection box to specify which occurrence
of the day that you want to run your backup—First,
Second, Third, Fourth, or Last.
b. Use the Day selection box to specify the day of the week
that you want to run your backup.
c. Use the at selection box to specify time of day that you
want to run your backup.
c. Click Next to display the initial Backup screen. The initial Backup screen display
depends on the type of backup you selected at step 13 on page 12. (See Figure 7
on page 14.)
15. On the initial Backup screen you can either:
• Run your first backup—See “Backing Up Files” on page 31 before clicking
Enable Backup.
• Click Skip Backup to skip the backup.
16. Click OK to close the Installation and Setup is complete dialog:
CONNECTING THE DRIVE AND GETTING STARTED – 13MY PASSPORT ULTRA
USER MANUAL
Note: The initial Backup screens only
appear one time—when you
install the WD SmartWare
software on your computer.
After that, launching the
software displays the Home
Initial Category Backup Screen screen so you can choose
what you want to do.
Initial File Backup Screen
Figure 7. Initial Backup Screens
CONNECTING THE DRIVE AND GETTING STARTED – 14MY PASSPORT ULTRA
USER MANUAL
WD SmartWare Software Functional Overview
13 This chapter provides a brief functional overview of the WD SmartWare software. It
includes the following topics:
Home Tab Display
Backup Tab Displays
Retrieve Tab Displays
Settings Tab Display
Help Tab Display
All operational features and capabilities of the WD SmartWare software are presented in
five tab-selected screen displays where:
The.. . tab display Provides . . .
Home Device icons and content gauges showing the total capacity and
category structure of the selected backup source device and each
available backup target device.
If the selected backup source device has more than one internal
hard drive or multiple hard drive partitions, or if an available backup
target device has multiple partitions or network shares, the
WD SmartWare software displays a selector box that you can use to
specify the one you want to work with.
See “Home Tab Display” on page 16.
Backup One of two backup dialogs, depending on the backup mode that
you select:
• The by-category dialog provides content gauges showing the
total capacity and category structure of the selected backup
source and backup target devices.
• The by-file dialog provides a folder view of the selected backup
source device for selecting the files and folders that you want to
back up.
See “Backup Tab Displays” on page 23.
Retrieve Three full-screen dialogs for selecting the:
• Backed up volume that you want to retrieve files from
• Destination where you want to copy the retrieved files
• Files that you want to retrieve
See “Retrieve Tab Displays” on page 25.
(Continued)
WD SMARTWARE SOFTWARE FUNCTIONAL OVERVIEW – 15MY PASSPORT ULTRA
USER MANUAL
The.. . tab display Provides . . .
Settings Buttons for opening dialogs to:
• Specify the number of backup versions that you want to keep
for each file
• Specify a different destination folder for retrieved files
• Automatically check for WD SmartWare software updates
• Configure a remote Dropbox folder for access by the
WD SmartWare Pro software
See “Settings Tab Display” on page 28.
Help Instant access to:
• Detailed information about backing up and retrieving files and
making your software setup selections
• WD Customer Support and software update services
See “Help Tab Display” on page 29.
In each display, the WD SmartWare software changes the names and graphic images to match
the hardware configuration of the connected devices.
Note: In addition to the detailed Help tab information, each WD SmartWare
display provides easy access to abbreviated online help to quickly guide
you through your backup, retrieve, and settings tasks. Whenever you are
uncertain about what to do, just click the info/online help icon in the
upper-right corner of the display:
To close the info/online help screen after reading the online help, click the X icon
in the upper-right corner of the help screen.
Home Tab Display
Use the Home tab display to view device content gauges and select:
• The source device or drive partition that has the files you want to back up
• The target device or device partition/network share that you want to back up files
to or retrieve files from
See Figure 8 on page 17 and Table 1 on page 18 for a brief functional description of the
Home tab display.
WD SMARTWARE SOFTWARE FUNCTIONAL OVERVIEW – 16MY PASSPORT ULTRA
USER MANUAL
Backup Target
Device Icons
Computer Icon
Backup Source
Selector
Backup Source
Device Selector
Backup Source Backup Target
Content Gauge Content Gauges
Figure 8. Home Tab Display
WD SMARTWARE SOFTWARE FUNCTIONAL OVERVIEW – 17MY PASSPORT ULTRA
USER MANUAL
Table 1. Home Tab Functional Description
Display Component Description
Activation code required Not shown in Figure 8 on page 17:
icon
Signifies that the device is either a non-WD device or an
unsupported WD device that requires a valid activation code and
upgrade to the WD SmartWare Pro software for access.
Backup source Dropbox Not shown in Figure 8 on page 17:
icon
Signifies that you have selected the Dropbox option for backup
operations.
Right-clicking the icon and selecting Select Account displays the
Dropbox login required dialog for configuring your Dropbox
account for access by the WD SmartWare Pro software:
Backup source computer Signifies that you have selected the computer option for backup
icon operations and provides the name of the selected drive or drive
partition.
Right-clicking the icon displays a menu with the following options:
• Open—To displays the computer’s file management utility
listing.
• Properties—To displays the Windows System Properties
dialog for the selected drive or drive partition.
(Continued)
WD SMARTWARE SOFTWARE FUNCTIONAL OVERVIEW – 18MY PASSPORT ULTRA
USER MANUAL
Table 1. Home Tab Functional Description (Continued)
Display Component Description
Backup source content The content gauge for the selected backup source device shows
gauge all of the files that are available for a category-type backup against
a blue background in six categories where:
This file category Includes files with these extensions
Documents .doc, .txt, .htm, .html, .ppt, .xls, .xml, and
other document extensions
Mail .mail, .msg, .pst., and other mail
extensions
Music .mp3, .wav, .wma, and other music
extensions
Movies .avi, .mov, .mp4, and other movie
extensions
Pictures .gif, .jpg, .png, and other picture
extensions
Other Others that do not belong in the five main
categories
For a complete list of all included file extensions, search for answer
ID 3644 in the WD Knowledge Base at http://support.wdc.com.
Note that:
• The System category, shown against a dark gray background,
includes all of your operating system files that are not available
for a category-type backup, including: system files, program
files, applications, working files like .tmp and .log files, and any
files that are stored in a Temp folder.
When you select and run a file-type backup, the name of the
System category changes to Excluded and it then includes all
of the files that were not included in your file backup.
• The Retrieved category, also shown against a dark gray
background, includes the files that you have retrieved from a
prior backup. They, too, are not available for a category-type
backup.
• The Additional Files category on the content gauge for your
backup target device shows the system files and hidden files
that your operating system put there when you installed the
device.
• Because they change so frequently, Outlook .pst files are only
backed up once every 24 hours for a continuous backup. This
exclusion does not apply to other mail application files. For a
scheduled backup, Outlook .pst files are backed up according
to the schedule.
• Hovering the pointer over a category displays the number of
files in the category.
(Continued)
WD SMARTWARE SOFTWARE FUNCTIONAL OVERVIEW – 19MY PASSPORT ULTRA
USER MANUAL
Table 1. Home Tab Functional Description (Continued)
Display Component Description
Backup source device When the computer option is selected, lists all of your computer’s
selector internal hard drives, hard drive partitions, and direct-attached
drives that are available as a backup source device.
Backup source selector Provides options for selecting the type of source device you want
to back up:
• Selecting the computer option displays your computer icon
and lists all of your computer’s internal hard drives, hard drive
partitions, and direct-attached drives in the device selector.
• Selecting the Dropbox option displays the Dropbox icon and
hides the device selector.
Backup target content After installing the WD SmartWare software—before running your
gauge first backup or copying any files to the device—the backup target
content gauge shows only a small number of files in the Additional
Files category. These are the system files and hidden files that your
computer’s operating system put there when you installed the
device.
After running a backup or copying files to the device, the backup
target content gauge shows:
• All of the files that have been backed up in the same categories
as the content gauge for the backup source device (see
“Backup source content gauge” on page 19)
• Any other files that you have copied or saved to the device in
the Additional Files category
Backup target device icon Provides the name of the backup target device connected to your
computer.
If you have more than one supported device connected to your
computer, left-click the one that you want to use for backup and
retrieve functions. The WD SmartWare software highlights your
selection with a light-blue background:
Selected My Passport Drive
(Continued)
WD SMARTWARE SOFTWARE FUNCTIONAL OVERVIEW – 20MY PASSPORT ULTRA
USER MANUAL
Table 1. Home Tab Functional Description (Continued)
Display Component Description
Backup target device icon Right-clicking a direct-attached drive icon displays a menu with the
(continued) following options:
• Open—Displays the device listing in your computer’s file
management utility
• Properties—Displays the Windows Drive Properties dialog
• Safely remove—Prepares your system to disconnect the drive
Note: The Safely remove option is not available for non-
WD drives.
Right-clicking a network-attached device icon displays a menu
with the following options:
• Open—To display the device listing in your computer’s file
management utility
• Dashboard—To display the Web interface for configuring the
device
• Map—To display the Windows Map Network Drive dialog
• Create Shortcut—To add a shortcut to the device to your
desktop display
• Alerts—To display the WD SmartWare WD Alerts reports
• Properties—To display the Device Details and Troubleshooting
information for the device
• Shut Down—To ready and shut down the device (not available
for My Net N600, N750, N900, and N900 Central routers)
Right-clicking the Dropbox folder icon displays a link to the
Dropbox Login Required dialog for configuring your Dropbox
account for access by the WD SmartWare Pro software.
(Continued)
WD SMARTWARE SOFTWARE FUNCTIONAL OVERVIEW – 21MY PASSPORT ULTRA
USER MANUAL
Table 1. Home Tab Functional Description (Continued)
Display Component Description
Backup target device Not shown in Figure 8 on page 17:
selector
The backup target device selector appears under the icon for each
supported backup target device that has more than one drive
partition or network share. The drive partition or network share that
you select is the target for subsequent backup operations and the
source for subsequent retrieve operations.
Device display scroll Not shown in Figure 8 on page 17:
pointers
Scroll Pointers
One installation of the WD SmartWare software supports as many
external devices as you system can handle. When the number of
connected devices exceeds the display capacity, the
WD SmartWare software displays left/right device display scroll
pointers so you can see them all.
Device locked icon Not shown in Figure 8 on page 17:
Signifies that the device is password protected and locked.
Free trial countdown icon Not shown in Figure 8 on page 17:
Signifies that non-WD devices, unsupported devices, and a remote
Dropbox folder are being accessed by a 30-day free trial of the
WD SmartWare Pro software upgrade.
Login required icon Not shown in Figure 8 on page 17:
Signifies that a valid login user name and password are required to
access secured network-attached storage devices.
No writable partition icon Not shown in Figure 8 on page 17:
Appears when the WD SmartWare software cannot find a valid
volume or share on the device. You must configure the device
before you can select it for WD SmartWare backup and retrieve
functions.
WD SMARTWARE SOFTWARE FUNCTIONAL OVERVIEW – 22MY PASSPORT ULTRA
USER MANUAL
Backup Tab Displays
The WD SmartWare software provides one of two different Backup tab displays,
depending on how you want to select files to back up:
• By category—As shown in the content gauges
• By file—As shown in the folder structure of your computer’s internal hard drive
Use the WD SmartWare Backup tab displays to select the files or categories of files that
you want to back up and control the backup operation.
See Figure 9 and Table 2 on page 24 for a brief functional description of the Backup tab
displays.
Backup by Category Display Backup by Files Display
Backup Source Advanced Backup Area Backup Target
Content Gauge Content Gauge
Category/File Backup Set Backup Frequency Enable/Disable Backup
Toggle Button Button Toggle Button
Figure 9. Backup Tab Displays
WD SMARTWARE SOFTWARE FUNCTIONAL OVERVIEW – 23MY PASSPORT ULTRA
USER MANUAL
Table 2. Backup Tab Functional Description
Display Component Description
Advanced backup area In category mode, the initial/default configuration of the
WD SmartWare software is to back up all categories of your files. In
this configuration, the advanced backup area is blank.
Clicking Advanced View displays a backup files selection box that
you can use to specify the categories of files that you want to back
up:
Clicking Apply Changes in the backup files selection box creates a
custom backup plan and updates the content gauges.
Clicking Switch to File Backup displays a folder structure view
that you can use to specify individual files or folders that you want
to back up:
Note: The folder structure view displaces the backup
source device content gauge on the Backup tab
display.
In file mode, the initial/default configuration of the WD SmartWare
software is with none of the files/folders selected for backup. After
selecting the files or folders that you want to back up, clicking:
• Apply Changes creates a custom backup plan using your
recent selections
• Revert clears your recent selections and redisplays the prior
applied configuration
(Continued)
WD SMARTWARE SOFTWARE FUNCTIONAL OVERVIEW – 24MY PASSPORT ULTRA
USER MANUAL
Table 2. Backup Tab Functional Description (Continued)
Display Component Description
Backup schedule Not shown in Figure 9 on page 23:
reminder button
For scheduled backups, clicking the button displays a status
dialog that:
• Shows the date and time of your next scheduled backup, the
last backup that might have been missed, and the last
completed backup
• Provides a Backup Now button for bypassing the schedule and
running the backup now
Backup source content Same as the content gauge for the backup source device on the
gauge Home tab display. (See “Backup source content gauge” on
page 19.)
Backup target content Same as the content gauge for the backup target device on the
gauge Home tab display. (See “Backup target content gauge” on
page 20.)
Category/File Backup Switches the backup mode between categories and files:
toggle button
• Category mode—Backs up files according to their categories,
as shown in the content gauges.
The button name is Switch to File Backup when the backup
mode is category.
• File mode—Backs up files according to their folder structure on
the selected backup source drive.
The button name is Switch to Category Backup when the
backup mode is file.
Enable/Disable Backup Starts and stops the backup.
toggle button
Set Backup Frequency Opens the Set Backup Frequency dialog for selecting either
button continuous or scheduled backups. A continuous backup runs all
the time. A scheduled backup runs only on specified days at
specified times.
Retrieve Tab Displays
Three WD SmartWare software Retrieve tab displays guide you through the tasks for
finding backup files and copying them to the selected backup source device:
• Selecting the backup volume to retrieve from
• Selecting the destination for retrieved files
• Selecting the files to retrieve from the selected backup target device
See Figure 10 and Table 3 on page 26 for a brief functional description of the Retrieve
tab displays.
WD SMARTWARE SOFTWARE FUNCTIONAL OVERVIEW – 25MY PASSPORT ULTRA
USER MANUAL
Backed Up Volumes Selection Box
Select a Volume to Retrieve From Display
Retrieve Destination Option Buttons
Change Retrieve Folder Box
and Browse Button
Select a Destination for Retrieved Files Display
Retrieve Files Option Buttons
Retrieve Some Files Selection Box
Start Retrieving/Cancel Retrieving
Toggle Button
Select Content to Retrieve Display
Figure 10. Retrieve Tab Displays
Table 3. Retrieve Tab Functional Description
Display Component Description
Backed Up Volumes Lists the backed up volumes that are available to retrieve files from
selection box on the selected backup target device.
You must select a backup volume before you can click Next to
continue with the retrieve operation.
Change retrieve folder box By default, the WD SmartWare software creates and uses a folder
and Browse button named Retrieved Contents in the My Documents folder for your
user name. If you want to specify a different folder, use the Browse
function and click Apply.
(Continued)
WD SMARTWARE SOFTWARE FUNCTIONAL OVERVIEW – 26MY PASSPORT ULTRA
USER MANUAL
Table 3. Retrieve Tab Functional Description (Continued)
Display Component Description
Retrieve destination Specify where you want to copy the files retrieved from the
option buttons selected backup target device:
• To the Original Places copies the retrieved files to the same
location that they were backed up from.
• To a Retrieved Content Folder copies all of the retrieved files
to a single folder.
Retrieve files option By default, the Retrieve Some Files option is selected and the
buttons WD SmartWare software displays the Retrieve Some Files
selection box that you can use to find and retrieve only selected
files or folders.
Selecting the Retrieve All Files option closes the Retrieve Some
Files selection box and the WD SmartWare software retrieves all of
the files from the selected backup volume on the selected backup
target device.
Retrieve some files Displays all of the files from the selected backed up volume in a
selection box folder structure with check boxes for selecting individual files or
folders:
Start/Cancel Retrieving Controls retrieve operations by starting and canceling the retrieve.
toggle button
WD SMARTWARE SOFTWARE FUNCTIONAL OVERVIEW – 27MY PASSPORT ULTRA
USER MANUAL
Settings Tab Display
See Figure 11 and Table 4 for a brief functional description of the Settings tab display.
Figure 11. Settings Tab Display
Table 4. Settings Tab Functional Description
Display Component Description
Dropbox Account button Displays the Dropbox Account dialog for configuring a remote
Dropbox folder for access by the WD SmartWare Pro software.
File History button Displays the Set File History dialog for specifying the number of
backup versions that you want to keep for each file.
Retrieve Folder button Displays the Set Retrieve Folder dialog for specifying a different
destination folder for retrieved files.
Software Updates button Displays the Software Updates dialog for enabling/disabling the
option that automatically checks for software updates.
WD SMARTWARE SOFTWARE FUNCTIONAL OVERVIEW – 28MY PASSPORT ULTRA
USER MANUAL
Help Tab Display
The WD SmartWare Help tab display provides quick access to Learning Center topics
and links to online support services.
See Figure 12 and Table 5 for a brief functional description of the Help tab display.
Learning Center
Topic Buttons
Contact Us Link WD Store Link
Support Link Online User Manuals Link
Figure 12. Help Tab Display
Table 5. Help Tab Functional Description
Display Component Description
Contact Us link Uses your Web browser to connect to the WD Service & Support
Contact Us page at http://support.wdc.com/contact.
Learning Center topic Provide links to display the main Learning Center help topics:
buttons
• Overview
• Backup
• Retrieve
• Manage & Customize
Online User Manuals link Uses your Web browser to connect to the user manual page for
WD SmartWare manuals at:
http//www.wdc.com/wdproducts/wdsmartware/um.asp.
There, you can select and open the online version of the user
manual for your WD device.
(Continued)
WD SMARTWARE SOFTWARE FUNCTIONAL OVERVIEW – 29MY PASSPORT ULTRA
USER MANUAL
Table 5. Help Tab Functional Description (Continued)
Display Component Description
Support link Uses your Web browser to connect to the WD Service & Support
Home page at http://support.wdc.com.
WD Store link Uses your Web browser to connect to the WD online store at:
http://store.westerndigital.com/store/wdus.
WD SMARTWARE SOFTWARE FUNCTIONAL OVERVIEW – 30MY PASSPORT ULTRA
USER MANUAL
Backing Up Files
1
4
This chapter includes the following topics:
How the Backup Function Works
Backing Up Files
How the Backup Function Works
The WD SmartWare software automatically backs up all your important files to the
selected backup target device—music, movies, photos, documents, email, and other
files. Continuous backup instantly makes a second copy whenever you add or change a
file on the selected backup source device. Scheduled backups run on the days and
times you select.
After the WD SmartWare software categorizes the different types of files on the selected
backup source device, clicking the Enable Backup button backs all of them up to the
selected backup target device. Or you can select specific files, folders, or categories of
files to back up.
After performing a backup, the WD SmartWare software protects your files by backing
up any:
• New file that is created on or copied to the selected backup source device
• Existing file that is changed in any way
This protection is automatic—the WD SmartWare software does it for you without any
action on your part—just leave the backup source and target devices connected to your
computer.
Note: Backup protection is automatic for as long as the backup source and target
devices are connected to your computer. Then, whenever you disconnect and
reconnect either device, the WD SmartWare software rescans the backup source
device for new or changed files and resumes automatic backup protection.
Backing Up Files
1. In the Backup Source area of the Home screen, select the device that has the files
you want to back up:
a. Use the backup source selector to specify whether you want to back up files
from a local hard drive or from a remote Dropbox folder:
• By default, the computer option is selected and the computer icon signifies
that the backup source device will be either an internal hard drive or drive
partition, or a local direct-attached external hard drive:
BACKING UP FILES – 31MY PASSPORT ULTRA
USER MANUAL
• Selecting the Dropbox option displays the Dropbox icon to signify that the
backup source device will be a remote Dropbox folder:
b. If the selected backup source device has more than one internal hard drive,
multiple drive partitions, or external hard drives, use the backup source device
selector to select the one that you want to back up:
2. In the Backup Target area of the Home screen:
a. If you have more than one backup target device connected to your computer,
select the one that you want to back up files to:
Selected My Passport Drive
b. Verify that a light-blue background highlights the selected device.
c. If the selected backup target device has more than one drive partition or network
share, use the backup target device selector under the device icon to select the
one that you want to use:
3. Click the Backup tab to display the Backup screen (see Figure 9 on page 23).
4. The initial/default configuration of the WD SmartWare software is for continuous
backups. If you want to configure scheduled backups, click Set Backup Frequency
to display the Set Backup Frequency dialog:
5. On the Set Backup Frequency dialog:
a. Select the Scheduled Backup option.
BACKING UP FILES – 32MY PASSPORT ULTRA
USER MANUAL
b. Select the Hourly, Daily, or Monthly option and use the check boxes and
selection boxes to schedule your backups:
Selecting . . . Performs a backup . . .
Hourly Every hour, on the hour.
Daily On the selected days of the week, at the selected time:
a. Select or clear the Days check boxes to specify the days
of the week that you want to run your backup.
b. Use the at selection box to specify the time of day that
you want to run your backup.
Monthly On the selected day of the month, at the selected time:
a. Use the Every selection box to specify which occurrence
of the day that you want to run your backup—First,
Second, Third, Fourth, or Last.
b. Use the Day selection box to specify the day of the week
that you want to run your backup.
c. Use the at selection box to specify time of day that you
want to run your backup.
d. Click OK to save your schedule and close the Set Backup Frequency dialog.
6. On the Backup screen:
IF you want to back up . . . on the
selected backup source device, THEN . . .
All of the categories of files Proceed to step 7.
Selected categories of files Skip to step 8 on page 34.
All of the files and folders Skip to step 9 on page 36.
Selected files and folders Skip to step 10 on page 37.
7. To back up all of the categories of files on the selected backup source device:
a. Verify that the backup mode is category and that Ready to perform category
backup appears at the upper-left corner of the Backup screen.
If the backup mode is file and Ready to perform file backup appears there, click
the Switch to Category Backup button and OK at the Switching Backup Plan
prompt.
BACKING UP FILES – 33MY PASSPORT ULTRA
USER MANUAL
b. Click Advanced View to open the backup by categories selection box and verify
that the check boxes for all six categories are selected:
c. Select any cleared check boxes and then click Apply Changes to create a
custom backup plan and refresh the content gauges.
d. Click Enable Backup to begin backing up all categories of files on the backup
source device, at the specified backup frequency, and skip to step 11 on page 38.
Note: If you configured a scheduled backup at step 5 on page 32, the
WD SmartWare software adds a backup schedule reminder button to the
Backup screen:
Clicking the reminder button displays the Scheduled Backup Status
dialog that shows the date and time of your next scheduled backup, the
last backup that might have been missed, and the last completed backup:
Click Backup Now if you want to bypass the schedule and run the
backup now.
8. To backup selected categories of files on the selected backup source device:
a. Verify that the backup mode is category and that Ready to perform category
backup appears at the upper-left corner of the Backup screen.
If the backup mode is file and Ready to perform file backup appears there, then
click the Switch to Category Backup button and OK at the Switching Backup
Plan prompt.
BACKING UP FILES – 34MY PASSPORT ULTRA
USER MANUAL
b. Click Advanced View to open the backup by categories selection box:
c. In the backup by categories selection box:
• Clear the check boxes for the categories of files that you want to exclude
from the backup.
• Select the check boxes for the categories of files that you want to include in
the backup.
d. Click Apply Changes to create a custom backup plan and refresh the content
gauges.
e. Click Enable Backup to begin backing up the selected categories of files on the
selected backup source device, at the specified backup frequency, and skip to
step 11 on page 38.
Note: If you configured a scheduled backup at step 5 on page 32, the
WD SmartWare software adds a backup schedule reminder button to the
Backup screen:
Clicking the reminder button displays the Scheduled Backup Status
dialog that shows the date and time of your next scheduled backup, the
last backup that might have been missed, and the last completed backup:
Click Backup Now if you want to bypass the schedule and run the
backup now.
BACKING UP FILES – 35MY PASSPORT ULTRA
USER MANUAL
9. To back up all of the files and folders on the selected backup source device:
a. Verify that the backup mode is file and that Ready to perform file backup appears
at the upper-left corner of the Backup screen.
If the backup mode is category and Ready to perform category backup appears
there, then click the Switch to File Backup button and OK at the Switching
Backup Plan prompt.
b. In the backup by files selection box, select the check box for the backup source
device:
c. Open the folder structure and verify that selecting the check box for the backup
source device automatically selected the check boxes for all of the files and
folders on the device:.
d. Click Apply Changes to create a custom backup plan using your selections.
Note: Clicking Revert clears your recent selections and redisplays the prior applied
configuration.
e. Click Enable Backup to begin backing up all of files and folders on the selected
backup source devices, at the specified backup frequency, and skip to step 11 on
page 38.
Note: If you configured a scheduled backup at step 5 on page 32, the
WD SmartWare software adds a backup schedule reminder button to the
Backup screen:
Clicking the reminder button displays the Scheduled Backup Status
dialog that shows the date and time of your next scheduled backup, the
last backup that might have been missed, and the last completed backup:
Click Backup Now if you want to bypass the schedule and run the
backup now.
BACKING UP FILES – 36MY PASSPORT ULTRA
USER MANUAL
10. To backup selected files or folders from selected backup source device:
a. Verify that the backup mode is file and that Ready to perform file backup appears
at the upper-left corner of the Backup screen.
If the backup mode is category and Ready to perform category backup appears
there, then click the Switch to File Backup button and OK at the Switching
Backup Plan prompt.
b. In the backup by files selection box, open the folder structure:
c. Select the check boxes for the individual files or folders that you want to back up.
Note that selecting a folder check box automatically selects all of the subfolders
and files in the folder.
d. Click Apply Changes to create a custom backup plan using your selections.
Note: Clicking Revert clears your recent selections and redisplays the prior applied
configuration.
e. Click Enable Backup to begin backing up the selected files or folders on the
selected backup source device, at the specified backup frequency, and proceed
to step 11 on page 38.
Note: If you configured a scheduled backup at step 5 on page 32, the
WD SmartWare software adds a backup schedule reminder button to the
Backup screen:
Clicking the reminder button displays the Scheduled Backup Status
dialog that shows the date and time of your next scheduled backup, the
last backup that might have been missed, and the last completed backup:
Click Backup Now if you want to bypass the schedule and run the
backup now.
BACKING UP FILES – 37You can also read