Football pitches iog guidelines for the preparation & maintenance of
←
→
Page content transcription
If your browser does not render page correctly, please read the page content below
guidelines for the preparation & maintenance of

football pitches
                                    iog
                                     years
                                    75
Contents

                                              Page

The course and objectives                      3

Introduction                                   5

Initial considerations                         6

FA Performance Quality Standards               9

Goal safety                                    12

Line marking                                   15

Mowing                                         23

Aeration                                       30

Scarification and verti-cutting                36

Brushing, dragmatting and harrowing            39

Spraying                                       41

Irrigation                                     43

Fertiliser application                         46

Seeding                                        51

Top-dressing                                   54

Health and Safety                              64

Surface drainage                               77

Maintenance quotes & specifications            79

Technical terms in turfculture                 86

                                      2
The Course & Objectives

About the course
l	This  course has been developed by The Institute of Groundsmanship in association
    with The Football Association

l	It is envisaged that grounds staff will develop their personal skills and expertise by following this scheme of
    instruction

l	The   course is designed to provide an initial knowledge of football pitch maintenance. The course will
    demonstrate and apply the skills required to provide, maintain and renovate the playing surface at the end
    of the playing season and during the non-playing period

l	The  course is designed to be of equal benefit to the person working alone on a football ground or a person
    working as part of a larger team.

Objectives
l   To provide safe working practices when completing operations on football pitches.

l   To appreciate the requirements for football pitch maintenance generally

l   To provide playing surfaces in line with Performance Quality Standards (PQS)

l To   implement the correct sequence of operations in producing and maintaining the playing surface

l   To use and compare the different materials available for the production of football pitches

l To  use and compare the range of equipment available for the production and maintenance of football
    pitches

l   To carry out repairs to the pitch after the game

l   To carry out maintenance of equipment used for football pitch management.

                                                         3
Notes

  4

Introduction

The role of the groundsman
The groundsman is an essential element of the sporting and recreational industry. He or she has the onerous
but rewarding role of preparing and maintaining the stage on which so many sporting men and women depend
for their performance and enjoyment.

It is therefore equally essential that grounds staff fully appreciate their responsibility in producing a safe and
consistent surface. This will only be achieved by having the knowledge and expertise found in the science of
turfculture.

Timing is essential. Even if you know what to do, this knowledge will be useless if the timing is wrong.

You must do each task:

l   In the right sequence

l   At the right time

l   In the right weather conditions

l   With a full understanding of the effect you want to achieve.

A note on Health & Safety
Many grounds staff who care for football grounds are self sufficient in maintaining and producing playing
surfaces, perhaps with the guidance of a club or grounds chairman. In large organisations, you may have to
report to a manager or supervisor. On every occasion the employer and/or club is ultimately responsible
for the health and safety of its workers.

                                                         5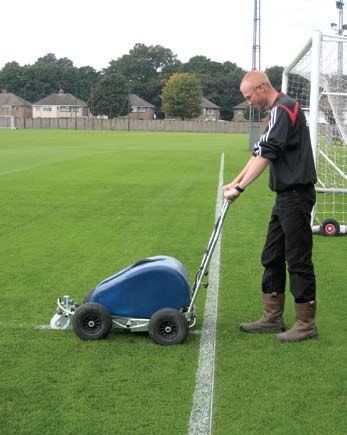
Initial Considerations

Topography
Consideration regarding the ‘lie of the land’ is most important when siting football pitches. The land should
under no circumstances be severely undulating or have a steep slope across or along the line of play.

Gradients
Gradients are recommended to avoid undue fatigue to players, to assist in surface water ‘run off‘ or to
compliment ‘falls’ for drainage systems, where necessary.

Recommended gradients for football pitches are 1:80 (min) down the length and 1:40 (min) across
the width of the pitch, or as level as possible if circumstances dictate.

Orientation
Orientation refers to the alignment of the pitch in relation to the position of the sun. The purpose is to prevent
sun glare into the eyes of key players such as goal keepers.

The ideal pitch orientation is between 285o NW to 20o NE in a north/south direction. The most common
orientation is on a bearing of 345o.

                                                         6
Guidelines for annual maintenance
The annual maintenance of football pitches is broken into the seasons as indicated below and will be
dependent on other uses of the surface.

Spring (playing season)

l	Mowing    should be a regular task – recommended height of cut 25 to 35mm for football but this will depend
    on the situation

l   Light scarification of surface

l	Maintain     surface aeration to aid root growth, but only if surface conditions allow

l	Irrigation - where the weather has continued to improve and surfaces are very dry you will need to irrigate to
    aid the preparation of the surface for maintenance work

l   Fertilising as required after soil analysis

l   Inspect for pest and disease infestation and remove as necessary.

Spring (end of playing season - renovation)

l   Reduce mowing height to 15 to 20mm before scarification, depending on conditions

l   Scarify the surface to remove ‘debris’

l	Irrigation - where the weather has continued to improve and surfaces are very dry you
    will need to irrigate to aid the preparation of the surface for maintenance work

l	Maintain   surface aeration to aid root growth. Now is the time to start deep spiking to relieve compaction
    (but only if surface conditions allow). If soil exchange is envisaged, the use of hollow core tines, opposed to
    solid tines, will also relieve compaction

l	Seeding   - direct drilling is always a preferred option as it ensures optimum growth conditions and reduces
    loss of seed

l   Fertilising as required from results of soil analysis

l   Verti-drain

l   Top dressing.

                                                            7
Notes

  8
FA Performance
                           Quality Standards

What is it?
The Performance Quality Standard (PQS) provides a recommended minimum quality standard for the
maintenance and construction of pitches. Specifically, it sets the basic standard recommended for natural
grass pitches, which may be located at a variety of locations including a club site, within a park or recreational
ground.

Principally, this recommends that a natural grass pitch must:

  l   Have adequate grass cover

  l   Low level of weed coverage

  l   Be flat

  l   Have the ability to drain water

If met, the PQS ensures a flat drained surface suitable for ‘recreational’ and competitive football activities up to
Step 1 of the Non-League pyramid.

Why was it developed?
There has been no commonly recognised basic technical standard for a natural grass pitch. In order to ensure
that any funding produces pitches of sufficient quality for community and non-league competitive use, it is
recognised that a performance quality standard has needed to be developed for all future projects.

How was it developed?
A voluntary technical consortium was established, with representation from the Sports Turf Research Institute
(STRI), National Playing Fields Association (NPFA) and the Institute of Groundsmanship (IOG).

Whose standard is it?
The PQS has been adopted by Sport England as a basic quality standard for natural grass pitches, funded
under their Playing Fields and Community Green Spaces programme. Whilst it was a programme specific
standard, The FA has worked with Sport England in 2004 to adopt and develop the standard for its own project
programme.

                                                         9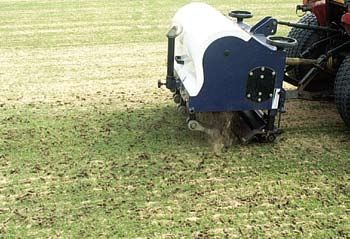
Why are the tolerances set so high?
Tolerances were set as a direct result of input from the voluntary technical consortium. This body was
established to agree on a common technical approach to be utilised under the programme. This included the
development of the PQS.

Are you going to change it?
Sport England is currently undertaking a data checking exercise, in order to quantify the technical aspects of
pitch improvement/construction. This technical data will be an important ‘legacy’, which will be passed onto
The FA. This will allow us to benefit from the ‘lessons learned’ under the programme, particularly with reference
to the implementation and measurement of the PQS.

Natural Grass Construction Upgrade Performance Quality Standard
               ELEMENT                               LIMITS                            METHOD OF TEST

                                                    20-60 PS
           Sward Height mm                                                              BS 7370 : P3 A3
                                                    20-75 SM

                                                                             STRI method of test using a 0.5kg Clegg
             Hardness in g                           5-200                    Impact Hammer from a drop height of
                                                                                             0.55 m

      Water infiltration rate mm/hr                     5                               BS 7370 : P3 A8

    Evenness – 2 meter straight edge                < 20mm                              BS 7370 : P3 A4

        Slope – Direction of Play                   < 1.25%
                                                                                        BS 7370 : P3 A5
              Across Play                            70 for SH 25-30
            Ground Cover %                                                              BS 7370 : P3 A6
                                                > 80 for SH 30-35

                                                       10
Notes 11
Goal Safety

l	Of    goals tested in a recent survey 41% of mini soccer goals, 50% of 5 a side goals and 22% of junior goals
     failed stability tests

l    Staff at every second site visited were unaware of the safety campaign run by the FA

l	Ground      conditions can affect the stability of the goals

l	Ensure   proper fixings are in use for the appropriate weather conditions.

Goal Inspection Sheet
    Site                           Walmer Road                    Pitch No.                    3

    Goal Reference                 Pitch 3 North End              Type of Goal                 Socketed Aluminium

    Size of goal                   7.32m x 2.44m                  Stability Test Pass                 Yes / No

                                   notes:                         Start Height                            mm

                                                                  Finish Height                           mm
    Strength Test
                                                                  Deflection Test                         mm

                                                                  (more than 10mm is a fail)         Pass / Fail

    Supplier of
                                   Harrod UK Ltd                  Date of manufacture          Feb 2005
    Manufacturer

    Inspected By                   Harry Pitts                    Date of inspection           10th Jan 2006

    Findings                       Goal Net has holes and brokern meshes, some net hooks also missing

    Action Taken                   Purchased new net and clips and fitted to goal

                                                            12
Warning signs should be attached to all A British Standard sign should be attached
goal post systems
Self balanced goals offer more safety It is important to leave some slack in the net.
All supports should be out with the width of the net.
If Dug outs are required or installed they should be fixed,
with the transport wheels locked if fitted. The technical
area should be clearly defined.
13Notes 14
Line Marking –
                      Safe Working Practice

The purpose of this guide is to highlight safe working practices for the use of
line marking equipment and it must not be treated as a substitute for training.

Protective clothing and equipment
l   Operators must wear appropriate protective equipment
		 i. In circumstances where crushing injuries to feet could occur, toe protected footwear MUST be worn
		 ii. Depending on the formulation and work practice: apron, face shield, gloves and facemask may be
        required
		 iii. If pesticides are being applied then protective clothing requirements will follow the recommendations of
         the label and the Control of Pesticide Regulations 1986
l   Avoid wearing loose fitting clothing
l   Never allow children or untrained operators to operate the equipment.

Before Use
l   Ensure there are no defects that could affect the safe operation of the applicator
l   Ensure applicator is clean and ready for use
l   Learn controls and know how to start and stop the applicator in any emergency
l   Lubricate any grease / oil points
l   Ensure all shields/ guards are undamaged and secured in place
l   Ensure the work area is free from obstructions
l   Ensure compound is properly mixed to prevent blockages
l   Do not fill or re-fill the applicator on the playing surface.

During Use
l   Never touch any mixed solution without wearing the appropriate protective clothing
l   Walk at a speed consistent with existing conditions
l   Avoid contamination of tapes and pegs
l   Ensure the line marker is disengaged before leaving the line.

After Use
l   Clean machine thoroughly

l   Examine the machine for loose or damaged components and replace

l   Complete the LOG BOOK and report defects.

                                                            15
One of the many jobs carried out by the groundsman that often provokes criticism or praise quickly
when viewed is line marking. Done well this job can set pitches off especially when being featured on
TV or when the pitch is being used for a high profile game. The secret of marking good lines is to keep
equipment clean and use approved marking compounds.
Lines should be kept straight. This can be
achieved by running a string along the length
of the line. The string then acts as a guide
allowing the groundsman to keep the line
ruler straight.
Care should be taken to walk at a sensible
pace allowing the machine to deliver the right
amount of paint to make a good line. It also
allows the operator to follow the string line.
Effective marking can be of great assistance
in the training environment as well. Areas
such as grids or specialised areas for
goalkeepers need to be as well defined as the
match pitch. Circles such as the one shown in
the picture are often used in a training ground
environment for special drills. As with other
marks they need to be clear and well defined.
The end of the string should be fixed in to the
ground by a peg. The radius should then be
measured. Once established the string should
be pulled tight and another peg tied onto it.
This peg should be used to scroll a line in the
grass. Once the circle has been etched in it
can be painted.
16For areas that have more than one pitch
the machine featured to the left is ideal. It
is designed for marking multiple pitches
in a short space of time. It can be fitted to
any utility vehicle making it very versatile.
The large tank enables the operator to carry
enough compound to mark several pitches at
a time with out having to stop and refill.
Above & below: Fleet Fastliner machine
A circle being etched in and
then marked properly.
Above: a Kombi line marker
17Finding a right angle
One of the most tried and tested methods of finding a right angle is by using the 3,4,5 method. This
method is essential when marking out a pitch for the first time. The five step guide set out below guides
you through step by step ensuring you will end up with a pitch that is square.
1. Place a taut line to produce the base line
A B
and mark the corner positions A and B
A 3 X B 2. From the corner peg A extend a tape for
30m point X. Extend a tape 40m from A to
.....................................
Y. The distance from Y to X must be 50m,
which will give a right angle at A.
5
Y
3. Extend the line A - Y for a length of 90 -
A 45 - 90m B
120m to identify the 3rd corner peg of the
pitch at point C
Y
(90 - 120m)
C
184. From the corner peg B extend a tape for
A W 3 B 30m point W. Extend a tape 40m from B-Z.
The distance from Z-W must be 50m which
will give you a right angle at B.
4
5
Z
C
A B 5.Extend the line B - Z to the required length
to produce the 4th corner peg at point D.
A complete rectangle is now made for the
pitch. The accuracy can be checked by
measuring the diagonals A - D and B - C
Z
C D
19Marking sequence for association football
Below: an association football pitch.
64 - 75m (70 - 80 yds)
Corner
Goal Area
Penalty Area
Touch Line
Centre Circle
100 - 110m (110 - 120 yds)
9.15m (10yds)
Halfway Line
Centre Mark
Penalty Mark
Goal Line
Optional Mark
20Follow the steps indicated below to relate to the sequence for marking a football pitch
The diagram below shows a suggested route to follow when marking the pitch. Just follow the numbers.
22 10
25 7
23 8
18 11
9
24
21
19
20 12
17 15
13
26 16 6
14
4
5
START FINISH
1 2
3
36
38
48
35
39
37
34
42
41
43
46
29
33
30 40 45
28 32 47
31 44
21Notes 22
MOWING

Mowing is one of the most important football pitch maintenance operations. Mowing can dictate the
appearance, health and vigour of the grass sward. Mowing is basically the pruning of the grass and as with
pruning a shrub or tree, grass needs different degrees of mowing dependant on seasonal factors.

Mowing influences grass density, sward characteristics and weed invasion. The height of cut and
frequency of cut will affect the balance of the grass specie. The playing surface will be greatly affected by the
removal or return of grass clippings.

Mowing of football pitches is achieved in two principle ways;

    1. Pedestrian controlled mowing machinery

    2. Ride -on tractor mounted or trailed gang mowers.

The use of pedestrian mowers usually allows for the collection of grass clippings via the grass boxes while
tractor mounted or trailed machinery return grass clippings to the pitch surface. There are four types of cutting
action on mowing machines-cylinder, rotary, flail and reciprocating. Football pitches require the use of cylinder
mowers for a better quality finish as cylinder mowers cut rather than tear the grass. While rotary mowers are
sometimes used neither they, nor a reciprocating mower, will give the desired finish.

Cutting heights
Typical heights of cut;

The pitch: playing season ideally 25 – 30mm

Training ground ideally 25mm to 30mm to ensure protection of the surface

The above heights are recommended heights of cut. Pitches cut higher than this will result in dramatically
slowing down the roll of the ball and make its movement erratic across the surface so reducing the quality of
the game. It will also make running more difficult and be tiring for the players as well as increasing the risk of
injury.

Before using a mower

l   Check fuel, oil levels and air cleaner

l Learn  controls and know how to start and stop the machine in an emergency. If in doubt consult the
    operations manual

l   Lubricate all chains and grease / oil points

l   Ensure all shields / guards are undamaged and secure in place

l Check   the condition and security of the blades, blade bolts and cutter assembly. If damaged replace in sets
    to maintain the balance

l   Check cutting height

l   Ensure the blades and drive clutches are disengaged.

                                                         23
During use
l Ensure the work area is free from obstructions before beginning to mow
l Disengage cutters before crossing paths or stop the engine of rotary mowers
l Never make adjustments / repairs with the engine running other than carburettor adjustments.
Always switch off engine and remove the spark plug lead
l Never touch any moving parts
l Disconnect the spark plug lead if leaving the machine unattended
l Do not walk backwards when operating rotary mowers
l Prior to refuelling, stop engine and allow cooling
l Do not fill fuel tank on the grass surface.
After use
l Clean machine thoroughly
l Examine the machine for loose or damaged components and replace
l Complete the LOG BOOK and report defects.
Cylinder mowers
Cylinder mowers have a cutting action which is similar to a pair of scissors. It therefore provides
a clean cut without tearing the grass. There are two working parts to the cutters - the cylinder and bottom
blade.
The blades of the cylinder are made with a
spiral twist to ensure a clean cut and lessen
damage from any objects hit by the machine.
The blades are connected by rivets or welding
on a series of flanges to the centre shaft. A
rapidly revolving cylinder with 5 -7 blades or
more provides the best cut. Chains, belts or
gears may drive the cylinder.
Left: Parts of a cylinder mower
The bottom blade should be strong but not too thick to prevent a low height of cut. The bottom blade is
attached to the sole plate. Careful adjustment is required to ensure that the cutting blades wipe the bottom
blade without being too tight to encourage wear on the cutting surfaces.
The remaining parts of the cylinder mower include the front and rear roller, the throw plate and the grass box.
The rear roller may be cast in one section or divided into two or three to assist with turning.
24Adjustments to a cylinder mower
There are several adjustments necessary to a cylinder mower to ensure the best use of the machine. Before
carrying out any adjustments all operators should have read the operator’s manual for the particular machine.
At all times safety should be considered before any adjustment to a mower. It is necessary to take the following
steps:
1. Switch off the engine
2. Switch off the fuel
3. Remove spark plug lead
4. Support the mower securely
5. Do not adjust the mower on the surface
(to prevent fuel and oil spillage damaging
the turf).
Setting a pedestrian mower
Probably the most common job any groundsman will do will be to cut the grass. Quality mowing will be as a
result of a good operator taking time and care to prepare the mower in a professional manner. The first step will
be to establish the cutting height of the mower. Cutting heights will vary depending on which area is to be cut
and the time of year that the cutting is being carried out.
The height on football pitches can vary between 17mm (3/4 of an inch) to 32mm (11/4 ). This is quite a variance
but should cover all mowing throughout the year. I have a preference to cut at around 24mm in season lifting
the height to 30mm in the close season when trying to establish the new swards.
Part of a groundsman’s tool kit should be a setting gauge. These gauges can be either bar gauges or a frame.
Whatever type of gauge is selected the setting principal is the same. The setting bolts will be measured and
set to the chosen height. The gauge will be placed under the mower with one end touching the front roller and
one end touching the rear roller. It is important that the gauge touches both rollers. At this point the lock nuts
holding the height adjustors on the mower should be slackened. The front roller should then be moved up or
down until the head of the bolt on the gauge can locate on to the bottom blade. When this is done the front
roller should be touching the gauge. The front roller should be able to be turned by hand but should not spin
freely.
If you are using a bar gauge you should check the height at both ends and the middle. If you are using a frame
gauge then check that the roller touches at both sides of the gauge. If you are sure the chosen height has been
set, lock the adjustments up before removing the gauge.
25The height of cut
The height of the sward found on a pitch will have a profound effect on how that pitch will perform. Adjustment
of the mower is critical to success. Raising the front roller will lower the height of cut and lowering the roller
will increase the height. The usual method for testing the correct height is to place a straight edge beneath
the machine and from the rear to the front roller. The gap between the straight edge and the top of the bottom
blade is the height that the machine will cut the sward. Allowances must be made when the surface to be cut is
damp as the weight of clippings in the machine being used will have a marked effect on the height, which will
have been already set.
Many grounds staff will now use a tool specially
made for adjusting the height of cut. This can be
made of a straight bar or frame as shown in the
picture. A bolt is threaded through the bar, which
can be adjusted to the height of cut required. It is
then placed onto the two rollers and the correct
adjustments made.
Height of cut - distance from top of straight edge to top
of bottom blade.
Adjusting the on cut
Having set the height the next step is to ensure that the cutting cylinder will give a good clean cut. Most cutting
machines will have setting screws at both ends of the cylinder. Using the correct sized spanner, these screws
should be turned slowly trying to do the same at both ends to ensure an even cut across the cylinder. Care
should be taken not to over tighten the cylinder. Should this happen the reel will screech when switched on
and tramlines (black lines) may appear on the cut.
An ideal situation is when the cylinder and bottom
blade are just touching.
To be certain that the machine is cutting evenly
and cleanly all over the cylinder should be
checked using a thin piece of dry paper. The
paper should be held between the cylinder and
the bottom blade. Using your free hand, carefully
turn the cylinder round onto the bottom blade and
test the cut. This should be done along the full
length of the cylinder. Having checked the height
of cut and the quality of the cut the rest of the
machine should now be checked. These checks
should take in the fuel, oil and guards.
The machine should also be greased if required.
26Using a pedestrian mower
Having set the mower for use care should be
taken when using the mower on the pitch. Most
mowers have the grass box out over the front of
the machine. This can add quite a bit of weight
to the machine. If it is allowed to accumulate
especially when the grass is wet it can affect the
height of cut. Extra care should also be taken
when turning. Damage can be done to the areas
along the goal line and touchline when turning.
The use of boards to help spread the weight of
the machine during turning can help prevent this.
Ride on mowers
Ride on mowers, and gang mowers, are used
on larger areas of sports grounds due to their
speed and quality of finish. For an acceptable
and more professional finish the mower must
have cylinder cutters.
Hydraulically driven ride on and gang mowers
tend to provide a more uniform cut than gear
driven or trailed sets, and also produce a
better cut in wet conditions. Uniform machine
setting is essential and careful measurement
Above: A jacobsen Lf 3800 5 gang Unit with grass catchers of height of cut is required. The cutting unit
must be set on a level surface as described
in the height of cut sections above. Most
gangs mower units have notches on the
side frame which adjust the rear roller and
thereby the cutting height. Gang mowers
with floating heads may require different
settings compared to conventional single
unit machines or those with fixed cutting
heads. If there is any doubt then consult the
manufacturer’s handbook.
To avoid risk of tyre depression marks the
direction of mowing should be varied where
Above: A 5 gang trailed unit possible for each cut, when using tractor
drawn machines. The tyre pressures should
also be checked. Differing pressures can
cause the height of cut to be out on the
cutting units.
Left: A Ransomes T-Plex 185 triple
27Setting and using ride on and trailed gang mowers
Many groundsmen manage large areas of sports turf, often covering more than one sport. In order to maintain
an effective mowing programme it is essential to mow with larger ride on or trailed equipment. The modern
day ride on machines have taken the place of the old trailed gang mowers although open gang mowing is still
widely practised. Ride on mowers can carry units in configurations of 3.5 or 7 units. This is the same as the old
configuration of the trailed gang mowers.
A number of companies manufacture mowers and models will range from 3 to 7 gang machines. The machines
are designed to cover large areas of ground in as short a time as possible but giving a quality cut. Machines
shown above will have ground speeds of around 15 m.p.h. with a cutting speed of around 6 m.p.h. This will
allow a full size pitch to be cut and boxed of in around 40 minutes or less. Despite the size of machine each
one is designed to spread its own weight to minimise surface compaction and damage to the leaf. This is
usually done through the use of special grass tyres.
Not all areas are suitable for the larger machines to work in. One of the machines shown is a 3 gang T-plex 185
from Ransomes. It is ideal for tighter areas with its 3-wheel configuration. Like all ride on mowers the machine
operator has good all around vision from the seat position. Most of the machines now have diesel-powered
engines with some of the latest models being electrically powered using special batteries.
Quality of cut
Quality of cut is affected by the setting of the mower blades. Implications of incorrect mower adjustments are:
a. ribbing
b. tram lining
c. tearing.
All of the above will detract from the look of the pitch and are easily avoided by attention to detail when setting
the mower up.
Sward measurement
A useful tool from the American golf industry
is the lawn measure. It is a tool used to
monitor the height of cut on the mowers. It is
particularly useful when using ride on mowers
and maybe one unit is slightly out. The tool is
basically a prism in a frame. The side of the
frame is marked in mm. When placed on the
grass the length is mirrored through the prism
allowing a reading to be taken.
Left: Lawn measure.
General mower maintenance and summary
If the guidelines set out above are followed then the mowing operation will give a good quality cut and
help to maintain a healthy sward. Remember, all moving parts should be oiled or greased as stated in the
manufacturer’s handbook. Ensure that excess oil is not applied as this may drop to the grass and cause
damage. If a machine is regularly used it may require a periodic regrind to the cylinder to maintain the cut
quality. All grass clippings should be removed after use either by a stiff brush or airline, or high-pressure water
jet. After washing a protective lubricant such as duck oil should be applied to prevent rusting.
28Notes 29
Aeration

Definition: Operations which are carried out to improve turf by physical methods to ventilate the soil, improve
             drainage and encourage better root development. A process by which air in the soil is replaced by
             air from the atmosphere.

Why aerate?
The purpose behind all aerating techniques is to maintain or increase the proportion of pore space within the
soil structure. Under the influence of play and maintenance practices, pore spaces become constricted as
compaction increases.

Compaction of the root zone layer leads to ponding or more extensive water logging, thatch build up and a
reduction in playing days.

The surface also suffers unnecessary damage during play or training. Once such a situation is noted,
deterioration in sward quality shows in rapid annual meadow grass ingress.

In addition to maintaining free drainage, aeration has other positive benefits. An open, dry soil structure will
warm more quickly in the spring promoting root extension, and will enhance the percolation of irrigation water
during drought summers.

                                                               Aeration equipment
                                                               There are a great variety of implements
                                                               available, though much is repetition of familiar
                                                               techniques. There is aeration equipment for
                                                               all shapes and sizes of turf area. The large
                                                               expanses of winter pitches lend themselves
                                                               to tractor-mounted aerators of up to 2 metres
                                                               in width. Hand forks have an important role
                                                               on local areas and worn goalmouths. Aeration
                                                               is such an important and frequent operation
                                                               that every sporting venue should have its own
                                                               equipment. The choice on which to buy or hire
                                                               must be determined by the size of the area
                                                               to be covered and the frequency of aeration
                                                               work undertaken.

                                                       30
There are three basic types of aeration technique most commonly employed on sports turf:
1) Slit tine aeration
2) Solid tine aeration
3) Hollow tine aeration.
Slit tine
Slit tining is the most frequent aeration treatment carried out on sports turf in this country as it introduces air
into the soil profile whilst causing minimal surface disturbance, primarily in the summer months. Slit tines are
described under a variety of terms; knife tines, diamond tine, chisel tines, and root prunes. The nomenclature
relates to the shape of the tine or its action.
Chisels or root pruners may be safe to use during the summer, provided efficient automatic irrigation is
available. Failure to irrigate during summer slitting can result in surface cracking. However do not over water
merely to facilitate the use of slits rather than safer alternative forms of tine.
Slit tines are available on the complete range of aeration implements. The working depth varies from 75mm to
150mm on pedestrian units, down as far as 300mm on the larger football pitch aerators. Many tractor mounted
units have pressure frames or are controlled by downward pressure from the tractor to give variable depth of
penetration and to facilitate full depth when needed.
The maxim that you should always slit as deeply as possible is inaccurate. Always aerating at the same
depth will create panning at that depth, obviously less of a problem at 300mm than 75mm but a problem
nonetheless. Frequency of slitting must relate to the quality of soil to be worked and the needs of each specific
site. Anything from weekly to monthly treatments could be appropriate.
Working along the same direction in anyone slitting season as cutting across previous slit marks could promote
serious disturbance to the playing surface, if not immediately then certainly through dry summers. Slitting can
be overdone and result in unevenness; a situation exacerbated during frosty spells, or on heavy saturated soils
when taking any machinery over the ground will cause more damage than the operation will do well.
Staring a slitting programme for the first time can be disruptive though after a few passes lifting should be
kept to a minimum. The initial damage is usually due to very poor rooting, a direct consequence of no, or very
limited, aeration work in the past. Units drawn behind compact tractors for relatively small areas of fine turf like,
golf greens, often have a pressure roller following the slitter to smooth down any slight lifting. Slitters without
such a roller can leave tufts of grass on removal of the slit from the ground which, unless smoothed down, can
be cut off when next mowing so producing small gaps in the turf cover.
Solid tine
With the danger of slit marks opening through dry periods in the spring and summer, but with the continued
need to limit compaction through the main playing season, solid tining provides a safe alternative to slitting.
Solid tines produce a round hole which will not gape. The primary purpose for solid tining through the drier
months is to contain the degree of compaction building up and also to retain a permeable turf surface
receptive to watering. Local treatment is generally the rule for solid tining although tractor mounted mechanical
treatments are employed to treat the entire surface area. Hand forking of goalmouths and centre circles on
football pitches can help retain ground cover in these well-worn areas through the playing season.
As the objectives for solid tining mainly relates to the top 100mm of the soil profile, most solid tining tools
can work through this depth. The desired hole spacing would be around 50mm centres. The frequency of the
operation will depend on the intensity of use of the pitch. It should be remembered that the entire root zone
region can be solid tined and this must be done as part of an over all aeration programme. A variety of different
sized tines and equipment can be used for this purpose. Much of the equipment now used such as the Verti
drain or Wiedenmann has a unique heaving action which in ideal conditions will fracture the soil or root zone
creating many small fissures in which air and water can move and in which root can develop.
31The possibility that solid tining might increase compaction has been proposed with the soil being squeezed in
between the tines. This may have some factual basis but the need to solid tine for the reasons already outlined,
outweighs any minor firming of the top soil which can be over come by other aeration techniques. Drum and
punch action solid tine machines are used, but penetration is cleaner and deeper with those implements
utilising a hydraulic ram systems or other power source. There is the danger of weak rooted turf rolling up like a
carpet with the drum units.
Hollow tine
Physical removal of a core of soil from the profile is the purpose behind the use of hollow tines. Primarily for the
removal of thatch, poor quality soil or to reduce severe surface compaction, hollowing tining introduces a great
volume of air into the surface layers of the soil profile. Hollow tining at 50mm centres can remove up to 5%
thatch.
Top dressing is usually applied after hollow tining but leaving the tine holes open is not unknown, particularly
for late autumn treatments when top dressing could cause smothering. As for solid tines, hollow tine units
mainly work to a depth of 75-100mm although some of the more modern equipment can work down as deep
as 250mm making them ideal for soil exchange work. The diameter of the hole produced can vary from 6mm to
25mm, and the size of tine used has a direct bearing on the spacing between the holes. The very narrow tines
can work as close as 25mm centres whereas the larger tine spacing would be widened to 50mm for 12mm
diameter tines and up to 100mm for the largest tines.
The narrowest of tines can be used occasionally right through the year as they cause minimal disturbance
to the smoothness of the playing surface and are very useful to improve the penetration of irrigation water in
areas of dry patch or prior to over seeding. Larger tines should be limited to autumn or spring use.
Hollow tining also has a role to play on the improvement of levels. Judicious top dressing and light rolling can
aid settlement. Over doing hollow tining can produce a soft playing surface. Not only are you removing up to
5% of thatch with each treatment but an equivalent volume of top soil, replacing the soil with top dressing
but without firming. Heavy top dressing after hollow tining can lead to layering in the profile unless consistent
materials are used year in, year out. If there is a significant problem in the top layers of the profile hollow tining
may be necessary once or twice a year for a number of years. With no specific problems to overcome, less
frequent coring is adequate.
After dry summers dry turf surfaces have been thoroughly opened up with hollow tining in the autumn to re-wet
powder dry soils. Hollow tining has been seen as the most effective means of achieving this aim whilst causing
minimal disruption.
In the past hollow tining has been considered one of the slowest and most laborious of aeration techniques.
The introduction of faster pedestrian units,
compact tractor mounted hollow tining units have
reduced the feeling of intimidation when faced
with the need to hollow tine. Tractor mounted
spoon tine units have been with us for some
time and are useful for treating large areas. Such
units can cause some severe disturbance though
springs and turf fingers are available for some
models to minimise such damage.
Some drum type hollow tiners are able to collect
the cores within the drum itself. Other hollow
tiners leave a trail of cores on the turf surface
which has to be collected separately though can
be windrowed to speed up the process. Many of
the pedestrian, self propelled and compact tractor
implements have interchangeable tines, capable
Above: A verti drain fitted with 12mm solid tines of taking slit, solid and hollow tines.
32Sub soil aeration:
Like other operations aeration has moved on at a pace with several new machines available on the
market. Machines such as the Earthquake and Rodgers Root Zone Injector are two examples of this.
The Earthquake and the Blec Groundbreaker are solid tine aerators but unlike the piston action of the
verti drain or Wiedenmann they aerate on a rotating drum using long slicing tines to break the ground.
As the tines cut through the ground they cause forward and sideways vibration completely
de-compacting the ground as they pass through.
The Rodgers Root Zone Injector and the Toro Hydroject aerate by blasting in water at high pressure.
This new technique originated in the U.S. but machines have been developed in the U.K. in recent years.
The Toro hydroject also does a similar job. Other types of aerator work by injecting high pressure air or
by drilling into the root zone.
A Blec aerator cuts and slices through compact soil A side view showing the Blecs slicing tines
Hole pattern from hollow coring Multi tine head
Hollow cores being punched out ready to mix with new Cores and sand start to mix
material
33Summary
Aeration is one of the most vital maintenance
operations to be carried out on any sports
turf area. Its primary function is to speed up
surface water removal by improving the drainage
characteristics of the soil. Beyond this obvious
scope aeration can be invaluable in improving
the efficiency of irrigation and improving levels.
There is a tremendous variety of machinery to
choose from to complete essentially the same
task. Expertise is necessary to appreciate the
type of implement to be used for a particular
situation as part of a regular programme and for
one – off trouble spots.
Close centred pencil tines are good for creating access
for new root to develop in to
34Notes 35
Scarification and
                              Verti-Cutting

Introduction
Decaying organic matter can build up on the immediate surface of the turf, especially when the clippings are
returned to the surface. This produces a thick impermeable layer that reduces the air, water and nutrient intake
into the soil, subsequently producing a weak sward which may be prone to the following;

   l   germination of moss spores

   l   introduction to fungal diseases

   l   introduction of weed seeds, particularly in the summer

   l   spread of unwanted grass seed

Prevention of thatch
The maintenance of the winter sports ground should encourage the maximum amount of activity of bacteria
and other micro-organisms. This will help provide a quick decomposition of thatch.

Poor aeration and compaction of soil will result in bad drainage and reduction in bacterial activity.

Avoid high nitrogen applications that give lush growth leading to an accumulation of organic matter and thatch.

This decaying matter is called thatch. Some benefit may be gained by a layer of thatch from the impact
absorbency quality provided but the advantage gained is far out-weighed by the disadvantages outlined
above. It is therefore better to rely on the impact absorbency provided by grass cover and soil moisture
content.

Thatch removal is achieved in varying degrees depending on the type of equipment used and the severity of
the operation.

Thatch removal from areas the size of football pitches is usually achieved, if and when required, by mechanical
means. Implements are either trailed or mounted on the three point linkage of tractors or similar prime movers.

Necessity may require these operations to be carried out during some of the drier periods during the year.
However, it is then essential to only scarify the plant and not the soil surface as any marks left can open up as
the pitch dries out.

Several double passes would be required by the equipment to be carried out alternately with continuous
mowing. All debris MUST be removed after scarification. There are several proprietary pieces of equipment on
the market for this purpose.

It is important to set any mechanical equipment up correctly in order that severe damage to the soil surface
does not occur.

                                                        36
Verti-cutting
Verti-cutting is very similar to scarification, in that it assists in thinning out the sward and removes dead
material, but it does not cut into the surface.
On sand based pitches verti-cutting is now replacing harrowing, but this is in the minority and local authorities
will still harrow.
Verti-cutting will remove surface thatch and thin out vegetation. It cuts vertically through living material which is
not affected by normal horizontal mowing and should be carried out routinely.
Verti-cutting should be carried out in at least two directions. The process will assist in increasing shoot density
and the tight vertical growth required for a good playing surface. This system will greatly increase the grooming
of the surface.
37Notes 38
Brushing, Dragmatting
                      and Harrowing

Benefits derived are:

   l   Improved quality of grass
   l   the dispersal of dew from the surface
   l   the scattering of worm casts
   l   sits the grass up prior to mowing
   l   striping for presentation

Most of the operations carried out on football pitches are done with tractor mounted or trailed implements.
This causes some surface compaction from tractor wheels and implements (particularly at turning points) and
must be relieved by frequent surface spiking.

Brushing and drag matting can be carried out by hand, especially where light work is required, for instance the
removal of dew can be carried out by dragging a rope across the ground – a form of switching.

Any work that involves the groundsman walking the ground will obviously increase the opportunity to inspect
the pitch for any problems.

Brushing removes surface material, which is subsequently picked up in the grass box. Scarifying is suitable for
the removal of near surface thatch layers without penetrating the underlying soil.

Harrowing can be a useful maintenance operation. The harrow used should be a smooth or short toothed chain
grassland type, which will have the advantage of evening out the surface and levelling footmarks when the
pitch surface is churned up after matches.

Although harrowing is a very useful maintenance operation it does have the effect of ‘smearing’ moist, bare
surfaces which restricts the downward movement of water causing surface puddling.

It is essential therefore to follow all brushing, dragmatting and harrowing operations in these conditions by
spiking to re-open the pitch surface.

Brushing, harrowing and dragmatting can also be used to work in top dressings i.e. sand, into the surface.

                                                             Left: SISIS Zig Zag brush

                                                        39
Notes 40
Spraying

Mistakes can happen

                         41
Notes 42
Irrigation

Definition: The controlled application of water to the turf surface.

Introduction
An important part of any pitch maintenance programme is the watering. Water should be viewed as a tool of
the job. It has its place and like any tool can cause damage if misused.

The rate of water required to sustain a pitch will vary on the type of construction. Sand type constructions will
require more than soil-based pitches.

It should be remembered that any new sward would need water to develop. Once developed it needs water to
survive. Water is also used to enhance the speed of the ball over the surface and managers at all levels of the
game prefer to play on a wet top.

Maintenance of data / records
It is useful to keep the following records when irrigating:

l   Rainfall

l   Amount of water used (especially if water is metered)

l   Regular weather records.

Timing
It can be fairly stated and understood that irrigation in the winter months is usually not required. However, it
may be required in the spring through to August / September. Additionally irrigation during the summer months
will be required to;

    l   Aid maintenance operations such as aeration
    l   Aid grass recovery after play
    l   Maintain healthy, vigorous grass growth
    l   Facilitate a level of impact absorbency
    l   Aid fertiliser applications
    l   Germinate seed
    l   Prevent stress
    l   Effect speed of ball across the pitch

Incorrect irrigation will encourage poor root structure and therefore poor stability.

                                                         43
Irrigation systems
The systems that are used to apply the water come in various forms:
l Automatic
l Semi automatic
l Static sprinkler.
Automatic
This would be considered the Rolls Royce of systems. Water is applied to the pitch by sprinklers that are in the
ground. They are connected to a ring main that carries water from a holding tank. The water is pushed round
by a pump. Each head is operated in turn from the controller. The controller is usually housed by the pump in a
shed. The centre of the pitch is usually watered by three heads that are fed by hose from a valve box. This is to
make life easier should there be a problem. Such systems are costly to install but are the most efficient way to
apply water. It is important that users of automatic systems have them checked periodically to ensure that the
flow and distribution of the water are correct. Pump pressure should also be checked to maintain uniformity.
Above: Flow and distribution test Above: A control panel for an automatic system
Semi automatic
This system usually features travelling
sprinklers with a hose to a mains supply
connecting them. The pressure of the water
passing through the sprinkler drives a gear,
which in turn drives the sprinkler. The sprinkler
passes over the pitch slowly spraying the
water over a wide area. The draw back with
this system is that it generally has to be done
by day. This results in water being lost to
evaporation. It can also be time consuming if
more than one sprinkler is involved.
Left: Travelling sprinklers working. While you can
cover a big area, the sprinklers have to be watched
and coverage is not uniform.
44Notes 45
Fertiliser Application

Introduction
All application of nutrients in the form of fertilisers must be based on good information and sound management
planning, and this can only be achieved from the information gained from a good soil analysis.

Fertiliser may be applied to maintain the health of the grass and appearance of the football pitch. It is also used
to help pitches recover after long periods of play. As with all turf surfaces different nutrient levels are applied at
different times of the year.

The basic method of feeding turf is to apply small quantities of specially formulated fertilisers at various times
of the year. Before doing this it is very important that you understand the reasons for using fertilisers of different
types and forms.

Plants have the ability to use the energy from the sunlight to join together carbon dioxide and water to make
sugar. The process is known as photosynthesis and takes place in all green plants. To make the process work,
the plant requires a number of essential nutrients, most of which are obtained directly from the soil.

Plants require individual nutrients in different amounts. Most soils contain enough of the nutrients for healthy
plant growth without additions being made. However, some nutrients are required in such large quantities that
additional applications must be given if maximum growth is to be stimulated.

Above: Soil analysis is vital if the corect programme is to be implemented

                                                             46
The major nutrients
There are three major nutrients that are required in large quantities by plants, namely, nitrogen, phosphorus and
potassium, and a further three minor nutrients that are required in smaller, but significant amounts; these are
calcium, copper, zinc, boron and molybdenum.
Most of the micronutrients are involved in some way in the production of enzymes, although some are also
used as catalysts to directly speed up chemical reactions.
The major and minor nutrients and their functions are as follows.
Nitrogen This is one of the three major nutrients required by plants.
Symbol N It is used to increase the size of leaves, and stimulate overall growth.
Phosphorus Phosphorus is another of the three major nutrients.
Symbol P It is used transferring energy around the plant, and encourages development of roots.
Phosphorus Potassium is the third major nutrient, it affects the flowering process of plants and assists
Symbol K the regulation of water loss from the leaves.
Calcium Calcium is found in large amounts within the plant, and is used in the development of
healthy cell walls.
Magnesium This nutrient helps to make the plants green, and affects the movement of certain nutrients
around the plant.
Sulphur This is used in the production of complex acids and oils within the plant.
Types of fertilisers
As mentioned above, the majority of soils will contain adequate nutrients for healthy growth, and it is only
nitrogen, phosphorus and potassium that normally need to be added to soils. These nutrients can be given in
different forms, and it is now possible to control how fast the nutrients become available to the plant.
Quick release fertilisers
It is now possible to control the rate at which fertilisers become available to the grass. Quick release fertilisers
are chemicals which become available over a very short time. They are usually manmade materials, for
example sulphate of ammonia. This type of fertiliser is normally applied during the growing season and is used
when you want to encourage rapid growth.
Slow release fertilisers
Slow release fertilisers are chemicals which release their nutrients over a relatively long period. Some, such as
hoof and horn and bone meal are natural organic materials which release their nutrients as they rot down. Man
–made slow release fertilisers, or controlled release as they are often called, are specially made to release their
nutrients throughout the growing season. An example of a controlled release fertiliser is isobutylidene diurea or
I.B.D.U. for short.
Slow release fertilisers are usually applied in spring and are used to encourage steady growth. They can be
bought as either liquids, granules or powders. Granules are the standard type, and consist of small round balls
of fertiliser, which are easy to apply.
Liquid fertilisers come as concentrated solutions which must be diluted before use. They are sprayed on to the
turf, and can cause scorching if applied during hot sunny weather.
Powdered fertilisers are less common than granules and they are made of very fine particles. On large sites
they are not as easy to apply as granules, especially if the weather is windy. To aid application of this type of
material you can mix it with an insert carrier, such as dry sand, and work it into the sward using a Tru–lute.
47Fertiliser distributors
Fertiliser distributors are used widely in turf culture for spreading fertiliser evenly and efficiently. Any distributors
should be able to carry out the following functions:
l Able to spread both granular and powdered fertiliser at a wide range of application rates
l The application rate should be easily adjustable
l They may be adaptable to sow grass seed and apply topdressing
l They should be designed and built in a way that will reduce corrosion as far as possible.
Spinning disc distributor
These machines are available in both pedestrian or tractor mounted versions. In most cases the tractor
mounted will be used on football pitches.
The fertiliser is contained in an inverted conical shaped hopper and spreader in a wide arc by a horizontally
rotating disc driven by land wheels. The fertiliser is fed to the centre of the disc by gravity. An agitator in the
base will help prevent blocking and improve distribution.
The spinning disc distributor has a wide distribution width and is therefore a quicker method of applying a
fertiliser.
This type of distributor requires a careful operator to ensure an even spread. Less fertiliser is placed towards
the sides of the distribution width, therefore a certain amount of overlapping is required. It is fair to mention
that some of the latest models of the spinning disc distributors have design features that help to compensate
for the problem of uneven placement. Variation in distribution width is produced by a change in forward speed
or a change in the material used.
The spinning disc distributor is rather difficult to calibrate accurately. One method is to place a one metre
square of corrugated cardboard on the surface. When the distributor is passed over the sheet the fertiliser can
be collected and weighted. Any necessary adjustment can be made by altering the slide in the base of the
hopper until the correct calibration is achieved.
Remember that different materials will have a different flow rate and require recalibration
Maintenance of distributors
Corrosion of distributors can occur very easily due to the chemical action of the fertiliser if it becomes damp.
This can result in replacement of parts, which is unnecessary cost. A wide range of distributors use of plastic,
rubber and fibreglass to try and prevent corrosion. It can be kept to a minimum by taking the following
precautions:
l All traces of fertiliser should be cleaned from the machine after use
l Fertiliser should not be left in the machine over night
l The distributor should not be left outside when not in use
l At the end of the season all working parts should be stripped down and thoroughly cleaned
l I f any parts are worn they should be replaced so that the distributor is ready for use at the start of
the following season.
48Fertiliser application
Using disc distributors tend to apply more to the centre of the distributors width. To avoid uneven placement
the machine is calibrated to half the rate required. If the machine is then used in the pattern indicated it would
supply the correct rate by passing the whole site twice.
Fertiliser spreading
Any grass area will, from time to time, have
to be fed. The size of area to be fed will
determine the type of applicator to be used.
On most multiple pitch situations the spreader
will probably be tractor mounted like the
picture on the left. The cone shaped spreader
will hold around 8 bags of fertiliser at a time.
The pitch area can then be marked out
allowing the fertiliser to be spread on evenly.
Care must be taken with such spreaders not
to damage the agitator where the fertiliser will
pass out.It is also advisable not to spread in
windy conditions. The inside of the spreader
should be kept dry.
49Notes 50
Seeding

Introduction
 t some point of a renovation it will be necessary to apply seed. This can be done by various methods.
A
Features such as disease resistance, shade tolerance, colour, shoot density and wear tolerance should be
taken into account. It is a good idea to speak to one of the seed houses that have people that can advise on
such matters.

Seed sowing
The two most common mechanical methods of seeding in football pitch maintenance are over seeding and
direct drill seeding. The latter is probably the favoured option for use during the close season renovation when
groundsmen have a bit more time to establish a sward.

When drill-seeding groundsmen look to sow the seed in a manner that will encourage a tight knit sward to
develop. Most direct drill machines sow the drills at 100mm (4 inch) centres. The machine then has to pass
several times over the pitch in different directions to give the new grass a chance to knit together. The machine
shown in the picture is the verti–seed. The verti–seed can sow drills in at 35mm centres. This means that in one
pass the total amount of seed can be applied. The advantage of this is that the tractor does not have to keep
running over the drills from previous runs. One impressive feature of the machine is the way it drops the seed
into the drill having first cut it open. The machine also has the ability to close the drill over again to protect
the new seed. The big advantage of the seed being in the drill is that it will produce stronger plants. This will
also help to protect the plants against potential bird damage. It is sometimes necessary to seed in the season.
Groundsmen will always look to minimise surface damage if this has to been done in the season. One method
of doing this is to over – seed. Over seeders usually have a roller on the front of them fitted with short spikes?
These insert hundreds of holes into the ground. The seed is then dropped out of the hopper and into the holes.
The take up of seed is not usually as good as direct drilling but can still be reasonably successful if done
properly.

                                                               Direct drill seeding
                                                               This is when the seed is drilled below the
                                                               ground. Such machines that carry out this
                                                               work usually cut a groove in the sward
                                                               dropping the seed in behind the cutting disk.
                                                               The groove is then closed over. Seed sown
                                                               in this manner generally produces a stronger
                                                               plant. Pitches are drilled in two or three
                                                               directions. The depth of the drills is approx
                                                               5mm.

                                                               Left: The under side of the verti seed.

                                                        51
You can also read