Forensic Investigation of Google's "hello" by Picasa
←
→
Page content transcription
If your browser does not render page correctly, please read the page content below

Forensic Investigation of Google’s “hello” by
                    Picasa
                                      Software Version 1

                                      Written By J. Curl

                                 jcurl@ci.beaumont.tx.us

                                       November 3, 2006

                                       Paper Version 1.4

Forensic Investigation of Google’s “hello”          Ver. 1                                       Page 1 of 32

This article in its entirety is copyrighted by J. Curl. The article may not be copied, disseminated, or
duplicated without express permission of the author
Forensic Investigation of Google’s hello

INTRODUCTION
In the world of trading on-line child pornography, the offenders are continuously looking
for newer, better, and more secure methods of plying their trade. Some of the older
methods utilized for trading child pornography via the Internet include email, chat rooms,
and instant messaging. These methods were limited due to the amount of child
pornography that could be traded in a single instance. One of the more current methods
involves using peer-to-peer software programs such as KaZaA and LimeWire. The peer-
to-peer method resolved the limitations related to file size and attachment size
restrictions. However, the typical peer-to-peer method is not secure, and unless steps are
taken by the offender with contraband files to share, they can be identified and
prosecuted. Additionally, the peer-to-peer method does not facilitate actual
communication between the parties trading the files.

Google’s “hello” software program by Picasa may be the newest answer for individuals
trading child pornography and wishing to build a support network and rapport among
individual traders. The program lets traders connect directly (peer-to-peer) to each
other’s computers specifically for the purpose of sharing pictures. Movie files may also
be shared but in a limited fashion. Since the connection is peer-to-peer, there is no limit
to the number and size of pictures that may be shared. Once a connection is created, the
individuals simply select the pictures they wish to share. This may be an individual
picture or a folder containing 1000’s of pictures. While connected, the individuals may
also engage in chat. All pictures and chat are encrypted during the transmission by the
software.

This paper will first address the use and features of “hello” followed by a review of some
of the evidence that is recoverable during a forensic examination of a computer utilized to
trade pictures using “hello”. The basis of this paper was derived from a controlled testing
environment as well as actual case investigations. This paper should not be considered
fact and should not be blindly relied upon by another investigator. The author
recommends that each examiner conduct their own independent research prior to
conducting an actual examination where the subject of their investigation utilized “hello”.

Forensic Investigation of Google’s “hello”          Ver. 1                                       Page 2 of 32

This article in its entirety is copyrighted by J. Curl. The article may not be copied, disseminated, or
duplicated without express permission of the author
USE AND FEATURES

Download and Install

During the download and installation process, the user must first set up their account via
the “hello” web site prior to downloading the software unless they already have a
username and password. The user is asked to create the following information: User
name or “handle”, email address, and password. The user is then given access to
download the installation file. Google sends a verification email to the address provided
during registration. The user is instructed to open the email and click on an embedded
link to verify the email address. Google stores this information and it may be obtained by
law enforcement via Grand Jury or Administrative Subpoena. According to the Google
legal department, they do not store the password on their servers in the interest of user
privacy. Each account will have a User Identification number (UID), handle, and a
verified or non-verified email address. Subpoena information will be discussed in greater
detail. While an email address is mandatory to obtain the installation file, it does not
have to be a valid email address.

All testing was conducted using the default options selected. “hello” was installed on 2
forensically sterile computers prepared specifically for testing. The computers were
connected to the Internet.

Forensic Computer 2, asset# 15000 was running Windows XP Professional Service Pack
2. The handle selected was “FC2test”. A real yahoo email address was used during
registration. The author opened the verification email and clicked on the link to verify
the email address. Forensic Computer 3, asset# 1895 was running Windows 2000
Service Pack 4. The handle selected was “FC3test”. A fictitious Yahoo email address
was used for this registration. Most of the discussion and analysis will focus on FC2 test
with Windows XP. In some examples, edited case information was utilized.

User Interface
The “hello” graphical interface is very simple to use. The only downside to the use of the
program is the lack of a search feature to locate and identify other “hello” users. The
traders must learn each other’s handles (also frequently referred to as a screen name or
user name) by other methods such as predicated chat rooms. In one investigation, a
suspect confessed to creating a Yahoo chat room titled, “perten trade on hello.” In an
interview, the suspect stated the sole purpose of the chat room was to locate other traders
that were utilizing “hello” and wished to trade pre-teen child pornography images. The
users then exchanged their “hello” handles in the chat room.

Exhibit 1 demonstrates the “hello” main user interface for “FC2test”. The pane on the
left displays a list of all the handles of users that are currently accepted as friends. The

Forensic Investigation of Google’s “hello”          Ver. 1                                       Page 3 of 32

This article in its entirety is copyrighted by J. Curl. The article may not be copied, disseminated, or
duplicated without express permission of the author

pane on the right displays the friends that are online. There is a button, “Invite” at the top
of the right pane and a “Add Friend” button at the bottom. By clicking either button, the
user will be prompted to enter either the handle or email of the person they wish to invite
to be a friend. Only friends may chat and trade images with each other.

    1. “hello” Graphical Interface-fc2test

Options and Preferences
From the menu options, the user may open the options window and review or change any
preferences that were selected during install. Exhibit 2 displays the default preferences
that were accepted during the install on Forensic Computer 2. The forensically important
issues in the options window are:

         1.       Remember my password
         2.       Automatically log in
         3.       Launch Hello when Windows starts
         4.       Save chat to history
         5.       Show Popup Notifiers
         6.       Automatically save all received pictures

Forensic Investigation of Google’s “hello”          Ver. 1                                       Page 4 of 32

This article in its entirety is copyrighted by J. Curl. The article may not be copied, disseminated, or
duplicated without express permission of the author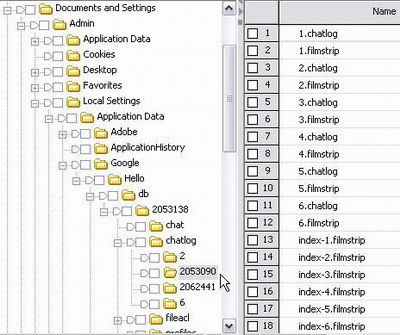
7.       Location (the full path where “hello” automatically saves all received
                  pictures if number 6 is selected).

The location listed in number 7 is the location where the user has normal access to the
images that were received. “hello” creates numerous image artifacts in hidden folders as
a part of the archiving system that will be discussed in greater detail that the average user
may not be aware of.

All the above preferences are automatically selected during install unless the user
manually unselects an individual preference. These preferences may be reviewed and
noted either through booting a copy of the user’s hard drive or analyzing the registry.

    2. Options Window-fc2test

Program Function
The following section will describe how the program is actually used to chat and trade
images. If the local user knows the handle of another user they wish to trade images
with, the local user simply clicks on the, “ADD FRIEND” button on the bottom of the
user interface. A small window will pop up where the local user types in the other
person’s handle. This is demonstrated in exhibit 3. If the local user does not know the
handle but knows the other user’s email address, they click on the, “Invite” button near
the top of the user interface.

Forensic Investigation of Google’s “hello”          Ver. 1                                       Page 5 of 32

This article in its entirety is copyrighted by J. Curl. The article may not be copied, disseminated, or
duplicated without express permission of the author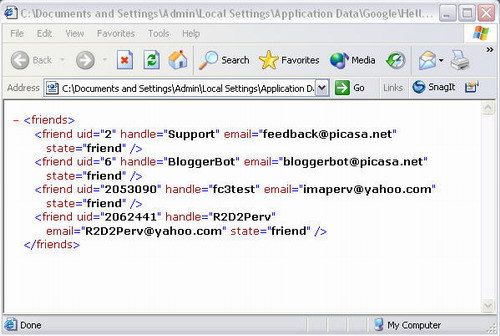
3. Add Friend-fc2test

Another option to obtain handles or emails of other user to trade with is through an
introduction. The local user can click on the “Friend” drop down menu and select,
“Introduce friend”. A pop up message will be sent to the 2 individuals being introduced
to each other by the user making the introduction.

Once a friend is added, their handle will be displayed in the left pane under the heading,
“Online” or “Offline” depending on whether the friend is online or offline with “hello”.
Exhibit 4 illustrates both an added friend, fc3test who is online, and the option to
introduce a friend.

Forensic Investigation of Google’s “hello”          Ver. 1                                       Page 6 of 32

This article in its entirety is copyrighted by J. Curl. The article may not be copied, disseminated, or
duplicated without express permission of the author
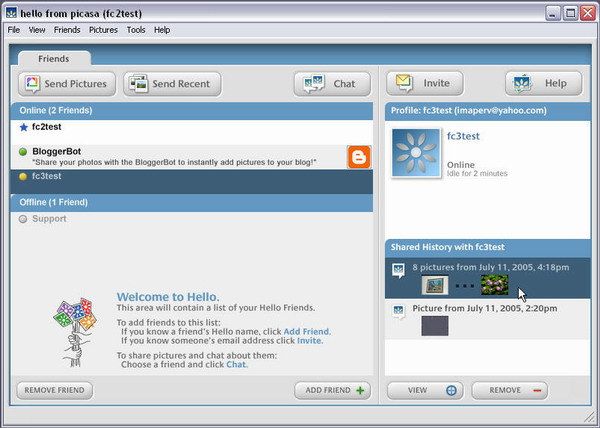
4. Online Friend-fc2test

The local user simply highlights the online friend they wish to chat with. In this case it is
“fc3test” followed by clicking the, “Chat” button near the center top of the interface.
This step will split the right pane into a top and bottom section. The top right pane will
display the chat while the bottom right pane will display a message area for the local user
to type their message. The left pane will split into a top and bottom pane as well. The
top left pane will be the larger of the 2 left panes and will display the “hello” logo along
with instructions stating to click the “send pictures” button to start sending pictures back
and forth between users. This screen is also used to individually view the pictures once
they are sent. The bottom left pane will currently be blank. This pane will display the
filmstrip that will appear similar to a 35 mm negative in appearance.

When a user selects to send pictures, a dialog box will open. The dialog box will display
the default path (selected in the preferences) to send pictures from on the local user’s
computer. The local user can also navigate to any other path to select a different location
where the images may be sent. Since the connection is peer-to-peer, there is no limit to
the number of pictures or size of pictures that can be selected to send at one time. The
author’s experience indicates that there is usually a very brief chat between the 2 users
establishing the type of pictures they are interested in trading, followed by a limited
sending of just a few pictures back and forth to establish they are talking about the same
thing, and to make sure neither one is going to “rip the other off”.

After pictures are sent back and forth, the filmstrip will populate with thumbnail images
of the pictures that were traded by both users. The top left pane can be used by the local

Forensic Investigation of Google’s “hello”          Ver. 1                                       Page 7 of 32

This article in its entirety is copyrighted by J. Curl. The article may not be copied, disseminated, or
duplicated without express permission of the author

user to display a larger view of any picture in the filmstrip. This can be done by clicking
on the thumbnail in the filmstrip, or the local user can select to follow along with the
friend and automatically view any image in the filmstrip being viewed by the friend.
Each time the friend switches to another picture, the local user’s top left pane will
automatically update to that picture is the local user chooses to follow along. Exhibit 5
demonstrates a chat with images traded between fc2test and fc3test. The screen capture
is of user fc2test.

    5. Traded Images-fc2test

If a user sends a message after the filmstrip is populated, whichever image is highlighted
and displayed in the sending user’s top left pane a thumbnail will be sent along with the
chat message. In this example, fc3test states, “2868 is really cool.” The image that was
highlighted on fc3test at the time the message was sent was indeed image 2868. The chat
log times may or may not be visible in the chat. The option of displaying the chat log
times is a preference that can be set by the user. In the test sample, the default was to
show times. Also imbedded in the chat log is grey text indicating that fc2test sent 11
pictures.
With the default install options and preferences selected, fc2test user selected all images
in a folder named, “My Cool Lab Pics,” on Forensic Computer 2 and sent all the images
to fc3test. “hello” on Forensic Computer 3, automatically created a folder named,

Forensic Investigation of Google’s “hello”          Ver. 1                                       Page 8 of 32

This article in its entirety is copyrighted by J. Curl. The article may not be copied, disseminated, or
duplicated without express permission of the author
“fc2test” \ “My Cool Lab Pics” on Forensic Computer 3 in the default save path of
“…My Documents\My Pictures\Hello\”. All the images sent by fc2test were saved in the
folder that “hello” created on Forensic Computer 3. Fc2test user then sent additional
pictures from another folder on Forensic Computer 2 to fc3test. “hello” automatically
created another folder, “from fc2test” on Forensic Computer 3 in the path, “…My
Documents\My Pictures\Hello\fc2test\from fc2test”. The program saved all additional
pictures sent by fc2test in the folder, “from fc2test”. The user may select the “SAVE”
button during the chat session. This process will prompt the receiving user with a menu
to choose a location to save the individual picture being viewed by the user. When a
picture is manually saved, it will normally be saved in its original size.

During actual examinations, the author has typically observed 20 to 500 pictures traded
during single sessions from recovered chat logs. The recovered chat has also been very
descriptive, and the users describe exactly what type of pictures they are interested in
trading. Past experience indicates, users also will click on an image and ask for more
images to be sent like the one they have highlighted. Of course, the image the user
selected becomes imbedded in the chat similar to the example above. After the chat
session is closed, it is automatically saved and archived. The chat will be viewable by the
local user through the hello interface. The below screen shot shows the organization of
the archived chats from within the hello interface.

    6. Archive History-fc2test
Forensic Investigation of Google’s “hello”          Ver. 1                                       Page 9 of 32

This article in its entirety is copyrighted by J. Curl. The article may not be copied, disseminated, or
duplicated without express permission of the author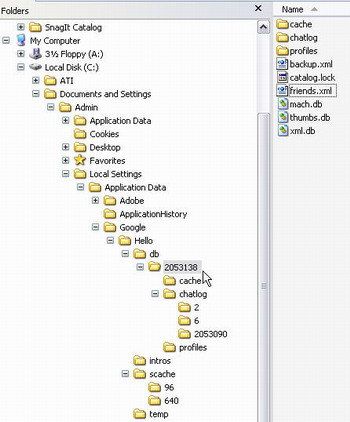
All current friends will be listed in the left pane under the friends tab. Highlight the
friend in the left pane and the chat archive will be displayed in the right pane. Highlight
the individual chat and press the “VIEW” button. “hello” will launch an HTML page of
the archived chat session for the user. The format of the HTML page is displayed below.
7. View of Archived Chat-fc2test
If the user clicks any of the images in the filmstrip or in the thumbnails imbedded in the
chat, a larger version of the image will be opened. The chat archive above came from
fc2test. The chat session was with fc3test. Each user sent 4 pictures to the other, which
is noted in the grey text. The chat archive also shows that a total of 8 pictures were
exchanged. This number equals the pictures in the filmstrip. An examiner cannot
conclude from this chat log that the first 4 images in the filmstrip were the images sent by
fc3test and the second 4 images in the filmstrip were sent by fc2test. This would actually
be true in this example because some time passed between each user sending pictures and
the filmstrip actually populated in that order. If the users send multiple images back and
forth with little or no time in between, the pictures will populate the filmstrip in a
different order. This will be discussed in the examination section in more detail.
Forensic Investigation of Google’s “hello” Ver. 1 Page 10 of 32
This article in its entirety is copyrighted by J. Curl. The article may not be copied, disseminated, or
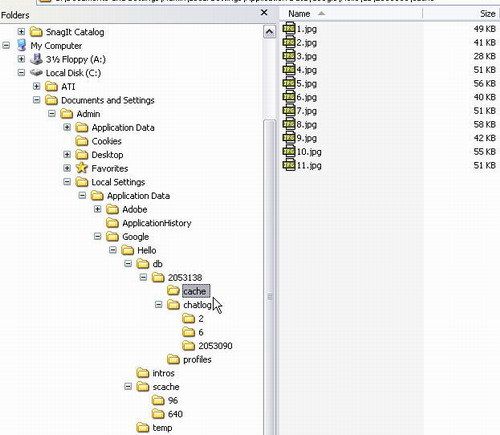
duplicated without express permission of the authorIn actual examinations, the author discovered that users would sometimes use the “REMOVE FRIEND” button on the main interface to delete a listed friend. When this occurs, all chats with that friend will be removed from the “hello” interface as well. The user can add that friend back at any time with the “ADD FRIEND” button and the friend will again be listed in the left pane and that friend’s archived chat will be listed in the right pane. FORENSIC EXAMINATION Folder Structure In Windows XP, the installation process will create a folder structure under the Documents and Settings user account used when the software is installed. In this example, the user was logged in as “Admin”. A folder titled, “Google” was installed at C:\Documents and Settings\Admin\Local Settings\Application Data\Google. It is important to note that this folder is a system folder and is not normally displayed to the user with the default Windows XP settings. The Google folder has a number of subfolders that will contain large amounts of evidence. The amount of evidence is directly dependant on the user’s knowledge of its existence. The typical folder structure can be viewed below in exhibit 8. This is a screen shot of Forensic Computer 2 also referred to as fc2test. Forensic Investigation of Google’s “hello” Ver. 1 Page 11 of 32 This article in its entirety is copyrighted by J. Curl. The article may not be copied, disseminated, or duplicated without express permission of the author
8. Hidden “hello” Folder Structure-fc2test

The first sub-folder of interest is “2053138”. This number is the UID or User
Identification number for the local user on Forensic Computer 2 with the handle fc2test.

Friends.xml

Within this folder is a file, “friends.xml”. This file contains a list of the local user’s
current friends. A sample of the friends.xml for fc2test is displayed below.

Forensic Investigation of Google’s “hello”          Ver. 1                                      Page 12 of 32

This article in its entirety is copyrighted by J. Curl. The article may not be copied, disseminated, or
duplicated without express permission of the author
9. friends.xml-fc2test

The Google servers maintain this file. Each time a user logs in, the file is downloaded to
the user’s computer. During transmission the file is encrypted. The file is not always
immediately updated and in testing sometimes required several logins before the file was
correctly updated. The file clearly identifies the friends’ UID, handles, and email
addresses. UID 2 and 6 are default support friends and are of no forensic interest. The
remaining, “fc3test” and “R2D2PERV” are actual users created for the testing process
and added as friends of fc2test. During this particular test, the recorded UIDs, handles,
and email addresses are correct as they were registered with “hello”. The email address
information will be recorded in the friends.xml regardless of whether the email address
was verified by the user as mentioned earlier in the paper. If the local user removes a
friend, the friend will also be removed from the friends.xml file.

Cache

The next folder of interest is “cache”. During limited testing this folder cached jpg files
of the pictures that were sent by fc2test and received by fc2test. The images were
renamed to 1,2,3, etc. by the program. The resolutions of the pictures were 640 x 425.
The original picture resolutions sent during the testing were about 1168 x 1760 and
around 350 kb in size. The author documented this folder through a screen shot while the
current chat was in progress. After closing the chat and viewing the folder structure with
a forensic program, the “cache” folder no longer existed. It is possible this folder is used
Forensic Investigation of Google’s “hello”          Ver. 1                                      Page 13 of 32

This article in its entirety is copyrighted by J. Curl. The article may not be copied, disseminated, or
duplicated without express permission of the author
to populate the viewing panes while conducting a chat with traded pictures. This is only
theory and no additional testing was conducted to support it. The examiner has not
located this folder during actual forensic examinations (which would be in support of the
above-mentioned theory). Exhibit 10 is a screen shot of the cache folder.

    10. Cache Folder-fc2test

Catalog.dat

A folder that did not appear in the above screen shot during program use, but was
viewable with forensic software afterwards was “chat”. This folder contains the file
“catalog.dat”. The file stores a listing of pictures sent by the local user along with the full
paths to the files. The file can be viewed with any text reader.

Forensic Investigation of Google’s “hello”          Ver. 1                                      Page 14 of 32

This article in its entirety is copyrighted by J. Curl. The article may not be copied, disseminated, or
duplicated without express permission of the author
11. catalog.dat-fc2test Chatlog The “chatlog” folder contains additional items of interest. This is probably the single most important folder that can be examined. The folder stores all of the chat logs and filmstrips complete with imbedded jpg image thumbnails of all the images sent and received during chats. Review the sub-folder structure of the “chatlog” folder above in exhibit 10. You will notice three folders, “2”, “6”, and “2053090”. Folders “2” and “6” are default folders. These are the UIDs for Picasa Support and Picasa BloggerBot. The third folder, “2053090” is the UID of fc3test. This folder was created by “hello” on Forensic Computer 2 after fc2test engaged in a chat with fc3test. In testing and actual examinations, the author has observed that all of the other users the local user has chatted with will have a folder created as a sub-folder of “chatlog”. The folders will be named with the other user’s UID. These sub-folders will exist even if the local user has removed them as a friend. It appears that after a removal as a friend occurs and the local user decides to add them back as a friend, the data contained in these folders is used to populate the chat logs that are accessible from the “hello” user interface. Exhibit 12 shown below is an example of the files that exist in folder “2053090” on Forensic Computer 2. Forensic Investigation of Google’s “hello” Ver. 1 Page 15 of 32 This article in its entirety is copyrighted by J. Curl. The article may not be copied, disseminated, or duplicated without express permission of the author
12. chatlogs-fc2test

Each time fc2test chatted with fc3test, X.chatlog, X.filmstrip, and index-X.filmstrip were
created in the folder “2053090” on Forensic Computer 2 where “2053090” is the UID of
fc3test. “X” is a numerical value that starts at 1 for the first chat session and is increased
by 1 for each additional chat session. This apparently occurs to prevent the previous chat
logs from being overwritten.

The files may be reviewed with the text view of forensic software, Notepad, or Wordpad.
The files are very difficult to read in this format and are of limited use to an investigator.
Below is a sample of “1.chatlog”

  Á! Òâ@              ÿÿÿ - žüæwWould you like to trade photos0–ü" Òâ@
ÿÿÿ       žüæwSure, what kind—Û$ Òâ@               ÿÿÿ      žüæwI like 13 and
up!8¤% Òâ@                ÿÿÿ    žüæwme to, you send first”>éS Òâ@
      ÿÿÿ      žüæwfc3testÈ[šƒ Òâ@              ÿÿÿ + žüæwok its your turn to send
remember 13 and upªµkŒ Òâ@                ÿÿÿ    žüæwhere they come
âd’ Òâ@             ÿÿÿ       žüæwfc3testÕåöG Òâ@             ÿÿÿ      žüæwi' m
logging off nowïã-M Òâ@             ÿÿÿ       žüæwfc3test
    13. 1.chatlog-fc2test

The author can make out the basic chat that occurred and can even identify one handle
imbedded in the chat that fc2test is talking to. In this instance, it is fc3test. However, the
author cannot be sure which user is saying what. The following chat log is “2.chatlog”.

Forensic Investigation of Google’s “hello”          Ver. 1                                      Page 16 of 32

This article in its entirety is copyrighted by J. Curl. The article may not be copied, disseminated, or
duplicated without express permission of the author
ZÑHÀ Òâ@ ÿÿÿ ) žüæwHello, Do you still want to be my
friendÁ lÁ Òâ@ ÿÿÿ žüæwSure do ¹ Ã Òâ@ ÿÿÿ
žüæwfc3test`,ùÅ Òâ@ žüæwI like do you have anymore.‚CZÆ Òâ@
žüæwnoœW Ï Òâ@ ÿÿÿ žüæwfc3test…ëÑ Òâ@
žüæwI am finished
14. 2.chatlog-fc2test
In this chat log the author can tell that someone typed, “I like do you have anymore.”
However, the author is not able to tell who typed that phrase along with which image is
the individual talking about. Compare the output using a text reader in exhibit 13 to
exhibit 7 earlier in the report where “hello” was used to view the chat. The amount of
information that was not decoded using the text method becomes obvious.
Next, examine a small portion of “2.filmstrip”. The below exhibit is a text view of that
file. The information in this file is used to fill in the thumbnail images in the earlier
exhibit 7. Notice the jpg header and footer highlighted in blue. A thumbnail version of
“DCP_2876.JPG” was located in this position. The data was removed to keep the exhibit
small. Also, there was actually information on 8 images contained in this file. That
number was reduced down to 4 to keep the exhibit small.
Besides the use of the file to complete exhibit 7 when the “hello” viewer is used to
decode the session, this file is packed with other valuable information. Notice the data
highlighted in red. ‘uid=2053090’ and uid2=2053138’. Keep in mind this file was
recovered from Forensic Computer 2 and is associated with the fc2test user. Any time a
user sends an image to another user, the sending user will be assigned the “uid” position.
The receiving user will be assigned the “uid2” position. So in this example, fc3test sent
the file “DCP_2876.JPG” to fc2test. The original resolution of the file was 1168 x 1760
and was about 306 kb in size. The picture was automatically saved on Forensic
Computer 2 (the receiving computer) at C:\Documents and Settings\Admin\My
Documents\My Pictures\Hello\fc3test\My Small Collection. Recall from the Program
Use section earlier in the report. The picture is being saved in a folder created by “hello”
on Forensic Computer 2 called “My Small Collection”. The folder “My Small
Collection” was automatically created on Forensic Computer 2 by “hello” because it is
the first time fc3test sent pictures to fc2test. All pictures sent by fc3test to fc2test during
this exchange will be stored in that same folder. That same folder name will exist on the
sender’s computer if it was local to his machine and this folder is the folder that fc3test
uploaded the images from. Keep in mind the sender can use external storage and that
path will be reflected. While fc3test sent a file that is 1168 x 1760 and about 306 kb in
size, the received file that is automatically stored on the local computer will be reduced to
about 640 x 425 and about 40 kb in size to preserve bandwidth if the default settings are
selected. The users can change the setting to accept the original resolution and size.
Forensic Investigation of Google’s “hello” Ver. 1 Page 17 of 32
This article in its entirety is copyrighted by J. Curl. The article may not be copied, disseminated, or
duplicated without express permission of the authorš™™>·C:\Documents and Settings\Admin\My Documents\My
Pictures\Hello\fc3test\My Small
Collection\DCP_2876.JPG·ÿØÿà··JFIF··········ÿÛ·C···············ÿÙ
·C:\Documents and Settings\Admin\My Documents\My
Pictures\Hello\fc3test\My Small
Collection\DCP_2877.JPG·ÿØÿà··JFIF··········ÿÛ·C···············ÿÙ
·C:\Documents and Settings\Admin\My Documents\My
Pictures\Hello\fc3test\My Small
Collection\DCP_2878.JPG·ÿØÿà··JFIF··········ÿÛ·C···············ÿÙ
·C:\Documents and Settings\Admin\My Documents\My
Pictures\Hello\fc3test\My Small Collection\DCP_2875.JPG·ÿØÿà··JFIF··········ÿÛ·C······
15. 2.filmstrip-fc2test-Redacted
Notice also, there is an MD5 hash value imbedded in each section. From testing, this
hash value appears to be a custom hash value created by “hello”. This hash value will not
match the normal hash of the original file on the sender’s computer or the reduced size
file received by fc2test. The author believes that “hello” only hashes a certain amount of
bytes for each file and not the entire file similar to KaZaA and LimeWire. This hash
value is most likely the custom “hello” hash of the original file on the sender’s computer.
This conclusion is based on the other values listed in the filmstrip such as the height,
width, and file size of the picture. These values are the original values of the original file
on the sender’s computer. The author is waiting on the release of proprietary information
from Google to confirm this conclusion.
Testing has shown that if the examiner uses EnCase and selects an individual filmstrip to
carve imbedded jpg’s, EnCase will carve out the jpg’s in the same order as they appear in
Forensic Investigation of Google’s “hello” Ver. 1 Page 18 of 32
This article in its entirety is copyrighted by J. Curl. The article may not be copied, disseminated, or
duplicated without express permission of the authorthe filmstrip only if the option to bookmark the images is selected. If the option to export
the jpg’s is selected when the examiner reviews the images with a graphics program, the
images will not be viewed in the same order as they were in the filmstrip. This issue is
very important if the examiner is attempting to state conclusively that a user sent a
specific image versus received a specific image. The testing consisted of using a
filmstrip that contained about 140 imbedded jpg’s. The author arbitrarily selected 6
imbedded jpg’s throughout the filmstrip and manually carved them while noting their
specific location in the filmstrip. EnCase was then used to carve all imbedded jpg’s with
the bookmark option then with the export option selected. The results were compared
and only the option to bookmark displayed the images in the same order as the manual
extraction. Due to time limitations, the author did not test any other forensic carving
software.
Profiles and Intros
The next folder of interest that will be discussed briefly is the “profiles” folder. “hello”
users have the ability to create profiles associated with their handles. If these profiles are
created, that information will be located in this folder and may include image files that
are associated with the profiles. When a user is logged onto “hello” and viewing the top
left pane where their friends are identified, a thumbnail of their profile image will be
displayed to the local user. The folder is located at C:\Documents and Settings\”XP
User”\Local Settings\Application Data\Google\Hello\db\”local UID”\profiles\.
The next folder of interest is “intros”. This folder may contain introductions that were
made by the local user where the local user introduced 2 other users to each other. This
folder will contain a jpg image of the introductions. The below screen shot demonstrates
the appearance of introduction evidence.
16. Introduction
The “intros” folder is located at C:\Documents and Settings\”XP User”\Local
Settings\Application Data\Google\Hello\intros\.
Forensic Investigation of Google’s “hello” Ver. 1 Page 19 of 32
This article in its entirety is copyrighted by J. Curl. The article may not be copied, disseminated, or
duplicated without express permission of the authorScache
The next major folder of interest is “scache”. The folder is located at C:\Documents and
Settings\”XP User”\Local Settings\Application Data\Google\Hello\scache\. The folder
will contain several sub-folders of interest. During testing using 3 “hello” user accounts
on 2 different computers, the author determined that all images in the scache sub-folders
are images sent or transmitted by the local user using “hello”. No received images were
intermingled in any scache subfolder. The analysis of these folders goes hand in hand
with the analysis of the filmstrips discussed earlier. The following is a screen shot of
fc2test’s scache.
17. scache
The folders contained within scache will follow the naming convention of “96”, “480”,
“640”, “691”, etc. These folders are created automatically by “hello”.
“hello” will create the “96” folder in the scache of a local user that has sent images using
“hello”. Thumbnail images of all sent images will be cached in the “96” folder. Notice
the naming convention of the files contained within “96”. The string of alphanumeric
characters after the 96- is a “hello” custom MD5 hash followed by the extension .cjp.
The author believes this hash is the custom hash of the file sent by the local “hello” user
to the other user. The author has not been able to test this due to the reluctance of Google
to release proprietary information concerning the operation of their program such as the
number of bytes being hashed. This hash will not match the hash mentioned earlier in the
discussion of the filmstrip. This hash will be the same value as the hash mentioned in the
next paragraph in the naming convention of the 640- files. These files are jpg images
with the jpg header. To view the files, the examiner must either export the files out and
change the extension to .jpg or use a forensic package that will allow the examiner to
view the images based upon the file header instead of the extension.
The remaining folders in the scache are also created by “hello” based upon the size of the
images being sent by the local user. The “640” folder will contain images that were sent
by the local user. The naming convention of the images is 640-“Custom MD5 Hash”.cjp.
The resolution of those images will be 640 x 425. These are reduced resolution copies of
Forensic Investigation of Google’s “hello” Ver. 1 Page 20 of 32
This article in its entirety is copyrighted by J. Curl. The article may not be copied, disseminated, or
duplicated without express permission of the authorthe original images sent by the local user. In testing, the original images were 1168 x
1760. The images received by the receiving user were 640 x 425.
During testing for every picture that was sent, a thumbnail image file was created in the
“96” folder and a corresponding 640 x 425 image was created in the “640” folder. Each
file used the same MD5 value in its file name.
Recall exhibit 2 of the options window. The user has the ability in the advanced
options box to select “Clear Cache”. When this operation is performed, the local
user’s scache is deleted.
Temp
The “ temp” folder is the next folder to be examined. The folder is located in the path
“C:\Documents and Settings\”XP User”\Local Settings\Application
Data\Google\Hello\temp”. When the local user chooses to view an archived chat session,
the session will be created as an HTML page and will appear to the local user in the same
format as exhibit 7 shown earlier in the report. Behind the scenes, the HTML page is
created in a sub-temp folder also named “temp”. Each time another archived chat session
is viewed another sub-temp folder is created and the sub-temp folder’s name is
incremented by the value of 1. In the below example, 6 chat session were viewed. When
the local user closes the “hello” program and shuts the computer down, the “temp” folder
and all sub-folders are deleted. When the power cord is pulled from the computer, the
“temp” folder does not delete and its contents are available to be reviewed.
18. Temp Folder
Forensic Investigation of Google’s “hello” Ver. 1 Page 21 of 32
This article in its entirety is copyrighted by J. Curl. The article may not be copied, disseminated, or
duplicated without express permission of the authorChat Recovery Options
There are currently no perfect forensic recovery options available for archived “hello”
chat. The following section will discuss 4 methods to accomplish the recovery but there
are issues to be considered with each method.
Physical Examination of Files
The first method was discussed earlier in the “chatlog” section starting on page 14. This
method is a little tedious. Regardless of which method is ultimately selected, the
filmstrip files will have to be parsed if the examiner wishes to produce evidence that
would identify the exact images sent to a specific user by the local user. The author has
contacted Guidance Software and has been discussing the writing of an EnScript that
would at a minimum automate the parsing step and possibly other steps. With this
method, the suspect’s “hello” password is not needed and no Internet connection is
required.
The author has tested the above listed method.
Manual Copy over Procedure 1
The next method was provided to the author by an outside source. It is believed to have
been written by a detective with the Connecticut State Police [1]. This method will work
if you only have a couple of chat sessions to decode. If the examiner has a number of
chat logs, this method would be very time consuming. The examiner does not have to
know the suspect’s “hello” password with this method, but an Internet connection is
required.
1. Download and install “hello” software on two separate computers.
2. Create two accounts.
3. From one created account, invite the other created account to be your friend
and have the latter account accept the invite. Have a brief chat between the
two accounts to establish their userid folder on your computer. End the chat
and remove any files from your chat with your friend but leave his userid
folder intact.
4. Determine your user id by going to the following path: \Documents and
Settings\~username~\Local Settings\Application
Data\Google\Hello\db\~userid~. The ~userid~ will be the one of your
account.
5. Determine your friends user id by opening the friends.xml file in the
following path: \Documents and Settings\~username~\Local
Settings\Application Data\Google\Hello\db\~userid~.
Forensic Investigation of Google’s “hello” Ver. 1 Page 22 of 32
This article in its entirety is copyrighted by J. Curl. The article may not be copied, disseminated, or
duplicated without express permission of the author6. From the suspect’s machine, copy out the folder from the following path:
\Documents and Settings\~username~\Local Settings\Application
Data\Google\Hello\db\~userid~\Chatlog\~userid~. Do not use the 2 or 6
folders, as these are support and blogger.
7. Using a hex editor open the file “1.filmstrip” from the folder that you just
copied out. Replace the userid from the suspect with yours throughout the
whole file.
8. Take all three files from the folder your copied out from the suspect and copy
them into the friend’s folder on your machine. The friend’s folder will be in
the path: \Document and Settings\~username~\Local Settings\Application
Data\Google\Hello\db\~userid~\Chatlog. If you had no chats create the
chatlog folder and the friend’s userid folder (not sure if this will work)
9. Start “hello” and click on your friend’s name. You can then open the chat
with pictures displayed that you copied over from your suspect’s machine.
10. You then need to change the names in the chat. Viewing the source code of
the page change the user name in red text to your suspect’s user name.
Change the user name in the blue text to the person he was chatting with. You
can determine who the suspect’s friend was by looking in his friends.xml file
located at \Documents and Settings\~username~\Local Settings\Application
Data\Google\hello\db\~userid~.
11. The thumbnail files and the html chat pages are stored at: \Documents and
Settings\~username~\Local Settings\Application Data\Google\Hello\db\temp.
The author has not tested the above method.
Manual Copy Over Procedure 2
This method is very similar to the above method. The examiner does not have to know
the suspect’s “hello” Password, but an Internet connection is required. This method also
requires some manual editing that will have to be documented but may be faster then the
method listed above [2].
1. Download and install “hello” software on two separate computers.
2. Create two accounts with handles such as “Recover1” and “Recover2”.
3. From one created account, invite the other created account to be your friend and
have the latter account accept the invite. Have a brief chat between the two
accounts to establish their userid folders on the computers. End the chat.
4. On the computer with the “Recover1” “hello” account, go to \Documents and
Settings\~username~\Local Settings\Application Data\Google\Hello\db\~local
UID~\chatlog\~other UID~\. Delete all files within this directory. This will
include any chatlogs or filmstrips.
5. From the suspect’s computer, copy out the files from the following path:
\Documents and Settings\~username~\Local Settings\Application
Data\Google\Hello\db\~local UID~\Chatlog\~other UID~. The files of interest
Forensic Investigation of Google’s “hello” Ver. 1 Page 23 of 32
This article in its entirety is copyrighted by J. Curl. The article may not be copied, disseminated, or
duplicated without express permission of the authorare named, “?.chatlog”, “?.filmstrip”, “index-?.filmstrip” where “?” is a numeric
number.
6. Using the computer with the “Recover1” “hello” account, paste these files into the
following folder, \Documents and Settings\~username~\Local
Settings\Application Data\Google\Hello\db\~local UID~\chatlog\~other UID~\.
7. Run the “hello” program on the computer with the “Recover1” “hello” account.
Log in as “Recover1”.
8. Select the “Recover2” account from the offline friends section. In the bottom
right pane under the “Shared History with Recover2” heading, select the chat of
interest and press the “view” button.
9. The chat will be displayed as an HTML page with Internet Explorer. The chat
will be displayed using the handles “Recover1” and “Recover2”.
10. Close the chat and open the HTML page with a text program. Select find and
replace. Replace “Recover1” with the suspect’s handle. Select find and replace
again. Replace “Recover2” with the handle of the individual the suspect was
chatting with. The handle the suspect was chatting with can be determined by
examining the suspect’s friends.xml file. The handle will be listed along with the
corresponding UID unless the suspect manually removed the friend prior to
seizure.
11. Reopen the chat with Internet Explorer. The chat will now be properly displayed
with the suspect’s handle.
12. Repeat steps 8-11 for each archived chat displayed between “Recover1” and
“Recover2”.
13. Repeat steps 4-7 for each separate UID archived on the suspect’s computer in the
path \Documents and Settings\~username~\Local Settings\Application
Data\Google\Hello\db\~local UID~\Chatlog\~other UID~.
The author has tested the above listed method.
This method would be somewhat faster then the Manual Copy Over Procedure 1 method.
However, both methods require manual editing to properly display the chat logs. If
manual editing were conducted, the examiner would need to take very concise notes and
document how each user’s handle was determined.
The advantage of the prior listed methods is that the suspect’s “hello” password does not
have to be determined. The remaining methods do require the examiner to determine the
suspect’s “hello” password and authenticate the suspect’s account with the Google
servers.
Booting Suspect Computer
The next method is by far easier than the previous listed methods to recover chat. By
using the suspect’s computer and installation of “hello”, the examiner is able to quickly
view the chat logs along with imbedded thumbnails and save them as HTML pages.
Forensic Investigation of Google’s “hello” Ver. 1 Page 24 of 32
This article in its entirety is copyrighted by J. Curl. The article may not be copied, disseminated, or
duplicated without express permission of the authorUnfortunately, this method also poses significant problems for the examiner including
policy issues, possible title 3 issues, and contraband distribution issues. When the “hello”
program is started, it opens a window for the username and password. Upon entering this
information, “hello” must authenticate with the “hello” servers to gain program access. If
this authentication does not occur, the program reports an error message and access to the
program is denied. If initial access is permitted by the examiner connecting the computer
to the Internet and allowing the program to authenticate with the “hello” server, the
Internet access must remain the entire time because “hello” constantly polls the “hello”
server. If the examiner disconnects from the Internet after initial access, the examiner
will quickly lose access to the program and an error messages will be received. The
following steps will discuss this method and some safeguards to prevent some of the
problems listed above.
1. Restore the suspect’s hard drive to a forensically wiped hard drive (or utilize
VMWare).
2. Install the restored hard drive into the suspect’s computer and boot the
suspect’s computer to the restored hard drive without an Internet connection
present.
3. Install a software firewall on the suspect’s computer. Configure the firewall
to deny all outgoing connections to the Internet and notify the examiner so
that the examiner can allow only “hello” to connect. The firewall is
absolutely necessary to prevent unwanted program connections to Internet.
The unwanted programs may include Trojans, communication software such
as email and instant messengers, and other Peer2Peer software such as KaZaA
and LimeWire. (Distribution of Contraband/Title 3 Issues)
4. Connect the suspect’s computer to the Internet.
5. Start the “hello” software and enter the username and password unless the
information is saved in the fields. (Password recovery is discussed on page
27)
6. The firewall will prompt the user to allow the “hello” program to access the
Internet. Be sure to deny access to all other programs attempting to access
the Internet.
7. This method should only be used during the daytime and preferably in the
morning hours. Remember that any friends that are associated with your user
and online will be notified that the suspect is online.
8. Simply click on any the friends that are listed in the top left pane and the
examiner will have access in the bottom right pane to the chat logs. Highlight
the chat log of interest and click on the “VIEW” button on the bottom right.
The chat log will be open as an HTML page. Save the HTML page to other
storage media. Repeat this process for all current friends.
9. Review the friends.xml file to obtain the UID of listed current friends.
Compare the UID for the list of current friends to the UID named folders in
the archived chat log folders to ensure that all chat has been recovered and
that no friends have been removed by the suspect.
Forensic Investigation of Google’s “hello” Ver. 1 Page 25 of 32
This article in its entirety is copyrighted by J. Curl. The article may not be copied, disseminated, or
duplicated without express permission of the author10. If the examiner locates UID folders containing archived chat for friends that
were not listed in the left pane of “hello”, the examiner will need to add the
individuals as friends.
11. Determine the handle for each UID not recovered by reviewing the ?.chatlogs
for that UID with a text viewing program.
12. From the “hello” interface, click the “ADD FRIEND” button on the bottom of
the widow. Enter the handle of the friend the examiner wishes to add back. If
this handle is still an active handle, the examiner will then have access to the
chat logs. WARNING: a message will be sent to that handle notifying the
person that your suspect wishes to add him as a friend. After recovering the
chatlogs for that handle, immediately remove that handle as a friend. The
author has tested this process; and if the examiner immediately removes the
added friend prior to the added friend logging on, no messages will be sent to
the added then removed friend.
13. Repeat the process until all removed friends have been added back the chat
recovered and removed as friends.
The author has tested the above listed method.
Automated Copy Over Procedure
The booting suspect computer method and the manual copy over procedures can be
combined to create a final option. This method may well be the best option at this point
in time. The examiner uses forensic software to copy out the local user’s UID folder
noted in exhibit 8 storing it on a sterile test computer with “hello” installed and active.
The test computer must have Internet access [2].
1. Save the suspect’s UID folder in the same path as the test computer’s local
UID folder. This path should be C:\Documents and Settings\”XP Local
User”\Local Settings\Application Data\Google\Hello\db\.
2. Start “hello” on the test computer.
3. Using the suspect’s username and password, log onto the suspect’s
account and not your own account.
4. Recover the chat in the same manner as listed above starting at step 7.
The author has tested the above listed method.
Other Methods under Development
Another investigator is making contact with Google, in an attempt to find a process to
bypass the online authentication needed when using “hello” to rebuild the chat logs
through the use of an authentication CD or through the use of a development or testing
version of the software.
Forensic Investigation of Google’s “hello” Ver. 1 Page 26 of 32
This article in its entirety is copyrighted by J. Curl. The article may not be copied, disseminated, or
duplicated without express permission of the authorParaben has been contacted and requested to develop software to examine “hello” similar
to other products they have produced.
Guidance Software has been contacted in an effort to create a custom EnScript to aid the
processing of “hello”
Hello Exif Data
The examiner also needs to look at the exif data of any images that are suspected of being
transmitted with “hello”. If the image was taken with a digital camera and the digital
camera exif data is present, there will not be a hello stamp. If the camera exif data is not
present, “hello” records information about the original file in the exif data area. Exhibit
19 displays the “hello” stamp.
19. hello Exif Data
MD5 Review
The custom MD5 values that are believed to be the hash values of the original files on the
sender’s computer have been discussed throughout the paper. The values are imbedded
in a number of files. The below table summarizes the files.
Embedded Original Image 96 Image 640 Image Filmstrip Received
hello Info Image
Md5 d544aea41d86c312 No Data Embedded Embedded Embedded
f12329dbc80e0fa3
origWidth 800 No Data Embedded Embedded Embedded
origHeight 600 No Data Embedded Embedded Embedded
origSize 105542 bytes No Data Embedded Embedded Embedded
Forensic Investigation of Google’s “hello” Ver. 1 Page 27 of 32
This article in its entirety is copyrighted by J. Curl. The article may not be copied, disseminated, or
duplicated without express permission of the authorREGISTRY ANALYSIS After the initial install but before the first use of the program, the registry hive of interest will contain very little useful data. The registry hive is not populated with valuable data until after the program is run the first time and allowed to connect to the “hello” server and authenticate. In fact during limited testing, it appears the registry is very slow to update and some information was not updated until after several uses. The main registry hive path for Windows XP of forensic value is: “C:\WINDOWS\system32\config\software\Google\PicasaNet”. Even if a restore of the suspect’s hard drive is booted to obtain preferences and testing, the examiner must still review the registry due to the large amount of data that “hello” stores relevant to the investigation. Below are samples of some of the data that is obtainable. The majority of the information obtained from the registry was obtained from an actual case and then edited to keep certain information confidential. This was done due to the delay in data being updated to the registry with the test case. Software\Google\Picasa\PicasaNet\Login Name Type Data Password REG_SZ (value not set) Username REG_SZ FC2Test The Username and Password are those selected by the user during registration. If the user elects to keep the default selection of, “Remember my password”. The password will be populated in this registry key. If the password data is not set, the examiner may want to examine the registry data stored in an earlier Windows XP restore point under the System Volume Information. It is possible the user originally allowed the password to be stored then later changed the preference. Depending upon which method of rebuilding chat logs is selected, locating the password, either through the registry, suspect interview, or through cracking other passwords that may been used as the “hello” password is very important. Google states they do not store user passwords on their server and therefore the information cannot be obtained through a subpoena. The Google stance seems very unlikely otherwise the Automated Copy Over Method would not require the real password when authenticating with the Google servers. Forensic Investigation of Google’s “hello” Ver. 1 Page 28 of 32 This article in its entirety is copyrighted by J. Curl. The article may not be copied, disseminated, or duplicated without express permission of the author
You can also read