12.0 SPORT FULL MANUAL - www.sigmasport.com - SIGMA SPORT
←
→
Page content transcription
If your browser does not render page correctly, please read the page content below

EN

ROX
12.0   SPORT
FULL MANUAL

 www.sigmasport.com
ROX 12.0 SPORT

Foreword:

Thanks for selecting ROX 12.0 SPORT as your new Bike Computer.
This is the full manual, to give you a detailed overview of the functions.
CONTENT

S. 5        1. Button Functions

S. 6        2. First Wake Up

S. 7        3. Screen Overview
S. 7        3.1 Status Bar
S. 7        3.2 Battery status information Home Screen
S. 8        3.3 Swiping Gestures (Sub-menu)

S. 8   4. Home Screen
S. 8   4.1 Home Screen Overview
S. 9		      4.1.1 Open Training Menu
S. 9		      4.1.2 Sport Profile Selection
S. 9		      4.1.3 Navigation
S. 10		     4.1.4 Track
S. 10		     4.1.5 Data Sync.
S. 11  4.2 Overview 3rd Party Integration
S. 11		     4.2.1 Strava
S. 12		     4.2.2 TrainingPeaks
S. 12		     4.2.3 komoot
S. 14		     4.2.4 Dropbox
S. 15  4.3 Overview: Settings, Workout, Memory
S. 15		     4.3.1 Settings
			A. Device
			B. Map
			               C. Sport Profile
			               D. Connect Sensor
			E. WiFi
			F. User
			               G. Firmware Update
			               H. Reset to Default Settings
S. 21		     4.3.2 Workout
S. 22		     4.3.3 Memory (Training History)
S. 22		     4.3.4 SIGMA CLOUD

S. 23  5. Navigation
S. 23		     5.1 Single Point Navigation
S. 25		     5.2 Multiple Point Navigation
S. 26		     5.3 Draw my Route
S. 26		     5.4 Start a Route

S. 27  6. Track
S. 28		      6.1 How to transfer a track to the ROX 12.0 SPORT
S. 28		      6.2 Where can I find my tracks?
CONTENT

S. 29  7. Training
S. 30		      7.1 Before you start your training
S. 31		      7.2 During the training
S. 33		      7.3 After the training

S. 34        8. Specifications

S. 35 9. Legal disclaimer
		Updates
		          More information
		          Guarantee, Warranty, Legal Disclaimer
1. BUTTON FUNCTIONS

The ROX 12.0 SPORT has a touch display, which you can use for almost any function or setting.

Functions like power on/off to start or stop the training and returning to the home screen
can be operated by the buttons, only.

An overview of the button functions is listed below:

                                                                                         ON /OFF

            TOGGLE -            STOP/FINISH                    START/LAPS               TOGGLE +

                                                       HOME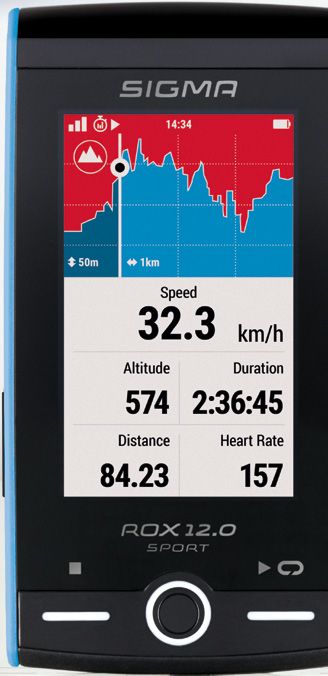
2. FIRST WAKE UP

To switch on the ROX 12.0 SPORT you must push the power button for about 3 seconds.
The display will light up and you can see the boot screen.

NOTE:
In case the ROX 12.0 SPORT does not start, please charge it first!

The ROX 12.0 SPORT will start with a step by step first wake up sequence.
Follow the steps to set up the most important settings.

It is highly recommended to add your home WiFi. If connected, the ROX 12.0 SPORT can automatically upload
your training or check if there is a new update available.

Once you have finished the first wake up settings, you will get a short instruction on how to use the
ROX 12.0 SPORT. Please pay attention, to learn basics functions.

                                                                                 All settings are done,
                                                                                 and you will see the
                                                                                 home screen now.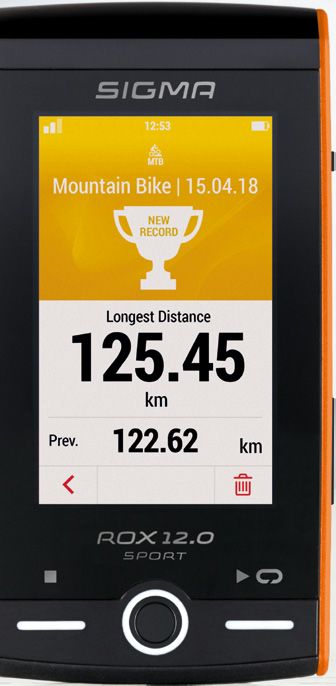
3. SCREEN OVERVIEW
3.1 STATUS BAR
You can see the following elements in the status bar:
GPS quality WiFi
(3 bars) (enabled when needed, only)
Battery status information
Status of the training Clock
(started, paused, stopped)
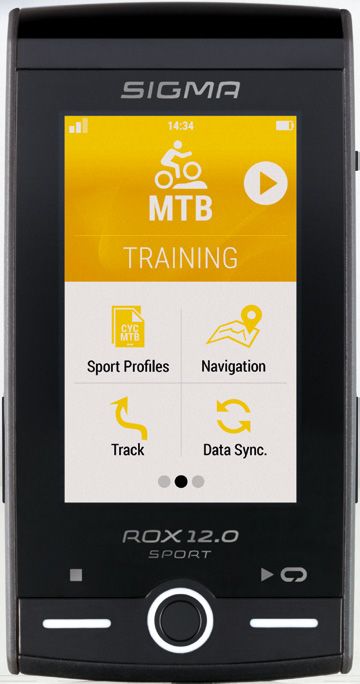
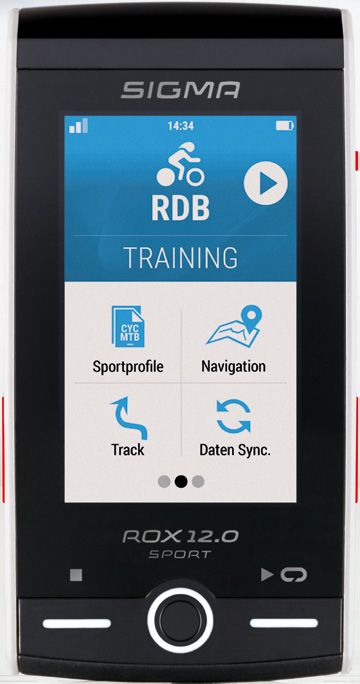
3.2 HOME SCREEN
The upper part is showing the active sport profile.
To enter the training, please push the play button
on the display.
In the lower part you will find the main menu with
different menu items. You can enter each one with
a single touch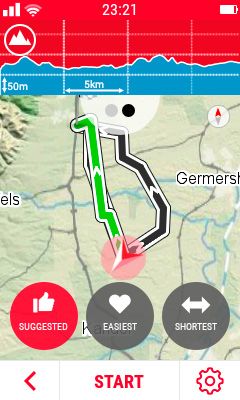
3.3 SWIPING GESTURES (SUB-MENU)
Beside the main menu, the ROX 12.0 SPORT supports
short cut menus, where you can find all important
settings.

Please swipe from top to bottom, to open this menu.
If you swipe bottom-up, the navigation short cut menu
will appear.

4. HOME SCREEN

If you are a smartphone user, you know the home screen already. The ROX 12.0 is working in the same way.
You can adjust your settings and once you are done, simply push the home button to return to the home screen.
No need to push push the back button multiple times.

4.1 HOME SCREEN OVERVIEW
On the home screen you will find the following
menu items
4.1.1 OPEN TRAINING MENU
To open the training menu you simply have
to push the play button in the colored area of
the home screen. Here you can customize the      Here you can see the training
training views to fit them to your needs.        time, if there is an ongoing
                                                 training.
Please check page 17 sport profiles for
detailed information).

4.1.2 SPORT PROFILE SELECTION
To learn more about sport profiles, please
check chapter 4.3.1. If you would like to
modify your sport profile, please go to
“settings ► sport profiles”.
                                                 If you would like to change the
                                                 sport profile, please select the
                                                 “sport profile” button on the
                                                 display.

4.1.3 NAVIGATION
Simply enter a destination or create a route
with multiple stops. To get more insides,
please check chapter 5.

                                                      Here you can select
                                                      different options to
                                                      create a route.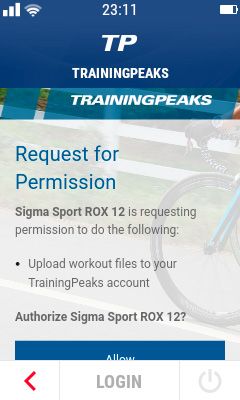
4.1.4 TRACK
Further details about how to create and
transfer tracks can be found in chapter 6.

                                               All tracks which have been
                                               imported from the DATA
                                               CENTER, will be found here.

4.1.5 DATA SYNC.
This is an overview page, to see the current
sync status.

                                               If you enter this menu item,
                                               the ROX 12.0 SPORT will
                                               automatically enable WiFi,
                                               to be able to sync the data.
4.2 OVERVIEW 3RD PARTY INTEGRATION
If you would like to use the 3rd party service, you have to login first. If you do not have an account,
you have to register first.
4.2.1 STRAVA
The ROX 12.0 SPORT has a full integration of Strava.
Strava Summit users can sync their starred preferred
segments as well their planned routes.
Login page
of Strava
STRAVA ROUTES AND
STRAVA LIVE SEGMENT DETAILS:
To sync the Strava segments, you must go to the
Strava website to mark them with a star. If a
Segment is marked, it will be synced automatically.
You can sync up to 100 Segments. If you select a
Strava route, the ROX 12.0 SPORT will automatically
add turn by turn guidance. You will have the same
features as if you plan a route on the ROX 12.0 SPORT
itself.
If you are logged in, all rides will be automatically
uploaded to Strava (available WiFi connection is
required).
NOTE:
If a segment is tagged as “dangerous”,
it won’t be synced! The judgment of the
segment will be done by Strava.4.2.2 TRAININGPEAKS
If you are logged in with your account, all rides will be
uploaded automatically afterwards.
Login
TrainingPeaks
NOTE:
If you login to TrainingPeaks, all rides from
the past will be uploaded as well.4.2.3 KOMOOT
The komoot integration will give you fast access to your
planned komoot routes.
Login
komoot
Once you are logged in, you will have access to all planned routes.
This list will contain the header information only. If you would like to use a route as track,
you must download it first. Once it is downloaded you can use it offline.
KOMOOT IN OFFLINE VIEW:
You can find detailed description of how to create
a route on the komoot website.
NOTE:
If you are logged in, all finished rides will be
shared to komoot as well.4.2.4 DROPBOX The Dropbox integration could help you to automize your analysis workflow. All finished rides will be uploaded to Dropbox. You can use the Dropbox Sync Tool to sync the .FIT files with your PC. Once synced, you can import the files directly to e. g. “Golden Cheetah” or similar analyzing tools. NOTE: We are using a Dropbox app, which is not supporting the same sharing features like other Dropbox folders (January 2020).
4.3 OVERVIEW: SETTINGS, WORKOUT, MEMORY

4.3.1 SETTINGS
All device settings can be found here.
Below you will find an overview of the settings:

A. DEVICE:
All device specific settings can be found here,
l e. g. display settings.

B. MAP:
The ROX 12.0 SPORT has a unique feature. You can
manage your maps on the ROX 12.0 SPORT itself.
You don’t need a PC or any further tools. Simply
connect it to WiFi and enter the Map menu.

NOTE:
Check if your maps are still the latest.

You can check it in the map management. If there
are updates available, we recommend to download
only the maps needed.
4.3.1 SETTINGS
B. MAP:
You can find maps for all over the world.                    NOTE:
Following maps are available:                                You can add and remove maps on your
                                                             ROX 12.0 SPORT, at any time.

    AFRICA:                     EUROPE:                  –   Spain                  OCEANIA:
–   Algeria                 –   Germany                  –   Sweden               – Australia
–   Egypt                   –   Albania                  –   Switzerland          – New Zealand
–   Libya                   –   Andorra                  –   Turkey
–   Mauritius               –   Austria                  –   Ukraine                  SOUTH AMERICA:
–   Mayotte                 –   Belarus                  –   United Kingdom       –   Argentina
–   Marocco                 –   Belgium                  –   Vatican City         –   Bolivia
–   Namibia                 –   Bosnia and Herzigovina                            –   Brazil
–   Reunion                 –   Bulgaria                     NORTH/CENTRAL        –   Chile
–   Seychelles              –   Croatia                      AMERICA:             –   Colombia
–   South Africa            –   Cyprus                   –   United States of     –   Ecuador
–   Tunesia                 –   Czech Republic               America              –   Falkland Islands
–   Zambia                  –   Denmark                  –   Bahamas              –   French Guiana
–   Zimbabwe                –   Estonia                  –   Belize               –   Guyana
                            –   Finland                  –   Canada               –   Paraguay
    ASIA:                   –   France                   –   Costa Rica           –   Peru
–   Armenia                 –   Gibraltar                –   Cuba                 –   Suriname
–   Azerbaijan              –   Greece                   –   Dominican Republic   –   Uruguay
–   Bahrain                 –   Hungary                  –   El Salvador          –   Venezuela
–   China                   –   Iceland                  –   Guadeloupe
–   Georgia                 –   Ireland                  –   Guam
–   India                   –   Italy                    –   Guatemala
–   Indonesia               –   Kosovo                   –   Haiti
–   Iran                    –   Latvia                   –   Hawaii
–   Iraq                    –   Liechtenstein            –   Honduras
–   Israel                  –   Lithuania                –   Jamaika
–   Japan                   –   Luxembourg               –   Mirtinique
–   Kazakhstan              –   Malta                    –   Mexico
–   Kyrgyzstan              –   Moldova                  –   Newfoundland and
–   Lebanon                 –   Monaco                       Labrador (Kanada)
–   Malaysia                –   Montenegro               –   Nicaragua
–   Nepal                   –   Netherlands              –   Panama
–   Philippines             –   North Macedonia          –   Puerto Rico
–   Qatar                   –   Norway
–   Saudi Arabia            –   Poland
–   Singapore               –   Portugal
–   South Korea             –   Romania
–   Taiwan                  –   Russia
–   Thailand                –   San Marino
–   United Arab Emirates    –   Serbia
–   Uzbekistan              –   Slovakia
–   Vietnam                 –   Slovenia
4.3.1 SETTINGS
C. SPORT PROFILES:
The sport profile contains all important settings for the
training, e. g. the training views.
You can customize the training views to fit to your
needs for each sport profile. As there are different
preferences for each discipline, you can adjust the
profile according to your needs. You can change
between set-up sport profiles within seconds.
The current sport profile selection is displayed on the
home screen. By selecting a sport profile, all settings
will be changed in accordance with your pre-selections.
Additionally you can adjust the routing profile to your
preferences.
There are default setting, based on the common
requirements, e.g. roads for road bikers and mainly If you would like to
trails for mountain bikers. modify them, you can
do it in the sport profile
settings.
You can find important settings like avg. cadence and
avg. power calculation in the sport profile settings as
well.
Below you can find an overview of all settings:
– Name of the sport profile NOTE:
– AutoLap You can add as many sport profiles as you
– AutoPause (on/off) need. The free storage space is the limit.
– Training View
– Alerts
– Bike Settings
– Avg. Calculation
– Power Zones
– Intensity Zones
– GPS/GLONASS (on/off)
– Routing Options4.3.1 SETTINGS D. CONNECT SENSOR: The ROX 12.0 SPORT is using a list of known sensors. You don’t have to assign it to a specific bike. You don’t even have to care about how to connect sensors during the training. Simply start your ride and the ROX 12.0 SPORT will take care of connecting the right sensors. All values provide by the sensor will be displayed on the ROX 12.0 SPORT. The easiest way to search for your sensors is the option “search all”. You just have to make sure the sensors are activated. All active sensors will be displayed, and you can simply connect them all at the same time. If you would like to double check the already paired sensors, just enter the menu “paired sensors”.
4.3.1 SETTINGS

NOTE:
If you are using a power meter, you will find the options “Auto Zero Calibration” in the sensor details.
You can start the calibration request here. If a power meter is connected you can find the same option in
the short cut menu as well.

Some sensors are providing several details about the
status of the sensor, like battery state of charge. If you
want to check it, please check the sensor details as
well.

The following ANT+ Profiles are supported:
– Speed
– Cadence
– Speed & Cadence Combo
– Heart Rate
– Power (PWR + CTF) – No Cycling Dynamics
– Shifting Profile – Di2, eTap, Campa EPS
– Shimano Di2
– Shimano STEPS
– LEV (E-Bike Profile)
– Remote
– Rotor Power Meter – incl. Values OCA/OCP

NOTE:
If you are using a ROTOR power meter,
you must pair it as ROTOR power meter,
otherwise the specific ROTOR values won’t
be shown on the ROX 12.0 SPORT.
4.3.1 SETTINGS
E. WIFI:
As WiFi is used for many cases, we highly recommend
setting up the WiFi at the “first wake up” already.

F. USER:
You can find all user related settings here. They are needed, for having a more accurate calculation of calories
and to calculate your intensity zones.

G. FIRMWARE UPDATE:
Once the connection to your WiFi is established, the
ROX 12.0 SPORT will regularly check, if there is a new
update available. If you would like to check it manually,
simply open the menu “settings ► update firmware”.

The ROX 12.0 SPORT will connect to the known WiFi
and will check if there is a new update available.
                                                                                          Update
                                                                                          available

H. RESET TO DEFAULT SETTINGS:
If you would like to reset your ROX 12.0 SPORT, use this menu.

IMPORTANT:
All personal data will be deleted! There is no way to restore them!
4.3.2 WORKOUT ROX 12.0 SPORT offers the option to create structured workouts. You can set up a workout fitting to your needs on the device itself. You can define a target and a target zone. Once you have reached the target, it will automatically start the next phase of the workout. If you prefer manual change, you can adjust it in the workout set- tings. Basically, you have two types of phases: simple phase and interval phase. A simple phase does not have repetition or recovery. It is simply a target and optionally a target zone, you can set up. If you would like to pre-define repetitions of trainingload and recovery section, please use the “interval phase”. Alternating phases of training load and recovery will repeat until a defined number of repetitions is accom- plished. You can set up a workout with up to 10 phases. NOTE: If you are notfamiliar with workouts, please consult a/your trainer.
4.3.3 MEMORY (TRAINING HISTORY)
If you would like to have a look at your finished rides,
you can find them in the menu item “memory”.

Beside the individual activities, you can find your
personal bests as well your totals for each
sport profile.

NOTE:
You can select an activity as a track and follow
your previous route. You have two options.
To follow it in the same direction or simply
reverse it.

4.3.4 SIGMA CLOUD
We highly recommend using the SIGMA CLOUD.

The cloud is a sync tool, which helps you to synchronize
all data between DATA CENTER, SIGMA LINK app and
ROX 12.0 SPORT.

You can plan a route in your DATA CENTER and sync it
with the SIGMA CLOUD. Next time you switch on your
ROX 12.0 SPORT, simply start the data sync and all
new routes or sport profiles will be transferred to your
bike computer.

Once the routes are stored on your ROX 12.0 SPORT,
there is no more WiFi connection needed.
5. NAVIGATION

Navigation is the centerpieceof ROX 12.0 SPORT.
It offers many different options of creating a route.

You can use it in the simple way, by adding an address
or a point on the map and start the ride. Or if you would
like to createa route with several waypoints, you can do
it as well.                                                                                  You have the
                                                                                             following options to
                                                                                             start a navigation:

5.1 SINGLE POINT NAVIGATION
If you would like to navigate to a specific destination you have the following options:
– Address
    Easy entry of a specific address
– POI (Point of Interest)
    You can choose a POI based on a category like gas station or cafe.
    If you would like to search for a POI closeby, please select „Actual Position“.
– Point on Map
    You can choose a single point or multiple points. Simply move the map and tapwhere you want to go
– Recent
    Here you can see a list of resent used points
– Favorites
    You can set “favorite” points in the short cut menu ► add point
– Coordinates
    If you would like to visit a place without having an address, you can alternatively enter the coordinates.

After having selected one of the above, the destination will be added to a list automatically. If you don’t want to
add any other waypoints you simply have to select “show route”. As it is common for most navigation systems,
the route will always start from your current position. There you havethree different options:
– Suggested
   Suggested route depending on the selected sport profile
– Easiest
   Route with least altitude
– Shortest
   Shortest possible route depending on the sport profile. Please be aware, that the shortest route
   could have significantly more uphill sections.
5.1 SINGLE POINT NAVIGATION
You will get the following overview:
Beside the distance
and altitude infor-
mation you can see
the altitude profile,
when swiping to the
left side.
If you tap on the map, it will be shown in full screen and
you can move the map to check the details of the route.
Further you have the options to save the route as
a track or save it as a favorite.5.2 MULTIPLE POINT NAVIGATION
The ROX 12.0 SPORT offers the option to create
a route with multiple points.
It is following the same steps as the single point route.
Once you selected a point, you just have to add another
one.
Beside a point, you can also add a track or an activity.
You can create a new route out of an existing one.
A route can consist of up to 50 points.
You can change their order by holding an entry and
move it up or down. If you would like to
delete individual
points/point, simply
swipe from right to
left.
The following options are available in the contex menu:
– Delete All NOTE:
Delete all entries If the distance to the starting point of
– Delete Selection the route is longer than 300 km, the
Select those entries you would like to delete. ROX 12.0 SPORT won’t calculate the
– Reverse route and will show an error message.
You can reverse the whole order of points and
get the route in the opposite direction. If you want to plan a route for your holidays
– Routing Options or for your training camp, we recommend
You can modify the routing options for this using the DATA CENTER. Once you planned
single ride. The settings won’t affect the general your routes, you can simply sync them via
routing options of the sport profile. SIGMA CLOUD (WiFi) or transfer it via USB
to the ROX 12.0 SPORT.
Once you are ready with adding waypoints,
simply push the button „Show Route“.
You will see an overview of your route including the
distance and altitude profile. Your actual position is
the starting point of the route you created.5.3 DRAW MY ROUTE
“Draw my Route” is a unique tool to generate a route. It less about planning a route, but more about
discovering new ways.
Choose the pen symbol, simply draw some lines or a circle on the map, and the ROX 12.0 SPORT will calculate
a routeThe route will be created based on preferences of the sport profile. It is the best way to discover new
regions or even known areas.
5.4 START A ROUTE
If you are ready to start the route, simply push the
“START” button on the display. IMPORTANT:
You have to push the “start” button on the
If the starting point is not close to your current position, device to record your ride.
the ROX 12.0 SPORT will automatically route you to the
starting point. In this case the total distance could be The navigation is working independently of
longer than shown before. the training record.
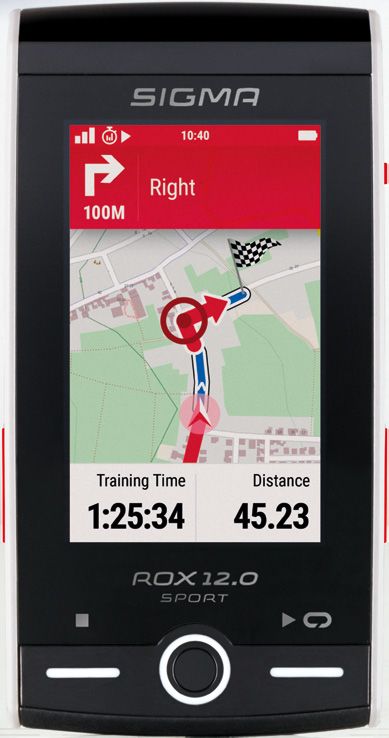
Once the route ortrack is started, the ROX 12.0 SPORT
will open the training view automatically. You will see the
navigation screen. The map in this screen is fixed and
can’t be changed. The two values below the map can be
changed.6. TRACK Apart from the navigation, which is handled by the ROX 12.0 SPORT itself, you can also use pre-planned tracks for guidance. NOTE: Difference between track and route The main difference between track and route is the re-routing behavior. If you are using a route, the destination is fixed, but the way how to get there can be flexible. If you leave the original route, the ROX 12.0 SPORT will automatically re-calculate a new route. If you are using a track, the ROX 12.0 SPORT will try to keep you on the track. If you leave the track, the ROX 12.0 SPORT will guide you back to the track, as soon as possible. This will start with a request for a U-turn, as long as it is still considered best to return to the track. Simultaneously, ROX 12.0 is checking the distance to the closest track point. IMPORTANT: Before you start a track, you can select one of two options: starting point or closest point. If you select the starting point, the ROX 12.0 SPORT will guide you to the starting point. If you are close to the track and you don’t want to be guided to the starting point, you should select closest point. The ROX 12.0 SPORT will guide you to the closest point to your actual position.
6.1 HOW TO TRANSFER A TRACK
    TO THE ROX 12.0 SPORT
You have the following options to transfer a track to the ROX 12.0 SPORT:
– Via DATA CENTER (USB – Connection)
– Via SIGMA CLOUD (WiFi) –create a track in the DATA CENTER, save and sync it to the SIGMA CLOUD
– Drag’n Drop to the folder “tracks”
  Connect the ROX 12.0 SPORT to your PC/MAC as mass storage device. Simply copy a .GPX file to the
  folder “tracks” on the ROX 12.0 SPORT. Please make sure, you don’t transfer corrupted /manipulated
  files to the ROX 12.0 SPORT, as it could cause a system crash!
– Via komoot
  You can sync your komoot routes, when you are connected to komoot
– Via Strava
  You can sync your Strava routes, when you are connected to Strava

IMPORTANT:
If you want to follow a track, you select the track in the menu item “track” instead of navigation menu
Only in the track menu the ROX 12.0 SPORT will add turning guidance to the track.

6.2 WHERE CAN I FIND MY TRACKS?
All tracks coming from the SIGMA CLOUD,
DATA CENTER or USB file transfer will be stored in         IMPORTANT:
“track”.                                                   If you sync your komoot tracks, all tracks will
                                                           be displayed in the menu of komoot. You can
If you have an extended list of tracks, you can go to      find more details in chapter 4.2.3.
the options to reorder the list. It is recommended to
display the latest at the top.                             If you sync your Strava routes, all routes will
                                                           be displayed in the menu of Strava. You can
                                                           find more details in chapter 4.2.1.
7. TRAINING All current information about your training or route can be found in the training menu. If you are starting NOTE: a navigation or you would like to follow a track, you will You must push the “start” button to record end in the training menu after you have made your your ride and you must push the “stop” selection. button to finish recording your ride. The most important settings can be found in the short cut menu. To open the menu, you have to swipe from top to bottom. THERE IS NO ONGOING NAVIGATION, FOLLOWING ITEMS ARE AVAILABLE: – Backlight Adjustment To save battery it is recommended to use “auto” setting – Mark Position You can mark a position at any time. You can find them in your favorites – Altitude Calibration It is highly recommended to use the auto setting. Once the ROX 12.0 SPORT has GPS fixed, the altitude will be calibrated automatically. Please note, that the calibration will only be executed when the training is not started. – Auto Pause When you start or stop your tour, the recording will be started or stopped automatically. – Calibrate Compass – Sync Sensors If a sensor is not found, please make sure it is activated. If yes, push “sync sensor” to start the search for the known sensors again – Strava Live Segment (ON/OFF) – Zero Offset Calibration If your power meter is connected, you can perform the zero-offset calibration
7. TRAINING

WHILE NAVIGATION IS ACTIVE YOU CAN FIND THE FOLLOWING ITEMS:
– Actual Activity
  You can find all important values of
  the ongoing training here
– Back to start
– Same Track back
– Automatic Lap (ON/OFF)
– Block next 500m
– Turning List
– Turning Guidence (ON/OFF)
– Cancel Navigation
– Previous Waypoint
– Next Waypoint

7.1 BEFORE YOU START YOUR TRAINING
When you enter the training menu, the ROX 12.0 SPORT will automatically search for known sensors.
Please make sure, the sensors you would like to connect are activated. You can double check if the sensors
are connected by opening the short cut menu.

The ROX 12.0 SPORT will calibrate the altitude, as soon as GPS is available.

If you are using a power meter, it is recommended to perform the “Zero Offset” calibration.
To start the calibration, you simply have to open the short cut menu and push “Zero Offset”.

Once you have done all your settings, simply push the “start” Button to start the training and record your data.

NOTE:
The altitude will be measured on the basis of air pressure. If there are fluctuations of the
weather within a short period, it may have an effect to the altitude measurement.
7.2 DURING THE TRAINING
Once you start the training, all data will be recorded.
The ROX 12.0 SPORT will record all data, even those
not displayed.

You may select the most important values during
the training, only and go to a deeper analysis after
the training with all data.

IMPORTANT:
You can start a navigation at any time. Push the
home button to go to the home screen. Here you
can select a navigation or a track.

NOTE:
You can reduce the map to a small cube in the
training view. If you would like to enlarge the map
temporarily, simply tap on the map. The map will
be shown in full screen for 10 seconds. You can
have a closer look and afterwards the full screen
will be closed automatically.

You can change the zoom level as well. The
selected zoom level will be kept until you change
it again.

You have the same function for the altitude profile as well. Just tap on the altitude profile to adjust the zoom
level or take a detailed look. It is very easy to change functions in the training view. Just push and hold the value
you would like to replace. The submenu will open and the categories of the different values will be shown. Select
the one you would like have on display.

Please take note, that a graphic function is not fit for a small cube.
7.2 DURING THE TRAINING
STRAVA DURING THE TRAINING
If you are using Strava Summit, you can sync your favorite Strava live segment to the ROX 12.0 SPORT. They
will be displayed, once you are close to the segment.

Once you start the segment, it will show a live comparison with, e. g. the KOM time. To change the comparison,
you can swipe to the left side.

WORKOUT DURING THE TRAINING
If you select a workout, the workout screen will be
enabled automatically.

You will see all important information about the selec-
ted workout. The phase you are in as well as the target
and target zone of the phase are shown.

If you select an automatic phase change, the
ROX 12.0 SPORT will start the next phase once you
have reached your personal target. When using manual
phase change, you have to push the right-side button
and hold it until the phase has changed.

                                                          If an interval phase is selected, you can see
                                                          the number of finished intervals in the upper
                                                          left corner.
7.2 DURING THE TRAINING CHANGE VALUES DURING THE TRAINING If you would like to replace a value which is displayed, you have to push and hold the value you would like to replace for 2 seconds. It will open the menu where you can select the new value you would like to display. Please note, graphic functions requires a minimum size to be displayed. 7.3 AFTER THE TRAINING After finishing and saving your ride, the ROX 12.0 SPORT will automatically try to upload it to the services your are currently logged in with (SIGMA CLOUD, Strava, TrainingPeaks, komoot, Dropbox). If you sync your data via WiFi, there is no need to connect it to your PC anymore. If you would like to take a look at the summary of the ride, go to the memory menu and select the ride. Here you can find the most important values as well as some charts.
8. SPECIFICATIONS

– Dimensions: 115 x 60 x 17 mm (length x width x height)
– Wight: 125 g

                                                               Maximum RF output          Number of
RF Interface                        Frequency Range
                                                               power:                     channels:
WLAN EU/ETSI                        2402 –2483 MHz             17.7 dBm                   13
WLAN North America /FCC             2402 –2473 MHz             17.7 dBm                   11
Bluetooth                           2400 – 2483 MHz            8.5 dBm                    79
Bluetooth
                                    2400 –2483 MHz             2.5 dBm                    40
Low Engergy
ANT+                                2403 –2480 MHz             2.3 dBm                    77
GPS                                 1575.42 MHz                N /A (receiver only)       N /A
GLONASS                             1602 MHz                   N /A (receiver only)       N /A
R1 ANT+ / BLE                       2.4 GHz / 2.4 GHz          -6.31 dBm / 3.04 dBm       N /A
R2 ANT+ / BLE                       2.4 GHz / 2.4 GHz          0.85 dBm / 3.81 dBm        N /A

Ambient temperature
                           ROX 12.0                   R1 DUO                     R2 DUO
Temperature range          -10°C – + 60°C             -5°C – + 50°C              -10°C – + 60°C
Charging temperature
                           0°C – +50°C                –                          –
range
9. LEGAL DISCLAIMER HOW TO USE THE NAVIGATION IMPORTANT: Do not operate the device while riding and always pay attention to your environment in order to recognise dangers in good time. Enter your destination before starting your ride to ensure a safe journey. Always follow the local signboards and follow the traffic rules. Rely on your own knowledge when there are discrepancies between the proposed route and the local conditions. If a route has been affected by environmental factors or the like, evaluate whether it can still be safely used. GPS NOTE The performance of the device is limited under certain circumstances. Thus, devices can use the terrestrial broadband network, which negatively affect the reception quality. OSM MAPS The maps are up-to-date at the time of manufacture. However, it may happen that already known roads, paths, house numbers, etc. are not included. This is not a mistake, it happens because the road network is in a permanent state of flux. The navigation is based on the maps of Open Street Map (OSM). OSM is a non-profit internet project. The strength lies in the fact that everyone can work on improving the quality. UPDATES The ROX 12.0 SPORT and the installed maps can be updated. To perform an update, a WiFi connection must be available. Since individual updates can take some time, it is advisable to carry out the update while loading the ROX 12.0. SPORT MORE INFORMATION More information can be found here: www.sigma-qr.com
GUARANTEE, WARRANTY,
LEGAL DISCLAIMER
We are liable to our contracting partners for defects in line with legal provisions. The warranty does not extend
to batteries. In the event of a warranty claim, please contact the retailer from whom you purchased your bike
computer. You can also send your bike computer, together with your receipt and all accessories, to the address
below. Please ensure you pay sufficient postage.

SIGMA-ELEKTRO GmbH
Dr.-Julius-Leber-Straße 15
D-67433 Neustadt/Weinstraße
Service-Tel. +49-(0)6321-9120-140
E-Mail: kundenservice@sigmasport.com

In the event of justified warranty claims, you will receive a replacement device.
You will only be entitled to the model available at the time of replacement.
The manufacturer retains the right to make technical modifications.

Batteries must not be disposed of in household waste (European Battery Law)!
Please take the batteries to an official collection point or to the retailer for disposal.                LI

                                                                                                          LI =
                                                                                                     Lithium Ionen
Electronic devices must not be disposed of in household waste.
Please take the device to an official waste collection point or to the retailer.

Before disposal, all relevant personal data must be deleted from the device.

EU DECLARATION OF CONFORMITY
We, SIGMA-ELEKTRO GmbH, Dr.-Julius-Leber-Str. 15, D-67433 Neustadt/Weinstraße, declare that the
bike computer ROX 12.0 and the transmitters R1 Duo and R2 Duo, when used as intended, comply with
the basic requirements of RED Directive 2014/53/EU and RoHS Directive 2011/65/EU.

The CE declaration can be found at: ce.sigmasport.com/rox12
ROX 12.0 SERVICE HOTLINE + 49 (0) 63 21-9120-118 sigmasport.com SIGMA-ELEKTRO GmbH Dr. - Julius - Leber - Straße 15 D -67433 Neustadt /Weinstraße Tel. + 49 (0) 63 21- 9120 - 0 Fax + 49 (0) 63 21- 9120 - 34 E - Mail: info@sigmasport.com
You can also read