Haier Medical and Laboratory Co., Ltd.
←
→
Page content transcription
If your browser does not render page correctly, please read the page content below
User Manual For Haier DW-86L288/388/628/386/626
                                   DW-86W420
             Ultra Low Temperature Storage Freezer

             This product is suitable for ultra low temperature storage of products in
             applications such as clinical, pharmaceutical, scientific research, and
             epidemic institutions.

             Haier Medical and Laboratory Co., Ltd.

              Read this user's manual carefully before using the ULT freezer.
              Place this manual in a convenient location for future reference.

0070505464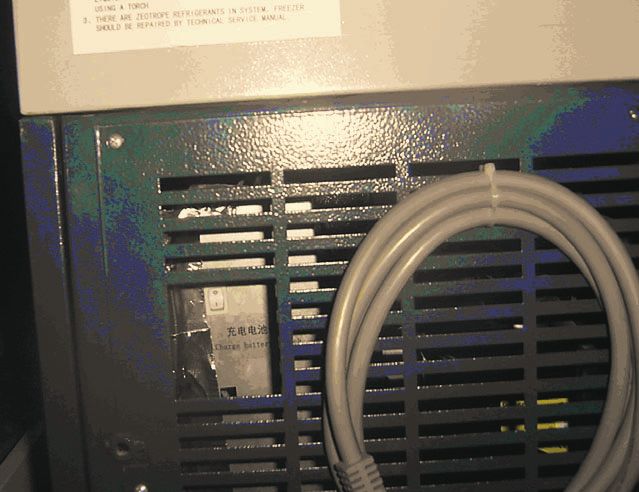
Table of Contents

General Information
Features of the Haier ULT Freezer .........................................................1
Description of Key Parts and Functions..................................................2
Safety Precautions..................................................................................3
Proper Usage..........................................................................................4
Pre-Installation Information.....................................................................7

Pre-Start Up Instructions
Installation...............................................................................................8
Initial Loading.......................................................................................... 9
Temperature Adjustment and Setting......................................................11
Display and Alarms .................................................................................13

Maintenance
Routine Maintenance..............................................................................15
Troubleshooting Guide ......................................................................16
Recycle Rechargeable Battery..........................................................17

Technical Data
Specifications ....................................................................................18
Schematic Diagrams, Refrigeration and Wiring Diagram..................19
Optional Accessories.........................................................................20
Technical Service ..............................................................................24

   The actual design, color and door pattern of the unit you received may
   vary as a result of continuous improvements.
Technical Service                                                                     Features of the Haier ULT Freezer

Your Haier ULT Freezer has a 3 year warranty on the compressors and 5 years parts          The Haier ULT Freezer is equipped with microprocessor control and a
and labor on the rest of the unit.
                                                                                           digital temperature display with a range of -10 to -86 . The normal
The warranty card should be kept for future service work. Should you need service or       operation temperature range is -50 to -86 .
to inquire about your freezer, please use the warranty card to contact your local Haier
Equipment and Instrument Service center.
                                                                                           The unit has a number of standard protection functions. They include
                                                                                           compressor delay protection, low voltage booster, and high voltage
                                                                                           protection.

                                                                                           The refrigeration system for the unit features a balanced cascade
                                                                                           technology powered by low-temperature rated speciality compressor.

                                                                                           Advanced LED display on the freezer can display the cabinet
                                                                                           temperature, set point, ambient temperature and line voltage. It also
                                                                                           allows the user to set the high temperature alarm, low temperature alarm
                                                                                           and notifies the user that the unit has developed a failure through the
                                                                                           display.

                                                                                           Innovative and integrated design of the door lock and handle provide
                                                                                           convenient application.

                                                                                          Note: Technical data published in this manual are nominal. The actual
                                                                                          ULT performance may vary slightly due to continuous product
                                                                                          improvements.

                                          24                                                                                 1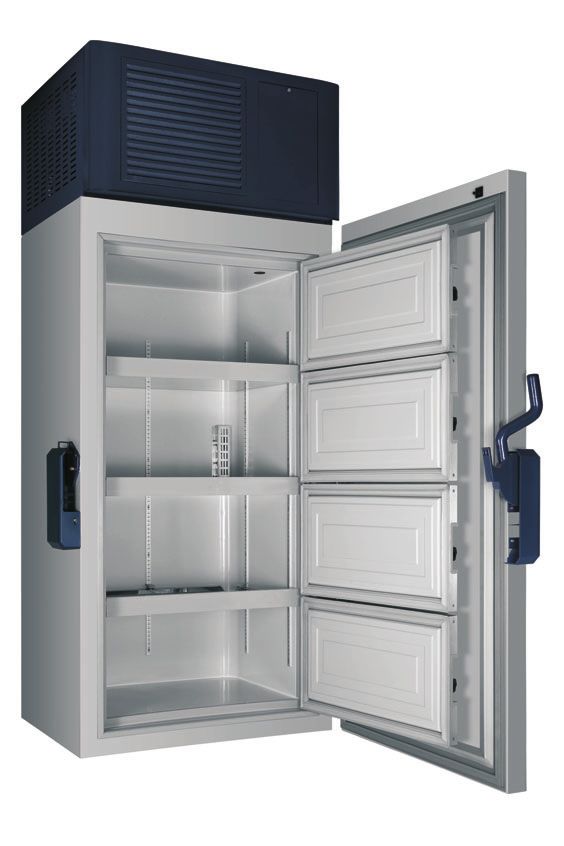
Description of Key Parts and Functions                              Optional Accessories

  Diagram of parts
                                                                   CO2 and LN2 backup cooling system
  Control                                                          For installation and instructions for operation, please refer to the user's manual shipped with the
  panel                                                            system.

                                                                     Warning Any equipment using CO2 can displace oxygen in the surrounding area. Please
  Door                                                               verify that there is sufficient ventilation around the workplace. If there is limited ventilation,
  handle                                               Inner         alternative means to ensure a safer environment must be employed. This may include air
                                                       door          quality monitoring and warning devices.
 Outer door

 Side panel
 for                                                               Storage rack and box
 refrigeration
 compartment                                                       If the unit is used to store small samples, storage racks and boxes provide more efficient use of
                                                                   internal space.
 Front protection
 panel for                                                                                                            Storage box
 refrigeration
 compartment                                                              Racks

 Reserved
 window for
 temperature
 recorder                                                               Storage box
                                   Door     Control
                            Lock   handle   panel

                                                                               Model                  Storage Rack                     Box
                                                                         DW-86L628                        20 (2 inch)               320 (2 inch)
                                                                         DW-86L388                        16 (2 inch)               192 (2 inch)

                                                                         DW-86L288                        12 (2 inch)               144 (2 inch)

                                                                         DW-86L386                        16 (2 inch)               192 (2 inch)
                                                                         DW-86L626                        20 (2 inch)               320 (2 inch)

                                               Protection panel
Power switch for battery                       for refrigeration
                                               compartment

                             2                                                                                      23
Optional Accessories                                                                      Safety Precautions
                                                                                            This manual and labels attached to the product include important safety precautions
                                                                                            required to operate this product. Customers are advised to follow instructions
This recorder has been calibrated at the factory. It retains the temperature accuracy       provided to avoid potential damage to product and injury to operators.
and calibration even when there is a power supply interruption. Should there be a need      Note: Use this product only in the way described in the product literature and this
to recalibrate the recorder, please follow the procedures below.                            manual. Before using it, verify that this product is suitable for its intended use.
a)Let the unit run continuously until it reaches a stable condition. The recorder has       Do not modify system components or use unauthorized parts as this will void the
registered temperature for at least two hours.                                              product warranty.
b)Place a standard thermocouple in a 100 ml container filled with 10% glycerin solution.
Place the container and the temperature recorder sensor in the unit. Do not place the
recorder sensor in contact with any liquid.                                                       This sign is directly related to operator safety and equipment safety. The
c)After four hours of soak time at the stable freezer temperature, the container                  contents and instructions that follow the sign must be strictly followed.
temperature should match the freezer temperature. Then compare the thermocouple
reading with the temperature recorder reading. If there is a discrepancy, use the button
(#1) or the button (#2) on the recorder to move the pen on the chart to reflect the               This sign refers to prohibited actions. Violation may result in damage to the
correct temperature.                                                                              freezer or compromise the operator's safety.

Note: The ink pen will operate 5 seconds after the button is released.
                                                                                                     This label is adhered to a cover that protects a high voltage area to
                                                                                                     reduce the chance of electric shock. Access to the cover should only be
Caution: The temperature recorder is preset during production, so resetting of the
                                                                                                     handled by a qualified engineer or technician.
temperature recorder is not recommended unless absolutely necessary.

                                                                                           NOTICE!
                                                                                           1.Freezer must be placed at least 200mm away from the wall to allow maximum air
                                                                                            circulation.
                                                                                           2.Changing of the Refrigerants should be done according to the Service Manual.

                                                                                           NOTICE!
                                                                                           For the most efficient energy consumption and optimized compressor life,the
                                                                                           temperature should be set at the highest temperature suitable for the samples to be
                                                                                           stored,normally set at -50 to -80 .

                                                                                                                                                                        switch
                                                                                                                                                                        battery
                                                                                                                                                                        Charge
                                                                                           When power to the unit is on, switch on the battery charger. When the unit
                                                                                           is not in use switch power off and then switch off the battery charger..

                                                                                                                                 Grounding mark

                                                                                           Wear Cryogloves before opening the door.
                                          22                                                                                         3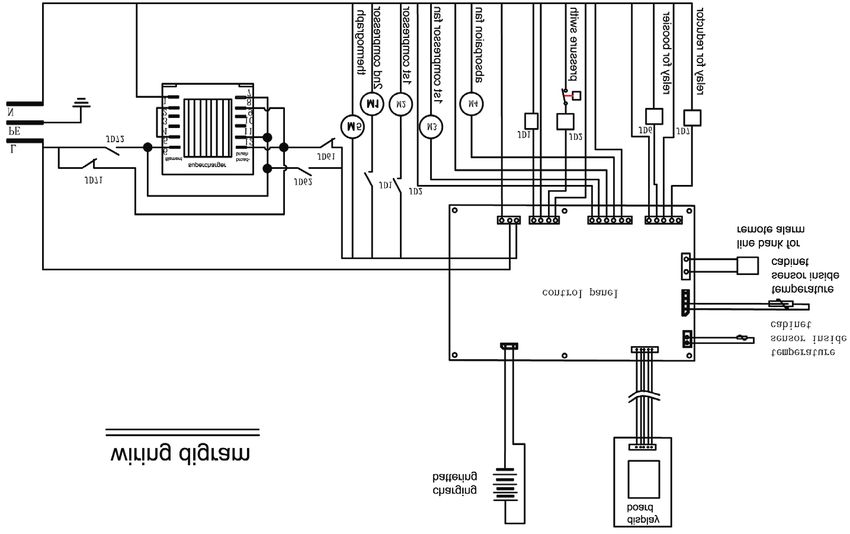
Proper Usage                                                                                Optional Accessories

The appliance requires 220V~/50Hz for 628/388/288/386/310 or 220V~/50Hz and
220V~/60Hz for 628/626.A regulator with a capacity of 4000W or higher must be
installed if the voltage if beyond the rated voltage of ±10%.If the power cord needs     2) Remove the supplementary power supply
to be extended, the extended conductor must have a cross area of equal or greater        Power LED light continues to flash. The recorder works normally. It suggests that the
than 2mm 2 for 628/388/288/386/310(220V~50/60Hz) or 3mm 2 for                            main power supply is sufficient while the backup battery lacks capacity. It is then
628/626(115V~/60HZ ),and the extended length must not exceed 3m.                         necessary to replace the battery until the green LED lights up and stops flashing.
                                                                                         3) Changing of Recorder Chart Paper
Your Haier ULT unit is equipped with a standard three-prong power plug, rated            When changing the chart paper for the recorder, please use the following steps.
current for 20A             f o r 6 2 8 / 6 2 6 ( 11 5 V ~ 6 0 H z ) a n d 1 6 A f o r
                                                                                            a. Locate the button (#3) at the front of the recorder.
628/388/288/386/626/310/420(220V~50/60Hz). Be aware that one of the three
prongs is for grounding purposes. Removal of the ground prong is strictly                   b. Press and hold the button (#3) for about one second. The imprinting stylus of the
prohibited for safety reasons under any circumstances. The electrical power plug         recorder moves to the left side of the chart.
should be securely plugged into the power socket. A loose plug in the socket may            c. When the stylus is completely off the chart, unscrew the center nut for the paper
cause fire.                                                                              and remove the old chart paper off the recorder. Place a new chart paper on the
                                                                                         recorder. Carefully match the day and time line on the chart with the reference mark on
The power socket intended for your Haier ULT usage must be grounded to avoid             the recorder panel (there is a small groove on the front of the recorder as shown in the
electric shock. If the socket does not meet this requirement, the condition must be
corrected by a qualified technician before using the ULT unit.                           figure).
                                                                                            d. Place the center nut over the chart paper and tighten it. Press the button (#3) to
Never use gas lines, water mains, telephone lines or lightening rods as the              move the stylus back to the chart to continue the temperature recording.
grounding device for your Haier ULT unit. This type of improper grounding may               e. Inspect the contact between the pen and the paper chart. Adjust the arm if
cause electric shock or other danger.                                                    necessary to make contact. (Note, do not damage the pen and arm. It might be easier
                                                                                         to remove the arm and pen to make a small bending adjustment and then install the
Never install your ULT in an unprotected area. After a unit is rained on, there is a
danger of electric shock.                                                                pen back on the recorder. Repeat the process until the recorder arm and pen work
                                                                                         properly.)
Installation and maintanence of your Haier ULT should be carried out only after             f. The accuracy of the temperature must be checked after changing the chart paper.
reading this manual. Haier Equipment & Instrument Services can install and               The procedure is described as follows. Press and hold the button (#3) until the pen
validate your unit please call local Haier sales and service center.                     moves to the outside of the chart paper. Then press the button (#3) again; the pen
                                                                                         should return to the chart paper area. When the pen reaches the outer most circle of
Your Haier ULT must be securely installed on a firm floor. A tilted installation may     the chart paper, it pauses for a moment. If the pen does not match the outer circle of
result in equipment falling causing injury and damage.
                                                                                         the chart marks, you can use the button (#2) or the button (#1) to move the pen to
Your Haier ULT must not be installed in a damp area or an area that can be subject       match the line. This must be done within 5 seconds after the pen pauses. If the
to water spray. A damp or wet unit may cause weakening of insulation which could         calibration is incomplete, repeat the same process until the pen matches the outer
lead to electric shock.                                                                  circle line.
                                                                                         4) Calibration of Temperature Recorder
Never store flammable, explosive or volatile materials in the unit. To avoid potential
explosion or fire, do not use any spray near the unit.

Never store corrosive chemicals with acid or alkaline properties in the unit as they
can lead to damage to internal components of the unit.

Do not use any hard object to explore any openings or gaps such as air ventilation
ports. Accidental contact between the hard object and a moving part may result in
electric shock or injury.

If poisonous, radioactive or other harmful materials need to be stored in the unit,
the equipment should be located in a safe zone. Improper usage of the equipment
with this type of materials may hurt the environment or operator's health.

                                        4                                                                                           21
Optional Accessories                                                                     Proper Usage
1.Temperature recorder
The ULT Freezer is equipped with a 6-inch temperature recorder for the chamber
temperature. When the unit is powered up, the recorder starts working.
                                                                                             If there is leakage of petroleum gas or another flammable gas, close the gas supply
For proper operation of the temperature recorder, please follow the procedures below.
                                                                                             valve and open doors and windows to ventilate the air. Do not plug or unplug your
1.Open the recorder door to access the recorder.                                             freezer unit.
2.Plug in the 9 volt battery located on the upper right corner of the recorder. This
  battery is a standby power.                                                                While the equipment is repaired, take precautions not to inhale any chemicals or
3.Install a new chart by following the diagram below.                                        aerosols existing near the unit. They might be harmful to your health.

                                                                                             Never directly pour water into the unit. The water may cause electric shock or
                 9V battery                                                                  short circuit.

                                                                                             Customers must not dismantle, repair or modify the equipment. Such improper
             Button                                                                          operations may result in fire or personal injury.

                                                                                             Should there be a malfunction in the equipment, power off the unit and unplug the
               Hand                                                                          power cord from power supply. Continuous operation with an abnormal condition
                                                                                             may result in electric shock and fire.
           Dateline                                            Button
                                                                                             In the event there is a power outage and recovery, be sure to wait for 5 minutes
                                                                                             before the unit power is turned back on. This is to reduce the chance of damage to
                                                                                             the compressors and refrigeration system. During a repair operation, power must
         Screw & fixing               Recorder
                                                                                             be disconnected. The power cord should always be protected to avoid damages.

                                            (Figure 5)                                       When unplugging the power cord from the socket, use a firm grip on the plug itself
                                     The Temperature Recorder                                for pulling. Do not pull the power cord as this action may strip the wires off the plug
                                                                                             causing electric shock, electrical short circuit and fire.
2.Power supply
The temperature recorder requires an AC power supply. If AC power supply is                  Maximum loading on the each shelf should be not more than 50kg and total loading
interrupted, the LED of the recorder blinks and the warning indicator turns on. The          for whole unit should be not more than 200 kg.Heavier loads may cause damage to
                                                                                             the shelving system .
temperature recorder can also be operated with DC from spare source battery which
lasts about 30 hours.(Caution: The battery should remain fully charged. If the unit is not
in operation, the battery should be switched off. Ensure that the battery is in good
status as a spare power source.) If power fails, the LED of the temperature recorder
blinks until AC power is supplied or spare power source is connected. The LED
indicator will blink when the power in the battery is low.
Replacement of Recorder Battery
When the green LED on the recorder flashes, there are two ways to inspect the unit.
1) Supplementary power supply (9 volt DC)
If the LED light is off and the recorder stops working, it would suggest that there might
be issues associated with the main power supply. Please inspect whether there is a
loss of power, a short circuit, or a loose connection. If there is no issue with the main
power supply and the recorder starts working normally, please install the backup
battery to the recorder. At this time, if the LED stops flashing, the supplementary
power supply is normal. If the LED continues to flashes, it means that the power supply
is under capacity requirement. It is necessary to replace the battery. The LED green
light is off when there is sufficient power to the recorder.

                                           20                                                                                        5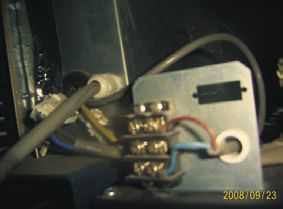
Proper Usage                                                                                      Schematic Diagrams, Refrigeration and Wiring Diagram
Do not touch any electrical components or power cord if your hands are damp or
wet. Such action might lead to an electric shock.                                           Refrigeration diagram
After restarting your unit after a power outage or shutdown, ensure that all settings                                               Filter dryer
are correct. Accidental change in setting may damage the stored products.                                                                          Capillary tube
                                                                                                                   Filter dryer
                                                                                                                                                                                  Evaporator
Do not place any water container or heavy object on top of the unit. A falling object                                                              Cascade condenser,
                                                                                                                   Capillary tube
may injure an operator. If the water spills into the unit, it may damage the insulation
causing electric shock.

Do not climb on top of the unit or place any object on top of the unit.         Falling
equipment may cause injury or property damage.
                                                                                                   Condenser
                                                                                                          Suction
Hold firmly onto the handle to close the door to avoid pinching your hands.                               Accumulator

                                                                                                 High stage compressor                                     Low stage compressor
Do not place any glass container or enclosed container in the freezer.          These                                               Pressure switch
containers may crack at cold temperatures causing injury to operators.

Do not use bare hands to directly handle the stored products. The cold temperature
of the products and the interior wall may cause the skin to burn.

During any repair operation, gloves should be worn to avoid injury by sharp edges                                                   Oil separator

or corners.

The air filter for the condenser should be cleaned regularly. Freezer temperature           wiring diagram
could be compromised.

If a unit is out of service for a long period of time, make sure the power cord is
unplugged. Deteriorated insulation on the power cord may lead to electric shock or
fire.

When a CO2 backup system is activated, the ventilation in the freezer room must be
monitored. Increased CO2 concentration in the air can be harmful and even fatal.

Do not tilt the unit more than 45 degrees when moving the unit.

                                                                                          Note: The way of connection the transformer pin: for 120V: connect 1 with 5, connect 2 with 6; for 240V: connect 2 with 5.

                                        6                                                                                                                   19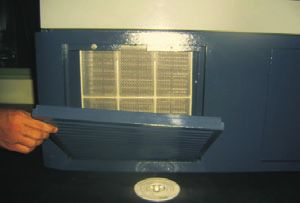
Specifications                                                                                        Pre-Installation Information
Description              Ultra Low Temperature Storage Freezer
Model Description DW-86L628/388/288/386/626                 DW-86W310/420                                      When a ULT unit has been placed in storage or out of service for a long time, its
Exterior wall material Coated cold rolled steel                                                           battery should be tested for low capacity because the battery may have already
Interior wall material Coated zine cold rolled steel                                                      released all of its energy. It does not mean the unit is in a malfunctioning condition.
Inner doors              Aluminum framed PS board                                                         Should this condition occur, please run the unit for about 6 days to fully charge up the
Shelves                  Adjustable stainless shelves                                                     battery.
Porthole for testing 25.8 mm diameter X 1 Located on back wall                                                 When the unit operates normally, the unit frame at the front near the door may be
Insulation               Vacuum insulated with polyurethane foam(non-CFC)                                 slightly warm. This phenomenon is normal because hot tubing is embedded there to
Compressors              High stage/Low stage: hermetically sealed                                        prevent condensation from forming on the frame.
                                                                                                               Before samples are loaded into the unit, make sure that the unit temperature has
Evaporator               Copper tube                                                                      reached the set point then load the samples into the freezer in batches. This method
Condenser                High stage: Finned coil     Low stage: tube in tube heat exchanger               can reduce the temperature rise as the load is being introduced.
Refrigerant              R134a     R404a   R290       R23                                                      The temperature display indicates the temperature where the temperature sensor is
Temperature controller   Microprocessor controller                                                        mounted inside the unit chamber. Temperature uniformity within the chamber may vary
Temperature display Digital display                                                                       from the sensor location due to loading patterns or insufficient temperature stabilization
Temperature sensor       RTD Pt 100 ohms                                                                  time.
Alarm device
                         High temperature alarm, low temperature alarm, power outage alarm, ambient            An access port is installed in the back wall of the unit which can be used as the
                         temperature alarm, dirty condenser alarm, battery alarm, voltage alarm
                                                                                                          through hole for the thermocouple wires during testing and validation . After all test
Remote alarm
terminals                Maximum load is 24 VDC at 1A                                                     wires are let through the access port, make sure that the gap in the port is sealed
Battery                  Rechargeable 12 VDC, automatically rechargeable                                  properly with insulation materials. Otherwise, the unit temperature may not come down
Accessory                Defrost scraper                                                                  to the desired temperature. The port ring in the outer wall can also accumulate frost
Note: design parameters may vary. No further notice is available.                                         and ice.
Technical data                                                                                                 When cleaning the unit, mild or neutral detergent solution should be used. (Non-
                                                                                                          diluted cleaning chemicals can damage the plastic portion of the unit. For directions on
                                                                                                          making a cleaning solution, please refer to the detergent section in the instructions).
                                                                                                          Never use a hard wire brush, acid, gasoline, detergent powder, polishing powder, or hot
                                                                                                          water to clean the freezer as these tools and materials can damage the powder coating
                 L                                                                                        and surface of the plastic. Particularly, never use gasoline or a solution with volatile
                                                                                                          chemicals to clean plastic or rubber parts.
                                                                                                               After the freezer runs for some time, a layer of frost usually forms on the interior
                                                                                                          liner and inner doors. When this layer of frost gets too thick, it can negatively impact
                                                                                                          the refrigeration performance of the unit. Energy consumption can increase. If the
                                                                                                          thickness reaches about 5 millimeters, please use the provided scraper to remove the
                                                                                                          frost.
                                                                                                               Before removing the frost, temporarily transfer the stored samples to another
Note: At 25 ambient, the unit's maximum cold temperature can reach -86 .                                  freezer. This reduces the chance of property loss due to rising temperatures.
Packing list                                                                                                   Behind the interior walls, there are many refrigeration tubes. Do not use a knife, an
                                                                                                          ice pick, or a screwdriver to cut ice and frost. This can potentially damage not only the
                                                                                                          liner but also the refrigeration tubes.
                                                                                                               If the freezer is not in use for a long time, please turn off the power and switch off
  Key                          /              /                 /              2              2       /   the backup battery. The power cord should be unplugged.

                                                             18                                                                                       7
Installation                                                                                     Recycle Rechargeable Battery

                                                                                               The Haier freezer is equipped with a rechargeable battery. This battery is recyclable.
 Environment
                                                                                               When the battery reaches the end of its life, please contact a local recycling
1.Ambient temperature: The Haier ULT is designed to operate between 5               to 28      organization for inspection or properly discard the battery.
     .The maximum ambient temperature is 32 . For best results, the operating                  1.Location of the battery
  ambient should be in between 18       to 25 . If necessary, use an air-conditioning          The battery in the freezer is for the power outage alarm. It is located inside the control
  system to achieve the required ambient condition.                                            box in the lower left behind the panel.
2.Relative humidity in environment: At a normal temperature, the maximum relative
  humidity should be less than 80 percent. At an environment of 32 , the maximum
                                                                                               Warning       There are high voltage components in the control box. To prevent
  relative humidity is 57 percent.
3.The intended location should be low in dust count.                                           electric shock, a qualified technician or engineer should open the cover.
4.The intended location should be vibration and shock free.
5.The highest elevation the unit can work safely in is 2,000 meters from sea level.
6.Input voltage should be within 220 or 120 VAC 10 .                                           2.Removal of the battery
                                                                                                 Turn off the power to the unit and unplug the power cord from the socket.
Notes: 1. An ultra low temperature freezer is usually sensitive to its operating                 Use a screwdriver to remove the screws on the side panel and take down the side
environment. If a unit is installed outside the conditions mentioned above, it cannot            panel.
operate reliably. Please improve the environmental conditions before using the                   Use the screwdriver to remove the cover for the control box.
equipment.                                                                                       Remove the bracket that fastens the battery. Remove the battery.
2. It is prohibited to use the unit in an outdoor place. After the unit is rained on, there      Follow regulations to recycle the battery or discard it properly.
is a danger of electric shock.
Location for installation                                                                       Caution
For the equipment in order to achieve an optimal operation condition, an intended               When changing the battery, you must make sure that the brown wire connects to
installation location should satisfy the following requirements.                                the positive of the battery, and the blue wire connects to the negative of the battery.
1.Do not install the unit in a room where there is little room to work on the unit should       The polarity must not be reversed. Incorrect polarity can damage the charge board
  there be a malfunction. The doorway should be large enough for the unit to freely             so that it cannot charge the battery.
  enter or exit the room if necessary. This is to allow the unit be repaired easily to avoid
  damage to property.
2.There should be at least 30 centimeters space all around the unit for good ventilation
  for heat removal.
3.The location for installation should be flat and firm.                                        Brown wire for the positive
                                                                                                terminal of the battery
4.There should be good ventilation and no direct sunlight.
5.The freezer unit cannot share the same power socket with another piece of
  equipment. The power plug should be securely connected with the power socket.
6.The power cord for the freezer should not be twisted or pinched.
7.If there is a need to extend the power cord, the extension should be rated for 220
  VAC at 16 A and 120 VAC at 20A .
8.Before using the freezer, check the voltage supply. A voltage stabilizer to deliver 220
  or 120 VAC ±10 percent is recommended for areas where the voltage is known to be                Blue wire for the negative
  unstable. The voltage stabilizer should be rated at least 4 kilowatts.                          terminal of the battery
9.A proper grounding terminal must be guaranteed.
10.If the power socket is connected with a ground terminal, make sure to inspect it for
    proper connection before using the equipment with it.
11.If the socket does not have a ground connection, it must be installed by a qualified
    technician.
                                             8                                                                                             17
Troubleshooting Guide Initial Loading
Should there be any malfunctions in the system, please attempt to answer the Installation
following questions before notifying maintenance or calling Haier Equipment & 1.Remove all packing materials and straps.
Instrument Service Center 2.Adjust support legs
Rotate the leveling legs clockwise to extend them out to anchor to the floor to ensure
Freezer does not start up. the unit does not move while in usage.
Is the power supply normal? Has the main power switch been turned on yet?
Is the voltage supply too low?
Is a larger amount of load placed into the unit at one time? Leveling
Leveling leg
leg
Freezer's refrigeration ability is reduced.
Is the environment temperature too high?
Are the inner doors and outer door closed properly? Does any ice and frost damage
the seal between the door and the frame?
Is the condenser filter clogged? 3.Grounding
Is the temperature setting correct?
Is the freezer far away from any direct sunshine? Warning A socket with proper grounding must be used for the equipment. If
Is the freezer near any heat source? the socket is not grounded, an upgrade of the power socket to include grounding
Is the porthole plug installed in the porthole with proper insulation materials? must be done by a qualified technician. Do not use gas lines, water mains, telephone
Has the freezer been loaded with too many non-frozen samples within the last few lines or lightening rods as the grounding device as they can lead to electric shock.
hours? If so, the problem is temporary. You can set the temperature to a higher After the unit's power cord is plugged into the power socket, the plug must be easily
value to let the freezer cycle at temperature then gradually lower the set point accessed. This allows a quick disconnect of the unit from the power supply in case of
temperature until it reaches the desired temperature. an emergency. The condenser inlet must not be blocked at anytime.
Test and adjustment
The unit is noisy. When the unit is started the first time, please follow the procedures below.
Is the unit set on a firm floor? 1.Leave the unit standing in its intended location for at least 24 hours before
Does the exterior of the unit touch any objects? switching the power on.
Is the freezer unit leveled with the leveling legs? 2.While keeping the unit empty, plug in the power cord to a dedicated power socket
Does the freezer operate in a low temperature zone? If the load is heavy, and the that meets all requirements.
cabinet temperature is warm, the unit may emit noise. The noise level would 3.Please turn on the power switch for the rechargeable battery located on the
decrease as the cabinet temperature gets colder. control box in the back the unit. This control box is visible from the back of the unit. If
Is the noise emitted from the compressors? ULT compressor noise tends to be this switch is in the "OFF" position, there will be a low battery alarm during functional
higher than that of a household refrigerator unit. test.
The noise might be a crackling sound. This is probably the result of contraction of 4.If the unit has a backup cooling system, turn off the backup system.
internal mechanical parts due to rapid cooling inside the equipment. Stepwise 5.If the alarm buzzer sounds, press the cancel button to silent the alarm.
pulldown in temperature with slower temperature change can reduce this noise. 6.Set the unit to desired temperature:Do not load the unit with any samples. Power
up the unit to let it run down to -60 . Let it run at -60 for 8 hours then lower it to -
80 . Observe the unit performance for 24 hours for normal cycling to ensure it is
working properly.
7.Once the unit is confirmed to operate properly, it is ready to be loaded with
samples. In principle, the freezer unit should be set at about 3 above the desired set
point. For example, if the storage temperature is -60 , set the unit at -57 . Load the
unit to 1/3 of the unit's capacity. Make the unit is capable of cycling for more than 8
hours.
8.If the unit has a backup cooling system, turn on its control.
16 9Initial Loading Routine Maintenance
Warning:To prevent electric shock or injury to operators, the AC power supply to the freezer
Warning must be disconnected completely before any repair and maintenance work is to be performed.
During any repair maintenance work, do not breathe in medical particles or aerosols near the
Your Haier ULT unit should be cared for by dedicated personnel. Every 2 to 4 equipment as they might be harmful to your health.
hours, the unit's working status should be inspected and recorded on a daily basis.
Should there be a malfunction in the unit, the freezer temperature rises. If the Cleaning the freezer
problems cannot be corrected in a short time, please remove the stored samples; Clean the unit once a month. This can help the exterior look new.
move them to another unit that meets the temperature requirement to avoid Use a dry cloth to wipe off loose dust inside and outside of the freezer. If the unit is rather dirty,
potential damage of property. use a clean cloth soaked with neutral detergent to clean the unit. Then use a dry cloth to wipe
Before loading the samples into the unit, make sure to check if the required off the left over detergent solution. Non-diluted detergent can harm plastic surfaces. Please
storage temperature matches the temperature capability of the freezer. This is to follow the instructions on how to mix a detergent solution.
avoid any property damage due to insufficient storage temperature for the Do not pour water directly onto the exterior and interior of the unit. Water can damage the
samples intended to be stored in the freezer. electrical insulation causing malfunction.
Because it takes time for refrigeration temperature to reach the stored samples, Compressors and other mechanical parts are hermetically sealed. They do not need
there is normally a temperature discrepancy between the actual shown lubrication.
temperature and the set point. This is a normal phenomenon. The lower the set Clean the frost and ice off the unit once a month. Also, clean the condenser filter once a month.
point is, the smaller this temperature discrepancy becomes. Clean the condenser filter
When the control panel shows an alarm signal for Hot Condenser, the alarm light flashes. The
condenser filter must be cleaned to avoid compressor overheating and to improve refrigeration
efficiency. Even if the light is not on, the filter should still be
Filter
Caution cleaned once a month. To clean the filter, follow the procedure
screen.
below.
All ultra low temperature storage units are low temperature storage equipment. It 1.Pull off the front grill cover. Front protection
is prohibited to load an excessive amount of samples into the unit at one time. 2.Pull out the filter screen. panel for refrigeration
3.Use water to wash the filter screen. compartment
The compressors run for a long period of time without stopping. The freezer
temperature may not decrease, and the compressors can become overheated. 4.Install the screen back in its original position and close the cover.
Samples must be loaded in batches, and in stepwise decreasing temperature 5.If the Hot Condenser light is on before cleaning, check the light to make sure the light is off after
setting. The process should be repeated until the final temperature is reached. cleaning.
Do not use any unauthorized mechanical means to remove or defrost the unit. Defrost the interior
Do not damage the refrigeration circuit. Frost usually forms in the upper portion of the unit and the on the inner doors. Frost and ice can
Do not use any non manufacturer-approved electrical components in the freezer. form in between the door gasket and frame to form an air gap. It can decrease the refrigeration
effect of the unit. Follow the procedure below to defrost the interior doors using the plastic scraper.
The first step is to move the samples to another freezer before the procedure. Do not use any
sharp tools such as knife or screw driver to defrost.
1.Remove the samples from the unit that needs to be defrosted. Move them to another unit or a
Operation after a power outage container with a CO2 backup system for temporary storage.
2.Turn off any backup refrigeration system if there is one.
Your Haier ULT freezer control setting is stored in its memory system. Should there be 3.Turn off the power supply.
a power outage and the power recovers, the unit can resume its operation based on the 4.Open the outer door and inner doors to let the unit thaw for a period of time.
prior set control settings. 5.Use a dry cloth to soak up and remove the water on the floor of the unit.
6.After defrosting the unit and cleaning up the water, restart the unit.
7.Load the samples back into the unit after it reaches the set temperature.
8.Turn on the backup refrigeration system if necessary.
Changing battery
The battery that supports the power outage alarm is a consumable item. The life expectancy for
the battery is about 3 years. If the battery is more than 3 years old, the battery should be replaced
because the alarm function may not work properly , and the stored capacity could also be reduced.
To do so, please contact Haier Equipment and Instrument Service center.
10 15Display and Alarms Temperature Adjustment and Setting
Notes:
A flashing alarm light cannot be cancelled unless the root cause for the alarm is eliminated. Alarms Silence
The buzzing alarm can be temporarily silenced for 30 minutes by pressing the alarm silence
button. However, if the problem is not fixed, the buzzer alarm will resume after 30 minutes.
-80
The freezer is equipped with a rechargeable battery controlled by a power switch. Before Run
Voltage Regulator SET
operating the freezer, this switch must be turned on. Once the unit is plugged into the
specified voltage, the unit operates to charge the battery. When there is a power outage, the V
battery sustains the temperature display. If the battery voltage is less than a threshold, the ULT FREEZER
temperature display turns off. While the battery is still capable of providing power to the
display, the temperature display can be turned off by unplugging the power cord and turning
off the battery control switch. The procedure to change the freezer temperature is as follows.
The freezer is also designed to auto-adjust the inner temperature set point at high ambient.
1.In order to change the setting of the freezer, the freezer's control must be unlocked
When the ambient temperature is warmer than 32 and the set point temperature is set to be
lower than -82 , the set point temperature will automatically default to -82 . If the ambient first. The temperature display flashes when the up or down arrow is pushed. Push the
temperature is equal to or cooler than 32 , the set point will resume to the intended inner set up or down arrow again to change the display to security code mode then enter the
point. This feature extends the life expectancy of the freezer. initial value 06. Push the SET key for 5 seconds. The locking sign turns off. This
means the unit is in unlocked mode. Push the SET key again to select the mode for
Buzzer alarm resumption after cancellation the temperature set point value, high temperature alarm value and low temperature
alarm value. The matching indicator lights up as each function is chosen.
When the unit is in the alarm mode, you may press the Silence key to stop the buzzing of
the alarm. However, the remote alarm cannot be cancelled. If the alarm condition still persists 2.Freezer temperature set point: Push the SET key. Once the Inner Temp.indicator
after 30 minutes, the buzzer alarm resumes automatically. is on, the temperature set point area flashes. To change the temperature set point,
push the or key intermittently to increase or decrease the temperature
Remote alarm terminals setting by 1 . After the adjustment is done, do not make any further changes for 10
seconds. The temperature display stops flashing. The unit enters the locked mode.
Remote alarm terminals are located in the machine compartment in the back of the unit. The
alarm signal is delivered via the terminals. The terminals are rated for 24 VDC at 1 A. The power
The temperature range is -10 to -86 .
for remote alarm system must be connected with the wire or battery with UL certificate.
3.Setting of high temperature alarm:Push the SET key to turn on the High Temp.
Terminal output Alarm light. The temperature display flashes. To change the high temperature alarm of
Under normal operating conditions, the terminals with wires are open. When the unit is in the the unit, push the or key intermittently to increase or decrease the
alarm mode, the two terminals with wires are in the closed mode. The following schematic is a temperature setting by 1 . After the adjustment is complete, do not make any further
wiring diagram. changes for 10 seconds. The temperature display stops flashing. The unit enters the
locked mode. When the freezer temperature is warmer than the high temperature
Remote alarm terminal with brown wire
alarm set point, the unit's alarm sounds, and the high temperature alert light flashes.
Remote alarm terminal with blue wire High temperature alarm set point can only be set to a value of at least 5 warmer than
the set point temperature of the unit. The high temperature alarm value cannot be set
to exceed the maximum limit.
DC power source Alarm device
Connect with remote
alarm terminal with brown 4.Setting of low temperature alarm: Push the SET key to turn on the Low Temp.
wire
Alarm light.To change the high temperature alarm of the unit,push the or
Connect with remote alarm key intermittently to increase or decrease the temperature setting by 1 . After the
terminal with blue wire
adjustment is complete, do not make any further changes for 10 seconds. The
temperature display stops flashing. The unit enters the locked mode. The low
14 11Temperature Adjustment and Setting Display and Alarms
Display and alarm
When the freezer is powered up, the display will show the actual freezer temperature,
temperature alarm set point can only be set to a value of at least 5 colder than the
set point temperature, and current voltage.
set point temperature of the unit. It cannot be set to the lowest temperature limit.
The display shows the following indicator lights.
Locked indicator:When the light is on, it means all set values are in the locked mode.
5.Setting the security code: When the unit is first setup to operate, the security
This is to prevent erroneous operations.
code to unlock the control is 06. After unlocking the unit, simultaneously push SET
Network indicator:The indicator suggests that the network is in working mode.
and Silence for 5 seconds. The display will show 06. Use the and
Run indicator:When the light is on, it means the compressors are in working mode.
key to change the security code. The choices are from 05 to 30. After a number is
Regulator indicator:The lit indicator means the voltage stabilizer is in working mode to
chosen, do not touch the unit for 5 seconds. The control system will enter the locked
boost or buck the voltage.
mode. The new code is effective.
Backup System indicator:The lit indicator means that the backup cooling system is in
working mode.
6.Setting the Startup delay timer: In order to reduce the startup power surge after a
power outage, your Haier ULT incorporates a startup delay feature. This feature can Alarm Conditions
alter the startup sequence of the compressors in the freezer. After the control is Alarm Alarm Trigging Condition Indicator Buzzer Sound
unlocked, simultaneously push SET key and key for 5 seconds. The
High When this indicator is on, Buzzer delays 15
temperature display shows the time delay to be 01 for 1 minute for the high stage Temperature the units temperature Alarm indicator flashes. minutes to sound
compressor to start after power up. This delay can be changed by pushing the Alarm reaches the warm alarm limit. intermittently.
or key to change the value from 1 minute to 10 minutes. The default value for Low When this indicator is on, Buzzer delays 15
Temperature the units temperature Alarm indicator flashes. minutes to sound
this delay is 1 minute. If this time delay startup is set at more than 5 minutes, the Alarm reaches the low alarm limit. intermittently.
equipment would take too much time to pull down the freezer temperature. If the power Power Failure Alarm indicator flashes. Buzzer delays for 1
source has sufficient capacity, there is no need to change the default value. Alarm Equipment loses power. Display shows temperature minute to sound
and blank interchangeably. intermittently.
7.Alarm test and low battery test: When the ULT unit is powered up,
simultaneously press the "Up" arrow and "Alarm Cancel" buttons for 5 seconds. The Voltage Improper Buzzer delay for 1
Alarm Supply voltage
Alarm indicator flashes. minute to sound
buzzer alarm should sound and the alarm indicator should flash. At this condition, the 6 exceeds the high or low limits.
intermittently.
second test procedure starts. If the battery capacity is low, the low battery light indicator
1.Condensers filter element
will flash 6 times. If the battery is at full capacity, the low battery light does not light up Hot Condenser
is clogged. Buzzer sounds
Alarm Alarm indicator flashes.
or flash. After 6 seconds, start the unit up. All indicators will light up for 6 seconds 2.Ambient emperature is too intermittently.
high.
without flashing. All electronic display windows will indicate a digit of 8 for 6 seconds.
When ambient
When this is done, all display functions work properly. High Ambient Ambient Temperature temperature exceeds
Temperature Alarm indicator flashes.
exceeds 32 . 38 , buzzer sounds
Alarm intermittently.
Main cabinet temperature Alarm indicator flashes, temperature Buzzer sounds
Probe Failure display alternates to show E2 and
control sensor fails. intermittently.
Alarm cabinet temperature.
Alarm indicator flashes, temperature
Condenser sensor fails. display alternates to show E1 and Buzzer sounds
cabinet temperature. intermittently.
Alarm indicator flashes, temperature Buzzer sounds
Ambient sensor fails. display alternates to show E0 and intermittently.
cabinet temperature
Alarm indicator flashes, temperature Buzzer sounds
Heat exchanger sensor fails. display alternates to show E3 and intermittently.
cabinet temperature.
Low battery Battery capacity runs low or During the test, the alarm
Alarm battery switch is not turned on. indicator flashes.
----
12 13You can also read