Halloween Costumes
 from a Pillowcase
←
→
Page content transcription
If your browser does not render page correctly, please read the page content below
Halloween Costumes from a Pillowcase

Basic Dress Supplies:
Basic Dress Instructions:                               Baby Lock Sewing Machine
 1. First remove the end seam and trim out a curved     Purchased standard pillowcase
    section on each side to become the armholes.        3-4 yard spool of decorative ½” wide ribbon
 2. Measure down 4 to 5” on each side and mark with     1 package single fold bias tape
    chalk. Then measure over 2 ¼” from the side and     Aerofil all-purpose thread to match fabrics
    mark with chalk.                                    Pins
                                                        Seam ripper
                                                        Chalk
                                                        Tape measure

                                                       Gathered Waistline Instructions:

                                                       11. Measure down and mark the waistline for
                                                           the dress using chalk.
 3. Draw in a slight curve from each of the marks.     12. Make a waistline casing by stitching both
                                                           edges of single fold bias tape to the
                                                           waistline mark.
                                                       13. Do not overlap the ends, leaving a small
                                                           gap allows you to run a ribbon through the
                                                           casing.
                                                       14. Gather the waist by running a ribbon
                                                           through the bias tape casing and tie into a
                                                           bow.

 4. Starting with the lowest part of each armhole. Fold
     under the raw edge and pin in place.
 5. Thread the grace machine.
 6. Turn under the edges of the armholes ¼” each turn to
     encase the raw edge, pin and topstitch it down.
 7. Fold under 1” the center section between the
     armholes to form a casing.
 8. Change to a contrasting thread and use a decorative
     stitch to sew down the casing and add some decoration
     to the neckline of the costume.
 9. Repeat this for the casing on the back.
     Optional: Add additional decorative stitches along the
     hemline of the pillowcase.
 10. Thread your neckline casings with ribbons and tie the
     ribbons into bows at the shoulders.
                                                    2
“Happy Witch”

     Supplies:

     Black pillowcase
     1/4 yard stripe fabric -cut into 1 ½” x width of fabric
     strips
     3.5" x 3.5 "square patch from purple spider web fabric
     3.5" x 3.5" square patch from green spider print fabric
     3.5" x 3.5" square patch from striped fabric

     Instructions:

          1. Follow the directions to make the basic dress.
          2. Use the hemmed edge of the pillowcase as
             the hem of the dress
          3. Cut the hem into 4” deep triangles cut up to
             the stitching of the pillowcase hem.
          4. Add Halloween fabric patches to the side of
             the dress front.
          5. Use the stripped fabric strips to make the
             shoulder ribbons and optional tie belt.
          6. Fold the raw edges on the striped strips to
             the center. Press. Then fold the strip in half
             again. Press and sew the edges together with
             a straight stitch.
          7. Tie a knot at the ends.

      3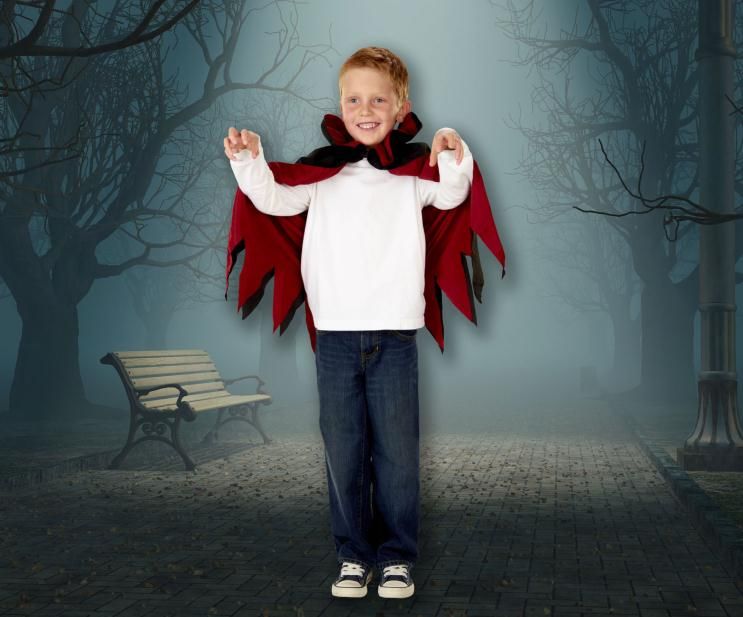
“Gatsby Girl”

Supplies:

Teal standard pillowcase
5/8 inches wide black satin ribbon
3 1/2 yards of 4 inch long black fringe
Madeira Aerofil all-purpose thread to match fabrics

Instructions:

   1. Follow the directions to make the basic
      dress.
   2. Then stitch the rows of satin fringe to the
      dress. The bottom two rows of fringe go all
      the way around the dress. The bottom row
      of the fringe should be even with the
      pillowcase edge.
   3. The top two rows of fringe are only on the
      front of the dress. The top row is attached
      along the stitching line of the neck casing.
   4. The second row on the top will attach
      straight across the front of the bodice
      section of the dress so that it spans from
      armpit to armpit.

                                                      4
“Fairy Princess”

Supplies:

Pink standard pillowcase
1 package pink single fold bias tape
3-4 yard spool of decorative ½” wide green    Instructions:
ribbon
1 ½ yards green sheer fabric for the petals       1. Follow the directions to make the basic
Madeira Aerofil all-purpose thread to match           dress.
fabrics                                           2. From the sheer fabric cut leaf shapes on
                                                      the fold in a large and small size.
                                                          Large leaf =11” long x 6” wide
                                                          Small leaf= 6” long x 4”wide
                                                  3. On the four small leaf shapes fold them in
                                                      half.
                                                  4. Using a decorative or straight stitch sew ½”
                                                      from the fold to create a casing. These will
                                                      be for the shoulders
                                                  5. Measure down and mark the waistline for
                                                      the dress using chalk.
                                                  6. Fold the large leaf shapes in half and stitch
                                                      along the bottom of the chalk line.
                                                  7. Add a second layer of the leaf over-lay as
                                                      desired.
                                                  8. Follow the Gathered Waistline Instructions
                                                      to complete the steps for adding a waistline
                                                      to the dress.
                                                  9. Thread your neckline casings with ribbons
                                                      and add two leaf shapes to each shoulder.
                                                      Tie the ribbons into bows at the shoulders.
                                                  10. Accent your fairy costume with additional
                                                      ribbons, beads or crystals and don’t forget
                                                      to add some wings!

                                              5
“Indian Princess”

 Supplies:

 Tan standard pillowcase
 Tan seam binding for ties and belt
 1/2 yard 5/8 inch wide decorative ribbon
 1 1/4 yards of 2” wide woven patterned ribbon
 Assorted color bag of pony beads
 2 yards of 2” wide tan faux suede fringe

Instructions:

   1. Follow the directions to make the basic
      dress.
   2. Stitch the lower fringe all the way around the
      dress along the pillowcase hemline.
   3. Measure up from the hem approximately 9”
      and stitch the wide woven ribbon all the way
      around the dress.
   4. The 5/8" ribbon and a row of suede fringe is
      attached at the top along the stitching line of
      the neck casing.
   5. String five pony beads of assorted colors
      onto each end of the shoulder ties and on
      each end of the belt.

                                                        6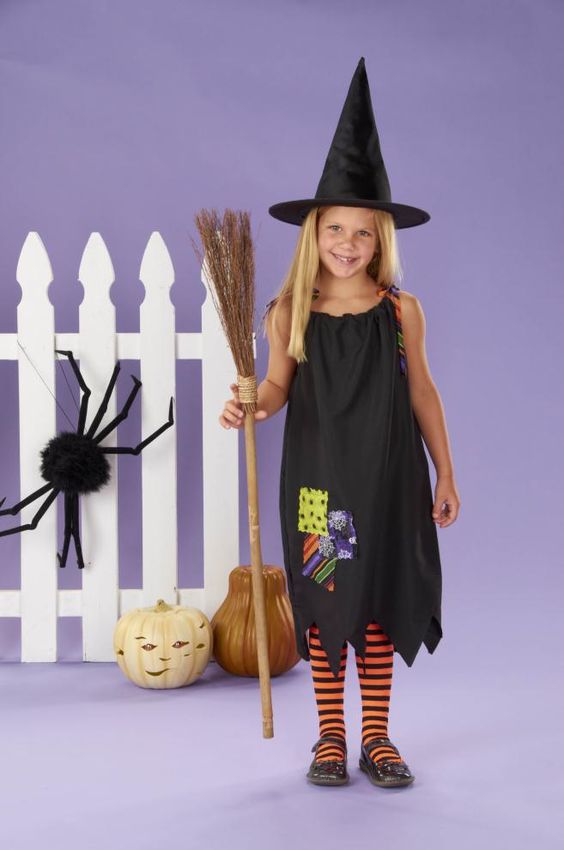
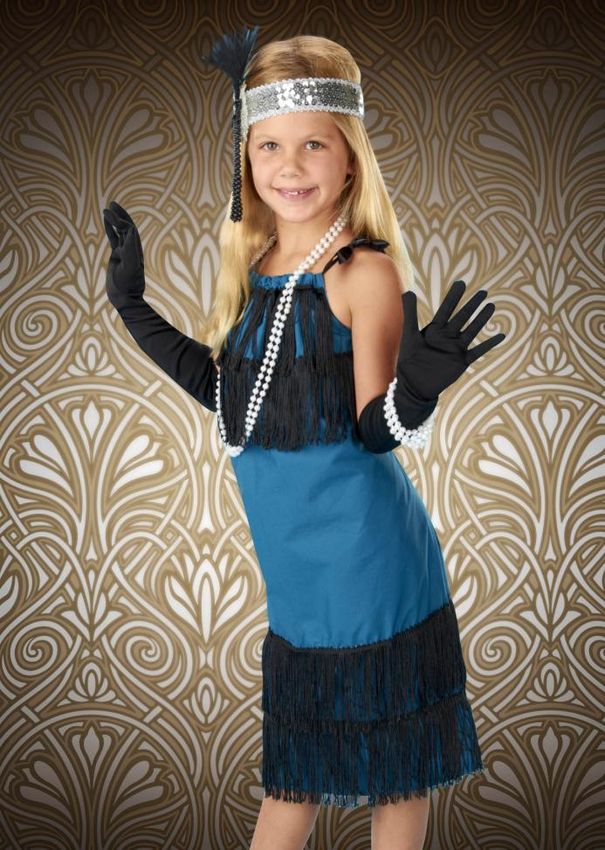
“Vampire Cape”

Supplies:

Two standard pillowcases: 1 red and 1 black
                                              Instructions:
1/2 yard of 3/8 inch wide black elastic
1/4 yard of 1 inch wide ribbon
                                                  1. Cut the pillowcases and open out flat.
Hook and loop dots
Madeira Aerofil all-purpose thread to match       2. Stitch the red pillowcase to the black
fabrics                                              pillowcase at the finished hem edge. The
                                                     hem now becomes the collar and the
                                                     stitching line of the hem becomes the
                                                     neckline edge.
                                                  3. Gather along the pillowcase hem stitching
                                                     line through both layers.
                                                  4. Then gather this neckline more by attaching
                                                     it to the elastic using a zigzag stitch.
                                                  5. Tack the ribbon to one side of the neckline.
                                                     Add a hook and loop dot to the end of the
                                                     ribbon. At the other side of the neckline add
                                                     the other side of the hook and loop dot.
                                                     Note: For safety reasons a ribbon with a
                                                     hook and loop dot are used to secure the
                                                     cape at the neckline, rather than the cape
                                                     tying at the neck.
                                                  6. At the other end of the pillowcases (what
                                                     was originally the seam end ) Cut into 6"
                                                     deep triangles to form a jagged edge.

                                              7
“Superhero Cape”

Instructions:                                          Supplies:

   1. Cut the pillowcase and open out flat.            Red standard pillowcase
   2. Clean finish the open sides with a narrow        18” of 1/4 inch wide elastic
      hem.                                             1/8 of the yard of red ribbon
                                                       Hook and loop dots
   3. Fold the top edge over creating a half inch
                                                       ¼ yard white cotton
      casing.                                          ¼ yard yellow cotton
   4. Run the elastic through the casing and           White, yellow and blue embroidery thread
      secure it at both ends of the casing.            Madeira Aerofil all-purpose thread to match
   5. Tack the ribbon to one side of the neckline.     fabrics
      Add a hook and loop dot to the end of the
      ribbon.
   6. At the other side of the neckline add the
      other side of the hook and loop dot.
      Note: For safety reasons a ribbon with a
      hook and loop dot are used to secure the
      cape at the neckline, rather than the cape
      tying at the neck.
   7. Draw and design your own superhero
      emblem and applique it to the center back.
   8. Use an embroidery machine to create your
      emblem. Use the framing patterns built into
      the machine to create a shield design.
      Enlarge the frames to the maximum
      embroidery hoop size for your machine. You
      can combine other designs from your
      collection such as a star and use the built-in
      alphabet letters for the center of the design.
   9. Embroidery the design to the center back to
      the cape.

                                                   8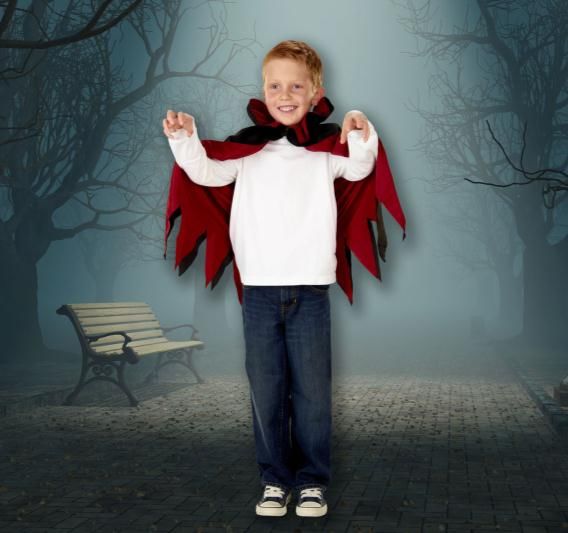

You can also read