HEALTHROSTER V10 HEALTHROSTER WORKSHOP 4 ROSTER CREATOR TRAINING MANUAL (V10) - USER TRAINING GUIDE
←
→
Page content transcription
If your browser does not render page correctly, please read the page content below
HealthRoster V10

Healthroster Workshop 4
Roster Creator
Training Manual (V10)

User Training Guide

Version      ALL1.0
Status       First Release
Issue Date   January 2014

1|Page
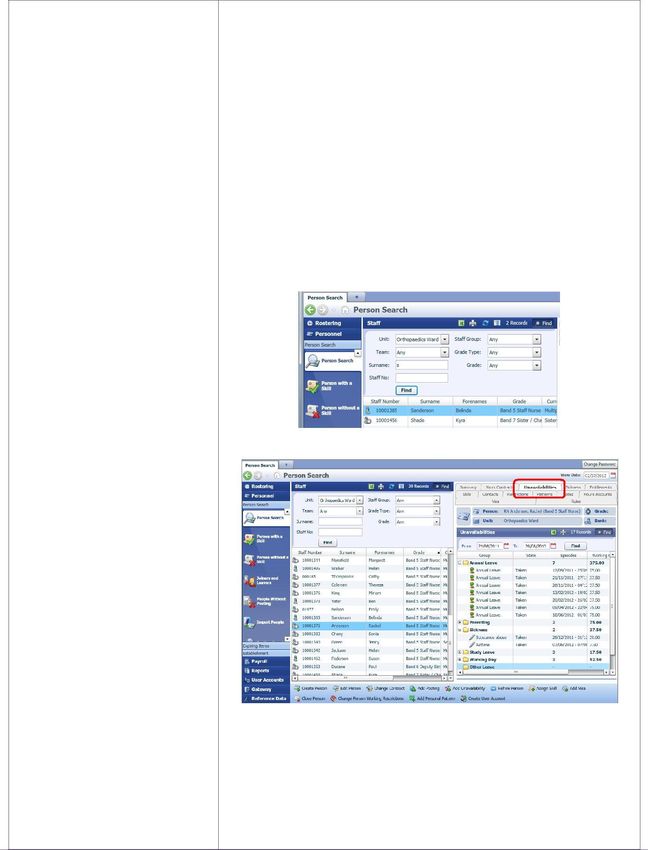
Table of Contents
Table of Contents ............................................................................................................................. 2
Foreword .......................................................................................................................................... 4
1       Navigating Healthroster .......................................................................................................... 5

Logging In To HealthRoster ............................................................................................................. 5

Basic Options and Functions ........................................................................................................... 5

Navigating Tasks and Shortcuts ...................................................................................................... 6

Opening Multiple Windows .............................................................................................................. 8

Using the Calendar           ........................................................................................................................ .9

Using Filters ................................................................................................................................... 10

Changing Visible Columns ............................................................................................................. 12

Exporting Data to Excel ................................................................................................................. 14

Using the Unit Summary ................................................................................................................ 15

Navigating to a Roster ................................................................................................................... 16
2       Personnel Management: Viewing & Editing People Data ...................................................... 18

Personnel Master Group Overview ................................................................................................ 18

Searching for a Person .................................................................................................................. 19

Details Pane – Person Records ...................................................................................................... 19

Editing Person Details ................................................................................................................... 19

Viewing Work Contract .................................................................................................................. 22

Adding Skills .................................................................................................................................. 24

Editing Skills .................................................................................................................................. 27

Deleting Skills (From a Person) ...................................................................................................... 28

Adding Skills in Bulk ...................................................................................................................... 30

Viewing Individual Unavailability Records ..................................................................................... 32

Adding Unavailability in Person Search ......................................................................................... 33

Editing Unavailability in Person Search ......................................................................................... 38

Editing Annual Leave and Study Day Requests ............................................................................. 43

2|Page
Deleting Unavailability in Person Search ....................................................................................... 47
3       Managing Teams ................................................................................................................... 49

Viewing and Assigning People to a Team - Establishment Management ....................................... 49
4       Rostering .............................................................................................................................. 53

Add Roster from Template ............................................................................................................. 53

Navigating the Roster Screen ........................................................................................................ 55

Show ing Vacancies / Viewing Vacant Duties                         ................................................................................ 60
Assign Duties Manually ................................................................................................................. 61

Assigning Long Day Shifts ............................................................................................................ 62

Removing a Duty from a Person .................................................................................................... 62

Recording a Duty as a Request ...................................................................................................... 63

Running Auto Roster ..................................................................................................................... 64

Clearing Duty Assignments ........................................................................................................... 65

Adding Notes to Roster .................................................................................................................. 67

Setting Request Period .................................................................................................................. 68

Swapping Duties ............................................................................................................................ 69

Adjust Duty Times.......................................................................................................................... 69

Re-Testing Rules (Bulk Check) ...................................................................................................... 70

Viewing the Roster Analyser .......................................................................................................... 71

Partially Approve a Roster ............................................................................................................. 72

Fully Approve a Roster .................................................................................................................. 73

View Staff Leagues ........................................................................................................................ 74

View 1 Week Work Roster .............................................................................................................. 75

View Four Week Work Roster......................................................................................................... 76

Ward/Unit Manager Work Report.................................................................................................... 78
5       Reporting Options ................................................................................................................. 79

Daily Staffing.................................................................................................................................. 79

Sickness Reports ........................................................................................................................... 79

Skills & Certificates Reports .......................................................................................................... 80

Understanding Your Roster Timetable…………………………………………………………                                                                                         81

3|Page

Foreword
Foreword

This Training Support Guide includes information regarding the creation and management of rosters
using HealthRoster v10. Key topics and functions are covered, enabling Roster Creators to practice the
steps and functions shown to them during implementation and training sessions. It is a complete
overview for those individuals who will be responsible for creating and managing rosters for their
ward/unit/team.

This document is designed to support Roster Creator’s post-training and on-going. It is designed as
a reference guide to be used with live data, but can also be used with a training database for on-
going training if required.

4|Page
1 Navigating Healthroster
The following sections cover key navigational functions.

LOGGING IN TO HEALTHROSTER

1. Double click on the icon
   located on the desktop
2. Enter your Username
3. Enter your Password
4. Click on Login

BASIC OPTIONS AND FUNCTIONS

The HealthRoster Screen has a
consistent layout, designed to
help you to navigate to key
tasks and functions.
The View Date and a calendar
icon always appear to the top
right of the screen, as does the
Change Password link
(highlighted opposite).

The name of the current screen
will be displayed on the first
tab to the top left of the
screen, as well as a heading, as
shown opposite.

There are Back (a page) and
Forwards navigation arrows
always displayed to the top left
of the screen, as shown opposite.

5|Page
There is a History drop down list
icon always visible to the top left
of the screen, next to the
navigating arrows (highlighted
opposite).
Click on this icon to see a list
of the screens that have been
visited recently.

There is a Home button always
visible to the top left of the
screen (highlighted opposite).
Click on this button to navigate to
your homepage (this will be the
Unit Summary, by default).

NAVIGATING TASKS AND SHORTCUTS

HealthRoster tasks and functions
are grouped by topic in the Filing
Cabinet. These groups are
consistently displayed to the left
of the screen.

Note: The groups and options
that you can see will vary,
depending on your User
Permissions.

6|Page
Groups of tasks are sorted into
various Drawers. These appear in
dark blue, to the left of the
screen (highlighted opposite).

Groups of task/screen shortcuts
are sorted into various Hanging
Files. These appear in light
blue, to the left of the screen
(highlighted opposite).

Within each Task Group you will
find a number of Paper Copies
(highlighted opposite).
Note: There are small arrows
that allow you to navigate to
further options up and down
the list.

7|Page
OPENING MULTIPLE WINDOWS

It is possible to have several
windows open at the same
time. This makes it much easier
to quickly move from one
screen to another, without
having to reselect groups,
shortcuts, filters etc.

Click on the + tab, next to the tab
for your current screen
(highlighted opposite).

A new window will open (shown
opposite).

Note: This defaults to the View
Rosters shortcut.

You can repeat and open
another window.

To close windows, hover over
the window tab (shown
opposite) and click on the red
cross that appears.

8|Page
USING THE CALENDAR

The calendar is a consistent
feature to the top right of the
HealthRoster view. You can use
it to navigate to rosters and
data past, present and future.
The calendar is always available
in forms where there are fields
which require a date to be
entered.

Click on the calendar icon
(shown below) next to View
Date, to the top right of the
screen (highlighted opposite).

Today’s date will be highlighted
in the calendar.

There are buttons at the
bottom of the calendar where
you can automatically select the
following dates:

        Today
        01/01/1900       (start
        of time)
        31/12/9999 (end of
        time)

Note: The 01/01/1900 is the
start date of the database and
it is used when something has
no definite start date, i.e. it is
assumed it has always existed.

9|Page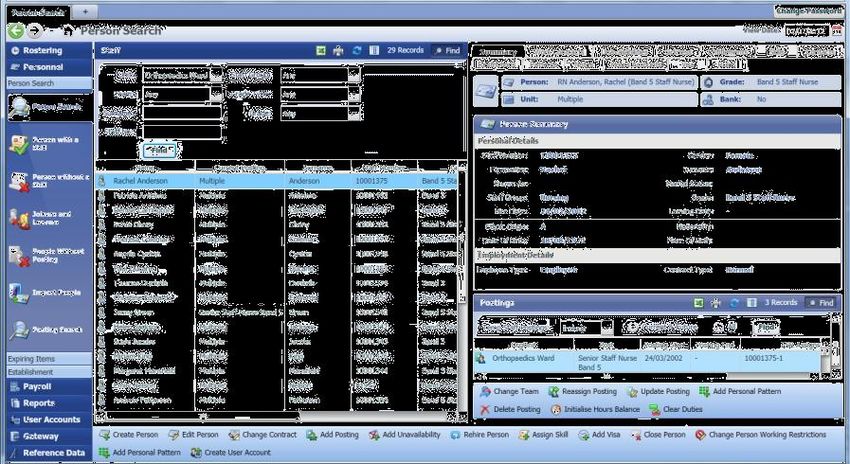
The 31/12/9999 date is used
when something or someone
has no definite end date, i.e. it
is assumed it/they will always
be there, until further notice.

You can click on the arrows
either side to move back and
forth through the months
(highlighted opposite).

You can click on the up and
down arrows to the right of the
year to navigate back and forth
through the years (highlighted
opposite).

You can click on a specific date
in the calendar to select it.

USING FILTERS

Filters are used throughout
HealthRoster to help you to find a
specific record, or a group of
records that match your criteria.

Note: The filter options available
will vary from screen to screen.

10 | P a g e
For example, select the
Personnel master group,
then select the Person Search
task group and shortcut.

Select your ward/unit from the
Unit drop down list by clicking
on the arrow to the right of the
filter field (highlighted
opposite), then click on Find.

A list of all staff on your
ward/unit will be returned.

When you highlight the name of
a person in the returned list, the
Details pane will be displayed to
the right of the screen.

Note: You can use a
combination of filters to make
your search more specific.

If you type one or more
characters in a filter field,
available matches will start to be
displayed.

11 | P a g e
CHANGING VISIBLE COLUMNS

It is possible to change the
columns of data in each screen,
and change the order in which
they appear.
When you change the visible
columns and the order in which
they appear, this becomes your
favourite and will always be the
order of the data display,
whenever you return to the
screen where the changes were
made.

You can change the visible
columns in a screen
wherever you see this icon:

For example, select the
Personnel master group,
then the Person Search task
group and shortcut.

Select your ward/unit from the
Unit drop down list, then click on
Find.

A list of all staff on your
ward/unit will be returned.

12 | P a g e
The Visible Columns icon is
located in the toolbar (highlighted
opposite).

Click on the icon to open a new
window , showing available
options.

Use the scroll bar to view
options (highlighted opposite).

Tick/untick as required.

Note: There are also options to
Select All or Clear All, or
Reset to original settings.

Click on OK to save.

The order of columns displayed
will change.

You can change the order in
which the columns are displayed
by simply dragging them.

For example, drag the
Surname column to the left of
the screen to become the first
column of data, by clicking on
the column heading.

13 | P a g e
EXPORTING DATA TO EXCEL

It is possible to export a list of
data from HealthRoster to Excel,
in order to keep specific records
or create your own reports.

When you navigate to a screen
with filters, and have used them
to search for a record or group
of records, you can export the
displayed data.

For example, select the
Personnel master group,
then the Person Search task
group and shortcut.

Select your ward/unit from the
Unit drop down and click on
Find.

A list of all staff on your
ward/unit will be returned.

The Export to Excel icon is
located in the toolbar above the
filters (highlighted opposite).

Click on this icon.

The data will be exported to a
new Excel spreadsheet, in the
order in which it appears in
HealthRoster.

14 | P a g e
USING THE UNIT SUMMARY

The Unit Summary screen will
be your homepage by default.

You may need to select your
ward/unit from the drop down
list, and click on Find:

Note: Entering the first letter of
the ward/unit will take you to
the full name,
Explore the following areas:
        Reminders
        Roster Problems
        Expiring Items
        Awaiting Approval
        Staff Changes
        Incoming Staff

You can obtain more detail on
some of the items displayed in
the summary, where there is a
... (highlighted opposite).

Click on the ... links to drill
down to more detailed
summaries of the issues/items.

You will automatically be
transported to the appropriate
shortcut or view in HealthRoster.

For example, click on a Reminder
... link (as highlighted above
and opposite) to be taken to
the roster.

15 | P a g e
Or click on the Awaiting Approval Leave Requests ... link (highlighted opposite) to be taken to the Annual Leave and Study Requests screen (below opposite). To return to the Unit Summary screen, simply click on the Back button (highlighted opposite). NAVIGATING TO A ROSTER Select the Rostering master group and the View Rosters task group. Select the View Rosters shortcut (highlighted opposite). 16 | P a g e
Select your ward/unit from the
Unit drop down list and click on
Find.

Note: Today’s date is displayed
by default.

Any rosters for the ward/unit
you have selected, valid for the
View Date, will be displayed,
represented by a purple bar
(highlighted opposite).

Click on the calendar icon to the
top right of the screen to open
the calendar and navigate to the
View Date for the roster you are
looking for.

Click on the + next to the Unit
name to open up the roster.

Note: You may need to click on
the purple Roster Bar to
highlight it and ensure that the
roster opens.

17 | P a g e
2 Personnel Management: Viewing & Editing People Data
This section focuses on the Personnel master group, including how to view and amend/update
staff details.
Note: Your permissions in this area may vary. Some tasks and functions detailed in this section may not
apply to your role, and so you will not be able to see or do them.

PERSONNEL MASTER GROUP OVERVIEW

Click on the Personnel
master group.

Here are up to three task
groups available:

        Person Search
        Expiring Items
        Establishment

Explore the available shortcuts
within each task group.

SEARCHING FOR A PERSON

Click on the Person Search task
group and the Person Search
shortcut.

You will be presented with a
number of filters.

18 | P a g e
Select your ward/Unit from the drop down list. You can enter the first letter of a person’s surname in the Surname field and click on Find. A list of matching records will be displayed. Note: If you leave all filter fields blank and click on Find, a list of all staff on your ward/unit will be displayed. DETAILS PANE – PERSON RECORDS Full details of a record can be displayed and viewed without having to select another option or risk making changes. To view a person’s full staff record in HealthRoster, simply click on their name as listed to highlight it. A Details Pane will appear to the right hand side of the screen. There are various tabs available which enables you to navigate to specific information easily (highlighted opposite). Click on each tab and explore the details held. 19 | P a g e
EDITING PERSON DETAILS

To edit a person’s record, select a
person from the list of people
displayed (simply click on them
to highlight).

Click on the Edit Person action
button at the bottom of the
screen (highlighted opposite), or
right click and select the option
from the menu that appears.

The Edit Person form will open.

You can make changes to
Personal Details on the left hand
side of the screen.

Click Save to save any changes.

You can select an alternative tab
from the top right of the
window, to navigate to different
information (highlighted
opposite).

20 | P a g e
Note: Action buttons relevant to
the screen/tab that are viewing
will be shown at the bottom of
the pane (highlighted opposite).

Select the appropriate action
button for the change you
wish to make – a new window
will appear.

Select the options required
to action the change.

Note: Use the calendar to select
the correct date from which the
change should take effect.

Click on OK.

Click on Save in the main Edit
Person view (highlighted
opposite) and close the window.

21 | P a g e
VIEWING WORK CONTRACT

Note: The changing of posting or
contract information, or working
restrictions, should be referred
to the Healthroster team. It is
important to ensure that the
correct ‘valid from’ dates are
entered for such changes, to
ensure that historical data is not
affected.

Use the filters in the Person
Search screen to locate the
record for the staff
member.

Select the person (click on their
name to highlight).

Select the Work Contracts tab in
the Details pane that displays to
the right of the screen
(highlighted opposite).

Note: There are scroll bars
within the Details pane that
can be used to view more
information (highlighted
opposite).

22 | P a g e
Select the Contract that you
wish to view and below the
Person Work Contracts, you will
now be able to see a breakdown
of the employees Contract
Summary details with your unit.

Ensure the correct Effective
From date is present.

Work through the various fields
to ensure the correct
information appears for your
employee.

Note: The Default Unavailability
Hrs field specifies how many
work-time hours should be
accounted for, by default, for a
day of Unavailability (e.g. Leave,
Sickness, or a Study Day). This
will be 7.5 hours for example for
a 37.5 hour contracted person
who usually works 5 days per
week.

23 | P a g e
ADDING SKILLS

HealthRoster can be used to
track people’s skills, including
training received, qualifications
and professional registrations
for clinical staff.

In HealthRoster, you can create
the demand for people with
specific skills on selected shifts.
You can also use Skills records
and reports to identify who
needs training, and incorporate
training and study days into the
rosters.

Use the filters in the Person
Search screen to locate the
record for the staff
member whose details you
wish to change.

Select the person (click on their
name to highlight).

Select the Skills tab in the
Details pane that displays to the
right of the screen (highlighted
opposite).

24 | P a g e
You can filter the
information display to show:

        Current and Future Skills
        All Skills

Select the appropriate radio
button to filter (highlighted
opposite).

Note: There are scroll bars
within the Details pane that
can be used to view more
information (highlighted
opposite).

Skills that have expired are
(dependent on your View Date),
are displayed with a greyed-out
icon:

Skills that are going to expire
within the next 3 months are
displayed with a warning icon:

Click on Add Skill at the bottom
of the screen (or right click and
select, as shown opposite).

25 | P a g e
The Add Skill form is displayed. Select the Skill Group from the drop down menu, followed by the Cluster and the Skill. Click on the calendar icon next to the Valid From field, and use the calendar to select a Valid From date. Repeat the above step to select a Valid To date. Note: The Valid To date should be the last date that the Skill is valid, not the day is it expired. Select the Date Gained. This may be different to the Valid From date. Select an Obtained From Reason from the drop down list. If applicable, enter a Certificate Number. Note: Notes are free-text. Click on OK to save. The newly added skill will be displayed under the Skills tab in the Details pane. 26 | P a g e
EDITING SKILLS

Use the filters in the Person
Search screen to locate the
record for the staff
member whose details you
wish to change.

Select the person (click on their
name to highlight).

Select the Skills tab in the
Details pane that displays to the
right of the screen (highlighted
opposite).

Click on / highlight the Skill
that needs to be amended.

Click on the Edit Skill button at
the bottom of the Details pane,
or right click and select the
option (highlighted opposite).

27 | P a g e
The Edit Skill form will be
displayed.

Change the Details as required
then clock on OK to save.

DELETING SKILLS (FROM A PERSON)

Note: You should only delete a
Skill from a person’s record if
it was added in error (i.e. they
never had it).

When a person’s Skill expires,
you should Edit the Skill to
change the Valid To date.

This will ensure that the
record is accurate and that
historical data and rosters are
not affected.

Use the filters in the Person
Search screen to locate the
record for the staff
member whose details you
wish to change.

28 | P a g e
Select the person (click on their
name to highlight).

Select the Skills tab in the
Details pane that displays to the
right of the screen (highlighted
opposite).

Click on / highlight the Skill
that you wish to delete.

Click on the Delete Person Skill
button at the bottom of the
Details pane, or right click and
select the option (highlighted
opposite).

A message will appear asking you
to confirm or cancel the action.

Click on OK to save.

The skill will be removed.

29 | P a g e
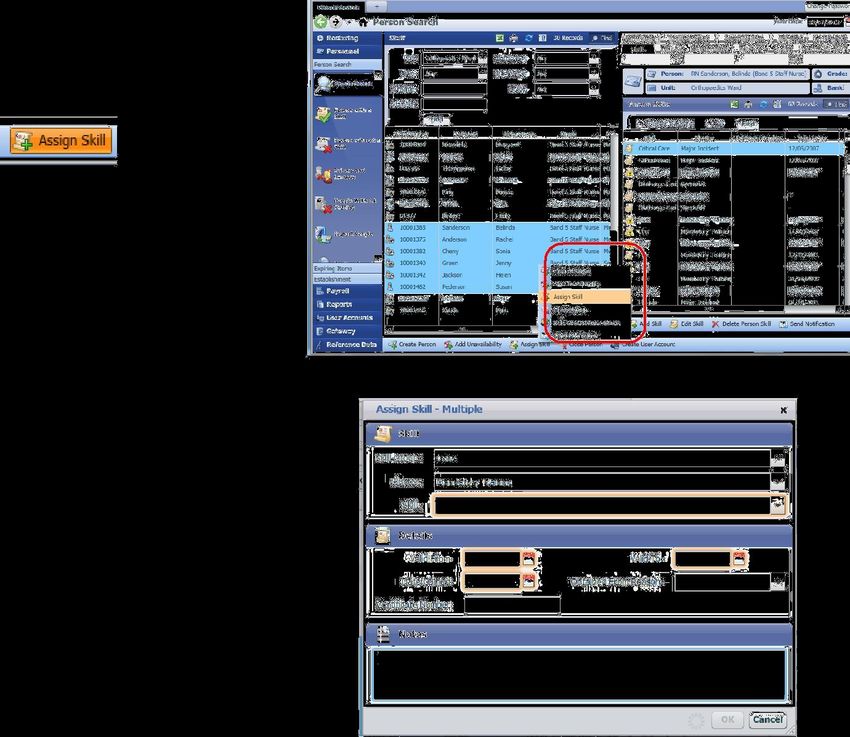
ADDING SKILLS IN BULK

You can add the same Skill to
multiple people at the same
time.

This is useful when several
people attend the same training
event.

Note: You can only add Skills to
multiple people at the same time
if the Valid From and Valid To
dates are the same.

Use the filters in the Person
Search screen to return a list
of all staff for your ward/Unit,
whose details you wish to
change.

Note: You can click on a column
heading to sort staff records in
to a specific order, for example
by Grade (highlighted opposite).

Use the CTRL key on your
keyboard to highlight/select
a number of people.

30 | P a g e
Click on Assign Skill at the
bottom of the screen, or right
click and select the option
(highlighted opposite).

The Assign Skill form will open.

Complete the fields as
appropriate to add the same
Skill to all staff.

Note: You can only add a Skill to
multiple people when the Valid
From, Valid To and Date Gained
dates are the same for all people.

Click on OK to save.

Note: You can check the skill has
been added by
selecting/highlighting staff
individually and checking the
Skills tab on the Details pane.

31 | P a g e
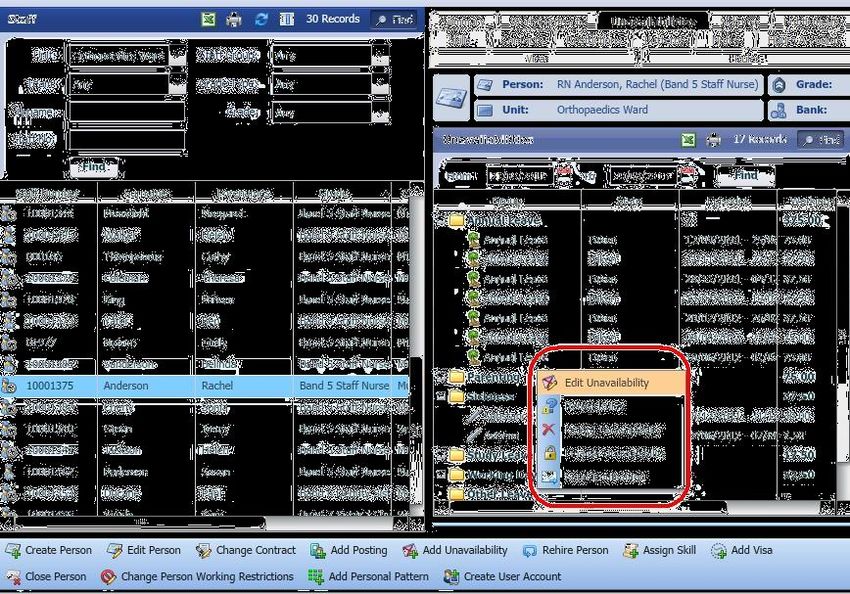
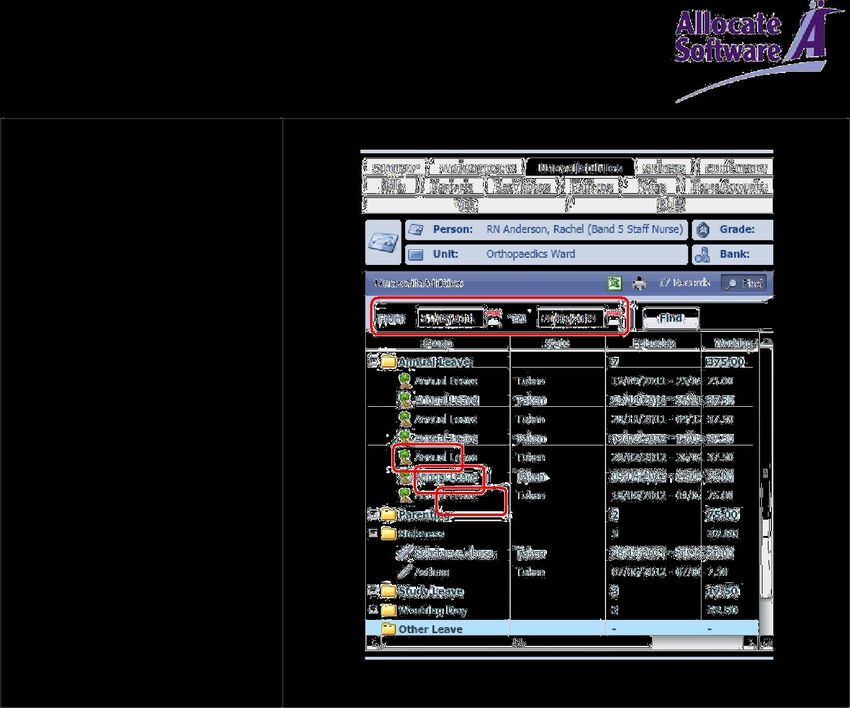
VIEWING INDIVIDUAL UNAVAILABILITY RECORDS

 Unavailability episodes such
 as annual leave, sickness and
 study days can be viewed in
 the rosters.
 It is also possible to run various
 reports on Unavailability, using
 filters to search for specific
 types of Unavailability, and/or
 within certain dates.
 A summary of an individual
 staff member’s Unavailability
 (past, present and planned)
 can also be viewed within a
 person’s staff record in
 HealthRoster.

 Use the filters in the Person
 Search screen to locate the
 record for the staff
 member whose details you
 wish to change.

 Click on the person’s name as it
 appears in the list to highlight
 their record, and select the
 Unavailabilities tab in the
 Details pane to the right of the
 screen (highlighted opposite).

 A series of folders will
 be displayed.

32 | P a g e
Click on the + to the left of
 each folder to open it and
 display all the recorded
 episodes.

 Note: You can click on the
 calendar icon next to the From
 and To fields to open the
 calendar and choose a date
 range for the episodes you wish
 to view (highlighted opposite).

 Remember to click on the Find
 button when you choose
 specific date ranges.

ADDING UNAVAILABILITY IN PERSON SEARCH

Unavailability can be added to a
person within the rosters. It can
also be added to a person’s
record at any time, which
enables planned/future
Unavailability such as annual
leave, study days etc. to be
recorded and scheduled in
advance.
Episodes of Unavailability
added to a person’s record will
automatically be populated in
rosters when the roster for the
period covering the episode is
loaded.

33 | P a g e
Use the filters in the Person
Search screen to locate the
record for the staff member
to whom you wish to add an
episode of Unavailability.

Select/highlight the name of a
person in the Person Search
screen.
Click on the Add Unavailability
button at the bottom of the
screen, or right click and select
the option (highlighted
opposite).

The Add Unavailability form
will open.

34 | P a g e
Select the Group (e.g. Annual
Leave) from the drop down list.
Select the Reason (e.g. A/L –
Annual Leave) from the drop
down list.

Select the State from the drop
down list (highlighted opposite).

Note: The State refers to the
status of the episode, i.e.
whether it is Approved
(confirmed), Pencilled (not
yet confirmed) or Cancelled.
Cancelled is used when a planned
or requested Unavailability is
declined or cancelled (so when
editing an episode).

Annual Leave and Study Day
Requests made by a staff
member via Employee Online are
automatically given the State of
Pencilled, pending approval or
cancellation by the manager
within HealthRoster.

Click on the calendar icon next to
the Start field to open the
calendar and select a date.

Note: The Start date of an
episode of Unavailability
should be the first day of
absence/unavailability.

35 | P a g e
Click on the calendar icon next to
the End field to open the
calendar and select a date.

Note: It is important that the
End date is the last day of
absence, not the day the
individual returns.
Note: You can enter the
Duration (in days) using the
arrows in that field (highlighted
opposite) and the End date will
be calculated for you.

The time fields to the right of the
Start and End date fields
(highlighted opposite) allow you
to record a part-day episode of
Unavailability. For example, a 2-
hour supervision, or a half-day
Study Day.

36 | P a g e
Note: If you are adding an
episode of Sickness, further
options will be displayed at
the top of the form
(highlighted opposite):

        The Secondary Sickness
        Reason relates to ESR
        (NHS only) reasons
        There are rules that can
        be set around when a
        Medical Certificate
        should be presented,
        so it is important to
        complete this field
        correctly
        There is the option
        to record additional
        information such as
        Occupational Health
        referrals

When the Start and End dates of
an episode have been added,
Work Time Information will be
displayed at the bottom part of
the form (highlighted opposite).
This shows the number of
Working Time (contracted)
hours the system has calculated
are accounted for per day of the
episode. Where a person has
more than one Posting, a line for
each will be displayed.
Note: This is based on the
default Contract settings and the
Restrictions of the individual,
but can be overridden.
Note: To adjust the calculated
hours, click on the number of
hours and manually type in the
correct figure.

37 | P a g e
When an episode of Unavailability spans more than one week, it is possible to view the Work Time Information for each week within the episode. Simply click on the arrow in field next to Week Start (highlighted opposite) and select each week in the drop down list, to check the calculated hours. You can add Notes if required. Click on OK to save. EDITING UNAVAILABILITY IN PERSON SEARCH Episodes of Unavailability can be edited where they appear within a roster. They can also be edited within a person’s staff record. This ensures that planned/future Unavailability can be easily amended, and is not dependent on a roster. Use the filters in the Person Search screen to locate the record for the staff member whose Unavailability you wish to amend. Click on/highlight the name of the person as it appears in the returned list. 38 | P a g e
Select the Unavailabilities tab
in the Details pane (highlighted
opposite).

Expand the appropriate
Unavailability Group folder by
clicking on the + to the left of
the folder (highlighted opposite).

Select/highlight the
Unavailability episode that you
wish to edit.

Click on the Edit Unavailability
button at the bottom of the
screen, or right click and select
the option (highlighted
opposite).

39 | P a g e
The Edit Unavailability form will
open.

Make the required changes, for
example changing the Start or
End dates, or Start and End
times.

Click on Save.

You can add Notes to an
Unavailability episode. To do
this, select the Notes tab in the
Edit Unavailability form
(shown opposite).

Click on the Add Note button
at the bottom of the window
(highlighted opposite).

40 | P a g e
The Add Notes window will
open.

Add the required notes in the
text box and click on OK to
save them.

The Note will be added and
details of who added the note,
and when it was added, will be
displayed (as shown opposite).

Note: To delete a Note simply
highlight the Note in the Notes
tab screen, and click on Delete
Note at the bottom (highlighted
opposite).

41 | P a g e
It is possible to view an Audit
Trail on Unavailability episodes.
Simply click on the Audit Trail
tab in the Edit Unavailability
form, as shown opposite.

The Audit Trail pane should
display any change events,
who changed it, the date of the
change, and the Lead Time.

Note: The Lead Time is the
period of time before the start
of the Unavailability episode
that the change was made.

Unavailability Rules can be
set up in HealthRoster. These
are restrictions around a
variety of things, such as:

    the maximum number of
    people who can be on leave
    or study at the same time
    the maximum length of
    annual leave episodes
    the maximum number of
    sickness episodes that a
    person is allowed before a
    warning is generated.

Outside of a roster, it is possible
to view the details of any
warnings (rule breakages)
associated with an individual
episode.

To view any warnings associated
with an episode of Unavailability,
select the Warnings tab in the
Edit Unavailability form (shown
opposite).

If there are no Warnings, a
message will confirm this.

42 | P a g e
EDITING ANNUAL LEAVE AND STUDY DAY REQUESTS Staff can make requests for Annual Leave or specific Study Days at any time via Employee Online. If a roster exists for the period covering the request, it will appear in the roster with a ? icon on it, and can be Approved or Declined from the roster screen. Annual Leave and Study Day Requests made via Employee Online can also be Approved or Declined within a specific shortcut report. This means that Requests for the future can be approved and planned for well in advance. To view outstanding Annual Leave and Study Day Requests and Approve/Decline them outside of rosters, navigate to the Unavailability task group within the Rostering master group (shown opposite). Select the Annual Leave & Study Requests shortcut. Select your ward/Unit from the Unit drop down list and click on Find. 43 | P a g e
A list of all outstanding Annual
Leave and Study Requests for
your ward/Unit will be displayed
(highlighted opposite).

Note: They have a ? icon
associated with them which
means that they are ‘pencilled’ in
(i.e., awaiting approval).

To Approve a Request,
select/highlight the Request you
wish to Approve.
Note: The Details pane to the
right of the screen will show any
Overlaps. These are episodes for
other people at the same time
(highlighted opposite).

There are also tabs in which can
be viewed:
    A summary of
    Unavailabilities  for
    the person
    A summary of the person’s
    Leave Entitlement(s) and
    balance(s)
    Any Warnings associated
    with the Request, i.e.
    rule breakages
    Any Notes, added at the time
    the Request was made by
    the employee, or added later
    by a Manager.

44 | P a g e
Click on the Approve Request button at the bottom of the Details pane (highlighted opposite). A message will appear, asking you to confirm if you wish to Approve the Request. Click on OK to Approve. Note: The episode/Request will disappear from the Annual Leave & Study Requests shortcut screen, and can be found within the Details pane that displays the person’s record (in the Person Search screen), under the Unavailabilities tab. The staff member will be able to see that the Request has been approved instantly in Employee Online. 45 | P a g e
To Reject/decline a Request,
select/highlight the Request you
wish to Reject.

Note: If you are Rejecting a
Request, it is helpful to select the
Notes tab and add a note
explaining the reason for
rejection.

Click on the Reject Request
button at the bottom of
the Details pane
(highlighted opposite).

A message will appear, asking
you to confirm if you wish to
Reject the Request.

Click on OK to Reject.

Note: The episode/Request will
disappear from the Annual Leave
& Study Requests shortcut
screen.
The staff member will be able
to see that the Request has
been Rejected instantly in
Employee Online.

46 | P a g e
DELETING UNAVAILABILITY IN PERSON SEARCH

Unavailability episodes should
only be deleted if they were
originally added in error.

Episodes that were/are planned
but then did/do not take place
after all should be edited, and
their State should be changed to
Cancelled.

Use the filters in the Person
Search screen to locate the
record for the staff member
whose Unavailability episode
you wish to view and delete.

Select/highlight the name of
the person as it appears in the
returned list.

Select the Unavailabilities tab
in the Details pane to the right
of the screen (highlighted
opposite).

Expand the appropriate
Unavailability Group folder by
clicking on the + to the left of
the folder (highlighted opposite).

47 | P a g e
Highlight/select Unavailability
episode you wish to delete.

Right click and select Delete
Unavailability, or click on the
action button at the bottom
of the Details pane
(highlighted opposite).

A message will appear asking
you to confirm the action.

Click on OK.

The Unavailability episode will
be removed.

48 | P a g e
3 Managing Teams

Teams can be used in HealthRoster as a way of grouping people together on the rosters in various ways,
for example by Occupational Group in mixed rosters, by Grade Type (e.g. RN), to indicate regional teams
(in community-based rosters) or by specialty (in medical rosters).
Teams can be ordered as required within the rosters and a separate roster can be printed for each team.
It is also possible to set up team-based rules and requirements (demand).

VIEWING AND ASSIGNING PEOPLE TO A TEAM - ESTABLISHMENT MANAGEMENT

Teams can be easily managed
within the Establishment
hanging file in HealthRoster.

Select the Personnel filing
cabinet drawer and then
click the Establishment
hanging file.

Select the Establishment
Management(Structure)
shortcut.

Expand the Organisation
Structure to locate your
ward/Unit, by clicking on the
+ symbols to the left of each
parent Unit (highlighted
opposite).

Note: Parent Units are shown in
yellow. Rostered Units are
shown in blue.

Expand your ward/Unit to view
Teams.

Teams are indicated with
a unique icon:

49 | P a g e
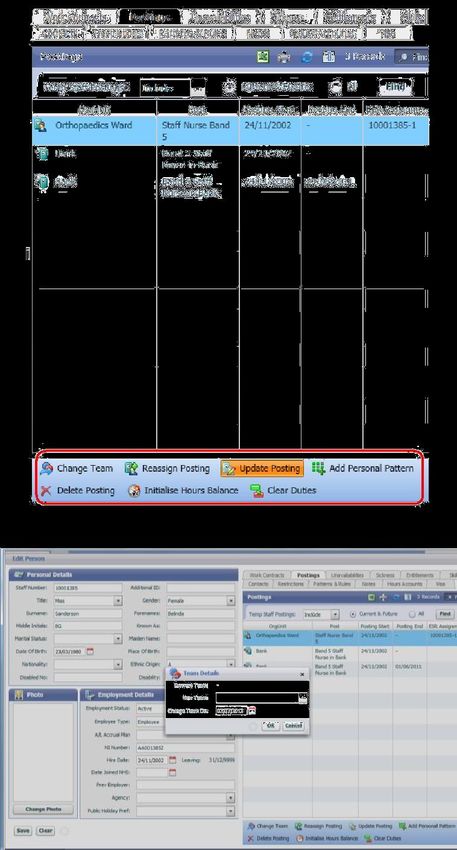
To move people into teams,
follow the steps below.

Highlight the Unit name as
it    appears     in    the
Organisation Structure.

Note: The Details pane to the
right of the screen will display
the Establishment Details, i.e. the
budgeted Posts that apply to the
Unit and an overview of
budgeted WTE versus people in
Post (highlighted opposite).

Select/highlight the Grade Type
of the person or people who
you wish to assign to a Team.

Click o the + to the left of the
Grade Type to expand the view
and display all the Posts within
that Grade Type (as shown
opposite).

50 | P a g e
Select/highlight the Post of the
person or people who you
wish to assign to a Team.

A list of staff of that Post will be
displayed (highlighted opposite).

Note: There are scroll bars that
can be used to view more
records or more detail for
individual records that are
listed (shown opposite).

51 | P a g e
Select/highlight the name of
the person you wish to move
within the Postings tab screen.

Click on the Change Team
button at the bottom of
the Details pane
(highlighted opposite).

The Team Details window
will open.

Select the New Team you wish to
assign the person to using the
drop down list.

Select the appropriate Change
Team On date by clicking on the
calendar icon and selecting the
correct first date that the team
placement takes effect from the
calendar.

Click on OK to save.

52 | P a g e
4 Rostering
This section focuses on creating an actual live roster.

ADD ROSTER FROM TEMPLATE

In order to create a roster
you must load a
Roster/Demand Template
into the live roster calendar.

The Roster/Demand Template is
created by the HealthRoster
Administrator. It details the
budgeted demand/requirements
of the ward/Unit, i.e. how many
people, of each Grade or Grade
Type, are required on each shift
per day. This is usually over a 28
day period.

Requirements by Location or
for specific Skills can also be
specified within a
Roster/Demand Template.

Select the Rostering filing
cabinet drawer and then click
the hanging file View Rosters.

Click on the Add Roster From
Template shortcut (shown
opposite).

Select your ward/Unit from the
drop down list and click on Find.

A list of available Templates will
be displayed (highlighted
opposite).

Note: You will usually only see
one option.

53 | P a g e
Click on the Template you wish
to use to create your roster to
highlight it.

The Create Roster from
Template form will open to
the right of the screen (shown
opposite).

Note: Periods that already have
live rosters loaded are listed
(shown greyed out, opposite).

Select the number of rosters you
wish to Create (i.e. how many
Templates you wish to load)
using the arrows to the right of
the field.

Select the roster start date(s)
using the calendar – click on the
calendar icon to the right of the
Roster(s) From field.

Note: The date will default to
the next available date for the
roster to start. This helps to
ensure that duplicate rosters,
or rosters that overlap, are not
created.

A new roster will be listed, with
an icon that indicates this is new
(highlighted above opposite).

Click on Save.

54 | P a g e
NAVIGATING THE ROSTER SCREEN

Once you have loaded a
Roster/Demand Template,
you can go to the View
Rosters shortcut.

The View Date will automatically
default to the start date of the
new roster you have loaded.

You will be able to view
your blank roster.

Note: Unavailability episodes
that have already been added to
the system (to individual staff
records) will automatically be
populated and displayed in the
new roster.

Select the Rostering filing
cabinet drawer and then click
on the hanging file View
Rosters.

Select the View Rosters shortcut.

Ensure your ward/Unit is
selected from the drop down list.
If not, select your ward/Unit
from the list and click on Find
(highlighted opposite).

55 | P a g e
Navigate to the View Date of the
start of your first electronic
roster (if it has not already been
selected) by clicking on the
calendar icon next to the View
Date field, to the top right of the
roster screen (highlighted
opposite).

The layout of the roster screen is
as follows:

    Staff are listed on the left
    hand side of the screen.

    Note: By default they will
    appear in Grade order,
    and alphabetically within
    their Grade grouping.

    Hours balances are
    displayed to the right of the
    roster screen.

    Note: The Hours Left column
    shows the balance left of
    contracted hours to be
    rostered for each person
    based on the total number of
    hours they would be
    expected to work for the
    roster period you are
    currently viewing.

    The Net Hrs Left column
    shows the balance left of
    contracted hours to be
    rostered for each person,
    based on the total number
    of hours they would have
    been expected to work
    cumulatively, from a fixed
    start date to the end date of
    the roster period you are
    currently viewing.

56 | P a g e
A positive figure indicates
hours yet to be rostered (i.e.
owed). A negative figure
indicates hours that have
been rostered that are over
what the individual is
contracted to deliver over
the period (i.e. time owing).
A - indicates that there is no
time owing or owed. A ?
indicates that no fixed start
date for Net Hrs has been
set, therefore a calculation
cannot be made.
Hover over a person’s name to
view a tooltip that displays
information about the person’s
Hours of Work, what they have
been rostered to work in the
previous week, and their Skills
record (example opposite)
Click on the Purple Roster Bar at
the top of the screen (highlighted
opposite).
Action buttons will be displayed
at the bottom of the roster.
57 | P a g eNote: You can also right-click on
the Roster Bar to see a menu of
appropriate options.
Click on a person’s name.
The action buttons will change.
Note: You can also right-click on
a person’s name to see a menu
of appropriate options.
You can change the Diary View
to the following using the drop
down menu in the tool bar:
1 Week View
2 Week View
4 Week View
5 Week View
6 Week View
8 Week View
9 Week View
View the Assignment Summary
by clicking on the Show
Assignment Count button in the
toolbar (highlighted opposite).
58 | P a g eNote: The Summary on a populated roster shows the skill mix ratio on each shift. Click on the drop down list next to the Print icon in the toolbar (shown opposite). There are a number of options for roster print outs, 59 | P a g e
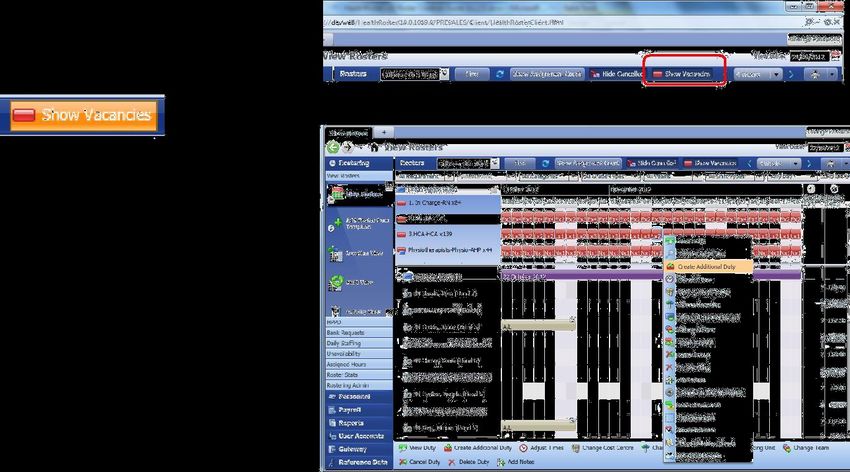
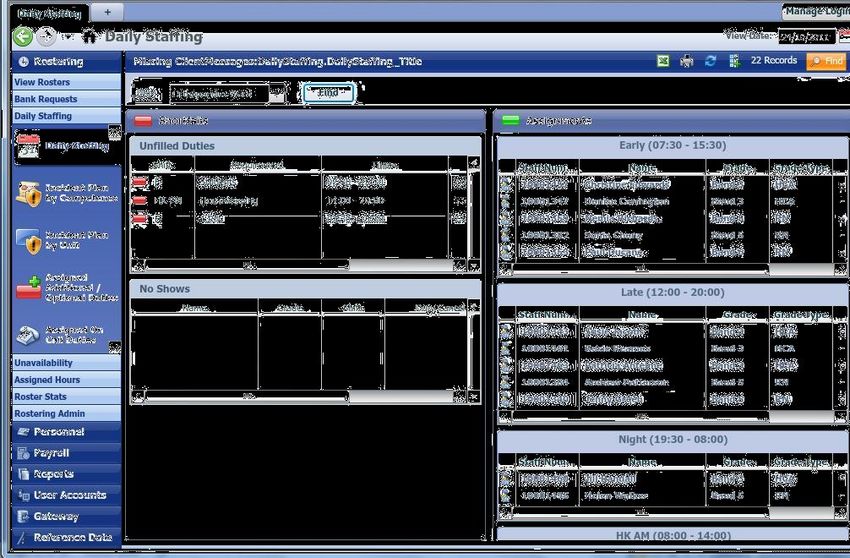
SHOW ING VACANCIES / VIEWING VACANT DUTIES

The demand of the ward/unit (i.e. the shifts that must be covered) is generated from the
Roster/Demand Template for each rostered period. This is based upon the establishment and service
demand of the ward/unit.

Click on the Purple Roster Bar.

Click on the Show Vacancies
button in the toolbar (highlighted
opposite).

The vacant duties that need to
be filled will appear at the top of
the roster.

Right-click on a vacant duty
to see a list of options.

There are Filters at the top of
the Vacancies window that
enable you to group specific
vacant duties.

Note: You will only see filters
that apply to your ward/Unit.

Hover over a vacant duty to view
the tooltip, as shown opposite.

60 | P a g e
ASSIGN DUTIES MANUALLY

To assign duties manually,
click on a vacant duty in the
Vacancies window to highlight
it, then drag it to the name of
the person in the roster that you
want to assign it to.

Note: You can hold down the
CTRL key to multi select
duties for assignment.

The duty will be displayed in
the appropriate place on the
roster, and should be green (as
shown opposite).

Note: Rules and restrictions are
checked as duties are assigned.

Duty assignments that break
rules are shown in orange. Hover
over the assigned duty to view
details, including the rule(s) that
have been broken.

61 | P a g e
ASSIGNING LONG DAY SHIFTS

It is possible to merge two day
shifts to create a long day. This
has to be set up by the
HealthRoster Administrator.
The template demand will be
set for cover mornings and
afternoons (or earlies and lates
for example). If someone is
going to be working the two
shifts as one, this can be created
by assigning both duties to
someone at the same time.
Select an Early and a Late on the
same day of the week one from
the Vacancies window using the
CTRL key.
Drag and drop onto the person
who is going to be working the
long day.

A Long Day shift is created.

Note: If you remove this duty
from a person and return it to
the Vacancies window, it will
split back down into two
separate shifts.

REMOVING A DUTY FROM A PERSON

To remove a duty from a person,
simply drag the duty off the
person it was allocated to in the
previous example and return it
to the Vacancies window.
Note: You can ‘drop’ it anywhere
in the Vacancies window and it
will return to the correct place.

Note: You can hold down the
CTRL key to multi select duties for
removal.

62 | P a g e
RECORDING A DUTY AS A REQUEST

Employees can request duties
via Employee Online. It is also
possible to manually assign shift
and day off requests on their
behalf within the roster.

Select the shift or day off to be
allocated as a request form the
Vacancies window.

Drag and drop the shift or day
off onto the person who has
requested it.

Right click on the shift or day off
and select Set Requested Status.

A Request icon will be applied to
the shift/day off.

63 | P a g e
RUNNING AUTO ROSTER

HealthRoster has the
functionality to assign duties to
people automatically for you.
This is known as Auto Roster. It
can lay down duties based on
fixed shared (rotational) and
personal patterns, and
accounting for acceptable
working sequences and rules
and restrictions.
Note: The output of the Auto
Roster and number of duties it
will assign will vary between
rosters, and between
wards/units.

Select the purple Roster Bar.

Click on the Auto Roster button
located at the bottom of the
screen.

A selection of settings will be
displayed.

Personal Patterns Only will only
lay down duties that are
specified to be worked by
specific individuals within fixed
Shared and Personal Patterns.

When run on the Nights Only
setting, auto roster will look
to allocate vacant night duties
to people, as appropriate,
within the roster.

64 | P a g e
When run on Full, auto
roster will try to allocate as
many vacant duties as
possible, in accordance with
rules and restrictions.

When run on the Patterns Only
setting, auto roster will only
allocate vacant duties to people
in workable sequences as
specified within global patterns.

The status of the roster will
change to Auto Roster
Requested, and the roster bar
will change from purple to
yellow.

Select the required Setting
and click on Run.

Hover over the Roster Bar to
view the progress of the Auto
Roster.

Note: The roster bar status will
change when the Auto Roster is
complete.

CLEARING DUTY ASSIGNMENTS

Rather than start a roster
again, it is possible to clear
assignments from the roster by
type, e.g. clear all that have
been manually assigned. This is
useful to ensure that requests
already made via Employee
Online are not lost.

Right click on the purple Roster
Bar.

Select Clear Roster from the
menu list that appears (shown
opposite).

65 | P a g e
Check the period you wish to
clear. You can change the Starts
On and Ends On dates using the
calendar (click on the calendar
icon to the right of each field).

Note: The roster period start and
ends dates will be entered by
default. You can change the
dates to just clear assignments
from a part of the roster.

There are a number of options:

    Keep Requested Duties
    Keep Manually Assigned
    Duties
    Keep Personal Pattern
    Assigned Duties
    Keep Shared Pattern
    Assigned Duties
    Keep Job Plan Assigned
    Duties

Note: If an option is greyed out,
it is because there are no
assignments of that type in the
roster.

The number of duties that will be
cleared if you select each option
will be displayed (highlighted
above opposite).

Check each option as required.

Click on OK to save

All assigned duties you have
select to remove will have
been cleared from the roster
and returned to the Vacancies
window.

66 | P a g e
ADDING NOTES TO ROSTER It is possible to add notes to a roster. These are then visible to staff in Employee Online. Click on the purple Roster Bar. Click on the Roster Notes button at the bottom of the screen, or right click and select the option (highlighted opposite). The Notes window will open. Click on Add Note at the bottom of the window. Add notes as required. Click OK to save. Close the window. 67 | P a g e
The note will be added with
a record of who added it and
when.

SETTING REQUEST PERIOD

It is possible to set restrictions
on the period during which staff
are able to make duty and day
off requests on a roster via
Employee Online.

Click on the purple roster bar.
Select Change Request
Period from the drop down
list that appears.

The Change Request Period
form will open.
Ensure Requests Open On
is ticked
Select the Open date using the
calendar (click on the icon).
Ensure Requests Closed After is
ticked.
Select the Close date using
the calendar (click on the
calendar icon).
Click on OK.

68 | P a g e
SWAPPING DUTIES

It is possible to swap shifts
between people. This is much
quicker than dragging shifts off
people to the Vacancies
window, only to drag them
back out to different people.

Note: Rules and restrictions are
checked as the swap is made.

Select the shifts assigned to
different people on the same day
that you wish to Swap (use the
CTRL key to multi select).

Right click and select Swap
Duties from the list that appears.

A message will appear asking
you to confirm the action.

Click OK to action the change.

ADJUST DUTY TIMES

The start and/or end times of
duties can be adjusted before or
after they are worked, and
before they are assigned from
the Vacancies window.

Select the shift you wish
to modify.

Click on the Adjust Times button
at the bottom of the screen, or
right click and select the option.

69 | P a g e
The Adjust Times form will open.

Change the Duty Start or Duty
End times as rewuired.

Check the Rest Time and Work
Time is still correct.

Click OK.

Note: The adjusted times will
show on the duty with a clock
icon and the tooltips will confirm
that the times have been
changed, as shown opposite.

RE-TESTING RULES (BULK CHECK)

If changes are made to rules or
the availability or restrictions of
individuals, it may be necessary
to re-test the rules. This enables
HealthRoster to check assigned
duties against the changes, and
may change the status of
assigned duties from orange
(with warning) to green (good
fit), or vice versa.

70 | P a g e
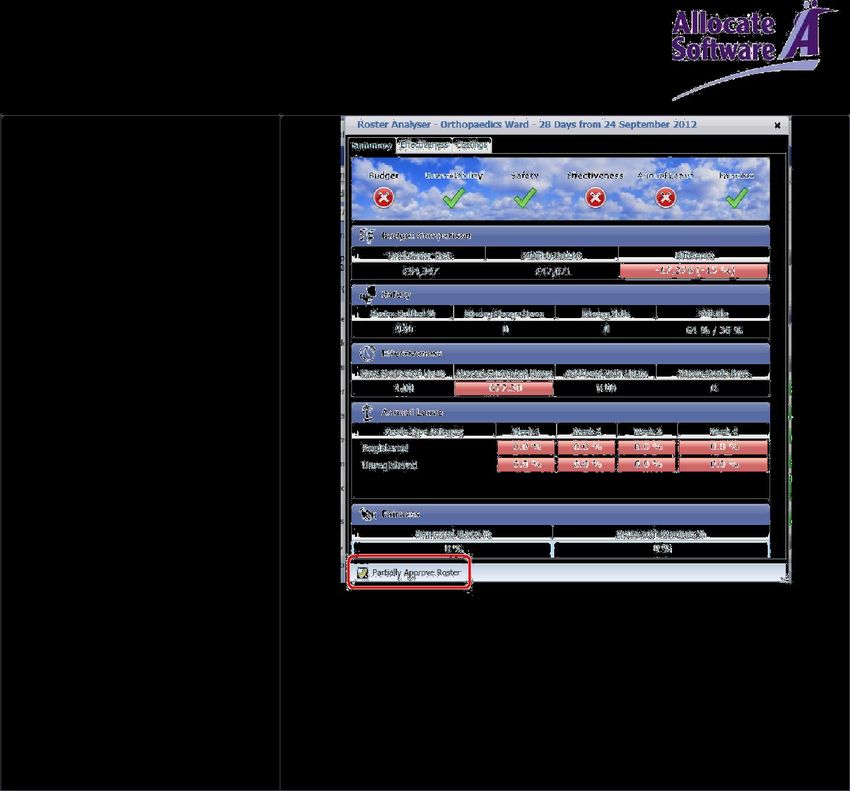
Highlight the purple roster bar.

Click on the Retest Rules on
Roster button at the bottom
of the screen, or right click and
select the option.

A message will appear asking
if you wish to continue with
the action.

Click OK.

Note: You can also do this
individually on individual duties.

VIEWING THE ROSTER ANALYSER

The Roster Analyser allows you to
view the performance of the
roster you have created against
the KPI thresholds that have been
set for the Organisation, and also
against each individual’s
establishment data and demand.
It is designed to enable roster
creators and ward/unit managers
to consider the quality and
fairness of their rosters, and the
impact on their budget, before
the roster is worked, and in order
to make an informed decision on
whether adjustments should be
made.

71 | P a g e
Click on the purple roster bar.

Click on the Roster Analyser
button located at the bottom of
the screen

Explore the following tabs:

               Summary
               Effectiveness.

Note: Further notes can be added
to the roster if useful.

Note: You can click on values in
the Summary screen to see
more detail.

A weather outlook at the top of
the Analyser window indicates
the quality of the roster.

PARTIALLY APPROVE A ROSTER

Click on the purple roster bar.

Click on the Roster Analyser
button located at the bottom of
the screen

72 | P a g e
Click on the Partially Approve Roster button at the bottom of the Analyser screen (highlighted opposite). A message will appear asking if you wish to approve this roster. The status of the roster will be updated on the roster bar. FULLY APPROVE A ROSTER Click on the purple roster bar. Click on the Roster Analyser button located at the bottom of the screen 73 | P a g e
Select the Fully Approve
Roster button at the bottom of
the Analyser screen
(highlighted opposite).

A message will appear asking if
you wish to approve the roster.

Click on OK.

The status of the roster will
show as Fully Approved on
the roster bar.

VIEW STAFF LEAGUES

Click on the purple roster bar.

Click on the Staff Leagues
button located at the bottom of
the screen

74 | P a g e
There are a number of
tabs, including:

               Requests
               Annual Leave
               Weekend Working
               Nights Worked
               Christmas
               Bank Holiday
               On Call
               Study Days
               Bank         &
               Agency Hours
               Overtime Hours

The leagues are useful when
rostering to ensure fairness
and flexibility over time.

VIEW 1 WEEK WORK ROSTER

Select the Reports master group.

Select the Reports task group.

Select the Roster Print
Reports shortcut.

 A list of report options
is displayed.

Select the Work Roster 1 Week.

75 | P a g e
You can also read