HP Virtualization Performance Viewer - Getting Started Guide for Virtual Appliance
←
→
Page content transcription
If your browser does not render page correctly, please read the page content below

HP Virtualization Performance Viewer
Software Version: 2.01
Linux operating system

Getting Started Guide for Virtual Appliance

Document Release Date: August 2014
Software Release Date: August 2014
Getting Started Guide for Virtual Appliance

   Legal Notices

   Warranty
   The only warranties for HP products and services are set forth in the express warranty statements accompanying such products and services. Nothing herein should be
   construed as constituting an additional warranty. HP shall not be liable for technical or editorial errors or omissions contained herein.
   The information contained herein is subject to change without notice.

   Restricted Rights Legend
   Confidential computer software. Valid license from HP required for possession, use or copying. Consistent with FAR 12.211 and 12.212, Commercial Computer Software,
   Computer Software Documentation, and Technical Data for Commercial Items are licensed to the U.S. Government under vendor's standard commercial license.

   Copyright Notice
   © Copyright 2013-2014 Hewlett-Packard Development Company, L.P.

   Trademark Notices
   Adobe® is a trademark of Adobe Systems Incorporated.
   Microsoft® and Windows® are U.S. registered trademarks of the Microsoft group of companies.
   Java is a registered trademark of Oracle and/or its affiliates.

   Acknowledgements
   This product includes software developed by the Apache Software Foundation (http://www.apache.org/).
   This product includes software developed by the OpenSSL Project for use in the OpenSSL Toolkit (http://www.openssl.org/)
   This product includes cryptographic software written by Eric Young (eay@cryptsoft.com)
   This product includes software written by Tim Hudson (tjh@cryptsoft.com)
   This product includes software developed by the Apache Software Foundation (http://www.apache.org/).

   Documentation Updates
   The title page of this document contains the following identifying information:
    l   Software Version number, which indicates the software version.
    l   Document Release Date, which changes each time the document is updated.
    l   Software Release Date, which indicates the release date of this version of the software.

   To check for recent updates or to verify that you are using the most recent edition of a document, go to: http://h20230.www2.hp.com/selfsolve/manuals
   This site requires that you register for an HP Passport and sign in. To register for an HP Passport ID, go to: http://h20229.www2.hp.com/passport-registration.html
   Or click the New users - please register link on the HP Passport login page.
   You will also receive updated or new editions if you subscribe to the appropriate product support service. Contact your HP sales representative for details.

   Support
   Visit the HP Software Support Online web site at: http://www.hp.com/go/hpsoftwaresupport
   This web site provides contact information and details about the products, services, and support that HP Software offers.
   HP Software online support provides customer self-solve capabilities. It provides a fast and efficient way to access interactive technical support tools needed to manage your
   business. As a valued support customer, you can benefit by using the support web site to:
    l   Search for knowledge documents of interest
    l   Submit and track support cases and enhancement requests
    l   Download software patches
    l   Manage support contracts

HP Virtualization Performance Viewer (2.01)                                                                                                                       Page 2 of 20
Getting Started Guide for Virtual Appliance
l Look up HP support contacts
l Review information about available services
l Enter into discussions with other software customers
l Research and register for software training
Most of the support areas require that you register as an HP Passport user and sign in. Many also require a support contract. To register for an HP Passport ID, go to:
http://h20229.www2.hp.com/passport-registration.html
To find more information about access levels, go to:
http://h20230.www2.hp.com/new_access_levels.jsp
HP Software Solutions Now accesses the HPSW Solution and Integration Portal Web site. This site enables you to explore HP Product Solutions to meet your business
needs, includes a full list of Integrations between HP Products, as well as a listing of ITIL Processes. The URL for this Web site is
http://h20230.www2.hp.com/sc/solutions/index.jsp
HP Virtualization Performance Viewer (2.01) Page 3 of 20Contents
Chapter 1: Introduction 5
Chapter 2: Installing HP vPV 6
Prerequisites 6
Deploy the HP vPV Virtual Appliance 6
Upgrade Scenarios 7
Upgrading HP vPV using the Virtual Appliance 7
Verify the Upgrade 9
Chapter 3: Accessing the HP vPV interface 10
Adding Data Sources 10
Chapter 4: Licensing 12
Types of Licenses 12
Activating the Evaluation License 13
Chapter 5: Troubleshooting 14
Chapter 6: HP vPV Community 19
Send Documentation Feedback 20
HP Virtualization Performance Viewer (2.01) Page 4 of 20Chapter 1: Introduction
HP Virtualization Performance Viewer (HP vPV) is a web-based analysis and visualization tool that
analyzes the performance trends of elements in virtualized environments. It enables virtualization
monitoring by providing an overview of the environment, near-real-time and historical data analysis and
triaging using an interactive dashboard. It also enables monitoring for cloud and hypervisor
environments. HP vPV helps you visualize performance data for elements in the context of each other
to rapidly analyze bottlenecks. HP vPV provides performance monitoring, graphing, and reporting in a
single interface. You can use HP vPV to do the following:
Performance Monitoring
l Dashboard provides quick and easy navigation to other HP vPV views.
l Treemap provides the graphical representation of the health of the environment. You can also
identify and view the problems at a glance. Treemap provides quick analysis of the entities such as
Datacenter, Host, or VMs.
l Workbench helps you to visualize and triage the performance of the monitored resources. You can
troubleshoot problems that occurred in the past for a specific time period. You can draw and view
graphs with the help of available metrics. Additionally, you can save frequently used graphs as
favorites.
l Alerts help you to identify and troubleshoot the problems generated in your virtualized environment.
l Real Time Guest Drill Down detects overloads in the environment. You can drill down to
determine the performance overload issue in VMs.
Capacity Analysis and Optimization
l Capacity Overview provides right size recommendation of the resources in the environment.
l Placement provides suggestions for adding new VMs based on available or reclaimable capacity.
l Forecast helps to project future capacity utilization levels of different resources for a predefined
time period. Using the Forecast feature, you can determine the Days to Capacity information to
make optimal allocation and placement.
l Modeler helps to determine the impact of adding or deleting resources in your environment. You
can estimate the future capacity utilization to proactively plan your hardware requirements.
HP Virtualization Performance Viewer (2.01) Page 5 of 20Chapter 2: Installing HP vPV
HP vPV is available as a virtual appliance for easy deployment in the VMware vCenter. You can use
the VMware vSphere client interface to deploy the HP vPV virtual appliance.
You can download the HP vPV virtual appliance from: http://www.hp.com/go/vpv. You can install the
HP vPV virtual appliance using the Deploy OVF Template functionality of the VMware vSphere client.
To log on to the virtual appliance, the username is root and password is vperf*viewer. For more
information, see the VMware documentation.
Prerequisites
Following are the prerequisites for installing HP vPV:
l Ensure that port 8081 is open to make HP vPV accessible from the remote browser, if there is a
firewall on the system where HP vPV is installed.
l Ensure that port 8444 is open to access in Hypertext Transfer Protocol Secure (HTTPS) mode.
l Ensure that the port used for accessing HP vPV (8081, by default) is open in the firewall, if there is a
firewall between HP vPV and Microsoft System Center Virtual Machine Manager (SCVMM) server.
l Ensure that the port 5480 is open to access the Virtual Appliance Management Interface (VAMI).
Deploy the HP vPV Virtual Appliance
HP vPV is available as a Virtual Appliance for easy deployment in vCenter. You can use the VMware
vSphere Client user interface to deploy the virtual appliance.
The supported VMware vCenter Server versions are 5.0, 5.1, and 5.5.
To deploy the HP vPV virtual appliance, follow these steps:
1. Open VMware vSphere Client.
2. Type the credentials and click Login.
3. Select File > Deploy OVF Template. The Deploy OVF Template window opens.
4. Click Browse to browse to the location where you have saved the HP vPV virtual appliance file.
5. Click Next. The window shows the details of virtual appliance.
HP Virtualization Performance Viewer (2.01) Page 6 of 20Getting Started Guide for Virtual Appliance
Chapter 2: Installing HP vPV
6. Click Next. The End User License Agreement details appear.
7. Click Accept and then click Next.
8. Type a name for the virtual appliance in the Name field.
9. Select where to deploy the virtual appliance from the Inventory Location tree. Click Next.
10. Select the host or cluster where you want the virtual appliance to run. Click Next.
11. Select the specific host where to run the virtual appliance. Click Next.
12. Select the storage location where you want to store the virtual machine files. Click Next.
13. Select the disk format in which you want to store the virtual disks. Click Next.
14. Type the required Networking Properties and click Next. The window shows the details of the
deployment.
15. Select the Power on after deployment check box.
16. Click Finish. The deployment task starts. After deployment, the virtual appliance name appears in
the tree in the VMware vSphere Client user interface.
Note: For more information, see the VMware documentation. The steps are subject to change
based on VMware.
Logging in to the Virtual Appliance
You can log in to the HP vPV Virtual Appliance using the username as root. The default password is
vperf*viewer and it is recommended to change the password after logging in.
Here is a short video on deploying the HP vPV Virtual Appliance and getting started with HP vPV.
Upgrade Scenarios
You can upgrade HP vPV only from version 2.00 to 2.01.
Note: Make sure that you take a snapshot of HP vPV 2.00 machine before upgrading to 2.01 as
rollback is not supported.
Upgrading HP vPV using the Virtual Appliance
If you already have HP vPV version 2.00 deployed on the virtual appliance and want to upgrade to
version 2.01, you can do it in the following two ways:
HP Virtualization Performance Viewer (2.01) Page 7 of 20Getting Started Guide for Virtual Appliance
Chapter 2: Installing HP vPV
l "Using CDROM Updates (Using .iso)"
l "Using Specified Repository (Using .zip)"
Using CDROM Updates (Using .iso)
1. Log on to VMware vSphere Client.
2. In the left tree pane, select the HP vPV machine that is to be upgraded.
3. Click the Connect/disconnect CD/DVD devices of the virtual machine icon. Select
CD/DVD drive1.
4. Click Connect to ISO image on local disk.Windows Explorer appears.
5. Select the HPPV_VA_2.01.xxx_UPDATE.iso file. Click Open.
6. In the HP vPV 2.00 interface, select Admin and click the Data Sources tab.
7. Launch the HP vPV Virtual Appliance Management web interface using the link provided at the
bottom of the page.
8. Log on to the HP vPV Virtual Appliance using the username as root. The default password is
vperf*viewer.
9. Click Update tab. The Update Status page appears.
10. Click Settings.The Update Settings page appears.
11. In the Update Repository section, select Use CDROM Updates.
12. Click Status. The Update Status page appears.
13. Click Check Updates. The available updates appear.
14. Select the update and click Install Updates. The upgrade process begins.
Using Specified Repository (Using .zip)
1. Download and unzip HPPV_VA_2.01.xxx_UPDATE.zip in the Web folder at the server (Web or
FTP) location.
2. Launch the HP vPV Virtual Appliance Management web interface using the link provided at the
bottom of the page.
3. Log on to the HP vPV Virtual Appliance using the username as root. The default password is
vperf*viewer.
HP Virtualization Performance Viewer (2.01) Page 8 of 20Getting Started Guide for Virtual Appliance
Chapter 2: Installing HP vPV
4. Click Update tab. The Update Status page appears.
5. Click Settings.The Update Settings page appears.
6. In the Update Repository section, select Use Specified Repository.
7. In the Repository URL box, type the server location where the update file is placed.
8. In the Username and Password box, type the User name and Password, if any.
9. Click Status. The Update Status page appears.
10. Click Check Updates. The available updates appear.
11. Select the update and click Install Updates. The upgrade process begins.
Verify the Upgrade
You can verify the upgrade to HP vPV version 2.01 by performing either of the following:
l In the HP vPV interface, go to the Help icon and click About HP vPV. A dialog box appears with
the version information.
l Verify the version by running the following command at the command prompt:
pv version
Note: After the upgrade, it is recommended to check the status of HP vPV processes using
the following command:
/opt/OV/bin/ovc
If any of the processes are not running, run the following command to restart the processes:
pv restart
HP Virtualization Performance Viewer (2.01) Page 9 of 20Chapter 3: Accessing the HP vPV interface
After HP vPV is installed successfully, access the HP vPV interface using one of the following URLs:
http://:8081/PV or https://:8444/PV
where, is the system name of the HP vPV server.
Note: PV is case sensitive.
HP vPV Interface appears as:
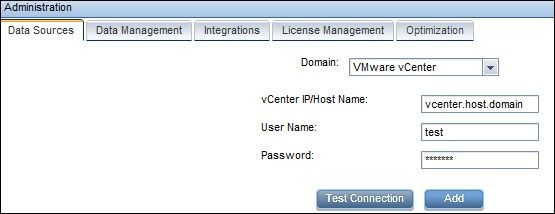
Adding Data Sources
When accessing HP vPV interface for the first time after installation, Data Sources tab in the Admin
page opens. Provide the details of the data sources that HP vPV must monitor.
HP Virtualization Performance Viewer (2.01) Page 10 of 20Getting Started Guide for Virtual Appliance
Chapter 3: Accessing the HP vPV interface
HP vPV supports the following data sources:
l VMware vCenter
l Microsoft Hyper-V
l KVM
l Xen
l OpenStack
l HP aPaaS
For more information on adding data sources, open the Data Sources tab on the Admin page and click
Help or see Virtualization Performance Viewer Online Help. This opens the context-sensitive help
for the Data Sources tab.
HP Virtualization Performance Viewer (2.01) Page 11 of 20Chapter 4: Licensing
The following types of licenses are available for HP vPV:
l Community: The product is free for you to use but certain features are restricted.
l Evaluation: You can use the evaluation version of the product, without any feature restrictions, for
a period of 60 days. During this period, you can evaluate the product and if required upgrade to the
permanent licensed version of the product. For more information on the features available with this
license, go to http://www.hp.com/go/vpv.
l Express: You can use the product but certain features are restricted. The license is valid for a
defined subscription period. The validity starts on a date as per the order placed by the subscriber
and the capacity value is decided based on the subscription.
l Premium: You can use all the product features without any restrictions. Premium license is valid
for a defined subscription period. The validity starts on a date as per the order placed by the
subscriber and the capacity value is decided based on the subscription.
Types of Licenses
The following table lists the available features for the Community, Express, Premium, and Evaluation
HP vPV Licenses:
Community Express Premium Evaluation
Feature License License License License
Number of Instances 25 instances 6000
Tested up to 6000 instance. Larger
configurations can be supported. For more
information, see the HP vPV Sizing Guide.
Data Retention Up to 24 90 days 90 days 60 days
hours
Enterprise Directory Integration No Yes Yes Yes
Reports Yes Yes Yes Yes
HP OM, HP PM and HP BSM No Yes Yes Yes
Integration
HP CSA Integration No No Yes Yes
Guest Operating System drill down No No Yes Yes
for advanced troubleshooting
HP Virtualization Performance Viewer (2.01) Page 12 of 20Getting Started Guide for Virtual Appliance
Chapter 4: Licensing
Community Express Premium Evaluation
Feature License License License License
Current Capacity Reports (Only for No No Yes Yes
VMware™ vSphere and
Microsoft™ HyperV)
Best-fit Capacity Optimization No No Yes Yes
(Only for VMware™ vSphere and
Microsoft™ HyperV)
Virtual Machine Placement (Only No No Yes Yes
for VMware™ vSphere )
Capacity Demand Forecast (Only No No Yes Yes
for VMware™ vSphere and
Microsoft™ HyperV)
Alerting (Only for VMware™ No Yes Yes Yes
vSphere )
Capacity Modeler (Only for No No Yes Yes
VMware™ vSphere )
Dashboard No No Yes Yes
Activating the Evaluation License
To activate the evaluation license, follow these steps:
1. Go to the License Management tab in the Admin page.
2. Click Start Evaluation. The evaluation license is activated.
Note: The evaluation license expires after 60 days and the community license is activated.
All product features are available for the Evaluation License. The only difference between the
Evaluation License and Premium License is the validity. For more information on licensing,
see License Management section in Virtualization Performance Viewer Installation Guide.
HP Virtualization Performance Viewer (2.01) Page 13 of 20Getting Started Guide for Virtual Appliance
Chapter 5: Troubleshooting
Chapter 5: Troubleshooting
The following section details how to troubleshoot HP vPV:
Vertica database is filled to near capacity due to the increase in the log file size.
Symptom The Vertica database is filled to near capacity due to the increase in the log file size.
Causes Vertica database consolidates and retains the log data in a .gz file daily. By default, this
process (called ‘rotate’) continues for 52 weeks.
Resolution To create more space on the Vertica database implement any one of the two solutions
below:
Solution 1
1. Go to /opt/vertica/config/logrotate/.
2. Open the pv file.
3. In the pv file, under # and keep for 52 weeks change the value of rotate from 52
to the number of weeks for which you want to save the rotated log files.
For example: rotate 3
In this instance, the Vertica database will retain the .gz files for 3 weeks.
4. Repeat step 3 for all instances of # and keep for 52 weeks.
5. Save and close the file.
Solution 2
1. Login as a root user.
2. Run the following commands on the HP vPV server:
cd /opt/vertica/bin
./admintools -t logrotate -d pv -r weekly -k
where, is the number of weeks for which you want to retain
the rotated logs.
Unable to Access HP vPV
Symptom Unable to access HP vPV through the default network port settings.
HP Virtualization Performance Viewer (2.01) Page 14 of 20Getting Started Guide for Virtual Appliance
Chapter 5: Troubleshooting
Causes l Your system has ovTomcatB configured to run with the non-root user or non-local
system account privileges and you have HP vPV installed on such a system.
l You cannot access HP vPV using the default http (8081) or https (8444) ports if
these ports are in use by other applications.
Resolution l Check if ovTomcatB is configured to run with the non-root user or non-local system
account privileges. If so, modify the settings to run ovTomcatB with the
Administrator or root user privileges.
l Try accessing HP vPV by using the following URL:
http://:/PV
where, is the IP address or the system name of the
HP vPV server and is the port number of the HP vPV server.
If the HP vPV Home page does not appear, check if the default ports are in use.
l To change the port settings, follow these steps:
1. Run the following command at the command prompt to change the port numbers
for HTTP, HTTPS, and Shutdown Ports:
ovconfchg -ns NONOV.TomcatB -set HTTPPort
ovconfchg -ns NONOV.TomcatB -set HTTPSPort
ovconfchg -ns NONOV.TomcatB -set ShutdownPort
2. Restart HP vPV.
Unable to connect to HP vPV server through HTTPS protocol
Symptom HP vPV is unable to connect to the server through secure communication (HTTPS)
protocol.
Cause The connection times out when HP vPV is not able to connect through the secure client
in the default timeout interval of one second.
Resolution Use the parameter SECURE_CLIENT_CONNECT_TIMEOUT to adjust the timeout
interval to connect to HP vPV server depending on your Internet connectivity or
infrastructure setup.
Deployment of HP vPV fails
Symptom The deployment of the HP vPV Virtual Appliance fails.
Cause This may happen when the time on the ESX server is set to a future time.
Resolution Ensure that the time on the ESX server is set correctly.
HP Virtualization Performance Viewer (2.01) Page 15 of 20Getting Started Guide for Virtual Appliance
Chapter 5: Troubleshooting
Unable to view content on HP vPV home page
Symptom The HP vPV Home page does not display anything except the header.
Cause JavaScript is not supported or Adobe® Flash Player is not installed in your browser.
Adobe® Flash Player version 10.3 is the minimum required version.
Resolution Install Adobe® Flash Player and enable JavaScript support for the Internet Explorer (IE)
or Mozilla Firefox browser by adding HP vPV to your list of Trusted Sites.
l To add HP vPV Web server URL to a trusted site, perform the following steps:
For IE browser
a. From the Tools menu, click Internet Options. The Internet Options pop-up
window appears.
b. Click Security tab.
c. Select the Trusted Sites icon.
d. Click Sites. The Trusted Sites pop-up window appears.
e. Type the HP vPV web server URL and click Add. The typed URL appears in the
list of trusted sites.
f. Click Close.
g. Click OK.
h. Restart the browser.
For Mozilla Firefox browser
a. From the Edit menu, click Preferences. The Options pop-up window appears.
b. Click Privacy tab.
c. Click Exceptions.
d. Type the HP vPV web server URL in the box under Address of web site.
e. Click Allow.
f. Click Close.
g. Click OK.
h. Restart the browser.
HP Virtualization Performance Viewer (2.01) Page 16 of 20Getting Started Guide for Virtual Appliance
Chapter 5: Troubleshooting
l If Adobe® Flash Player is not installed in your browser, HP vPV Home page does
not appear. The browser displays a message stating that you must Install Adobe
Flash Player to view the HP vPV Home Page. Click the message to download
Adobe® Flash Player.
l If JavaScript is not enabled in your browser, HP vPV Home page does not appear in
the IE browser even after adding it as a trusted site. The browser displays a
message stating that JavaScript is not enabled in your browser and you must
enable JavaScript to view the page.
To enable JavaScript support, perform the following steps:
For IE browser:
a. From the Tools menu, click Internet Options. The Internet Options pop-up
window appears.
b. Click the Security tab. Check if the security level in your browser settings is set
to High.
c. Make sure the Trusted Sites icon is selected and click Custom Level. The
Security Settings pop-up window appears.
d. Scroll down to Scripting section and select the Enabled option under Active
Scripting.
e. Click OK.
f. Click Apply.
For Mozilla Firefox browser:
a. From the Tools menu, click Options.
b. Click Content.
c. Select the Enable JavaScript check box.
d. Click OK.
HTTP Status 404 - /PV Error
Symptom When trying to access HP vPV, you get the HTTP Status 404 - /PV Error message.
Cause The message appears if the /www/webapps/PV directory is empty.
Resolution Extract the Perf.war file again from /newconfig/PV to /www/webapps/PV. Run the command pv deploywar.
What are the log files available with HP vPV?
The following table lists the log files available with HP vPV:
HP Virtualization Performance Viewer (2.01) Page 17 of 20Getting Started Guide for Virtual Appliance
Chapter 5: Troubleshooting
Compon
ent Description Location
pvcd (PV pvcd daemon uses XPL tracing mechanism. A If tracing is enabled, /tmp/
Collectio default pvcdXPL.itc (trace configuration) is directory contains the trace files
n available in /opt/OV/support directory. (use - ls /tmp/pvcd_*.trc)
Daemon)
To start the tracing, run
/opt/OV/support/ovtrccfg -app pvcd
-cf
/opt/OV/newconfig/conf/xpl/trc/pvc
dXPL.itc The XPL trace files are present at
/tmp/pvcd_*.trc.
To stop tracing, run
/opt/OV/support/ovtrccfg -app pvcd
-off
pvcd and pvconfig tools log important status /var/opt/OV/log/System.txt
and error messages, if any, in System.txt.
Collector vCenter and OpenStack collector status log file /var/opt/OV/log/status.virtser
s /var/opt/OV/log/status.virtserver ver
KVM collector status log file /var/opt/OV/log/status.kvm
XEN collector status log file /var/opt/OV/log/tmp/status.xen
Database Vertica catalog file to view database /var/opt/OV/databases/pv/catal
Transacti transactions og/pv/v_pv_node0001_
on catalog/vertica.log
User Local trace and log messages are logged in /var/opt/OV/log
Interface ovpmtrace.0.txt and ovpm.0.log
HP Virtualization Performance Viewer (2.01) Page 18 of 20Chapter 6: HP vPV Community You can get HP vPV related information from the HP vPV Community through the following: HP vPV Blogs You can get more information and use cases for HP vPV in HP vPV Blog HP vPV Videos You can view HP vPV demonstration videos and tutorials in HP vPV Videos. HP vPV Community Forum You can access the HP vPV community forum to get help and ask any questions that you may have. You can address any queries regarding HP vPV in the HP vPV forum. HP Virtualization Performance Viewer (2.01) Page 19 of 20
Send Documentation Feedback
   If you have comments about this document, you can contact the documentation team by email. If an
   email client is configured on this system, click the link above and an email window opens with the
   following information in the subject line:

   Feedback on Getting Started Guide for Virtual Appliance (Virtualization Performance Viewer
   2.01)

   Just add your feedback to the email and click send.

   If no email client is available, copy the information above to a new message in a web mail client, and
   send your feedback to docfeedback@hp.com.

   We appreciate your feedback!

HP Virtualization Performance Viewer (2.01)                                                   Page 20 of 20
You can also read