MANUAL HSAjet TCU - A guide to operating and managing the HSAjet TCU series - with and without display.
←
→
Page content transcription
If your browser does not render page correctly, please read the page content below

HSAjet TCU
            MANUAL

A guide to operating and managing the HSAjet TCU series – with and without display.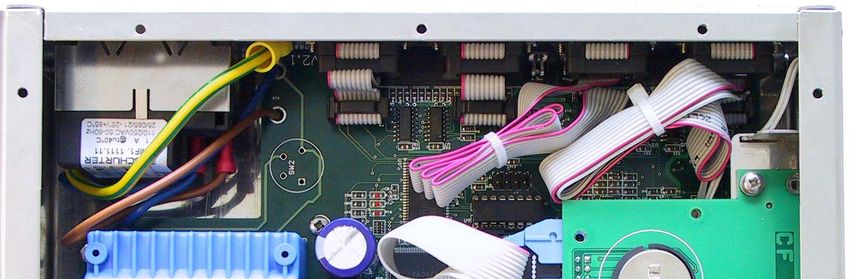
Definitions of warnings, notices and tips:

                           Warning
                           Do not do this, or your equipment may be damaged or not work

                           Notice
                           Additional information to or emphasizes a topic.

                           Tip
                           A different way of doing things or something that might be able to help you
                           use the product.

Assistance
For assistance, please contact your local distributor where you purchased the product.

Version: 2005-04-07 for TCU release 2.1

Third Party Companies and Trademark Information.
Mention of third party products, companies, and web sites in this documentation is for informational purposes only. HS Automatic ApS
provides this information only as a convenience to users and makes no representation whatsoever regarding the content of any other web
sites. When you access a third party site, please understand that it is independent from HS Automatic ApS and that HS Automatic ApS has
no control over the contents on that web site.

HP® is a registered trademark of Hewlett-Packard Company. © 1994-2000 Hewlett-Packard Company. All rights reserved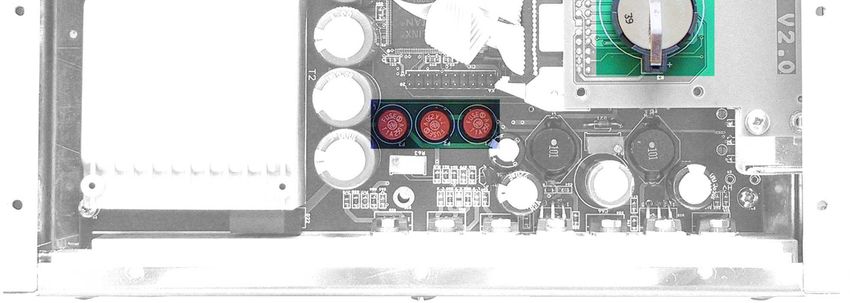
IMPORTANT - FOR YOUR SAFETY ..................................................................................2
               Power Supply                                                                                                      2
               Environment                                                                                                       2

CONCEPT OF THE THE TCU.............................................................................................3

DIFFERENT MODELS OF THE TCU ..................................................................................3

FEATURES OF THE TCU ...................................................................................................4
               Message resolution and speed                                                                                      4

THE TCU KEYBOARD........................................................................................................5

GETTING STARTED WITH YOUR TCU .............................................................................6
               You need this equipment to print                                                                                  6
               Recommended equipment                                                                                             7
               To-Do-list for printing                                                                                           8

CONNECTING THE TCU PARTS .......................................................................................9

TCU CONNECTORS .........................................................................................................10

DESIGNING TCU PICTURES ...........................................................................................12
               How to design a picture using OBJ INKdraw                                                                        13

STARTING THE TCU ........................................................................................................21
               Start-stop print                                                                                                 21
               Purge heads                                                                                                      21

USING THE TCU (NON-DISPLAY VERSION)..................................................................23
               Setting date / time without display                                                                              24

USING THE TCU (DISPLAY VERSION) ...........................................................................25
               Setup                                                                                                            26
               Printing                                                                                                         28

MENU OVERVIEW ............................................................................................................30

UPGRADING YOUR TCU .................................................................................................33
               Getting the upgrade firmware                                                                                     33
               Doing the upgrade                                                                                                33

ERROR SITUATIONS .......................................................................................................34

ADJUSTING THE LANGUAGE ........................................................................................35

THE TCU INSIDE ..............................................................................................................36
               Replacing battery and fuses                                                                                      37

APPENDIX ........................................................................................................................39
               Technical overview                                                                                               39
               Start sensor connections                                                                                         40
               Encoder connections                                                                                              42

1                                                                                                                     TCU manual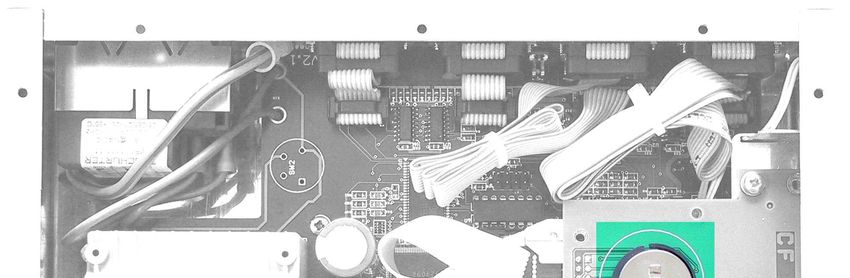
Important - For your safety
Please follow these guidelines for safe operation.

Power Supply
    Only use the unit within the specified power range. Please check the label before
    connecting
           Frequency: 50 Hz (220V-240V) or 50/60 Hz (110V-120V)
    Only use a good, undamaged cable

Environment
    The TCU is electronic equipment and designed to be operated in a dry environment.
    Please do not expose printer or print heads to water or dirt.
    Do not subject the printer to strong shocks or vibrations
    Do not expose printer to open flames

                     Before removing back panel, make sure the unit is turned off and the power
                     cord is unplugged.

                     The unit is is not serviceable by customers. Only the documented service jobs
                     should be performed by the user, please see the end of this documentation.

                     Take great care when you connect RS232 (serial cable) to the TCU. You
                     must make sure that computer and TCU are both grounded.
                     Otherwise, you can burn the serial ports in either PC or TCU.

2                                                                                       TCU manual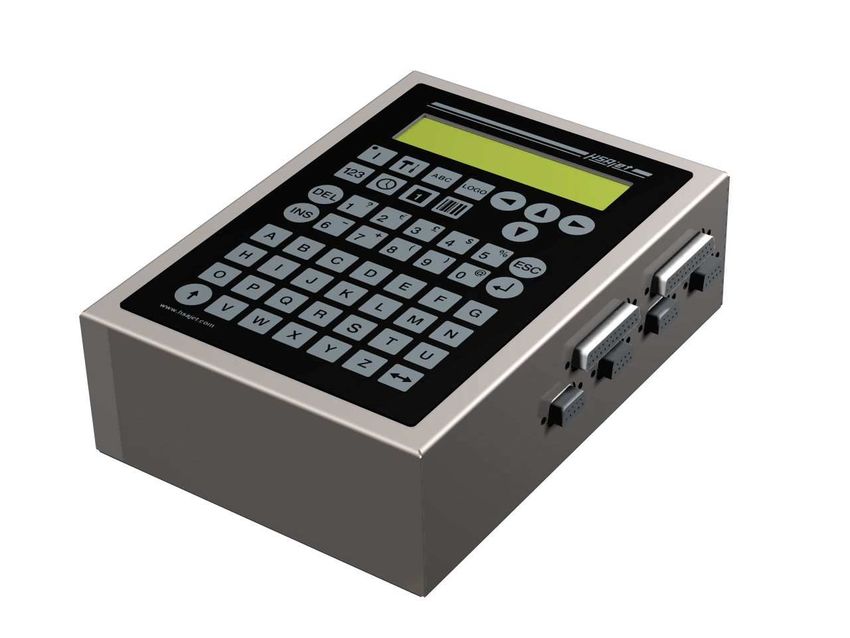
Concept of the the TCU
The HSAjet TCU (Tiny Controller Unit) is a very cost-effective printing solution designed for limited
printing jobs still requiring a high-resolution and high quality print. It is the ideal solution for simple
printing jobs, e.g. stamping of checks, paper documentation, pre-coding, internal logistics, date
documentation e.g. integrated in letter openers, or in the pharmaceutical industry.

Ideal Solution
The HSAjet TCU is the ideal printing solution for small messages, i.e. text printing, barcode
printing, counter printing, time- and date printing, expiry data printing and logo printing.
It is a very compact solution and calls for a minimum amount of maintenance. Consequently, no
special training is required to operate and maintain the HSAjet TCU, and the cartridges are clean
and easy to install. In addition, the HSAjet TCU has a design of stain-less steel and can easily be
implemented in production areas.

Advanced Technology
The HSAjet TCU is based on standard HP cartridges and makes use of the thermal inkjet
technology. Thermal inkjet technology places small ink drops extremely accurately and gives a
very high image and text quality.
The ink is available either black or colored (red, blue, yellow, green), which enhances possible
printing applications. The HSAjet TCU also enables printing on almost any surface such as
cardboard, paper, wood, and plastic.

Different models of the TCU
The TCU is available in 2 different models:
Standard                     Button for start / stop print. Most simple version. No direct editing of
                             messages possible on the unit.
                             It is possible to add switch or terminal to select messages.
Integrated v/ display        Simple editing of start position and prompts possible. Indication of
                             current message, number of prints etc. Same features in one unit as
                             standard TCU with terminal.

3                                                                                                 TCU manual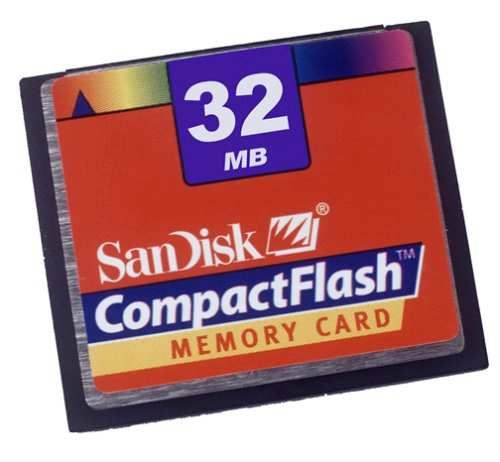
Features of the TCU
Below the most important features of the TCU is explained.
Print using high-resolution HP cartridges. Because the TCU is based on the HP® technology, you
get high resolution and little or no maintenance. If a cartridge is empty or damaged, simply replace
it with a fresh one. You can also use different types of ink and different colors with the same
printing system.
Messages stored on standard Compact Flash modules. All messages and
setup information is stored on Compact Flash cards. They are standard and
can be purchased anywhere. It is no problem to create more messages and
have many different cards to choose from. Each card stores 16 different            Compact Flash
messages.
Very simple to use. The TCU is designed to be a select-and-print solution. The operator can do
little more than select the correct message, adjust the start delay and activate the print. No
possibility to change any of the message content as the designer has control of which objects that
prompts for value before print. This makes the TCU ideal for applications where security is an
issue.
Messages are designed in graphic program on a PC. Use OBJ INKdraw to design all messages.
Both static and variable content. In the design process, all content in the message is based on
objects. You can move objects around and use all objects available in OBJ INKdraw. You can use
your own logos and even create 2-d barcodes. When saved, this background formes a static
picture, to which you can add a number of variable fields such as counters, dates and barcodes.
Prepare-as-you-print. It is possible to load a new message and prepare it's settings while another
message is printing. When it is time to change message, simply press print, and confirm change to
a new message.

Message resolution and speed
The maximum speed available for the printer depends on the resolution you have selected when
you design your messsage. The table below gives an overview:
DPI                               Using                             Max speed m/minute
600 x 600                         Two rows                          39
300 x 300                         Two rows                          156
300 x 300                         One row                           78
300 x 150                         Two rows                          312

The resolution is stored inside the TCU message and can not be altered on the unit.

4                                                                                          TCU manual
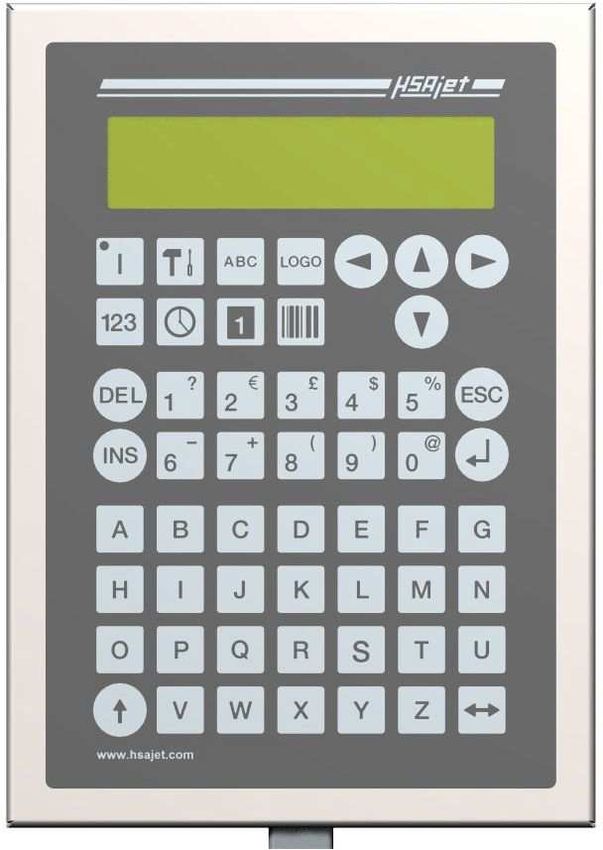
The TCU keyboard
      The TCU keyboard is identical
      to the keyboard of the HSAjet
      SA. But not all keys are used in
      the TCU, as some functions are
      not available.

      Used to start and stop print
      activity

      Enter the setup menu

      Enter the previous menu or go
      to main menu

      Arrow keys, use with enter to
      select message.

      Enter activates edit mode or
      accepts a choice

5                                        TCU manual
Getting started with your TCU
Congratulations on the purchase of your TCU.
This section will tell you how to get started when you unpack your unit. For instructions on how to
connect start sensor and encoder, please refer to next section.

You need this equipment to print
In order to print with your unit, you need to have at least the following equipment
                                TCU Unit.
                                This can be with or without terminal / print selector.

                                Compact flash card, from 16 to 256 MB.
                                This holds both the system files and the messages you wish to print

                                HP stall(s)
                                Either 1 or 2 stalls, or a double stall unit. Cables are included.

                                HP ink cartridge
                                Should be compatible with HP51645A cartridge (known as “45”
                                type)

                                Start sensor
                                In it’s simplest form a mechanical switch, but can also be a
                                photoelectric or inductive sensor. The TCU can use both NPN and
                                PNP sensors.

6                                                                                             TCU manual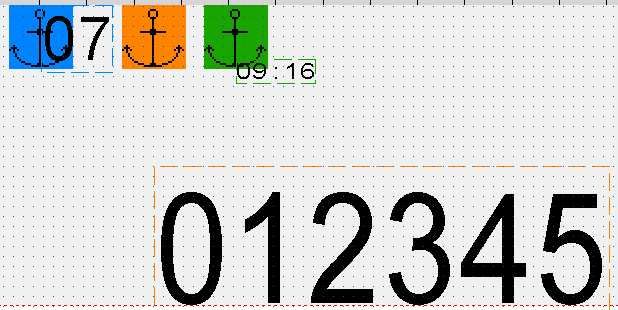
Recommended equipment
                 Terminal / Message selector
                 To be able to use more than 1 message per card, use the terminal
                 or message selector

                 Encoder
                 If you wish to ensure a perfect printout in highest resolution, you
                 should use an encoder (wheel not shown in picture)

                 Compact flash writer
                 For easy transfer of messages from PC to TCU. Typically this is a
                 USB unit, but they are also available in PCMCIA version.

7                                                                             TCU manual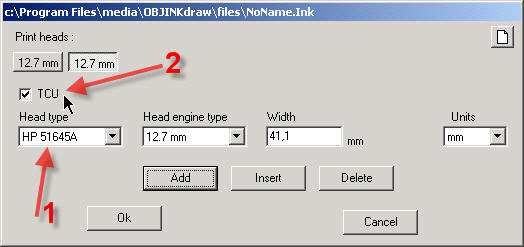
To-Do-list for printing

    Connect parts are described on the
    following page
    Make sure CF card is formatted and
    contains system files and at least 1 set of
    TCU files. (zip file with demo files
    available from HSA)
    Insert CF card into TCU
    Insert cartridges into stalls
    Turn on TCU unit
    Select message
    Start print

8                                          TCU manual
Connecting the TCU parts
Once you have checked that you have all the parts for your TCU, connect them as follows.
Optional parts are shown with dotted lines.
CF card.
Must be
inserted
during use
TCU Unit.
HP print head(s).
Terminal
Connect to HEAD1
Connect / HEAD2
to COM2
with a
straight
cable
Start switch.
Connect to Encoder
I/O Connect to
ENC
9 TCU manualTCU connectors
Power connector
The TCU operates at 110V or 220V depending on which type you order. The mains plug connector
is a standard type IEC.
Notice that the TCU is using 24 V in the I/O and encoder connector, where
the previous HSA equipment uses 12 V.
I/O connector
The main function for this connector is to provide the start signal, to begin print. In the same
connector is also an additional input as well as 2 output signals (additional IN/OUT are not
currently used).
It is located in the back of the board, as a 9-pin female SUB-D.
The wiring of the I/O connector is required for proper function of the print – you will not get a
printout without a start signal.
You can use either a simple mechanical switch or a 24V photo cell for the start signal, please see
pinout and connection guide in the back of this manual.
Notice that the "Print mode" button (Red on front of TCU) is not the same as
the "Start print" signal. It only tells the machine to prepare for the print
process.
Encoder connector
This connector is where the signals for the encoder are coming in. You will notice that there is a
“normal” encoder input and an inverse input. Which one you use depends on your encoder. Active
high use normal, for active low use inverse. Head connectors HP
Two connectors are available for the HP heads. Head1 and Head2 are both 25-pin SUB-D, you
need a straight-through cable (1:1) to connect to the heads.
Please see the pinout and connection guide in the back of this manual.
10 TCU manualCOM 1
Use a crossed 9-pin SUB-D cable to connect to a PC.
You need a crossed 9-pin serial cable to connect to a PC.
This type of cable is also called Nullmodem (9-9)
As you can see from connection table below, cross pin 2 and 3.
Signal SUBD 1 SUBD 2 Signal
Receive Data 2 3 Transmit Data
Transmit Data 3 2 Receive Data
System Ground 5 5 System Ground
COM 2
Use this 9-pin SUB-D to connect the TERM3 terminal or the Print Selector box.
For both these you need a straight- through (1:1) cable.
11 TCU manualDesigning TCU pictures
The TCU pictures / files are designed using the OBJ INKdraw software.
In each picture you can have a fixed background and a number of variable fields. The background
is a "photography" of the canvas in OBJ INKdraw, meaning that you in the design process can
place any number of objects, and move them around as you please. When the file is saved, the
canvas is converted to a fixed image. The variable fields such as counters and dates are then
added to this image in the print job on the TCU.
An illustration of this process:
Design:
everything is an
object. Text,
logos, barcodes
etc can be moved
around freely.
Print:
The grey area
(text, logos and
barcodes) are
converted to one
fixed image.
Variables (Blue)
are imposed on
top.
Variable content
(TCU objects) will
be on top
12 TCU manualDesign a picture using CB Inkdraw
All pictures for the TCU are designed using CB Inkdraw. You do this in a special mode, selected
when you start a new picture. You can also change to this mode later, and thereby turn your
existing pictures into TCU pictures.
Features of the TCU
1 or 2 HP heads, up to 2 x 12,7mm print height (1 inch)
Message length up to 2 meters, depending on resolution.
Memory is dynamically allocated between message length, font sizes and resolution.
4 special TCU objects: date, time, counter and text prompt. Available is 2 time, 2
counter, 4 dates and 10 text prompts
All other OBJ INKdraw objects available will become static background
Starting a new picture
When you want to design pictures for the TCU, you must select “HP” as the head type, and make
sure to check "TCU". You will be able to add 1 or 2 heads of 12,7mm.
Dialog box when
making a new
TCU picture
Notice
If you wish to change a “normal” HP message to TCU, and you have more than
2 heads, you will be asked to delete some of the heads before you can
continue. The TCU will only work with max two heads.
13 TCU manualMessage Objects
After selecting the message length, you will see the normal canvas where you can add objects like
you normally do. However, some functions are disabled, as they do not work on the TCU:
Icon bar with
disabled icons
softened.
In addition to the disabled icons, four new icons are added to the icon bar
Dato for TCU Tæller for TCU Tid for TCU Tekst (prompt) for TCU
TCU icons
Differences compared to normal objects
The TCU objects are different compared to normal objects in several ways.
• You have only 3 different font sizes / types per message to choose from (see section on TCU
fonts)
• The TCU objects can not overlap.
• You can drag the objects freely sideways, but vertically you are limited to the setup of the
chosen font.
14 TCU manualDate / Time
The formats for the Date/Time object is limited to the following:
DATE FORMATS (1) DATE FORMATS (2) TIME FORMATS
dd mm/dd-yy hh
mm mm/dd-yyyy nn
yy yy/mm/dd hh:nn
yyyy yyyy/mm/dd
dd/mm "#J" (day of year, 3 digits)
mm/dd
dd/mm-yy
dd/mm-yyyy
Where the letters mean the following for the date 29 February 2004 14:45
Code Meaning Values possible In example above
dd day, 2 digits 00 - 31 29
mm Month, 2 digits 00 - 12 02
yy Year, 2 digits 00 - 99 04
yyyy Year, 4 digits 2004 - 9999 2004
hh Hour, 2 digits (24 hour clock). 00 - 23 14
nn Minute, 2 digits 00 - 59 45
At the moment, dates are formatted on the canvas as Windows usually
formats dates. For non-English settings this means that you might see the
canvas display f.ex. "dd-mm-yyyy" but you have selected "dd/mm-yyyy". The
TCU will print as the drop-down.
In later releases you will be able to input your own format.
Counter
The TCU counter object can only display numbers, and only the decimal format.
You can choose, as with the normal counter, to count up/ down and how many decimal places you
want. You can also choose a lead-in from either "space", "0" or "nothing" (in which case the object
will be left-adjusted).
Text (prompt)
TCU text is used if you wish to enter variable information before print. The user is asked before
print starts about the content, and can enter all available characters on the TCU keyboard. If
nothing is entered, the content put in the object in OBJ INKdraw will be used.
Also, in OBJ INKdraw you can set a max length, up to 16 characters.
15 TCU manualWorking with TCU font styles The variable TCU objects display textual information. Because of it's resources, the TCU is not able to place and scale fonts freely. That is why the font anchors were made. For every TCU message you can choose up to 3 different fonts, each linked to an anchor with a different color. Within each of the 3 fonts, you can choose between font type (Arial, Courier, and every other installed true type font), a font size, bold - you can even stretch the font freely. Each of the 3 fonts can be freely placed relative to the anchor, which is fixed to the top of the head. You can always move the font left and right in single-pixel steps. Some illustrations will show the point of anchors: As you can see in the above picture, the 3 different font styles have been added to the TCU picture. So far, none of the font styles have been edited (in new pictures, they always default to Arial 24pt, at 16 px offset). Here the fonts have been edited to 3 different sizes and positions. Notice how the anchors are kept in the same position and the text is relative to the anchor. 16 TCU manual
Editing TCU fonts
To edit the TCU fonts, click the icon next to the font style selector. This will bring up the font editor
window.
To edit the font style, select it in the
drop-down top left and alter the
appearance.
You can either set a pre-defined
size or drag freely.
Notice the head limits (dotted lines)
- you can not exceed these.
When you are done editing the font
style(s), press Close.

17                                                                                              TCU manual
Limitations of the TCU fonts
Although the font specifications are quite flexible, there are a few limitations in the TCU:
You can not have the other two TCU font styles
start for the duration of an object. If you do, the
last will not be printed.
In this example, the blue and green objects both
start within the horizontal position of the orange.
However TCU texts do not have this
limitation.

Fonts can not exceed limits of the head.
They will automatically be moved into the limits
of the head.

The TCU has limited memory resources. A
combination of the following: 600 dpi, large fonts
and long message length, can cause the
memory to be used 100%. Reduce one or more
of these factors to go below 100%.
The bar at the bottom of the picture will flash
red if all memory is used.

18                                                                                             TCU manual
Saving the TCU message
Working with TCU files is just like working with INK files. In fact, the TCU file is an INK file until you
transform it (compile it) into TCU files.
When you save the TCU message, it will be saved to the files directory, where your normal OBJ
files are placed – as an INK file.

To transform the file into TCU format, press “Compile to CF”               or press “F10”
This will open the "Save" dialog box. You can select your CF card drive here, if a formatted card is
inserted, and set options.

TCU save dialog

Enter a file name into the filename box. You may
choose any location, it is recommended to
choose your CF drive directly.
You can choose to save the .INK file along with
the TCU file, so you always have them together.
If you click
Notice:
Only English characters are permitted in the file
name (a-z and 0-9).
It is strongly recommended that you remember
to eject the CF card. Failure to do so may
corrupt your files.

19                                                                                              TCU manual
When you have saved, you will notice that not only 1 but minimum 4 files
                   have been created, all with the same name. They are all needed for the
                   TCU to load the file correctly. You must copy over all 4 files to the compact
                   flash.
                   filename.fnt              Font data for the TCU objects
                   filename.pic              Background (non TCU object)
                   filename.tab              Tables for the printout
                   filename.tcu              TCU Object data
                   filename.p??              Text prompt data.Only if there are text prompts in
                                             the message
                   It is strongly recommended to use short filenames, meaning no more than 8
                   characters, and no spaces. Otherwise, the files will be shown as
                                  filena 1   (ex: “filename 1”)

For the NON-DISPLAY TCU, the file names must be TCU-1, TCU-2, etc. up to TCU-10.

20                                                                                     TCU manual
Starting the TCU
The Compact Flash card must be inserted into the TCU before turning on power.
When you start up the TCU, and turn on the power, the FPGA file will be loaded. You can compare
this to the startup of a PC – it needs an operating system to work.
The FPGA file is located on the compact flash card, and must always be
present. If you delete it, you can not use your TCU.
You should always have the following files on your flash card:
FPGAFILE.EPR (TCU operating system)
LANGUAGE (laguage file)
Do not remove the compact flash card when the TCU is
turned on. This may damage the card and/ or the internal
memory of your unit.
After loading the FPGA file – which will take less than 2 seconds – your unit will load the first file
found on the compact flash card. It is now ready to print.
Start-stop print
Press the red button to start / stop print. The print will start from last counter value if it is restarted.
Purge heads
Press the black button to purge all heads. This is useful to test head status.
21 TCU manualHSAjet TCU The non-display TCU can be used for very simple operations where you only have to select a message and start printing. 22 TCU manual
Using the TCU (non-display version)
The Non-Display TCU works just like the version with display – only, you don’t have the display to
select messages. Instead, you have 2 other methods of selecting messages.

Without print selector
If you wish to use the unit without any message selector (print selector or terminal), you can use
only one file per flash card. This file will automatically be loaded when you turn on the power.
Simply press print button on the front to start print process.
                     If more than 1 TCU file is present on the flash card, the first file found will be
                     loaded. This is the file first written to the card, and is not necessarily the first
                     file alphabetically.

Print Selector

                          To add more flexibility, you can connect a print selector box. This is a
                          separate item available for purchase, and is not included with the TCU.
                          When changing between each of the 10 positions and 2 test pictures,
                          you select a file and load it. Press the start button on the TCU to activate
                          print.

                     With the print selector you also have access to 2 test pictures on the flash
                     card. Test-1 and Test-2, which are pre-defined from HSA and write-protected
                     to prevent deletion.

                     File names for use with the print selector must have names from
                     TCU-1 to TCU-10

                     (inclusive the dash)

23                                                                                               TCU manual
Setting date / time without display
If you do not have a display connected to your TCU, it is necessary to connect it to a normal PC to
set the internal date / time. Follow this procedure for instruction.
Connect a crossed over 9-pin serial cable from your PC to the
TCU (COM1).
This cable is often referred to as a Null-Modem cable, which
has pins 2 and 3 crossed.
It is only necessary to connect pins 2, 3 and 5.
Install a terminal program.
HSA has tested this with HilGraeve’s HyperTerminal, which is
free for personal use. Please see http://www.hilgraeve.com/htpe/index.html
9600 bps, Connect using the parameters listed to the left.
8 data bit,
2 stop bit
no parity, no flow control
TIP!
Once you turn on the TCU, you should see the main menu. The
Resize the terminal simulates the TCU TERM3 screen, so that you see the
window so
that you see 2 TERM3 screen in the top section, and the navigation menu in
menu lines
(screen) plus
the bottom section. Use ESC, S, and P to navigate.
navigation
menu
Press S to go to setup menu and use 8, 4, 6, 2 to navigate the
menu. “X” is the cursor.
When the “X” is above what you wish to change, press enter
and type the new value. Then press enter again to accept.
If you wish, you can do everything over the serial connection that you can do
with a terminal. This is a simple way of adding a terminal without purchasing
additional hardware.
24 TCU manualUsing the TCU (display version)
When you turn on the TCU, it will show the main menu.
The FPGA file is located on the compact flash card, and must always be
present. If you delete it, you can not use your TCU.
Likewise, the compact flash card must always remain inserted as long as the
TCU is in function.
The main menu simply is a list of files available on the installed compact
flash memory card. The first file will always be loaded into memory when
you turn on the machine.
You will see a “>” in front of the file currently selected.
If more than 2 files are available there will be arrows indicating that you
can scroll up / down the list to select a file.
When the unit is not in print mode, “Choose file.” is displayed.
When a message is printing you will see “printing” displayed. This
indicates that the current message is in print function.
If a different message is printing, you will see it’s name displayed. Here,
apples is printing while oranges 1 is loaded.
Notice the “>” to the right indicating that there are more files available.
From the main menu you have these options
Load the selected file by pressing the enter key, or use arrow keys to locate a different
file name
Press the setup button to enter the configuration menu
Press the print button to start print
It is easy to find the file name if you know the start letter(s). The TCU has
built-in find-as-you-type function.
If you start typing on the numeric keypad, the display will jump to the filename
that best matches they characters typed in. Press Enter to load the file, or
ESC to cancel.
25 TCU manualSetup
The configuration of the TCU is done through several screens. Navigate between the individual
screens with arrow up / down. Go back to the main menu with ESC.
To select an option, navigate with arrows left / right and press ENTER.
Purge Pressing enter on this will purge all connected heads to
clean them.
Spit Pressing enter on this will allow you to set up the automatic
Screen 1 is for the
spit function
basic setup.
Cart Press enter to change cartridges. Use this to turn off power
on the heads when changing. You will see a separate
screen indicating that you can change the cartridges.
S000 Start delay. Press enter to edit, then enter a number.
Edg+ Press enter to toggle negative / positive edge
Rate 00 How often the printer is spitting. Input a
value in seconds
Burst 00 How many rows the printer is spitting each
time.
Settings for spit.
Recommended spit settings
Based on our experience and the dry time of standard HP cartridges, a
recommended spit setting is 20 seconds and 10 burst.
Confirmation for cartridge change. Press enter when
done.
Enc / When there is encoder activity,
the / will change between / - \ |
St When the start sensor is activated, the “+” will change to “-“
Screen 2 is to test
encoder / start sensor 1:+ 2:- Shows if the message is configured for head 1 / 2.
and to show the 600 x 600 Indicates the current print resolution.
resolution. The print resolution is set in OBJ INKdraw when you create
the message. You can not change it in the TCU.
26 TCU manualYou move between the individual parts of the date / time with arrows left /
right, press enter to edit / accept changes.
Dates / times should be entered in YYYY-MM-DD HH:MM format, in a
Screen 3 is for the date
24-hour clock. The text will show you what part you are editing (year,
/ time setup
mon, day, hour, min)
You can not edit anything here, but the screen shows what version of the
TCU software / Eprom you are using. This is very helpful if you need to
report any issues with your unit.
Screen 4 is the version
information
27 TCU manualPrinting
The TCU allows you to print with one file and at the same time prepare another message for quick
change of print jobs.
When you press the print button the print mode will be activated.
If you have defined the message to have one or more prompts, the prompt screen will ask you to
enter the values of the object.
Until further notice, you can only use numeric characters in the TCU. This means
that you can not use prompts for textual input - only for dates and counters.
The date input will be in the same format defined in OBJ INKdraw, you will not have
to enter for example ":" or "/" characters.
If you have 2 single stalls connected to your unit, you can of course place one head
on each side of the object to print onto.
But you can not print different directions on the two heads. This means that if
you have variable content on both sides, one will print reversed.
Prompts
A prompt is set on the objects if you want the user to enter a value before the print starts. For
example, you can use prompts for best-before dates or start values of counters.
Enter the desired date and press enter to accept the value.
Prompt for date1
object.
If you press enter and wish to change the value of the prompt you just entered, you
can press ESC to go back. This is only possible if your prompt is not the last to be
entered.
To start over, stop print and from the main menu press print again without loading a
different file.
28 TCU manualAfter entering prompts you will see to the print screen.
000000 The numbers indicate the number of prints that were done
since last print start.
You can adjust the start delay during print with the arrow
Print screen
keys left/right.
ESC:main Informs that ESC will go to main menu
0000 Start delay setting. Change with arrows left/ right. Arrows
up/down changes 100s. This value is stored in the message
for next use
During print mode, if you press print button, you will stop the print activity.
Pressing ESC will take you to the main menu. From there you can load a new file, and press print
to go to the print menu. All the time the file that was printing before will still remain in memory.
Restarting print
If you press print and you have loaded a different file, you will be prompted if you want to restart
the old print job, or start the new.
Acceptable values are
Y: start over with the same print job
N: start with the new file
ESC: do nothing - do not start print.
Pressing (N)o to restart the print (so, to start with a new message) will
prompt you to save the settings of the current message.
Start position and prompts will be saved.
After selecting you return to the main menu.
29 TCU manualConnecting to the TCU by RS/232
Connection information
To connect to the TCU, you need to use these parameters:
Cable type Crossed
(Null-Modem)
Baud Rate 9600
Data Bits 8
Parity None
Stop Bits 1
You also need to use a communication software (terminal program). For example “advanced serial
port monitor” by Agg Software.
What you can do with remote control
As there is no “protocol” for the TCU, you can do the same thing you can do with the keyboard on
the terminal (Term3).
This means that you can
Select messages
Start / stop print
Change parameters (date/time, start delay, spit)
Enter prompts
Special characters
The normal letters, numbers etc are sent as they are, but there are some special characters to be
aware about:
#0D Enter key
#1B ESC key
2, 4, 6, 8 Act as arrow keys. 2 = down, 8 = up, etc.
S (capital) Setup screen
M (capital) Main screen, same function as ESC
P (capital) Print start / stop
30 TCU manualConnecting to and controlling the TCU
Once you connect to the TCU, you will see a menu like that displayed on the TCU unit. The answer
from the TCU is split into 3 parts:
The character you sent last
M
- - - - - -
>TCU-1 <
Choose file
- - - - - -
M-main TCU display shown here.
S-setup
P-print
- - - - - -
Menu to remind you about the
keys.
Every time you send a character, the 9 lines (split by #0A) are returned by the TCU.
The TCU has no internal buffer. You need to send one character at a time
for all operations.
What you sent should not be followed by any characters (like CR, LF, etc)
Loading a file
If you know the file name, send it one character at a time. This uses the type-ahead
function of the TCU.
If not, you need to know the files position, and send as many “2” as the needed
“#0D” (enter key)
“Y” (Yes to load)
Hint: You only need to enter as many characters as needed to find the file. So if your
files are named A, B, C… you only need to send 1 character, then enter.
Activate print
“P” starts and stops print mode
During print mode, you can change the start distance with 2, 4, 6, 8.
2 and 8 to change -/+ 100, 4 and 6 to change -/+ 1.
Use the setup menu
To change settings, send “S” and navigate the menu with 2, 4, 6, 8.
Start editing fields with “#0D” and accept the change again with “#0D”
31 TCU manualMenu overview
ESC
Setup SETUP
menu Key
MAIN MENU
"EDIT"
message
active
ESC
PRINT Key
key
SETUP
Printing ? Yes Key
Setup
menu
ESC
No
No
Any promps in
Yes
Prompt
ENTER
to
Last
Yes
Print menu
message ? input screen
input
prompt ?
(printing active)
PRINT
Key
Yes
Yes Is loaded
.. stop print and message same
go to main menu as message
printing ?
File saved Yes
No
No
Save Restart ? .. start print
"Edit" message
message ? with "Edit" message
now active
No
32 TCU manualUpgrading your TCU
Sometimes it is necessary to upgrade your TCU. This could be because new features are added or
the unit is improved in other ways. It is possible to do this directly from the TCU itself, the process
requires a compact flash card and takes about 30 seconds.
Getting the upgrade firmware
The firmware is distributed from HSA. Over time, it will be available from our web page for
download. It will be distributed in one file called firmware.000 where 000 is a number. An
internal check is done to make sure that it is a valid firmware file and that you don’t downgrade.
Simply place the firmware file on a compact flash card. You may use the same card that you stored
messages on. Once the upgrade is done, you can safely delete the firmware file from the compact
flash card.
Doing the upgrade
When you turn on the TCU with the compact flash card containing the firmware file inside, it will
automatically detect if there is an upgrade available. You will see the following on the screen:
New firmware has been found. You can choose if you wish to upgrade or
not. Press Y to upload the upgrade, or N to skip upload.
It is important that you leave the Compact Flash card in the TCU when
you upgrade. You are asked again to confirm that you understand this.
Press Y to start the actual upgrade.
During upgrade you will see this message and the dots will indicate the
progress.
The upgrade will take about 10-15 seconds.
When the progress bar (dots) is not longer counting, you can switch off
your unit.
33 TCU manualError situations
Should an error situation occur, the TCU display will show you what the error could be. The
following will describe the error situations.
If you have the Print Selector, the error LED will either flash ( ) or be lit continously ( )
Display on TCU Meaning of error Shown on Print Selector
Error The CF card is missing or not formatted.
No CF installed Check that you have inserted a valid CF
card before turning on the TCU.
Error The file with the FPGA is not on the CF
FPGA missing card.
Place this file on the card and try again.
You can download a copy from
HS Automatic’s web page
Error There is no language file on the CF card.
Language missing Place this file on the card and try again.
You can download a copy from
HS Automatic’s web page
Error The file you were trying to load is missing
File incomplt one or more parts. Remember that each
TCU file is 4 parts (TCU, FNT, TAB and
PIC).
Check that you copied all 4 parts.
Error The file you were trying to load is write
Write Protected protected.
File missing.
This applies to the special file names on
the Print Selector, you can’t select a non-
existing file on the terminal.
Turn dial to an existing file.
34 TCU manualAdjusting the language
The language of the TCU is by default English. The setup of the language is done via a language
file on the compact flash card, called LANGUAGE (notice no extension). As it is just a simple text
file, you can create your own language strings for the TCU interface.
Simply create a backup of the file and replace the original with your translated version
The lines must be in the same order as the original file. If you add/ remove
lines, the display will not be correct.
String lengths are fixed, any additional characters are chopped off
Even if you redefine prompt letters, you must still use Y and N to answer.
Format of the language file
The language file consists of different lines, with a description and the actual value, separated by
an ‘=’ (equal sign). For your help, the length of the text is inserted in [ ]. This is only for information,
since the line will automatically be chopped or spaces will be added.
The order of the lines is important. Do not delete or add lines, and do not remove any ‘=’.
Below a few lines from the file
Print mode active (active file), main menu [16] = Printing
Print mode active (other file), main menu [4] = prt:
Choose message, main menu [16] = Choose file
Purge menu [5] = Purge
Edge toggle [3] = Edg
Translating the language file
When you translate the file, you can add your own description to the left side of the ‘=’. You do not
have to keep the numbers or brackets [ ]. Below an example of a Danish translation
Udskriver aktiv fil, hovedmenu = Udskrives
Udskriver anden fil, hovedmenu = Uds:
35 TCU manualThe TCU inside
This section will describe the insides of the TCU. This is mostly for your information, but also to
inform about simple service jobs you can do.
Before removing back panel, make sure the unit is turned off and the power
cord is unplugged.
Performing any other service jobs on the unit than the ones described here
will void your warranty.
Power connector
Main PCB
shielding
Power Supply
3 Fuses
1 A type TR Battery for internal clock
Type CR2032
36 TCU manualReplacing battery and fuses
Should it occur that a fuse is burned or the internal clock battery is dead, they can be replaced by
the user. Fuses are located both inside and outside the TCU unit.
Please notice the picture below which illustrates the location of these parts.
Internal Battery
Located just above the compact flash reader. You should use a button cell
battery of type CR2032.
Please place the battery like this illustration, with “+” upwards.
Internal fuses
There are 3 fuses inside the TCU. All are of type TR, 1A, 220V.
Internal fuses Battery for
clock
37 TCU manualExternal fuses
Next to where the power cord is connected there are 2 fuses. If the unit will not turn on, one of
these could have been burned.
You should use 20 x 5 mm glass fuses, 315mA in 220V version and 630mA in 115V version.
To replace, follow this guide
Press on the two taps located on each side of the plastic
cover
Now you can lift out the holder with the fuses inside
Take out the burned fuse and replace it
Press on the holder until you hear a “click”
38 TCU manualAppendix
Technical overview
Printer HP HSAjet TCU
Print Head HP 12.7 mm
Max nr of heads 2 (Total height 25.4 mm / 1 inch)
Distance to surface 0.5 mm – 3 mm
Speed / resolution (Horizontal x Vertical)
600 x 600 dpi => max resolution 38 m/min
300 x 300 dpi 76 / 150 m/min
150 x 300 dpi => max speed 300 m/min
Max message length: Depends on resolution and font sizes.
Ink All HP inks
Print Capacity
Design software OBJ INKdraw (Free)
Font support Full support for Windows Truetype®
Text Scale, Rotate, different fonts on each object
Static Objects Unlimited per message
Variable Objects
- dato Maximum 4 per message
- tid Maximum 2 per message
- tæller Maximum 2 per message
- text Maximum 10 per message
Special Functions Change of date, time, counter, text by use of prompts
Barcode Printing Yes (not variable). All symbologies, incl 2d.
Graphics / Logos Scaleable to max height
Inputs / Outputs
Print sensor Negative / positive flank
Encoder Encoder input (24 V and 5 V), Quadratur / Position mode
Message Selector HSAjet print selector, HSAjet Terminal, RS232
System
Operator interface language English, user-defineable
Internal Memory 0.5 mb
External Memory CF card (32 to 256 Mb)
Voltage 115 V / 230 V
Warranty
Equipment 1 year
Service (minimum) 5 years
39 TCU manualStart sensor connections
As a start sensor, you can use a simple switch, or a photo cell. The output is 24V, but typically
photo cells are 10-30V.
PIN........................................................... DESCRIPTION
1............................................................... V I/O
2............................................................... 5 V
3............................................................... IN 2
4............................................................... START
5............................................................... GND
6............................................................... IN 1
7............................................................... 24 V
8............................................................... OUT 1
9............................................................... OUT 2
Using a simple mechanical switch.
Loop pins 1-2 and connect the switch between
pins 4 and 5.
5 Volt NPN / PUSH/PULL sensor.
VCC to pins 1,2
Signal to pin 4
GND to pin 5
5 Volt PNP sensor.
VCC to pins 1,2
Signal to pin 4
GND to pin 5
1 K resistor between
pin 4 and 5
24 Volt NPN / PUSH/PULL
VCC to pins 1,7
Signal to pin 4
GND to pin 5
40 TCU manual24 Volt PNP sensor.
VCC to pins 1,7
Signal to pin 4
GND to pin 5
1 K resistor between pin 4 and 5
External power source, +3-36V, using NPN /
PUSH/PULL sensor
VCC to pin 1
Signal to pin 4
GND to pin 5
External power source, +3-36V, using PNP
sensor
VCC to pin 1
Signal to pin 4
GND to pin 5
1K resistor between 4 and 5.
41 TCU manualEncoder connections
For the encoder, you can use either a single or double channel. If you have both channels
connected, you need to activate “Quadrature” in the software, and divide distance / pulses by 4.
PIN........................................................... DESCRIPTION
1............................................................... V ENC
2............................................................... 5 V
3............................................................... ENC A
4............................................................... ENC B
5............................................................... GND
6............................................................... INK LEVEL (not used)
7............................................................... 24 V
8............................................................... ENC A (inv.)
9............................................................... ENC B (inv.)
5 VOLT encoder double channel
NPN / PUSH/PULL encoder
5 VOLT encoder double channel
PNP encoder
24 VOLT encoder single channel
NPN/ PUSH/PULL encoder
24 VOLT encoder single channel
PNP encoder
42 TCU manual24 VOLT encoder double channel
NPN / PUSH/PULL encoder
24 VOLT encoder double channel
PNP encoder
External power source, 3-36V, encoder
single channel
NPN/ PUSH/PULL encoder
External power source, 3-36V, encoder
single channel
PNP encoder
External power source, 3-36V, encoder
double channel
NPN / PUSH/PULL encoder
External power source, 3-36V, encoder
double channel
PNP encoder
43 TCU manualYou can also read