HTML Redirect Integration Guide - V5.1 September 2014 Business Gateway
←
→
Page content transcription
If your browser does not render page correctly, please read the page content below

Business Gateway HTML Redirect Integration Guide V5.1 September 2014 Use this guide to: Integrate your website with Worldpay Create and test HTML Redirect orders Look up ISO codes, payment method codes, and more

HTML Redirect Integration Guide > Contents

      Contents
      1     Introduction ..................................................................................................... 6
          1.1    Why use HTML Redirect? ..............................................................................................6
          1.2    Who is this guide for? ...................................................................................................6
            1.2.1      Skills and knowledge ...................................................................................................... 6
          1.3    More help? ...................................................................................................................7
          1.4    Legal.............................................................................................................................7
      2     Overview ......................................................................................................... 8
          2.1    How HTML Redirect works ............................................................................................8
          2.2    Before starting the integration......................................................................................9
            2.2.1      Initial checks ................................................................................................................... 9
            2.2.2      Getting your installation ID from Worldpay ................................................................ 10
            2.2.3      Deciding on your merchant codes ............................................................................... 10
            2.2.4      Using different currencies ............................................................................................ 10
            2.2.5      When you register........................................................................................................ 11
            2.2.6      The importance of well-formed HTML ........................................................................ 11
            2.2.7      Using iframes with our payment pages ....................................................................... 11
            2.2.8      How you can trade online safely.................................................................................. 11
          2.3    Integrating your website shop with our payment service ............................................ 12
            2.3.1      Choosing how to integrate ........................................................................................... 12
            2.3.2      View example sites to base your integration on ......................................................... 12
            2.3.3      Checking the list of your installations .......................................................................... 13
          2.4    Customising your installation to suit you .................................................................... 13
            2.4.1      Customising your payment pages ................................................................................ 14
          2.5    Testing your installation ............................................................................................. 14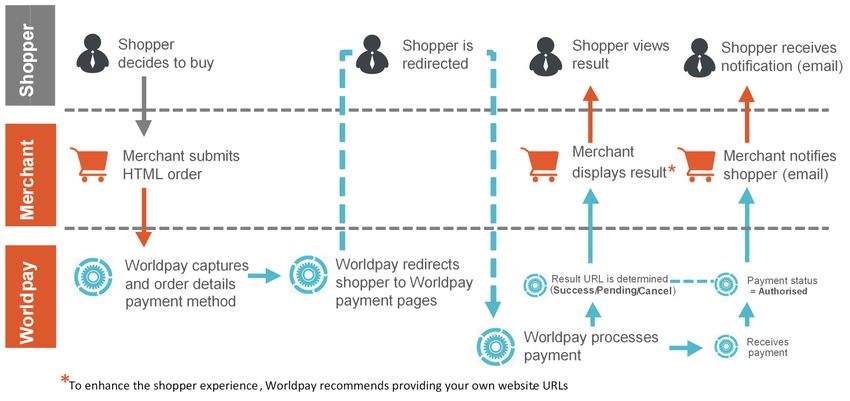
HTML Redirect Integration Guide > Contents                                                                                                                   3

          2.6    Steps to going live ...................................................................................................... 15
      3     Integrating your website with Worldpay ........................................................ 16
          3.1    Use a Storebuilder package for simplicity and speed ................................................... 16
          3.2    Use our ready-made HTML to integrate quickly and easily .......................................... 16
            3.2.1      Setting up the HTML form quickly ............................................................................... 16
            3.2.2      An example HTML form ............................................................................................... 17
            3.2.3      A test version of the order details form ...................................................................... 18
            3.2.4      Going live...................................................................................................................... 19
          3.3    Develop your own custom system .............................................................................. 19
          3.4    Submitting a URL order details string .......................................................................... 19
            3.4.1      Advantages and disadvantages .................................................................................... 19
            3.4.2      URL string content........................................................................................................ 19
          3.5    Order details .............................................................................................................. 20
            3.5.1      Including optional details in your order ....................................................................... 20
            3.5.2      Mandatory and optional details .................................................................................. 20
            3.5.3      Mandatory details ........................................................................................................ 21
            3.5.4      Optional details ............................................................................................................ 21
            3.5.5      Your own custom fields................................................................................................ 21
          3.6    Specifying the merchant code ..................................................................................... 21
          3.7    An example order details form with data .................................................................... 22
          3.8    Managing shoppers’ billing address details ................................................................. 23
            3.8.1      Fixing and hiding parameters....................................................................................... 23
            3.8.2      Examples of fixContact and hideContact use .............................................................. 23
          3.9    Bypassing the Payment Selection page ....................................................................... 24
            3.9.1      How to advise your shoppers about payment methods and cards ............................. 25
      4     A complete HTML page .................................................................................. 26
          4.1    HTML for a complete page .......................................................................................... 26
      5     Telling you about payment results ................................................................. 29
          5.1    Viewing the payment result ........................................................................................ 29
          5.2    Types of payment result ............................................................................................. 30
HTML Redirect Integration Guide > Contents 4
6 Telling your shopper about payment results .................................................. 31
6.1 Telling your shopper about payment results using result pages ................................... 31
6.1.1 Result pages ................................................................................................................. 31
6.2 Telling your shopper about payment results by email confirmation ............................. 32
6.3 Uploading your own result pages ................................................................................ 32
6.3.1 Creating your custom results files ............................................................................... 32
6.3.2 Adding your own details to the result page................................................................. 34
6.3.3 Example – resultC.html: cancelled transaction ........................................................... 34
6.3.4 Example – resultY.html: successful transaction........................................................... 34
6.3.5 Enabling and using Payment Response messages ....................................................... 35
7 HTML Redirect parameters ............................................................................ 36
7.1 Initiating purchase transaction parameters ................................................................. 36
7.1.1 Mandatory parameters ................................................................................................ 36
7.1.2 Optional parameters .................................................................................................... 37
7.1.3 Display parameters ...................................................................................................... 40
7.1.4 The subst parameter .................................................................................................... 41
7.2 Payment page parameters .......................................................................................... 41
7.3 Payment result parameters ........................................................................................ 42
7.4 Recurring payments (FuturePay) parameters .............................................................. 45
7.5 Custom parameters .................................................................................................... 45
7.5.1 Creating custom parameters ....................................................................................... 45
8 Customising your HTML messages ................................................................. 47
8.1 Parameter and file substitution .................................................................................. 47
8.1.1 Substituting the value of parameters .......................................................................... 47
8.1.2 Substituting the value of a display property ................................................................ 48
8.1.3 Embedding the contents of a file ................................................................................. 48
8.1.4 Embedding tags within tags ......................................................................................... 48
8.1.5 Custom parameter substitution ................................................................................... 49
9 Enhancing security with MD5 ......................................................................... 50
9.1 What is MD5 encryption? ........................................................................................... 50HTML Redirect Integration Guide > Contents 5
9.1.1 How does MD5 encryption work? ............................................................................... 50
9.2 What you need to use MD5 encryption ....................................................................... 50
9.2.1 If you use a ready-built shopping cart ......................................................................... 50
9.2.2 If you use a bespoke setup........................................................................................... 51
9.3 Additional security ..................................................................................................... 52
9.3.1 MD5 reference sites ..................................................................................................... 52
Appendix A: Troubleshooting ........................................................................... 53
Appendix B: ISO currency codes ....................................................................... 55
Appendix C: ISO country codes......................................................................... 57
Appendix D: Test card numbers ........................................................................ 58
Appendix E: Payment method codes ................................................................ 59
Appendix F: Important Changes from VISA Europe .......................................... 60
Important Changes from VISA Europe for MCC 6012 (Financial Services) payments ................ 60
Example of valid data.................................................................................................................. 61
Appendix G: Changes to this Guide ................................................................... 62HTML Redirect Integration Guide > 1 Introduction 6
1 Introduction
Welcome to the HTML Redirect Integration Guide.
This guide describes how to integrate your website with our payment gateway using
the HTML Redirect model. This is the simplest and easiest method of integration,
and works on just about any platform.
This guide shows you how to:
Send us orders in HTML
Redirect a shopper from your website to the Worldpay payment pages
Test your integration with Worldpay
Customise your integration – for example, by giving the payment pages the look and feel of your
own website, and creating your own customer messages
Make sure your integration is safe and secure
For details of the revision history of this guide, see Appendix G: Changes to this Guide.
1.1 Why use HTML Redirect?
HTML Redirect ensures that:
Your integration with Worldpay’s payment gateway is faster, simpler and cheaper
Your shoppers make their payment on Worldpay’s secure payment pages, not your website
Collecting and storing shoppers’ payment details and payment method on your own website can be time-
consuming and costly. Instead, if you use HTML Redirect, shoppers are redirected to our payment pages,
and their orders and payments are processed by Worldpay. You have full daily reporting facilities, and we
keep both you and your shopper updated at every stage.
1.2 Who is this guide for?
This is a technical integration guide, aimed at:
Customers who are managing their own integration
Other technical roles, including system integrators who are involved in designing your integration
1.2.1 Skills and knowledge
To integrate with us using HTML Redirect, you need:
A basic knowledge of the Worldpay payment services
A working knowledge of HTML, for a simple integrationHTML Redirect Integration Guide > 1 Introduction 7
Web development expertise, including server-side scripting. This could be useful, for example, if
you wanted to include an automated ordering system or bespoke shopping cart functionality in
your integration
1.3 More help?
For more information about Worldpay’s products and services, including payment methods, see the
Worldpay website at http://www.worldpay.com
For all our technical and operational guides, see http://www.worldpay.com/support/bg/
If you have a question our guides can't help you with, or you'd just like to speak to us directly, contact us at:
Email: support@worldpay.com
Phone: +44 (0)870 3661233
1.4 Legal
©Worldpay 2014. All rights reserved.
This document and its content are proprietary to Worldpay and may not be reproduced, published or
resold. The information is provided on an “AS IS” basis for information purposes only and Worldpay makes
no warranties of any kind including in relation to the content or suitability. Terms and Conditions apply to
all our services.
Worldpay (UK) Limited (Company No: 07316500/ FCA No: 530923), Worldpay Limited (Company No:
03424752 / FCA No: 504504), Worldpay AP Limited (Company No: 5593466 / FCA No: 502597). Registered
Office: The Walbrook Building, 25 Walbrook, London EC4N 8AF and authorised by the Financial Conduct
Authority under the Payment Service Regulations 2009 for the provision of payment services. Worldpay
(UK) Limited is authorised and regulated by the Financial Conduct Authority for consumer credit activities.
Worldpay, the logo and any associated brand names are all trade marks of the Worldpay group of
companies.HTML Redirect Integration Guide > 2 Overview 8
2 Overview
In this chapter, we'll tell you what HTML Redirect is, and how you can use it to
integrate your online business with Worldpay.
HTML Redirect is suitable for Internet shop environments, call centres, reservation centres, and multi-
channel sales situations. It enables you to process payments in real-time, and ensures you have access to
the maximum number of ways to make payment online.
The HTML Redirect service is secure, and provides Worldpay with the information needed to perform active
fraud risk assessment. Also, it is the fastest way to get up and running with on-line payments. Payment
takes place on our pages, so you don't have the costly burden of having to gather shopper data yourself.
You just send the shopper to us to complete their purchase.
HTML Redirect is a simple and safe method of integration, and works with almost all payment systems.
Figure 1: HTML system flow
2.1 How HTML Redirect works
The HTML Redirect service enables your website with its own online shopping system to work in
conjunction with our payment service. This guide helps you create your own online shop, and get started.
HTML Redirect uses HTML forms to pass information to the Worldpay payment gateway for payment
processing. You create the form in your web page and insert parameters such as currency that describe the
purchase – this form is known as an order details form.HTML Redirect Integration Guide > 2 Overview 9
This is how HTML Redirect works:
1. When a shopper is ready to pay for their goods, your website should present them with a button
or link which, when selected, submits the order details to our payment page.
2. The shopper is then taken to our payment pages to enter their payment details, such as
credit/debit card details. Your website does not gather card details from the shopper – we do this
in our payment pages.
3. If the shopper has chosen to pay by credit/debit card:
- We forward the shopper's details to the bank, where the shopper's credit worthiness is
checked
- The bank returns an authorised or declined response to us
If the payment is declined, the shopper is given two options – to try another means of payment or
to cancel the purchase.
4. We then display a result page to the shopper showing the outcome of the payment transaction.
We also send them a confirmation email. For more information, see chapter 6. Telling your
shopper about payment results.
5. We also inform you about the transaction. How this is done depends upon how you have
configured your options with the Merchant Interface, but at the very least we send you an email.
For more information, see chapter 5. Telling you about payment results.
Have a look at our range of example internet shop websites, which we have built for you to use as the basis
for your own. There are several examples of very simple sites, as well as more detailed custom-made sites.
To view the example sites, click this link:
http://support.worldpay.com/support/bg/index.php?page=development&sub=integration&subsub=exa
mples
2.2 Before starting the integration
2.2.1 Initial checks
Check that everything you need is in place before you start. For example:
Are your systems capable of taking orders and submitting them to us?
Have you tested your integration out?
Have you been set up on the Worldpay system?
Have you received your Worldpay Administration Code? (We send you this as soon as your
application is provisionally accepted.) This is not the same as either your Installation ID or your
Merchant Code, both of which are described shortly.
The Administration Code is a unique code that identifies a Worldpay merchant. It is a reference
under which all the merchant codes that a merchant has with the Worldpay payment service are
stored.
Have you set up appropriate usernames and passwords for yourself and your staff to log on to the
system?
Are you aware of the PCI-DSS standard on card-handling security? One feature of HTML Redirect
is that Worldpay is responsible for the collection, storage and processing of cardholder data. This
helps to reduce your costs, as otherwise you would be responsible for implementing the securityHTML Redirect Integration Guide > 2 Overview 10
measures needed for full PCI DSS compliance. For details, see
https://www.pcisecuritystandards.org/
If you have any questions about setting up your system, email the Worldpay Support team at
support@worldpay.com.
2.2.2 Getting your installation ID from Worldpay
When you submit order details to us, you must include your Installation ID, which is a unique 6-digit
reference number we assign to you. It tells us which payment methods and currencies your installation
supports.
To get your Installation ID:
Go to Merchant Interface > Installations
You can use your Installation ID in both the live and test modes.
The Installation ID is not the same as the Worldpay Administration Code, which we send to you as
soon as your application is provisionally accepted.
2.2.3 Deciding on your merchant codes
Something you need to consider before your account goes live is how many merchant codes you will need.
The Merchant Code is a unique identifier for a particular merchant account within the Worldpay payment
service, although it is possible to have more than one merchant code, as explained below.
As a general rule, we open one merchant code (account) per currency set that you process, so if you trade
in GBP and Euros, for example, you would have two merchant codes. However, this may not be enough for
the kind of trading you do – you may need to consider using preferred merchant codes if you have a
number of merchant codes with identical characteristics but where they are used for different purposes.
For instance, you may have a merchant code for software sales and another for hardware sales – if so,
order details submitted to us for software need to specify the software merchant code, and order details
submitted for hardware need to specify the hardware merchant code.
You can discuss this with us when your application is being processed.
For details of how you use the merchant code in HTML, see 3.6 Specifying the merchant code .
2.2.4 Using different currencies
When you apply for a Worldpay merchant code (account), you get at least one free currency. You can add
more currencies by paying a one-off fee for each currency. Or you may want to use currency combinations,
where the acquisition and settlement currencies are different. For details, please email the Worldpay
Support team at support@worldpay.com.HTML Redirect Integration Guide > 2 Overview 11
Exchange rates
If you are dealing with a number of currencies on your website you may want to ensure that you are using
up-to-date exchange rates. The exchange rates we use are updated every 24 hours at midnight GMT. These
rates are then guaranteed for the next 24 hours for all transactions through Worldpay.
2.2.5 When you register
When you register with Worldpay you will be given two separate URLs for each method of payment and
currency set you will be using. One will be the URL for the Test Environment and the other will be the URL
for the Production Environment.
2.2.6 The importance of well-formed HTML
When you submit an HTML order it must be well-formed, using the correct HTML syntax. If it isn’t, it may
not get sent. See http://www.w3schools.com/html/html_intro.asp for more information about HTML and
how to write it.
You must open and close the elements with the correct tags, and all attribute values must be quoted. Also,
make sure all nested code is correctly resolved, that is, the hierarchies are correct. It may help if you check
your HTML code for accuracy by using a validator like this one:
http://jigsaw.w3.org/css-validator/#validate_by_input
2.2.7 Using iframes with our payment pages
Worldpay does not support the use of iframes on our payment pages. However, we are aware
that some merchants prefer to use them anyway. If you decide to use an iframe to host the
Worldpay payment pages then you need to:
Tell the Worldpay support team of your decision.
Be aware that you are taking on security liability for using iframes. You must use
appropriate technology to secure the iframes so that the host page does not interfere
with either the content or the events on the Worldpay payment pages.
2.2.8 How you can trade online safely
We take the risk of fraud on the internet very seriously. Our payment system uses state of the art
encryption techniques, and supports the industry leading anti-fraud systems provided by both MasterCard
and Visa.
In addition we have developed our own anti-fraud software which provides you with a sophisticated
detection system designed to identify potentially fraudulent transactions.
To find out what you can do to reduce the risk of fraud in your online trading, see Fighting Fraud. For more
information about security and fraud, see chapter 9. Enhancing security.HTML Redirect Integration Guide > 2 Overview 12
2.3 Integrating your website shop with our payment service
You can now begin the process of integrating your website shop with our payment service.
Integration is very straightforward. You’ll know when you have integrated successfully – when you can send
us the order details of a purchase from your website and get an email response from us, you have
integrated your website.
To integrate with Worldpay, what you need to do is:
Gather order details from a shopper. What this means is:
- The shopper selects products in their trolley
- You collect the details and send them on to us
- The shopper is redirected to our payment pages
- We take their payment details
In order to do that, you need to establish communications between our server and your website –
basically this just means sending a test HTML transaction to us and getting an email response
As soon as you have integrated, you can then activate your installation and, subject to some checks, you
can go live.
2.3.1 Choosing how to integrate
Depending on your level of HTML knowledge, you can opt for a very simple integration solution, or choose
a more advanced option:
Integration
Description Further details
option
Storebuilder This option provides you with a ready-made ‘shopping cart’ Section 3.1
that is already integrated with HTML Redirect.
Quick and If you are familiar with HTML you can choose to set up a Section 3.2
simple simple integration using examples provided in this guide, and
by making use of our standard payment pages.
More If you have advanced HTML skills you can develop your own Section 3.3
advanced fully automated ordering system, complete with customised
payment pages.
URL query You don’t have to integrate using HTML forms; instead, you Section 3.4
string can submit order details in a single URL query string.
Table 1: Choosing how to integrate
2.3.2 View example sites to base your integration on
If you want to see a range of integration examples before building your own, or if you just need some
pointers about how to pass the information you gather to us, click example sites.HTML Redirect Integration Guide > 2 Overview 13
This site has links to a number of model shops that we have built to help you, as well as the full HTML code
which creates them, and which you can use as the basis for your own site. There are several examples of
each of the three options below:
Basic sites – plain, non-customised versions of the Worldpay payment pages
Fully integrated sites – examples are a site with a full shopping cart with an editable basket, and
another selling 20+ items on one page.
Recurring payment sites – two examples of sites where payment is made over a period, perhaps
for a magazine subscription. Payments are either on a rolling or a time-limited basis.
We cannot accept responsibility for the smooth running of any sites derived from the code on
these example pages. The shops exist merely as examples and are not supported Worldpay
products.
2.3.3 Checking the list of your installations
Go to Merchant Interface > Installations to see a list of your installations. To configure installation options,
click the spanner button for the installation you are interested in—select the Test column if you are setting
up for the first time.
There are Test and Production columns for each installation listed. If you are setting-up for the
first time you should initially select the Test column, which enables you to develop and test every
feature of your website pages before moving to a real production environment.
For general information about how the Merchant Interface works, see the Merchant Interface Guide. For
information about customising your payment pages, see either the Customising Guide (Standard) or the
Customising Guide (Advanced).
2.4 Customising your installation to suit you
You can make our payment pages look like your own shop, even if you base your installation on one of the
‘off-the-shelf’ options shown in section 2.3.2 View example sites to base your integration.
You can customise HTML Redirect to suit yourself by configuring various options. For instance, you can:
Upload your own versions of the payment pages that are displayed to your shoppers, giving them
the style, look and feel of your own website
Decide what payment methods and currencies your shoppers can use
Write your own messages to be displayed to shoppers during the payment process
Customise the results pages and confirmation emails that you and your shoppers receive
Specify that you want to use the Enabling and using Payment Response messages feature which,
for example, enables you to send your own result page when your shopper has completed a
transaction
For a more sophisticated level of customisation, you will need to modify the files used to build the Payment
Service. To do this you should have expertise with HTML, and you will need to see the Customising Guide
(Advanced).HTML Redirect Integration Guide > 2 Overview 14
Although specific configuration tasks are described in other sections in this guide, you should
note that you configure your installation within the Merchant Interface, which is our web-based
financial administration tool for merchants using the WorldPay payment service.
2.4.1 Customising your payment pages
Once you have submitted order details to our payment service via your website and we have received
them, we present a series of payment pages to your shopper. These pages gather the payment information
needed to process the transaction. For an illustration of this, see Figure 1: HTML system flow.
These pages can be customised in many ways to suit your website style and presentation. For
comprehensive information on customising your payment pages, see the Customising Guide (Advanced).
To customise payment pages
Click the Edit Payment Pages button— an easy-to-use wizard helps you control how the payment
pages are displayed. For more information see 7.1.3 Display parameters.
If you have enabled Payment Response messages, you can control how these pages are displayed by using
parameters in your submission. Payment Response enables you to automate and control your website. For
more information, see 6.3.5 Enabling and using Payment Response messages.
We gather credit/debit card details in these payment pages. This means there is no need for you
to do this in your website, although you do collect and send us shopper details. We then collect
the payment details, and process the rest of the transaction.
Currency selector box
This is where you choose the currency to be used for a particular payment from a shopper (if you accept
payment in more than one currency).
If some of your chosen currencies are missing from the Currency Selector Box in the payment page, please
check that you are using the correct Installation ID for the transaction. If this is correct, then your
currencies may not have been added to our system; in this case, please email the Worldpay Support team
at support@worldpay.com.
2.5 Testing your installation
You can test your site by carrying out test transactions in the Test Environment. This can be very useful
when you are developing your website, as it enables you to try out your pages with actual live debit and
credit cards without transferring funds.
This enables you to get a realistic sense of the whole payment processing procedure via Worldpay, without
any money ever changing hands.
You can access the test environment from the Merchant Interface, our online management tool.
For more information about testing your installation, see the Test and Go Live Guide.HTML Redirect Integration Guide > 2 Overview 15
You can also test your live merchant code (account) - this is different to running in the Test
Environment. For more information see the Test and Go Live Guide.
While you are testing, there is no risk of accidentally triggering a live transaction until you and Worldpay
have agreed that you are ready to go live.
If you try to submit a live payment before you go live, the payment is refused, and you receive an error
message telling you that there are no appropriate accounts to process your payment.
2.6 Steps to going live
When you have finished developing your site and integrating it with Worldpay, you’re ready to go live,
which means that you can accept and process real, live orders from customers.
These are the steps to going live:
1. Complete your testing, by sending us successful test transactions.
2. Request that we make your installation live. You do this by filling in the online Installation
Activation Details page, and sending us the URL of the site you want to make live, and some other
details. See the Test and Go Live Guide for further details.
3. We confirm your activation request by email.
4. We set your site live within two working days, providing we are satisfied with your technical
integration.
For further details of going live, see 3.2.4 Going live.HTML Redirect Integration Guide > 3 Integrating your website with Worldpay 16
3 Integrating your website with Worldpay
Integration is very straightforward – when you can successfully send us details of an
order and get an email response from us, you have integrated your website.
There are four ways to integrate your website with us, detailed below.
3.1 Use a Storebuilder package for simplicity and speed
The easiest way to get your website shop up and running is to use an off-the-shelf storebuilder package
that is already integrated with HTML Redirect. These packages provide you with a ready-made ‘shopping
cart’, which is a means for your customers to select goods from your store and then pay for them. For a list
of these, see Shopping carts.
If you are taking this route, see the Test and Go Live Guide for information about testing your website and
going live with it.
3.2 Use our ready-made HTML to integrate quickly and easily
If you are familiar with HTML, you can use our example HTML form as the basis for your site.
What you need:
A working Internet connection and your Installation ID, which is a unique 6-digit reference
number we assign to you
Some knowledge of HTML. If you have this, there are two options:
- Follow the steps outlined below in section 3.2.1. Setting up the HTML form quickly,
describing how to set up an integration using the simple example HTML form
- Or if you want to try out a complete, working, ready-to-go example of an integrated HTML
page, with an order details form already included, see 4. A complete HTML page.
3.2.1 Setting up the HTML form quickly
This uses an HTML submission form with a small number of tags containing parameters, which is
used as a template in your own web pages.
This is the quick set-up:
1. Copy and paste the example HTML form shown below into your website page advertising the
product you wish to sell. The form holds the details of the order, and sends this information to us
using its POST method, which is secure and encrypted.
2. Update the parameter values and elements to suit the product details in your website page. The
parameters included in this example are mandatory, and must be included in the form. See
section 3.5.3 Mandatory details for more information.HTML Redirect Integration Guide > 3 Integrating your website with Worldpay 17
Only update the parameter values, not the parameters themselves. If you decide to
rewrite the parameters, take care with spelling – they must be exactly as shown below
– and note that they are case-sensitive: INSTID is not the same as instId.
3. View the page in your browser, and select the 'Buy This' button. You are taken to our payment
service where you can follow the progress of the transaction through the payment pages. The test
version of the HTML example is set up for the Test Environment, so you can try it out without
worrying about transferring real money.
4. You’ll know your site is integrated if you can successfully get to the payment pages, and you can
receive an email about the test purchase. We send you email notifications of each transaction
automatically, including Test Environment transactions. You can use the example order details
form as the basis for all your website pages or you can develop them further from this point in
your own style.
Single and multiple items
A single order details form must describe a single total purchase rather than a series of items in a
shopping cart. If you want to sell multiple items, you must summarise the total purchase amount
and the description of the goods on your own site before passing the summarised details through
to Worldpay.
When you are happy with your site in Test, you can move to the live / production environment. See 3.2.4
Going live for details.
3.2.2 An example HTML form
The comments inside the symbols can be included in your HTML page; the browser
ignores them.HTML Redirect Integration Guide > 3 Integrating your website with Worldpay 18
the quotes after value= -->
Code example 1: Basic order details form
3.2.3 A test version of the order details form
This version of the basic order details form also has a simple structure. It uses the URL for our test
environment and includes the testMode parameter.
Because this is a test transaction no money ever changes hands. For details of using test
submissions see the Test and Go Live Guide.
Code example 2: Test version of a basic order details formHTML Redirect Integration Guide > 3 Integrating your website with Worldpay 19
You can specify the type of response you want from our system for a test submission by entering
REFUSED, AUTHORISED, ERROR or CAPTURED as the value in the name parameter. You can also
generate an AUTHORISED response by using a real name such as J. Bloggs. For more information,
see the Test and Go Live Guide.
3.2.4 Going live
When you have completed the development of your pages, and have tested them, you are ready to go live,
which means that you can accept and process real, live orders from customers. You can make the example
HTML form suitable for the live Production Environment by changing its URL and removing the testMode
parameter.
For more information, see the Test and Go Live Guide.
3.3 Develop your own custom system
If you have advanced HTML skills, you can develop your own fully automated ordering system, complete
with customised payment pages. But keep in mind that your order details submissions must contain the
four mandatory parameters as a basic minimum. See section 3.5.3 Mandatory details for details.
You can customise our payment pages so that they fit in with the look and feel of your own website—see
2.4 Customising your installation to suit you.
You can choose to have transaction details returned to your server and, if required, display your own
transaction confirmation message to your shoppers, using a feature called Payment Responses. For more
information, see 6.3.5 Enabling and using Payment Response messages.
3.4 Submitting a URL order details string
You do not have to use an HTML form to create and submit order details – you can use a URL query string.
For example, you can carry out integration by submitting this single URL string:
https://secure-test.worldpay.com/wcc/purchase?instId=123456&cartId=WorldPay+Test
&amount=40.00¤cy=GBP&desc=WorldPay+Test&testMode=100
Code example 3: URL order details string
3.4.1 Advantages and disadvantages
The advantages are that nearly all browsers support URL strings, and they are simple to code and to use.
However, because the recipient can see all the attributes and values in the URL string, you may not feel it is
secure.
This is an important difference when compared with using Worldpay’s example HTML forms, which are
encrypted and sent by the secure POST method.
3.4.2 URL string content
As is the case with form-based submissions, the URL order details string must contain the four mandatory
parameters, as shown in the example. See section 3.5.3 Mandatory details for more information.HTML Redirect Integration Guide > 3 Integrating your website with Worldpay 20
The URL string shown above is for the Test Environment, and the testMode parameter is specified
as 100 – this causes our system to treat the submission as a test submission.
If you specify any other value in the name field, such as a real shopper's name, the system responds with an
AUTHORISED test result.
The URL string may also contain a range of optional parameters. For more information about parameters,
see section 7. HTML Redirect parameters.
3.5 Order details
When your shopper is ready to pay for their goods, your website submits the order details to our payment
page. We then present the payment pages to the shopper for payment.
Your order details submission must contain at least the four mandatory parameters shown in
3.5.3 Mandatory details. It’s perfectly acceptable if that’s all it contains. In that case, the payment pages
open up to the shopper with empty fields – the shopper then has to enter details, such as name and
address, directly into the payment pages.
3.5.1 Including optional details in your order
Alternatively, you could include other optional details in your order details submission. For example, you
might gather name and address information in your own website pages, and include this information in
your order details submission. We can then pass this information on to the payment pages, so that it is
included when the pages are displayed to the shopper. For more information, see section 3.8 Managing
shoppers’ billing address details.
Including Recurring Payments in your order
Your submission could also contain 7.4 Recurring Payments (also known as FuturePay) details. Recurring
payments are where the shopper pays for a purchase – for example, a magazine subscription – over, say, a
year, with recurring monthly payments.
Including custom display settings in your order
You can also control the appearance of the payment pages by including custom display settings. See 7.1.3
Display parameters for details.
You cannot collect card details on your website. One feature of HTML Redirect is that Worldpay is
responsible for the collection, storage and processing of cardholder data. This helps to reduce
your costs, as otherwise you would be responsible for implementing the security measures
needed for full PCI DSS compliance.
3.5.2 Mandatory and optional details
Order details can be mandatory, in respect of either the order details submission or the payment pages.
For example, you can optionally include the shopper's address in the order details submission page, but if
you do not include the address, the shopper must in any case provide this information on the paymentHTML Redirect Integration Guide > 3 Integrating your website with Worldpay 21
page. See section 7.1.2 Optional parameters for full details of optional details, and whether or not they are
mandatory in the payment pages.
3.5.3 Mandatory details
The following four parameters must be included in the order details you submit to us:
Parameter Definition Example
Your Worldpay Installation ID. This is a unique 6-digit
instId reference number we assign to you. It tells us which payment 1234
methods and currencies your installation supports.
cartId A reference you assign to help you identify the purchase. 101KT0098
amount The total cost of the purchase. 25.35
currency The purchase currency, see Appendix B: ISO currency codes. GBP
Table 2: Mandatory parameters
All parameter names are case-sensitive.
3.5.4 Optional details
You may include some optional details when you submit an order, such as a shopper's billing address
details. But note that although they are optional in an order details submission, some of them are
mandatory in the payment pages, as described in 3.5.2 Mandatory and optional details. This means that
they can be left out of your order details message, but will have to be included in the payment pages in
order for the transaction to be processed.
You can also include Recurring Payments (FuturePay) parameters in an order details submission. For more
information, see 7.4 Recurring payments (FuturePay) parameters.
3.5.5 Your own custom fields
You can highly customise the payment pages, the result pages displayed after a transaction has taken place,
and the confirmation emails that you and your shoppers receive. This is done using the Payment Page
Editor, which is the simplest and fastest way to customise your payment page. You access the Payment
Page Editor via the Merchant Interface. For details of the fields you can customise, see 7.5 Custom
parameters.
If you want, you can carry out more detailed customisation – for details, see the Customising Guide
(Advanced).
3.6 Specifying the merchant code
In the HTML order details form you submit to us, you specify the merchant code to be used by using the
parameter accId1. For example:HTML Redirect Integration Guide > 3 Integrating your website with Worldpay 22
By default, our system searches your merchant codes in order until one suitable for the payment is found.
If none of the specified merchant codes matches, then our system goes on to try any other merchant codes
you may have. Hence, these parameters specify a preference rather than an absolute list of merchant
codes to use.
3.7 An example order details form with data
The form-based HTML code shown below is an example of the data that can be submitted to us for a single-
item payment.
This URL is for the Test Environment, so the testMode parameter is specified as 100 – this makes
our system treat the submission as a test submission.
You can specify the type of response you want from our system for a test submission by entering
REFUSED, AUTHORISED, ERROR or CAPTURED as the value in the name parameter. You can also
generate an AUTHORISED response by using a real name, as shown in this example (J. Bloggs).
For more information see the Test and Go Live Guide. This is the safe
encrypted
method by which
These are the Mandatory parameters – your message is
see 3.5.3 Mandatory details. sent to us.
Code example 4: Order details form with data
Shopper’s billing address details – if you capture this information from the shopper on your website and
submit it to us, we add it to the payment pages, saving the shopper from having to enter them again.
The shopper can change any of the address details on display in the payment pages, unless you specify
that they cannot. You do this by specifying that these details are fixed data. For more information, see
section 3.8 Managing shoppers’ billing address details.HTML Redirect Integration Guide > 3 Integrating your website with Worldpay 23
For information about the parameters included in this form, see 3.5 Order details . For a full list of all the
parameters that can be submitted to initiate a payment, see 7. HTML Redirect parameters.
3.8 Managing shoppers’ billing address details
If you pass the shopper's billing address details to us when you submit order details, we automatically place
them into the billing address fields that the shopper would otherwise be required to enter in the payment
pages. However, the shopper can change these address details in the payment pages unless you specify
that they are fixed data.
3.8.1 Fixing and hiding parameters
To make sure your shopper can't change their billing address details on the payment pages:
1. Make the billing address fields mandatory on your site – how you do this is a matter of personal
choice.
2. Use an additional parameter in your order details called fixContact to lock the contact information
in the payment page.
Using the fixContact parameter locks the address information passed to us, so that your shoppers
cannot change this information when they reach the payment pages, as shown in the example below.
Alternatively, you can use the hideContact parameter to hide the address information of shoppers on
the payment pages.
For V.me by Visa transactions, the billing address details supplied by V.me override any billing
address submitted by you, even if the fixContact and hideContact parameters are used.
3.8.2 Examples of fixContact and hideContact use
The following example shows you how to use the fixContact and hideContact parameters.
If you use both the fixContact and hideContact parameters, the hideContact parameter
takes precedence.
This fixes the address
information so your
shopper can’t change it
on the payment pages
This hides the address
information on the
payment pagesHTML Redirect Integration Guide > 3 Integrating your website with Worldpay 24
Code example 5: Using fixContact and hideContact
For more information on parameter names for contact details, see section 7. HTML Redirect parameters.
3.9 Bypassing the Payment Selection page
If you already know a shopper's desired payment method, you can enable the shopper to skip or bypass the
Payment Selection page and go directly to the Payment page. Here they can enter details for their chosen
payment method, such as the card number and its expiry date.
If you have enabled multiple languages and you allow shoppers to bypass the Payment Selection
page, the Select Language list box usually displays on the Payment Page. To avoid this, you need
to specify a language and then "fix" it – for details, see Specifying the Language in the
Customising Guide (Advanced).
To enable bypassing, you must supply the payment method in the order details submission by including the
parameter paymentType, with its value set to the appropriate code for the payment method, as shown in
the example below. See Appendix E: Payment method codes.
You may need to modify this HTML fragment, so that it displays only the payment methods that
our payment service can accept for your installation.
The paymentType parameter,
Card Type with some of its possible
payment methods shown below
Payment method
American Express
Diners
ELV
JCB
Mastercard
Mastercard Debit
Laser
Maestro
Visa
Visa Debit
Visa Electron
Visa Purchasing
V.me
I will choose a method laterHTML Redirect Integration Guide > 3 Integrating your website with Worldpay 25
Code example 6: Collecting the payment method
3.9.1 How to advise your shoppers about payment methods and cards
If you collect payment methods on your website you may wish to add some supporting information to
assist your shoppers in their choice of payment method, such as advice on identifying cards.
You may also want to advise your shoppers about misreading their cards, which may cause them to select
the wrong payment method for their card.
For example, they might select Visa as the payment method, when they actually have a Maestro card. If
they do this and enter the Maestro card number into the Payment page, it will not match, and in this case
their payment attempt will fail. However, in this case we redisplay the Payment page, and thus enable
entry of payment details for the selected Visa card.
Add extra shopper advice to your Payment pages
When we redisplay the Payment page, this could be a good opportunity for you to add extra advice to your
customised Payment Service pages to assist the shopper. For instance, you could enable shoppers to review
their order, or you could provide a link to a troubleshooting page, before they try again. It could cut down
on the number of issues in your system, and increase the number of successful transactions.
To do this, you simply modify our error messages and add you own. Make yourself familiar with the error
messages that we display to shoppers for incorrect entry of payment details, and then modify them within
the appropriate messages_*.properties files.HTML Redirect Integration Guide > 4 A complete HTML page 26
4 A complete HTML page
This chapter describes a complete and working example of a simple integrated
HTML page. It includes an order details submission form, and helpful comments.
To use the page:
1. Copy the entire section of HTML code shown below, and save it as an HTML file in a suitable
folder. To do this, use Notepad++, PS Pad or other source text editor.
2. Double-click the HTML file in the folder to run it. When the page opens in your browser, it
displays the table shown below:
Figure 2: A complete HTML page
3. Select one of the Buy buttons and then follow the sequence of secure pages to experience a
transaction in progress.
4. Use the following test card details to proceed with the transaction (for more test card details see
Appendix D: Test card numbers):
Visa Card Number: 4917610000000000 or, MasterCard Number: 5454545454545454
Expiry Date: A date later than today but within seven years from submission
Security Code: 123
The transaction is sent to the Test Environment so no actual money changes hands. An email showing the
transaction details is sent to the address you specify in the payment pages.
If you want to view test transaction details for your own merchant code in the Merchant
Interface, enter the test installation ID '1234' for the instId parameter value in the HTML code.
4.1 HTML for a complete pageHTML Redirect Integration Guide > 4 A complete HTML page 27
HTML Redirect 0.1
td {text-align:"left"; vertical-align:"middle"; font-
family:"arial"; color:"black"} h1,h2,h3,h4,h5,h6,h7 {text-align:"center";
vertical-align:"middle"; font-family:"arial"; color:"black"}
function calc(productNo)
{
if (productNo==1)
{
document.BuyForm.amount.value = 5.00;
document.BuyForm.desc.value = "Product 1";
}
else if (productNo==2)
{
document.BuyForm.amount.value = 10.00;
document.BuyForm.desc.value = "Product 2";
}
// To add a new product price, copy from hereHTML Redirect Integration Guide > 4 A complete HTML page 28
else if (productNo==3)
{
document.BuyForm.amount.value = 15.00;
document.BuyForm.desc.value = "Product 3";
}
//...to here, and paste directly below.
// You will need to alter the 'productNo' and its price value.
}
One-Stop Shop
Product 1
Price: £5.00
Product 2
Price: £10.00
Product 3
Price: £15.00
Code example 7: HTML for a complete pageHTML Redirect Integration Guide > 5 Telling you about payment results 29
5 Telling you about payment results
This chapter describes the types of payment result sent to you after we process your
payment.
It describes:
The different ways you can view or receive information about the payment result
The different types of payment result
The shopper can cancel at any point in the payment process, including when a card is declined by
its issuer. The shopper always has the choice of trying another method of payment, such as
another card.
5.1 Viewing the payment result
When a payment has been processed, information about the processed transaction is made available to
you in the following ways:
Information channels Description
Merchant Interface You can log in to the Merchant Interface, which is our payments
management tool, to view details of a successful transaction.
Email confirmations We send you an email about each successful transaction. The confirmation
email is sent to the address you specified for the merchant code receiving
the payment.
Payment Response message If you have Payment Responses enabled, a message is sent to you whenever
a payment transaction is either successfully completed or cancelled. All the
details of the transaction are sent back to you in the message. For more
information, see section 6.3.5. Enabling and using Payment Response
messages.HTML Redirect Integration Guide > 5 Telling you about payment results 30
5.2 Types of payment result
The following table shows the types of payment result sent to you when a payment has been processed.
Status / condition Transaction ID generated Email Payment notification sent
(view with the Merchant Interface) sent
Successful Yes Yes Yes
Declined Yes No No
Cancelled No No Yes
Browser closed, No No No
connection broken
or similar
Table 3: Types of payment result
The Payment Notification sent column is only relevant if you have Payment Responses enabled.
For more information, see 6.3.5. Enabling and using Payment Response messages.You can also read