INSTRUCTION MANUAL - Clever Company
←
→
Page content transcription
If your browser does not render page correctly, please read the page content below

INSTRUCTION
              MANUAL
          Cord-connected inflatable hot tub
           with built in blower, heater and
                   control device
        ETL MODEL No. 10001 / 10002 / 10003 / 10004

CLEVERSPA ETL US IM_FINAL.indd 1                      07/01/2020 16:17
CONTENTS

   Safety Instructions	                                                                                              02 - 03
   CleverSpa® Parts Checklist                                                                                             04
   Indoor & Outdoor CleverSpa® Installation		                                                                             06
   Setting up your CleverSpa®		                                                                                      07 - 08
   Operating your CleverSpa®                                                                                               10
   Maintenance & Repair of your CleverSpa®                                                                                  11
   Cleaning & Storing away your CleverSpa®	                                                                                12
   Troubleshooting	                                                                                                        13
   Returns                                                                                                                 14
   Warranty	                                                                                                               15

   IMPORTANT SAFETY INSTRUCTIONS - READ, FOLLOW AND SAVE ALL INSTRUCTIONS
   FOR FUTURE REFERENCE - SEE PAGE 15 FOR A REPLACEMENT SAFETY SIGN
   When installing and using this electrical equipment, there are basic safety precautions that
   should always be followed, including the following:
   • W  ARNING: Do not permit children to use this product unless they are closely supervised at all times.
   • A wire connector is provided on this unit to connect a minimum, 6 AWG (13.3mm2) solid copper conductor
       between this unit and any metal equipment, metal enclosures of electrical equipment, metal water pipe, or
       conduit within 5 feet (1.5m) of the unit.
   • DANGER: Risk of injury.
       a) Replace damaged cord immediately.
       b) Do not bury cord.
       c) Connect to a grounded, grounding type receptacle only.
   •  WARNING: This product is provided with a ground-fault circuit-interrupter within the plug. The GFCI must be
       tested before each use. With the product operating, When the product stops operating, this indicates that the
       door is equipped with an electrical interlock. Next, push the test button on the GFCI and close the service door.
       The product should not operate. Now open the service door, push the reset button on the GFCI and close the
       service door. The product should now operate normally. When the product fails to operate in this manner, there
       is a ground current flowing indicating the possibility of an electric shock. Disconnect the power until the fault
       has been identified and corrected.
   • DANGER: Risk of Accidental Drowning. Extreme caution must be exercised to prevent unauthorized access by
       children. To avoid accidents, ensure that children cannot use this hot tub unless they are supervised at all times.
   • DANGER: Risk of Injury. The suction fittings in this hot tub are sized to match the specific water flow created
       by the pump. Should the specific water flow created by the pump? Should the suction fittings or the pump?
       Be sure that the flow rates are compatible. Never operate hot tub if the suction fittings are broken or missing.
       Never replace a suction fitting with one rated less than the flow rate marked on the original suction fitting.
   • DANGER: Risk of Electric Shock. Install at least 5 feet (1.5m) from all metal surfaces. As an alternative, a hot tub may
       be installed within 5 feet of metal surfaces if each metal surface is permanently connected by a minimum, 6 AWG
       (13.3mm2) solid copper conductor to the wire connector on the terminal box that is provided for this purpose.
   • DANGER: Risk of Electric Shock. Do not permit any electric appliance, such as a light, telephone, radio, or
       television, within 5 feet (1.5m) of a hot tub.
   • WARNING: To reduce the risk of injury:
       a) The water in a hot tub should never exceed 40°C (104°F). Water temperatures between 38°C (100°F) and
           40°C (104°F) are considered safe for a healthy adult. We recommend never exceeding 38°C for young
           children and when hot tub use exceeds 10 minutes.
       b) Since excessive water temperatures have a high potential for causing fetal damage during the early months
           pregnant women should limit hot tub water temperatures to 38°C (100°F).
       c) Before entering a hot tub, the user should measure the water temperature with an accurate thermometer
          since the tolerance of water temperature-regulating devices varies.
       d) The use of alcohol, drugs, or medication before or during hot tub use may lead to unconsciousness with
           the possibility of drowning.
       e) Obese persons and persons with a history of heart disease, low or high blood pressure, circulatory
          system problems, or diabetes should consult a physician before using a hot tub.

                                                               02

CLEVERSPA ETL US IM_FINAL.indd 2                                                                                    07/01/2020 16:17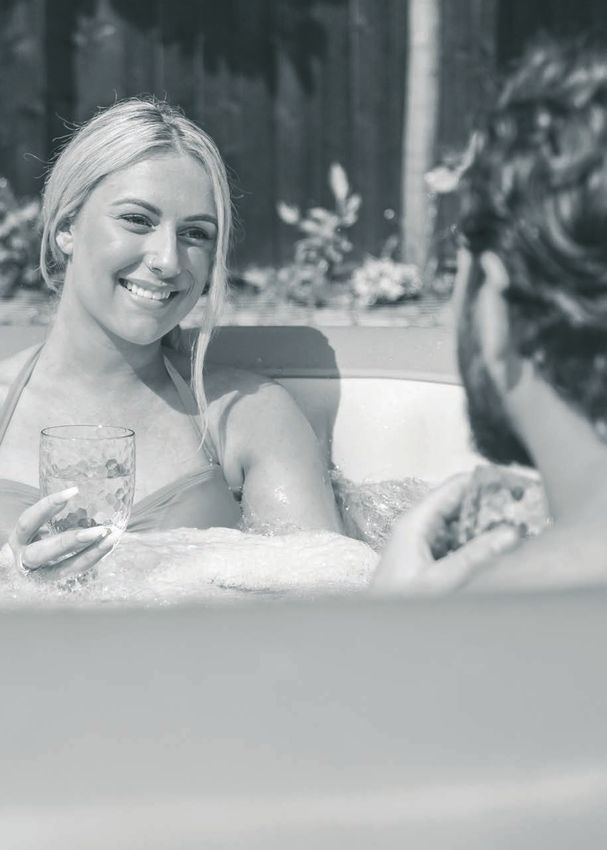
SAFETY INSTRUCTIONS

                           f)  Consult your doctor before use as some medication may induce drowsiness while other medication may
                                affect heart rate, blood pressure, and circulation.
                           g) To accurately check the water temperature we recommend the use of a calibrated digital thermometer
                              or mercury thermometer, ensuring this matches with the spa control panel (see page 10 regarding how
                              to operate your hot tub).
   •  Hypothermia occurs when the internal temperature of the body reaches a level several degrees above
      the normal body temperature of 37°C (98.6°F). The symptoms of hypothermia include an increase in
      the internal temperature of the body, dizziness, lethargy, drowsiness and fainting.
       The effects of hypothermia include failure to perceive heat, a failure to recognise the need to exit the
       CleverSpa®, an unawareness of impending hazards, fetal damage in pregnant women, a physical inability
       to exit the CleverSpa® and unconsciousness resulting in the danger of drowning. WARNING – The use
       of alcohol, drugs, or medication can greatly increase the risk of fatal hypothermia.

   SAVE THESE INSTRUCTIONS
   SPECIFIC REQUIREMENTS FOR THE SUCTION FITTING
   •  Required replacement of the suction fitting may only be performed by authorised representatives of Clever
       Company Limited.
   •  This suction fitting is for surface mounted wall installation only, and can be classed as a self-contained hot
       tub fitting for multiple outlet use only.
   •  Suction outlets must not be modified from the original position and located on seating areas or on the
       backrests for such seating areas.
   •  When two or more suction fittings are used on a common suction line, they shall be separated
       by a minimum of 3ft, or if any are located closer, they shall be located on two different planes.
   •  In the event that a suction outlet becomes blocked, the hot tub should not be used until the defective outlet is
      fixed or replaced by an authorised representative. The remaining suction outlets serving that system shall have
      a flow rating capable of the full flow of the pump(s) for the specific suction system.
   •  Only the pipework utilised in the original construction (OD/ID) can be used on this hot tub and cannot be
       interchanged for other sizes.

                                                              Flow vs Head Loss for Suction Fitting
                                                               Model No. MX01 (bbspa08500-20)
                            2

                           1.8                                                                                               1.73

                           1.6
                                                                                                                 1.39
                           1.4
                                                                                                      1.2
   Total Head Loss (PSI)

                           1.2

                            1                                                                 0.89
                                                                                   0.8
                           0.8                                     0.67   0.71
                                                0.57   0.62
                           0.6       0.53
                           0.4

                           0.2
                                 0
                            0
                                 0          5                 10           15            20                 25          30          35
   •  Wall mounted only.                          Flow (GPM)

   •  Suction fitting reference MX01.
   •  Replace within 3 installed year.
   •  Required replacement of the suction fitting may only be performed by authorised representatives of Clever
       Company Limited.
                                                                                                                    o     o
   •  To protect the life of the suction fitting, the water in this hot tub should never be allowed to drop below 5 C, 41 F.
   •  The maximum flow rate through the suction fitting must not exceed 14 gpm.
   •  Before each use of the spa/hot tub, please inspect the suction fitting and its fastening for damage or tampering.
   •  We will state missing, broken or cracked/damaged suctions fittings must be replaced before use
   •  The suction fitting must be installed tightly, a loose fitting must be tightened before any use of the spa/hot tub.
   •  The flow rate through the suction fitting must not be increased through the introduction/use of an increased
       capacity flow pump.

                                                                                                      03

CLEVERSPA ETL US IM_FINAL.indd 3                                                                                                         07/01/2020 16:17
CLEVERSPA® PARTS CHECKLIST

                           Please check all parts are present in your box before first use.
                          To order new or missing parts please visit: clevercompany.com

                              GROUNDSHEET (A)                   FILTER CARTRIDGES (B)               FILTER PROTECTOR
                                                                                                        COVER (C)

                              INFLATION HOSE (D)                CLIP-ON TOP COVER (E)               REPAIR PATCHES (F)

                                                DRAINAGE PLUG (G)                      SAFETY LOCKING
                                                                                        CLIP KEYS (H)

    PRODUCT SPECIFICATION                 71” CIRCULAR               82” CIRCULAR             73” X 73” SQUARE       71” CIRCULAR

    ETL Model Number:                     10001                      10002                    10003                  10004

    Capacity                              2-4 People                 4-6 People               4-6 People             Up to 7 People

    Water Capacity (approx.)              211 Gallons                264 Gallons              250 Gallons            270 Gallons

    Actual Water Flow (approx.)           350 Gal/H                  350 Gal/H                350 Gal/H              350 Gal/H

    Inflated Size (approx.)               71” x 25.6”                82” x 25.6”              73” x 73” x 25.6”      71” x 25.6”

    Product Weight (approx.)              53lbs                      57.5lbs                  57.5lbs                63.4lbs

    Filled Weight (approx.)               1,830lbs                   2,280lbs                 2,160lbs               2,310lbs

    No. of Bubble Jets                    110                        130                      140                    140

    Pump Voltage                          120V ~ 60Hz 12A            120V ~ 60Hz 12A          120V ~ 60Hz 12A        120V ~ 60Hz 12A

    Maximum Temperature                   104oF (40oC)               104oF (40oC)             104oF (40oC)           104oF (40oC)

    Temperature Rise (approx.)            3-4oF/H (1.5-2oC/H)        3-4oF/H (1.5-2oC/H)      3-4oF/H (1.5-2oC/H)    3-4oF/H (1.5-2oC/H)

    Rated Power Input for Heating         1200W                      1200W                    1200W                  1200W

    Rated Power Input for Bubbling        600W                       600W                     600W                   600W

                                                                           04

CLEVERSPA ETL US IM_FINAL.indd 4                                                                                                    07/01/2020 16:17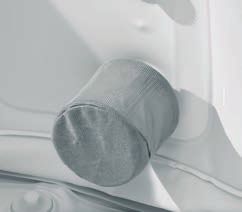
05

CLEVERSPA ETL US IM_FINAL.indd 5        07/01/2020 16:17
BEFORE YOU SET UP YOUR CLEVERSPA®

      Before setting up outdoors                             Before setting up indoors
      1. Y ou must have solid support foundation where      1. F
                                                                 loor must be able to withstand
          you install your CleverSpa®. When setting up,         weight of the CleverSpa® + occupants.
          ensure there are no sharp objects that could       2. Floor should be a non-slip, level surface.
          damage the CleverSpa® and the location is level
          so the CleverSpa® sits properly.                   3. Suitable drainage is essential when
      2. During filling, emptying or when in use, water        installing your CleverSpa® indoor.
          may spill out. You should install it near to a        Carefully consider the placement
          drainage point that is able to accept the total       of your hot tub before installation.
          volume of water.
      3. Do not leave the surface of the CleverSpa®
          exposed to direct sunlight for long periods
          of time as this may affect the strength of
          the welds.

                                                        06

CLEVERSPA ETL US IM_FINAL.indd 6                                                                       07/01/2020 16:17
SETTING UP YOUR CLEVERSPA®
1 2 3
A
ay out groundsheet (A) on
L Unpack CleverSpa® on Unfold the CleverSpa®, ensuring
a flat even surface, clear of any groundsheet. sides are as upright as possible.
sharp objects.
4 5 6
J
K
L
Uncoil cord and RCD/GFCI Connector Locations:
Remove protective plastic plug, located under built-in Air Outlet (J), Inflation Valve (K)
from connectors. control unit. and Water Outlet (L).
7 8 9
J K
J
D
Unscrew outer cap from Inflation
Unscrew cap from Air Outlet (J). Screw Hose (D) on to Air Outlet (J). Valve (K). Do not unscrew the
black inner valve.
10 11 12
D K
Push the Hose (D) into Press ‘Inflate/Air Jets’ on control
panel to start inflation (red light To aid the inflation pull the sides
Inflation Valve (K). Plug into
will appear). upright and spread out the base.
mains and switch on.
07
CLEVERSPA ETL US IM_FINAL.indd 7 07/01/2020 16:17SETTING UP YOUR CLEVERSPA®
13 14 15
D
K
K
Once inflated, press the Remove Hose (D) from Screw cap back onto
‘Inflate/Air Jet’ on control panel
to ‘Stop’ inflation. Inflation Valve (K). Inflation Valve (K).
16 17 18 M
D
J J
G
Unscrew Hose (D) Screw cap back Water Outlet (M)
from Air Outlet (J). onto Air Outlet (J). Drainage Plug (G).
19 20 B 21
N2
C
N1
Filter Connectors Screw Filter Cartridge (B) Add the Filter Protector
on to Filter Connectors (N1 & N2). Cover (C) onto the
(N1 & N2) Drainage Plug (G).
Filter Cartridges (B).
22 23 24
Add water to level, no Set temperature on control panel*. Double lock clips with
higher than ‘Max’ level. Clip on Top Cover (E) to retain the heat. Safety Locking Keys (H).
*See page 10 for full operating instructions.
You can also see our Clever Clips on how to setup your CleverSpa® just visit clevercompany.com
08
CLEVERSPA ETL US IM_FINAL.indd 8 07/01/2020 16:1709 CLEVERSPA ETL US IM_FINAL.indd 9 07/01/2020 16:17
OPERATING YOUR CLEVERSPA®

   SETTING THE TEMPERATURE                                 INFLATE/AIR JETS
   Press ‘SET TEMP/LOCK’ and the numbers on                Press ‘INFLATE/AIR JETS’ to start air jets - a red
   display screen will start to flash. Increase/           light will appear. Press again and air jets will
   decrease temperature by pressing ‘TEMP UP’              stop working - red light will go out.
   or ‘TEMP DOWN’.
                                                           Air jets stop automatically after 20 minutes.
   Choose desired temperature, press ‘SET TEMP/            To reset, wait for 10 minutes and press
   LOCK’ again to confirm. Temperatures can be             ‘INFLATE/AIR JETS. Air jets can be stopped/
   set between the range of 20°C to 40°C                   started any time during their 20 minute cycle.
   (68oF - 104oF). (See safety instructions for
   recommended operating temperatures).                    Air Jets will stop after 20 minutes to avoid
                                                           internal pump over-heating.

                                                                                    ‘FILTER

   HEATER                                                  FILTRATION SYSTEM
   Press ‘HEATER’, red light will appear.                  Press ‘FILTER’, red light will appear, pump will
   Press ‘HEATER’ again and heating system                 start to work. Press ‘FILTER’ again to stop pump,
   will stop, red light will go out.                       red light will go out.
   When heater system is on, filter system will            After approx. 168 hours, ‘FC’ will appear on
   switch on automatically to circulate water. When        display screen (flashing), with a warning tone.
   temperature has reached 1°C above pre-set               Red light will be lit on ‘FILTER’, pump will not
   temperature, heating system will stop working,
                                                           be operational. Heating system will also not
   but light will remain on. Filter pump will
                                                           work and red light will be off.
   continue to operate even when heater
   is not functioning.                                     To make sure filtration system is off, press
   When water falls 1°C below pre-set temperature,         ‘FILTER’. ‘FC’ on display screen will disappear
   heating system will automatically heat water            as well as warning tone. Water temperature will
   back to 1°C above selected temperature.                 be displayed, all functions will return to normal.
   Once achieved, heater will stop to allow                ‘FC’ and warning tone remind user to replace filter.
   temperature to settle at pre-set value.

                                                      10

CLEVERSPA ETL US IM_FINAL.indd 10                                                                    07/01/2020 16:17
MAINTENANCE & REPAIR OF YOUR CLEVERSPA®
WATER LEVEL
Water should be filled and maintained between ‘Min’ and ‘Max’ fill lines as indicated on inner wall
of your CleverSpa®
IMPORTANCE OF WATER TREATMENT
You need to regularly monitor and appropriately treat the water in your CleverSpa®.
PEOPLE WITH THE FOLLOWING TRAITS ARE AT HIGHER RISK INCLUDING:
• Diabetes, lung and heart disease • Smokers and heavy drinkers
• Anyone with an impaired immune system • People suffering from chronic respiratory or kidney disease.
For more information contact your doctor.
WATER AND LEGIONNAIRES DISEASE?
Legionnaires’ disease can be contracted by inhaling small droplets of water (called aerosols), which
are suspended in the air and contain the bacteria. Certain conditions increase the risk of Legionella if:
• W
ater temperature in all or some parts of the system is between 20-45°C (68°F-113°F), which is suitable
for growth of the bacteria.
• It is possible for breathable water droplets to be created and water is stored and/or re-circulated.
• There are deposits that can support bacterial growth providing a source of nutrients for the
organism e.g. rust, sludge, scale, organic matter and biofilms (from the body).
For more information visit: clevercompany.com/support/chemical-maintenance
CLEANING YOUR CLEVERSPA®
Detergent residues, dissolved solids from bathing suits and chemicals will gradually accumulate
in the water. To clean your CleverSpa®, use soap and water then rinse thoroughly.
Please note: do not use hard brushes or abrasive cleaners.
REPAIRING PUNCTURES IN YOUR CLEVERSPA®
If your CleverSpa® is torn/punctured, use repair patches. Completely dry area to be repaired, apply
strong adhesive to repair patch and then cover the damaged area. Smooth the surface to remove
any air bubbles. Leave to dry for 12 hours before using the CleverSpa®.
For more information cleaning and repairing your hot tub visit:
clevercompany.com/support/faqs/cleverspa-faqs
11
CLEVERSPA ETL US IM_FINAL.indd 11 07/01/2020 16:17CLEANING & STORING AWAY YOUR CLEVERSPA®
HOW TO EMPTY YOUR CLEVERSPA®
1. Firstly, remove the CleverSpa® plug from the electrical mains.
2. Remove the screw cap from the water outlet (L) (below the pump system of the CleverSpa®) ensuring
the Drainage Plug (G) is still inserted to prevent unexpected draining.
3. Screw the inflation hose (D) onto the water outlet (L) and direct the open end of the hose appropriately.
4. Remove the drainage plug from the outlet within the floor of the CleverSpa®, so the water can flow out.
5. When the CleverSpa® is completely drained of water, you must operate the bubble function for 30
seconds to drain any remaining water from the pipeline.
6. When draining has finished, remove the inflation hose (D) and replace the drainage plug (G) and
water outlet cap (L).
HOW TO DEFLATE YOUR CLEVERSPA®
1. Locate the black two part air valve on the spa (see point 9) on ‘setting up your CleverSpa®’ item (K).
2. Fully unscrew and remove the rapid deflation air valve turning anti-clockwise (K).
3. Fold the spa away carefully to direct and remove as much air as possible through the open valve.
STORING YOUR CLEVERSPA®
Make sure all the water is completely drained from the CleverSpa® and pump system. This is vital in
extending the life of your CleverSpa®. We recommend the use of a wet/dry vacuum to blow out or
suck up water from the CleverSpa® pipes and pump lines. Remove the filter cartridge.
CleverSpa® should be placed in the bag provided and stored in a dry place, ideally raised off the floor
and away from any extreme temperatures.
Please note: Plastic becomes brittle and susceptible to breakage when exposed to subzero temperatures
and this can severely damage your CleverSpa®. Leaving your CleverSpa® outside and uncovered during
the winter months will void your warranty.
CLEANING THE WATER FILTER CARTRIDGE & MESH FILTER
If using your CleverSpa® 2-3 times per week, we suggest that you change your
filter every 2 weeks to maintain the best performance.
1. Remove the filter protector cover (C) and then remove the filter cartridge (B).
FILTER
2. The filter cartridge can be rinsed periodically under a cold tap and reused.
CARTRIDGE (B)
However, if the filter cartridge remains soiled and discoloured the filter cartridge
should be replaced. If any holes are present in the paper filter or the paper
in the cartridge is noticeably worn, replace the filter with a new one before
further use. We DO NOT recommend the use of pressurised water to clean
any CleverSpa® filters.
3. Replace
the filter protector cover (C) over the filter cartridge (B) and attach
to the filter connector (N1 & N2) by turning it clockwise until hand tight. FILTER PROTECTOR
COVER (C)
To help to keep your water clean, check your filter cartridge every day.
To order filters and chemicals for your CleverSpa®, please visit: clevercompany.com
12
CLEVERSPA ETL US IM_FINAL.indd 12 07/01/2020 16:17TROUBLESHOOTING
SOME TIPS TO HELP YOU TO DIAGNOSE AND RECTIFY COMMON SOURCES OF TROUBLE:
PROBLEMS POTENTIAL CAUSES SOLUTIONS
Air jet system A1 Air pump too hot A1 U nplug system. After air pump has
is not operating A2 Something wrong with cooled, insert plug and press air jets
power box button to activate
A3 Air Pump in cooling mode A2 Wait for 10 Minutes and restart
A3 Call CleverSpa® Aftersales if does not reset
Heating system A1 Temperature is set too low A1 S
et to a higher temperature 20-40°C
does not operate A2 Dirty filter cartridge (68oF-104oF) than current water temperature
A3 Improper water levels A2 Clean/replace filter cartridge
A4 Heating element failure A3 Add water to specified levels
A4 Call CleverSpa® Aftersales if does not reset
Filtering system A1 Dirty filter cartridge A1 Clean/replace filter cartridge
does not operate / A2 Something wrong A2 Call CleverSpa® Aftersales if it does not reset
Rattling noise when with power box A3 Ask a professional electrician to check
switching filter on household electrical supply
is functioning correctly
CleverSpa® leakage A1 CleverSpa® is torn or punctured A1 Use repair patch provided
Water not clean A1 Insufficient filtering time A1 Increase filtration time
A2 Dirty filter cartridge A2 Clean/replace filter cartridge
A3 Improper water maintenance A3 Refer to chemical
manufacturer’s instructions
Display temperature A1 R esidual water in the CleverSpa® A1 U
nplug from mains and wait.
is higher than 40oC, will continue to be heated Temperature will start to reduce
after stopping by residual temperature and return to normal
heating function A2 Water inlet through filter system A2 Clean the inlet
may be blocked A3 Call CleverSpa® Aftersales if does not reset
Code Cause Solution
FC When filtration system has worked for approx. Check filter and change if necessary.
168 hours, ‘FC’ will appear on display with a warning Once done, press filter again. ‘FC’ error
tone. Red light will still be lit on filter, pump will code will disappear, and warning tone
not be operational. Heating system will not will stop. Water temperature will be
work, and red light will be out on heater. displayed, all functions will return
to normal.
SL/HL Temperature Issue Contact CleverSpa® Aftersales on:
support.usa@clevercompany.com
SH Water Temperature Sensor Issue
Contact CleverSpa® Aftersales on:
support.usa@clevercompany.com
CORRECT DISPOSAL OF THIS PRODUCT
This marking indicates that this product should not be disposed with other household waste throughout the EU. To prevent possible
harm to the environment, or human health from uncontrolled waste disposal, recycle it responsibly to promote the sustainable reuse
of material resources. To return your used device, please use the return and collection systems or contact the retailer where the
product was purchased. They can take this product for environmental safe recycling.
13
CLEVERSPA ETL US IM_FINAL.indd 13 07/01/2020 16:17RETURNS
CHANGED YOUR MIND AND NEED TO RETURN YOU HOT TUB?
PLEASE FOLLOW THE BELOW INSTRUCTIONS:
• If you have purchased a CleverSpa® and have simply changed your mind, follow the retailers instructions
for returns. You will need to register your warranty at: clevercompany.com/support/warranty and will
require proof of purchase.
DEFECTIVE ITEMS
If your item is defective in any way, i.e. it doesn’t work but you can’t identify why, in the first instance
please consult our FAQ section at clevercompany.com as there may be a simple solution to the
issue, if this does not help to resolve the issue, email: support.usa@clevercompany.com for assistance.
DAMAGED ITEMS
If you receive an order with obvious shipping damage from the retailer, then we suggest the delivery is
refused. If the delivery has been accepted and then shipping damage is found, please follow the specific
instructions advised by the retailer.
In all circumstances please save all packaging material and paperwork for the order. Please be aware that
if you dispose of packaging material or attempt to return the merchandise without contacting the fulfiller,
you jeopardise your chances of making a claim, and you may not receive a credit for the return.
LIMITS OF RESPONSIBILITY
CleverSpa® accept no responsibility for misuse or user damage and/or loss of parts incurred during
operation or use of the CleverSpa®.
This warranty relates to all CleverSpa’s bought in the US and covers the following areas:
• CleverSpa® Pump Heater: 12 months from the date of purchase
• CleverSpa® Cover & Liner: 6 months from the date of purchase
This warranty is not transferable if the goods are resold after the original purchase.
Your CleverSpa® is designed and manufactured for domestic use only. The CleverSpa® Warranty does not
extend to any commercial businesses operating in the rental of CleverSpa® hot tubs.
14
CLEVERSPA ETL US IM_FINAL.indd 14 07/01/2020 16:17WARRANTY
REGISTERING YOUR WARRANTY
To register your warranty, visit clevercompany.com/support/warranty and complete the form within
28 days of purchase. The warranty will start from the date of purchase which must be verified by proof
of purchase.
For up-to-date troubleshooting advice, technical information and FAQs please visit our online help
centre at support.usa@clevercompany.com.
WARRANTY CLAIMS
Before making a claim, we may be able to answer your query, simply visit clevercompany.com/support/
cleverspa-faqs for further information.
If the FAQs don’t solve the issue and you need to make a claim, please ensure that you have registered
your warranty and contact us by email at: support.usa@clevercompany.com. Our dedicated Aftersales
Team will endeavour to answer all messages within 48 hours.
15
CLEVERSPA ETL US IM_FINAL.indd 15 07/01/2020 16:17SAFETY SIGN POSTING
Please post the ‘Safety Sign’ provided in an area visible
to all users of the hot tub, to alert them of the safety rules and warnings.
REPLACEMENT SAFETY SIGN
To obtain additional or a replacement ‘Safety Sign’, please contact
Clever Company on support.usa@clevercompany.com.
EXAMPLE SAFETY SIGN
General Enquiries, Returns, Spare Parts, Repairs & Chemical Advice
visit: clevercompany.com
Clever Company Ltd. UK Address: Oldgate, St.Michael’s Industrial Estate, Widnes, Cheshire, WA8 8TL.
European Address: Radarweg 29, 1043 NX Amsterdam, Netherlands.
CLEVERSPA ETL US IM_FINAL.indd 16 07/01/2020 16:17You can also read