Instruction Manual Xfinity Li-ION 20V JOBSITE Radio - Shopify
←
→
Page content transcription
If your browser does not render page correctly, please read the page content below
Xfinity Li-ION 20V
JOBSITE Radio
Instruction Manual

                                          MODEL NUMBER TRD18MA.9
                                                                Version number: 003

    IMPORTANT
    Read carefully before use             1300 889 028         info.aldi@positecgroup.co
                                                                                       m

    Keep for future reference
                                MODEL: TRD18MA.9   PRODUCT CODE: 8307            06/2019
2
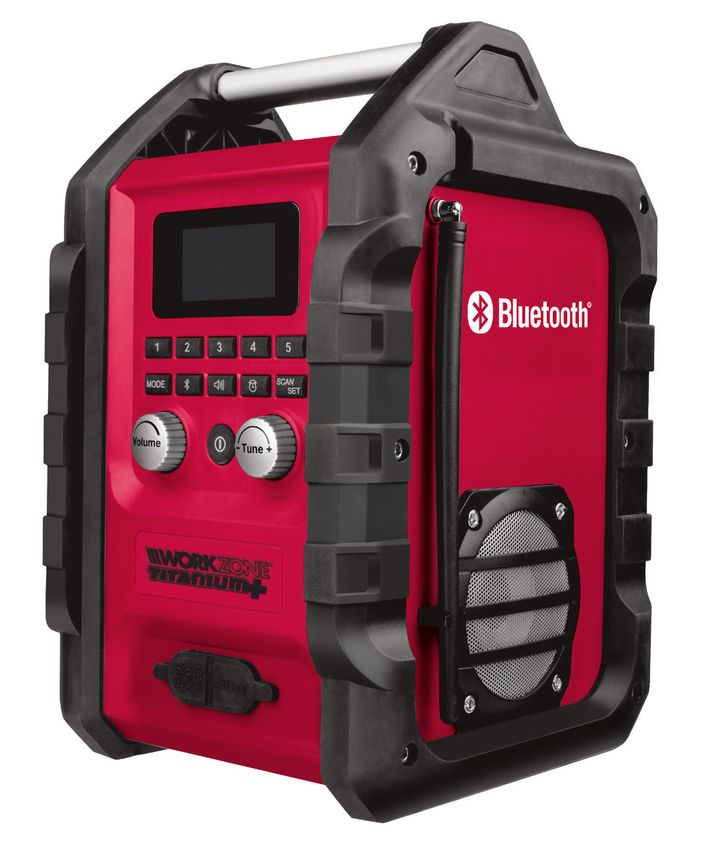
Welcome
Congratulations in choosing to buy a Workzone® Titanium 20V Li-Ion
Jobsite Radio (battery / charger not included).
All products bought to you by Workzone® Titanium are manufactured
to the highest standards of performance and safety and, as part of our
philosophy of customer service and satisfaction, are backed by our
comprehensive 5 Year Warranty. We hope you will enjoy your purchase
for many years to come.
When you open your packaging, first remove all items and check there
are no parts damaged or missing. If you find anything wrong, do not
operate the product until the parts have been replaced or the fault has
been rectified. Failure to do so could result in serious personal injury.
AFTER SALES SUPPORT 2
e-mail: info.aldi@positecgroup.com
1300 889 028 (toll free) MODEL No.: TRD18MA.9 • 8307 • 06/2019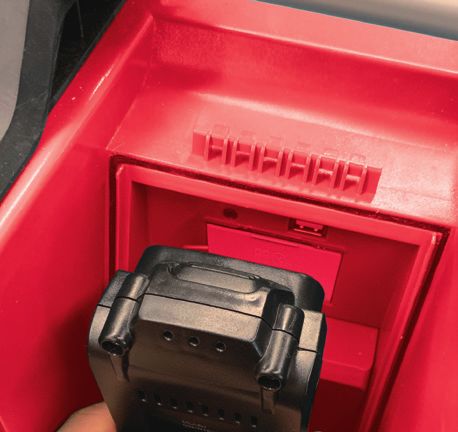
3

                                     20V Li-Ion Jobsite Radio

                                  Warranty Details
REGISTER YOUR PURCHASE AT www.aldi.com.au/en/about-aldi/product-registration/ TO KEEP UP-TO-DATE WITH IMPORTANT PRODUCT INFORMATION

The product is guaranteed to be free from defects in workmanship and parts for a period of 60 months from the
date of purchase. Defects that occur within this warranty period, under normal use and care, will be repaired,
replaced or refunded at our discretion. T           conferred by this warranty are in addition to all rights and
remedies in respect of the product that the consumer has under the Competition and Consumer Act 2010 and
similar state and territory laws.

Our goods come with guarantees that cannot be excluded under the Australian Consumer Law. You are entitled
to a replacement or refund for a major failure and for compensation for any other reasonably foreseeable loss or
damage. You are also entitled to have the goods repaired or replaced if the goods fail to be of acceptable quality
and the failure does not amount to a major failure.

AFTER SALES SUPPORT                                                3
                                                                              e-mail: info.aldi@positecgroup.com
          1300 889 028 (toll free)                                            MODEL No.: TRD18MA.9 • 8307 • 06/2019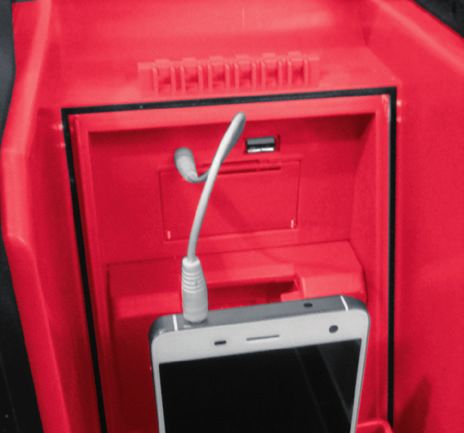
4

    Contents
    Application                                                             5
    Package Content List                                                    5
    Parts description                                                       6
    Description of symbols                                                  7
    Product Safety                                                          8
    Important information – Product care                                    9
    Assembly                                                                9
    Operation                                                              12
    Maintenance                                                            18
    Warranty                                                               19
    Environmental protection                                               20
    FAQ/Troubleshooting                                                    21
    Technical specifications                                               22

    AFTER SALES SUPPORT               4
                                          e-mail: info.aldi@positecgroup.com
           1300 889 028 (toll free)       MODEL No.: TRD18MA.9 • 8307 • 06/2019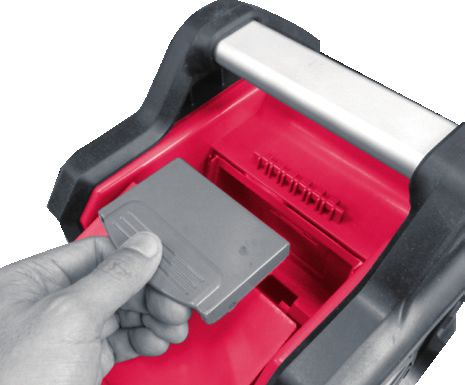
5

20V LI-ION JOBSITE RADIO
1. Application
First time users or inexperienced operators pay particular attention to the
operation of the 20V Li-Ion Jobsite Radio, including details of starting and
stopping and correct use of the 20V Li-Ion Jobsite Radio on pages 12-18, as
well as the maintenance instructions on pages 18.

Intended use of 20V Li-Ion Jobsite Radio (battery / charger not included)

NOTE: This product is for private domestic DIY use only. It is not suitable for
commercial or trade use.
This 20V Li-Ion Jobsite Radio is used for listening to AM/FM radio, playing
music via bluetooth, and charging USB devices.
The 20V Li-Ion Jobsite Radio is to be used only for its prescribed purpose.
Any other use is deemed to be a case of misuse.

2. Package Content List
1 x 20V Li-Ion Jobsite Radio Skin              • Remove all packing materials
1 x AC power adapter                           • Ensure all parts on the contents
1 x Instruction manual                           list are present
1 x Quick Start Guide                          • Check the appliance, and all
1 x Warranty Card & Certificate                  accessories for transportation
                                                 damages

        WARNING! Please read and understand this instruction manual
        before use and keep it for your future reference. Your product
        should only be passed on together with this instruction manual.
        WARNING! To reduce risk of injury, only use ALDI 20V Li-Ion Xfinity
        Plus battery packs. Other type of battery packs may burst causing
        personal injury and damage. The battery pack must be recharged
        only with a ALDI 20V Li-Ion Xfinity Plus battery charger.
AFTER SALES SUPPORT                   5
                                            e-mail: info.aldi@positecgroup.com
       1300 889 028 (toll free)             MODEL No.: TRD18MA.9 • 8307 • 06/2019
6

    3. Parts description
    1. Handle                                 10. “Volume” adjustment knob
    2. LCD screen.                            11. “Tune” adjustment knob
    3. Control Panel                          12. Battery compartment latch
    4. AC adapter port                        13. AA Battery back up compartment
    5. Auxiliary port                              (See Fig. C)
    6. Antenna                                14. 20V Battery port (See Fig. D)
    7. Speaker                                15. 20V Battery (See Fig. E)
    8. Battery compartment area               16. Power button
    9. AC power adapter                       17. USB Charging port (See Fig. I)
    * 20V Battery and 20V Charger not included. Shown only for instructional purposes.

                                                                                  1
                                                                                  8
                                                                                 12

     2

     3
     10
                                                                                  6
     16
     11                                                                           7
      4
                                                                5
     9

    AFTER SALES SUPPORT                    6
                                                  e-mail: info.aldi@positecgroup.com
           1300 889 028 (toll free)               MODEL No.: TRD18MA.9 • 8307 • 06/2019
7

4. Description of symbols
The instruction manual, rating plate, or on the product itself, may
show these symbols. These represent important information about
the product or instructions on its use.

           To reduce the risk of injury, user must read instruction manual

           Warning

           Conforms to relevant standards for electrical safety and
           electromagnetic compatibility.

60         60 Months Warranty

           Double insulation

           For indoor use only

           SMPS incorporating a fail-safe safety isolating transformer

           The output plug is with positive center pole and negative outer pole

           Fuse

           MEPS.

AFTER SALES SUPPORT                     7
                                               e-mail: info.aldi@positecgroup.com
       1300 889 028 (toll free)                MODEL No.: TRD18MA.9 • 8307 • 06/2019
8

    5. Product Safety
    SAFETY WARNING
    SAVE THESE INSTRUCTIONS!
    READ ALL INSTRUCTIONS!

    Safety instructions
          WARNING: READ AND UNDERSTAND ALL INSTRUCTIONS.
           Failure to follow all instructions listed below may result in
    electric shock, fire and / or serious personal injury.

    1) Do not use this apparatus near water.
    2) Clean only with dry cloth.
    3) The ventilation should not be impeded by covering the
       ventilation openings with items, such as newspapers, table-
       cloths, curtains, etc.
    4) Do not use near any heat sources such as radiators, heat
       registers, stoves, or other apparatus (including amplifiers) that
       produce heat.
    5) Only use attachments/accessories specified by the manufacturer.
    6) Remove the battery during lightning storms or when unused for
       long periods of time.
    7) Refer all servicing to qualified service personnel. Servicing is
       required when the apparatus has been damaged in any way,
       such as liquid has been spilled or objects have fallen into the
       apparatus, the apparatus has been exposed to rain or moisture,
       does not operate normally, or has been dropped.
    8) The apparatus shall not be exposed to dripping or, splashing and
       that no objects filled with liquids, such as vases, shall be placed
       on the apparatus
    9) The batteries shall not be exposed to excessive heat such as
       sunshine, fire or the like.

    AFTER SALES SUPPORT               8
                                           e-mail: info.aldi@positecgroup.com
           1300 889 028 (toll free)        MODEL No.: TRD18MA.9 • 8307 • 06/2019
9

CAUTION: Danger of explosion if the incorrect battery is used. Use
only ALDI 20V Li-Ion Xfinity Plus batteries and chargers for this
product.
6. Important information – Product care
NOTE: Battery and Charger not included. For any issuses related
directly to your Battery / charger, contact the Customer Service
of the manufacturer as listed on the battery / charger packaging,
manual or on the label on the battery / charger.
This 20V Li-Ion Jobsite Radio uses Lithium Ion Battery Cells. Care
MUST be taken to ensure both the safety and life of the pack is
maintained. Ensure you have read all of the safety notes in the
previous pages before using the 20V Li-Ion Jobsite Radio.
Treat the battery pack with care and within the guidelines of this
manual.
If the battery pack does become immersed in water or any fluids,
or is subject to a severe drop or it does not operate within the
guidelines of this manual or the supplied manual, immediately STOP
using the battery pack and have it checked.
Use only ALDI 20V Li-Ion Xfinity Plus range of batteries and chargers.

7. Assembly
7.1 AA Back-up Battery installation (not supplied)
Keeping 2 x AA batteries inside the AA Battery compartment
prevents stored data in preset memories from being lost.
1. To open the battery compartment area (8), raise the battery
compartment latch (12) from the rear of the radio, push the
latch forwards to the front of the radio to release it from the
engagement tabs, and then open the battery compartment area (8)
by pulling the latch and cover backwards.
There are 2 battery pack compartments; (a) the AA battery back up
compartment and (b) the 20V battery port .(See Fig. C, D)
2. Using a philips head screwdriver (not supplied) loosen the screw
by rotating in an anti-clockwise direction. Remove the AA back up

AFTER SALES SUPPORT               9
                                       e-mail: info.aldi@positecgroup.com
       1300 889 028 (toll free)        MODEL No.: TRD18MA.9 • 8307 • 06/2019
10

 battery compartment (13) cover and insert 2 new AA batteries (not
 supplied). Make sure the batteries match with the correct polarity
 markings inside the compartment. Replace the AA back up battery
 compartment (13) cover (See Fig C, D). Secure the cover by re
 inserting and tightening the screw in a clockwise direction.
        WARNING: Batteries may leak chemicals or may explode if
        used incorrectly. The following care should be taken to
 prevent such an incident:
 • Make sure the positive (+) and negative (-) battery terminals are
      positioned correctly.
 • Do not mix new and old batteries together, or mix different
      types of batteries.
 • Do not try to recharge non-rechargeable batteries.
 If chemicals from the batteries come in contact with your skin, wash
 them off immediately with water. If chemicals leak onto the radio,
 clean the radio completely.
     A                               B

     C                               D

                             13

         Loosen      Tighten                   14

 AFTER SALES SUPPORT                     10
                                              e-mail: info.aldi@positecgroup.com
          1300 889 028 (toll free)            MODEL No.: TRD18MA.9 • 8307 • 06/2019
11
3. Installing or removing 20V battery (not supplied)
1. To insert the 20V battery (15), push it into the 20V battery port.
Always insert it all the way until it locks in place with a click. (See Fig E)
2. Do not use force when inserting the battery. If the battery does not
slide in easily, it is not being inserted correctly. Remove and re-insert the
battery until ( ) appears on the screen.
3. To remove the battery, depress the battery pack release button to
release and slide the battery pack out from the 20V battery port (14) .
(See Fig F)
4. When the low battery sign appears and keeps on flashing it is time
to recharge and replace the 20V battery (15).
NOTE: The 20V battery (15) cannot be charged via the supplied
AC power adapter. Remove the 20V battery (15) from the radio,
when not used for long periods of time.
E F
15
Battery not included Battery not included
4. Using supplied AC power adapter (9)
Remove the rubber cover over the AC adapter port (4) on the front
side of the radio and insert the AC power adapter (9) into the port
for the AC power adaptor (4). Plug the AC power adapter (9) into
a standard mains socket outlet. Whenever the AC power adapter
(9) is used, the battery pack is automatically disconnected, and
disappears. The AC power adapter (9) should be disconnected from
the main supply when not in use. (See Fig. G )
AFTER SALES SUPPORT 11
e-mail: info.aldi@positecgroup.com
1300 889 028 (toll free) MODEL No.: TRD18MA.9 • 8307 • 06/201912
G
9. Operation
9.1 Radio
1. Press the power button (16) to switch on the radio.
You can choose the source AM or FM by pressing on the MODE button.
2. Turn the volume adjustment knob (10) to adjust the volume. Turn
the tune adjustment knob (11) to set the frequency.
3. Press the SCAN/SET button to search for a station automatically.
The LCD screen (2) display will flash the scanning symbol until
it detects a station. To find another station, press the SCAN/SET
button again.
4. This radio can save up to 5 stations per frequency. Once the station
you require has been detected, press and hold one of the number
buttons 1 to 5 to save. Repeat on the next number button for
further stations.
5. Press the button 1/2/3/4/5 to listen to stations that you have saved.
6. If required, the FM frequency band can be set from 87.5 to 108
MHz, the AM frequency band can be set from 520 to 1710 kHz.
While radio is switched off and then in standby mode for 15
seconds, long pressing of the MODE button for more than 3
seconds will first show current FM frequency band.
Continue pressing MODE button for approx. another 5 seconds
until display FM and 50 kHz (frequency band) is flashing. By
rotating the TUNE control, you can adjust to 100 kHz.
After FM frequency band is reset, pressing MODE button again,
display will show AM and flash 9 kHz.
AFTER SALES SUPPORT 12
e-mail: info.aldi@positecgroup.com
1300 889 028 (toll free) MODEL No.: TRD18MA.9 • 8307 • 06/201913
By rotating the tune adjustment knob (11), you can adjust to 10 kHz.
Complete the setting by pressing mode button.
9.2 Setting the clock
1. Press and hold down the SCAN/SET button for 3 seconds. The
time is displayed in the middle of the LCD screen (2) and the hour
flashes. Turn the volume adjustment knob (10) to adjust the time.
2. Press SCAN/SET again; the minute flashes. Turn the volume
adjustment knob (10) for adjusting the minutes.
3. Finally, press SCAN/SET to validate and complete the setting of
the clock.
9.3 Setting the alarm clock
1. Press and hold the button for 3 seconds. The alarm time
is displayed in the middle of the LCD screen (2) and the hour
flashes.
Turn the volume adjustment knob (10) to adjust the time.
2. Press the button again, the minutes will flash. Turn the volume
AFTER SALES SUPPORT 13
e-mail: info.aldi@positecgroup.com
1300 889 028 (toll free) MODEL No.: TRD18MA.9 • 8307 • 06/201914
adjustment knob (10) to adjust the minutes.
3. Finally, press to confirm and finish the setting of the alarm clock.
4. To activate/deactivate the alarm, press the button once. The icon
appears on the screen when the alarm is activated.
9.4 Setting the clock radio
1. Press and hold the button for 3 seconds. The alarm time
is displayed in the middle of the LCD screen (2) and the time
flashes. Turn the volume adjustment knob (10) to adjust the time.
2. Press on once, the minutes will flash. Turn the volume
adjustment knob (10) to adjust the minutes.
AFTER SALES SUPPORT 14
e-mail: info.aldi@positecgroup.com
1300 889 028 (toll free) MODEL No.: TRD18MA.9 • 8307 • 06/201915
3. Press the mode button to choose the radio station. Turn the tune
adjustment knob (11) to choose among the 5 stations.
4. Finally, press to complete the setting.
5. To activate/deactivate the alarm, press the button once. The
icon is displayed on the screen when the alarm is activated.
9.5 Setting the off time
1. Turn on the unit by pressing the button .
2. Press and hold down the button , you will hear a sound of
«beep» and the screen appears in order:
01:00-00:45-00:30-00:15-02:00-01:30. Release the button at the
time you want to set the off time.
3. The display at the bottom right of the screen shows the
remaining time until it will stop automatically.
AFTER SALES SUPPORT 15
e-mail: info.aldi@positecgroup.com
1300 889 028 (toll free) MODEL No.: TRD18MA.9 • 8307 • 06/201916
9.6 Bluetooth
The performance of the Bluetooth system depends on the brand
and the model of your device to be connected.
Compatibility with all types of devices is not ensured. To get the
best effect from transmission of data via Bluetooth, the distance
between the two devices must not exceed 8 m, and there must
be an open path between the radio and the bluetooth device. An
obstacle (for example, a wall of cement, a person or heavy furniture
etc.) between the devices can reduce the minimum distance of
connection or influence the performance of data transmission. In
this case, you can reset your device in position closer to the radio.
First, you should familiarize yourself with the function and method
of using the Bluetooth of your device.
1. Activate the Bluetooth function on your device (mobile phone,
iPod, computer etc).
You can refer to the manual of your device.
2. Place your Bluetooth device close to the radio. The distance
should not exceed 1 m.
3. Press to turn on the unit.
4. Press to enter the BLUETOOTH mode. is flashing on the
Upper left of the LCD screen (2). The word BLUETOOTH is
displayed in the middle of the LCD screen (2).
5. Select ‘TRD18-radio’ on your device.
6. The connection can be established in a few seconds. stops
flashing with a sound of «quick beep» . This means that the two
devices are properly connected. Now you can listen to music
from your own device with the speaker of the jobsite radio.
7. Turn the volume adjustment knob (10) to adjust the volume.
Turn the tune adjustment knob (11) to change the song.
AFTER SALES SUPPORT 16
e-mail: info.aldi@positecgroup.com
1300 889 028 (toll free) MODEL No.: TRD18MA.9 • 8307 • 06/201917
9.7. Using an Auxiliary Device
1. Remove the rubber protector and insert the connector into
the auxiliary port (5) on the front side of the radio. It is for
connecting a cell phone, MP3 Player, CD player or other audio
device with the radio. (See Fig. H)
2. Open the battery compartment area (8) There is another
auxiliary port (e) (See Fig. I), It is also for connecting a cell
phone, MP3 Player, CD player or other audio device with the
radio.
3. When an external device is connected to the radio with an extra
cable (not supplied) into the AUX, the unit enters the mode AUX
automatically.
4. Press the mode button to change the source AUX1 or AUX2.
5. Turn the volume adjustment knob (10) to adjust the volume.
H I
17
e
AFTER SALES SUPPORT 17
e-mail: info.aldi@positecgroup.com
1300 889 028 (toll free) MODEL No.: TRD18MA.9 • 8307 • 06/201918
9.8. USB Power outlet
This radio includes a USB charging port located in the battery
compartment area (8). This can be used to charge phones and other
USB devices within the parameter of the USB output . Charging will
occur only when the radio is plugged into an outlet or running by a
battery pack. (See Fig J)
J
10. Maintenance
1. Always disconnect power source before any cleaning or
maintenance.
2. Clean the outside of the unit by gently rubbing with a soft damp
cloth.
3. In order to avoid any risk of fire and/or electric shock, do not
pour water or any other liquid to the interior of the appliance.
4. We recommend a periodic cleaning of the radio to remove any
dust or dirt that is accumulated inside or outside the appliance.
WARNING: NEVER USE DETERGENT, CHEMICAL AGENTS OR
SOLVENTS AS IT MAY DAMAGE THE PLASTIC PARTS.
Storage
When not in use, the radio should be stored in a dry, frost free
location not within the reach of children.
AFTER SALES SUPPORT 18
e-mail: info.aldi@positecgroup.com
1300 889 028 (toll free) MODEL No.: TRD18MA.9 • 8307 • 06/201919
11.Warranty
Your new WORKZONE® TITANIUM 20V Li-Ion Jobsite Radio will more
than satisfy your expectations.
It has been manufactured under stringent WORKZONE® TITANIUM
Quality Standards to meet superior performance criteria.
You will find your new 20V Li-Ion Jobsite Radio easy and safe to
operate, and, with proper care, it will give you many years of
dependable service.
CAUTION. Carefully read through this entire instruction manual
before using your new WORKZONE® TITANIUM 20V Li-Ion Jobsite
Radio. Take special care to heed the Cautions and Warnings.
Your WORKZONE® TITANIUM 20V Li-Ion Jobsite Radio has
many features that will make your job faster and easier. Safety,
performance, and dependability have been given top priority in
the development of this 20V Li-Ion Jobsite Radio, making it easy to
maintain and operate.
Use only WORKZONE® TITANIUM replacement parts for your product. Non-
conforming parts or modifications made to parts will void your warranty.
What your 5 year warranty means
Great care has gone into the manufacture of this product and it
should therefore provide you with years of good service when used
properly. In the event of product failure within its intended use over
the course of the first 5 years after the date of purchase, we will
remedy the problem as quickly as possible once it has been brought
to our attention. In the unlikely event of such an occurrence, or if
you require any information about the product please contact us via
our after sales support services, details of which can be found in this
manual and on the product itself.
After Sales Support TEL: 1300 889 028
AFTER SALES SUPPORT 19
e-mail: info.aldi@positecgroup.com
1300 889 028 (toll free) MODEL No.: TRD18MA.9 • 8307 • 06/201920
Service Support
If you have any issues with the operation of your product, please call us
on 1300 889 028 for advice, or email us at info.aldi@positecgroup.com
12. Environmental protection
Recycle unwanted materials instead of disposing of them
as waste. All tools, hoses and packaging should be sorted,
taken to the local recycling centre and disposed of in an
environmentally safe way.
AFTER SALES SUPPORT 20
e-mail: info.aldi@positecgroup.com
1300 889 028 (toll free) MODEL No.: TRD18MA.9 • 8307 • 06/201921
13. FAQ/Troubleshooting
Fault Cause Remedy
It’s a result of the
The Battery pack stepping down of the
gets warm when chemical reactions inside This is normal.
charging. the batteries during the
charging process.
Return the tool to an
The fault cannot The tool needs to be
authorized dealer for
be rectified. repaired.
repair.
The radio has already Check and disconnect the
been linked to Bluetooth connectivity of
another device. the other device.
The device is placed
too far away from the Place nearer to the radio.
radio.
Mobile device
cannot be linked Defective Bluetooth
Contact Customer Service.
to the radio by function.
Bluetooth. Check what the source
of interference is. It may
Strong
be charger or computer
electromagnetic
or any high-powered
interference in the
household electrical
environment
appliances. Place the radio
far away from the source.
Charge the battery, or use
Low battery.
The speaker the adapter directly
switches off Contact Customer
automatically. Defective battery. Service, or the battery
manufacturer.
For further inquiries or issues associated with your tool, call our Customer
Service on 1300 889 028 or email us at info.aldi@positecgroup.com
AFTER SALES SUPPORT 21
e-mail: info.aldi@positecgroup.com
1300 889 028 (toll free) MODEL No.: TRD18MA.9 • 8307 • 06/201922
15. Technical specifications
DC input 12V 1A
Battery voltage 20V
USB Output 5V 1.0A
AM frequency coverage 520-1710KHz
FM frequency coverage 87.5-108MHz
Aux input terminal Standard 3.5mm
Bluetooth Input 2402MHz---2480MHz
Bluetooth Range 8m
Weight 4.5kg
AFTER SALES SUPPORT 22
e-mail: info.aldi@positecgroup.com
1300 889 028 (toll free) MODEL No.: TRD18MA.9 • 8307 • 06/201923
This 20V Li-Ion Jobsite Radio complies with the following
Standards:
Radio
LVD: IEC 60065
AS/NZS 60065
EMC: EN 55032
EN 55035
EN 61000-3-2
EN 61000-3-3
EMF: EN 62479
RED: EN 300328
EN 301489-1
EN 301489-17
EN 303 345
Adapter
LVD: IEC 61558-1
IEC 61558-2-6
AS/NZS 61558.1
AS/NZS 61558.2.6
EMC: EN 55014-1
EN 55014-2
EN 61000-3-2
EN 61000-3-3
AFTER SALES SUPPORT 23
e-mail: info.aldi@positecgroup.com
1300 889 028 (toll free) MODEL No.: TRD18MA.9 • 8307 • 06/2019ALDI guarantees that our exclusive brand products are
developed to our stringent quality specifications. If you are
not entirely satisfied with this product, please return it to your
nearest ALDI store within 60 days from the date of purchase
for a full refund or replacement, or take advantage of our after
sales support by calling the supplier‘s Customer Service Hotline.
WORKZONE® TITANIUM is a registered trademark of ALDI Stores
AUS
Made in China
WORKZONE TITANIUM is a registered trademark of ALDI Stores
®
DISTRIBUTED BY:
ALDI STORES
1 SARGENTS ROAD, MINCHINBURY NSW 2770
www.aldi.com.au
1300 889 028 info.aldi@positecgroup.co
m
MODEL: TRD18MA.9 PRODUCT CODE: 8307 06/2019You can also read