IP Set-top box Motorola VIP 1910 - Installation instructions and manual designed for users of viaTV cable television service
←
→
Page content transcription
If your browser does not render page correctly, please read the page content below
IP Set-top box
Motorola VIP 1910
Installation instructions and manual
designed for users of viaTV cable television service

© T-Systems Czech Republic a.s., 2009 - 2010

Content:

PART A – comments and notes to the original manual .......................................................................... 4
  1.1 Basic terms ................................................................................................................................... 4
  1.2 Set-top box installation................................................................................................................ 4
  1.3 Set-top box installation for HDTV (using HDMI connector) ..................................................... 4
2   Remote controller (RC) ....................................................................................................................... 4
  2.1 Switching on/off the set-top box, stand-by mode ..................................................................... 4
  2.2 Application buttons...................................................................................................................... 4
  2.3 Function color buttons ................................................................................................................ 5
  2.4 MENU / BACK / INFO buttons...................................................................................................... 5
3   Set-top box setting.............................................................................................................................. 5
  3.1 Selection of the TV standard (optional, it is possible in the viaTV Portal as well) ................ 6
  3.2 Selection of the video format for HD outputs............................................................................ 6
    3.2.1    Standard television set with a standard definition (SCART) ................................................... 7
    3.2.2    Component YPbPr – analogue HD output .............................................................................. 7
    3.2.3    Television set with high definition (HDMI) ............................................................................... 7
  3.3 Information about the system ..................................................................................................... 7
  3.4 Save and leave setting ................................................................................................................. 8
  3.5 Set-top box setting using the viaTV Portal ................................................................................ 8
4   Start of the set-top box ....................................................................................................................... 9
  4.1 Troubleshooting upon start ........................................................................................................ 9

PART B – Motorola VIP 1910 in the service for viaTV ........................................................................... 10
5    First start-up of the set-top box ....................................................................................................... 10
   5.1 PUK .............................................................................................................................................. 10
   5.2 PIN of the parent lock (security PIN) ........................................................................................ 10
   5.3 Purchase PIN .............................................................................................................................. 10
   5.4 I have forgotten the PIN, what shall I do? ................................................................................ 10
   5.5 Sound and subtitles ................................................................................................................... 11
6    viaTV Portal ....................................................................................................................................... 11
   6.1 Portal in English ......................................................................................................................... 11
   6.2 Portal interface ........................................................................................................................... 11
7    Map of the Portal (original design) .................................................................................................. 13
   7.1 The meaning of the individual items: ....................................................................................... 13
     7.1.1    Television .............................................................................................................................. 13
     7.1.2    New Portal ............................................................................................................................. 15
     7.1.3    Video services ....................................................................................................................... 15
     7.1.4    Games ................................................................................................................................... 16
     7.1.5    Radio ..................................................................................................................................... 16
     7.1.6    Settings ................................................................................................................................. 16
8    Enhanced TV – Doing tricks with TV (original design) ................................................................. 19
   8.1 Description of individual items in the Enhanced TV menu.................................................... 19
     8.1.1    Detail ..................................................................................................................................... 19
     8.1.2    Pause playback ..................................................................................................................... 20
     8.1.3    Play from beginning .............................................................................................................. 20
     8.1.4    Record ................................................................................................................................... 20
     8.1.5    Mosaic ................................................................................................................................... 22
9    Map of the Portal (new design) ........................................................................................................ 23
   9.1 The meaning of the individual items of the Main menu: ........................................................ 24
     9.1.1    Old version ............................................................................................................................ 24
     9.1.2    Television .............................................................................................................................. 24
     9.1.3    Program guide....................................................................................................................... 26
     9.1.4    Recorded programs .............................................................................................................. 27
     9.1.5    Radio ..................................................................................................................................... 27
     9.1.6    Recorded programs (lock) .................................................................................................... 27
     9.1.7    Settings ................................................................................................................................. 28
10     Enhanced TV – Doing tricks with TV (new design) ..................................................................... 32
   10.1     Description of individual menu items: ................................................................................. 33
     10.1.1      Back ................................................................................................................................... 33
     10.1.2      Switch to channel .............................................................................................................. 33

viaTV_STBmanual_M1910_EN.doc                                                                                                             Page 2 (Total 38)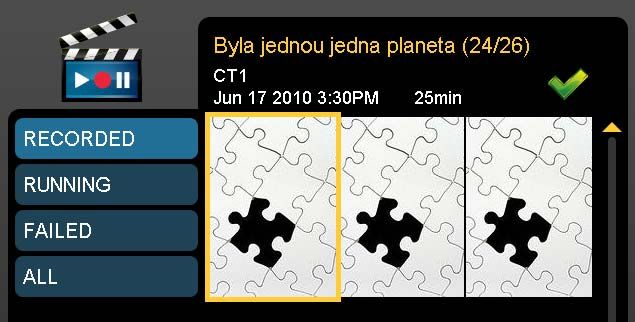
10.1.3 Watch // Pause / Watch from the beginning ...................................................................... 33
     10.1.4 Detail ................................................................................................................................. 33
     10.1.5 Record ............................................................................................................................... 33
     10.1.6 Close ................................................................................................................................. 35
     10.1.7 Mosaic ............................................................................................................................... 35
11    Summary ......................................................................................................................................... 36

These instructions are intended as supplementary instructions to the original
manual, which is enclosed to the set-top box. They extend the general
information on the use of the set-top box for the purpose of the viaTV service
provided by the T-Systems.
Basic operation of the set-top box is included in the original instructions.

viaTV_STBmanual_M1910_EN.doc                                                                                                          Page 3 (Total 38)
PART A – comments and notes to the original manual
1.1 Basic terms
EPG – electronic program guide – TV program accessible via set-top box; similar to a teletext
(standard teletext is also available)
viaTV Portal (middleware) – an interface for above-standard functions of viaTV service – EPG,
various settings, ordering other TV channel packages etc.
Resolution – picture quality on the TV set. The higher resolution, the better picture.
The assumption is that your TV set supports it and the TV channel is broadcasted in this
resolution. Currently we can distinguish a standard resolution (SD) and high resolution (HD).
Set-top box (STB) – a device for reception of TV signal, in our case of viaTV service.
1.2 Set-top box installation
Prior the installation take off all plastic covers from the set-top box because of heat, including
the plastic foil on the front panel!
If your set-top box is rented, please do not discard the box or the covers, but keep them!
1.3 Set-top box installation for HDTV (using HDMI connector)
If your TV set is „HD ready“ (HDTV ready or Full HD), you can connect it to the set-top box via a (digital
HDTV, preferred – the best picture) or via YPbPr input (older analogue HDTV) instead of a scart
connector.
When using a HDMI connector on a TV with a lower (older) version of HDMI system than 1.2, you can run
into problems with volume regulation via the set-top box remote controller. In this case, we recommend
using the original TV set remote. In case there is no sound at all, change the TV set input to a different
one (a non HDMI) an then switch to a HDMI input again.
2 Remote controller (RC)
Note: there can be several different types of RC
Hint: how to display, what means which button on the RC without having this manual?
Use the on-line help – press the INFO button on the RC.
2.1 Switching on/off the set-top box, stand-by mode
Set-top box is switched on/off by a red button in the right top corner. Before it, the box must be plugged
in to electric socket 230V (stand-by mode). The RC switches it from stand-by into operation mode.
2.2 Application buttons
Text – there are two options for this button:
while watching TV, it activates teletext
while browning in menu, it displays a virtual keyboard
viaTV_STBmanual_M1910_EN.doc Page 4 (Total 38)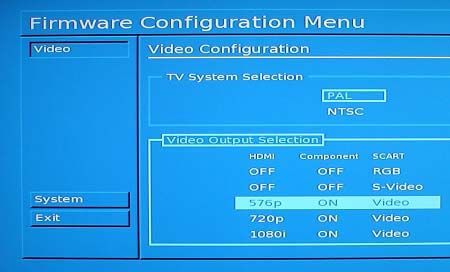
TV – EPG and TV
Portal (marked as a dot in a circle) - entering into so called viaTV Portal – access to many useful
functions and settings. More details about the Portal can be found at the end of this manual.
www – activates a web browser (not active at viaTV service).

2.3    Function color buttons
The low row of color buttons is used for context based functions in the viaTV Portal, EPG and teletext.
Their meanings may vary from application to application and they are always described in the lower part
of TV screen.

2.4    MENU / BACK / INFO buttons
Menu – toggles between the viaTV Portal and TV broadcast.
Info – displays help

3 Set-top box setting
Apart from a standard setting of the set-top box in-service on the so-called viaTV Portal (operation
of the Portal is provided below), you may perform several other settings in the beginning, in particular the
selection of the TV standard (TV system) of your television set and used outputs (output connectors).

For the purpose of their performance, immediately upon connecting the set-top box to the power supply
network, press the MENU button on the control and keep it pressed. In this way, you will get to the menu
for the television set output setting.

A screen, similar to the one in the figure below, should appear. At the same time, the LED diodes on the
front panel should start flashing, altering red and green; the same shall be applicable to every pressing
of any button on the remote control. (When the above-mentioned screen appears, you may release the
MENU button).

Note: In practice, due to the Portal, it is possible to set up everything under current operation, with
the exception of picture for HD definition setting (HDMI and YPbPr output). If you do not use the HD
output (as you use scart), we recommend skipping this section over. If you wish to use the HDMI
output (see bellow), you have to perform the setting here and prior to the beginning of the
operation of the viaTV service as such.

                                                                       Movement on the screen and
                                                                       changes setting is performed by
                                                                       the cursor-movement keys on
                                                                       the control (up, down, left, right)
                                                                       and you use the "OK" button to
                                                                       confirm a change. The field,
                                                                       which is illuminated in light
                                                                       green-blue is active.

                                                                       You move between the illu-
                                                                       minated items using arrow keys
                                                                       up / down.

                                                                       You undo / do up the menu
                                                                       relating to the illuminated item
                                                                       using left arrow / right arrow.

Please note that all pictures in the manual are directly photo-shot from a real TV screen for a 100%
accuracy with a real usage of the set-top box. However, this may lead to a slightly lower picture quality
than at computer printscreens.

viaTV_STBmanual_M1910_EN.doc                                                                  Page 5 (Total 38)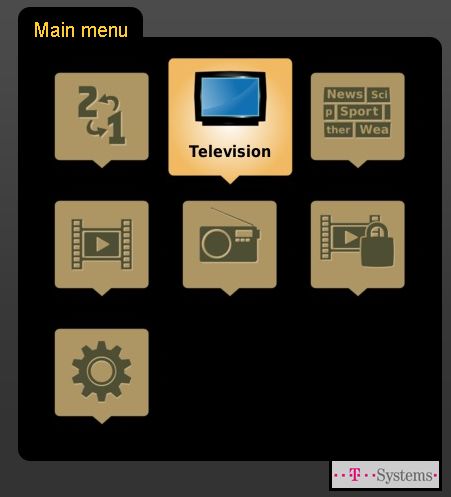
3.1    Selection of the TV standard (optional, it is possible in the viaTV Portal
       as well)
Start with the selection of the so-called television standard (system) format. Press the right cursor arrow
and the “Video” item will undo into the “TV System Selection” and the “Video Output Selection” items
(the figure on the left). Press the arrow once more and the option of a change between the PAL and
NTSC picture formats becomes activated (the figure on the right). The format is selected using the up and
down arrows.

The PAL refers to a standard used mainly in Europe, while the NTSC refers to a standard used in
the USA. Unless you have some special reason for selecting NTSC, select PAL, (if there is
a selection from several PAL systems (in case of later models of the set-top box, select the one,
which
is supported by your television set, see the instruction manual for the television set).

As soon as you have found, using arrows, the picture format you prefer, activate it by pressing the OK
button.

We recommend performing the entire setting in the viaTV Portal (as mentioned below).

3.2    Selection of the video format for HD outputs
The selection of the video format depends on the possibilities of your television set and on the type
of video connectors you use. The set-top box has three connectors – which corresponds with the three
columns in the menu below – HDMI, Component and SCART. The set-top box may be set in five
different states (combinations of states) corresponding with five lines mentioned below, among which you
perform your selection. For you, the current items in the column (of the connector), which you wish to use,
are relevant.

viaTV_STBmanual_M1910_EN.doc                                                                 Page 6 (Total 38)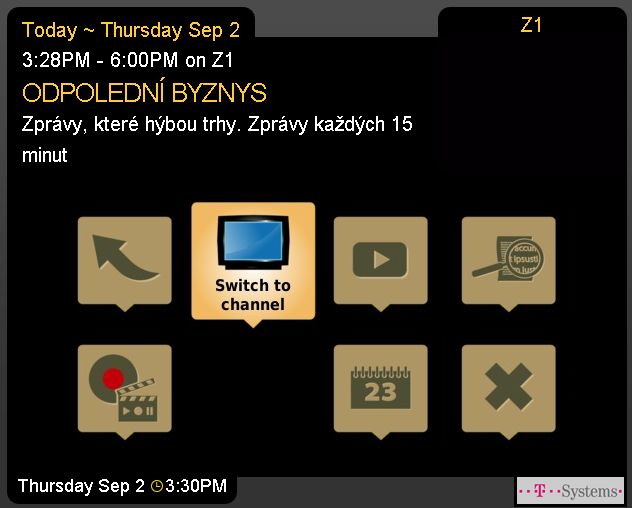
3.2.1    Standard television set with a standard definition (SCART)
If your television set (or LCD) is of a standard type and if it works with standard definition (it neither
supports HDTV nor it has the HDMI or the YPbPr connector), then the SCART column is relevant for you
(the one most to the right). Together with scart setting, the other connectors are somehow set up too,
however which is not relevant for you.

Using the navigation arrows up / down, select the video format you prefer. The scart connector is able, in
case of the VIP 1910 set-top box, to offer three types of output: RGB – the so-called component RGB,
S-video and Video – i.e. composite output.

The Video (composite output) is most common, however, with the lowest quality of these three outputs
(but with minimum differenced only). It is possible to connect it at the back of the television set into scart
(the same connector as you have in your set-top box) or into the input having a form of three RCA
connectors (=3x cinch) (two connectors in case of monophonic television sets). In the cinch form, it is
used as input for video cameras on the front side of the television set.

The S-video offers a higher quality, however, not every television set is equipped with it. If your television
set has it, it may be in the form of the S-video original round connector (then it is necessary to have
a scartS-video cable or an adapter) or it may use the scart connector directly.

RGB – input of a higher quality that the composite one, however, not every television set is equipped with
it. The connector for it, is the ordinary scart connector, however, the television set needs to support this
function.

We recommend performing the entire setting in the viaTV Portal (as mentioned below).

3.2.2    Component YPbPr – analogue HD output
If your television set is able to process the component YPbPr output, use this one. Such an output is of
a higher quality than the above-mentioned ones, however, in the development of television sets this one
represent a sort of dead end so that there are few television sets equipped with it. In the menu, it is
necessary to set up the output of the set-top box so that it was in some of the positions in the Component
column in the ON state.

3.2.3    Television set with high definition (HDMI)
If your television set has the HDTV function and if it is connected to the set-top box using HDMI, find out
what sort of HD definition it enables to reach in fact (the so-called low HD 720p (HD ready) or the so-
called Full HD 1080i – see the instruction manual for the television set).

If it is impossible to find such information out, select the 720p item in the HDMI column (the so-called low
HD, for HD ready television sets). Then confirm your option by pressing OK. Another option available for
the selection is the 576p standard definition (standard PAL system, however in digital quality).

3.3     Information about the system
In the System item, you will find information on the set-top box, which however is not of much relevance.
In addition, such information is available on the viaTV Portal as well.

viaTV_STBmanual_M1910_EN.doc                                                                    Page 7 (Total 38)
3.4    Save and leave setting
Press the right arrow for return to the main menu and go down using the navigation arrow to Exit, then
press OK. Then the set-top box asks you whether you wish to save the respective setting.
For the purpose of saving the changes, select Save and reboot, for the purpose of not saving, select
Reboot without saving.

The set-top box is then restarted and prior to se restart, it either saves (Save and reboot) or does not
save (Reboot without saving) the respective changes. The restart of the set-top box lasts approximately
4 minutes.

3.5    Set-top box setting using the viaTV Portal
Once the set-top box is under standard operation (it is possible to watch programs), it is possible
to perform some setting in the so-called viaTV Portal (more information on the Portal is to be provided in
the following chapter). Specifically, this concerns the TV standard (PAL/NTSC) setting and setting of the
output for a standard television set using a scart connector.

viaTV_STBmanual_M1910_EN.doc                                                                Page 8 (Total 38)

4 Start of the set-top box
Upon connection of the set-top box to the television set and to the power supply, the starting process will
start and on the screen of the television set, you will see a similar figure as mentioned below (this
concerns colored little rings on the television screen).

The set-top box is now connecting to the telecommunication network and is downloading information and
software necessary for its operation. Upon displaying the first green little ring, the initial screen is
displayed. Wait until this starting process has been completed fully.

                                                                        The little rings (little squares) on the
                                                                        screen are changing their colours in
                                                                        the course of the starting process
                                                                        according to its course, of the state
                                                                        of which they inform you. In the
                                                                        beginning, all little rings are grey. If
                                                                        the set-top box is performing a
                                                                        search for or processing the
                                                                        downloaded operating software
                                                                        (a program for the needs of the set-
                                                                        top box), one little ring will start
                                                                        flashing        in      yellow.    Upon
                                                                        downloading software as such, the
                                                                        little ring is flashing in green and at
                                                                        the same time, a line of ten more
                                                                        little rings is displayed bellow which
                                                                        represents the state of the
                                                                        download.

                                                                       As soon as the individual parts of
                                                                       the starting process are completed,
the little ring will turn green. Once all the little rings are green, the screen will be flashing and the
“Authentication is in progress” sign and subsequently the “Downloading” sign will appear. Then TV
broadcasting should start. Upon the very first start-up, you will be asked to enter the PUK and the
PIN codes, for further details, see Section 5.

If any of the circles turns red, a part of the process failed and the rest of the process has been terminated.
The entire process lasts approximately 4 minutes and proceeds any time the set-top box
is disconnected from the power supply.

Note: Different stages of this process take different times (“colouring” of some little rings (little squares)
takes longer, in particular in case of the third one).

If you wish to use the HDMI output in your set-top box, it is necessary to perform this output
setting prior to the starting process (see Section 3.2).

4.1    Troubleshooting upon start
If the start-up of the set-top box failed and some of the little rings turned red or yellow, remember its
position (1-5). Subsequently, contact the Contact Centre of T-Systems, to which such information will help
find the problem. Contact data are on the last page of this manual.

viaTV_STBmanual_M1910_EN.doc                                                                     Page 9 (Total 38)
PART B – Motorola VIP 1910 in the service for viaTV

5 First start-up of the set-top box
Upon the very first start-up of the set-top box, you will be asked to enter the PUK and the PIN codes.
Depending on the model of the set-top box, you may also be asked to set the initial language for
the broadcast TV programs (soundtrack and subtitles), on condition that the respective program
is broadcast in two languages.

5.1    PUK
The PUK refers to a numerical code, which you will receive in the Welcome Letter and which activates
this service. Connect and switch on the set-top box as it was described above, and upon its start (the
screen with colored little squares), you will be asked to enter the PUK code.

5.2    PIN of the parent lock (security PIN)
Primarily, it serves for access to contents not available for children, which has already been locked by
the provider using this PIN. Please, note that if the set-top box is used in a household, in which
minors live, it is necessary not to unlock this lock permanently and not to unlock the channel, to
which the lock is applied, only in case you are present and you can make sure that such minors
are not present.

In addition, it is possible to lock any other TV channel on a temporary basis, such as the channel for
children, as a disciplinary action in case of naughty children. More information on the subject in
the section concerning the Portal –> Settings -> TV channels.

This PIN is required in case of a change in the positions of the channels as well, e.g. you do not wish
to have TV Nova on the position No. 5 but right on the position No. 1., etc. More information on the
subject in the section concerning the Portal –> Settings -> TV channels.

This code is selected by you, in the scope of 4 to n digits. You enter the code twice, for the second time
for confirmation that no typing error occurred. The code as such shall be protected against misuse.

This PIN code may be changed in the course of the service use. More information on the subject in the
section concerning the Portal –> Settings -> Restricted content -> Parental PIN change

5.3    Purchase PIN
This PIN code is used in a similar manner as when using a credit card. In case of viaTV, it is used for the
purpose of ordering additional TV channels or the whole program packages in so-called Self care.
Further, it can be used for renting movies in a virtual video rental (VoD – Video on Demand) of for getting
access into various archives. The use of such services is upon your choice, of course, nevertheless, as
early as now, it is necessary to enter this code, again in the scope of 4 to x digits fully at your discretion
(you are the person performing the selection).

You enter the code twice, for the second time for confirmation that no typing error occurred. The code
as such shall be protected against misuse (e.g. from your kids :-)

This PIN code may be changed in the course of the service use as well. More information on the subject
in the section concerning the Portal –> Setting -> Change in the PIN code.

5.4    I have forgotten the PIN, what shall I do?
Do not hesitate to contact our Contact Centre (the contact details are provided at the end of this
publication). For the purpose of your authorization, you will need the Welcome Letter where your
customer number is provided together with other information, in relation to which you may contact our
Contact Centre for advice (to prevent possible misuse). Subsequently, your PIN will be deleted and you
will be able to enter it again.

viaTV_STBmanual_M1910_EN.doc                                                                   Page 10 (Total 38)
5.5 Sound and subtitles
Depending on the set-top box model, you may be asked to set the initial language for the broadcasted TV
programs – sound and subtitles. The prerequisite is that the program is broadcast in two (or more)
languages. The languages and subtitles may be easily set up for every program – the yellow
button refers to sound, the blue one to subtitles. More information on the subject is provided at the
end of the manual in the Summary section. Please note that even if several languages and subtitles are
shown available when watching a particular program, they may not be available in real.
6 viaTV Portal
The viaTV Portal is the viaTV service add-on, which enables to offer a wide range of other functions
increasing the comfort of the service operation. This system is not located directly in the set-top box
however on the servers of the provider. Upon its using, the set-top box demands the necessary data from
the server and it is provided with them. Just this transmission to and back is not immediate and explains
the approx. one-second delay concerning your order. The Portal is also available in English.
The viaTV Portal enables you, in principle, to take advantage of three new groups of items:
Comfortable operation and setting of the service (setting of the sound tracks in case of multi-
language broadcasting, subtitles, picture format, transfer of channels (setting of their order), help,
videogames, etc.),
Functions enabling pausing an ongoing program and its further playback, as well as replaying
a program from the beginning.
Video recorder function.
Mosaic function for a quick view of multiple channels.
Self-care (i.e. ”channel supermarket” - on-line ordering of other supplementary TV channels /
packages (this function is to be activated in late 2009),
EPG – the Electronic Program Guide (the “improved teletext” known for example from DVB-T
terrestrial digital broadcasting), including the possibility to set your own TV channel – My TV.
For the purpose of the Portal activation, press the Portal button (a dot in a little ring) or the MENU on a
remote control. For the purpose of return to watching TV, press the TV button (immediately above the
Portal button).
Subsequently, the Portal appears. Here, you will find the below-mentioned items, within which you move
using the cursor arrow keys or the PAN buttons. An active item is illuminated in magenta (pink)
and upon a click on “OK” on the RC, it is activated. In addition, the colored function buttons (the
coloured keys on the RC) are used. At the bottom of the screen, always watch which buttons are
currently active and what they can do. It is also possible to display Help (the INFO button) on the
screen. For the purpose of escape by one step back, it is sometimes possible to use the BACK
button.
6.1 Portal in English
For switching the Portal into English, press the blue button (in the
original design of the Portal) or click onto icon “Nastavení”
(“Settings” in English) – an icon of a gear wheel (in the new
design of the Portal). Then click onto icon with flags “Jazyky”
(“Languages” in English).
6.2 Portal interface
It is currently possible to activate two visual alternatives of the Portal – the original item-based version
and a new icon-based version. You can switch back and forth and select the one of your choice. Both
versions of the portal are based on the same system and enable practically the same functions. Besides
visual differences, working with the EPG is a bit different (though it is not possible to say which one is
better) as well as different work with recorded/paused programs. Subjectively said, the new design is a bit
faster. It is up to you which version of the Portal you want to use. The following page displays the main
menus of both versions. Both versions will be described further – read the manual to the version which
you plan to use. Note: In the future, the set-top box manufacturer will support only the new design
and the old one will be turned off.
viaTV_STBmanual_M1910_EN.doc Page 11 (Total 38)The initial screen of the Portal (original design): The initial screen of the Portal (new design): viaTV_STBmanual_M1910_EN.doc Page 12 (Total 38)
7 Map of the Portal (original design)
The entire contents of the Portal, including submenus and an outline of the logic where you can get by
clicking, looks as follows:

  Television
  New Portal
  Video Services                Personal VCR
  Games                         Tetris, Solitaire
  Radio
  Settings                      Self-Care                  Purchase PIN change
                                                              Self-Care
                                Restricted content         Parental PIN change
                                                              Parental PIN level
                                Video Services Settings    Language Preferences
                                                              Listing Order Settings
                                TV channels
                                Radio channels
                                STB settings               STB information
                                                              Video output setup
                                                              TV aspect ratio setup
                                                              Screen centering

7.1     The meaning of the individual items:

7.1.1    Television
Activates the EPG (Electronic program Guide). The EPG serves as an advanced teletext as far as
information on the programs is concerned. Within the scope of approx. one week, it informs of all
programs on the individual channels, namely quickly and without disturbing commercials. Unlike teletext
(which is also included in the viaTV service), it does not inform of anything else.

The EPG is displayed both automatically upon every change of a channel, the so-called quick EPG – brief
information at the bottom of the screen concerning the program you are just watching. This information
may be displayed by pressing OK in the course of regular watching. For the purpose of watching TV,
press OK again.

The program description within the EPG is in Czech only, regardless the set up Portal language.

program
begining          channel          program name / lenght           program end            time

                               progress bar of the program              next program
viaTV_STBmanual_M1910_EN.doc                                                               Page 13 (Total 38)
day channel
Complete EPG looks as follows (a vertical EPG)
program
Or as follows (a horizontal EPG):
a hint what can be controlled by the color buttons
viaTV_STBmanual_M1910_EN.doc Page 14 (Total 38)The program of the TV channel, which you are watching, is displayed as the initial one with respect to the
actual time.
Operation of the full EPG is as follows:
PAN buttons (arrows) left / right – switching between days (can be seen at the very top)
Cursor keys (arrows) left / right – switching between channels (can be seen under it); only in the
vertical display form
Cursor and PAN buttons (arrows) left / right – shift in time, by individual programs in the list /
quickly
Context buttons (coloured buttons at the bottom of the control)
– červené – recoding of the current or selected program
– green – Enhanced TV / options – displaying options what you can do with a current program, see
bellow. This button can be used even while watching TV (if EPG is not shown).
– yellow – at the complete EPG – switching the EPG display:
Horizontal – easier display without detailed description of the programs
Vertical – more detailed
– at a quick EPG – switching between audio tracks (more languages, if available)
– blue – at the complete EPG – activating function My TV, see bellow
– at the quick EPG – switching between subtitles (more languages, if available)
The so-called quick EPG may be displayed by pressing OK in the course of regular TV watching.
The number of the channel is displayed, the name of the program and its short description, time and other
information. For the purpose of watching TV, press OK again.
If you click, while watching TV, on the cursor arrow key “left” or “right”, the quick EPG is displayed and
the list of all channels. Between them, you may move using the cursor arrow keys. By pressing OK, you
get the selected channel - it serves for the purpose of quick switching to a certain TV channel if you do
not know, in which position exactly it is located.
Note: the EPG is not available for all programs, in particular in case of foreign ones.
My TV – the channel 0 (zero) is reserved for your own television. There you may compose a channel
of your own from all channels on offer depending on your taste. How does it work? In the EPG
(we recommend using the horizontal EPG, which is more clear for this purpose), you select a program
which you wish to watch. It may be on an arbitrary channel, at any time or on any day (within the scope
determined by the EPG). Then press the blue button (active on the screen as + My TV). In this way,
the respective program in added to My TV and is displayed in the EPG in position 0.
Subsequently, if you are watching television, then, upon oncoming beginning of the selected program,
the EPG will inform you and will ask you whether it should switch to the respective program. With My TV
you will never miss any beginning of your favourite program any more.
If two or more programs are broadcast at the same time, it is possible to define their priorities with the My
TV blue button. Using this button, you also remove the already inserted programs.
Note: the times of beginnings and ends of the programs with which My TV works are determined by
the respective broadcast scheme of the individual TV stations. If there is e.g. a delay in their
broadcasting, My TV unfortunately is not able to do anything about it. For the purpose of commercials,
most TV stations does not broadcast the so-called AVS signal informing when exactly the respective
program begins.
7.1.2 New Portal
Switches to the new version of the Portal, which is described further. The switch takes 10-20 seconds.
7.1.3 Video services
This section enables viewing programs previously saved with the video recorder.
Video recorder – contains programs which you have recorded with the virtual video recorder.
The recordings are saved to central T-Systems servers, so there is nothing saved in the actual
set-top box and it is not necessary to connect any additional devices.
viaTV_STBmanual_M1910_EN.doc Page 15 (Total 38)This section serves only to play recorded content. For recording, press the red button
during a program or use the Enhanced TV menu.
7.1.4 Games
Tetris, Solitaire
These concern popular easy games known from
computers. The instructions are provided directly on
the screen.
7.1.5 Radio
Activates the EPG (Electronic program Guide) for radio
stations. However, no EPG data for radio is available.
7.1.6 Settings
Various settings and access to other TV channels via Self-
Care
Self-Care
o Purchase PIN change
Changes the PIN code, used for e.g. on-
line ordering of additional TV packages
through the set-top box. It is necessary to
enter the existing PIN code, the new PIN
code and the new PIN code again for
confirmation.
o Self-Care
Self-Care is a way to order additional TV channels. Clicking here displays a list of
available channels or packages (packages of similar TV channels ordered at once). Use
the up/down arrow keys to navigate the channels. The current package is displayed along
with the channels it contains and the monthly price.
viaTV_STBmanual_M1910_EN.doc Page 16 (Total 38)To order a package press the green button and then enter the purchase PIN.
To cancel your package, proceed analogically. Remember that when ordered, the some
packages must be active for at least one month. It is not possible to cancel it earlier.
Newly ordered channels should appear in the list immediately and their content should be
available within approximately 15 minutes.
TV channels offered in Self-Care cannot be ordered or cancelled otherwise than through
Self-Care.
Self-Care is not available for viaTV Basic.
Restricted content
Parental PIN change
It changes the PIN code for the purpose of security of the individual channels so
that your children could not watch them. It is necessary to enter the existing PIN
code, the new PIN code and the new PIN code again for confirmation. For
confirmation, press OK.
Parental PIN level
Serves to set up restrictions on content which is not suitable for children. These
settings automatically hide programs (recorded or from the video library) which
are not suitable for children (it moves them to the adult folder which is accessible
only after entering the PIN) and requires the parent PIN to view adult content.
Video service settings
Video settings – recorded programs, programs from the video library (not yet
active). Contains language preferences, where you set up the preferred default
language for audio and subtitles, and sort by to sort programs from the video
library according to various criteria (not yet active).
TV channels
This item serves both for the purpose of the parental lock activation (protection
of the children against inappropriate content) and for the purpose of a change in
the order of the channels.
Activation / deactivation of the parent lock is performed by the red context
button. This always concerns one channel which is active. If the lock is activated,
then at any time when the respective channel is selected on the set-top box prior
to its display, the person watching TV is asked to enter the PIN code of the
parental lock.
Shift of channels (their order on the set-top box) is performed as follows: go to the
channel, the position of which you wish to change, press OK (the channel will turn white)
and then move it using arrows up or down. Then press OK again.
Movement within the table of channels is performed by the cursor arrow keys.
In the end, it is necessary to save the changes – the green context button.
Radio channels
This item is identical to setting up of TV channels
viaTV_STBmanual_M1910_EN.doc Page 17 (Total 38) STB settings
Various set-top box settings:
o STB information
Displays basic information on the set-top box – its serial number, IP and MAC address,
etc. For the purpose of the standard operation, it is not relevant for a common user.
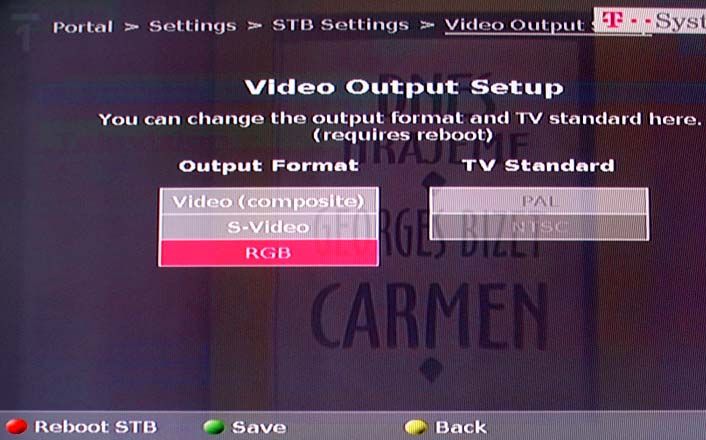
o Video output setup (scart connector only)
This item sets the video output for the scart connector, see the figure. In the left part, the
output format is to be set, in the right part, the TV standard. Both the items may be
changed independently. The output format may be set only for analogue standard
definition using the scart connector. Which output and the reason why to select it has
been described in part 3.
For HD definition, it is necessary to set the output format directly in the firmware of
the set-top box, see section 3.2 of this instruction manual.
o TV aspect setup
viaTV_STBmanual_M1910_EN.doc Page 18 (Total 38)On the left, you select the actual type of your television set (the screen format) either
the classical square-like 4:3 or the wide rectangular-like 16:9.
On the right, you select customization of the picture if the program is broadcast in another
that the actual definition (e.g. if you have the 4:3 television set and the program (typically
a film) is broadcast as 16:9 and vice versa).
For the 4:3 television sets, your possibilities to customize the picture are as
follows:
None – the 16:9 picture will be distorted
Pan&Scan – the picture is cut out on the sides and you will not see it complete, the
entire screen will be used
Letter box – the picture gets narrower, a black unused band will be seen at the top
and at the bottom of the screen, however, you will see a complete picture.
For the 16:9 television sets, your possibilities to customize the picture are as
follows:
None – the 4:3 picture will be distorted
Overscan - the picture is cut out at the top and at the bottom and you will not see it
complete, the entire screen will be used
Pillar box - the picture gets narrower, a black unused band will be seen on both the
sides of the screen, however, you will see a complete picture.
Similar setting may be performed directly on your television set as well.
o Screen centering
Shift of the picture (if it is not directly in the middle) to the left / to the right / up /down.
The shift is performed using the cursor arrow key (fine shift) or using the PAN arrows
(coarse shift in big steps).
8 Enhanced TV – Doing tricks with TV (original design)
Clicking on the green button while watching TV (or
using the fast EPG) will take you to the Enhanced TV
menu. It offers premium functions not available with
standard TV. To navigate the Enhanced TV menu,
use the standard up/down cursor arrows. Use OK to
confirm a selection.
8.1 Description of individual items in the
Enhanced TV menu
8.1.1 Detail
Displays a description of the current program.
viaTV_STBmanual_M1910_EN.doc Page 19 (Total 38)8.1.2 Pause playback
Pauses playback of the current program, for example
if you need to leave the TV. To continue playback,
enter the Enhanced TV menu again and use the
"Unpause playback" button, which is now displayed
instead of the "Pause playback" button. Select the
button and confirm with OK. Playback will start from
where it was paused (delayed). To return to the real-
time broadcast (live) use the "back to live broadcast"
button.
There is now also a "rewind" (Seek backward) button,
which enables not only pausing, but rewinding as
well. Fast-forward is not possible.
Note: Pause can be activated not only from the menu, but also (and better) by using the play/pause
button (the far left VCR button – see image of remote control). The stop button (far right) goes back to live
broadcasting. The second button from the left side can be used for rewinding. Be careful not to press the
colored buttons, but those above them.
8.1.3 Play from beginning
The play from beginning function enables replaying an ongoing program from the beginning.
Note: The system does this according to the EPG, so there will be commercials at the beginning which
cannot be skipped. However, fast-forward is possible in the new Portal version (this is probably the most
significant functional difference between the two visual versions). In the case of an extremely long
program (for example a tennis match with many sets), the beginning is not guaranteed.
8.1.4 Record
Clicking on "Record" activates the virtual video recorder and initiates recording of the current program.
The recorder is virtual because it is not integrated into the set-top box, neither is it necessary to connect it
in any way. Videos are recorded centrally at T-Systems servers.
Several notes regarding this type of recording:
Recording is always performed according to information from the EPG, which means that:
o It is possible to record programs from their beginning even if they are already under way
(=all programs are recorded from their beginning).
o It is not possible to record a program otherwise than as stated in the EPG (= it is not
possible to skip the commercials before a program and start recording after them, it is not
possible to record only part of a program – even if turned on halfway through, the entire
program will be recorded).
o If the broadcast is not on time as stated in the EPG (usually delayed), this affects the
recording. Hence the video recorded automatically starts recording some time before the
selected program and ends some time after its end.
It is possible to watch something else then what is being recorded.
It is possible to record multiple programs simultaneously (and watch something else as well).
It is possible to record when you are not there using a timer (programmed recording).
Every customer has their maximum time limit for recordings. The limit cannot be exceeded. If
your "virtual video cassette" (storage space) is full, it is not possible to record further without
deleting something. These limits are stated in the viaTV FAQ on the website. Premium price
plans have more space for recordings.
Your programs are saved in your storage space for an unlimited time. They are not automatically
deleted in time.
It is not possible to access the recorded programs otherwise than via the set-top box (they cannot
be burned to a CD, etc.). It is not possible to edit recorded videos
Some TV stations may restrict or prohibit recording of their programs. In such a case, it is not
possible to record them via the Enhanced TV service.
viaTV_STBmanual_M1910_EN.doc Page 20 (Total 38) It is not possible to record programs from the video library or similar services (HBO Digital).
(In the future, these services are not yet provided.)
How recording works
Recording an ongoing program
o Press the red context button (to
directly start recording) or…
o … press the green context
button "options" (to enter the
Enhanced TV menu) and select
record
The same (red or green) buttons are
used to stop recording
Planned recording using the
timer
Recording is done using the EPG –
select the channel and program that you
wish to record. If it is possible to record
it, press the red button. The program will
be highlighted and recorded
automatically.
Use an opposite procedure to cancel the planned recording.
It is possible to record multiple programs simultaneously, even if the set-top box is turned off (it can
even be pulled out from the socket).
Playback and deletion of recorded programs
All recorded programs can be found in the Menu - "video recorder" folder.
(Press Menu on the remote control, select Video Services -> Personal VCR).
Under "Perosnal VCR", you can view all your recorded items and sort them according to various criteria.
Press the red button to play the selected program.
The upper right corner displays the time used and time remaining for recordings.
viaTV_STBmanual_M1910_EN.doc Page 21 (Total 38)Pressing the green button displays options related to the program:
Detail – description of the program
Delete - deletion
Category – displays a keyboard, which can be used to
assign the selected program to a certain (user-created)
category
Lock program – lock the program with a parental lock if it is
not suitable for children
8.1.5 Mosaic
Mosaic divides the TV screen into 9 smaller screens and displays the current programs of 9 various
channels. This gives you a quick overview of what is currently showing.
Use the cursor arrows to navigate between the sections. The section inside the frame shows your current
location. This selected channel will be played with sound. Press the OK button to switch to the channel in
the frame and display it normally over the entire screen.
Press the down arrow to scroll down to further screens.
The channels on the screens roughly comply to the themes of individual channels (general, sport etc.).
This is fixed and cannot be changed by the user.
Restricted display
If a channel is locked with a parent lock, it shows a padlock image. When you click on the image,
you will be prompted to enter the parent PIN.
If a channel may be ordered via Self-Care, it displays a shopping cart image. Click on the image
to proceed to Self-Care, where you may order it. Sound will be on for 5 seconds.
Channels from a higher price plan will not be displayed at all.
viaTV_STBmanual_M1910_EN.doc Page 22 (Total 38)9 Map of the Portal (new design)
Click on the Menu button to display the
Main Menu:
Use the cursor arrows to navigate
up/down and right/left.
The active icon is slightly larger,
highlighted and its description is
displayed under it (here the active icon is
"Television")
Press OK to confirm or BACK to go back.
Description of the icons:
Main Menu, line one:
Original portal design – switches
to the original (= other) viaTV Portal
version.
Television – switches back to TV
broadcast and briefly displays the
quick EPG related to the respective
channel and time
Program guide – switches to the
program guide (EPG).
Main Menu, line two:
Recorded programs – access to recorded programs (video recorder)
Radio – switches to radio broadcast and briefly displays the quick EPG related to the respective
channel and time
Recorded programs (lock) – enables locking recorded programs (adult only)
Main Menu, line three:
Settings – various settings of the set-top box and the service itself
A detailed description is provided further on.
Weather application
Right of the menu is an icon informing about the current weather in the
given region. It serves for information only in the displayed form.
viaTV_STBmanual_M1910_EN.doc Page 23 (Total 38)9.1 The meaning of the individual items of the Main menu:
9.1.1 Old version
Original portal design – switches to the original (= other) viaTV Portal version.
9.1.2 Television
Switches back to TV broadcast and shortly activates the EPG (Electronic program Guide). The EPG
serves as an advanced teletext as far as information on the programs is concerned. Within the scope of
approx. one week, it informs of all programs on the individual channels, namely quickly and without
disturbing commercials. Unlike teletext (which is also included in the viaTV service), it does not inform of
anything else.
The EPG is displayed both automatically upon every change of a channel, the so-called quick EPG – brief
information at the bottom of the screen concerning the program you are just watching. This information
may be displayed by pressing OK in the course of regular watching. For the purpose of watching TV,
press OK again.
The program description within the EPG is in Czech only, regardless the set up Portal language.
The quick EPG is displayed at the screen bottom and shows this information:
actual time and date
channel
program name /
description
program next „progress bar“ of the program end
beginning program program
If the quick EPG is displayed, you can use the two arrows in its top right area.
Click on the left arrow key of the remote control to display a list of channels.
Click on the right arrow key of the remote control to display the Menu.
The same is possible when watching TV, even if the quick EPG is not displayed.
The list of channels
looks this:
viaTV_STBmanual_M1910_EN.doc Page 24 (Total 38)The left area shows the name of the channel, the right area shows what's currently on.
You can browse the list using the up/down arrows and display the channel of your choice. Click OK to
display the selected channel's broadcasting.
When you click on the left arrow of the remote control while browsing the list of channels, Programs are
displayed – a list of programs of the respective channel for the current day.
When you click on the right arrow of the remote control while browsing the list of channels, Detail is
displayed – a detailed description of the respective channel. You can also display detailed descriptions of
future (or past) programs by displaying a list of programs (left arrow – Programs), selecting a program
and displaying details.
Example of program detail:
If you click the right arrow when the quick EPG is displayed, the Menu will be shown:
Description of icons:
Menu, line one:
Back – back to previous screen
Program guide – displays the complete EPG
Mosaic – displays several TV channels simultaneously to provide an overview of what is on
viaTV_STBmanual_M1910_EN.doc Page 25 (Total 38)Menu, line two:
Watch from the beginning – plays the current program from its beginning
Record program – records the current program
Main Menu – switches to the Main Menu
A detailed description of the Menu is provided further on.
9.1.3 Program guide
Displays the full program guide (EPG):
Left is a list of channels,
right is a timeline and
individual programs. A
short description of the
selected (yellow
highlighted) program is
displayed at the top.
Click on OK to display
details of the selected
program and further
options on what to do
with the program:
viaTV_STBmanual_M1910_EN.doc Page 26 (Total 38)Description of icons:
back arrow – return to the previous
screen (EPG)
Switch to channel – displays live TV
broadcasting
*Watch – displays TV broadcasting
with the option to pause and rewind
the program
Detail – displays a description of the
program
*Record – records the selected program
Close – return to watching TV
* These functions need not be available for all programs.
All These functions are described further in the section Enhanced TV
Other items in the Main Menu:
9.1.4 Recorded programs
In this part of the Main Menu you can access the programs that you have recorded.
Recorded programs – contains programs which you have recorded with the virtual video
recorder. The recordings are saved to central T-Systems servers, so there is nothing saved in the
actual set-top box and it is not necessary to connect any additional devices.
This section serves only to play recorded content. For recording, press the red button
during a program or use the Menu or the above menu, which is displayed after clicking on
the selected program in the EPG.
9.1.5 Radio
Same as "Television", but for radio stations.
9.1.6 Recorded programs (lock)
Enables locking a recorded program which is not suitable for children (when the parent PIN is entered).
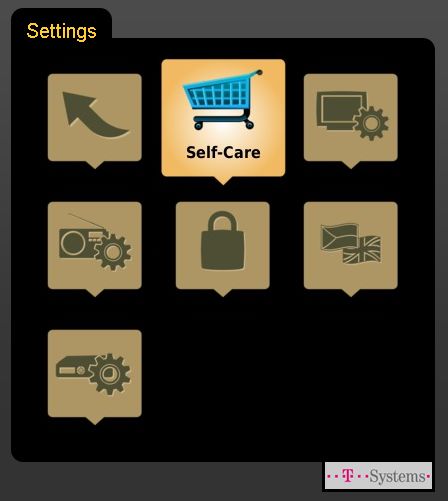
viaTV_STBmanual_M1910_EN.doc Page 27 (Total 38)9.1.7 Settings
Various settings and access to other
TV channels via Self-Care
Description of icons:
Menu Settings, line one:
Self-Care
Self-Care is a way to order additional
TV channels. Clicking here displays a
list of available channels or packages
(packages of similar TV channels
ordered at once). Use the up/down
arrow keys to navigate the channels.
The current package is displayed
along with the channels it contains
and the monthly price.
After having clicked onto a selected
channel package, a menu dedicated
to the package appears:
Item „Detail“ displays a detailed
description of the package, especially
the list of channels.
To order a package click onto the
shopping cart icon and then enter the
purchase PIN.
To cancel your package, proceed
analogically. Remember that when
ordered, some packages must be
active for at least one month. It is not
possible to cancel it earlier.
Newly ordered channels should appear in the list
immediately and their content should be available
within approximately 15 minutes.
TV channels offered in Self-Care cannot be ordered or
cancelled otherwise than through Self-Care.
Self-Care is not available for viaTV Basic.
viaTV_STBmanual_M1910_EN.doc Page 28 (Total 38)You can also read