LED Metrology Handbook of - WE BRING QUALITY TO LIGHT.
←
→
Page content transcription
If your browser does not render page correctly, please read the page content below
WE BRING QUALITY TO LIGHT.

     Handbook of
LED Metrology
Handbook of LED Metrology INSTRUMENT SYSTEMS GmbH
LED Metrology
Contents
Page
1. Introduction 2
2. Terms and Definitions in Photometry and Colorimetry 3
2.1 Radiometric quantities 3
2.2 Photometric quantities 4
2.3 Colorimetry 6
3 Basic Properties of LEDs 7
3.1 Package design 7
3.2 Electrical properties and ambient conditions 8
4 Optical Characteristics of LEDs 11
4.1 Spatial radiation characteristics 11
4.2 Luminous intensity and radiant intensity 13
4.3 Luminous flux and radiant power 15
4.4 Wavelength, color and spectrum 18
5 Requirements for Optical Measuring Instruments 20
5.1 Comparison of photometer and spectroradiometer 20
5.2 Requirements for a spectroradiometer 21
5.3 Calibration 24
6 Discussion of Sample Measurements with Error Analysis 27
6.1 Effects of the dynamic measuring range 27
6.2 Influence of stray light on white LEDs 30
6.3 Influence of bandpass (spectral resolution) 33
6.4 External influences 34
6.5 Measurement in production 35
7 Summary 38
8 Bibliography 40
Version 1.1 page: 1Handbook of LED Metrology INSTRUMENT SYSTEMS GmbH 1. Introduction Incredible developments in LEDs in recent years have generated a significant growth market with completely new applications. Full color displays only became possible with the introduction of high-intensity blue LEDs, while white LEDs are becoming widely used in lighting engineering and the automobile industry. These new applications have placed increasingly stringent demands on the optical characterization of LEDs, which serves as the benchmark of product quality. Specific expertise is needed in order to obtain precise and reproducible results. This application note discusses the special characteristics of LEDs and provides recommendations for obtaining accurate measurement results. The goal here is to provide not only an introduction to LED metrology for readers new to this subject area, but also a useful reference work for more experienced readers. A short introduction describes the basic terms and definitions used in photometry and colorimetry, and details the physical properties that are specific to LEDs. Later sections describe the test setups and methodology required for accurate measurements. Possible sources of error arising from interactions between LEDs and measuring instruments are also discussed. Readers who are short of time can go straight to the summary at the end of the brochure and then selectively read individual sections. However, we recommend that you read the entire brochure to obtain in-depth understanding of this subject area. The CIE (Commission Internationale de l´Éclairage) is currently the only internationally recognized institution providing recommendations for LED measurements. The CIE publication 127 entitled LED Measurements was published in 1997 and is an important cornerstone of this application note. Version 1.1 page: 2
Handbook of LED Metrology                      INSTRUMENT SYSTEMS GmbH

2. Terms and Definitions in Photometry and Colorimetry
The relevant optical quantities for LED metrology are defined under
radiometry and photometry. This section provides a brief overview of
important terms that are essential for an in-depth understanding and correct
use of measuring instruments. A distinction is made between radiometric
quantities describing physical radiation properties and photometric quantities
describing effects on the human eye.

2.1 Radiometric quantities
Radiometry is concerned with the energy or the power of optical radiation for
a given geometry of propagation. The spectrum covers the full range from UV
to infrared light and is therefore independent of the sensitivity of the human
eye to brightness and color.

There are four basic radiometric quantities:

Radiant power or radiant flux

Radiant power Φe is defined as the total power dQe emitted by a light source
per unit time dt (see Figure 1). The unit of radiant power is the watt [W].
        dQ e
Φe =
         dt

Radiant intensity

Radiant intensity Ie is defined as the power dΦe emitted per unit solid angle
dΩ (see Figure 1). It is expressed in watts per steradian [W/sr].

        dΦ e
 Ie =
         dΩ

A detector with an active area A positioned at distance r from a light source
measures radiant power dΦe. This configuration assumes a point source and
that therefore the inverse square law holds true. Distance r and the detector
area dA define the solid angle dΩ.

Version 1.1                                                      page: 3
Handbook of LED Metrology INSTRUMENT SYSTEMS GmbH
dA
dΩ =
r2
Irradiance
Irradiance Ee is obtained from the ratio of the radiant power dΦe and the area
of the detector dA. It is expressed in watts per square meter [W/m 2].
dΦ e
Ee =
dA
The following relationship between radiant intensity Ie and irradiance Ee for a
point light source is derived from the above formula for irradiance Ee.
dΦ e I e dΩ I e
Ee = = = 2
dA dA r
Radiance
Radiance Le is measured for extended, light sources (i.e. no point source)
and is defined as the radiant power dΦe emitted from an area dAe per unit
solid angle dΩ. It is expressed in watts per steradian per square centimeter
[W/sr cm 2]:
d2Φe
Le =
dA e dΩ
2.2 Photometric quantities
Each radiant quantity has a corresponding luminous quantity which considers
the visual perception of the human eye. The V(λ) curve describes the spectral
response function of the human eye in the wavelength range from 380 nm to
780 nm and is used to evaluate the corresponding radiometric quantity that is
a function of wavelength λ. As an example, the photometric value luminous
flux is obtained by integrating radiant power Φe (λ) as follows:
Version 1.1 page: 4Handbook of LED Metrology INSTRUMENT SYSTEMS GmbH
780nm
Φv = Km ∫ Φ e (λ ) ⋅ V (λ )dλ
380nm
The unit of luminous flux Φv is lumen [lm]. The factor Km = 683 lm/W
establishes the relationship between the (physical) radiometric unit watt and
the (physiological) photometric unit lumen. All other photometric quantities
are also obtained from the integral of their corresponding radiometric
quantities weighted with the V(λ) curve.
The table below lists important radiometric and photometric quantities:
Radiometry Unit
Radiant power Φe W
Radiant intensity Ie W/sr
Irradiance Ee W/m2
Radiance Le W/m2 sr
Photometry Unit
Luminous flux Φv lm
Luminous intensity Iv lm/sr = cd
Illuminance Ev lm/m2 = lx
Luminance Lv cd/m2
Table 1: gives an overview of radiometric and photometric quantities and
their units.
A1 A2
radiant power or radiant intensity or
luminous flux luminous intensity
Figure 1: illustrates the definition of luminous flux and luminous intensity.
Version 1.1 page: 5Handbook of LED Metrology INSTRUMENT SYSTEMS GmbH
2.3 Colorimetry
Colorimetry relates to the visual perception of color by the human eye and
provides a quantitative and qualitative description of color. In 1931 the CIE
established the X, Y, Z tristimulus system which is based on the assumption
that every color is a combination of the three primary colors red, green and
blue [1]. The X, Y, Z tristimulus values are obtained by integrating the spectral
power distribution of radiation S (λ) and the three eye response curves x (λ),
y (λ) and z (λ) over the 380 nm to 780 nm wavelength range (see Figure 2,
left). The known x, y and z color coordinates are then derived from the
tristimulus values. Figure 2 (right) shows this chromaticity space. There are
other chromaticity spaces, e.g. u´ v´ and L∗a∗b∗ that can be calculated by
transformation of the x,y,z values.
2.0
520 nm
spectral tristim ulus values [a.u.]
CIE, 1931
0.8
2° observer
550 nm
1.5
0.6
λ dom .
y-coordinate
500 nm
F
1.0 0.4
600 nm
E
650 nm
0.2 780 nm
0.5
480 nm
0.0 450 nm
380 nm
0.0
400 500 600 700 0.0 0.2 0.4 0.6 0.8
wavelength [nm ] x-coordinate
Figure 2: left: The tristimulus functions x(λ) (dashed line), y(λ) (solid line) and
z(λ) (dotted line).
Right: 1931 CIE color diagram for 2° observer.
Version 1.1 page: 6Handbook of LED Metrology INSTRUMENT SYSTEMS GmbH
3. Basic Properties of LEDs
This section describes the basic physical properties of LEDs. Some of these
properties have a significant influence on optical measurements.
3.1 Package design
Radiation from LEDs is generated by a semiconductor chip that has been
mounted in a package. LEDs can now be obtained in a wide range of designs
and types that exert a significant influence on the spatial radiation
characteristics of the particular LED (see Figure 3). Lenses, mirrors or
diffusers can be built into the package to achieve specific spatial radiation
characteristics. Production tolerances in the manufacture of the LED package
can also play a role. For example, the mechanical and optical axes may not
be coincident (see figure 3 below).
mechanical axis
optical axis
Figure 3: shows various LED designs and an example of a skewed radiation
cone of a LED.
Version 1.1 page: 7Handbook of LED Metrology INSTRUMENT SYSTEMS GmbH A reproducible test setup is therefore an important prerequisite for precise measurement of luminous intensity in order to guarantee that the detector always sees the same section of the emission cone. Figure 4 A precision test socket from Instrument Systems for 5 mm LEDs. Figure 4 shows a precision test socket from Instrument Systems for 5 mm LEDs. The three clamps always grip the LED package at the same point and thus permit identical alignment of the mechanical axis for all LEDs with the same package. This setup follows the CIE recommendation that the mechanical axis of the LED, rather than the optical axis, should be taken as the reference axis for measurements [2]. 3.2 Electrical properties and ambient conditions LEDs are normally operated at a constant current. The emitted light is a function of the set forward current IF, and the compliance voltage Uf. Experiments show that the voltage is not stable instantly following the device energization. Uf comes to stabilization as the temperature of the (light emitting) diode junction stabilizes. The temperature rises due to electrical power consumed by the LED chip and then stabilizes at a temperature value Tc > TAmbient after a period of time. Because of this effect, the emitted light is not stabilized until a stable forward voltage is attained Figure 5 shows the stabilization over time of a white LED. The luminous intensity and the forward voltage is obtained every 10 seconds when a Version 1.1 page: 8
Handbook of LED Metrology                   INSTRUMENT SYSTEMS GmbH

current begins to flow through the LED lasting until a constant forward voltage
value is achieved.

              3.26

              3.25
  U F [V]

              3.24

              3.23

              2.46
   I V [cd]

              2.43

              2.40

              2.37
                     0   20    40         60         80        100         120

                                      time [sec.]

Figure 5: shows the stabilization period of a white LED. Time [sec.] is
entered on the x-axis and luminous intensity [cd], respectively forward voltage
UF[V] on the y-axes.

The stabilization procedure can last several seconds or up to a minute,
although this is an extreme example and might be influenced by the
properties of the phosphor (for white LEDs). As soon as thermal equilibrium
has been reached in the chip, the value Tc is determined by measuring the
heat exchange with the ambient surroundings. This occurs mainly via the
electrical contacts.

Since the heat from the junction must be dissipated into the ambient
somehow, changing the ambient temperature affects the junction temperature
and hence the emitted light. A typical temperature coefficient for the forward
voltage at constant current is approximately –1.5 to – 2.5 mV/K. At a given

Version 1.1                                                          page: 9
Handbook of LED Metrology INSTRUMENT SYSTEMS GmbH current, therefore, the measured forward voltage is lower at higher temperatures. If the ambient temperature rises, the entire spectral power distribution is shifted in the direction of the longer wavelengths (except for blue LEDs). The shift in peak wavelength is typically about 0.1 to 0.3 nm/K. This effect has a negligible influence upon the photometric values of green, yellow or amber LEDs because their peak wavelength is at the flatter portions of the V(λ) curve. However, the peak wavelength for red and blue LEDs are on the much steeper slopes of the V(λ) curve and this can lead to significant changes in the photometric values (see Figure 12). This is why the current and temperature stabilization is important for attaining constant spectral properties. If the forward current is not constant, i.e. modulated, the temperature may fluctuate. The average radiant power then no longer corresponds to the radiant power under constant current conditions. Similar problems apply to pulsed LEDs, where a high current is switched on and off periodically. Differences in the value for luminous intensity may arise between multiplex operation and constant-current operation despite comparable power consumption. Version 1.1 page: 10
Handbook of LED Metrology                     INSTRUMENT SYSTEMS GmbH

4. Optical Characteristics of LEDs

4.1 Spatial radiation characteristics

The many different packages and types of LEDs generate different spatial
radiation patterns. Precise knowledge of the angle-dependent distribution of
radiation is necessary for some applications. For example, a full-color (red,
green, blue) LED display may appear white when observed at a normal
angle if all three colors are illuminated simultaneously. However, if the LEDs
have a different spatial distribution of radiation for the individual colors a color
change occurs when the display is observed off axis.

                                               90

                                        120                60
                          0.9

                          0.6     150                               30

                          0.3
          intensity [%]

                          0.0   180                                       0

                          0.3

                          0.6     210                               330

                          0.9
                                        240                300
                                              270

Figure 6: shows three very different spatial distribution patterns of radiation

Figure 6 shows three typical LED radiation patterns: a diffuse LED with
virtually Lambertian distribution (dotted line), a narrow-angled specular LED
(solid line), and a LED with two intensity peaks at 30° and 150° for
background illumination of displays (Argus LED, broken line).

Version 1.1                                                          page: 11
Handbook of LED Metrology INSTRUMENT SYSTEMS GmbH
A goniometer can be used to analyze the radiation pattern of an LED. The
LED is pivoted about its tip and the intensity is measured, i.e. the angle ϑ is
scanned. This provides a profile of the radiated beam in one plane. In order to
record the two-dimensional radiation pattern the LED can also be rotated
about its mechanical axis. This corresponds to angle ϕ in the spherical
coordinate system.
0.36
0.34
x-coordinate
0.32
0.30
-80 -60 -40 -20 0 20 40 60 80
angle θ [degree]
Figure 7: shows the x color coordinate of an angle-dependent measurement
of a white LED. A significant blue shift is seen in the center and edges of the
beam.
Both a single profile and the complete spatial radiation pattern can be
determined using the LED goniospectroradiometer (see Figure 10) from
Instrument Systems. The detector comprises a diffuser and a fiber bundle
linked to the spectroradiometer. The advantage of a goniospectroradiometer
is that all relevant information such as the photometric integral, color
coordinates, dominant wavelength, color temperature, etc. can be recorded
simultaneously with each single measurement. For example, the color
coordinates of a white LEDs often show a significant blue shift because the
light path through the yellow phosphor is angle dependent (see Figure 7)
Version 1.1 page: 12Handbook of LED Metrology INSTRUMENT SYSTEMS GmbH The detector should be positioned at a distance of 10–20 cm for measuring Lambertian radiation distributions. If resolution is required to determine the structure of very narrow-angled LEDs, the detector should instead be positioned at a distance of 30–50 cm with an aperture limit at the detector. Angular scanning requires increments of 0.1° ϑ for typical narrow-angled LEDs with FWHM of 2°. 4.2 Luminous intensity and radiant intensity Luminous intensity is the most frequently measured parameter. However, the underlying concept for measuring radiant intensity and luminous intensity assumes a point source of light. One method of determining luminous intensity lv involves calibrating the detector in illuminance Ev and calculating luminous intensity using the inverse square law Iv = Ev r2. However, the validity of this calculation requires two conditions: • The distance r between the detector and LED must be precisely determined. The many different designs available make it difficult to determine the precise position of the emission center (also known as the goniometric centroid) of the LED. • The distance between the detector and LED must be large with respect to the spatial width of the light source (far field condition). Many LEDs have a relatively large emitting area compared to the short distance that is generally used for a measurement and hence a point source can not be assumed. Therefore the inverse square law no longer holds, and the irradiance measured at the detector is not easily related to the intensity of the source. “Averaged LED intensity” concept Because of this, the CIE has developed the concept of “averaged LED intensity” to solve the problem that occurs under near field conditions [2]. This concept no longer corresponds to the physically precise definition of luminous intensity but relates more to a measurement of illuminance at a fixed distance. The LED is positioned in such a way that its mechanical axis is directly in line with the center point of a round detector with an active area of 1 cm 2, and the surface of the detector is perpendicular to this axis. The CIE gives two recommendations for the distance between the LED and the detector surface (see table below). The front tip of the LED is always Version 1.1 page: 13
Handbook of LED Metrology                   INSTRUMENT SYSTEMS GmbH

taken as the reference point for the distance in both cases. This guarantees
that the same geometry is always used when measuring luminous intensity in
different laboratories irrespective of the design of the LED.

      CIE              Distance between       Solid angle
 Recommendation           LED tip and
                            detector
    Condition A             316 mm             0.001 sr
    Condition B             100 mm              0.01 sr

Table 2: The CIE recommendations for the concept of averaged LED
intensity. The area of the detector is always 1 cm2. The relevant solid angle is
determined by the distance between the LED tip and the detector.

Figure 8 shows the realization of this concept in practice. The LED 430
intensity probe developed by Instrument Systems comprises an optical probe
of suitable length into which an LED test socket can be inserted. The distance
between the tip of the LED and the detector – in this case a diffuser – is
exactly 100 mm. Two baffles in the beam path help to reduce stray light. A
fiber bundle is located behind the diffuser to guide the light into a calibrated
spectroradiometer.

Figure 8: shows the LED-430 measuring adapter that conforms to the
standard CIE condition B for 100 mm distance.

Condition B (100mm) is the most commonly used geometry since it is also
suitable for weak LED light sources. An optical probe such as the LED-440
should be used in accordance with condition A for bright LEDs with a very
narrow emission angle.

Version 1.1                                                       page: 14
Handbook of LED Metrology INSTRUMENT SYSTEMS GmbH
4.3 Luminous flux and radiant power
The two principal methods for measuring total radiant power/luminous flux are
using either an integrating sphere or a goniophotometer. These two
measuring principles are explained below.
The integrating sphere
The integrating sphere is a hollow sphere, the interior of which is coated with
a very stable material that is a diffuse reflector. Figure 9 shows a cross-
section of an integrating sphere suitable for carrying out measurements of
luminous flux. The sphere has a port for the LED and a baffled port for the
detector.
spectroradiometer
LED
Figure 9: shows a cross-section of an integrating sphere. The LED port is at
the left and the detector is positioned at 90° (top ).
The coating on the interior of the sphere ensures that the launched radiant
flux Φ incident on area ∆A in the interior of the sphere is reflected in such a
way that the radiance or luminance is equal in all directions. Under a certain
angle the area ∆A radiates to ∆A` and generates an indirect irradiance Eind
that is independent of the relative position of ∆A to ∆A` [3]. The indirect
irradiance Eind is therefore already equal over the entire surface of the sphere
Version 1.1 page: 15Handbook of LED Metrology INSTRUMENT SYSTEMS GmbH
after one reflection. The irradiance E, that arises at a specific area ∆A´ within
the sphere can be calculated by integrating the indirect irradiance Eind over
the entire surface of the sphere. Taking multiple reflections into account this
irradiance E is proportional to the total radiation Φ and is measured by a
detector.
This only applies if the interior of the sphere has a Lambertian characteristic
with constant spectral properties, if the detector has perfect cosine correction,
and if there are no absorbing surfaces in the sphere [3, 4]. However, there
are a number of error sources under experimental conditions. For example, it
is not possible to create a perfectly diffuse reflector with constant reflectance
over the entire interior of the sphere. Spectral characteristics of the coating
and the size of the ports also constitute additional sources of error.
The wide range of radiation characteristics shown by LEDs can introduce
calibration errors in measuring luminous flux. An accuracy of ±5% can be
obtained for components with diffuse emission, but deviations of more than
10% are possible with narrow-angled LEDs. Sphere diameters of 80 and 150
mm have become established for measuring luminous flux. The larger sphere
is recommended if it is important to keep measurement errors to a minimum,
because the ratio of the sphere area to the size of the ports and the LED is
more favorable. However, this advantage results in a loss of intensity.
Where to position the LED in the integrating sphere remains a matter of
controversy. In the latest CIE discussions it was agreed to position the entire
package of the LED inside the sphere (ie up to the point where the contacts
start, see Figure 9). This setup is called 2π luminous flux measurement
allowing the best match to the actual use of the LED in a final end product
(e.g. in a backlight).
The goniophotometer
A goniophotometer offers another method for determining luminous flux and
radiant power. It is best to envisage the LED enclosed by an imaginary
sphere. A cosine-corrected detector moves on the surface of the sphere
along specific paths at distance r (the sphere radius). The detector is used to
determine irradiance E arising as a result of the partial radiant flux dΦ
incident on detector area dA as a function of ϑ and ϕ.
dΦ
E(ϑ, ϕ ) =
dA
Version 1.1 page: 16Handbook of LED Metrology INSTRUMENT SYSTEMS GmbH
In order to determine total radiant power, the detector is moved incrementally
around angle ϑ. Several measurements are taken for each angle ϑ with angle
ϕ varying from 0° to 360°. Individual zones are scan ned corresponding to a
constant degree of latitude of the sphere. Total radiant power Φ is then
2π π
Φ = r2 ⋅ ∫ ∫ E(ϑ, φ) ⋅ sin(ϑ ) dϑ ⋅ dϕ
0 0
Alternatively, instead of moving the detector which requires considerable
mechanical effort, the LED can be rotated about its tip. Measurements at the
PTB (Physikalisch-technische Bundesanstalt) have shown that it is irrelevant
whether the detector or the LED moves [6]. The distance between the LED
and detector should be 30 cm. A measurement area of 1 cm2 is
recommended for diffuse LEDs. However, the active area should be reduced
for narrow-angled LEDs. Figure 10 shows the setup for this kind of LED
goniophotometer. The angle ϕ is adjusted by rotating the LED about its
mechanical axis and angle ϑ by pivoting about its tip. The detector sits on an
optical rail to permit measurements at various distances.
Figure 10. shows the LED goniospectroradiometer from Instrument Systems
where the LED is moved instead of the detector.
Version 1.1 page: 17Handbook of LED Metrology INSTRUMENT SYSTEMS GmbH
4.4 Wavelength, color and spectrum
The spectral power distribution of the optical radiation emitted by LEDs differs
in many ways from other radiation sources. It is neither monochromatic like a
laser nor broadband like a tungsten lamp but rather lies somewhere between
these two extremes. The spectrum of an LED has a specific peak wavelength
λp depending on the manufacturing process where the FWHM is typically a
couple of tens of nanometers (Figure 11).
1.0
0.8
λp
0.6
intensity [%]
0.4
λc
0.2
0.0
400 450 500 550 600
∆ λ 0.5 wavelength [nm]
Figure 11: The spectral power distribution of a blue LED and important
spectral parameters.
The spectral parameters of LEDs are listed below:
Peak wavelength λp :
The wavelength at the maximum intensity of the spectrum. The peak
wavelength is easy to define and is therefore generally given in LED data
sheets. However, the peak wavelength has little significance for practical
purposes since two LEDs may well have the same peak wavelength but
different color perception.
Version 1.1 page: 18Handbook of LED Metrology INSTRUMENT SYSTEMS GmbH
FWHM:
The spectral bandwidth at half intensity ∆λ0,5 is calculated from the two
wavelengths λ`0.5 and λ``0.5 on either side of λp: ∆λ0.5 = λ`0.5 - λ``0.5
Center wavelength λ0.5m:
The average wavelength corresponds to the wavelength halfway between
the half-wavelengths λ`0.5 and λ``0.5.
Centroid wavelength λc:
The centroid wavelength λc is the wavelength that divides the integral of a
spectrum into two equal parts according to the following formula:
λ2
∫ λ ⋅ S(λ ) ⋅ dλ
λc =
λ1
λ2
∫ S(λ ) ⋅dλ
λ1
The centroid wavelength is ideal for characterizing the radiometric properties
of LEDs (e.g. infrared LEDs).
Dominant wavelength:
The dominant wavelength is determined from the color coordinates of the
measured spectrum. A straight line is taken through the color coordinates of a
reference illuminant and the measured color coordinate F in the color diagram
(see Figure 2). The equal energy point E is generally taken as the reference
illuminant. The intersection S between the straight line and the boundary of
the color diagram gives the dominant wavelength. It is a measure of the color
sensation produced in the human eye by the LED.
Purity:
Purity is defined as the ratio of the distance from the equal energy point E to
the color coordinate F and the distance from the equal energy point E to
intersection S in the color diagram. Most LEDs are narrow band radiators,
with a purity of nearly 100%, i.e. the color cannot be distinguished from a
monochromatic beam.
Version 1.1 page: 19Handbook of LED Metrology INSTRUMENT SYSTEMS GmbH 5. Requirements for Optical Measuring Instruments This section describes the most important properties of optical measuring instruments relevant to the precise measurement of optical LED parameters. There are two measuring procedures for determining the photometric and colorimetric values of light radiation: • The integration method based on a photometer • The spectral resolution method based on a spectroradiometer 5.1 Comparison of photometers and spectroradiometers Photometers use a broadband detector in conjunction with a V(λ) filter to measure luminous intensity. The output current of this detector is directly proportional to the photometrically measured value, i.e. a photometer for luminous intensity is calibrated in cd per photocurrent. A spectroradiometer measures the total spectral power distribution of the LED. Then the photometric value is calculated (usually in software) from this measured spectrum weighted by standard CIE tables. This basic difference between spectroradiometers and photometers is extremely important in LED metrology. V(λ) filters are well suited for carrying out measurements on standard illuminant A light sources (Planckian radiator with 2850 K color temperature). These sources have a maximum radiation distribution in the infrared region which decreases gradually over the visible range of the spectrum. At 400nm, the value is only 8% of the maximum. If the V(λ) filter is optimized to this radiation distribution, the accuracy of the correction in the slopes of the V(λ) curve is not so important because there is relatively little light in the blue range of the spectrum. A filter deviation in the slopes only results in a slight error of the measured photometric values. LEDs, however, have a completely different spectral power distribution, which tends to be Gaussian with a specific peak wavelength and a FWHM of a couple of tens of nanometers. The relatively poor correction of the filter, particularly at the slopes of the V(λ) function (see figure 12 dashed and broken curve), results in large deviations in the luminous intensity and dominant wavelength particularly for blue, red and white LEDs. Errors of several 100% are not unusual for blue LEDs [4, 5] and correct evaluation of the blue peak in white LEDs is critical for an accurate determination of the color coordinates (see also section 6.2). Version 1.1 page: 20
Handbook of LED Metrology                    INSTRUMENT SYSTEMS GmbH

                     1

                   0.1

                  0.01
  intensity [%]

                  1E-3

                  1E-4

                  1E-5
                         400   500            600              700

                                     wavelength [nm]

Figure 12: Theoretical V-lambda function (dashed line) and measured
transmission curve (broken line) of a real V(λ)-filter, a blue and red LED (solid
lines), and radiation from standard illuminant A (dotted line).

A precise spectroradiometer (see next section) avoids these errors because
the photometric quantities are calculated from the spectral data with precisely
defined CIE functions. Spectroradiometers should therefore be used for LED
metrology.

5.2. Requirements for a spectroradiometer

A spectrometer must meet certain basic requirements for carrying out
radiometric measurements before it can be used as an accurate
spectroradiometer. Accuracy depends on the interaction of all components
including both the optical systems (monochromator, optical probe) and
electronics (detector, amplifier and analog/digital converter). Simple, low-cost
spectrometers generally fail to meet these high standards and can lead to
significant errors and lack of correlation in measurements.

Version 1.1                                                          page: 21
Handbook of LED Metrology INSTRUMENT SYSTEMS GmbH The following criteria should be considered for the monochromator or spectrograph: Spectral resolution Depends on the slit width, focal length and dispersion of the grating and should be about 3 nm. Measurements with poor spectral resolution can lead to errors, particularly for narrow band LEDs. Wavelength accuracy Should be better than ±0.5 nm. Wavelength deviations have linear effect on peak and centroid wavelength, but errors of 1 nm also lead to similar deviations in calculating the dominant wavelength for red and blue LEDs. Stray light rejection Three orders of magnitude are the minimum requirement. Section 6 discusses examples of the wide-ranging effects of stray light. There are similar rigorous requirements for the detector and electronics: Sensitivity Extremely sensitive detectors are required for testing LEDs in the mcd and mlm range because the optical probes for luminous intensity (diffuser) and luminous flux (integrating sphere) result in a considerable loss of light. Signal-to-noise ratio of the detector Excellent signal-to-noise ratio is important for radiometry because the measured spectra are analyzed over the entire wavelength range and a high noise signal at the spectral ends leads to errors. Cooled detectors are preferable because these significantly reduce thermal noise and guarantee long-term stability of the dark current. Linearity of the detector Linearity is an important factor for a spectroradiometer. Any change in the light power launched into the spectrometer must lead to a proportional change in the detector signal, otherwise the system is not suitable for radiometric measurements. Array spectrometers must have linearity over the entire specified range of integration times. Electronic dynamic range There should be at least three to four orders of magnitude as in stray-light rejection, and this demands 14-bit analog-to-digital electronics as a minimum. A spectroradiometer can be designed on the basis of two different principles. Scanning spectrometers have a single detector and a grating that rotates. Array spectrometers have a fixed grating and a detector comprising many single diodes or CCD elements. The array setup has the advantage of capturing the entire spectrum simultaneously. Scanning spectroradiometer A scanning spectroradiometer will generally offer the highest accuracy, but at the expense of longer measuring times (ie several to tens of seconds). Switching the dynamic range electronically during the scanning procedure enables precise recording at the steep slopes of very narrow-band LEDs. Version 1.1 page: 22
Handbook of LED Metrology                    INSTRUMENT SYSTEMS GmbH

Using a single detector permits use of an additional baffled slit on the detector
side of the spectrometer to minimize stray light. This produces an extremely
good optical dynamic range that may be up to five orders of magnitude when
measuring LEDs. Another advantage of scanning spectrometers is the large
spectral range combined with high spectral resolution and wavelength
accuracy. The SPECTRO 320 from Instrument Systems is based on this
concept and is the preferred choice as a reference instrument for R&D and
calibration labs.

                                      detector

                                                                  concave
                                                                  mirrors
              slits

                                grating

Figure 13: Technical drawing of a scanning monochromator.

Array spectroradiometer

An array spectrometer can carry out measurements much faster because the
entire wavelength range is recorded simultaneously. The fastest measuring
times are around 10 ms, and an increase in sensitivity can be achieved by
increasing the integration (measurement) time. The absence of an exit slit
results in a loss of optical dynamic range of about an order of magnitude
compared to a scanning spectrometer because the stray light cannot be
excluded as effectively. The spectral resolution of array spectrometers is in
the region from 1 to 10 nm, depending on the number of pixels of the detector
and the optical resolution of the spectrograph. The imaging optics in the
spectrograph are extremely important to guarantee optimum flatfield

Version 1.1                                                        page: 23
Handbook of LED Metrology INSTRUMENT SYSTEMS GmbH
correction for the flat detector. This means that optical imaging errors such as
astigmatism and field curvature must not cause any image distortions over
the entire width of the detector. Imaging errors of this type lead to
deterioration of the spectral resolution at the outer edge of the detector.
Improved imaging characteristics can generally be obtained with longer focal
lengths and larger optics. The fast measuring speeds make this type of
spectroradiometer ideal for measurements in production control.
fixed concave grating diode or
CCD array
plane
mirror
slit
focussing lens
Figure 14: Design of an array spectrometer.
5.3 Calibration
Accurate radiometric measurements require precise calibration of the
measuring instrument. Spectroradiometers are calibrated in three stages:
Wavelength calibration
Wavelength calibration is the first stage. A fixed-frequency laser or Hg / HgAr
lamp with several lines can be used for this purpose. Particularly in the case
of array spectrometers many calibration points should be checked to calibrate
the entire spectral range.
Version 1.1 page: 24Handbook of LED Metrology INSTRUMENT SYSTEMS GmbH Spectral calibration The second stage involves spectral calibration of the spectroradiometer, i.e. determining the relative spectral response of the system over the specified wavelength range. This is basically determined by the sensitivity curves of the detector, the grating and the optical probe used. The measured relative sensitivity curve of the spectrometer and the spectral data of a 1000 W FEL lamp (traceable to a national calibration laboratory) are used to generate the correction function (calibration file). The lamp current must be stabilized to within ±0.0001 A to attain a constant operating state and hence exact reproducibility of the spectrum. A change in current leads to a change of the lamp temperature. The Planckian radiation distribution is exponentially dependent on temperature, therefore slight changes in color temperature cause significant changes in spectral distribution, particularly in the short wavelength range. A current error of 10-4 results in an irradiance error of 10-3. Absolute calibration Absolute calibration of the spectroradiometer is then carried out using an LED for which the luminous intensity has been determined by a national calibration laboratory. The value for luminous intensity of the reference LED is then assigned to the result that has been calculated from integrating the measured LED spectrum which has been weighted with the V(λ) curve. The broadband spectral calibration is thus equated with an absolute value. This stage corresponds to the substitution method recommended by all national calibration laboratories [7, 4]. The substitution method means using a reference standard for calibrating a measuring instrument such that the properties of the standard are intended to correspond as closely as possible to those of the test specimen. This is the only way of guaranteeing direct traceability to a national standard. Instrument Systems measures the luminous intensity of four different calibration LEDs (different colors) to check calibration. The entire spectral range must not show any deviation greater than ±5% from Iv. Why is an LED necessary for absolute calibration? Only an LED can be used as a reference for absolute calibration. The reason for this is that LEDs are not point light sources under standard measuring conditions. In addition, their spectral distribution and radiation characteristics differ considerably from those of a halogen lamp. Attempts to perform an absolute calibration of a detector for irradiance using a halogen lamp Version 1.1 page: 25
Handbook of LED Metrology                     INSTRUMENT SYSTEMS GmbH

standard and calculating radiant intensity using the inverse square law fail
because the essential prerequisite for the validity of the inverse square law is
not fulfilled. Even if the intensity probe is calibrated for irradiance at 3 meters
distance from the FEL lamp, one can still obtain radiometric errors of 15 % at
the correct CIE measurement distance B.
For that reason Instrument Systems uses current and temperature stabilized
reference LEDs. The luminous intensity of these LEDs has been calibrated by
the Physikalisch-Technische Bundesanstalt in Germany. The LEDs and
control electronics have been specially developed by Osram Opto
Semiconductors. A special package is used with a diffuser as a cap for the
LED in order to obtain Lambertian spatial radiation characteristics.

Version 1.1                                                         page: 26
Handbook of LED Metrology                    INSTRUMENT SYSTEMS GmbH

6. Discussion of Sample Measurements with Error
Analysis
This section discusses possible sources of error in LED measurements.
Examples are used to show the influence of optical and electronic properties
of a spectrometer on measurement accuracy. On the basis of calculation with
the CIE evaluation functions, it emerges that the quality of the spectrometer
and calibration is much more important than was initially realized.

6.1 Effects of the dynamic measuring range

The dynamic measuring range of a spectrometer is determined by its
electronic and optical properties. The electronic dynamic range depends on
the resolution and accuracy of the A/D converter and the signal-to-noise ratio
of the detector. The optical dynamic range is determined by the stray light
properties of the monochromator. Measurements on a red LED are used as
an example to demonstrate the influence of the dynamic measuring range
(see figure 15).

Table 3 lists the relevant measuring results of these spectra, shown in figure
15:

Dynamic         x         y      λ dom.       Color
 range                            [nm]      saturation
 10 E2        0.675    0.282     648.1        87 %

 10 E2.5      0.701    0.286      637.0       96 %

 10 E3.5      0.714    0.287      634.3      100 %

Table 3: lists the measuring results of the spectra.

Version 1.1                                                     page: 27
Handbook of LED Metrology                   INSTRUMENT SYSTEMS GmbH

                    1

                  0.1
intensity [% ]

                 0.01

                 1E-3

                 1E-4
                        400   500           600             700

                                    wavelength [nm]

Figure 15: shows three measurements of a red LED as a relative logarithmic
representation with different dynamic measuring ranges (solid = 10 E2,
dashed = 10 E2.5 and dotted = 10 E3.5). The other dotted line corresponds to
the x(λ) evaluation function.

Correlation between color values and the corresponding dynamic measuring
range can be clearly seen. The noise in the spectral range from 380 nm to
approximately 570 nm (where the actual spectrum of the LED begins)
contributes more to calculating the color coordinates as the dynamic
measuring range decreases (becomes poorer). The optical and electronic
dynamic range of the spectrometer must be at least an order of magnitude
greater than the range covered by the weighting curves to prevent this artifact
exerting an influence on the evaluation.

Version 1.1                                                       page: 28
Handbook of LED Metrology INSTRUMENT SYSTEMS GmbH
1.0
0.8
0.4 0.6 E
0.4
y-coordinate
634 nm
E 0.2
0.0 0.2 0.4 0.6
0.0
648 nm
0.2
0.3 0.4 0.5 0.6 0.7
x-coordinate
Figure 16: The points of the color coordinates from the series of
measurements are indicated in this section of the color diagram (the triangle
corresponds to the color coordinates of the measurement with 100% purity,
the square to 96% purity and the circle to 87% purity).
Calculation of the dominant wavelength and color saturation is also affected
by the change in color coordinates. If for red GaAs-LEDs values lower than
100% are measured in color saturation, this always indicates a poor dynamic
measuring range [8]. Figure 16 shows how a reduction in the color saturation
in this part of the CIE color diagram produces a large shift in the dominant
wavelength to the infrared region even though noise rises in the short-
wavelength range of the affected spectra.
Version 1.1 page: 29Handbook of LED Metrology INSTRUMENT SYSTEMS GmbH
6.2 Influence of stray light on white LEDs
This section will focus on the question of stray light rejection and the effects
of stray light on the measurement accuracy for white LEDs. Stray light is a
property of the spectrometer and should not be confused with ambient or
background light.
There are different methods of determining stray light performance of a
spectrometer. The following procedure provides the most useful information
for a spectroradiometer: Light from a halogen lamp1 is launched into the
spectrometer through a yellow filter with a cut wavelength of 455 nm. The
yellow filter has an absorption of 6 orders of magnitude below this wavelength
and hence radiation detected below this cut wavelength must be caused by
stray light artifacts from the monochromator.
1
0.1
intensity [%]
0.01
1E-3
1E-4
400 500 600 700
wavelength [nm]
Figure 17: shows the result of a stray light test from three different
spectrometers. The solid curve was determined using a scanning
spectrometer and the two dashed curves using two different array
spectrometers. The spectrum of a halogen lamp is also indicated (dotted line)
for reference. All curves were normalized to 1 at the same wavelength.
1
The spectrum of halogen lamps correponds to that of Plankian radiators.
Version 1.1 page: 30Handbook of LED Metrology INSTRUMENT SYSTEMS GmbH
Stray light properties of spectrometers
Figure 17 shows curves from the three different spectrometers used in the
stray light test described above. The curve with the best stray light rejection
was measured using a scanning spectrometer and the other two curves were
measured using array spectrometers.
Erroneous calibration caused by stray light
The section on calibration described how a Planckian radiator with a color
temperature of approximately 3000 K and maximum intensity in the near
infrared range is used for spectral calibration. The stray light superimposed
on the actual spectrum of the lamp (see Figure 17) will contribute to the
measurement because only 10% of the maximum intensity is available in the
blue spectral range at 400 nm. The calibration error is therefore 1% for 0.1%
stray light and as much as 10% for 1% stray light.
-6
1.6x10 -6
1.5x10
radiant intensity [W /sr]
-6
1.2x10
-6 1.0x10
radiant Intensity [W /sr]
-7
5.0x10
-7
8.0x10
0.0
400 420 440
-7 wavelength [nm]
4.0x10
0.0
400 500 600 700
wavelength [nm]
Figure 18: shows three measurements from a white LED (solid line:
measurement with scanning spectroradiometer corresponds to the highest
peak, dashed lines: measurements with two different array
spectroradiometers). The maximum of the blue peak diminishes as the optical
dynamic range of the spectrometer decreases.
Version 1.1 page: 31Handbook of LED Metrology INSTRUMENT SYSTEMS GmbH Measurement errors as a result of incorrect calibration This calibration error does not lead to large measurement errors provided that a similar type of lamp is being tested. However, large measurement errors may arise in the case of white LEDs where the spectrum deviates significantly from a Planckian radiator. Figure 18 shows three spectra from the same white LED obtained using the spectrometers with the stray light curves shown in Figure 17. When a white LED is measured there is less stray light within the spectrometer (compared with the amount produced by the calibration lamp) because white LEDs emit light in the visible spectrum, but none in the near infrared range. In conjunction with the calibration file which contains stray light from the broadband lamp standard, this leads to an inaccurate evaluation of the blue peak. Correct weighting of the blue peak with the broadband part of the spectrum has a decisive effect on the calculated color coordinates. These are listed in Table 4 for the spectra shown in Figure 18. Spectro- x Error y Error meter Scanning 0.2894 - 0.3041 - Array 1 0.2903 0.0009 0.3065 0.0024 Array 2 0.2915 0.0021 0.3098 0.0058 Table 4: shows the results of color coordinates for the three measurements from Figure 18. Scanning spectroradiometers generally obtain the correct result because of their sufficient stray light rejection. Measurements with array spectrometers can give rise to substantial deviations depending on the quality of the spectrometer. Version 1.1 page: 32
Handbook of LED Metrology                   INSTRUMENT SYSTEMS GmbH

6.3 Influence of bandpass (spectral resolution)

The measurement result of a spectrometer is always a convolution of the
spectrometer bandpass with the actual spectrum of the light source. The
bandpass determines the spectral resolving power of the spectrometer.
Provided that the spectrum of the light source is significantly wider than the
spectral resolving power, e.g. in a halogen lamp, the measured spectrum also
corresponds to the actual spectrum of the light source. Conversely, the
measured FWHM will correspond to the bandpass for a very narrow laser
line.

Table 5 and Figure 19 show how different bandpass functions affect the
measuring results of a red LED with a FWHM (full width at half maximum) of
20 nm.

                   1.0

                   0.8

                   0.6
  intensity [% ]

                   0.4

                   0.2

                   0.0
                         600   620        640           660          680

                                     wavelength [nm]

Figure 19: shows three measurement curves of the same red LED that were
measured at different spectral resolutions (solid line: 10nm, dashed line: 5 nm
and dotted line: 2nm).

Version 1.1                                                      page: 33
Handbook of LED Metrology INSTRUMENT SYSTEMS GmbH
Band- Lambda Centroid FWHM
pass dom. [nm] wavelength [nm]
[nm] [nm]
0,5 634.18 644.71 20.75
1 634.16 644.59 20.80
2 634.13 644.62 20.95
5 633.91 644.56 21.82
10 633.26 644.44 24.49
Table 5: lists the measuring results of a red LED obtained with different
spectral resolutions
The measured FWHM increases substantially from a bandpass of 5 nm. The
centroid wavelength remains virtually the same within the scope of the
measuring accuracy, but the increase in FWHM causes a shift in the
dominant wavelength of up to 1 nm for large slits. Wrong color coordinates
leading to a change in the dominant wavelength will be calculated by
widening the spectrum.
A publication by Carolyn Jones describes how this behavior can be explained
in theoretical terms [9]. The interaction between the spectrum and the
resulting color coordinates is modeled on a mathematical formulation. This
analysis shows that the dominant wavelength in certain spectral ranges –
below 480 nm and above 590 nm – is heavily influenced by the spectral width
of the measured LED spectrum. However, practical measurements show less
dependence than the mathematical model because the bandpass does not
contribute fully to the measured FWHM [10].
A recommendation for the spectral resolution of a spectrometer can be
derived from these experiments. The bandpass should be approximately 1/5
of the FWHM of the LED for measurements of narrow band LEDs, i.e. should
not significantly exceed 3 nm.
6.4 External influences
There are a number of other parameters apart from the spectrometer that
influence the measuring accuracy of LEDs. These are given below in a short
list. The percentage errors and uncertainties specified were obtained by
comparative measurements.
Version 1.1 page: 34Handbook of LED Metrology INSTRUMENT SYSTEMS GmbH a) The accuracy and stability of the current source: In the case of a red LED a change of more than 1% in the value for luminous intensity was observed for a deviation of 2% in the current. It is therefore advisable to monitor the value of the current using a multimeter for simple current sources. b) The precise mechanical setup plays an important role. The CIE recommends that the distance from the LED tip to the diffuser must be precisely 100 nm. The inverse square law means that a deviation of just 2 millimeters leads to an error of approximately ±4 %. c) The quality of the test socket may be of considerable importance particularly in the case of clear, narrow-angled LEDs. Reproducible alignment of the mechanical axis of the LED must be guaranteed to achieve a reproducible measurement of luminous intensity. This can be obtained for clear 5 mm LEDs by using the LED 511 precision test socket with twist-lock mechanism (see Figure 4). An investigation revealed that this precision socket guarantees a standard deviation of 2% for measurements on a green narrow-angled LED while simpler test sockets without the twist-lock mechanism show standard deviations of 3% and more. d) The temperature stabilization time for LEDs (see section 3.2) exerts considerable influence. Figure 6 shows that beginning the measurement at a different point in time can lead to results differing by several percent. The stabilization time depends on the LED type and external conditions such as ambient temperature. It is therefore not possible to give a general recommendation for the time of measurement. The forward voltage of the LED gives an indication of when the steady state has been attained at which point the measurement can be performed. 6.5 Measurements in production Photometers and color measuring heads performing integral measurements were generally used in production control because measuring speed is a critical factor for this application. The basic problems with photometers have been discussed in section 5.1. The quality of photometer based testers in production was reasonable for testing green, yellow and red LEDs but not sufficient for blue and white LEDs. The robust construction of array spectrometers and their short measuring time make them ideal for production applications. The biggest disadvantage Version 1.1 page: 35
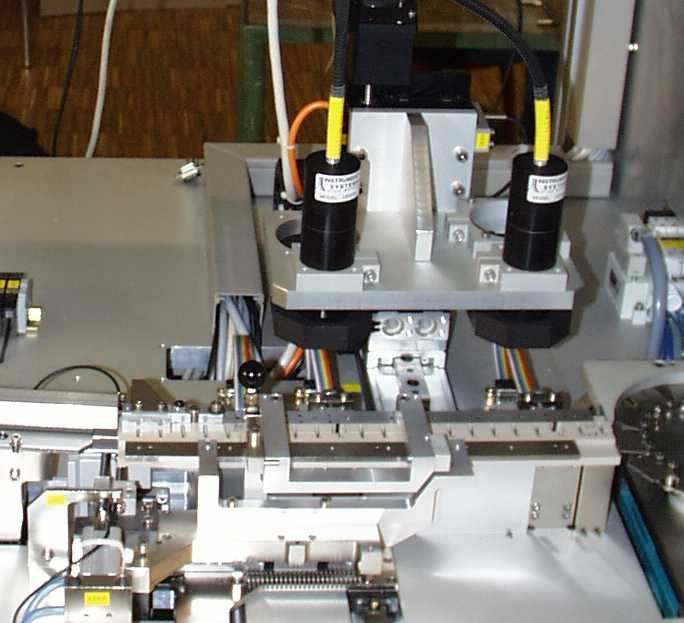
Handbook of LED Metrology                 INSTRUMENT SYSTEMS GmbH

up to now has been the lack of sensitivity and dynamic range. Integration
times in the millisecond range could not be obtained using an optical probe
compliant with CIE recommendation B (section 3.2) and a diffuser that
reduced light throughput dramatically.

The development of a new generation of high quality “back-illuminated” CCD
sensors (with a significant increase of sensitivity) now permits LED
measurements according to CIE recommendations in milliseconds.
Array spectroradiometers with this type of detector are now prefereable for
production control of LEDs because they eliminate the disadvantages of
photometers without compromising on measurement time.

Figure 20: shows the optical measurement setup integrated in a sorting
system for LEDs. (Photo by courtesy of Osram Opto Semiconductors).

Version 1.1                                                   page: 36
Handbook of LED Metrology                   INSTRUMENT SYSTEMS GmbH

A high speed sorting system places exacting demands on the accuracy of
mechanical positioning for the handler. The mechanical axis of the LED has
to be exactly aligned along the optical axis of the intensity probe. External
influences, such as ambient light and undesired reflections within the feed
mechanism for the LED, need to be taken into account.

There is a further phenomenon relating to the metrology of testing under
production conditions. As discussed in detail in section 3.2, LEDs require a
certain stabilization time before reaching steady state. However, current only
flows through LEDs for a few milliseconds during an optical test, a period of
time which is not sufficient to guarantee a steady state in most LED types.
The values measured under these test conditions therefore differ from those
obtained under constant-current conditions. However, there is generally a
reproducible correlation between the two test procedures. The manufacturers
of LEDs are responsible for determining this correction function for individual
LED types and taking account of it in production testing.

Version 1.1                                                      page: 37
Handbook of LED Metrology                    INSTRUMENT SYSTEMS GmbH

7. Summary
A number of conditions must be met for performing light measurements on
LEDs and obtaining accuracies better than 10%. They may be classified into
four groups:
• CIE-compatible optical probe for measuring the relevant photometric
   parameter
• Calibration equipment traceable to a national calibration laboratory
• High-performance spectroradiometer
• Proper handling

Industrial photometers are not recommended for testing blue, deep red and
white LEDs because of an inadequate V-lambda correction in those regions
as shown in figure 12.

CIE-compatible optical probe

The CIE has published two geometric recommendations for measuring the
luminous intensity of LEDs. The distance of the LED to a sensor with an area
of 1 cm² is defined giving a specific solid angle. Since LEDs are not point light
sources and their spatial radiation characteristics vary, the mechanical axis of
an LED must be aligned while maintaining the distance between the LED tip
and the sensor.

Two measuring principles are suitable for luminous flux measurements: the
integrating sphere, which integrates the total luminous flux, and the
goniophotometer, which measures the radiation beam of the LED at different
theta and phi angles with subsequent calculation of total luminous flux.
Numerous geometric and spectral sources of error have to be taken into
account when using the integrating sphere, in particular the wide range of
radiation characteristics of LEDs. Thus, the goniophotometer provides the
greatest accuracy.

Calibration with the right standards

An accurate calibration of the measuring instrument is essential for carrying
out precise measurements of luminous intensity on LEDs. Broadband light
sources for spectral calibration of a spectrometer where spectral data is
traceable to a national calibration authority are frequently found in optical
laboratories. These are ideal for calibrating the relative spectral sensitivity of
the spectrometer. However, such lamps are not suitable for absolute

Version 1.1                                                        page: 38
Handbook of LED Metrology                    INSTRUMENT SYSTEMS GmbH

calibration of a CIE-compatible setup for measuring “average luminous
intensity” of LEDs. Because LEDs are not point light sources within the
measuring geometries proposed by the CIE the inverse square law is not
valid for calculating radiant intensity from irradiance. It is therefore necessary
to use temperature-stabilized LEDs with lambertian radiation characteristics
for absolute calibration. The value for luminous intensity or radiant intensity of
these standards has to be determined by a national calibration lab. Only
under these conditions can luminous intensity be measured accurately using
the right optical probe and traceable to national standards.

Spectroradiometer with high dynamic measuring range and precision

Only spectrometers meeting stringent criteria can be used as
spectroradiometers. The wavelength accuracy of the monochromator must
be better than 0.5 nm and the spectral resolution must be approximately
3 nm. Only stray light rejection of at least three orders of magnitude
guarantees a calibration and subsequent measurement without errors.
Otherwise there are inevitably substantial deviations in the color coordinates.
The detector must have a dark current signal that is as low and stable as
possible, and this is best obtained by cooling the detector. The detector must
show linear behavior over the entire output range. Any deviation produces
incorrect radiometric results. The downstream electronics should permit a
dynamic measuring range of four orders of magnitude in order to avoid errors
resulting from noise at the edges of the spectrum. The technical requirements
for carrying out measurements on blue and white LEDs are particularly
rigorous because the effect of all these errors is amplified in this spectral
region.

Proper handling

The best measuring instruments cannot replace proper handling. Careful
attention must be paid to external influences such as ambient temperature,
forward voltage stabilization, and LED fixturing in order to obtain precise
results.

Version 1.1                                                        page: 39
You can also read