MADERA Guide to Wood Floors
←
→
Page content transcription
If your browser does not render page correctly, please read the page content below
MADERA Guide to Wood Floors

 New York | hellony@maderasurfaces.com | Los Angeles | hellola@maderasurfaces.com
                718 484 7260 | maderasurfaces.com | @maderasurfaces
Introduction

MADERA wood floors are a unique expression of nature made from living material that should
be treated with the utmost care. Our guide to wood flooring provides comprehensive
guidelines to consider when purchasing, receiving, acclimating, installing, protecting and
maintaining your wood floors.

The most important thing to understand is that wood floors are a living and breathing
material. Wood is affected by its environment and can react drastically to changes in
temperature and humidity. Like all living things, wood performs best in a stable environment,
in equilibrium with temperature and humidity. With this in mind, we cannot stress enough
how important it is to properly understand the conditions within your home environment and
how to adjust them accordingly if necessary.

Wood floors are a significant investment and we recommend that you read through the guide
and follow the recommendations to ensure that your floors last a lifetime. Please contact us
if you have any questions regarding your wood floors and the conditions in your home.

              New York | hellony@maderasurfaces.com | Los Angeles | hellola@maderasurfaces.com
                             718 484 7260 | maderasurfaces.com | @maderasurfaces
Table of Contents
Section 1: Purchasing Wood Floors .................................................................................... 4
1.1 Engineered or Solid Wood Floor ..................................................................................... 4
1.2 Finished in Advance vs. Finished on Site ........................................................................ 5
1.3 To Bevel or Not to Bevel ................................................................................................. 6
1.4 Selecting the Grade of a wood floor ............................................................................... 7
1.5 Lead Times ...................................................................................................................... 7
1.6 When to Schedule Delivery of Your Wood Floor ............................................................ 7
1.7 Who should install your floor? ....................................................................................... 7
1.8 Who will receive my floor upon delivery? ...................................................................... 8
Section 2: Receiving and Acclimating Your Wood Floors .................................................... 8
Section 3: Installing Your Wood Floors ............................................................................. 10
3.1 Selecting the Right Installer .......................................................................................... 10
3.2 The Basics ..................................................................................................................... 10
3.3 Installing a Finished Floor ............................................................................................. 11
3.4 Installing Floors with a Square Edges ........................................................................... 12
3.5 Install to Achieve the Right Look and Feel in your Home ............................................. 12
3.6 Installing Over Radiant Heat ......................................................................................... 12
3.7 Installing Over Cement Slab.......................................................................................... 13
Section 4: Protecting and Maintaining Your Floors ............................................................. 9
4.1 Protect Your Floors During Moves ................................................................................ 14
4.2 Daily Protection and Maintenance ............................................................................... 14
Section 5: Environmental Conditions and Wood Floors .................................................... 16
4.1 Excessive Dryness ......................................................................................................... 16
5.2 Excessive Humidity ....................................................................................................... 17
5.3 Use Your Hygrometer ................................................................................................... 17
5.4 Humidification is Not a Part-Time Thing ....................................................................... 17
5.5 Humidification Systems ................................................................................................ 18
New York | hellony@maderasurfaces.com | Los Angeles | hellola@maderasurfaces.com
718 484 7260 | maderasurfaces.com | @maderasurfacesSection 1: Purchasing Wood Floors
There are several things to consider when purchasing a hardwood floor. We want to make
this process as easy and pleasurable as possible, as there are plenty of other things to worry
about when renovating your home. This section will go over the most important
considerations while choosing the perfect floor for you.
1.1 Engineered or Solid Wood Floor
There are benefits to both engineered and solid wood flooring, and the decision is not as
clear-cut as many would like to make it out to be. Below is a description of both solid and
engineered flooring and some points to simplify the decision-making process.
Solid Flooring. A solid floor is the most traditional hardwood floor and has been around for
centuries. A solid floor is milled from a single piece of lumber, with a tongue on one long side
of the board, and a groove on the other. MADERA solid wood floors also have an end-match,
a tongue and groove on the ends of each board.
Engineered Flooring. There are several common misconceptions about engineered flooring,
one being that it is not made from real wood. MADERA engineered wood floors are made
from real solid wood, the only difference being the way it is put together. Unlike a solid floor,
MADERA engineered wood flooring have two elements: the wear layer and the substrate. The
wear layer is a 4mm or 6mm thick slice of solid wood, which, just like a solid wood floor, is
cut from a board that comes from a log felled in the forest. The substrate is a multi-ply veneer
Baltic birch plywood. The plywood is stable, strong, and moisture-resistant, which is why
many consider engineered flooring to be more stable than solid flooring. The visible top wear
layer is adhered onto the plywood and then treated like any other wood floorboard.
Frequently Asked Questions
1. Is engineered flooring more stable than a solid floor?
It is true that engineered flooring offers more dimensional stability than a solid wood floor,
due to the stable nature of the Baltic Birch plywood. Also, because the wear layer is thinner
than a solid wood floor, it is less sensitive to changes in the environment that can cause wood
to swell or contract. A solid floor will shrink when it is dry, and swell when it is humid. The
amount of change is much greater in a solid floor than in an engineered floor. Engineered
flooring stays straighter and flatter than a solid floor when the environment changes. Solid
floors can cup, crown, bow and/or twist more easily than an engineered wood floor.
That being said, engineered flooring has its own set of risks. In very dry environments, the
wear layer on am engineered floor can check, crack, and even delaminate as the solid wood
shrinks and the plywood maintains its original shape. For this reason, it is sometimes said that
solid flooring reacts better in dryer environments, while engineered flooring reacts better in
New York | hellony@maderasurfaces.com | Los Angeles | hellola@maderasurfaces.com
718 484 7260 | maderasurfaces.com | @maderasurfaceshigher humidity environments. Everything comes down to maintaining a good and healthy
environment!
2. How many times can I sand an engineered floor?
The simple answer is a 6mm floor can be sanded and re-finished up to five times. A 4mm wear
layer can be sanded three times. Keep in mind that you can buff and re-finish your floors
numerous times without sanding down any of the floors wear layer, and there are new re-
finishing techniques that rely on chemical removal of a finish rather than a mechanical
removal of the wood.
3. Is an engineered floor always pre-finished?
No. Engineered refers to how the floor is made. An engineered floor can be pre-finished or
finished on-site, just like a solid floor.
4. Is a pre-finished floor always engineered?
No. A solid floor can also be pre-finished.
5. Is an engineered wood floor more expensive than a solid wood floor?
This depends on several factors, including the type of wood and dimensions of the floor. In
our experience, engineered flooring is more economical on floors that are over 7” in width.
In general, the wider the floorboard the more cost savings there are with an engineered wood
floor.
1.2 Finished in Advance vs. Finished on Site
The decision to purchase a floor that has been finished in advance versus a floor that will be
sanded and finished on site can be a tricky one. There are a lot of opinions out there when it
comes to this. These are based on pre-conceptions and bad experiences that may be rooted
in old technology. Advances in finishing technology, as well as the oils and polyurethanes
being used these days have greatly improved in the last decade.
Finished in Advance
Most MADERA wood floors are finished in advance. That means that the floors have been
treated with a combination of stains and techniques to achieve a particular color and coated
with multiple layers of a sealer such as polyurethane, natural oils, or water-based urethanes.
When we finish on a production line, we are able to achieve very complex finishes that can
be near impossible to achieve on-site. When finished “on the line” the finish is cured under
powerful Ultraviolet lights that create a very durable finished surface. Here are some other
benefits to a finished-in-advance MADERA wood floor:
New York | hellony@maderasurfaces.com | Los Angeles | hellola@maderasurfaces.com
718 484 7260 | maderasurfaces.com | @maderasurfaces• More affordable than an on-site finish
• More variety and complexity of finishes is available (including textures such as wire
brushing, hand scraping, and contour sanding)
• Much harder and scratch-resistant
• A cleaner job site and less downtime. A floor that has been finished in advance is ready
to walk on the moment it has been installed.
• No bad smells. Site finished oils and polyurethanes can off-gas for weeks or even
months.
• You know what the floor will look like before it’s even installed.
MADERA Wood Floors are available with two types of finishes: UV polyurethane and UV oil.
UV Oil is made from linseed and other oils. It is applied in 7 layers and cured immediately. UV
oil creates a rich, beautiful finish but can require some maintenance, including buffing, touch-
ups, and/or re-application of oil after a certain amount of time. A UV poly is one of the
hardest and most durable finishes available and requires no maintenance.
Benefits of UV Oil:
• More natural looking finish
• Easier to touch up
• Non petrol-based oils made from plants
Benefits of a UV Poly:
• Extremely durable
• Minimal Maintenance
• Easy to clean
MADERA has created a set of UV Poly finishes that look and feel like natural oils, unlike the
typical high-gloss poly finishes most customers are accustomed to seeing. It’s the best of both
worlds: superior protection with a natural matte finish.
Volatile Organic Compounds (VOC’s), Added Formaldehyde, and CARB II Compliance
All MADERA Wood Floors are low-VOC and have no added Urea Formaldehyde. This means
that the glues and adhesives, as well as the UV Oils and Polyurethanes used in our floors do
not any emit toxic compounds once installed. Our material has gone through rigorous testing
to ensure this. MSDS and CARB Compliance information is available upon request.
1.3 To Bevel or Not to Bevel
Most wood floors that are finished in advance come with an edge micro bevel. A bevel is a
machine-made angled cut on the ends and edges of each board. The purpose of a bevel is to
allow floorboards that have been finished in advance to come together without creating
sharp edges (over/under wood). There is no need for bevels on unfinished floors, as they will
be sanded flat on site before a finish is applied. Although MADERA recommends a micro
New York | hellony@maderasurfaces.com | Los Angeles | hellola@maderasurfaces.com
718 484 7260 | maderasurfaces.com | @maderasurfacesbevel, we do offer a square edge option as long as the installer and contractor understand
the limitations of such a floor. An alternative to a micro bevel is an “eased edge” that is
created by rounding the edges of a floor with a sander. Eased edges are softer and more
natural looking than the micro bevel.
The choice to bevel or not is a personal one and we recommend coming to our showroom to
see examples of both if you are unsure what you would prefer.
1.4 Selecting the Grade of a Wood Floor
When we talk about the “grade” of a floor we are referring to its level of character or
imperfection. All wood floors, no matter how high the grade, will have variation in both color
and grain. Knot size, face checking (cracking), color variation and grain pattern are just a few
of the consideration when picking a grade and every species has a different set of variations.
In selecting a wood floor, it is important to understand the overall “look” and “feel”. A sample
can give you a general idea but should not act on its own as a measure of the overall look of
the floor once installed. Do your best to fully understand the grade you want to minimize the
risk of a surprise. We find that the best way to understand a grade is to see an image of a
floor installed. For that reason, we have many quality images of our floors in different grades
available on our website.
1.5 Lead Times
MADERA floors are all proudly made to order. Manufacturing can take anywhere from 4
weeks to 3 months depending on the species, dimension and size of the order. This is very
important when creating your construction schedule as well as factoring in any delays that
may be due to weather or seasonal holidays.
1.6 When to Schedule Delivery of Your Wood Floor
A wood floor that is finished-in-advance is more sensitive and prone to damage than an
unfinished one. We suggest that your order is delivered to the job site as late as possible and
after all heavy construction is complete. All wood needs to acclimate to its new environment
and it is therefore important to leave enough time for acclimation prior to install. Acclimation
can take anywhere from 2 days to 2 weeks depending on the conditions in your home.
Please coordinate with your contractor, designer and installer to determine the best time to
have your new floor delivered.
1.7 Who Should Install Your Wood Floor?
Only a certified installer should install your new floor. Ask your contractor to identify the
installer they have subcontracted for the job and make sure they have a current National
Wood Flooring Association (NWFA) certificate. If you do not use a NWFA certified installer
you run the risk of having your floors installed incorrectly. If any problem arises down the
road, not having used a certified installer will void any MADERA product warranties.
Benefits of using a NWFA installer include:
New York | hellony@maderasurfaces.com | Los Angeles | hellola@maderasurfaces.com
718 484 7260 | maderasurfaces.com | @maderasurfaces• They are competent and professional.
• They have received the proper training on wood floor installation and are up to date
with new technologies, techniques and materials.
• They should follow NWFA guidelines for hardwood floor installation.
• They will be held accountable for any damage or issues with the install if they do not
follow the proper guidelines.
• They will know how to protect your floors once installed which is very important.
1.8 Who Should Receive My Floor Upon Delivery?
MADERA will typically arrange delivery of your floor. All deliveries are curbside unless
otherwise noted. You and/or your contractor will be responsible for moving the material from
the sidewalk or street curb into the building and secure jobsite. Please make sure you have
identified the responsible party to unload and bring the material safely into your home before
scheduling a delivery. Delays one delivery is in transit can result in additional fees and will be
applied if the material is turned away or unloading takes longer than expected.
Section 2: Receiving and Acclimating Your Wood Floors
MADERA wood floors arrive packaged in bundles of approximately 24 square feet, weighing
approximately 75lbs up to 12’ long. Damage can easily occur during the movement of bundles
into a job site so make sure you take your time and protect the material when it is being
moved. Also confirm the bundles will fit into the elevator or stairwell if applicable.
Once all the bundles have been delivered to the job site, spread the bundles throughout the
rooms to allow for better acclimation. If the bundles have been shrink-wrapped remove the
plastic so the wood can breathe easily and acclimate more quickly.
When your floors arrive on site they have to acclimate to the new environment before
installation. Acclimation is not a matter of time but rather a matter of equilibrium. This means
that the Moisture Content (MC) of the floors matches the Relative Humidity (RH) of the space.
It is very important that the RH of the space is between 30-65% before your new floors arrive.
Our floors are shipped with a MC between 7-9%. Below is a chart showing the relationship
between Relative Humidity and the Equilibrium Moisture Content in wood.
New York | hellony@maderasurfaces.com | Los Angeles | hellola@maderasurfaces.com
718 484 7260 | maderasurfaces.com | @maderasurfacesWood will acclimate to the conditions of its new environment regardless of what it is. A dry
environment leads to the drying of the wood and humid environment will lead to the
absorption of moisture. It is therefore very important that the environment is stable and
healthy for wood flooring. Table 1 presents a list of the general environmental requirements
as set forth by the National Wood Flooring Association (NWFA). We provide a detailed
explanation about the effects of moisture, temperature, and excessively dry environments on
wood floors in Section 5.
Table 1. Necessary environmental conditions for proper acclimation and continued health
of wood floors.
Room Temp 60-80° F
Room Humidity 35-65% RH
Concrete Moisture Content 85% RH with vapor barrier and 65% without
Humidity of Joists/Beams Max 10-12%
Humidity of plywood / Underlayment Max 8-10%
Section 3: Installing Your Wood Floors
New York | hellony@maderasurfaces.com | Los Angeles | hellola@maderasurfaces.com
718 484 7260 | maderasurfaces.com | @maderasurfacesThese guidelines are meant to inform the installation process specifically for MADERA
engineered and solid wood floors. They draw from our own experience, manufacturers
specific recommendations as well as the most recent National Wood Flooring Association
(NWFA) Guidelines. Please follow these instructions carefully. If you have any questions call
a MADERA representative and they will be happy to walk you through the process or send
any relevant information that may be needed. It is always better to ask than to assume. Once
floors have been installed, they are no longer the responsibility of MADERA. It is important to
inspect floors and to notify MADERA of any perceived material defects prior to installation.
For general installation guidelines for both solid and engineered flooring you should refer to
the most recent National Wood Flooring Association (NWFA) Guidelines. There are dedicated
sections that cover the installation of solid and engineered wood floors and installing over
radiant heat and concrete slab. Make sure to follow the right guidelines for your particular
application. Again, a competent certified installer should be following all appropriate
guidelines, but it never hurts to print this out and hand it to him/her before they begin.
3.1 Selecting the Right Installer
Would you let a neighborhood kid hang the Picasso? We didn’t think so! That kid may give
you a great price on the job, but it’s just not a good idea. Your floors need to be installed by
a certified installer who knows what they are doing. MADERA is happy to refer our clients to
a MADERA Recommended flooring installer in the New York Metropolitan area.
A qualified installer should be up-to-date on the most recent NWFA recommendations as well
as the best glues, fasteners and install methods to use for your particular floor however, they
should read though this guideline, so they don’t miss any important product specific details
prior to install.
3.2 Installing MADERA Engineered and Solid Wood Flooring
Subfloor: The subfloor needs to be level and properly secured to the structure of the house.
A sub floor can be floated over structural beams but must offer a solid and level base for
proper floor installation. Subfloor must be free of protruding corners, nails, screws etc.
Subfloor should be clean and free of dust prior to installation. See section 3.7 for information
about installation over concrete subfloor. For proper Sub Floor construction see the NWFA
installations guidelines.
Sound matt: Using sound mat has become increasingly popular but create new challenges
for flooring installation. We recommend a 5mm Regupol sound mat or a product of the
same quality. Homasote is not a high-quality sound attenuation material and we do not
recommend installing a MADERA floor over Homasote.
Expansion Gap: Expansion gap will vary according to board size as well as room size.
Typically, expansion gaps are between 1/2”and 3/4”. Contact us for project specific
New York | hellony@maderasurfaces.com | Los Angeles | hellola@maderasurfaces.com
718 484 7260 | maderasurfaces.com | @maderasurfacesquestions.
MADERA floors, both engineered and solid, perform best if installed with a glue/nail
combination system. If nailing is not an option (as is the case with floors directly over concrete
or over a sound mat) we recommend 100% coverage troweled glue application.
For a nail down installation 25-50% glue spread is sufficient for MADERA floors up to 7” wide.
For anything wider than 8” a 100% glue spread is necessary. Nails should be no more than 4”
apart along the length of the board. Only use a proper pneumatic or mechanical flooring
nailer to fasten the floor.
Spread the glue in columns perpendicular to the orientation of the floor (if the floors run
lengthwise north-south glue columns should run east-west.) A spread of glue should also be
applied to the subfloor where the ends of two boards come together for best adhesion.
A random length floor should be laid out as to maximize the distance between joints so that
several joints do not stack up next to each other creating an evenly staggered floor. At least
24” between staggered joints is recommended. Installer should be aware of any pattern
requested by the client or designer. If in question, ask!!
Always make use of the end match Tongue and Groove when laying a row of flooring. No
square buts when joining two boards end to end. Square buts can be reserved for starter
boards.
For a glue down only install MADERA recommends the use of flooring clamps that pull and
hold boards together while the glue cures. Installer must check his/her work frequently as
boards can drift and move apart while glue is still wet.
MADERA Recommended Glue: Bona R851, Bostiks Best, or Sika Bond flooring adhesives.
3.3 Installing a Finished Floor
Floors that have been finished in advance can save time and money and gives the client a
much wider range of finish options. It is also the best way to assure your finished floors are
exactly what you want before it’s too late.
If you have purchased a floor that has been finished in advance keep in mind that installing
these floors takes special consideration and skill. Because the installer does not have the
opportunity to sand the floors once installed they only have one opportunity to get everything
right. Imperfections in the installation cannot be easily corrected after the fact without added
costs and time.
The subfloor (the layer of wood or concrete to which the floors will be installed over) must
be flat and void of imperfections.
New York | hellony@maderasurfaces.com | Los Angeles | hellola@maderasurfaces.com
718 484 7260 | maderasurfaces.com | @maderasurfacesScratches, indents and tear-outs are fine in an unfinished floor as they can be sanded out but
that is not the case for a floor that has been finished in advance.
Due to this all contractors must be extremely careful not to damage the finished floor during
and after install.
Non water-based glues, tapes, adhesives, and oil-based product can adhere to the finish and
not come off easily. Please make sure to use water-based adhesive and wipe off quickly any
excess that may come in contact with the surface of the floor.
3.4 Installing Floors with a Square Edges
Many of our customers want finished floors without a micro bevel. A micro bevel allows for
slight variation in floor thickness and imperfections in the subfloor to be hidden. The over-
under-wood that results from these variances are concealed by the micro bevel and make it
easier to install the floor. MADERA offers finished floors with a square edge (no micro bevel)
but the customer must understand that these floors do not allow for any variation in the
subfloor or poor installation and even if installed on a perfectly level surface some over-
under-wood is to be expected.
3.5 Install to Achieve the Right Look and Feel in Your Home
During installation, remember to consider grain pattern and the color of individual boards in
relation to the overall look of the floor. The goal is to arrange the boards in a way that results
in a harmonious layout and appearance. Your installer should understand the look you prefer
and layout accordingly.
Do not install boards that have defect or unpleasant to your eye. Extra material was ordered
for this purpose. Once installed, it is very difficult to remove a board. MADERA does not
accept complaints about the visual appearance of individual boards once they are installed.
3.6 Installing Over Radiant Heat
Radiant heat has gained popularity in recent years. With this shift away from more traditional
heating systems like forced air or steam radiators come new challenges. Heat in any form
takes moisture out of the air, which dries wood and can cause shrinking and checking. In the
worst cases cupping, crowning and delamination on engineered floors can appear. These
symptoms, common to all wood flooring, can be avoided with proper control of the heating
system as well as environmental conditions in your home.
Keep in mind that the wider the board the more sensitive it is. Since the majority MADERA
wood floors are wide plank, these guidelines are particularly important for our clients to
consider. Wood flooring can be successfully installed over radiant heat as long as there is an
understanding of how the system works and affects the wood floor.
Not all floors are well suited for a radiant heat system. Wood floors that have proven
dimensional stability perform the best. The following is a list of wood floors best suited for
this application:
New York | hellony@maderasurfaces.com | Los Angeles | hellola@maderasurfaces.com
718 484 7260 | maderasurfaces.com | @maderasurfaces• Engineered wood flooring is more dimensionally stable than solid wood flooring.
• Certain species are known for their inherent dimensional stability such as:
• North American oak, American cherry, American walnut. Denser species such as
maple and Brazilian cherry are less stable.
• Quarter sawn and rift-sawn wood flooring is more dimensionally stable in width than
plain sawn wood flooring particular for wider floors.
• Narrow boards are more dimensionally stable than wide boards.
• For MADERA Extra Wide Floors (12”+) over radiant heat we suggest a board 5/4”
rather than the standard ¾” thick. The thicker the board the more stable the floor in
general.
Installing the right type of floor over radiant heat will decrease the chances of your new floors
failing due to environmental conditions but equally as important is making sure you manage
the radiant heat correctly before and after your floors have been installed.
3.7 Installing Over Concrete Slab
MADERA engineered wood floors can be installed directly over a concrete slab. However,
there are some things to consider. Concrete holds water and releases moisture as it cures.
When installing over a concrete floor, be absolutely sure that the concrete is fully cured.
Measure the moisture level of the concrete with accurate sensors at the core of the slab.
Relative humidity of the concrete should be no more than 65%, and a vapor barrier must be
used. Concrete moisture can destroy wood floors. Always install a moisture barrier when
installing over a concrete floor to minimize the transfer of moisture from the concrete to your
floors.
3.8 Installing Herringbone Flooring
MADERA offers a herringbone pattern in any and all of our finishes as well as solid and
engineered flooring. A herringbone floor consists of floor boards that are all exactly the same
length staggered in a replicating L pattern. It is a beautiful floor, but it is not easy to install.
For that reason, it is very important for an installer to understand the process and follow
these guidelines carefully.
Structure: MADERA herringbone boards consist of 1 long edge with a tongue and 3 sides
grooved. This is the standard for herringbone flooring. Wherever a groove meets a groove a
spline must be used to assure the ends line up. MADERA provides splines for each and every
project and they MUST be used for proper installation. If splines are not provided, please call
the MADERA office and we will ship them out as soon as possible.
End groove: The end grooves on MADERA herringbone floors are slightly larger than the
tongue on the long side of each board. This is typical for herringbone flooring and accounts
for any swelling that may occur on site and allows the floor to easily go together without
having to force each piece together. Any force exerted on the herringbone pattern can and
will result in inconsistencies in the pattern.
New York | hellony@maderasurfaces.com | Los Angeles | hellola@maderasurfaces.com
718 484 7260 | maderasurfaces.com | @maderasurfacesStaying on course: Herringbone looks great if it is installed correctly and the patterns stays
on target. It is very easy for the herringbone patterns to begin to shift and each shift can be
compounded if not corrected immediately. See this link for a set of detailed instructions as
laid out by the National Wood Flooring Association.
Section 4: Protecting and Maintaining Your Floors
You bought beautiful floors, hired the right installer to make it look just right, and even kept
the humidity level at a perfect 45% only to find that the movers dragged the 500lb stove
across the floor and left three nasty gashes in the finish.
4.1 Protect Your Floors During Moves or Construction
Once the floor is installed, it is very important that they are protected. Rosin paper and tape
is not adequate. Protection takes time and needs to be done right.
Here are the steps to properly protect the floors while construction is ongoing:
1. One full layer of overlapping rosin paper or similar product taped at the seams and
baseboard to keep dust from making its way underneath the paper. Never, ever, ever
apply tape directly to the floor. (more on tape below)
2. Lay overlapping ram board or luan on top of the rosin paper taped at the seams.
3. Do not use poly film of other non-breathing coverings as they can cause the floor to
become damaged from humidity buildup.
4. Clean the floor thoroughly before laying the covering to ensure that no debris is
trapped underneath.
5. Tape pieces of protective covering together but do not tape them to the wood
flooring, ever!! Duct tape and even blue tape if left on a finished floor for too long can
pull the finish right off of the wood.
4.2 Daily Protection and Maintenance
Floors can last a lifetime if they are well maintained and protected. A few simple steps can
lead to long-lasting and beautiful floors without much maintenance. Understanding what
type of finish has been applied to your MADERA floor is the first step. An oil finish demands a
different set of maintenance practices than a polyurethane finish as an example. See below
for specific recommendations.
UV Oil: The quality and longevity of your UV oil finished floors depend on proper maintenance
and care. MADERA floors finished with a UV oil should be cleaned with specialty conditioning
soaps and on occasion re coated with oil to bring out its original luster. Oil finishes can be
recoated without sanding or buffing floors, the more coats added to the floor the higher the
level of protection and the healthier the floor in general. No wet moping! Never wet mop a
floor!
New York | hellony@maderasurfaces.com | Los Angeles | hellola@maderasurfaces.com
718 484 7260 | maderasurfaces.com | @maderasurfacesMADERA Recommended Products:
• WOCA Master soap – To be used during regular floor cleaning.
• WOCA Oil Refresher – Apply 3-4 times a year.
• WOCA Maintenance Oil – Yearly use or when floors begin to wear.
• Bona Floor Cleaner – Floor cleaning alternative for daily use. Does not condition
floor.
UV Polyurethane: MADERA UV poly finishes offer the most protection for your floors. The 7
layers of durable acrylic creates a sealed topcoat that does not allow water or other liquids
to penetrate and stain. These finishes do not wear easily with regular foot traffic. A UV poly
cannot be re coated like the UV oils and should not be cleaned or conditioned with WOCA
product. If a UV poly floor needs to be re-coated the floor surface must be buffed or sanded
to strip the top layer of acrylic before coating the floor with a topcoat. Cleaning a UV poly
floor is easy and most cleaning product can be used as long as any liquid or moisture is
removed quickly. No wet moping! Never wet mop a wood floor!
MADERA Recommended products:
• Bona Floor Cleaner – For daily use.
Hand Applied Oils: The quality and longevity of a MADERA Hand Applied oil finish depends
on proper maintenance and care. MADERA floors finished on site with or in advance with a
hard-wax oil should be cleaned with specialty conditioning soaps and on occasion re coated
with oil to bring out its original luster. Oil finishes can be recoated without sanding or buffing
floors, the more coats added to the floor the higher the level of protection and the healthier
the floor in general. Make sure floors are clean and clear of dust and grease before using
conditioning soaps or oils. No wet moping! Never wet mop a wood floor!
MADERA Recommended Products:
• WOCA Master soap – To be used during regular floor cleaning.
• WOCA Oil Refresher – Apply 3-4 times a year.
• WOCA Maintenance Oil – Yearly use or when floors begin to wear.
• Bona Floor Cleaner – Floor cleaning alternative for daily use. Does not condition floor.
General Maintenance
• Place walk-off mats at all entrances to help collect dirt and debris.
• Install felt floor protectors underneath all furniture.
• Do not allow people to wear spiked heels on the floor, which will damage even the
hardest wood floors.
• Pet claws should be properly trimmed at all times.
New York | hellony@maderasurfaces.com | Los Angeles | hellola@maderasurfaces.com
718 484 7260 | maderasurfaces.com | @maderasurfaces• Work boots and shoes that may have pebbles lodged in the soles should be removed
prior to entering.
• Sweep or vacuum frequently.
• Clean floors using a Swiffer and non-abrasive and caustic products (i.e. Bona Cleaner
or similar)
• Never wet mop or use saturated rags to clean your new floors. Water can seriously
damage the wood and finish.
• All mats or rugs should be cleaned on a regular basis. They should also be moved
occasionally to allow natural color changes caused by light to occur evenly in all areas.
Section 5: Environmental Conditions and Wood Floors
Wood is often the only living material in a new construction project. Wood, just like a plant,
is alive and will react to changes in the environment. For this reason, environmental
conditions should be front and center during the design process.
It is much easier to pre-emptively plan for humidity and temperature control in your new
home than to retroactively do so, and much less expensive!
This is the most important section of the MADERA Guide to Wood Floors. Please read carefully
and share with your designer, contractor and installer.
4.1 Excessive Dryness
A very dry environment can seriously damage a wood floor. This is the case for both solid and
engineered. Though engineered flooring is typically more stable than a solid floor, it is not
immune to these conditions. Wood floors perform best within a relative humidity of 30-55%.
When relative humidity drops below 30%, you will start to see the negative impacts: Face
checking and delamination are both symptoms of low humidity.
December, January and February
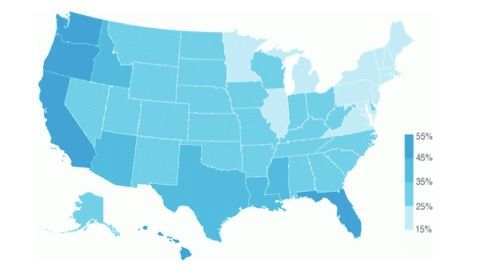
These are the most important months to pay attention to regarding excessive dryness. The
average indoor relative humidity in New York City during these months is 15%, well below the
recommended 35% for wood flooring.
Below is a map of the United States and the average indoor humidity during 2015.
Moisture must be added to your indoor environment to bring the humidity level to at least
30%. This is the case wherever there are cold winters and unmanaged heating systems. We
have included a list of stand-alone and in-line humidification systems that MADERA
recommends.
If at any time the RH of your space dips below 30% or the MC content in the wood flooring
drops below 5% any MADERA warranty will be voided.
New York | hellony@maderasurfaces.com | Los Angeles | hellola@maderasurfaces.com
718 484 7260 | maderasurfaces.com | @maderasurfacesFigure 1. Average Indoor Relative Humidity
5.2 Excessive Humidity
Excess humidity can severely damage both solid and engineered flooring. Engineered flooring
is better suited for high humidity conditions, but it is not immune. During summer months,
when the heat and humidity peak, it is important to keep the indoor relative humidity levels
below 65%.
Wood will also react negatively to direct contact with water. Spills should be promptly cleaned
up and never use a wet mop to clean the wood floor. Leaks and floods will seriously damage
your floors as well so make sure to protect them from burst pipes, overrun bathtubs and the
kids indoor water park.
Damage due to excessive humidity (above 65% RH) or direct contact with water (floods or
wet moping) voids any product or MADERA warranty.
5.3 Use Your Hygrometer
A hygrometer is your floors best friend! Hygrometers can be found on Amazon or in most
hardware stores. Please make sure you use your hygrometer and track the RH in your space
before, during, and after installation. If you find yourself reaching for the hand lotion a bit
more often it may be time to turn on that humidifier!
5.4 Humidification is Not a Part-Time Thing
The wood life is a good life, but it does take some effort! If you decide to use a free-standing
humidifier that is not controlled by a thermostat, you must make sure that it is full and in
working order at all times. The moment your humidifier runs out of water, the RH level will
New York | hellony@maderasurfaces.com | Los Angeles | hellola@maderasurfaces.com
718 484 7260 | maderasurfaces.com | @maderasurfacesplummet. It only takes a few hours for your floors to start reacting to excessive dryness, so
please by vigilant.
Table 2: Climate Condition and Reaction of Wood Floors
60-70% RH Slight transverse warping should be expected in solid flooring (Minimal in
engineered flooring)
50-60% RH No contraction gaps, slight warping should be expected in solid flooring,
not in engineered flooring.
40-50% RH The floor planks are stable and level
30-40% RH Moderate contraction gaps (approximately 1% of plank width in solid)
and slight warping should be expected in solid flooring, but not
engineered flooring.
20-30% RH Contraction gaps of 1% of the width or more and moderate transverse
warping should be expected. There will also be minor face checking in
solid and engineered flooring.• Once-a-year maintenance
• Typical 5 to 10-year warranties
• Installed by professional
• More expensive than stand along
Stand Alone Humidification Systems
MADERA Recommended: BONECO AOS U700 Digital Warm & Cool Mist Ultrasonic
Comments: Although much more affordable than the in-line system the stand-alone
humidifier is dependent on you to fill it, clean it and control it. If you leave for warmer climes
in the middle of January who is going to make sure your humidity level stays above 30%? If
you aren’t confident this can be maintained, do the right thing and install the in-line system
if possible.
• Humidifies up to 1000 SF
• Self-controlled (not automatic)
• Not dependent on HVAC or external heating system
• Affordable
• Portable
• Energy Efficient
• Quiet
• Not self-sustained
• Humidifies smaller volumes
For further instructions, recommendations or if you have any questions that are not answered
in this guide please call MADERA at 718-484-7260 or email hellobk@maderasurfaces.com for
our Brooklyn Showroom or call 213-317-3130 or email us at hellola@maderasurfaces.com for
our LA Showroom.
New York | hellony@maderasurfaces.com | Los Angeles | hellola@maderasurfaces.com
718 484 7260 | maderasurfaces.com | @maderasurfacesYou can also read