Magic Water : A Black Box Activity
←
→
Page content transcription
If your browser does not render page correctly, please read the page content below
Magic Water©: A Black Box Activity
                                     By Annie Chien and Allison Godshall
                                          Updated Summer 2005
                                        Contact annie@mschien.com

         This lesson was originally birthed by SOF Science Coach Allison Godshall, and modified by Annie Chien

Teacher’s Notes: Teaching the scientific method involves more than just experimentation. The
understanding and use of the scientific method have many components: the reflective, the interactive
and the manipulative. A Black Box experiment is a great teaching tool to introduce the scientific
method as a generic protocol for problem solving. “Black Box experiments” are problem-based
situations the teacher creates that offer a hypothetical mystery (hence, the “Black Box”). The
problem is easily researched, observable and is very straightforward. Students then use what they
observed to create a hypothesis, design and implement a test to explore their hypothesis, collect data
and make a conclusion. While Black Box experiments do not model real life science research and
experimentation, it does offer a good opportunity for students to experience the scientific method on
their own scale. For older and more advanced learners, it’s also an opportunity reflect and critique its
simplicity and to go deeper into the complexity of real scientific problems.

The most popular black box is the sealed shoebox with mystery items inside. Without opening the
box, students need to determine its contents by using their senses. This lesson plan offers a unique
design and twist to a Black Box mystery. Here is the problem: You are presented with a black box
with tubes protruding out of it. If you pour water into one of the inlet tubes, colored water would
come out of one of the outlet tubes. Different inlet tubes result in different outlet colored water. You
will act as engineers to determine the “plumbing system” of this magic water black box.

Content Objectives: Students will be able to…
  • Construct thoughtful and detailed hypothesis based on observations and research
  • Understand that the scientific method is a cyclic process

Instructional Objectives: In addition to content objectives, students will also be able to…
   • Practice/engage in accountable and constructive discussion between each other
   • Share content understanding
   • Build on each other’s content understanding
   • Push each other to address misconceptions

National Standards Meet: Teaching Standard B. Teachers of science guide and facilitate learning.
In doing this, teachers:
   • Focus and support inquiries while interacting with students.
   • Orchestrate discourse among students about scientific ideas.
   • Challenge students to accept and share responsibility for their own learning.
   • Recognize and respond to student diversity and encourage all students to participate fully in
       science learning.
   • Encourage and model the skills of scientific inquiry, as well as the curiosity, openness to new
       ideas and data, and skepticism that characterize science.

Materials Check List:
Prepared magic water black box – long milk crate, clear plastic tubing (from hardware store,
around 4-6 feet depending on how complex you design your mystery), hot glue, restaurant
plastic takeout containers with lids, one trash bag big enough to cover the milk crate, 3
funnels (more or less depending on how complex you wish your black box to be), clear cups or
beakers as reservoir, good sponges, food dye.
Individual student accountability sheet
One chart paper to display team discussion protocol
Pre Class Preparations:
Setting up your Magic Water Box is a fun process! The first step is to determine how you want to set
up the problem. The design included in this lesson plan is a generic set up, but definitely use our
example to build your own “plumbing system” for your students. Use hot glue to connect your tubing.
In Figure B, inlet #1 allows water to drain directly down. This serves as the “control”.
Inlet #2 was connected to a plastic container and the outlet was higher up on the container in the
back - so it took a lot longer for the fluid to leave the box. A sponge soaked in red dye is placed here.
As a result, red colored water exits its outlet tube.
Inlet #3 is the challenging one. It has two outlet tubes - one very low on the container (so it would
run out early) and another tube higher up that ran into the neighboring container - so fluid would
also run out of that tube should enough water be added. In this schema, we put a yellow sponge in
container B and a blue sponge in container C. Yellow colored water would exit to outlet 3. When
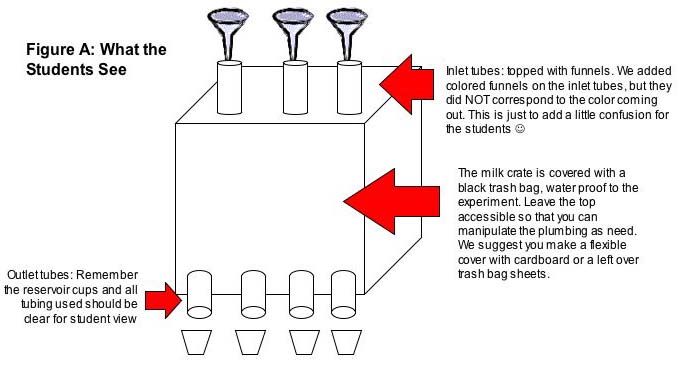
enough water is added to container B, it would overflow to container C where it will run blue. Youmay want to add some more challenge here for your students. If you pour the water slowly, the yellow water will settle on the bottom of the container and make a layer on top with clear water (thanks to their density properties). This top layer will overflow to container C that will make outlet 4 pour blue-colored water. However, if you pour quickly, outlet 4 will possibility pour out green water. You can even place a green dyed sponge in container C. The whole milk crate is covered in a trash bag (with the top accessible of course). We added colored funnels on the inlet tubes, but they do NOT correspond to the color coming out. This is just to add a little confusion for the students You would have to replenish the food dye from class to class. It made it more interesting to the kids that the color faded. Remember that how you pour the water, and everything else you do, are observations students will make, hence clues to the plumbing system (timing of the water exiting on the outlet, color of the water, how much you poured, the rate at which you poured). The design of your plumbing system will determine the kinds of clues you offer. Add on challenges by establishing limitations to what the students can/cannot do to experiment with their hypothesis. For example, in this lesson plan, students are only allowed to test their hypothesis by pouring in clear, fresh water. They are not allowed to manipulate the system, for example, using an instrument to poke at the inlet tubes, or pouring in colored water. The Class Workshop:
•   Conduct the demo. Instruct students must observe carefully to identify patterns.
   •   Inform students of their goal and the “rules of the game”: The box cannot be opened.
       Students can pour regular tap water into the inlet tubes. No other tools are allowed. Students
       cannot interrupt the system by adding dyes, or other objects. Assure the students that the
       supplies used in the plumbing system are cheap and inexpensive – there is no fancy gadgetry
       to it!
   •   Team discussion protocol:

          (1) There should be a team facilitator who assures that everyone has a fair chance to
              speak.
          (2) Each student is accountable in filling out the worksheet provided.
          (3) Each team is allowed 20 minutes to figure out the plumbing system.
          (4) At the end of the team discussion, each team must have on their chart paper (a) Their
              hypothesis. They must NOT throw away their previous hypotheses. It must be detail on
              chart paper to demonstrate their team’s thinking process. (b) A conclusion based on a
              detailed hypothesis. Their conclusion must be based on evidence. They will talk about
              how they come up with their conclusion.

   •   Each team expects to class share their findings. 5 minutes allowed per team to present.
   •   After each team’s presentation, the class is opened to challenge questions and comments for
       the group. Each group has 1 minute to discuss the presenter’s comments within their own
       groups – do their ideas add on to their conclusion? Support their conclusion? Disprove their
       conclusion?

Homework Assignment:
  • Identify some of the different variables that you considered in determining the design of the
    plumbing system. Why do you consider each to be important?
  • Explain how you came up with your hypothesis. What do you need in order to make a
    hypothesis that is workable? How do you think scientists make workable hypothesis in a real
    life science problem? Consider using examples and hypothetical situations to answer this
    question – how might scientists create a workable hypothesis on asthma rates in children in
    New York City? Obesity rates? AIDS infection rates?
  • The scientific method is a cyclic process. Do you agree or disagree? Explain your answer using
    examples.
  • Design your own plumbing system. Be sure to create challenges for your audience. Use a
    schema or built one yourself!

Differentiation Tactics
   • Students can write down their observations during the demo. You should perform the demo
      twice and allow time for students to ask questions to clarify answers
   • You may want to design several magic water boxes, each one different complexity. You can
      either scaffold the whole class to the difficult problem, or have students move from one box to
      another on their own pace.
   • You will notice that most students will not perfectly design the black box. Students can be
      pushed to think harder in detail to help them perfect their design in every step, and their
      efforts are celebrated. But the true design is never revealed to them until the end of the year.
      Depending on your students, you may want to assure them of their success if you are going
      for the scaffolding model, but leave the ultimate “difficult box” as a long-term mystery.
• Encourage students to sketch out their ideas, and test their hypothesis, within the
experiments’ limitations.
• Post team discussion protocols on the board to keep each group on track.
• Push students to re-examine the original “clues” that were given in the demo if they have
trouble making their hypothesis.Your Name: Experiment Worksheet – INDIVIDUAL While you are working in teams, you are accountable in completing this sheet in your own words! What is your investigative question? Define your hypothesis Discuss your experimental design in detail Construct a Conclusion
You can also read