Maine American Kestrel Nest Box Monitoring Program - A Project of the Maine Natural History Observatory
←
→
Page content transcription
If your browser does not render page correctly, please read the page content below
Maine American Kestrel Nest
 Box Monitoring Program
                March 2019, version 1.0

                A Project of the
        Maine Natural History Observatory
Introduction
       Thank you for your interest in Maine's American Kestrel Nest Box Monitoring
Program. This is a project coordinated by Maine Natural History Observatory in

partnership with the Maine Bird Atlas, a project of the Maine Department of Inland
Fisheries and Wildlife. Your efforts to place nest boxes in appropriate breeding habitat

and monitor their use will help us to understand the breeding distribution of kestrels in
the state and increase the number of nesting options for a species which is experiencing

declines throughout its breeding range.
       Nest boxes should only be installed if the volunteer intends to monitor and

maintain the box throughout the season. An unattended box can be detrimental to
kestrels and other native nest box users if non-native species begin using the box. Paper

wasps, mice, squirrels, and even snakes may take up residence in an unattended nest
box. For more information on how to handle these situations, see the “Maintaining Nest

Boxes” section below.

Why Monitor American Kestrels?

       Hole nesting species have been able to find and use natural cavities in trees and

other crevices naturally found in the wild, so why does Maine need nest boxes for these
species? Birds have been getting help from humans for some time – think about all of

the bird feeders that are put out in Maine each year. In addition, some bird species are
losing nesting habitat. Natural nesting cavities can be found in areas with lots of

standing deadwood, but sometimes this standing deadwood is removed for various
reasons or there are no natural cavities suitable for nesting present in an area. Building

nest boxes and placing them out in your gardens or other areas can make a difference
for species where adequate nesting locations are limited. In addition, there is great

                                             2
value in monitoring how well birds do at raising a brood of chicks, since that influences
the number of individuals entering the breeding population in the future.
American Kestrels are currently experiencing widespread declines. Declining
kestrel numbers in Maine have been attributed to a potential increase in competition for
suitable nesting sites, loss of grassland habitat, pesticide use, and predation. This led
Maine to list the American Kestrel as a “Species of Greatest Conservation Need” in the
2015 Maine Wildlife Action Plan.
Identifying the issues leading to declines in American Kestrels will require a better
understanding of the species’ distribution during the breeding season and monitoring
their breeding success at nesting sites. Like many other cavity nesting bird species,
American Kestrels will readily nest in properly designed boxes placed in suitable habitat.
This quality makes kestrels far easier to observe and monitor during the breeding
season. Observing kestrels at nest boxes can provide vital information about the species
breeding behaviors and the success of their breeding efforts here in Maine.
Natural History
The American Kestrel, once known as the Sparrow Hawk, is the smallest falcon in
North America. This small raptor sports colorful plumage, bold facial markings, and, with
its long and pointed wings, is a swift predator. It is mostly associated with open habitats
such as grasslands, meadows, powerline right-of-ways, and agricultural landscapes, but
will also take up residence in more developed areas if suitable nesting and hunting sites
are present.
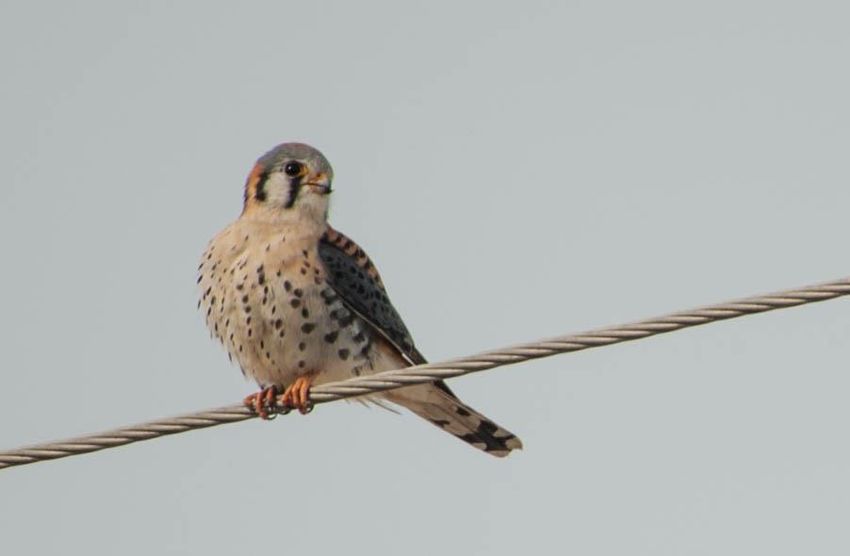
American Kestrels hunt in open areas with low-growing vegetation and are often
observed perched on a treetop, utility wire, or building from which they scan their
surroundings for prey. In the absence of a perch, kestrels will hover in place by rapidly
beating their wings. From their vantage points, kestrels pounce on prey including small
3mammals such as mice, voles, and shrews, insects such as grasshoppers, cicadas,
beetles, dragonflies, and sometimes small songbirds.
American Kestrels are a cavity nesting species. They do not, however, excavate or
modify nesting cavities like woodpeckers, chickadees, or nuthatches. They instead
usually rely upon the abandoned nest sites of woodpeckers. They prefer nest sites
ranging from 10’ to 30’ in height that are in or on the border of open areas. Males are
responsible for finding these nest sites and must attract a female kestrel with their
plumage, dive displays, and quality of their selected nest site.
Copulation is a commonly observed breeding behavior between mated kestrels
and can be initiated by either pair member. The transfer of food items (from males to
females) is part of pair bonding and is a probable indicator that kestrels breed within
the area. Pairs tend to remain bonded throughout life and will nest together year after
year. Kestrels will breed with new partners, however, if one of the pair is killed or
disappears.
American Kestrels in Maine
Although American Kestrels live throughout much of North America year-round,
this falcon species does not overwinter in Maine. In the breeding season, however, they
are widely distributed throughout the state and can be found from the Kennebunk
Plains of York County all the way up to agricultural lands of northeastern Aroostook
County.
Nest Box Monitoring
For this project, we are asking volunteers to install nest boxes in American Kestrel
habitat and to monitor these boxes throughout the breeding season. The breeding
season is a sensitive time for nesting birds. Because of this, our efforts are designed to
4minimize disruption that could lead to stress on these birds. The safety of the
volunteers, the nesting adults, and their young is a priority. It is important to adhere to
the monitoring protocol described below to best guarantee a successful season for all
parties. Lastly, it is important to remember that if your nest box remains unoccupied,
this is still important information. If no birds take up residence in a nest box this season,
that is okay. We still would like for you to collect data that can be used to inform our
effort. Give the birds some time to find your box, but if your box remains unused after
many years, it is worth moving the box to a new location.
Where to Install Nest Boxes
Kestrel nest boxes should be installed in open areas such as grasslands,
meadows, agricultural areas, pastures, old fields, parks, shrublands, and residential areas
with adequate open foraging space (minimum of acre). Sites with adjacent perches such
as snags, isolated trees, posts, utility poles, and other scattered vantage points are
especially suitable. Boxes should be placed, when possible, at least 50 feet from wooded
areas. Sites with extensive tree cover, limited open space for foraging, and near loud
roadways should not be used.
Nest boxes should be installed between 8’ and 30’ in height (10-12’ is our
preferred height) on the side of a building, although placement on a post or a tree in a
field could also suffice. This means you will more than likely need to use a ladder to
access the box during monitoring and maintenance. Take extra care with ladders, follow
all safety precautions, and make sure to have a second person present to help steady
the ladder. Placement and monitoring of nest boxes are potentially hazardous, and
extreme care to your safety is the highest priority. Be familiar with the safe working
practice for any tools you use. Beware of electricity from overhead power lines,
particularly if carrying or placing a ladder, and keep nest boxes at least 50 feet away
5from any power lines. Ensure your ladder is secure before you climb. Please do not risk
injury of any kind - the nest box and breeding observations are not worth the risk of an
accident.
The box should be installed with its opening facing roughly southeast, making
sure there is some shade on the box during the hottest part of the day so that the chicks
won’t overheat with full sun on the nest box. While some cover (such as tree branches)
is acceptable, the box should not be obscured, should be easily viewable from 30’ away,
and birds should have a clear flight path to the box. While volunteers are welcome to
install and monitor more than one nest box, each kestrel box should be installed a
minimum of 0.5 miles apart.
Predators should be considered when picking a location for the nest box. It may
be impossible to avoid all potential predators, but pay particular attention if the area has
outdoor cats and pick a location for the box where cats cannot climb and access the
nest box. If predators are a big problem in your area, consider adding a predator guard
to keep them from reaching the box (http://nestboxbuilder.com/nestbox-predator-
controls.html).
There are many methods for attaching nest boxes to trees or buildings, and you
will need to use the method that best suits your particular needs. You can drill holes into
a short piece of wood (wider than the nest box) and tie this tightly to the tree using wire
(pad the wire to help protect the tree), then attach the nest box to that short piece of
wood.
Monitoring Protocol
Here in Maine, the American Kestrel breeding season runs from approximately 25
May until 25 July. These safe dates indicate the time period where most migrating birds
have already reached their breeding grounds. As such, these dates will serve as the start
and end date for conducting nest box monitoring. Nest boxes (with coarse wood
6shavings – not sawdust – in the bottom of the box) should be installed by 1 May, if
possible, to best ensure that the box is considered by arriving males.
It is important to remember that nest boxes are not always used immediately
after they are put up (actually we expect less than 50% of boxes will be used in the first
year), and we hope that this does not discourage you. Perseverance is essential as it
takes time for birds to find a nest box and learn that it can be safe for nesting. If your
nest box does not attract a nesting kestrel, it is not a wasted effort. Other species may
still use the box for nesting or roosting.
25 May to 22 June: Monitoring should be conducted once per week. During these
first four weeks of monitoring ending on 22 June, observations should be limited to
viewing the nest box from a distance of approximately 30’ to avoid disrupting the
kestrels during the early nesting phase. The time and duration of your visit is up to you
and your availability. We ask that you spend at least 15 minutes conducting
observations per visit during this period. All observations should be entered onto your
monitoring data sheet. Note that opening the nest box early in the nest cycle may cause
the birds to desert the box, so this is strongly discouraged.
During the first few weeks of nest box monitoring, your efforts will be entirely
focused on observing American Kestrel breeding behaviors at the nest box. You may
observe behaviors which indicated that breeding is possible or probable. In some
instances, you may be able to confirm breeding even during these early weeks. Make
note of breeding behaviors you observe during your monitoring visit on your data
sheet. A possible indicator that American Kestrels breed in the area would be the
presence of an adult in appropriate habitat (code H). There are several probable
indicators of breeding that may be observed. Agitated adults may give “klee” calls from
a nearby perch if they feel intruders are too close to their nest (code A). An adult visiting
a probable nest site would be coded as N. Often this probable nest site will be the nest
box, but it is possible that a pair will take up residence in a natural site like a
7woodpecker or other cavity. Aerial courtship displays, copulation (often on a tree
branch near a nest site), and food transfers are coded as C. American Kestrels defend
their nesting territories and give chase to larger raptors such as Red-tailed Hawks and
Cooper’s Hawks. Fighting and aggressive displaying (spreading the wings and tail
feathers) may occur between male kestrels early in the breeding season. Both these
types of territorial defense should be coded as T. The presence of a pair moving
together and interacting in the area should be coded as P. Confirming kestrel breeding
will likely occur during the latter portion of the season, however, you may observe
kestrels carrying food items to the nest box (code CF) or dismembering larger food
items to feed to begging young at the nest box (code FY) before your nest box visits if
the pair begins nesting early.
23 June to 25 July: During this latter part of the survey period (once you have seen the
male bring food to the nest box), volunteers are asked to limit their observations to
once every two weeks. During this part of the project, view the inside of the nest box to
note the number of eggs and/or nestlings. If you suspect that the young are older than
24 days or getting close to fledging, do not check the nest as the young birds are liable
to fledge prematurely if disturbed. This will likely require the use of a ladder to access
the box, although some has successfully used a small video camera taped to an
extension pole to observe the contents of the nest box. When using a ladder, securely
mount the ladder on the side of the box with the hinged side (through which you will
access the nest box). Carefully and quietly ascend the ladder to the nest box. Once at
the nest box, volunteers will gently tap the tree trunk or outside of the box (to
encourage any adults to leave the box), open the box, count the number of adults, eggs,
and/or nestlings without touching or disturbing any adults or young, and close and
secure the nest box. If any young fledge prematurely with the disturbance, gather them
up and put them back in the nest box. You may need to put your hand over the hole for
8a few minutes while the young settle before you can quietly move away. Take care to
avoid inhaling any dust from old nests and always wash your hands after working at a
nest.
While conducting visits to the nest box, it is important to work quickly and
quietly. The amount of time spent at the open nest box should be limited to the time it
takes to make your counts and no longer. In most instances this should be no longer
than 10 to 15 seconds. Do not touch the birds or reach into the box for any reason. This
work should be conducted as quietly possible. The data sheets should not be completed
at nest box, but should be promptly completed once you are at least 30’ away from the
box. If the adults appear stressed by your presence, move back another 30’.
During the latter portion of the season, your observations will be largely focused
on your nest box visits. You are encouraged to note any other observed breeding
behaviors you see during this period on the comment section of your data sheet. Count
the number of adults present when making your visit then count the number of eggs
and/or nestlings visible during your nest box check. American Kestrels typically lay
between 3 to 5 eggs. Eggs are not glossy and are typically light reddish, with darker
speckling that is often dense at one end. Very young nestlings have only a scant coat of
white down, but will develop a second, thicker coat of cream-colored down as they age.
Again, there is no reason to reach into the box or touch any of the birds. Simply note
what you are able to see from your vantage point outside the box.
Reporting your results
Send your completed datasheets to Maine Natural History Observatory at the
end of the field season (contact info on the datasheet). In addition, it is very helpful if
you can enter these breeding records directly into the Maine Bird Atlas eBird portal
(https://ebird.org/atlasme/home).
Maintaining Nest Boxes
9Proper maintenance of a nest boxes is just as important as nest box placement.
Nest boxes should be cleaned annually and, when necessary, repaired between seasons.
At the end of the season (once all the young have fledged and the nest box is
unoccupied), take down the kestrel box. Leaving the box up between seasons will
shorten the life of the box and could mean squirrels, wasps, mice, or other species could
nest in the box. Take down the box, empty it of any nest materials (wear gloves), and
store the nest box in a dry, protected place until the next field season. Do not use any
cleaning solutions when cleaning out the box. If there is a build-up of debris stuck inside
the box, use warm water and stiff-bristled brush to clean out the box (dry in the sun
before storing). If any major repairs are needed, consult the nest box design instructions
to complete the repairs yourself so long as you are comfortable doing so. Fresh coarse
wood shavings (2-3 inches deep) should be used to line the inside of the box. Sawdust
should not be used as it will clog the drainage holes, hold moisture when wet, and could
possibly cause drowning of the chicks.
A note on competition with non-native bird species: Introduced Old World
species such as European Starlings and House Sparrows often compete with native
species for nest boxes. The larger diameter openings required for American Kestrel nest
boxes make simply excluding these species impossible. These introduced species
threaten native wildlife and are therefore not protected by state or federal laws. If
Kestrels have already started using the box, they are usually successful in defending
their box against these species. If Kestrels have not found the nest box, there are two
options if invasive bird species take up residence in the nest box. Option 1: Nest box
removal. Once an invasive species moves into the box, it is unlikely that kestrels will use
the box that same field season. Therefore, volunteers who are comfortable doing so are
welcome to remove nest boxes for the season and dispose of any materials, nests, and
eggs associated with an invasive species discovered in an American Kestrel nest boxes.
10These contents should be disposed of well away from the nest box. Option 2: Continue
your observations. While preventing invasive species from nesting is the ideal solution,
some volunteers may not feel comfortable disposing of invasive species nesting
materials and eggs. That is okay. If that is the case, you are encouraged to continue your
observations. If you observed European Starlings or House Sparrows entering the box,
inspect the box as soon as possible to confirm the invasion and either remove the box
for the season or continue making observations of the invasive species. If one of these
non-native or any other native species takes up residence in your nest box(es), note the
species in the comment section on your form. If a native bird species takes up residence
in the box, simply make note on your data sheet and continue your observations. Native
bird species should not be disrupted regardless of if they are the project’s target
species.
A note on competition with other wildlife: Occasionally, you may discover that other
forms of wildlife have taken up residence in your nest box. These may include mice,
squirrels, insects, and snakes. These animals can be removed from the nest box if you
are comfortable doing so. Should you decide to remove these animals, proper
precautions should be exercised during this type of maintenance. If rodent nests are
found within the box, remove the contents with gloved hands. Small paper wasp nests
can be manually removed from boxes and destroyed with a gloved hand. Do not use
any insecticides to exterminate insects as these products may contain chemicals which
can be hazardous to nesting birds using the box. If a particularly large nest of stinging
insects is suspected or detected, make note. Large stinging insect nests will likely have
to be removed at the end of the season. Unless discovered and removed quickly at the
beginning of the season, the presence of any of the animals discussed above will likely
mean kestrels do not use the nest box this field season. Any box which is invaded by
11these non-bird animals should be relocated to a new location the following field season.
Do not risk injury for the sake of nest box maintenance.
Nest Box Plans
A good nest box design must be secure from predators, weatherproof, simple
and inexpensive to construct, monitor, and maintain, and the target species must accept
and use the box to successfully fledge healthy young. A limited number of Kestrel nest
boxes are available free to volunteers. If we have run out of our supply of nest boxes,
you can get on a waiting list when additional nest boxes are available, or you can build
your own using the plans below. See the “Contact” section should you have any
questions about the nest box plans. These nest plans were generously shared by The
Peregrine Fund. Note that the dimensions given in these plans do not need to be
measured to the nearest fraction of an inch - natural nest holes where kestrels nest are
variable in size and their openings also differ in size and shape. There is room for
experimentation in nest box design, defense against predators, and location. Using
wood from scrap piles or even driftwood will help to keep costs down. Do not paint or
treat the wood for a nest box with any preservatives. Do not add a perch to the box as
they are not needed by kestrels and would provide a foothold for predators. It is often
helpful to use a marker to number your nest boxes so that it is easier to keep track of
multiple nest boxes.
12Materials:
• (1) 8’ 1”x10”, White Pine or Cedar
• Coarse wood shavings (to line the bottom of the nest box)
• (20-30) 1 1/2” Exterior Screws (trimhead)
• (2) 8 Penny Common Nails, galvanized (for hinge)
• (4) 3” wood screws or galvanized lag screws and washers (for mounting)
• (1) 2” hook and eye (for locking the nest box)
• Cordless Drill
• Staple Gun and staples
13• Table Saw
• Skill Saw or Chop Saw
• Jig Saw or 3” hole saw
• Hammer
• Caulking Gun and Acrylic Latex Caulk (optional)
Instructions:
1. Begin by gathering all necessary tools and nest box components. Your materials
should consist of a Front, Fixed Side, Opening Side, Bottom, Back, Roof, and a
latch (to secure the opening side).
2. Preassemble the nest box to ensure the fit of each part - make adjustments as
necessary.
3. With the box still preassembled, attach the Front of the box to the Fixed Side and
the Bottom with 1 ½” exterior screws. Special note: The Bottom should be
installed approximately 1/2”-1” from the bottom edge of the front and sides of
the box. This will help prevent rain from running into the box during storm
events.
4. Place the box with the Front facing down and fasten the Back of the box to the
Fixed Side and Bottom with 1 ½” exterior screws. Install roughly 4”-5” from the
top/bottom of the Back (thus leaving room to mount the box to a tree, building,
or post in the spring).
5. Turn the box over with the Back facing down. Fasten the Roof to the Front, Back,
and Fixed Side of the box using 1 ½” exterior screws. Do not attach the Roof to
the Opening Side.
6. Now to install the opening side. Ensure that there is large enough gap at the top
of the Opening Side so that you can open the box once the hinge nails are
installed. Hammer a galvanized nail through the Front of the box through the top
of the Opening Side. Turn the box over and nail through the Back of the box into
the Opening Side exactly opposite the first nail. These nails will function as a
hinge.
7. Install the hook and eye latch on the bottom of the Opening Side. This will keep
the Opening Side of the box securely fastened.
8. Place the box with the Front facing up. Using a 3” hole saw, cut an opening
through the front of the box. Clean out debris from inside the box.
9. Line the inside of the back with 2”-3” of course wood shavings (not sawdust).
10. The nest box is ready to deploy!
14Helpful tips:
- Predrilling all your holes will help prevent splitting when fastening the box
together.
- Do not use wood glue on your nest box. Doing so will make replacing a
damaged component on the box far more difficult. Instead, use a thin bead of
acrylic latex caulk along the seams of the box (barring the Opening Side). As
the nest box continues to dry and shrink, you can add additional caulk to seal
any cracks that form.
- You can add a piece of hardware cloth or a small block on the inside of the
box below the opening to make it easier for nestlings to access the opening.
Contact
For questions regarding this project, please contact:
Logan Parker, Maine Natural History Observatory
(207) 649-4689 (cell) – logan@hereinthewild.com
Email scans of completed data sheets to:
logan@hereinthewild.com
or mail to:
316 Chisholm Pond Road, Palermo, ME 04354
15You can also read