MASTERS OF WAR: THE AIF IN FRANCE 1918 - 14 APRIL 2018 - Military History & Heritage Victoria
←
→
Page content transcription
If your browser does not render page correctly, please read the page content below
Masters of War: The AIF in France 1918

                MASTERS OF WAR:
                   THE AIF IN FRANCE 1918

   THE PROCEEDINGS OF THE CONFERENCE HELD AT
       THE POMPEY ELLIOT MEMORIAL HALL,
    CAMBERWELL RSL BY MILITARY HISTORY AND
              HERITAGE, VICTORIA.
                                 14 APRIL 2018

Proudly supported by: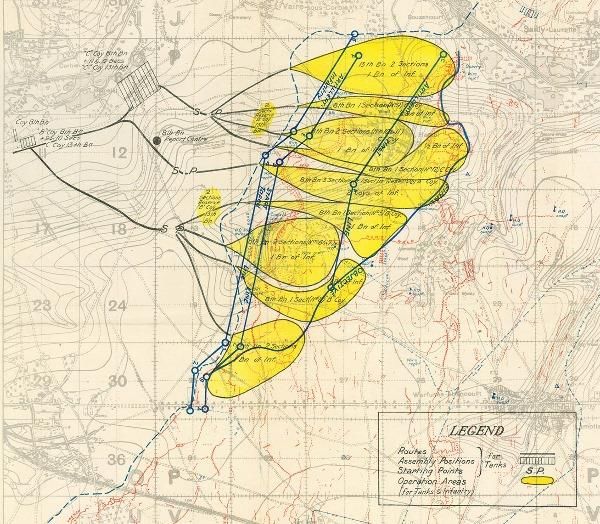
Masters of War: The AIF in France 1918

                     Hamel and the Battle of Amiens:
       The Australian contribution to Allied Offensive Operations in 1918
                                 The Australian Corps at its Zenith1

                                   Dr Andrew Richardson

    Introduction

     “Our attack started at 4.20 this morning and seems to have taken the enemy completely by
      surprise… […] Who would have believed this possible even 2 months ago? How much
                easier it is to attack, than to stand and await an enemy’s attack!”2
                  Field Marshal Douglas Haig’s letter to Lady Haig, 10:30am, 8 August 1918

          “August 8th was the black day of the German Army in the history of this war.”3
               Quartermaster General Erich Ludendorff, My War Memories, 1914-1918, 1919

    At 4:20am on 8 August 1918, three Corps’ worth of British, Australian and Canadian
    infantry, supported by a Cavalry Division, 2,070 guns4, 432 tanks and 800 aircraft launched
    an attack that would punch an 11 kilometre salient in the German lines by nightfall. The
    Battle of Amiens was the British Expeditionary Force’s (BEF) greatest victory of the war,
    and was the largest single battle the Australian Imperial Force (AIF) had ever fought.

    The British III Corps assaulted on the Australians’ left flank (on the northern bank of the
    Somme), the Canadian Corps on their right (south of the Amiens-Chaulnes Railway) and the
    French First Army further south. The attack achieved complete surprise, immediate tactical
    dominance, and brought localised mobility to the front line. Integrating artillery, infantry,
    tanks, airpower and cavalry, Amiens was the second British combined arms attack in the
    Somme sector in 35 days – the first being the composite 4th Australian Division’s attack at
    Hamel on 4 July.

    Why were Australian troops involved in both the battles of Hamel and Amiens, and how did
    they contribute to the success of both, and ultimate Allied victory in the latter part of 1918?5
    This paper will describe the features of these battles, examine their similarities, and make
    broad assessments of the Australian Corps’ contribution to victory in 1918.

1
  The opinions expressed in this paper are those of the author and do not necessarily represent the Australian
Army History Unit, the Australian Army or the Department of Defence.
2
  Field Marshal Douglas Haig’s letter to Lady Haig, 10:30am, 8 August 1918, in, Gary Sheffield and John
Bourne (eds.), Douglas Haig: War Diaries and Letters 1914-1918, London: Weidenfeld & Nicolson, 2005, p.
440.
3
  Quartermaster General Erich Ludendorff, My War Memories, 1914-1918, 1919.
4
  1,386 field guns and 684 heavy guns.
5
  Meleah Hampton has produced a broad ranging assessment of the Australian Corps’ contribution to allied
victory in 1918. See, Meleah Hampton, ‘The Key to Victory: Australia’s Military Contribution on the Western
Front in 1918’, in Kate Ariotti & James Bennett (eds.), Australians and the First World war: local-global
connection and contexts, Cham, Switzerland: Palgrave Macmillan, 2017, pp. 27-43.
Masters of War: The AIF in France 1918

    Strategic Context

    German troops during an attack against Allied positions.
    Image: Australian War Memorial H12333

    The German Spring Offensives were intended to split the BEF from the French through a
    series of major attacks along the Western Front. Under Operation ‘Michael’, the Germans
    attacked toward Amiens, the gateway between the British and French fronts.6 While initially
    effective, the subjugation of sound strategic design in favour of localised tactical supremacy
    saw the German Army commit its last great reserves of men and its last possible chance at
    winning the war through battlefield victory.

    Once German forces had been stopped before the vital rail junction of Amiens and Villers-
    Bretonneux had been wrested back decisively on Anzac Day, the Somme front settled back
    to a more static relationship between the opposing forces – characterised by the Dominion
    forces’ ‘peaceful penetration’ or ‘stealth raiding’ – described by Lucas Jordan this morning.
    They were materially aided by the poor defences on the German Second Army’s front, with
    the Chief of Staff of the British Fourth Army noting that the sector “in front of Amiens…was
    especially weak, and nothing had been done to improve [it]”, giving, “the Allies an opening
    for a counter-stroke of which … full advantage would be taken.”7

6
  The Germans knew this too, which made the city such a valuable target for their ‘Michael’ attack. See, Thilo
von Bose, Die Katastrophe des 8 August 1918, Berlin: Verlag von Gerhard Stalling, 1930, p. 23. For a
discussion as to why the Germans launched the offensives, see the following blog by Dr Spencer Jones,
http://beyondthetrenches.co.uk/why-did-germany-launch-its-spring-offensive-in-1918/
7
  Montgomery, The Story of the Fourth Army, 1920, p. 5.
Masters of War: The AIF in France 1918

Map showing location of Australian Corps (2th, 3th, 4th and 5th Australian Divisions) actions between May-
August 1918. 1st Australian Division remained in Belgium until the start of August 1918.
Map: Catherine McCulloch, Australian Army History Unit

On 31 May, LTGEN Sir John Monash took over command of the Australian Corps in
General Sir Henry Rawlinson’s Fourth Army. Localised Australian attacks north of the
Somme at Morlancourt on 10 June prompted Rawlinson and Monash to consider options
south of the Somme, particularly as the village of Hamel was still in German hands and
firing in enfilade into the 2nd Australian Division north of the river. Capturing Hamel was
estimated to take a Division but would provide a buffer in defence of Amiens, and allow an
improved view east along the Somme River. Such an attack would assess the German
defences and morale.

Hamel

The village of Hamel lies northwest of Villers Bretonneux and east of Corbie in the Somme
valley. Hamel sits between two gentle hills west to east, with the southern section of the
commune rising to the Villers Bretonneux plateau, while the northern section gently
descends to the banks of the Somme River.

Rawlinson and Monash planned the capture of Hamel as a very limited objective – the
attacking front was just under 6.5 kilometres long north to south, to a depth of only 2.4
kilometres at its deepest part.
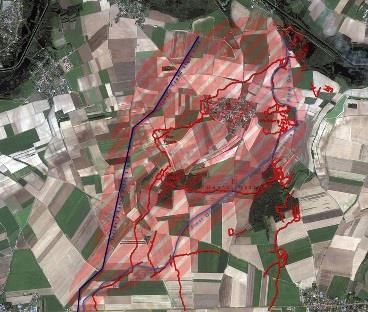
Masters of War: The AIF in France 1918

The Hamel battlefield shown in Google maps. Key German trench systems, the infantry start line, final
infantry objective line and the footprint of the battlefield have been overlaid.
Image: Google Maps with author-sourced data overlaid

The Hamel plan would employ tanks, aircraft, artillery and infantry in concert in
overwhelming numbers on a limited objective. The final objective for the attack – the ridge
to the east of Hamel – provided clear views further east along the Somme River. The attack
would serve an important strategic function as an ‘enabling battle’ to the planning of a larger
offensive. The operation was the capture of one hill line to the east of the existing front line
but most importantly, would test a combined arms attack on a limited objective.

One brigade of the 4th Australian Division, under the command of MAJGEN Ewen Sinclair
MacLagan, was joined by a brigade each from the 2nd and 3rd Divisions. While the 5th
Division supplied a Brigade for a feint attack at Ville north of the Somme as part of an
elaborate deception scheme to deflect the true location of the main attack, it falls strictly
outside of the scope of this paper.

Hamel was Monash’s first operational plan as Corps Commander and he involved himself in
most aspects of the planning, including running conferences that discussed every feature of
the attack. While this raises questions on the separation of responsibilities between Corps
and Divisional commanders, it is likely that Hamel’s status as the first set-piece British
offensive operation since the end of the German Spring Offensives played a key role in
Monash’s exertion of command authority for this encounter.
Masters of War: The AIF in France 1918

Trench map of the Hamel battlefield, overlaid with the disposition of attacking units, main features and
objectives.
Map: Australian War Memorial 3DRL/2316, Personal Files Book 19, 23 June – 7 July 1918, Sir John Monash
KCMG KCB overlaid with information from author
Masters of War: The AIF in France 1918

The distribution of the attacking units was (left to right):

3rd Division
                                                                                42nd Battalion
                          11th Brigade                                          ½ 44th Battalion
                                            41st Battalion (in reserve)         43rd Battalion
                                                                                ½ 44th Battalion

-------------------------------------------------------------------------------------------------------

4th Division
                                                                                15th Battalion
                                               th
                          4th Brigade       14 Battalion (in reserve)           16th Battalion
                                                                                13th Battalion

-------------------------------------------------------------------------------------------------------

2nd Division

                          6th Brigade                                           21st Battalion
                                                                                23rd Battalion

The 13th Brigade (4th Division, 49th, 50th, 51st and 52nd Battalions) was in reserve.

In response, the German units of the Second Army (under command of General Georg von
der Marwitz) holding the ground to be captured were (north to south):

43rd Division, with the 202nd Reserve Infantry Regiment occupying the northern sector to
be attacked;

-------------------------------------------------------------------------------------------------------

13th Division, with the 55th, 13th and 15th Infantry Regiments holding the middle sector;
and

-------------------------------------------------------------------------------------------------------

108th Division, with the 137th Infantry Regiment holding the southern section of front to be
captured.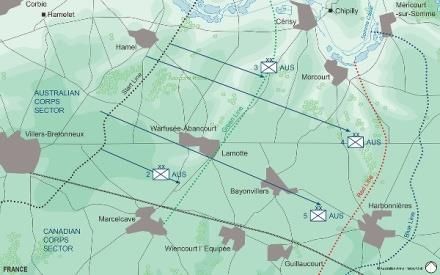
Masters of War: The AIF in France 1918

British Mark V ‘Male’ tank.
Image: Australian War Memorial E03100

Both Rawlinson and Monash were keen to use the new Mark V tanks which arrived in
France in June. Mindful of their poor reputation post-Bullecourt, Rawlinson and Monash
instituted infantry-tank training to promote mutual trust on the battlefield. Initially adopting
a plan for a largely tank-led attack with minimal artillery, backlash from his Battalion
Commanders saw the plan revised to make it an infantry-led operation, with tanks in support.

Mark V ‘Male’ tank
Image: Catherine McCulloch, Australian Army History Unit
Masters of War: The AIF in France 1918

    The Americans

    Over summer 1918, the US 33rd Division was training with Fourth Army so Rawlinson
    included American troops in the attack, planning to use 10 companies of troops from two
    regiments, attached by platoons to Australian battalions. An eleventh hour intercession by
    General John Pershing, Commander of the American Expeditionary Force, reduced that to 4
    companies only. Pershing’s protestations almost saw the remaining 4 companies removed
    but for the late support of Field Marshal Haig.8 The date of the battle – 4 July – was selected
    both as a nod to the American involvement, and as one of the earliest feasible dates for the
    attack.

    American troops, resting on their way to the Australian lines to participate in the Battle of Hamel the following
    day, Corbie, 3 July 1918.
    Image: Australian War Memorial E02694

    Planes

    The Royal Air Force (RAF) and Australian Flying Corps (AFC) were attached to this
    operation. Artillery and infantry officers were attached to No. 3 Squadron AFC to liaise on
    contact work, artillery observation and aircraft recognition. No. 3 Squadron was also tasked
    by Rawlinson to deliver machine gun ammunition from the air using modified aircraft bomb
    racks, supplying Lewis and Vickers gun crews on the ground during the attack. It is believed
    that the idea of aerial resupply was adopted from a captured German document. This
    ammunition was delivered by small parachutes.

8
  Monash covered the prevarication and strained discussions over US participation in, Lieutenant-General Sir
John Monash GCMG, KCB, VD, DCL, LLD, The Australian Victories in France in 1918, London: Hutchinson
& Co., 1920 (second edition), pp. 52-54.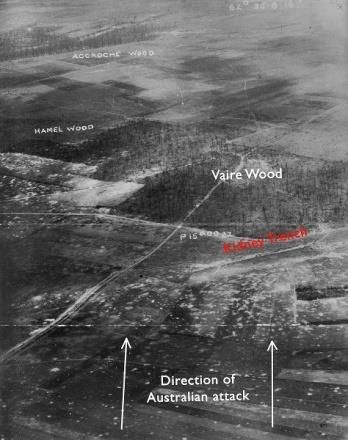
Masters of War: The AIF in France 1918

    Field Artillery barrage map showing the lifts, the 10 minute halt line, and protective barrage zone during
    consolidation of the final objective.
    Map: AWM4 23/12/29 Part 1 – July 1918 Appendices, 12th Infantry Brigade, p. 61.

    Artillery

    As part of the preparation for the Hamel attack, the artillery bombarded the enemy with
    harassing fire in the week leading up to the operation, mixing gas shells with smoke shells.
    This was designed to condition the Germans to don gas masks whenever smoke shells were
    fired. As the Corps Artillery War Diary noted, “This procedure proved very successful as on
    the morning of the operation when smoke shell only was fired, many of the enemy when
    captured were wearing respirators.”9

    Fourth Army largely supplied the artillery for Hamel, with a total of 326 Field Guns and 302
    Heavy guns assigned in support10 – 628 pieces in all. This equated to one 18 pounder gun

9
  AWM4 13/4/15 Part 1 – General Officer Commanding, Royal Artillery, 1st ANZAC Corps and Headquarters,
Royal Artillery, Australian Corps.
10
   SS218 – Operations by the Australian Corps against Hamel, Bois de Hamel, and Bois de Vaire, 4th of July
1918, p. 5. Pederson claims 313 heavy guns were available, rather than 302. See his, Hamel, 2003, p. 51.
Masters of War: The AIF in France 1918
for every 25 yards of front line and each 18 pounder was given 600 rounds. 11 The artillery
was moved into position over four days, and all moves, including the stockpiling of
ammunition, were completed at night. Batteries were sited in preparation for counter battery
work to suppress any German attempts at disrupting the advance, with aerial photography
critical to success.
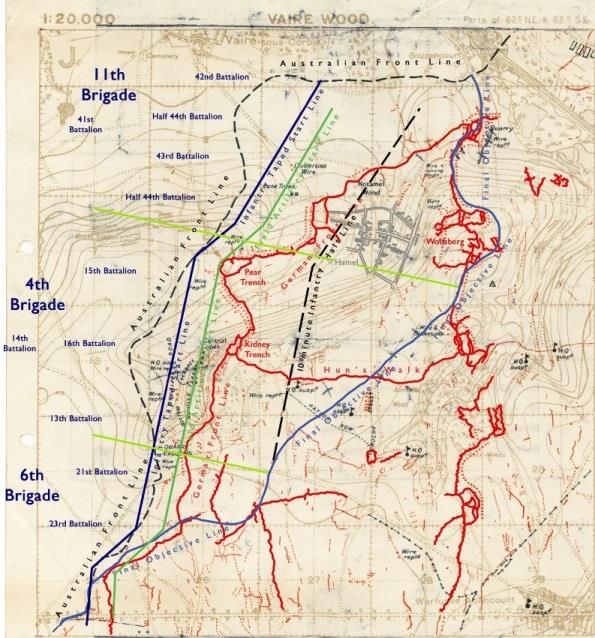
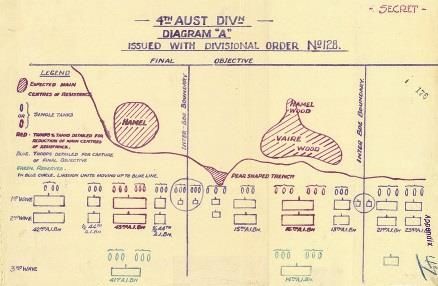
Fourth Division’s order for the distribution of units and tanks for the attack.
Map: AWM4 23/12/29 Part 1 – July 1918 Appendices, 12th Infantry Brigade, p. 108.
Operational Security
Great lengths were taken to conceal the steady build-up of artillery, tanks and infantry.
Movement was by night, and engineers erected and dismantled bridges across the Somme
each night in the week leading up to the attack. Only the hours of full darkness – after 10pm
and before 3am – were used for movements. The attacking frontline troops were left
ignorant of the planning of the battle until the day before the attack.
The Battle
When harassing fire opened at 3:02am on 4 July, it followed the routine of the preceding
fortnight. This fire triggered the approach of the tanks, the noise of their movement
disguised by the shelling and circling aircraft.
At Hamel, Rawlinson and Monash dispensed with a preliminary bombardment to conceal the
impending attack. The harassing fire gave way to the proper barrage at 3:10am — Zero hour
— as the infantry jumped off their starting tapes. The heavy guns also opened suppressing
fire on enemy batteries, plotted thanks to a mix of aerial reconnaissance, flash spotting and
11
Ibid., p. 5.Masters of War: The AIF in France 1918 sound ranging. Three artillery barrage lines provided a creeping barrage 600 yards deep with smoke shells to shield the assault from enemy observation. Pear Trench Pear Trench, attacked by the 15th Battalion (4th Brigade) from right to left. It was the site of Private Henry Dalziel’s Victoria Cross action. Note the ‘Pear’ shape, which gave the trench its name. Image: Australian Army Museum of Western Australia AMWA41632 The tanks in the central brigade’s sector were late, so the infantry attacked without them. When the 15th Battalion was stopped by enemy machine guns, Pte Henry Dalziel – part of a Lewis gun team – rushed a machine gun post with his revolver, silencing the gun and being awarded the Victoria Cross.
Masters of War: The AIF in France 1918

Kidney (Vaire) Trench, attacked by the 16th Battalion (4th Brigade), was the site of Lance Corporal Thomas
Axford’s Victoria Cross action.
Image: Australian Army Museum Fort Queenscliff

Vaire and Hamel Woods

The woods were occupied by German troops, and fed by a long communication trench from
the rear of Hamel Wood, across open ground and into Accroche Wood. The battalion had
been held up by heavy machine gun fire from Kidney/Vaire Trench, just in front of the
woods. In an act of extraordinary bravery, LCPL Thomas Axford advanced, bombing the
enemy machine gunners, allowing the battalion to clear the woods by 6:00am. He too was
awarded the Victoria Cross.
Masters of War: The AIF in France 1918

Hamel village and Notamel Wood. Stiff resistance was encountered at the Notamel Wood site.
Image: Australian Army Museum of North Queensland

Hamel Village

While Hamel village was a strongpoint, the majority of resistance came from Notamel Wood
on the northern boundary of the village. The 43rd Battalion overcame sharp fighting here
with the assistance of tanks. At the western edge of the village where the tanks had not yet
arrived, a platoon of Americans moved south to outflank a troublesome position and, under
cover of dust and smoke haze, extinguished all resistance. Final resistance within the village
was overcome by 7:00am, an hour after the Final Objective Line had been reached. The
tanks proved indispensable.
Masters of War: The AIF in France 1918

Australian and American troops dig in, Hamel, 4 July.
Image: Australian War Memorial E02694

One company of Americans was allotted to the 43rd Battalion, the unit’s history noting that,
“The fighting qualities of the Americans favourably impressed the [43rd] Battalion, their
dash and bravery leaving nothing to be desired.”12 A following battalion leapfrogged the
village and stormed the Wolfsburg trenches on the high ground to the east of Hamel.

Southern Flank – 6th Brigade

On the southern flank of the attacking front, smoke shells shielded the attackers while the
tanks crushed German morale. The right battalion encountered stubborn opposition from
enemy machine guns on the southern boundary of the attack. A German counterattack was
repulsed by artillery support and the southernmost flank was held.

The Tanks

Five companies of tanks took part in the attack, totalling 60 vehicles, with a further 4 carrier
tanks participating in the consolidation phase. The tanks were under command of the
individual Battalion Commanders in whose areas they operated. The tanks acted as a mobile
screen between the barrage and the infantry – with the exception of the attack at Pear Trench
where the tanks arrived late.

12
  CAPT E.J. Colliver MC & LT B.H. Richardson, The Forty-Third. The Story and Official History of the 43rd
Battalion, A.I.F., Adelaide: Rigby Limited, 1920, p. 93.
Masters of War: The AIF in France 1918

Distribution of the tanks for the attack, Hamel, 4 July 1918.
Map: Australian Army Museum Fort Queenscliff

The 4 carrier tanks brought forward 5.5 tons each of supplies and ammunition, equating to
the same load as carried by 1,250 men, bringing new efficiency to immediate battlefield
logistical demands.

The 10 minute artillery and infantry halt allowed the tanks to catch up. As dawn broke, tank
crews enjoyed improved vision and navigated the battlefield more efficiently. They mopped
up remaining pockets of resistance and provided covering fire for the digging of new
trenches.

While the Final Objective Line cut across the open ground between Hamel Wood and
Accroche Wood, at least one tank ventured into enemy-held Accroche Wood to harass the
retreating Germans. Only five tanks were damaged in the battle and all were salvaged inside
48 hours.

Aerial Resupply

The advancing machine gun crews laid out large 6 foot ‘V’ shapes made from canvas strips to
request ammunition resupplies, and the aircraft from No. 3 Squadron AFC and No. 9
Squadron RAF released their boxes of ammunition, usually landing them within 100 yards of
Masters of War: The AIF in France 1918

their target. In all, 87,00013 rounds were delivered this way, for the loss of two aircraft. RAF
squadrons retained aerial control above Hamel, also bombing German troops beyond the
objective line.

British RE8 shot down at Hamel Wood after an ammunition drop to troops. Note parachute in the tree.
Image: Australian War Memorial E03844

The lighting of flares along the easternmost point of the objective line at 4:45am signified
that all objectives had been reached in a scarcely believable 93 minutes, despite ongoing
mopping up. The combination of artillery, air power and tanks had been so effective that no
genuine counterattack was attempted.

This small victory was the first set piece counter-strike on the British front since the German
Spring Offensives and did much to restore morale. The General Staff produced pamphlet SS
218 on the Hamel action, using it as a model battle to illustrate the effectiveness of combined
arms warfare on the Western Front. While there has been a tendency to laud this battle as
one of the all-time great actions involving Australians, the General Staff issued its own
caveat, which has often been lost in the hyperbole over the last century:

          It is important, in drawing deductions from this action, to bear in mind the
          local and special conditions, especially the high moral of the infantry, the
          fact that there was not much wire, that the ground was suitable for the action

13
  Michael Molkentin’s paper, ‘Air Power and the Australian Corps in 1918’ at the Masters of War: the AIF in
France 1918 conference gave a figure of 11,000 rounds of ammunition dropped by aerial resupply.
Masters of War: The AIF in France 1918
of tanks, and that the objective was strictly limited and within the effective
fire of the field and heavy artillery as sited for the attack.14
The overall casualties for the Battle of Hamel were light for a Western Front operation. Total
Australian infantry casualties were around 1,400 (inclusive of the feint at Ville) while 1,600
German prisoners were captured. The Americans suffered 176 casualties, justifying
Pershing’s reluctance to commit them.
Hamel succeeded because of the limited scope of its objectives. It trialled the all-arms attack,
bringing planes, artillery, tanks and infantry together for the first time, achieving the
objective while limiting casualties. This battle proved the experiment for the great attack on
8 August.
Amiens
The success at Hamel secured the line on the Amiens front, allowing the planning of a larger
counterstroke. The Battle of Amiens represented arguably the largest British set piece
offensive operation on the Western Front in 1918. For Generalissimo Ferdinand Foch,
Supreme Commander of Allied forces, Amiens was one step in a rolling series of attacks
along the entire length of the Western Front, designed to weaken the German Army.15
Amiens would capitalise on the success of the large French-American attack at Soissons in
late July.
The attack was planned for General Sir Henry Rawlinson’s Fourth Army Front, utilising the
hardened Australian Corps and the crack Canadian Corps, which had been secretly
transported from Arras. The operational security around the movement of the Canadians
must surely rank as the single outstanding element of the plan, for German intelligence failed
to identify that they had moved to the Somme. The objective was “to clear Amiens and the
Amiens-Paris railway as well as defeat and throw back the enemy between the Somme and
Avre.”16 Foch recognised the importance of the battle, asking Haig to take command –
including of the French First Army.
Lewis light machine gun. These weapons were distributed in larger numbers across 1917-18 to provide greater
firepower to platoons and offset the dwindling numbers of reinforcements to the AIF.
Image: Catherine McCulloch, Australian Army History Unit
The firepower assembled for the attack was more numerous and of a higher quality than the
BEF had been capable of amassing thus far. By August 1918, greater firepower devolved
14
S.S. 218 Notes Compiled by the Fourth Army on the Operations by the Australian Corps against Hamel, Bois
de Hamel, and Bois de Vaire, on 4th of July, 1918.
15
The lack of respite was one of the justifications he stated in his memoirs. See, Ferdinand Foch, The Memoirs
of Marshal Foch, translated by Colonel T. Bentley Mott, London: Heinemann Ltd, 1931, p. 436.
16
Ferdinand Foch, The Memoirs of Marshal Foch, translated by Colonel T. Bentley Mott, London: Heinemann
Ltd, 1931, p. 436.Masters of War: The AIF in France 1918 down to lower levels to compensate for lower strength battalions. The decision to assign two Lewis guns per platoon by March 191817 across the BEF greatly enhanced the concentration of automatic weapons fire down. Combined with the growth in the technical competence of machine gun companies, refinements in the calculation of heavy and field artillery fire (through flash spotting, sound ranging, barrel wear adjustment, improved quality shells and calculation of atmospheric conditions) leading to improved lethality, and the development of the improved Mark V and brand new Mark V* tanks, the assaulting units in the Fourth Army sector were at the British technological and doctrinal cutting edge. Aerial oblique photograph of the ground over which the Australian Corps advanced, Battle of Amiens, 8 August 1918. Image: Australian Army Museum of Western Australia AMWA41643 The German Second Army held the Somme sector opposite the Fourth British Army. Despite occupying that sector since the Spring Offensives, “there were no well-organised systems of defence, and … the German trenches were badly constructed, and were protected with little wire.”18 This defensive laxness had surprised Fourth Army after Hamel, pointing to the decline in German morale. Amiens was Hamel writ large. The same fundamental elements featured in the planning and execution of both attacks: the focus on operational security, secrecy, deception, concealment, and the delivery of maximum combat effect through the combination of infantry, artillery, 17 Robert Stevenson, ‘The Battalion: The AIF Infantry Battalion and its Evolution’, in Jean Bou (ed.), The AIF in Battle: How the Australian Imperial Force Fought 1914-1918, Melbourne: Melbourne University Press, 2016, p. 58. 18 Sir Archibald Montgomery, The Story of the Fourth Army, 1920, p. 11.
Masters of War: The AIF in France 1918

tanks, aircraft and at Amiens, cavalry. Monash’s ‘musical score’19 was magnified from one
division to encompass all three Corps in Fourth Army. Five months’ experience on the
Somme sector nominated the Australians as the spearhead formation. Due to the constraints
of time, I’ll focus my remarks on the performance of the Australian Corps in this battle, and
on the effects of 8 August (rather than all four days of the battle).

The ground over which the Australian Corps advanced, between the Somme River (north) and the Amiens-
Chaulnes Railway line (south), Battle of Amiens, 8 August 1918.
Map: Catherine McCulloch, Australian Army History Unit

The Battle

A few minutes before Zero hour, the first wave of the 432 tanks started its advance to the
artillery barrage line for the start. At 4:20am, the massed artillery opened fire along the entire
Fourth Army 18-kilometre frontage. North of the Somme River, the leading III British Corps
divisions moved forward into the thick mist, while south of it, the 2nd and 3rd Australian
Divisions pushed forward. To the Australian right flank, south of the Amiens-Chaulnes
Railway, the 1st, 2nd and 3rd Canadian Divisions launched their attack, their right flank
joining the left of the French XXXI Corps – not scheduled to attack until 45 minutes later.20
Over 2,000 field and heavy guns21 pulverised the ground and neutralised the majority of
German batteries. As at Hamel, Allied aircraft wheeled overhead, drowning the noise of the
tanks. Across the whole of Fourth Army’s front, men and tanks advanced, protected by a
curtain of artillery fire.

19
   This is one of the most quoted of Monash’s writings, where he outlined his philosophy on waging battle: “A
perfected modern battle plan is like nothing so much as a score for an orchestral composition, where the various
arms and units are the instruments, and the tasks they perform are their respective musical phrases.” Lieutenant-
General Sir John Monash, The Australian Victories in France in 1918, London: Hutchinson & Co., 1920, p. 56.
20
   A motorised machine gun brigade from the Canadian 3rd Division bridged this gap and were given a narrower
frontage and more artillery support as compensation for the difference in attacking plans with the French. See,
Alistair McCluskey, Amiens 1918: The Black Day of the German Army, Oxford: Osprey Publishing, 2008, p. 34.
21
   Pedersen, Anzacs on the Western Front: the Australian War Memorial Battlefield Guide, p. 380.
Masters of War: The AIF in France 1918

The 15th Brigade start their advance in pursuit of the retreating enemy around 8:20am (2nd phase of the battle),
8 August 1918. Note the remnants of the fog.
Image: Australian War Memorial E02791

The consistent theme in accounts from all sides was the thick mist that enveloped the
battlefield. The Fourth Army considered this critical to the early success of the attack as it
concealed it from the enemy, though it caused problems with infantry/tank co-operation22 and
maintaining direction.23 In German accounts, Thilo von Bose argued that, “Never was an
attack in trench warfare easier and less risky than the one launched by the English,
Australians, Canadians and French in the sea of fog between the Avre and the Ancre on 8
August 1918!”24 The Australian 44th Battalion history claimed that, “The fog, which at first
seemed the undoing of the attack, was the best thing that could have happened, as the Hun
never had a target for his machine guns until the infantry were right on top of him.” 25 The
German artillery that was not neutralised by British counter-battery fire, struggled to locate
and range the enemy. The fog of war was both metaphorical and literal.

22
   Montgomery, The Story of the Fourth Army, 1920, p. 32.
23
   Bean explains some of the difficulties for the infantry in maintaining their correct direction and contact with
fellow platoons. See, CEW Bean, The A.I.F. in France 1918, Vol. VI, pp. 530-531.
24
   David Pearson and Paul Thost, with Tony Cowan (trans), Thilo von Bose, Die Katastrophe des 8 August
1918, 1930, forthcoming publication, Newport, NSW: Big Sky Publishing, p. 45.
25
   Cyril Longmore, “Eggs-a-Cook”: the Story of the Forty-Fourth. War as the Digger Saw It, Perth: The
Colortype Press Limited, 1921, pp. 106-7.
Masters of War: The AIF in France 1918

A German illustration (1926) of the fighting on 8 August 1918, showing the approach of a British Mark V tank
to a German trench. A machine gunner has abandoned his MG08 medium machine gun on the parapet while
another solder prepares to throw bundled M17 stielhandgranate (stick grenades).
Image: Thilo von Bose, Die Katastrophe des 8 August 1918, Berlin: Verlag von Gerhard Stalling, 1930,
opposite p. 8.

In the Australian Corps sector, the two lead divisions – the 2nd and 3rd – attacked with two
brigades forward. The element of surprise provided by the mist caught many German
machine gun posts unawares and they were dealt with by the tanks or by individual feats of
bravery. One such feat was LT Alfred Gaby’s singlehanded capture of a German company
and four machine guns south-east of Villers Bretonneux, which saw him awarded the Victoria
Cross.26 In most instances, however, as at Hamel, the tanks destroyed enemy points of
resistance.

The mist caused considerable confusion for the attackers, with some 3rd Division battalions a
full mile south of their intended position.27 However, closer to the Somme, the northernmost
battalions of the Division encountered little resistance, with three German Infantry Regiments
captured in their dugouts and shelters. This same division – the 13th German – had been in
the line for five weeks and had also endured the Hamel attack.

By 7:30am, the German front system had been broken. While the lead brigades of the 2nd
and 3rd Australian Divisions pushed swiftly to the east and south-east toward the Green Line
(First Objective), the British in the northernmost sector had limited success.28 This caused
problems for the Australian left flank later in the day.

26
   C.E.W. Bean, The A.I.F. in France 1918, Vol. VI, pp. 531-532; and, Lionel Wigmore, They Dared Mightily,
Second edition, 186, pp. 60-61.
27
   C.E.W. Bean, The A.I.F. in France 1918, Vol. VI, p. 535.
28
   This was due to two main factors: on 6 August, a German raid had captured the forward posts of the front line
— ground the Division had to regain as it started its attack on 8 August. Secondly, the ground in this frontage
was broken, preventing the tanks from operating.
Masters of War: The AIF in France 1918
View of the Somme Valley, taken from Chipilly Heights, 17 August 1918. From these heights, the Germans
shelled the 4th Division in enfilade (centre of the image, middle distance) on 8 August.
Image: Australian War Memorial E02989P
The 2nd and 3rd Australian Divisions made the First Objective Line just as the mist lifted,
and dug in to consolidate. The 4th and 5th Australian Divisions then pushed through to
advance to the Red Line (Second Objective). The clearing of the mist changed the character
of the fighting as the tanks could now locate enemy positions by sight, but also brought
greater vulnerability from German field guns.
As the day unfolded, the lack of British progress on the northern Somme bank allowed
German field guns on the Chipilly Spur to fire into the flank and rear of the Australians
advancing south of the river. This caused considerable difficulties for the Australian 4th
Division as it pushed on to the second and third objectives; a situation not completely
resolved until late on 9 August with the capture of Chipilly.
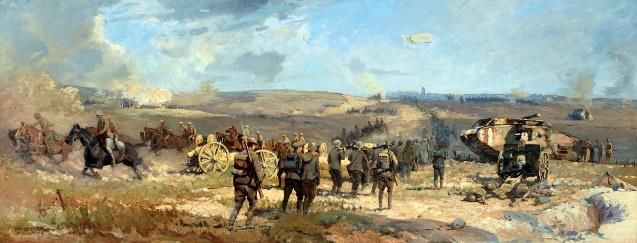
8th August 1918, painting by Will Longstaff. The Australian artillery is shown moving forward from Villers-
Bretonneux.
Image: Australian War Memorial ART03022
The 4th and 5th Divisions (and Canadians south of them) advanced at 8:20am after following
the leading divisions to the First Objective Line. Artillery batteries were rushed up to support
the second phase which was led by the supporting Mark V tanks. “As soon as the movement
began”, Bean wrote, “German machine-guns chattered from various parts of the front, but as
the tanks advanced the gun-crews … fled back like game driven by advancing beaters.”29
When the mist suddenly cleared before 9am, it revealed an “extraordinary spectacle.” The
37th Battalion history records that,
29
C.E.W. Bean, The A.I.F. in France 1918, Vol. VI, p. 549.Masters of War: The AIF in France 1918
“The whole countryside seemed to be a moving mass of infantry, tanks,
and guns, very much like some of the open warfare manoeuvres we that
had practised on Salisbury Plain. … battery after battery of horse-drawn
guns calmly pass[ed] over our old front line and cross[ed] what had, an
hour to two before, been No-Mans’ Land.”30
This advance had been four hard years in the making. But the clearing mist also exposed the
tanks to German field guns with many destroyed. However the Allied advance rolled on.
Armoured cars on the Peronne Road. 30 minutes after this photo was taken, they were shooting up the enemy’s
rear areas.
Image: Australian War Memorial E03099
Twelve armoured cars of the 17th Armoured Car Battalion in the Australian Corps sector
demonstrated the dominance of the Allied attack most clearly. They penetrated beyond the
furthest Australian infantry into enemy held territory, roaming the main roads, shooting up
enemy troops in Framerville and Proyart. In Framerville, they encountered an enemy
transport column, raking it with machine gun fire. “A flying officer was met in his car and he
and the car were brought back by the armoured car battalion commander.”31
Rittmeister von Kries, a sub-unit commander in the German 18th Infantry Regiment, noted
the impact of the combined arms assault:
“Enemy planes firing machine guns and dropping bombs, the psychological
effect of the tanks in the rear, enemy cavalry on the left flank, the absence
30
N.G. McNicol, The Thirty-Seventh: History of the Thirty-Seventh Battalion A.I.F., Melbourne: Modern
Printing Co. Pty. Ltd., 1936, p. 217.
31
‘Summary of Operations, 8th August,1918’. AWM4 1/14/10 Part 1, General Staff, Headquarters 4th Army,
August 1918, p. 59.Masters of War: The AIF in France 1918
of our own artillery support, all had such an effect on the men that they
attempted at every opportunity to fade away.”32
The speed of the advance saw German units that stood and fight either captured or killed,
while others were forced to withdraw. Many groups simply surrendered.
Mark V ‘Male’ tank, put out of action by a direct hit at point blank range, Bayonvillers.
Image: Australian War Memorial E03891
The 4th Division’s phase of the attack proceeded largely without incident. Cerisy was
captured at 9:30am, the Red Line (second objective) at 10:30am, Morcourt at 10:35am, and
between 12:10pm and 1:45pm, the Blue Line final objective was reached along the division’s
sector.33 Despite harassment by machine gun and artillery fire from the unsecured Chipilly
Spur north of the Somme, operations did not falter. On its right, the 5th Division also
encountered no significant delays. The Division’s historian, Alexander Ellis acknowledged
that by 9:30am, “a great victory was clearly in sight.”34 The Red Line was reached by the
Division’s brigades before 10:30am, assisted by the tanks. Wherever enemy resistance was
encountered, the tanks drove straight at them. The Mark V* tanks carrying machine gunners
were to advance from the Red Line to the final Blue Line, but failed to appear in time, so the
4th and 5th Divisions pressed ahead to the final objective. By 4:30pm, the Australian Corps
sector had secured and reinforced the final Blue Line Objective. Reserve brigades were
distributed in depth between the green and red objective lines, waiting for an enemy
counterattack that never came.
32
David Pearson and Paul Thost, with Tony Cowan (trans), Thilo von Bose, Die Katastrophe des 8 August
1918, forthcoming publication, Newport, NSW: Big Sky Publishing, pp. 125-126.
33
‘Fourth Australian Division, Intelligence Summary No. 315, From 6.a.m. 8th to 6.a.m. 9th August, 1918.
AWM4 1/48/29 Part 1, General Staff, Headquarters 4th Australian Division, August 1918, p. 63.
34
A.D. Ellis, The Story of the Fifth Australian Division, p. 332.Masters of War: The AIF in France 1918
The tank in the last image (AWM E03891) has been knocked out by this gun over open sights, shown. The tank
is in background.
Image: Australian War Memorial E03891
Until nightfall, British armoured cars patrolled the roads in front of the final objective
looking for enemy retaliation. No signs were seen. In a war of limited gains, the objectives
for 8 August were aggressive, ambitious, yet had been achieved. That they had been won
with such comparative ease possibly exceeded Haig’s and Rawlinson’s expectations, as
everywhere south of the Somme, the German Army was in disarray. Von Bose concedes that
if Fourth Army’s attack had been,
“continued energetically on both sides of the Roman road, the enemy could
have advanced much further east without encountering any German
reserves.”35
35
David Pearson and Paul Thost, with Tony Cowan (trans), Thilo von Bose, Die Katastrophe des 8 August
1918, forthcoming publication, Newport, NSW: Big Sky Publishing, 2018, p. 129.Masters of War: The AIF in France 1918 German perspective of Fourth Army’s attack on 8 August. This map includes III Corps, Australian Corps and Canadian Corps dispositions. Map: Thilo von Bose, Die Katastrophe des 8 August 1918, Berlin: Verlag von Gerhard Stalling, 1930, liftout. While the Germans suggested it was an opportunity lost for the Allies, Hamel proved that success came from limited objectives. Exploitation beyond the final objective risked jeopardising the gains by overextension. Field artillery had to provide a screen to protect infantry digging in along the newly won ground, so gunners needed the precise location of the most forward troops on their front – a difficult task on a crowded and mobile battlefield. But, by von Bose’s own admission this was “the German Army’s worst defeat since the beginning of the war.”36 By nightfall on 8 August, the Australian Corps had pushed the new front line 11 kms to the east. The Canadians had penetrated 13 kms, while the French pushed 8 kms. North of the river on the Australian left flank, the British III Corps managed 3.2 kms. These advances, and those of the next three days, irrevocably changed the tempo of fighting in this sector of the Western Front. The Germans mounted increasingly stout resistance as more reserves 36 David Pearson and Paul Thost, with Tony Cowan (trans), Thilo von Bose, Die Katastrophe des 8 August 1918, forthcoming publication, Newport, NSW: Big Sky Publishing, 2018, p. 196.
Masters of War: The AIF in France 1918

were thrown in, and while this battle did not defeat them, their capacity for anything beyond
defensive operations was spent.

German prisoners arriving at a temporary POW camp near Amiens, 9 August 1918.
Image: Imperial War Museum Q 9193

German estimates of casualties

The scale of German losses between 8-11 August stunned the German High Command.
Casualties in the pre-war ‘active’ divisions such as the 13th and 41st were especially
alarming considering their participation as assault divisions during the ‘Michael’ offensive –
both were mauled by the Australian Corps. German estimates for the Second Army sector
alone note up to 700 officers and 27,000 men lost (killed, wounded or captured) on that first
day.37 With so many officers taken captive, it is possible that there were ‘ordered surrenders’
with entire bodies of troops surrendered to the Allied advance.38

37
   David Pearson and Paul Thost, with Tony Cowan (trans), Thilo von Bose, Die Katastrophe des 8 August
1918, forthcoming publication, Newport, NSW: Big Sky Publishing, p. 196.
38
   Tony Cowan’s ‘Introduction’ contains specific figures of the Germans’ own casualties sustained from the
Battle of Amiens. They make sobering reading as some formations sustained over 90% casualty rates,
reinforcing the ‘catastrophic’ moniker given to the battle. See, Tony Cowan, ‘Introduction’, in, David Pearson
and Paul Thost, with Tony Cowan (trans), Thilo von Bose, Die Katastrophe des 8 August 1918, forthcoming
publication, Newport, NSW: Big Sky Publishing, 2018.
Masters of War: The AIF in France 1918

Assessments of the Australian Corps

The Australian Corps continued as the spearhead of the Fourth Army through the battles of
Mont St Quentin, Peronne, the Hindenburg Line and Montbrehain on 5 October. They were
then relieved, exhausted, dangerously low in strength, but with an enviable fighting record.

How good was the Australian Corps in 1918? The AIF, like organisations of similar
experience, evolved in response to greater familiarity with their operating environments and
tactics of their enemy, adoption of the latest doctrine, familiarity with the range of weaponry
at their disposal, and from months (and years) of hard experience refined through a form of
military Darwinism by the cycle of campaigning, training and rest. Though the AIF achieved
great battlefield feats, so too did other Dominion and some British formations – led by
equally competent senior officers, staffs and junior commanders. Proponents of Australian
exceptionalism may be surprised to find that in 1918, the German High Command rated the
Canadian Corps as the pre-eminent Dominion formation. In January and September 1918,
German intelligence assessments consistently rated all four of the Canadian infantry divisions
as a “Particularly good assault division”, whereas of the five Australian infantry divisions,
only two earned that assessment.39

These assessments may come as some surprise to Australians raised on a diet of
incomparable AIF feats in 1918, but this demonstrates that the enemy considered the
attacking capability of other Dominion divisions at equal to the Australians. Nonetheless, I
believe the Australian Corps was at its zenith across July and August 1918. The Canadians
maintained numerically stronger divisions as a consequence of conscription and the
sustainment of four full strength divisions only, rather than the Australians’ five stretched
formations. The Canadians’ aggression and tactical acumen was at least the equal of the
AIF’s. It was no accident that the Australians and Canadians were selected as the central
attacking formations for Amiens, and their success justified their selection. Their reputation
for aggression and pugnacity was fully justified by their battlefield performance. But the
Australian Corps gave nothing away to the Canadians in ability or achievement.

Conclusion

Hamel was an important battle in Australian military history. It has assumed central
importance to the Australian Army, naming both its biennial exercise and its 105mm towed
field gun, built under licence in Australia, after that battle. Amiens, however, has not
received the same commemoration. Hamel has also been used to prove Monash’s military
‘genius’ and forward-looking command philosophy to catapult the Australian Corps as the
pre-eminent BEF formation on the Somme. Hamel was a battle of minute planning,
employed the latest doctrine, the latest technology, pioneered novel methods of ammunition
delivery, and proved the efficacy of the Mark V tank in infantry operations – all in 93
minutes. However, I argue its importance has been overstated in recent years.

39
  See the Introduction by David Pearson and Paul Thost, with Tony Cowan (trans), Thilo von Bose, Die
Katastrophe des 8 August 1918, forthcoming publication, Newport, NSW: Big Sky Publishing, 2018. Cowan
compiled the table from OHL circulars of 1 January and 5 September 1918.
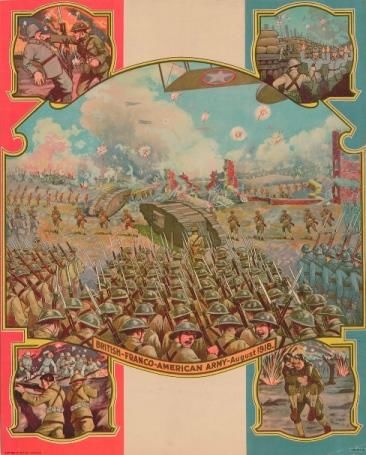
Masters of War: The AIF in France 1918

A commemorative illustration of the success of the battles in August 1918.
Image: Library and Archives Canada e010696883-v8

It was limited in scope, advanced the line incrementally no further than 2.4 kms, and did not
lead to a breakthrough on the Somme. Its value was as an enabling battle – to create the
conditions for the Allied planning and conduct of an offensive a month later that signalled the
beginning of the end for Germany.

Ludendorff’s oft-quoted line of the 8 August as the ‘Black Day’ of the German Army was
predicated not on the ground lost, but referred rather to the realisation that the fighting morale
of German divisions had collapsed to a point that 27,000 men marched into captivity rather
Masters of War: The AIF in France 1918

than fight to their deaths to defend ground.40 For the German High Command, this was the
clearest indication yet that a military victory was now out of the question. Despite later
statements, Ludendorff initially believed that a defensive war could still be fought and that
the Hindenburg Line would provide a new opportunity to resurrect German fortunes.
However it is the sheer scale of the victory at Amiens that explains most clearly the British
belief, expressed in the title of Charles Messenger’s book, that 8 August was ‘the day we won
the war’.41 The Australian Corps was there, front and centre, and Hamel was the model that
proved the concept.

40
   David Pearson & Paul Thost, with Tony Cowan (trans.), Thilo von Bose, Die Katastrophe des 8 August 1918,
Newport, NSW: Big Sky Publishing, 2018, p. 197. (forthcoming publication).
41
   Charles Messenger, The Day We Won the War: turning point at Amiens, 8 August 1918, London: Weidenfeld
& Nicolson, 2008.
You can also read