MAXX AIR FRYER OVEN FOUR FRITEUSE À AIR CHAUD
←
→
Page content transcription
If your browser does not render page correctly, please read the page content below
MAXX
           AIR FRYER OVEN
      FOUR FRITEUSE À AIR CHAUD

    www.KALORIK.com              AFO 46045 – 200723C
AFO 46045                   1
                                          EN:….4
120V~60Hz 1700W (14.2A)                   FR:…31
PARTS / PIÈCES
2 3 4 5
1
6
7
8 9 10 11 12 8
13 14 15
17
18
16
20 21
19
www.KALORIK.com AFO 46045 – 200723C
21. LED display 1. Écran DEL
2. Air Fry function button 2. Bouton fonction friture à air
3. Rotisserie function button 3. Bouton fonction rôtisserie
4. Inner oven light button 4. Bouton éclairage intérieur
5. Oven function button 5. Bouton fonction four
6. Selector dial 6. Sélecteur
7. Start / Stop button 7. Bouton démarrage/arrêt
8. French door handles 8. Poignées
9. Rails / Racks and basket slots 9. Supports pour accessoires
10. Heating elements (top and 10. Éléments chauffants (haut et bas)
bottom) 11. Tournebroche
11. Rotisserie spit insert 12. Porte à deux battants en verre
12. Glass French door 13. Plateau de cuisson/ramasse-
13. Baking / Drip pan gouttes
14. Air fryer basket 14. Panier de cuisson
15. Baking rack 15. Grille de cuisson
16. Crumb tray 16. Ramasse-miettes
17. Rotisserie spit and forks 17. Tournebroche et fourches
18. Rotisserie handle 18. Manche de tournebroche
19. Tray handle 19. Poignée du plateau
20. *2-in-1 Dehydrator and steak 20. *Déshydrateur et plateau à
tray steak 2-en-1
21. *Bacon tray 21. *Plateau à bacon
*Varies by model * Varie selon le modèle
www.KALORIK.com AFO 46045 – 200723C
3IMPORTANT SAFEGUARDS
When using electrical appliances, basic safety precautions should
always be followed, including the following:
1. READ ALL INSTRUCTIONS.
2. Check that your mains voltage corresponds to that stated on the
appliance.
3. Do not touch hot surfaces. Use handles or knobs.
4. To protect against electrical shock, fire or personal injury, do not
immerse cord, plugs, or the appliance in water or other liquid.
5. Close supervision is necessary when any appliance is used by or near
children.
6. Unplug from outlet when not in use and before cleaning. Allow to cool
before putting on or taking off parts.
7. Do not operate any appliance with a damaged cord or plug or after
the appliance malfunctions or has been damaged in any manner.
Return the appliance to the nearest authorized service facility for
examination, repair, or adjustment.
8. The use of accessory attachments not recommended by the
appliance manufacturer may cause injuries.
9. Do not use outdoors. This appliance is for HOUSEHOLD USE ONLY.
10. Do not let the cord hang over the edge of a table or counter or touch
hot surfaces.
11. Do not place on or near a hot gas or electric burner, or where it could
touch another heated oven.
12. Extreme caution must be used when moving the appliance. Let the
appliance cool to room temperature before handling or moving.
13. When in operation, hot air is released through the air vents. Keep your
hands and face at a safe distance from the air vents and take extreme
caution when removing the accessories from the appliance. Failure to
do so may lead to burns and/or injury
14. When operating the oven keep at least four inches of space on all
sides of the oven to allow for adequate air circulation.
15. Always operate on a stable, heat resistant surface. Do not use on a
cloth-covered surface, near curtains or other flammable materials.
16. Do not place the oven near the edge of a bench or table during
operation. Ensure the surface is level, clean and free of water, debris,
etc.
www.KALORIK.com AFO 46045 – 200723C
417. Extreme caution must be used when moving an appliance or parts
containing hot oil or other hot liquids.
18. Do not use the appliance for other than intended use.
19. Oversize foods or metal utensils must not be inserted in the Air Fryer
Oven as they may create a fire or risk of electric shock.
20. A fire may occur if the Air Fryer Oven is covered or touching flammable
material, including curtains, draperies, walls, and the like, when in
operation. Do not store any item on top of the appliance when in
operation.
21. Do not clean with metal scouring pads. Pieces can break off the pad
and touch electrical parts involving a risk of electric shock.
22. Extreme caution should be exercised when using containers
constructed of other than metal or glass.
23. Do not store any materials in this oven when not in use.
24. Do not place any of the following materials in the oven: paper,
cardboard, plastic, and the like.
25. Do not cover crumb tray or any part of the oven with metal foil. This
causes overheating of the oven.
26. Do not leave unit unattended, especially when toasting or broiling.
27. Use extreme caution when disposing of hot grease.
28. Always wear protective, insulated oven gloves when inserting or
removing items from the hot oven.
29. To disconnect, press the Start/Stop for 3 seconds to ensure the machine
is off, then remove plug from wall outlet.
30. Never connect this appliance to an external timer switch or separate
remote-control system as this may lead to burns and/or injury
31. Do not cover or block the air vents while the appliance is in operation.
Doing so will prevent even cooking and may damage the appliance or
cause it to overheat may result in fire or burns.
32. Do not rest cooking utensils or baking dishes on the appliance’s
hot surfaces
SAVE THESE INSTRUCTIONS
HOUSEHOLD USE ONLY
www.KALORIK.com AFO 46045 – 200723C
5SAFETY TIPS
1. When in use, always use oven mitts or potholders when touching any
outer or inner surface of the oven, or when handling accessories.
2. To reduce risk of fire, keep oven interior clean and free of food, oil,
grease and any other combustible materials.
3. Do not use metal utensils such as knives to remove food residue from
the heating elements as this can damage the appliance as well as
lead to electrocution.
4. Do not store any materials in the oven when not in use.
POLARIZED PLUG INSTRUCTIONS
This appliance is equipped with a polarized plug (one blade is wider than
the other). To reduce the risk of electric shock, this plug will fit into the
polarized outlet only one way. If the plug does not properly fit into the outlet
at first, reverse it. If it still does not fit, contact a competent qualified
electrician. Do not attempt to modify the plug in any way.
SHORT CORD INSTRUCTIONS
A short power supply cord is provided to reduce the hazards resulting from
becoming entangled in or tripping over a longer cord. Extension cords may
be used if care is exercised in their use.
• The electrical rating of the extension cord should be at least that of the
appliance. If the electrical rating of the extension cord is too low, it
could overheat and burn.
• The resulting extended cord should be arranged so that it will not drape
over the countertop or tabletop where it can be pulled on by children
or tripped over.
PRODUCT SPECIFICATIONS
Model No.
AFO 46045 SS 26 qt/25 L 9 Slices 120V, 60Hz 1700W 15.8inx12.5inx14in
www.KALORIK.com AFO 46045 – 200723C
6KNOW YOUR AIR FRYER OVEN
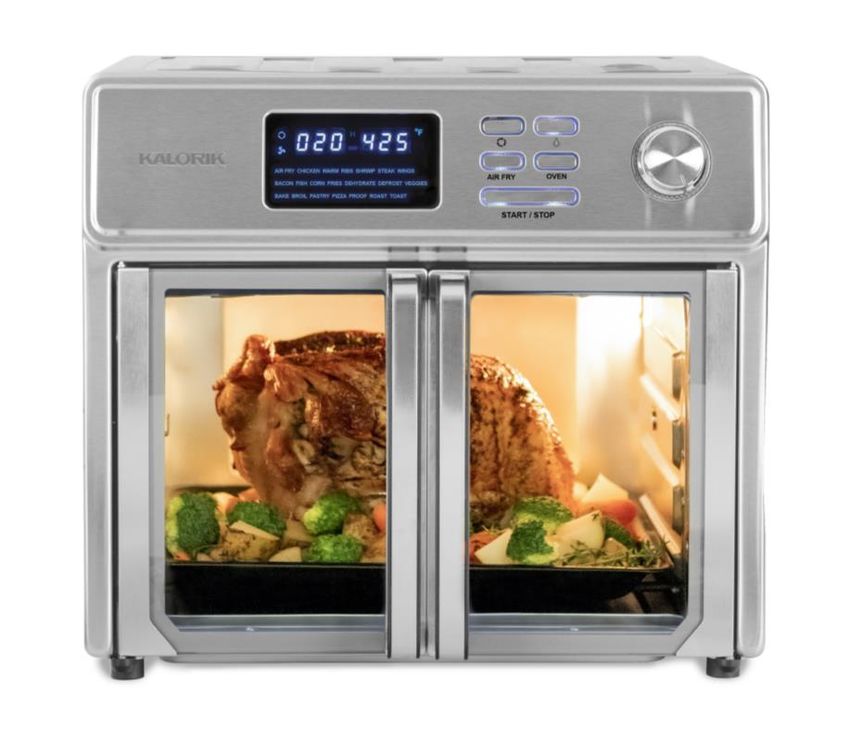
Discover the new generation of air fryer ovens! The Kalorik 26 Quart Digital
Maxx Air Fryer Oven combines multiple appliances into one. It functions as
an air fryer, roaster, broiler, rotisserie, dehydrator, oven, toaster, pizza oven,
and slow cooker.
The Kalorik Digital Maxx Air Fryer Oven uses special Turbo Maxx technology
to cook food faster than ever. Customized upper and lower heating
elements provide even heat distribution for perfectly cooked results. An
optimized airflow system and high-performance turbo fan are engineered
for maximum air circulation, delivering the same crispy texture and rich
flavor of deep-fried food, with little to no oil. This reduces fat and calories
for healthier meals.
The rotisserie setting rotates the included spit accessory during cooking,
allowing meat to roast evenly in its own juices and develop maximum
flavor.
The Kalorik Digital Maxx Air Fryer Oven reaches up to 500°F, perfect for
searing meat or vegetables to caramelized perfection. The oven can fit a
large chicken, 12” pizza, or up to 9 slices of toast in its cavity.
Modern and multifunctional, the Kalorik Digital Maxx Air Fryer Oven features
glass French doors with single hand automatic opening to prevent dripping
or scalding.
A built-in auto-shutoff safety feature automatically stops operation when
the doors are open.
An easy-to-use digital LED display contains 21 presets for foolproof cooking.
Accessories include an air frying basket, baking pan, air rack, crumb tray,
*bacon tray, *2-in-1 steak and dehydration tray, rotisserie spit, rack handle
and rotisserie handle.
BEFORE THE FIRST USE
• Unpack the appliance and accessories and wash and wipe everything
down. Wipe the interior of the oven with a damp cloth or sponge. Dry
with a paper towel. Make sure the oven is dry before operating the
unit.
• Position the oven on a flat and heat resistant surface so that it is also
positioned at least 4 inches (10cm) away from any surrounding object.
• Unwind and plug in the power cord into the wall outlet. Place the
*Varies by model
www.KALORIK.com AFO 46045 – 200723C
7sliding crumb tray inside on the bottom of the unit, underneath the
bottom heating elements. Make sure unit is clean and everything has
been taken out of the oven.
• It is normal if some smoke or smell emanates from the appliance when
using it for the first time. This is not harmful. To eliminate any packing oil
that may remain after production, we recommend operating the
appliance for 20 minutes on steak function, putting the thermostat on
its maximum temperature setting (500 °F).
• Once you plug in the unit, the Start / Stop button will turn on for one
minute to indicate it is plugged in and then turn off.
CONTROL PANEL
LED Screen
The LED screen displays the Countdown Timer and Temperature (1),
Rotisserie signal symbol (2), Air fry signal symbol (3), and Presets (4).
1
WARM
FISH DEHYDRATE VEGGIES 4
Buttons & Selector Dial
www.KALORIK.com AFO 46045 – 200723C
81. Rotate: Use when cooking with the rotisserie spit. Press the Rotate
button to turn on the rotisserie mode and make the accessory rotate to
achieve an evenly crispy outcome. Press again to turn off the rotisserie
function. The Rotisserie function can be activated/inactivated at any
time during the cooking process. The rotate button and icon will turn on
when activated.
2. Light: Press the Light button to turn the oven light on or off. The light can
be turned on at any time to help monitor your food while cooking if the
unit is on. The light turns off automatically after one minute.
3. Air Fry: Press the Air Fry button to select the air frying function. There are
14 presets are available for use with this mode. Use the selector dial to
select your desired preset.
4. Oven: Press the Oven button to use the unit as a conventional oven. 7
cooking modes are available when using the Oven function. Use the
selector dial to select your desired cooking mode.
5. Selector dial: Use the dial to select your desired preset. Press the dial to
adjust cooking time and temperature.
6. Start/Stop: Press Start/Stop to turn the unit on, begin, or end the cooking
cycle. Long press 3 seconds to switch off the machine directly.
Using your Kalorik MAXX Air Fryer Oven
1. Press Start/Stop to select Standby mode. From here, select “Air Fry”
or “Oven” and get to cooking in the mode of your choice.
2. Press “Air Fry” to directly select air frying mode. Use the selector dial
to choose between 14 air frying presets or select “Air Fry” to choose
the time and temperature of your choice.
3. Press “Oven” to directly select oven mode. Use the selector dial to
choose between 7 oven presets, or select “Bake” to choose the
time and temperature of your choice.
Once your Kalorik MAXX Air Fryer oven is on and ready for use, the selector
dial allows you to scroll through the various presets available to you to
facilitate your cooking needs. The preset will blink and show the time and
temperature associated with it as you scroll through it.
To select a preset simply press the knob. The 1st press will cause time setting
to blink, indicating that you are able to change the time settings if you
wish. Turn the selector dial clockwise to add time and counterclockwise to
remove time. Once you have the desired time set, you can press the
www.KALORIK.com AFO 46045 – 200723C
9selector dial once more. The 2nd press will cause the temperature setting to
blink. If you wish to change the temperature setting, simply turn clockwise
to increase temperature and counterclockwise to decrease temperature,
both possible by increments of 5°F. If you wish to select a different preset,
press a 3rd time to go back to preset selection.
Got your time and temp set? Press Start/Stop to begin the cooking process.
The selected program will blink to indicate the unit is preheating under the
chosen programming. The preset light will blink until the chosen
temperature has been reached, and then remain steady to indicate the
unit is ready. The fan icon will turn on as well if the program you have
selected uses a fan for its cooking process.
Need to adjust? Change time or temperature settings with ease at any
point during the cooking process. All you need to do is press the selector
dial once (1) for time adjustments and twice (2) for temperature
adjustments. Press again a 3rd time to confirm, or unit will automatically
adjust to new time and/or temperature after 3 seconds.
All done? MAXX is equipped with both an automatic and manual stopping
function.
In automatic stop, once the cooking time has elapsed (0:00), MAXX will
beep three (3) times and enter “Off” mode (display will show “OFF OFF”).
The inner fan will continue to work for 3 minutes to help the unit cool down
if the selected mode used the fan (AIR FRY), and all lights other than
“START/STOP” will turn off. The side cooling fans will turn in all modes to assist
with the cooling process.
To turn off MAXX manually, press the Start / Stop button once and the
machine will enter “Off” mode as described above.
If the unit is in the process of entering “Off” mode in either way, you can re-
enter Standby mode during the 3 minutes of cooling process by pressing
Start / Stop. After three minutes, the unit will emit a single beep to tell you
the cooling process is finished.
Notes:
o MAXX will turn off automatically if the French Doors are open for longer
than 10 minutes during a cooking process.
www.KALORIK.com AFO 46045 – 200723C
10o Unless it is in a cooking mode, the unit will turn off after 2 minutes
without operation.
o The inner light turns on automatically and stays on if the French doors
are opened.
o Pressing the Start / Stop button for three (3) consecutive seconds will
turn the machine off.
PRODUCT AND PARTS
Use the markings on the door for recommended accessory positions.
Accessory Positioning Diagrams
Follow the diagrams below to use your oven to the fullest and to achieve
consistent and professional results.
Air Fry
• This function is used to air fry meals as a healthy
alternative to deep-frying in oil.
• For best results, use the provided air fryer
basket.
• Flip or shake food halfway through the cooking
process to cook food evenly.
• Air Frying does not require oil. A tablespoon of
oil may be added to enhance flavor.
www.KALORIK.com AFO 46045 – 200723C
11Fast Air Fry
• Cook food even faster by placing the basket
on the top rack.
• Reduce your cooking time and shake your
food halfway to ensure even results.
• Air Frying does not require oil. A tablespoon of
oil may be added to enhance flavor
• Use the rotisserie spit and its handle to cook
Rotisserie
whole chickens and roast all types of food.
• Press the “Rotate” button to allow the rotisserie
spit to rotate during cooking, allowing meat to
roast evenly in its own juices and develop
maximum flavor.
• Rotisserie automatically turns on under the
Chicken preset, for all other presets button
must be pressed.
• This setting can be turned on and used during
the air fry, bake, and roast cooking functions.
Bacon
• Cook bacon to perfection with the bacon tray.
• Important: Place the accessory on the
baking/drip pan.
• The wave design keeps bacon up and away
from draining grease.
• Accommodates multiple slices at once.
• Use the bacon air fry function when cooking
bacon.
Steak Tray • Use the steak tray to sear and caramelize your
foods to perfection.
• Important: Place the accessory on the
baking/drip pan.
• Slotted design allows excess fat to drain into
the drip pan.
• Place steak tray on the top slot to obtain
perfect searing.
• Use the steak air fry function when cooking
steaks, chops, chicken, seafood and veggies.
www.KALORIK.com AFO 46045 – 200723C
12• Dehydrate all types of foods with the
Dehydration dehydration function. Select the Defrost
function and set the temperature to 130°F and
the time to 1 hour. Add time as needed.
• Use the 2-in-1 steak and dehydrator tray. Flip
the steak tray upside down and slide it in the
dehydrator slot (top). Place your food in the air
fryer basket and slide it in the fast air fry slot.
Press the Start/Stop button to begin.
• The built-in fan and low heat are used to
create a flow of warm air that reduces the
water content found in fresh foods.
• Place food in a single layer with no overlap.
• Lemon juice can be used to pretreat fruits and
vegetables and prevent browning.
• Use to dehydrate fruits and vegetables, or to
Baking rack make beef jerky, and more.
• The baking rack can be used for both air frying
and the oven functions.
• This accessory can be used for a variety of
foods including pizza or used when cooking
with cake pans to place on top.
• When baking with bakeware for foods like a
loaf, quick bread, cake, and muffin pan, place
on the bottom (BAKE 1) rack. Anything that
needs to be cooked well from the bottom, like
a pie, should also be on the BAKE 1 level. Rule
of thumb is, if you’re using a pan or tin to bake,
use the bottom level and the baking rack.
• When using the oven function, we recommend
rotating your rack 180° halfway through the
cooking time to ensure even results.
Baking pan
• Used for baking oven function.
• Ideal for smaller food bits.
• Doubles as a drip tray to catch grease during
cooking when slid into the bottom level.
• When using as a baking sheet for foods like
cookies or grilled cheese, or other baking
functions like roasting smaller cuts of food (like
www.KALORIK.com AFO 46045 – 200723C
13chicken breasts, corn dogs, …), then place on
2nd (BAKE 2) level.
• When using the oven function, we recommend
rotating your pan 180° halfway through the
cooking time to ensure even results.
Tips
• When setting up the Maxx Air fryer oven, always make sure the sliding
crumb tray is inserted prior to starting your cooking process. Rinse and
clean the sliding crumb tray after every use.
• When cooking foods that may drip crumbs or grease during the
cooking process, make sure to place the baking/drip pan on the
lowest slot. This will help maintain the unit as clean as possible and
protect the lower heating elements.
Using the Rotisserie Spit
• Insert the rotisserie spit through the center of the food lengthwise.
• Slide the forks onto each side of the spit and secure them in place by
tightening the screws provided. Make sure the forks are securely
inserted and food is centered on the spit.
• Use the rotisserie handle to lift the rotisserie rod. The hooks of the
rotisserie handle should be placed under the grooves on both sides of
the rod. Make sure the long end of the rod is on the right side of the
handle, and the short-indented side is on the left side of the handle.
• Open the oven doors. Slide the accessory in the cavity. Insert the right
side (long end) of the rod in the rotisserie spit support. Then, place the
left side (short indented end of the rod) on the left hook inside the
cavity.
CAUTION: Rotisserie accessories are very sharp and will likely get very hot
during the cooking process. Be careful and use oven mitts to avoid
personal injury.
WARNING: Place all ingredients on the racks, rotisserie spit or basket in a
way to prevent any contact with the appliance’s heating elements. Do not
overfill.
www.KALORIK.com AFO 46045 – 200723C
14FUNCTIONS
AIR FRYER
Air frying can be used as a healthy alternative style of cooking, requiring
little to no oil and using rapid hot air to cook meals faster.
• Place your food on or inside the appropriate rack, pan, or basket and
position it inside the oven.
• Press start, select the Air Fryer function. and use the selector dial to
scroll through the presets, the presets will flash as you go by each one.
• If you wish to change either the temperature or the time from your
preset, press the selector dial once to change the time and once
again to change the temperature. Turn it clockwise to increase and
counterclockwise to lower.
• Once you have found the preset you desire to use, press the Start/Stop
key to begin. The appliance will turn on and the unit will start the
cooking process, you will see the timer countdown. The selected
preset will blink until the desired temperature has been attained, and
then remain steady throughout the remainder of the cooking time.
• Tip: Flipping or turning food halfway through the cooking process
ensures that the food is evenly cooked.
• When the countdown timer reaches 0:00, the unit will beep 3 times,
and the heating elements will turn off. Please note that after cooking
time is done, the fan will remain on for 3 minutes for cooling purposes.
“OFF OFF” will start blinking in the display until cooling process is
finished.
• Once the cooling process is done the unit will beep and turn off right
after.
• Carefully take out your food with oven mitts and using the tray handle.
• Note: the cooking process can be cancelled at any time by pressing
the Start/Stop button.
Notes:
• Although oil is not necessary, a small portion of oil can be sprayed on or
brushed on food before air frying. Make sure to distribute oil evenly on
food.
• Some foods release water or oil when cooking. When cooking large
quantities for an extended period, condensation may build up, which
could leave moisture on your countertop.
• Use the baking pan to catch water or oil when dripping.
www.KALORIK.com AFO 46045 – 200723C
15Air frying presets:
Default Time Adjustable Adjustable
Default
Food Temperature Time
Temperature (°F)
(°F)
Air Fry 425°F 15 mins 140-450°F 1-90 min
*Chicken 435°F 40 mins 140-450°F 1-90 min
Warm 280°F 6 mins 140-450°F 1-90 min
Ribs 400°F 25 mins 140-450°F 1-90 min
Shrimp 375°F 10 mins 140-450°F 1-90 min
*Steak 500°F 13 mins 140-500°F 1-90 min
Wings 450°F 15 mins 140-450°F 1-90 min
*Bacon 425°F 9 mins 140-450°F 1-90 min
Fish 375°F 10 mins 140-450°F 1-90 min
Corn 440°F 140-450°F 1-90 min
15 mins
Fries 450°F 15 mins 140-450°F 1-90 min
80-155°F 1 min –
Dehydrate 130°F 3 hours
9h59 min
Defrost 80°F 40 mins 80-140°F 1-90 min
Veggies 400°F 10 mins 140-450°F 1-90 min
Times and temperature are indicative, and results can vary on food or quantity
*Steak (medium rare)
- Insert steak tray on the baking tray and place inside the oven.
- Preheat for 5 minutes.
- Using oven mitts and the tray handle, carefully pull out the tray and place your steak on
top. Place the steak tray back inside the unit for 4 minutes.
- Flip your steak over and continue to cook for another 4 minutes.
*Bacon
- Place bacon tray right on top of baking pan and place bacon on the bacon tray.
*Chicken
-Use the Chicken preset when cooking a whole chicken. This preset will automatically turn
on the rotisserie function.
If cooking chicken breasts, chicken cutlets or single chicken pieces, use the Air Fry preset
and adjust cooking time and temperature as needed. Chicken is done when internal
temperature reaches 165°F.
www.KALORIK.com AFO 46045 – 200723C
16OVEN
This mode is for use of the bake, broil, pastry, pizza, proof, roast, and toast
functions. Place the baking tray or rack with food inside the oven. Use the
selector dial to scroll through the presets, when desired preset is flashing,
press the Start/Stop button to confirm the preset and start cooking. As with
any traditional oven, the bake functions generate more heat in the back
than in the front, near the doors. To ensure more even results, we suggest
rotating your baked goods 180° halfway through the cooking time when
using oven functions. You can do this by simply rotating the baking pan or
rack with the food inside. Another alternative for certain foods is to use the
Air frying functions which circulates air and allows more even heat
distribution and faster results. It is recommended to adjust for 5-10 minutes
faster cooking times and/or a 10-25°F decrease in cooking temperature
when air frying baked foods for the first time.
• Place the baking pan / drip tray underneath the baking rack or basket
as there is a chance food may drip during the cooking process. The
baking pan will help catch any grease or crumbs.
• Baking refers to a wide variety of cooking modes, which is why there
are 2 baking levels ideal for different types of baking. All bakeware
baking (cakes, loaves, muffins) should preferably be done on the
bottom level, indicated by BAKE 1 on the door, placed on the baking
rack. Baking free-form loaves, cookies, sandwiches, and roasting should
be done on the baking pan on the 2nd level, indicated by BAKE 2 on
the door, which allows for a gentler heat distribution on flat baking
pans.
• Press start/stop, select the Oven mode, and use the selector dial to
choose the desired preset you wish to use. Press the Start/Stop button
for confirmation. Once started, the selected preset will blink until the
desired temperature has been attained, and then remain steady
throughout the remainder of the cooking time. This lets you know when
your oven is ready for use!
• Temperature and time can be adjusted by pressing the knob when the
preset is flashing. Press it once to change time and twice to change
temperature. Turn it clockwise to increase and anti-clockwise to lower.
When done, press the Start/Stop button to confirm.
• Time can be adjusted from 1 to 90 minutes and temperature from 140°F
to 450°F (can vary depending on the selected preset).
• Press the rotisserie function if needed for your cooking operation.
www.KALORIK.com AFO 46045 – 200723C
17• When the cooking time has elapsed, the unit will beep. The heating
elements will turn off and the display panel will show “OFF OFF”. Please
note, although the unit has powered off, the fan will take an additional
3 minutes to cool down before coming to a complete stop and
beeping one last time.
• Bake function is best for foods that require rising like cakes, quick
breads and loaves, soufflés, and the like.
CAUTION: Carefully take out your food with oven mitts and using the tray
handle.
Notes:
• Cooking process can be cancelled at any time before the timer
finishes counting down by pressing the Start/Stop button.
• Food gets cooked quickly during broil, it is best to watch over food to
not overcook.
Function Description Info
Recommended for • Works with prepacked frozen meals.
foods that would • For best results, preheat the oven at
normally be prepared least 5 minutes at the desired
Bake
in a conventional temperature.
oven. • Recommended accessories: baking
rack and/or backing pan.
Used for meats such as • Preheat the oven for 5 minutes.
beef, chicken, or pork. • For best results, use the top slot.
Also used for top • This function usually requires shorter
browning casseroles cooking time.
and gratins. • Food gets cooked quickly during
broil, it is best to watch over food to
not overcook.
• Do not use glass oven dishes to broil.
Broil • Recommended accessories: baking
rack in top slot and baking tray in
lower slot to catch grease drippings.
• CAUTION: Aluminum foil is not
recommended for covering the
rack. If covered, the foil prevents
the fat from dripping into the drip
tray. Grease will accumulate on the
foil surface and may catch fire.
www.KALORIK.com AFO 46045 – 200723C
18Use this function to
• Preheat oven for 10 minutes.
cook any kind of
Pastry • Donuts, cinnamon rolls and pies
dough that is used to
work great with this function.
make baked goods.
Recommended for • Preheat oven for 10 5 minutes.
fresh or frozen pizza. • Recommended accessory: baking
rack in the middle slot position for
Pizza
even cooking.
• Rotate pizza 180° halfway through
cooking for best cooking results.
Proofing can be used • Dough is usually ready when it
to prepare bread or appears double in size. Check
pizza dough. regularly when cooking.
Proof • Allow dough to complete at least
one rise at room temperature.
• Recommended accessory: baking
rack with proofing dish on top.
Roasting can be used • Preheat oven for 10 minutes.
to enhance flavor • Roasting can get done quicker so it
through caramelization is suggested to check on food
and browning on the before time has ended.
Roast
surface, leaving food • Used for larger meats and
moist and juicy on the vegetables.
inside. • Recommended accessory: baking
pan.
Use the toast function • Preheat oven for 10 minutes.
to toast bread to • For best results, set food on the
perfection: crunchy on center of the rack spaced out
the outside and soft on evenly.
Toast the inside. • If toast is lighter than desired, place
back inside oven and add more
time by using the selector dial.
• Recommended accessory: baking
rack in middle slot.
www.KALORIK.com AFO 46045 – 200723C
19Default Default Time Adjustable Adjustable
Mode Temperature (min) Temperature (°F) Time (min)
(°F)
Bake 375°F 25 140—450°F 1-90
Broil 450°F 15 140—450°F 1-90
Pastry 400°F 30 140—450°F 1-90
Pizza* 400°F 20 140—450°F 1-90
Proof 100°F 60 80-140°F 1-90
Roast 425°F 35 140-450°F 1-90
Toast 400°F 5 140—450°F 1-90
Times and temperature are indicative, and results can vary on food or quantity
*Frozen regular or rising-crust pizza
www.KALORIK.com AFO 46045 – 200723C
20KALORIK MAXX BASIC COOKING GUIDE:
Food internal Quantity Accessory Level Setting Temp Time
temp* (°F)
Chicken 165°F 8-10 oz Air Frying 3rd (AIR Air Fry 400°F 15-20
breast Basket FRY) mins
Chicken 165°F 3-5 oz Air Frying 3rd (AIR Air Fry 380°F 10-15
tender- Basket FRY) mins
loins
Chicken 165°F 7-8 oz Air Frying 3rd (AIR Air Fry 450°F 15-20
thighs Basket FRY) mins
(bone-in)
Chicken 165°F 7-8 wings, Air Frying 3rd (AIR Air Fry 400°F 10-15
wings 1.5 lbs total Basket FRY) mins
(fresh)
Fish 135°F 6 oz filet Air Frying 3rd (AIR Air Fry 375°F 8-12
Basket FRY) mins
Tofu 165°F 1-inch thick Air Frying 3rd (AIR Air Fry 425°F 15-20
Basket FRY) mins
Pork loin 145°F 20-25 oz Air Frying 3rd (AIR Air Fry 425°F 20-25
Basket FRY) mins
Meatloaf* 165°F 1.5 lb Baking Bottom Air Fry 400°F 35-40
(Beef) meatloaf pan / (BAKE) or Bake mins
Rack
Mac and 160°F 4 portions Baking Bottom Air Fry 400°F 10-25
cheese** rack (BAKE) mins
(baked)
Baked Soft 5.5 oz Air Frying 3rd (AIR Air Fry 400°F 30-35
potato center* Basket FRY) mins
Grilled Melty 4 Baking 2nd TOAST 400°F 5-7
cheese cheese* sandwiche Pan (TOAST) mins
s
Frozen Melty Thin crust Baking Bottom Bake 400°F 10
pizza (thin cheese* rack (PIZZA) (PIZZA) mins
crust)
Frozen Melty Thick crust Baking Bottom Bake 400°F 20
pizza cheese* rack (PIZZA) (PIZZA) mins
(thick
crust)
Frozen fish 165°F 1/2 lb (10 Air Frying 3rd (AIR Air Fry 425°F 10-12
sticks sticks) Basket FRY) mins
Frozen 165°F 20 nuggets Air Frying 3rd (AIR Air Fry 360°F 6-7
chicken Basket FRY) mins
nuggets
Frozen 165°F 10 sticks Baking 3rd (AIR Air Fry 425°F 6-7
mozzarella Pan FRY) mins
sticks
www.KALORIK.com AFO 46045 – 200723C
21Chocolate Browned 4-6 cookies Baking 2nd Bake 375°F 10
chip edges* pan (BAKE 2) mins
cookies (turned
upside
down)
Cake** Tooth- 1 cake (9 Tin placed Bottom Bake 350°F 25
pick test* inch round on Baking (BAKE 1) mins
pan) rack
Quick Tooth- 1 loaf (9 x 5 Tin placed Bottom Bake 375°F 35
bread** pick test* in) on Baking (BAKE 1) mins
rack
Muffins Tooth- 6-12 muffins Tin placed Bottom Bake 375°F 12
pick test* on Baking (BAKE 1) mins
rack
Pie** Bottom Two-crust Tin placed Bottom Air Fry 375°F 15-20
crust pie on Baking (BAKE 1) mins
starts to rack
brown*
Cooking times will vary with different conditions such as size, quantity, initial temperature,
and preparation used. These are meant to serve as basic cooking guidelines to help you
get the most out of your Kalorik MAXX air fryer oven. Additional notes for each food are
found on the next page. Most recipes, unless otherwise indicated, require either to rotate,
flip, or turn food halfway through the cooking process to provide more even results.
*Internal temperatures as recommended by FDA, other doneness standards are
indicative only.
**When in doubt, use BAKE at the recommended time and temperature provided by your
recipe when baking loaves, pies, cakes, and other larger foods that require thorough
internal cooking.
See additional cooking notes on the next page.
www.KALORIK.com AFO 46045 – 200723C
22Food Notes:
Place baking pan / drip tray on the lowest level to catch falling grease
and juices. Spray air frying basket with cooking oil before placing breasts.
Maximum recommended capacity is 3 10 oz breasts. Add an additional
Chicken 1-2 minutes for each additional oz/breast. Remember to flip halfway
breast through the cooking process.
Place baking pan / drip tray on the lowest level to catch any falling juices
or breading (if marinated). Spray air frying basket with cooking oil before
placing tenderloins on the basket. Add an additional 1-2 minutes for
Chicken each additional oz. Maximum recommended capacity is 4 bone-in
tenderloins chicken thighs. Flip halfway through the cooking process.
Place baking pan / drip tray on the lowest level to catch falling grease
Chicken and juices. Add an additional 1-2 minutes for each additional oz.
thighs Maximum recommended capacity is 4 bone-in chicken thighs (no
(bone-in) drumstick attached). Flip halfway through the cooking process.
Place baking pan / drip tray on the lowest level to catch falling grease
Chicken and juices. Can place last few minutes, or an additional 2 minutes, on 4th
wings (FAST AIR FRY) level if planning to glaze and get crispy wings. Max
(fresh) recommended amount is 8 whole wings.
Recommended to spray basket with non-stick cooking spray. Fish should
Fish be opaque once cooked through.
Place baking pan / drip tray on the lowest level to catch falling grease
Pork loin and juices. Add an additional 2-3 minutes for each additional oz.
For drained, extra-firm tofu. Drain overnight if necessary, to ensure the
Tofu crispiest results. Flip halfway through cooking time.
For a freeform loaf: Recommended to wrap loosely in tinfoil to avoid
excessive browning in Air Fry function. For a loaf in a pan: recommended
bake function. You can cover the pan loosely in tinfoil to avoid excessive
Meatloaf browning and uncover in the last 5-10 minutes to help crisp up the top.
(Beef)** Recipes will vary.
No need to wrap with foil, but poking holes with a fork will provide best
Baked results, as well as covering outside with a little bit of oil to help skin crisp
potato up.
Assumes cooked macaroni, only used for finishing off the recipe as in a
Mac and baked mac and cheese recipe. This is good for adding a nice broil to
cheese your mac and cheese and help the cheese melt. For less browning,
(baked) cover tightly with foil.
Butter outside of the bread and flip halfway through cooking time. Try to
Grilled avoid going near the sides of the baking pan as it may lead to unwanted
cheese marks on the bread.
Frozen Rotate the baking rack 180° halfway through the cooking time to ensure
pizza (thin even cooking. Pizza should be ready when all the cheese is melty, and
crust) crust is warm.
www.KALORIK.com AFO 46045 – 200723C
23Frozen
pizza Rotate the baking rack 180° halfway through the cooking time to ensure
(thick even cooking. Pizza should be ready when all the cheese is melty, and
crust) crust is warm.
Frozen fish Shake the fish sticks halfway through cooking time for maximum
sticks crispiness. No preheating necessary.
Frozen
chicken Shake the nuggets halfway through cooking time for maximum crispiness.
nuggets No preheating necessary.
Frozen Shake the mozzarella sticks halfway through cooking time to ensure
mozzarella maximum crispiness. Use baking pan to prevent cheese drippings. Careful
sticks not to overcook, as it may cause cheese to leak.
Rotate baking pan 180° halfway through the cooking time to ensure
Chocolate even cooking. Turning the pan upside down and placing it on a higher
chip level helps to give the cookies a little more distance from the heating
cookies element to ensure a more uniform heating.
Bake until a toothpick inserted comes out clean. Different pan materials
and sizes will yield different results. Check doneness 5 minutes before the
end of the minimum recommended for your recipe and add time as
Cake needed. Preheat oven for 5 minutes.
Rotate the loaf pan 180° halfway through cooking. Insert toothpick to
Quick check for doneness. Baking times will vary based on size of loaf and type
bread of pan used. Preheat 5 minutes.
Rotate the baking rack 180° halfway through the cooking time to ensure
even cooking. Muffins should be done once an inserted toothpick comes
Muffins out cleanly. Preheat 5 mins.
Cover the pie loosely with foil if it starts to brown too much. Air Fry works
best for a crispier pie and Bake for a softer pie. Preheat oven for 5
Pie minutes.
www.KALORIK.com AFO 46045 – 200723C
24Dehydration*:
Food Thickness Accessory Level Setting Temperature Time
Apples 1/16"-1/8" Dehydration Top Dehydrate 135°F 3½
tray + Air (DEHYDRATOR) hours
Frying + 3rd (AIR FRY) + 2-4
Basket hours
Pineapple 1/8"-1/4" Dehydration Top Dehydrate 135°F 4
tray + Air (DEHYDRATOR) hours
Frying + 3rd (AIR FRY) +2-4
Basket hours
Jerky 1/4" Dehydration Top Dehydrate 155°F 4-6
(GROUND tray + Air (DEHYDRATOR) hours
TURKEY/ Frying + 3rd (AIR FRY)
BEEF) Basket
To use your MAXX as a dehydrator: Slide the 2-in-1 dehydrator/steak tray into
the top level. Place the Air frying basket in the 3rd level for best air flow.
Additional time will lead to crispier results. Times will vary depending on initial
thickness. We recommend checking the doneness of your dehydrated foods at
the initial cooking time indicated and adding afterwards as needed when
dehydrating a type of food for the first time.
*Accessories vary by model.
GET MORE OUT OF YOUR PRODUCT
Browse Chef-created recipes specifically made for your Kalorik product.
Visit our website www.kalorik.com to see our extensive recipe library and
start cooking. Sign up for the Kalorik email mailing list to receive special
offers and recipes and connect with us on social media for daily inspiration.
www.KALORIK.com AFO 46045 – 200723C
25CLEANING AND MAINTENANCE
• Make sure to clean the appliance after each use! Cleaning regularly
prevents the accumulation of grease and helps avoid unpleasant
smells.
• Unplug the appliance from the outlet and allow it to cool completely.
• Do not immerse the unit in water or wash under running water.
• All accessories, except the sliding crumb tray, are dishwasher safe. All
can be washed in hot soapy water.
• Do not use metal kitchen utensils or abrasive cleaning materials to
clean them, as this may damage the non-stick coating. Rinse and dry
thoroughly after cleaning.
Inside cleaning
• To remove crumbs, pull out the sliding crumb tray from the Air Fryer
Oven. Wipe clean and place back inside before using the appliance.
• Wipe cavity with a damp cloth or sponge. Dry with paper towel. To
remove baked on food, pour a little cooking oil on the food and allow
to stand for five to ten minutes. This should soften the food and allow it
to be removed with absorbent paper toweling or a soft cloth.
• Clean the inside of the glass doors with a damp soapy cloth. If the glass
has stubborn stains, open the door and cover the inside of the door
with a few damp paper towels. Leave for a few minutes, then remove
the towels and wipe door clean. Never use sharp utensils as scratching
may weaken it and cause it to shatter.
• Never use abrasive products in the cavity. Never immerse the
appliance in water and make sure no water or damp penetrates the
appliance except the cavity.
Make sure no water comes on the oven doors when the latter are still
hot.
Housing cleaning
1. Wipe clean with a damp sponge. Wipe dry
2. NEVER use steel wool, metal scouring pads or abrasive cleaners, as
they may damage the finish.
Replacing the inner lamp
A replacement bulb is available to you should the original stop working. If
this is the case, you can call customer service at the address listed in the
www.KALORIK.com AFO 46045 – 200723C
26“WARRANTY” section to get a replacement bulb. Be sure to perform the
following steps carefully as they comprise of manipulating small glass parts.
1. Unplug the appliance from the outlet and allow it to cool completely
to avoid electric shocks or burns.
2. With a screwdriver, unscrew the screw holding the metal clamp against
the glass cover.
3. Using a tool such as a flat-ended screwdriver, carefully remove the
glass to gain access to the lightbulb.
4. Remove the lamp by shifting it upwards and ejecting the bi-pin end
from its place. To replace with new bulb, align the two pins with the
small holes in the original bulb base and plug back in, ensuring the
new lamp is securely in place.
5. Place the glass cover back into a secure position, ensuring it fits neatly,
and screw the metal clamp back into its original position to prevent
glass cover from falling off.
DO NOT IMMERSE THE OVEN IN WATER OR ANY OTHER LIQUID.
ANY OTHER SERVICING SHOULD BE PERFORMED BY AN AUTHORIZED SERVICE
REPRESENTATIVE.
www.KALORIK.com AFO 46045 – 200723C
27TROUBLESHOOTING
Problem Possible Cause Solution
1. Appliance is not 1. Plug power cord into wall
plugged in. socket.
2. You have not pressed 2. Make sure you have
The unit does
the start/stop button. selected a function and
not work
3. The oven doors are pressed the start button.
not properly closed. 3. Make sure both doors are
securely shut.
1. Too much food is 1. Use smaller batches for
Food not placed into the oven. more even frying.
cooked 2. The temperature is set 2. Raise temperature and
too low. continue cooking.
Some foods need to Flip or shake your food
Food is not be turned or shaken halfway into the cooking
fried evenly during the cooking process and continue
process. cooking.
1. There is oil residue in 1. Wipe down to remove
the oven. excess oil.
White smoke 2. Accessories have 2. Clean the accessories after
coming from excess grease residue each use.
the unit from previous cooking. 3. Place baking pan
3. Oil is dripping on underneath air rack or
heating element. basket.
1. Wrong type of potato
French fries being used. 1. Use fresh, firm potatoes.
are not fried 2. Potatoes not 2. Use cut sticks and pat dry to
evenly blanched properly remove excess starch.
during preparation.
www.KALORIK.com AFO 46045 – 200723C
28WARRANTY
We suggest that you complete and return the enclosed Product
Registration Card promptly to facilitate verification of the date of original
purchase. However, return of the Product Registration Card is not a
condition of these warranties. You can also fill out this warranty card online,
at the following address: www.KALORIK.com
This KALORIK product is warranted in the U.S.A. and in Canada for 1 year
from the date of purchase against defects in material and workmanship.
This warranty is not transferable. Keep the original sales receipt. Proof of
purchase is required to obtain warranty performance.
During this period, if the KALORIK product, upon inspection by KALORIK, is
proven defective, it will be repaired or replaced, at Kalorik’s option,
without charge to the customer. If a replacement product is sent, it will
carry the remaining warranty of the original product.
This warranty does not apply to any defect arising from a buyer's or user's
misuse of the product, negligence, failure to follow KALORIK instructions
noted in the user’s manual, use on current or voltage other than that
stamped on the product, wear and tear, alteration or repair not authorized
by KALORIK, or use for commercial purposes. There is no warranty for glass
parts, glass containers, filter basket, blades and agitators, and accessories
in general. There is also no warranty for parts lost by the user.
ANY WARRANTY OF MERCHANTABILITY OR FITNESS WITH RESPECT TO THIS
PRODUCT IS ALSO LIMITED TO THE ONE YEAR LIMITED WARRANTY PERIOD.
Some states do not allow limitation on how long an implied warranty lasts
or do not allow the exclusion of incidental or consequential damages, so
the above limitations may not apply to you. This warranty gives you specific
legal rights, and you may also have other rights which vary from state to
state.
If the appliance should become defective within the warranty period and
more than 30 days after date of purchase, do not return the appliance to
the store: often, our Customer Service Representatives can help solve the
problem without having the product serviced. If servicing is needed, a
Representative can confirm whether the product is under warranty and
direct you to the nearest service location.
www.KALORIK.com AFO 46045 – 200723C
29If this is the case, bring the product, or send it, postage prepaid by the user
(all Kalorik customers are responsible for the initial shipment back to the
warranty center), along with proof of purchase and a return authorization
number indicated on the outer package, given by our Customer Service
Representatives. Send to the authorized KALORIK Service Center (please
visit our website at www.KALORIK.com or call our Customer Service
Department for the address of our authorized KALORIK Service Center).
When sending the product, please include a letter explaining the nature of
the claimed defect.
Extended warranty may be available on your product, please contact
Customer Service for more information.
If you have additional questions, please call our Customer Service
Department (please see below for complete contact information),
Monday through Thursday from 9:00am - 5:00pm (EST) and Friday from
9:00am - 4:00pm (EST). Please note hours are subject to change.
If you would like to write, please send your letter to:
KALORIK Customer Service Department
Team International Group of America Inc.
16175 NW 49th Avenue
Miami Gardens, FL 33014 USA
Or call:
Toll Free: +1 888-521-TEAM / +1 888-KALORIK
Only letters can be accepted at this address above. Shipments and
packages that do not have a return authorization number will be refused.
www.KALORIK.com AFO 46045 – 200723C
30MESURES DE PROTECTION IMPORTANTES
1. LISEZ TOUTES LES INSTRUCTIONS.
2. Vérifiez que la tension du secteur correspond à celle indiquée sur
l’appareil.
3. Ne touchez pas les surfaces chaudes. Utilisez les poignées ou les
boutons.
4. Pour éviter les décharges électriques, les incendies ou les blessures, ne
plongez pas le cordon, les fiches ou l’appareil dans l’eau ou autre
liquide.
5. Une surveillance étroite est nécessaire lorsqu’un appareil est utilisé par
un enfant ou près de celui-ci.
6. Débranchez l’appareil lorsque vous ne l’utilisez pas et avant de le
nettoyer. Laissez-le refroidir avant de placer ou de retirer des pièces.
7. N’utilisez pas un appareil dont le cordon d’alimentation ou la fiche est
endommagé ou qui ne fonctionne pas correctement ou qui a été
endommagé de quelque façon que ce soit. Retournez l’appareil au
centre de service autorisé le plus près pour qu’il soit examiné, réparé
ou réglé.
8. L’utilisation d’accessoires non recommandés par le fabricant peut
causer des blessures.
9. Ne pas utiliser à l’extérieur. Cet appareil EST destiné À UN USAGE
DOMESTIQUE SEULEMENT.
10. Ne laissez pas le cordon pendre d'une table ou d'un comptoir ou entrer
en contact avec des surfaces chaudes.
11. Ne placez pas l’appareil sur ou près d’un brûleur au gaz ou électrique
chaud, ou à un endroit où il pourrait toucher un autre four chauffé.
12. Utilisez des précautions lorsque vous déplacez l’appareil. Laissez
l’appareil refroidir à température ambiante avant de le manipuler ou
de le déplacer.
13. Lorsqu’il est en marche, l’air chaud est libéré par les bouches d’air.
Gardez vos mains et votre visage à une distance sécuritaire des
bouches d’air et soyez extrêmement prudent lorsque vous retirez les
accessoires de l’appareil. Le non-respect de cette directive peut
entraîner des brûlures ou des blessures
14. Lorsque vous utilisez le four, laissez au moins quatre pouces d’espace
sur tous les côtés du four pour permettre une circulation d’air
adéquate.
www.KALORIK.com AFO 46045 – 200723C
3115. Faites toujours fonctionner l’appareil sur une surface stable et résistante
à la chaleur. Ne pas utiliser sur une surface recouverte de tissu, près de
rideaux ou d’autres matériaux inflammables.
16. Ne placez pas le four près du bord d’un banc ou d’une table pendant
le fonctionnement. Assurez-vous que la surface est à niveau, propre et
exempte d’eau, de débris, etc.
17. Il faut faire preuve d’une extrême prudence lors du déplacement d’un
appareil ou de pièces contenant de l’huile chaude ou d’autres
liquides chauds.
18. N’utilisez pas l’appareil à des fins autres que celles prévues.
19. Les aliments surdimensionnés ou les ustensiles en métal ne doivent pas
être insérés dans le four friteuse à air, car ils peuvent provoquer un
incendie ou un risque de décharge électrique.
20. Un incendie peut se produire si le four friteuse à air est couvert ou
touche des matériaux inflammables, y compris des rideaux, des
draperies, des murs et autres, lorsqu’il est en marche. Ne placez aucun
article sur l’appareil lorsqu’il est en marche.
21. Ne pas nettoyer avec des tampons à récurer métalliques. Les pièces
peuvent briser et toucher des pièces électriques présentant un risque
de décharge électrique.
22. Il faut faire preuve d’une extrême prudence lorsqu’on utilise des
contenants autres que du métal ou du verre.
23. Ne rangez aucun matériel dans ce four lorsque vous ne l’utilisez pas.
24. Ne placez aucun des matériaux suivants dans le four : papier, carton,
plastique, etc.
25. Ne couvrez pas le ramasse-miettes ni aucune partie du four avec du
papier d’aluminium. Cela entraîne une surchauffe du four.
26. Ne laissez pas l’appareil sans surveillance, surtout lors du grillage ou de
la cuisson au grilloir (fonctions « Toast » et «Sear »).
27. Soyez extrêmement prudent lorsque vous jetez de la graisse chaude.
28. Portez toujours des gants de protection isolants lorsque vous insérez ou
retirez des articles du four chaud.
29. Pour déconnecter la machine, appuyez sur le bouton de
démarrage/arrêt pendant 3 secondes pour vous assurer qu’elle est
éteinte, puis retirez la fiche de la prise murale.
30. Ne branchez jamais cet appareil à un interrupteur de minuterie externe
ou à un système de télécommande distinct, car cela pourrait causer
des brûlures ou des blessures
31. Ne couvrez pas et ne bloquez pas les bouches d’air pendant que
l’appareil est en marche. Cela évitera une cuisson uniforme et pourrait
www.KALORIK.com AFO 46045 – 200723C
32endommager l’appareil ou causer une surchauffe, ce qui pourrait
provoquer un incendie ou des brûlures.
32. Ne mettez pas d’ustensiles de cuisson ou de plats de cuisson sur les
surfaces chaudes de l’appareil
CONSERVEZ CES INSTRUCTIONS
USAGE DOMESTIQUE SEULEMENT
CONSEILS DE SÉCURITÉ
1. Lorsque vous utilisez le four, utilisez toujours des gants de cuisine ou des
maniques lorsque vous touchez une surface extérieure ou intérieure du
four, ou lorsque vous manipulez des accessoires.
2. Pour réduire les risques d’incendie, gardez l’intérieur du four propre et
exempt de nourriture, d’huile, de graisse et de tout autre matériau
combustible.
3. N’utilisez pas d’ustensiles en métal (comme des couteaux) pour
enlever les résidus alimentaires des éléments chauffants, car cela
pourrait endommager l’appareil et provoquer une électrocution.
4. Ne rangez aucun matériel dans le four lorsque vous ne l’utilisez pas .
INSTRUCTIONS POUR LA FICHE POLARISÉE
Cet appareil est équipé d'une fiche polarisée (une broche est plus
large que l'autre). Pour réduire le risque de choc électrique, cette fiche
ne s'adapte à la prise polarisée que dans un sens. Si la fiche ne s’insère
pas bien dans la prise de courant au début, l'inverser. Si elle ne s’insère
toujours pas, contactez un électricien qualifié. N'essayez pas de
modifier la fiche d'aucune façon.
INSTRUCTIONS POUR LE CORDON COURT
Un cordon d'alimentation court est fourni pour réduire les dangers
résultants de l’emmêlage, ou de trébucher sur un cordon plus long. Un
cordon d’extension peut être utilisé avec précaution.
www.KALORIK.com AFO 46045 – 200723C
33• Si la puissance électrique du cordon d’extension est trop basse,
ceci pourrait causer la surchauffe et/ou un risque d’incendie de
l’appareil.
• Le cordon d’extension doit être arrange de façon à ne pas pendre
du comptoir ou de la table, ou il pourrait être tire par des enfants
ou vous faire trébucher.
CARACTÉRISTIQUES DU PRODUIT
Nº de modèle
AFO 46045 SS 26 qt/25 L 9 Tranches 120V, 60Hz 1700W 15.8inx12.5inx14in
À PROPOS DE VOTRE FOUR FRITEUSE À AIR
Découvrez la nouvelle génération de fours friteuse à air chaud ! Le four
friteuse à air chaud numérique de 25 litres Kalorik MAXX combine plusieurs
appareils en un seul. Il fonctionne comme une friteuse à air, une rôtissoire,
un déshydrateur, un four, un grille-pain, un four à pizza et une mijoteuse.
Le four friteuse à air chaud numérique Kalorik MAXX utilise la technologie
spéciale Turbo Maxx pour cuire les aliments plus rapidement que jamais.
Les éléments chauffants supérieurs et inférieurs assurent une distribution
uniforme de la chaleur pour des résultats de cuisson parfaits. Un système de
circulation d’air optimisé et un ventilateur turbo haute performance sont
conçus pour une circulation d’air maximale, offrant la même texture
croustillante et la même saveur riche des aliments frits, avec très peu ou
pas d’huile. Cela réduit le gras et les calories pour produire des repas plus
sains.
La rôtisserie fait tourner la broche incluse pendant la cuisson, ce qui permet
à la viande de rôtir uniformément dans son propre jus et de développer un
maximum de saveur.
Le four friteuse à air chaud numérique Kalorik MAXX atteint jusqu’à 500 °F,
ce qui est idéal pour saisir la viande ou caraméliser les légumes à la
perfection. Le four peut accueillir un gros poulet, une pizza de 12 pouces
(30 cm) ou jusqu’à 9 tranches de pain dans sa cavité.
Moderne et multifonctionnel, le four friteuse à air chaud numérique Kalorik
MAXX est doté de portes en verre à deux battants et d’une ouverture
automatique à une main pour prévenir les éclaboussures ou les brûlures.
www.KALORIK.com AFO 46045 – 200723C
34You can also read