Model Numbers: USG730SS (The Cumberland) USG890SS (The Irondale) - US Stove Company
←
→
Page content transcription
If your browser does not render page correctly, please read the page content below
Owner’s Instruction and Operation Manual

         Model Numbers:
   USG730SS (The Cumberland)
   USG890SS (The Irondale)
                                                                                               U.S. Patent No. 10,201,247

* All Pictures In This Manual Are For Illustrative Purposes Only. Actual Product May Vary.             853636B-0902K

                       Save These Instructions In A Safe Place For Future Reference.

         SAFETY NOTICE: FOR OUTDOOR USE ONLY! Please read this entire manual before
         installation and use of this pellet fuel-burning appliance. Failure to follow these
         instructions could result in property damage, bodily injury or even death. Contact local
         building or fire officials about restrictions and installation inspection requirements in
         your area. Save these instructions.

         A MAJOR CAUSE OF FIRES IS FAILURE TO MAINTAIN REQUIRED CLEARANCES (AIR
         SPACE) TO COMBUSTIBLE MATERIALS. IT IS OF UTMOST IMPORTANCE THAT THIS
         PRODUCT BE INSTALLED ONLY IN ACCORDANCE WITH THESE INSTRUCTIONS.

                                     CALIFORNIA PROPOSITION 65 WARNING:
                                This product can expose you to chemicals including carbon
                                monoxide, which is known to the State of California to cause
                                cancer, birth defects, and/or other reproductive harm. For
                                    more information, go to www.P65warnings.ca.gov

                       THIS MANUAL IS SUBJECT TO CHANGE WITHOUT NOTICE.
 © 2021 United States Stove Company, 227 Industrial Park Rd., South Pittsburg, TN 37380         Ph. 800-750-2723
INTRODUCTION
Use only wood cooking pellets specified by the It is important to note that the ash content of the fuel and
manufacturer. It is important to use only cooking pellets the frequency of operation will determine the frequency
that is dry and free from dirt or other impurities. The of required cleaning for this pellet grill. A high ash fuel
cooking pellet industry has established standards for may result in daily cleaning, while a low ash fuel may
wood pellet manufacturers. We recommend that cooking result in less frequent cleaning.
pellets used in all U.S. Stove pellet burning grills meet or Occasionally, impurities in the fuel will cause a hard mass
exceed the following specifications: build up in the burn pot of this pellet grill. Impurities,
Use ONLY pelletized fuel formulated for cooking such as silica, can virtually form little glass balls when
Do Not Use Cooking Pellets Labeled as Having subjected to the high heat generated in the burn pot. When
Additives allowed to collect, a hard base build up may block air flow
through the burn pot, which will significantly affect the
performance and efficiency of this pellet grill. It is a good
Maximum through a 1/8” idea to check the burn pot for any hard mass buildup or
Fines (fine particles)
screen other blockage on a daily basis, and if necessary, let the
Bulk Density Minimum 40 lbs per cubic foot burn pot cool and then clean the burn pot.
Maximum 3/8” Diameter by U.S. Stove Company realizes that it cannot control the
Size
1-1/2” length quality of cooking pellets you choose to use in your
1% Maximum (Premium grade) pellet grill; U.S. Stove assumes no responsibility for
that choice.
Ash Content 3% Maximum (Standard
grade) CAUTION: BE SURE TO STORE COOKING PELLETS A
MINIMUM OF 3 FEET (914.5mm) AWAY FROM THE
Moisture Content 8% Maximum
PELLET GRILL. RADIANT HEAT CAN IGNITE THE
Heat Content Minimum 8,200 btu’s per hour FUEL.
Please note that the rating label is located on the
Use only wood pellets formulated for cooking in this
inside of the hopper lid.
pellet grill.
PRODUCT FEATURES
• Stainless lid and pedestal sides with cast aluminum • Wire basket/tool hanger for side table (can be mounted
sides. in 3 locations on side table-front side or back).
• Improved hinging and lid stops. • Wheel locks to prevent movement.
• Convenient cord wrap located at the back of the hopper. • New grease management system internally; removable
• Handy meat probe holder. for cleaning.
• Easily removable stainless steel insert for the side • New drip tray designed for standard commercially
table. available aluminum pan.
• Heat relief on side table. • New gasket materials.
• New push to close hopper latch
2
© 2021 United States Stove CompanySAFETY INFORMATION
• IMPORTANT: READ ALL INSTRUCTIONS BEFORE • Never block free airflow through the open vents of the
INSTALLING AND USING THE APPLIANCE. Failure unit.
to do so may result in property damage, bodily injury, or • Keep foreign objects out of the hopper.
even death. Proper utilization of this grill is crucial for
safe and efficient operation. • The moving parts of this grill are propelled by high
torque electric motors. Keep all body parts away from
• Warning: do not operate this grill under a ceiling or the auger while the grill is plugged into an electrical
overhang. outlet. These moving parts may begin to move at any
• Contact your local building officials to obtain a time while the grill is plugged in.
permit and information on any additional installation • Do not place clothing or other flammable items on or
restrictions or inspection requirements in your area. near this grill.
• Do not throw this manual away. This manual has • This appliance is not intended for commercial use.
important operating and maintenance instructions
that you will need at a later time. Always follow the • Warning: Operate your pellet grill only on a
instructions in this manual. noncombustible floor or provide floor protection
adequate to provide ember protection around grill.
• This appliance is designed for the use of pelletized fuel
that is specificity made for cooking. The use of other • Creosote-Formation and need for removal. When wood
than cooking pellets will not give satisfactory results. pellets are burned slowly, they produce tar and other
organic vapors that combine with expelled moisture
• Never use gasoline, gasoline-type lantern fuel, to form creosote. The creosote vapors condense in a
kerosene, charcoal lighter fluid, or similar liquids to relatively cool oven flue and exhaust hood of a slow
start or “freshen up” a fire in this appliance. Keep all burning fire. As a result, creosote residue accumulates
such liquids well away from the appliance when in use. on the flue lining and exhaust hood. When ignited, this
• Do not unplug the grill if you suspect a malfunction. creosote makes an extremely hot fire. When grease
Turn the “On/Off” switch to “Off” and contact your or creosote has accumulated, it should be removed to
dealer. reduce risk of fire.
• Your grill requires periodic maintenance and cleaning • Do not use accessories not specified for use with this
(see the “Maintenance” section of this manual). Failure appliance.
to maintain your grill may lead to improper and/or • Follow these guidelines to prevent this colorless,
unsafe operation. odorless gas from poisoning you, your family or others.
• Never try to repair or replace any part of the grill unless • Know the symptoms of carbon monoxide poisoning:
instructions for doing so are given in this manual. All headache, dizziness, weakness, nausea, vomiting,
other work should be done by a trained technician. sleepiness, and confusion. Carbon monoxide reduces
• Do not touch the hot surfaces of the grill. Educate all the blood’s ability to carry oxygen. Low blood oxygen
children on the dangers of a high-temperature grill. levels can result in loss of consciousness and death.
Young children should be supervised when they are in • See a doctor if you or others develop cold or flu-like
the same vicinity as the grill. symptoms while cooking or in the vicinity of this
• The hopper and grill top will be hot during operation; appliance. Carbon monoxide poisoning, which can
therefore, you should always use some type of hand easily be mistaken for a cold or flu, is often detected
protection when refueling your grill. too late.
• A power surge protector is required. This unit must be • Alcohol consumption and drug use increase the effects
plugged into a 110 - 120V, 60 Hz grounded electrical of carbon monoxide poisoning.
outlet. Do not use an adapter plug or sever the grounding • Carbon monoxide is especially toxic to mother and
plug. Do not route the electrical cord underneath, in child during pregnancy, infants, the elderly, smokers,
front of, or over the grill. Do not route the cord in foot and people with blood or circulatory system problems,
traffic areas or pinch the cord under any object. such as anemia, or heart disease.
• Unplug the grill when not in use. • SAVE THESE INSTRUCTION
• The grill will not operate during a power outage. If
a power outage does occur, check for unsafe burn
conditions that might have occurred.
3
© 2021 United States Stove CompanyCLEARANCE TO COMBUSTIBLES
This pellet grill must be installed with the clearance to REAR WALL
combustibles as shown in this manual.
24”
SIDE WALL
SIDE WALL
WARNING:
DO NOT OPERATE THIS GRILL UNDER A CEILING
OR OVERHANG. 12”
12”
OVERALL DIMENSIONS
USG730SS
45-1/2”
28-5/16” 55-3/4”
USG890SS
45-5/8”
28-1/2” 61-11/16”
4
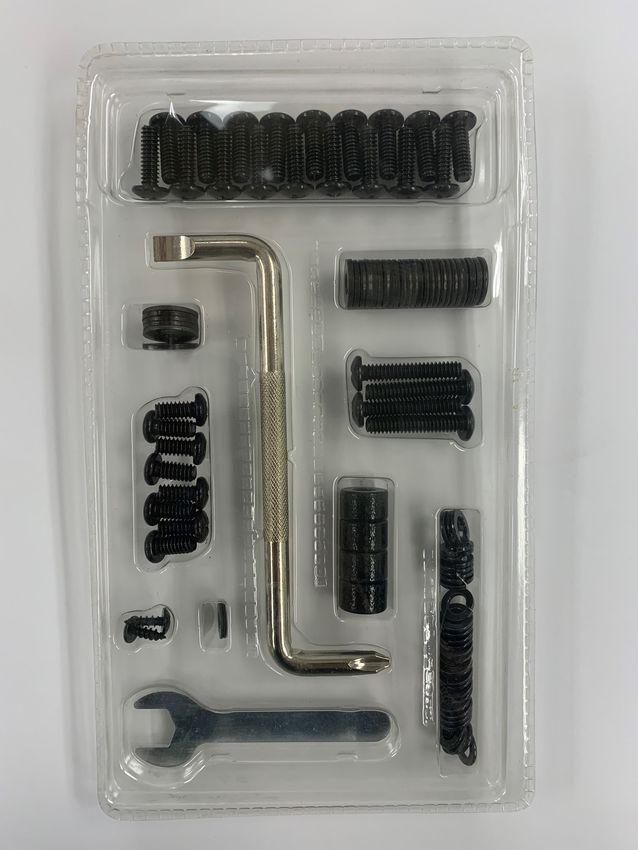
© 2021 United States Stove CompanyScrew (A)
Washer (E)
Washer (F)
Screw (B)
Screw (C)
Washer (G)
Screw (D)
Washer (H)
Washer (J)
5
© 2021 United States Stove CompanyASSEMBLY INSTRUCTIONS
READ ALL INSTRUCTIONS BEFORE INSTALLING pedestal panel using the provided washers and bolts.
AND USING THE APPLIANCE
Screw A
TOOLS & MATERIALS NEEDED FOR Washer H
Washer E
INSTALLATION
• #3 phillip screwdriver (use of a drill with a phillips bit
will speed up the assembly process)
Use proper assembly technique when installing bolts,
start all bolts first and then tighten appropriately. The
assistance of a second person is strongly recommended.
Remove the grill contents for assembly. Do Not
Remove The Searing Station.
STEP 1 BASE AND PEDESTAL ASSEMBLY
1. Swivel Wheel Installation 4. Attaching the Pedestal
• Attach both swivel wheels, one at a time; to the grill • Attach the assembled pedestal to the base using the
base using the provided bolts, lock washers, and flat provided washers and bolts.
washers.
Screw A
Screw C Washer H
Washer H Washer E
Washer E
2. Fixed Wheels Installation
• Slide the axle through the hole located in the front side
flange of the grill base.
• Secure the axle to the grill base using the provided
5. Attaching the Main Body
washer, lock washer, and nut.
• Repeat these steps to attach the second fixed wheel to
ATTENTION:
the other side of the unit.
THE ASSISTANCE OF A SECOND PERSON IS
STRONGLY RECOMMENDED FOR THIS STEP.
• Attach the main grill body to the assembled pedestal
with the provided washers and bolts.
Note: The three cushioned pads installed between the lid
and the body of the unit are for shipping purposes only.
Please remove them.
3. Assembling the Pedestal
• Attach the left and right pedestal panel to the center
6
© 2021 United States Stove CompanyASSEMBLY INSTRUCTIONS
STEP 2 SIDE TABLE ASSEMBLY & INITIAL
IMPORTANT: FIRING
1. Attaching the Side Table
DO NOT REMOVE THE SEARING STATION. THE
SEARING STATION IS NOT SHOWN IN THE IMAGES • Attach the side table to the main grill body using the
BELOW FOR CLARITY PURPOSES ONLY. provided bolts and washers.
• NOTE: Washer (G) must be placed between the side
table and the grill.
Screw B
Washer H
Washer E
Washer G
Screw A
Washer H • Place the stainless steel plate into position.
Washer F
2. Spice Rack Assembly
• Attach the spice rack to the side table. The provided
predrilled holes allow the spice rack to be attached to
the front, side, or rear of the side table.
Screw D
Washer J
Screw A
Washer H
Washer F
7
© 2021 United States Stove CompanyASSEMBLY INSTRUCTIONS
3. Drip Pan
• Place the disposable pan into the drip pan holder and
slide into place.
• NOTE: Make sure that the pan is aligned with the drip
hole
4. Initial Firing System Check • Press the power button to turn the unit off.
• Clean the drip pans, flame plate, warming grate, and
IMPORTANT: grill grate with soap and water, then rinse. Allow the
components to dry before continuing the assembly. DO
DO NOT PUT ANY PELLETS INTO THE HOPPER
NOT TOUCH THE IGNITOR OR THE AUGER.
OR GRILL DURING THE INITIAL FIRING SYSTEM
CHECK.
STEP 3 GRILL SURFACE, DRIP PAN, AND
FLAME PLATE ASSEMBLY
• Open the pellet hopper lid to check for foreign objects 1. Flame Plate Installation
in the hopper.
• There are two cutouts along the bottom edge of the
flame plate, one in the front and one in the rear. Use
the two cutouts to position the flame plate accurately.
NOTE: One side of the flame plate is longer than the
other. When installing the flame plate ensure that the
longer side is installed to the rear of the unit.
WARNING:
IF THE FLAME PLATE IS INSTALLED INCORRECTLY
THE PELLETS MAY BURN BACK INTO THE HOPPER,
• Plug the grill into a three-wire, grounded wall outlet. AND/OR THE GRILL MAY SMOKE EXCESSIVELY
DURING COOK MODE AND MAY NOT MAINTAIN
• Press the power button to turn the unit on. DO NOT SET COOKING TEMPERATURE PROPERLY.
TOUCH THE AUGER OR THE IGNITOR! Open the
hopper lid and check to see that the auger is turning
freely - approximately 2 rpm. LOOK TO SEE THAT THE
AUGER IS TURNING. DO NOT TOUCH.
• Place your fingers over the burn pot and feel the air
movement from the combustion blower. Ignitor will
glow within 1 minute.
Front Of Rear Of
The Unit The Unit
2. Drip Pan Installation
8
© 2021 United States Stove CompanyASSEMBLY INSTRUCTIONS
• Place the right drip pan. Make sure the drip pan slides STEP 4 PREPARING THE GRILL FOR USE
into the grease drain. 1. Seasoning The Grill
IMPORTANT: THE GRILL MUST BE SEASONED
BEFORE COOKING ANY FOOD ON IT FOR THE
FIRST TIME.
The grill is now fully assembled and it is time to season
the grill. The seasoning process is an important part of
preparing your grill for use. It allows any oil residue from
the manufacturing process to burn off and it allows the
high-temperature paint to cure. Do Not place anything
on the unit during the seasoning process as the paint
• Slide the left drip pan into position. could be permanently damaged. Once you have read and
understood the “Standard Use And Operation” section of
this manual follow the steps below to season the grill:
a. Fill the hopper 1/2 full with cooking pellets.
b. Press the power button to turn the grill on.
c. Prime the auger by pressing and holding the “PRIME”
button for two minutes.
3. Grilling Grate
PRIME
• Place the main grilling surface onto the grill mounting
bracket. Align with the searing station. .
d. Close the grill’s lid.
e. When smoke is visible use the “COOK TEMP” button
to adjust the grill to the maximum temperature
(500°F).
COOK
TEMP
4. Warming Grate
f. Run the grill at maximum temperature for a minimum
• Place the warmer onto the warmer mounting brackets. of 1 hour.
SAVE THESE INSTRUCTIONS
9
© 2021 United States Stove CompanySTANDARD USE & OPERATING INSTRUCTIONS
Adjust cook Meat Probe
temperature
Chage temperature
WOOD PELLET FIRED CONVECTION GRILL display
Power
TEMPERATURE CONTROL
ACTUAL COOK Change between “Cook”
and “Smoke” mode
Primes COOK
TEMP
DISPLAY MODE
the auger PRIME
SETPOINT SMOKE
USSC GRILLS • USSCGRILLS.COM
Make sure the grill is always sitting level. determine when the grill has preheated to the desired
cooking temperature.
STANDARD STARTUP SEQUENCE NOTE: During the startup, the grill temperature can
1. Fill the hopper with pellet fuel. Never leave pellets exceed the set-point temperature. It is advisable
in the hopper and only use the minimum amount of to keep the display in “Actual” mode to check the
pellets needed for cooking. Be sure to close and latch temperature readings and avoid overcooking or
the hopper lid. Only burn pellet fuel that is specifically burning. It is easy to tell if the grill is still in startup
manufactured for use in pellet grills and cookers. by the “Cook” or “Smoke” light blinking. The grills
2. Open the grill lid and press the “Power” button. The settings will determine which light blinks.
three dots between the numbers on the temperature 6. Once the 15 minute startup time is met, and the grill
readout will begin to flash; showing that the grill is in has reached its set-point temperature, the grill is
startup-sequence in the corresponding mode. The grill ready to have food added.
will automatically light 5 to 8 minutes after pressing
NOTE: As previously mentioned, keep the lid closed
the “Power” button. Remember, start-up times may
as much as possible to maintain constant cooking
vary based on outside ambient temperature and fuel
temperature. The temperature may fluctuate slightly.
quality). Prime your auger press the button found on
the control panel labeled “Prime.” When pressed, the NOTICE !! During operation, the technology in this
auger spins and feeds pellet fuel to the burn pot. Hold grill’s programming learns the fuel rate needed to
the “Prime” button in for up to 1 minute to prime the sustain the selected cooking temperature. Therefore,
auger tube with pellets. start-up times may vary based on outside ambient
temperature and fuel quality or type (flavored or not).
NOTE: The startup mode will last approximately 15
Using the “Prime” button may help facilitate a quicker
minutes. Excessive smoke during startup is typical.
start-up time.
3. Set the control board to the desired cooking
temperature using the “Cook Temp” buttons on STANDARD SHUTDOWN SEQUENCE
the control board. Temperature settings are in 5°F 1. To turn the grill off, make sure the searing station is
increments. off. The light will be off when the searing station is off.
4. Once the grill ignites, you can hear a flowing sound 2. Press the power button.
slightly louder than the blower motor of the grill. At
this point, the grill produces significantly less smoke. 3. The word “Cool” will show on the display, and the grill
Close the grill lid once ignition has occurred. will enter a shutdown mode. The blower will continue
to run until it has reached a safe temperature.
NOTE: Allow the grill lid to remain closed during
the pre-heat and as much as possible during cook NOTE: The “Cook” light will stay solid, and the
time. Feed rates during run mode are determined by “Smoke” light will flash during the shutdown
temperature readings. Each time the lid opens, the sequence. Shutdown sequence can take up to 1 hour
temperature goes down, causing the auger to feed depending on the cooking temperature and the outside
more. This can lead to potential overcooking of food. temperature.
5. Check the actual temperature compared to the set- DO NOT TURN THE GRILL OFF BY UNPLUGGING IT.
point temperature by using the “Display” button SAVE THESE INSTRUCTIONS.When the grill is plugged
on the control board. The display button helps to in, the control board will flash through a sequence of
letters and numbers before going to a blank display
10
© 2021 United States Stove CompanyOPERATING TIPS
screen. SEARING STATION
• When the grill is turned on, there will be three flashing • The searing station control is operable from the toggle
lights found between the numbers of the display. The switch only (found next to the display board). Only turn
three lights will continue to flash until the grill reaches on the searing station for the needed time of use. Make
180°F, then the startup sequence will be finished. sure to turn the searing station off when not in use. The
searing station will function even if the grill is not in
• Grill operating temperatures are 180°F to 500°F.
operation. Always unplug the grill when not in use.
• When the grill is first turned on, the control board will
• Using the searing station during general cooking
go to 350°F on the first ignition. If the grill has been
needs is not recommended, as it can interfere with the
used, the control board will go to the last setting used.
temperature sensor. Only use the searing station to
• “Smoke” mode ranges from 180°F to 230°F. The quickly sear the food and then turn it off. The searing
concentration of smoke will vary depending on station takes approximately 5 minutes to reach a
the temperature selected. There will be a higher searing temperature during use in the “Cook” settings.
concentration of smoke at lower settings than there
is when operating at higher temperatures for “Smoke” MEAT PROBE
mode. The grills meat probe will track the temperature of the
• The combustion blower is on constantly during “Cook” food as it cooks without having open the grill lid several
mode and does not vary in speed. times to test the food with an instant-read thermometer.
The correct placement of the meat probe is especially
• If the grill is turned off during “Startup” mode,
important when cooking at a higher heat as opposed to
everything shuts off without a shutdown sequence.
low and slow; because there is such a large difference
• If the flame plate is installed improperly, a burn back within just one inch of space in the food. When inserting
may occur due to the airflow restrictions at the burn the meat probe, avoid the bone because it will give
pot. inaccurate readings. After inserting the probe, make sure
• If the grill is in “Cook” mode and change to “Smoke” it is secured into place. As the thermometer nears its
mode, the temperature will automatically go to 180°F. target temperature, spot-check other areas to see if they
are also close. Be careful, the meat probe and its wires
• If the grill is in “Smoke” mode and change to “Cook”
are hot.
mode, the temperature will automatically go to 450°F.
To use the meat probe, first follow the startup
• Temperature control doesn’t begin to control the feed
instructions in this manual. Bring the grill up to the
rate for 15 minutes, due to the 15-minute start-up
desired temperature. Once preheating is complete, place
sequence.
the meat onto the grill surface with the probe inserted
• Make sure to unplug the grill only after it has gone into the best section of meat. Plug the meat probe into
through the shutdown sequence, cooled off, and is not the display panel and push the “Display” button until
in use. both the “Actual” and “Setpoint” lights are not lit. The
• DO NOT unplug the grill during use or to shorten the temperature shown on the display will be the internal
shutdown sequence. meat temperature. Using the meat probe will prevent
the need of opening and checking the internal meat
temperature, therefore preserving heat and pellet usage.
11
© 2021 United States Stove CompanyOPERATING TIPS
Note: These are suggested approximations only and intended as guidelines only. For best results please follow
appropriate recipe.
Meat Cooking
Cut Approximate Suggested Cook Time
Type Temp.
Beef Hamburgers 425°F 10 min on each side
Beef T-Bone/Ribeye 450°F 10 to 20 min (depending on degree of doneness desired) turning once
Beef Tenderloin 400°F 25 to 30 min (depending on degree of doneness desired)
Beef Brisket 225°F 4-6 hrs
Beef Filet Mignon 450°F 10 to 15 min (depending on degree of doneness desired) turning once
Beef Flank Steak 450°F 10 to 15 min (depending on degree of doneness desired) turning once
Beef Ribs 225°F 3-4 hrs
Pork Loin 350°F 1 to 1.5 hrs
Pork Baby Back Ribs 325°F 2 hrs
Pork Shoulder Steak 325°F 35 to 40 min
Pork Ground Pork 300°F 45 min
Pork Pork Chops 325°F 45-50 min
Chicken Breast 350°F 25-30 min, turning once 1/2 way through
Chicken Thighs 350°F 40-45 min
Whole Chicken
Chicken 450°F 70-90 min
4-5 lbs
Turkey 10-12lb Turkey 325°F 3 hrs
Turkey Legs 225°F 4-5 hrs
Lamb Rack of Lamb 400°F 30 min, for Rare, longer if desired
Lamb Lamb Chops 450°F 12 min, turn once 1/2 way through
Salmon Filet 350°F 25-30 min
Cod Loin 400°F 20 min
Scallop Scallop 450°F 8-10 min
Shrimp Whole Shrimp 450°F 2-3 min/side
Lobster Tail 400°F 25-30 min
12
© 2021 United States Stove CompanyMAINTENANCE
3. Replace the flame plate, drip pan, and grilling surface.
WARNING:
DISCONNECT THE POWER CORD BEFORE
INSPECT HOPPER FOR FINES
PERFORMING ANY MAINTENANCE! NOTE:
Note: Allow the unit to cool to ambient temperature
TURNING THE “ON/OFF” SWITCH TO “OFF”
before inspecting or cleaning the grill.
DOES NOT DISCONNECT ALL POWER TO THE
ELECTRICAL COMPONENTS OF THE GRILL. Periodically check the hopper for pellet dust (fines) build-
up. The accumulation of fines can reduce the efficiency of
the grill, increase the chance of hopper fires, and other
Failure to clean and maintain this unit as described in
unsafe operating conditions. If dust (fines) accumulate
this manual may cause poor performance and hazardous
sufficiently, vacuum out and reload the hopper with new
situations. Adjust the maintenance schedules based on
pellets.
the frequency of usage to ensure the proper operation and
maximum efficiency of this pellet grill. When performing
any maintenance on this grill, make sure the unit has
ASH REMOVAL
Note: Allow the unit to cool to ambient temperature
powered off, allowed full shutdown sequence, and then
before inspecting or cleaning the grill.
unplugged from the power source.
1. Use an ash vacuum to remove ashes from the burn
pot and the bottom of the grill’s body.
Maintenance Schedule
Operation Interval
WARNING:
Clean or change drip pan After Each Use
BE SURE ALL ASH EMBERS ARE EXTINGUISHED
Inspect and clean burn pot After Each Use
AND ALL ASHES ARE COOL TO THE TOUCH
Inspect hopper for fines (sawdust) Biweekly BEFORE VACUUMING.
Ash removal After Each Use
Inspect and clean combustion air 2. Dispose of ashes into a metal container.
Annually
blower
DISPOSAL OF ASHES
CLEAN DRIP PAN Ashes should be placed in a steel metal container with
Note: Allow the unit to cool to ambient temperature a tight-fitting lid. The closed container of ashes should
before inspecting or cleaning the grill. be placed on a non-combustible floor or on the ground
well away from all combustible materials, pending final
1. Take out the main grilling surface. DO NOT REMOVE
disposal. If the ashes are disposed of by burial in soil or
THE SEARING STATION.
otherwise locally dispersed, they should be retained in the
2. Scrape drippings down the grease drain and into the closed container until all cinders have been thoroughly
grease pan provided. cooled. Do not place other waste in the same container.
3. Clean or change the drip pan with a food-safe de-
greasing agent and ensure all the cleaning solvents INSPECT AND CLEAN COMBUSTION AIR
and chemicals are thoroughly rinsed off after BLOWER
cleaning. Note: Let the unit cool to ambient temperature before
4. Empty the grease pan if necessary. inspecting or cleaning the grill.
5. Reinstall the grilling surface.
DANGER:
INSPECT AND CLEAN BURN POT RISK OF ELECTRIC SHOCK. DISCONNECT POWER
Note: Allow the unit to cool to ambient temperature BEFORE SERVICING UNIT.
before inspecting or cleaning the grill.
1. Remove the main grilling surface. DO NOT REMOVE Over time, ash or dust may accumulate on the blades
THE SEARING STATION. of the fans. Inspect the fans and if any accumulation is
present vacuum clean. The accumulated ash or dust can
2. Inspect the burn pot to check that the combustion air
impede the fan’s performance.
holes have not become plugged. If necessary, clean
thoroughly.
13
© 2021 United States Stove CompanyMAINTENANCE
1. Open the service panel by removing the six screws. 2. Inspect the fan for dust or ash build-up and clean if
necessary.
3. Close the service panel and reinsert screws.
TROUBLESHOOTING
ERROR CODES
Possible Causes Possible Remedies (Unplug grill first when possible)
Error Code 1 - Power Failure - The power
failed while the grill was operating and Call Customer service (800) 750-2723 if the error doesn’t go away by
the grill temperature was below the warm restarting.
set point when power was returned
Error Code 2 - The circuit for the RTD
Check to see if the wires for the RTD have come unplugged. If they are not
(temperature probe mounted in the grill)
unplugged the RTD has failed.
is open.
Check to see if the grill has ran out of pellets. If there are still pellets in
Error Code 3 - Grill Temperature drops
the hopper check to see if the auger is turning. If the auger is not turning
significantly / Failure to Ignite - Grill has
it may be jammed or the auger motor has failed. If the grill does not ignite
ran out of pellets, Auger is not turning.
check to see if the Igniter is working. If the igniter is not getting hot call
Igniter did not ignite pellets.
customer service at (800) 750-2723
GRILL WON’T IGNITE
Possible Causes Possible Remedies (Unplug grill first when possible)
Verify power at the electrical outlet Plug another electrical device into that outlet to confirm power
If the power cord is connected to a GFI
(Ground Fault Interrupter), check and Reset the GFI and initiate startup procedure
reset if necessary
14
© 2021 United States Stove CompanyTROUBLESHOOTING
GRILL ENTERS SHUTDOWN MODE UNEXPECTEDLY
Possible Causes Possible Remedies (Unplug grill first when possible)
The convection blower is overheating and Clean any dust off of the windings and fan blades. If oiling the blower does
tripping the internal temperature shutoff not help, the blower may be bad.
This pellet grill is designed and tested to use cooking wood pellets. Check
Fuel other than wood pellets is being for signs of fuel other than wood pellets. No other types of fuel have been
burned in the grill approved for this pellet grill. If there are signs of other types of fuel being
used, stop using them immediately.
A power surge, spike, or voltage drop could cause the thermocouple to
Power surge or brown out situation
malfunction. Use a surge protector
Thermocouple is malfunctioning If the other items check out good, replace the thermocouple.
AFTER GRILL HAS BEEN ON FOR A WHILE, THE BURN POT OVERFILLS
Possible Causes Possible Remedies (Unplug grill first when possible)
Grill is dirty, which restricts airflow Follow all cleaning procedures in the “Maintenance” section of the
through the burnpot owner’s manual.
Burnpot holes are blocked Remove the burnpot and thoroughly clean it.
Visually inspect the air intake that leads into the burnpot for foreign
Blockage in air intake pipe
material.
Combustion blower is not spinning fast Clean fan blades and inspect bearings for wear. Ensure the fan is free of
enough any obstructions.
The brand of pellets or the batch of pellets that is being used may be of
poor quality. If possible, try a different brand of pellets. It is advisable
Bad Pellets to try a brand that is made from a different type of wood (softwood vs.
hardwood). Different woods have different characteristics when being
burned.
POWER FAILURE DURING USE
Possible Causes Possible Remedies (Unplug grill first when possible)
Observe the grill to make certain unsafe burning conditions do not occur
Power goes out during operation
during the outage.
Press the power and the prime button at the same time to resume
Restarting the unit after a power outage
standard operation.
GRILL FEEDS PELLETS, BUT WILL NOT IGNITE
Possible Causes Possible Remedies (Unplug grill first when possible)
Put power directly to the igniter element. Watch the tip of the igniter from
Bad igniter element the front of the grill. After about 2 minutes the tip should glow. If it does
not, the element is bad.
Check the voltage going to the igniter during startup. It should be 110-
The control board is not sending power to
115 volts. If the voltage is lower than full voltage, check the wiring. If the
the igniter
wiring checks out good, the board could be bad.
15
© 2021 United States Stove CompanyTROUBLESHOOTING
GRILL WILL NOT FEED PELLETS
Possible Causes Possible Remedies (Unplug grill first when possible)
Wait for the grill to cool for about 30 - 45 minutes. Check the thermocouple
Thermocouple is defective
to see if it’s bad. Check resistance with volt meter.
Remove the six retaining screws in the service panel. Remove the auger
motor from the auger shaft and try to run the unit. If the motor will turn,
Bad auger motor
the shaft is jammed on something. If the motor will not turn, the motor is
bad.
Start by emptying the hopper. Then remove the auger motor by removing
the auger pin. Remove the two screws holding the auger bushing. Gently
pull the auger shaft straight out so that the end of the auger shaft comes
Auger jam out. After the shaft is removed, inspect it for bent flights, burrs, or broken
welds. Remove any foreign material that might have caused the jam. Also,
check the auger tube for signs of damage such as burrs, rough spots, or
grooves cut into the metal that could have caused a jam.
Check all wires and connectors that connect to the auger motor,
Loose wire or connector
thermocouple, and fan.
If the fuse and the wires and connectors check out good, and if the high
limit switch did not trip, test for power going to the auger motor. If there
Bad control board
is not a full current going to the auger motor when the fuel feed light is on,
the control board is bad.
HOW TO ORDER REPAIR PARTS
For Parts Assistance Call: 800-750-2723 Ext 5051 or Email: parts@usstove.com
The information in this owner’s manual is specific to your unit. When ordering replacement parts the information in
this manual will help to ensure the correct items are ordered. Before contacting customer service write down the model
number and the serial number of this unit. That information can be found on the label attached to the back of the unit.
Other information that may be needed would be the part number and part description of the item(s) in question. Part
numbers and descriptions can be found in the “Repair Parts” section of this manual. Once this information has been
gathered you can contact customer service by phone 1-800-750-2723 Ext 5051 or Email parts@usstove.com.
Model Information
Model Number
Serial Number
16
© 2021 United States Stove CompanyREPLACEMENT PARTS
1
2
3
14
13
4
5
6
12 11
7
8
9
10
19
18
16
15
17
17
© 2021 United States Stove CompanyREPLACEMENT PARTS
Key Description Model # Part # Qty
USG730SS 893119 1
1 Grilling Grate
USG890SS 893120 1
2 Searing Station 80825 1
USG730SS 893191 1
3 Drip Pan Assembly
USG890SS 893192 1
4 Temperature Probe 80826 1
5 Flame Plate 893193 1
6 Side Table Plate 893560 1
7 Grill Basket 893561 1
8 Drip Pan Holder 893536 1
9 Caster Wheel Assembly (set of two) 893115 1
10 Fixed Wheel Assembly (set of two) 893114 1
11 Control Board 80827 1
12 Switch 80833 1
13 Fuel Grate 893206 1
14 Felt Gasket 88349 1
15 Auger Motor 80828 1
USG730SS 893287
16 Auger 1
USG890SS 893288
17 Induction Fan 80829 1
18 Ignitor Cartridge 80830 1
19 Burnpot 893189 1
N/S Meat Probe 80843 1
To order parts:
Call 1-800-750-2723 Ext 5051 or
Email to: parts@usstove.com
IN ORDER TO MAINTAIN WARRANTY, COMPONENTS MUST BE REPLACED USING ORIGINAL
MANUFACTURERS PARTS PURCHASED THROUGH YOUR DEALER OR DIRECTLY FROM THE APPLIANCE
MANUFACTURER. USE OF THIRD PARTY COMPONENTS WILL VOID THE WARRANTY.
18
© 2021 United States Stove CompanyWIRING DIAGRAM
WHITE
RED WHITE
IGNITOR
FUSE
WHITE
HOT
IGN AUG FAN
COM
RED
YELLOW
PURPLE
M YELLOW
BLACK
WHITE
AUGER
MOTOR
WHITE
M PURPLE
INDUCTION
GRILL
FAN
TEMPERATURE
PROBE
POWERED CONTROL BOARD
SWITCH POWER SUPPLY
BLACK
WHITE 115 VOLTS AC
GND
BLACK
BLACK
SEARING STATION
853641
19
© 2021 United States Stove CompanyNOTES
20
© 2021 United States Stove CompanyNOTES
21
© 2021 United States Stove CompanyYou can also read