MYOFFICESUITE DESKTOP APP - USING THE MYOFFICESUITE DESKTOP APP TO BE MORE PRODUCTIVE - WINDSTREAM ENTERPRISE
←
→
Page content transcription
If your browser does not render page correctly, please read the page content below

MyOfficeSuite Desktop App
USING THE MYOFFICESUITE DESKTOP APP TO BE MORE PRODUCTIVE

                                                                              CONTACT SUPPORT
                                                                                  1-888-623-VOIP
                                                            OfficeSuiteSupport@Broadviewnet.com
                                                              http://community.broadviewnet.com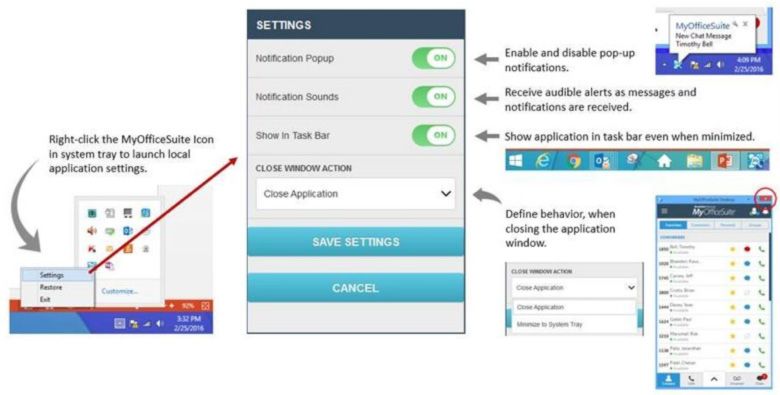
Table of Contents
    Introduction.  .  .  .  .  .  .  .  .  .  .  .  .  .  .  .  .  .  .  .  .  .  .  .  .  .  .  .  .  .  .  .  .  .  .  .  .  .  .  .  .  .  .  .  .  .  .  .  .  .  .  .  .  .  .  .  .  .  .  .  .  .  .  .  .  .  .  .  .  .  .  .  .  .  .  .  .  .  .  .  .  .  .  .  .  .  .  .  .  .  .  .  .  .  .  .  .  .  .  .  .  .  .  .  .  .  .  .  .  .  .  .  .  .  .  .  .  .  .  .  .  . 3
    Home Page. .  .  .  .  .  .  .  .  .  .  .  .  .  .  .  .  .  .  .  .  .  .  .  .  .  .  .  .  .  .  .  .  .  .  .  .  .  .  .  .  .  .  .  .  .  .  .  .  .  .  .  .  .  .  .  .  .  .  .  .  .  .  .  .  .  .  .  .  .  .  .  .  .  .  .  .  .  .  .  .  .  .  .  .  .  .  .  .  .  .  .  .  .  .  .  .  .  .  .  .  .  .  .  .  .  .  .  .  .  .  .  .  .  .  .  .  .  .  .  .  . 3
    Contacts Icon .  .  .  .  .  .  .  .  .  .  .  .  .  .  .  .  .  .  .  .  .  .  .  .  .  .  .  .  .  .  .  .  .  .  .  .  .  .  .  .  .  .  .  .  .  .  .  .  .  .  .  .  .  .  .  .  .  .  .  .  .  .  .  .  .  .  .  .  .  .  .  .  .  .  .  .  .  .  .  .  .  .  .  .  .  .  .  .  .  .  .  .  .  .  .  .  .  .  .  .  .  .  .  .  .  .  .  .  .  .  .  .  .  .  .  .  . 4 - 5
                Icons. .  .  .  .  .  .  .  .  .  .  .  .  .  .  .  .  .  .  .  .  .  .  .  .  .  .  .  .  .  .  .  .  .  .  .  .  .  .  .  .  .  .  .  .  .  .  .  .  .  .  .  .  .  .  .  .  .  .  .  .  .  .  .  .  .  .  .  .  .  .  .  .  .  .  .  .  .  .  .  .  .  .  .  .  .  .  .  .  .  .  .  .  .  .  .  .  .  .  .  .  .  .  .  .  .  .  .  .  .  .  .  .  .  .  .  .  .  .  .  .  .  .  .  . 4
                Favorites Tab.  .  .  .  .  .  .  .  .  .  .  .  .  .  .  .  .  .  .  .  .  .  .  .  .  .  .  .  .  .  .  .  .  .  .  .  .  .  .  .  .  .  .  .  .  .  .  .  .  .  .  .  .  .  .  .  .  .  .  .  .  .  .  .  .  .  .  .  .  .  .  .  .  .  .  .  .  .  .  .  .  .  .  .  .  .  .  .  .  .  .  .  .  .  .  .  .  .  .  .  .  .  .  .  .  .  .  .  .  .  .  .  .  .  .  .  . 5
                Coworkers Tab. .  .  .  .  .  .  .  .  .  .  .  .  .  .  .  .  .  .  .  .  .  .  .  .  .  .  .  .  .  .  .  .  .  .  .  .  .  .  .  .  .  .  .  .  .  .  .  .  .  .  .  .  .  .  .  .  .  .  .  .  .  .  .  .  .  .  .  .  .  .  .  .  .  .  .  .  .  .  .  .  .  .  .  .  .  .  .  .  .  .  .  .  .  .  .  .  .  .  .  .  .  .  .  .  .  .  .  .  .  .  .  .  .  . 5
                Personal Tab .  .  .  .  .  .  .  .  .  .  .  .  .  .  .  .  .  .  .  .  .  .  .  .  .  .  .  .  .  .  .  .  .  .  .  .  .  .  .  .  .  .  .  .  .  .  .  .  .  .  .  .  .  .  .  .  .  .  .  .  .  .  .  .  .  .  .  .  .  .  .  .  .  .  .  .  .  .  .  .  .  .  .  .  .  .  .  .  .  .  .  .  .  .  .  .  .  .  .  .  .  .  .  .  .  .  .  .  .  .  .  .  .  .  .  .  . 5
                Groups Tab .  .  .  .  .  .  .  .  .  .  .  .  .  .  .  .  .  .  .  .  .  .  .  .  .  .  .  .  .  .  .  .  .  .  .  .  .  .  .  .  .  .  .  .  .  .  .  .  .  .  .  .  .  .  .  .  .  .  .  .  .  .  .  .  .  .  .  .  .  .  .  .  .  .  .  .  .  .  .  .  .  .  .  .  .  .  .  .  .  .  .  .  .  .  .  .  .  .  .  .  .  .  .  .  .  .  .  .  .  .  .  .  .  .  .  .  .  . 5
    Calls Icon.  .  .  .  .  .  .  .  .  .  .  .  .  .  .  .  .  .  .  .  .  .  .  .  .  .  .  .  .  .  .  .  .  .  .  .  .  .  .  .  .  .  .  .  .  .  .  .  .  .  .  .  .  .  .  .  .  .  .  .  .  .  .  .  .  .  .  .  .  .  .  .  .  .  .  .  .  .  .  .  .  .  .  .  .  .  .  .  .  .  .  .  .  .  .  .  .  .  .  .  .  .  .  .  .  .  .  .  .  .  .  .  .  .  .  .  .  .  .  .  .  .  .  .  . 6
    Voicemail Icon.  .  .  .  .  .  .  .  .  .  .  .  .  .  .  .  .  .  .  .  .  .  .  .  .  .  .  .  .  .  .  .  .  .  .  .  .  .  .  .  .  .  .  .  .  .  .  .  .  .  .  .  .  .  .  .  .  .  .  .  .  .  .  .  .  .  .  .  .  .  .  .  .  .  .  .  .  .  .  .  .  .  .  .  .  .  .  .  .  .  .  .  .  .  .  .  .  .  .  .  .  .  .  .  .  .  .  .  .  .  .  .  .  .  .  .  .  .  .  . 6
    Chat Icon.  .  .  .  .  .  .  .  .  .  .  .  .  .  .  .  .  .  .  .  .  .  .  .  .  .  .  .  .  .  .  .  .  .  .  .  .  .  .  .  .  .  .  .  .  .  .  .  .  .  .  .  .  .  .  .  .  .  .  .  .  .  .  .  .  .  .  .  .  .  .  .  .  .  .  .  .  .  .  .  .  .  .  .  .  .  .  .  .  .  .  .  .  .  .  .  .  .  .  .  .  .  .  .  .  .  .  .  .  .  .  .  .  .  .  .  .  .  .  .  .  .  .  .  . 6
    Fly Out Icon .  .  .  .  .  .  .  .  .  .  .  .  .  .  .  .  .  .  .  .  .  .  .  .  .  .  .  .  .  .  .  .  .  .  .  .  .  .  .  .  .  .  .  .  .  .  .  .  .  .  .  .  .  .  .  .  .  .  .  .  .  .  .  .  .  .  .  .  .  .  .  .  .  .  .  .  .  .  .  .  .  .  .  .  .  .  .  .  .  .  .  .  .  .  .  .  .  .  .  .  .  .  .  .  .  .  .  .  .  .  .  .  .  .  .  .  .  .  .  .  .  . 7
    Application Settings .  .  .  .  .  .  .  .  .  .  .  .  .  .  .  .  .  .  .  .  .  .  .  .  .  .  .  .  .  .  .  .  .  .  .  .  .  .  .  .  .  .  .  .  .  .  .  .  .  .  .  .  .  .  .  .  .  .  .  .  .  .  .  .  .  .  .  .  .  .  .  .  .  .  .  .  .  .  .  .  .  .  .  .  .  .  .  .  .  .  .  .  .  .  .  .  .  .  .  .  .  .  .  .  .  .  .  .  .  .  . 8
    Menu Options .  .  .  .  .  .  .  .  .  .  .  .  .  .  .  .  .  .  .  .  .  .  .  .  .  .  .  .  .  .  .  .  .  .  .  .  .  .  .  .  .  .  .  .  .  .  .  .  .  .  .  .  .  .  .  .  .  .  .  .  .  .  .  .  .  .  .  .  .  .  .  .  .  .  .  .  .  .  .  .  .  .  .  .  .  .  .  .  .  .  .  .  .  .  .  .  .  .  .  .  .  .  .  .  .  .  .  .  .  .  .  .  .  .  .  .  .  . 9
                My Email. .  .  .  .  .  .  .  .  .  .  .  .  .  .  .  .  .  .  .  .  .  .  .  .  .  .  .  .  .  .  .  .  .  .  .  .  .  .  .  .  .  .  .  .  .  .  .  .  .  .  .  .  .  .  .  .  .  .  .  .  .  .  .  .  .  .  .  .  .  .  .  .  .  .  .  .  .  .  .  .  .  .  .  .  .  .  .  .  .  .  .  .  .  .  .  .  .  .  .  .  .  .  .  .  .  .  .  .  .  .  .  .  .  .  .  .  .  .  . 10
                Do Not Disturb. .  .  .  .  .  .  .  .  .  .  .  .  .  .  .  .  .  .  .  .  .  .  .  .  .  .  .  .  .  .  .  .  .  .  .  .  .  .  .  .  .  .  .  .  .  .  .  .  .  .  .  .  .  .  .  .  .  .  .  .  .  .  .  .  .  .  .  .  .  .  .  .  .  .  .  .  .  .  .  .  .  .  .  .  .  .  .  .  .  .  .  .  .  .  .  .  .  .  .  .  .  .  .  .  .  .  .  .  .  .  .  .  . 10
                My Call Twinning .  .  .  .  .  .  .  .  .  .  .  .  .  .  .  .  .  .  .  .  .  .  .  .  .  .  .  .  .  .  .  .  .  .  .  .  .  .  .  .  .  .  .  .  .  .  .  .  .  .  .  .  .  .  .  .  .  .  .  .  .  .  .  .  .  .  .  .  .  .  .  .  .  .  .  .  .  .  .  .  .  .  .  .  .  .  .  .  .  .  .  .  .  .  .  .  .  .  .  .  .  .  .  .  .  .  .  .  .  .  . 11
                My Call Forwarding .  .  .  .  .  .  .  .  .  .  .  .  .  .  .  .  .  .  .  .  .  .  .  .  .  .  .  .  .  .  .  .  .  .  .  .  .  .  .  .  .  .  .  .  .  .  .  .  .  .  .  .  .  .  .  .  .  .  .  .  .  .  .  .  .  .  .  .  .  .  .  .  .  .  .  .  .  .  .  .  .  .  .  .  .  .  .  .  .  .  .  .  .  .  .  .  .  .  .  .  .  .  .  .  .  .  .  .  . 11
                Voicemail Settings .  .  .  .  .  .  .  .  .  .  .  .  .  .  .  .  .  .  .  .  .  .  .  .  .  .  .  .  .  .  .  .  .  .  .  .  .  .  .  .  .  .  .  .  .  .  .  .  .  .  .  .  .  .  .  .  .  .  .  .  .  .  .  .  .  .  .  .  .  .  .  .  .  .  .  .  .  .  .  .  .  .  .  .  .  .  .  .  .  .  .  .  .  .  .  .  .  .  .  .  .  .  .  .  .  .  .  .  .  . 12
                Multi-Desking. .  .  .  .  .  .  .  .  .  .  .  .  .  .  .  .  .  .  .  .  .  .  .  .  .  .  .  .  .  .  .  .  .  .  .  .  .  .  .  .  .  .  .  .  .  .  .  .  .  .  .  .  .  .  .  .  .  .  .  .  .  .  .  .  .  .  .  .  .  .  .  .  .  .  .  .  .  .  .  .  .  .  .  .  .  .  .  .  .  .  .  .  .  .  .  .  .  .  .  .  .  .  .  .  .  .  .  .  .  .  .  .  .  . 13
                My SoftPhone. .  .  .  .  .  .  .  .  .  .  .  .  .  .  .  .  .  .  .  .  .  .  .  .  .  .  .  .  .  .  .  .  .  .  .  .  .  .  .  .  .  .  .  .  .  .  .  .  .  .  .  .  .  .  .  .  .  .  .  .  .  .  .  .  .  .  .  .  .  .  .  .  .  .  .  .  .  .  .  .  .  .  .  .  .  .  .  .  .  .  .  .  .  .  .  .  .  .  .  .  .  .  .  .  .  .  .  .  .  .  .  .  .  . 13
                My HD Meeting.  .  .  .  .  .  .  .  .  .  .  .  .  .  .  .  .  .  .  .  .  .  .  .  .  .  .  .  .  .  .  .  .  .  .  .  .  .  .  .  .  .  .  .  .  .  .  .  .  .  .  .  .  .  .  .  .  .  .  .  .  .  .  .  .  .  .  .  .  .  .  .  .  .  .  .  .  .  .  .  .  .  .  .  .  .  .  .  .  .  .  .  .  .  .  .  .  .  .  .  .  .  .  .  .  .  .  .  .  .  .  .  . 14
                OfficeSuite® Community.  .  .  .  .  .  .  .  .  .  .  .  .  .  .  .  .  .  .  .  .  .  .  .  .  .  .  .  .  .  .  .  .  .  .  .  .  .  .  .  .  .  .  .  .  .  .  .  .  .  .  .  .  .  .  .  .  .  .  .  .  .  .  .  .  .  .  .  .  .  .  .  .  .  .  .  .  .  .  .  .  .  .  .  .  .  .  .  .  .  .  .  .  .  .  .  .  .  .  .  .  .  .  . 15
                Company Settings .  .  .  .  .  .  .  .  .  .  .  .  .  .  .  .  .  .  .  .  .  .  .  .  .  .  .  .  .  .  .  .  .  .  .  .  .  .  .  .  .  .  .  .  .  .  .  .  .  .  .  .  .  .  .  .  .  .  .  .  .  .  .  .  .  .  .  .  .  .  .  .  .  .  .  .  .  .  .  .  .  .  .  .  .  .  .  .  .  .  .  .  .  .  .  .  .  .  .  .  .  .  .  .  .  .  .  .  .  . 15
                Account Settings. .  .  .  .  .  .  .  .  .  .  .  .  .  .  .  .  .  .  .  .  .  .  .  .  .  .  .  .  .  .  .  .  .  .  .  .  .  .  .  .  .  .  .  .  .  .  .  .  .  .  .  .  .  .  .  .  .  .  .  .  .  .  .  .  .  .  .  .  .  .  .  .  .  .  .  .  .  .  .  .  .  .  .  .  .  .  .  .  .  .  .  .  .  .  .  .  .  .  .  .  .  .  .  .  .  . 15 - 16
    		HD Meeting Settings .  .  .  .  .  .  .  .  .  .  .  .  .  .  .  .  .  .  .  .  .  .  .  .  .  .  .  .  .  .  .  .  .  .  .  .  .  .  .  .  .  .  .  .  .  .  .  .  .  .  .  .  .  .  .  .  .  .  .  .  .  .  .  .  .  .  .  .  .  .  .  .  .  .  .  .  .  .  .  .  .  .  .  .  .  .  .  .  .  .  .  .  .  .  .  .  .  .  .  .  .  .  . 16
    		Chat Notifications .  .  .  .  .  .  .  .  .  .  .  .  .  .  .  .  .  .  .  .  .  .  .  .  .  .  .  .  .  .  .  .  .  .  .  .  .  .  .  .  .  .  .  .  .  .  .  .  .  .  .  .  .  .  .  .  .  .  .  .  .  .  .  .  .  .  .  .  .  .  .  .  .  .  .  .  .  .  .  .  .  .  .  .  .  .  .  .  .  .  .  .  .  .  .  .  .  .  .  .  .  .  .  .  .  . 16
                Contact Us.  .  .  .  .  .  .  .  .  .  .  .  .  .  .  .  .  .  .  .  .  .  .  .  .  .  .  .  .  .  .  .  .  .  .  .  .  .  .  .  .  .  .  .  .  .  .  .  .  .  .  .  .  .  .  .  .  .  .  .  .  .  .  .  .  .  .  .  .  .  .  .  .  .  .  .  .  .  .  .  .  .  .  .  .  .  .  .  .  .  .  .  .  .  .  .  .  .  .  .  .  .  .  .  .  .  .  .  .  .  .  .  .  .  .  .  .  . 17
                Sign Out.  .  .  .  .  .  .  .  .  .  .  .  .  .  .  .  .  .  .  .  .  .  .  .  .  .  .  .  .  .  .  .  .  .  .  .  .  .  .  .  .  .  .  .  .  .  .  .  .  .  .  .  .  .  .  .  .  .  .  .  .  .  .  .  .  .  .  .  .  .  .  .  .  .  .  .  .  .  .  .  .  .  .  .  .  .  .  .  .  .  .  .  .  .  .  .  .  .  .  .  .  .  .  .  .  .  .  .  .  .  .  .  .  .  .  .  .  .  .  . 17

2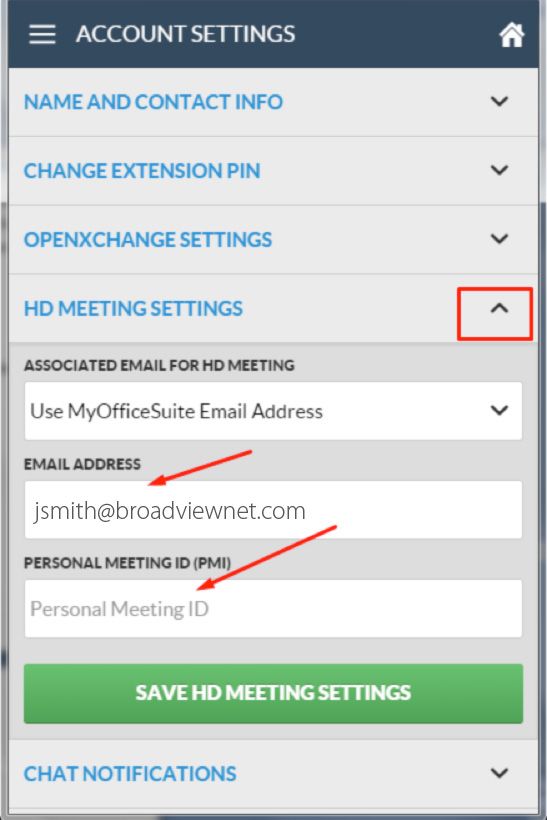
Using the MyOfficeSuite Desktop App
     The MyOfficeSuite Desktop App allows you to unify communications with a concise and convenient interface that is designed specifically for the desktop.

     The desktop app will automatically start whenyour PC is turned on and will stay on in the background, so you are always connected to enable features, set services, click-to-call and
     chat…right from your PC! It even gives you an audible notification when you get a new voicemail or chat! This eliminates the need to log into the MyOfficeSuite portal to access
     your contacts and manage your services.

     The desktop app will increase your productivity by allowing you to see the availability of your entire company and manage all of your communications from a simple application that
     is always on and available.

     Homepage
     Click the three horizontal bars on the top right corner of your Desktop App to view the      The bell icon will notify you if there is an alert. An alert is typically an informational
     menu options where you can manage your settings associated with your OfficeSuite®            message announcing new capabilities in MyOfficeSuite. An alert is represented by a
     services. The menu options are explained in detail a little later in this document.          number in a red circle over the bell indicating you have an alert that you have not read.

                                                                                                  View your presence and chat status with the person icon. The dot on the left of the
                                                                                                  icon reflects your phone status (red means you are on the phone, green means you
                                                                                                  are not on the phone). The dot on the right reflects your Chat status settings (blue
                                                                                                  means you are available to chat, a clear circle with a line through it means you are
                                                                                                  unavailable to chat). Click on the icon to easily manage your Presence and Chat.
                                                                                                  By default, MyOfficeSuite follows the status of the phone.

At the bottom of the homepage there are several icons to manage your OfficeSuite® features.

                                                                                                                                                        MyOfficeSuite Desktop App Guide        3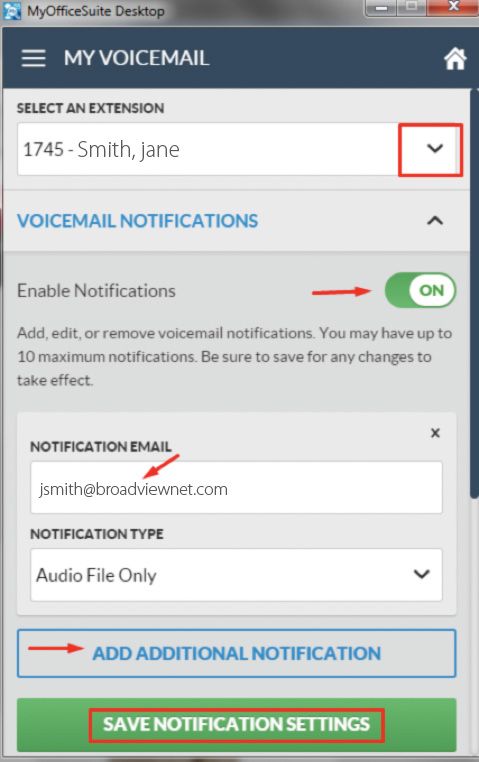
Contacts Icon

                                       On the Contacts page, you will see a star, a bubble and a phone handset across from
                                       each name listed. Each represents a status for that individual.

                                       Star – If the star is yellow, this means you indicated it as a favorite and the name will
                                       also be listed in the favorites tab.

                                       Bubble (Chat) - The bubble represents the person’s chat presence.
                                       The various colors mean:
                                       Blue filled – available to chat
                                       Grey with a line – offline; not available to chat
                                       Red filled – you have a chat from the person associated with the red bubble
                                       White with a red outline – a chat is awaiting me from someone who is offline

                                       Phone Handset - The handset indicates the person’s availability to speak over the
                                       phone. The status for each variation is:
                                       Green – they are logged in and available to speak
                                       Red – they are logged in and on another call
                                       Grey with a line through their name – they are not logged into an OfficeSuite® phone.

                                       Click-to-Call – You need to have your phone available and logged in. Then, you click
                                       on the picture of the handset (click-to-call). Your OfficeSuite® phone (this can be an
                                       OfficeSuite® phone, PC Console, Softphone etc.) will start to ring and the distant end
                                       will begin to ring. The called party will either answer or you will be sent to coverage.
                                       This is no different than if you called from the phone, only now you have the added
                                       convenience of doing this all from one place (your desktop).

4    MyOfficeSuite Desktop App Guide
Contacts Icon Continued
Favorites Tab                                                                                 Personal Tab
Build your Favorites list by clicking on the star next to a person’s name in the co-workers   Use this tab to view and access personal
tab or the personal tab. You can also move a group to your favorites list by clicking on      contacts (personal contacts are added
the star across from the group name on the Group tab. Clicking the star turns it yellow,      through the MyOfficeSuite portal). You
indicating the name is one of your favorites. The names will now also appear in your          won’t see the presence of your personal
Favorites tab. Your favorite groups will be listed below your favorite coworkers.             contacts, but you will have the added
                                                                                              convenience of click-to-call (in order to
                                                                                              have presence, the contact must belong
                                                                                              to your organization’s OfficeSuite® system).
                                                                                              Click the personal contacts name, then
                                                                                              click on the phone icon to activate click-
                                                                                              to-call.
                                                                                              Groups Tab
                                                                                              As a user, you can create your own groups. Other users can also create groups and
                                                                                              add you as a member. This tab lists all of the groups that you belong to. The user
                                                                                              creating the group becomes the group administrator. MyOfficeSuite Administrators
                                                                                              cannot change members of groups; only the user who created the group (ie. the group
                                                                                              administrator) can add or remove members.
                                                                                                                                             You can mark a group as a favorite so the
                                                                                                                                             group appears in the Favorites tab.

                                                                                                                                             The double bubble represents group
                                                                                                                                             chat. You can click on this and the chat
                                                                                                                                             will be sent to the group members. If
                                                                                                                                             the double bubble is red, there is a chat
                                                                                                                                             awaiting you from one of the members of
                                                                                                                                             the group. All chats within the group can
                                                                                                                                             be viewed by all group members.

                                                                                                                                             You are a member of a group if there is an
                                                                                                                                             informational icon across from the group
                                                                                                                                             name. Click on the icon and you can see
                                                                                                                                             who is the admin of the group, as well as
                                                                                                                                             a listing of all other group members. A
                                                                                                                                             pencil icon across from the group name
Coworkers tab
                                                                                                                                             indicates you are the admin of the group.
The coworkers tab lists all the employees in your organization who have an OfficeSuite®
                                                                                                                                             Click the pencil to add and remove
extension.
                                                                                                                                             members, modify the group name or
                                                                                                                                             delete the group.

                                                                                                                                                   MyOfficeSuite Desktop App Guide   5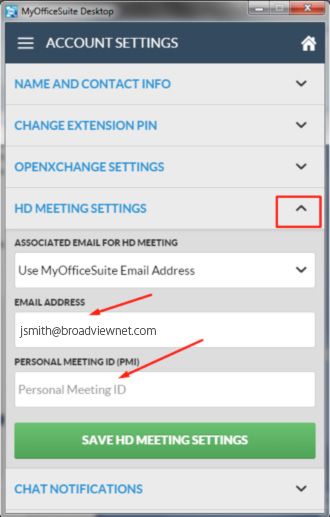
Calls Icon                                     Voicemail Icon                                                      Chat Icon
                                               From the voicemail icon, you can listen to your voicemail, return   Click on the Chat icon to start an individual or group chat,
                                               a call to the person who left a message, email the message to       initiate a call to an individual (not to a group) or delete the chat.
                                               another person, or delete the message.

Click on the calls icon to see the last 25
calls you made or received. You can click-
to-call from the call log by clicking on the
phone handset next to a number/name.

6        MyOfficeSuite Desktop App Guide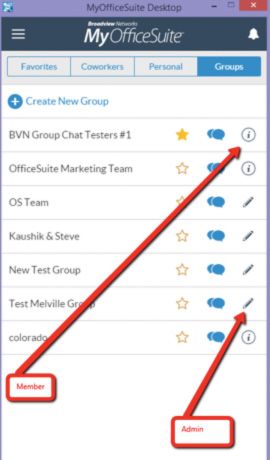
(Fly Out) Icon
Click on the fly out to bring up two options: HD Meeting and Dialpad.

If you are logged into your HD Meeting account when you click the HD Meeting icon,
the HD Meeting app will pop up allowing you to make use of all HD Meeting features,
including scheduling, joining and starting meetings. If you are not logged into HD
Meeting when you click the icon, you will be brought to the HD Meeting login screen.
Contact your Administrator for an HD Meeting license if you don’t already have one
assigned to you.

                                                                                          If you select dial pad, you will
                                                                                          be able to place a call by typing
                                                                                          the number or clicking on the
                                                                                          numbers on the dialpad.
                                                                                          The call will be activated on
                                                                                          your OfficeSuite® device.

                                                                                       MyOfficeSuite Desktop App Guide    7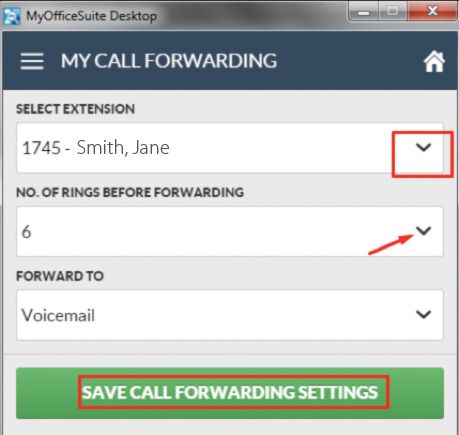
Application Settings
You can choose whether you want the X to minimize the app so that chat is “always on”         Other enhancements include a blinking task-bar icon and a flashing window frame to
or close it out entirely. Changing the application settings is easy. Simply right-click the   help ensure that you never lose sight of incoming chats, newly received voicemails,
MyOfficeSuite Icon in the system tray to launch the application settings.                     and system-generated alerts while the application is minimized or tucked behind other
                                                                                              windows.

8       MyOfficeSuite Desktop App Guide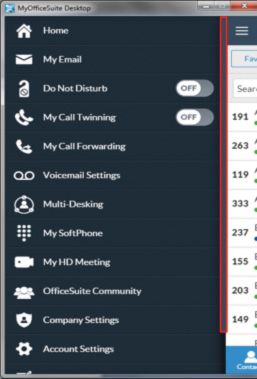
Menu Options
Click the three horizontal bars on the top right corner of your Desktop App to view
                                                                                                                              Use the scroll bar on the right to see all
menu options where you can manage your settings associated with your OfficeSuite®
                                                                                                                              menu options.
services.

                                                                                      Clicking on the ‘Home’ menu option
                                                                                      returns you to the main screen of the
                                                                                      Desktop App.

                                                                                                                                    MyOfficeSuite Desktop App Guide        9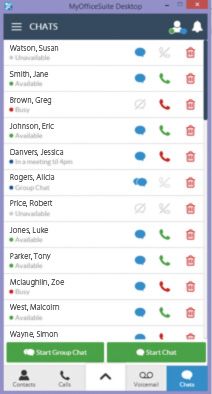
My Email                                   Do Not Disturb

Clicking on the MyEmail menu option        By default, Do not Disturb is set to ‘Off’.
lets you save your OpenExchange            You can click ‘Off’ to turn Do Not Disturb
Email Settings. If you have purchased      ‘On’. By doing this, all incoming calls will
OpenExchange Email with us, you can        be sent directly to your voicemail.
enter your email address. After you have
saved your OpenExchange settings, you
can check your Email from the Email
widget on the MyOfficeSuite portal
dashboard page.

                                                                                          If you have multiple OfficeSuite® extensions, you can click on
                                                                                          ‘Do Not Disturb’. The following screen appears. Click the drop
                                                                                          down arrow to choose the OfficeSuite® extension you wish to
                                                                                          set to Do Not Disturb. Make sure to press ‘Save Do Not Disturb
                                                                                          Settings’ before returning to the home page or the menu.

10      MyOfficeSuite Desktop App Guide
My Call Twinning My Call Forwarding
My Call Twinning enables incoming calls Click My Call Forwarding to forward your OfficeSuite® extension. Choose the OfficeSuite®
to ring your OfficeSuite® phone and extension you wish to forward from the drop-down list. Then choose the number of
another phone simultaneously. Press rings before forwarding. You can pick a number from 1– 20. Then, choose how you wish
the toggle to turn twinning on or off. to forward: directly to voicemail, an auto attendant, another extension, another phone
This assumes you have already entered a number, or no call forwarding. If an auto attendant or another extension is chosen,
phone number to ring simultaneously. If another field will appear where you can pick the extension or the auto attendant from a
you have not, then click My Call Twinning drop-down list. Once you have chosen your forwarding option, click Save Call Forwarding
and follow the steps below. Settings. If you want to turn call forwarding off, choose No Call Forwarding from the
forwarding options drop-down list, then click Save Call Forwarding Settings.
If you have multiple OfficeSuite®
extensions or need to set the number
you wish your incoming calls will ring
simultaneously, click My Call Twinning.
The following screen appears. Click
on the drop-down list to choose the
OfficeSuite® extension you wish to set to
Do Not Disturb. Then press the toggle to
enable Twinning. Enter the phone
number, including area code, you wish
to ring simultaneously. Then press
Save Twinning Settings.
MyOfficeSuite Desktop App Guide 11Voicemail Settings
Under My Voicemail, you can also change
your voicemail PIN. Enter in a new PIN.
Then, re-enter your new PIN in the
Select Voicemail Settings to set your
Confirm New PIN field. Next, enter your
voicemail notifications or change
portal password. This is your password
your voicemail PIN. First, select the
to MyOfficeSuite. Press Save New
OfficeSuite® extension from the
Voicemail PIN to set your new PIN. Visit
drop-down list that you want to set
the OfficeSuite® Community for more
notifications for or change the voicemail
information on PIN requirements.
PIN. For notifications, click Voicemail
Notifications. Press the toggle to turn on
notifications. Enter the email address in
the notification email field. Then, choose
the notification type. You can choose
audio file only, audio file with transcript,
or No Audio. If you want to add a second
notification email, click Add Additional
Notification and enter in another email
address and choose your notification
type. You can enter up to 10 different
email addresses to notify of a new email.
Then, press Save Notification Settings.
12 MyOfficeSuite Desktop App GuideMulti-Desking My Softphone
Multi-Desking gives you the ability to If you have a Softphone license, you will see a menu option for ‘My SoftPhone’. If you are logged into your softphone
be connected to more than one device and click this menu option, your softphone console will pop up on your screen. If you are not logged into your
via the same extension. The company softphone and you click ‘My SoftPhone’, the softphone login screen will pop up on your screen.
administrator has to turn multi-desking
on for users. Once you are logged
into more than one device, you must
determine which device is the click-to-
call originator and the intercom recipient.
You can also log out without being near
the physical device. You can change
these settings at any time.
MyOfficeSuite Desktop App Guide 13My HD Meeting
You can use HD Meeting to start a
meeting or join an HD Meeting. You
must purchase an HD Meeting license to
start a meeting. If you do have a license,
you need to associate your HD Meeting
personal meeting ID (PMI) with your
email address in order to use the HD In the MyOfficeSuite portal under the Settings tab, choose My Account Settings. Scroll down to HD Meeting Settings.
Meeting option. You can do this through Enter in your HD Meeting email address and your PMI, then press Save.
Account Settings > HD Meeting Settings
in the Desktop App, or you can log into
the MyOfficeSuite portal.
If you are logged into your HD Meeting account when you click the My HD
Under Account Settings, click HD Meeting menu option, the HD Meeting app will pop up allowing you to make
Meeting Settings to expand that section. use of all of the HD Meeting features, including: scheduling, joining and starting
Enter your email address associated with meetings. If you are not logged into HD Meeting when you click the icon, you
your HD Meeting license and your PMI. will be brought to the HD Meeting login screen. Contact your Administrator for
Then, press Save HD Meeting Settings. an HD Meeting license if you don’t already have one assigned to you.
14 MyOfficeSuite Desktop App GuideOfficeSuite Community Company Settings
OfficeSuite® Community enables our If you are a Tenant Administrator, you
customers and employees to collaborate will see a menu option called ‘Company
on answers, solutions and ideas about Settings’. Use this option in an emergency
the OfficeSuite® products and services to quickly enable all of the emergency
you use. Once you are a member, you overrides setup for your organization by
can ask a question, submit a product clicking Enable Emergency Overrides.
idea, or share feedback. You can also revert back to normal call
routing by clicking Disable Emergency
Click on the OfficeSuite® Community Overrides.
menu option. If you are already a
member, sign in using your Community Emergency Overrides can be setup in the
login credentials. If not already a MyOfficeSuite portal using the Incoming
member, follow the steps below to get Call Routing widget on your dashboard.
started.
STEP 1: Click “Register” (upper right)
Account Settings
STEP 2: Login using your Facebook or
Google credentials or click «Or Register»
to create an account. Under the Account Settings menu option, you can manage your contact information and other settings tied to your
OfficeSuite® services.
STEP 3: Fill in your name and email
address, create a password, type in the
words you see and click Sign up.
STEP 4: You will receive an email
from “Get Satisfaction” who powers our
OfficeSuite® Community. Please click on
the ‘confirm my email address’ link which
is at the bottom of that email.
Click on each option to expand each section. Under Name and Contact Info, you can change your name, email address and
contact phone number.
MyOfficeSuite Desktop App Guide 15Account Settings Continued
Under Change Extension PIN, you can change the PIN associated with your extension HD MEETING SETTINGS
and apply the same PIN to your voicemail if you wish. Enter the information requested; Enter your email address associated with your HD Meeting license and your PMI.
choose whether to apply a new PIN to your voicemail, then press Save New Extension Then, press Save HD Meeting Settings.
PIN.
Under OpenExchange Settings, choose whether to associate your OfficeSuite® email CHAT NOTIFICATIONS
address or a different email address. Follow the instructions on the screen. Make sure Choose whether to show a preview of chat messages in your notifications by toggling
you save your OpenXchange Settings. the on/off switch. When you receive a chat, you will see a notification in a white box
appear in the lower right hand corner of your screen.
16 MyOfficeSuite Desktop App GuideContact Us Sign Out
Use this menu option if you want to send a comment to us. Use the comment box Use this menu option to sign out of the
to type your remarks, then simply hit send. Your name, company name and contact Desktop App
information is pre-populated for you.
WE ARE HERE TO HELP! PLEASE CONTACT US AT:
Phone: 888.623.VOIP (8647)
Email: officesuitesupport@broadviewnet.com
Live Chat: Chat live with us via the portal.
Just click on Live Help on top of the MyOfficeSuite Dashboard
http://MyOfficeSuite.broadviewnet.comYou can also read