NAVAL POSTGRADUATE SCHOOL - MONTEREY, CALIFORNIA - NPS-CS-13-006
←
→
Page content transcription
If your browser does not render page correctly, please read the page content below
NPS-CS-13-006

                        NAVAL
                    POSTGRADUATE
                       SCHOOL
                       MONTEREY, CALIFORNIA

                 BULK EXTRACTOR 1.4 USER’S MANUAL

                                         by

                                 Jessica R. Bradley
                                Simson L. Garfinkel

                                  August 31, 2013

                Approved for public release; distribution is unlimited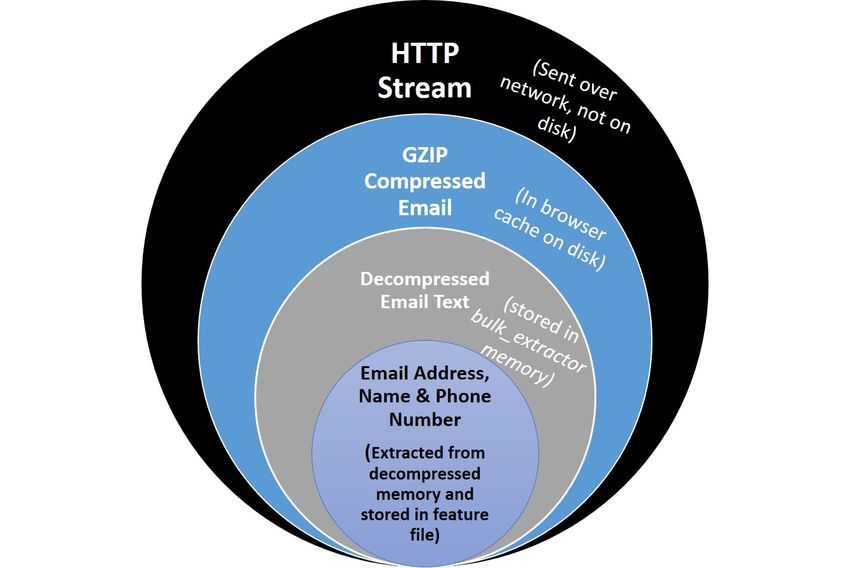
THIS PAGE INTENTIONALLY LEFT BLANK
NAVAL POSTGRADUATE SCHOOL
                         Monterey, California 93943-5000

RDML Jan E. Tighe                                          Douglas A. Hensler
Interim President                                          Provost

The report entitled “Bulk Extractor 1.4 User’s Manual” was prepared for and funded by
Defense Intelligent Agency.

Further distribution of all or part of this report is authorized.

This report was prepared by:

Jessica R. Bradley                                 Simson L. Garfinkel

Reviewed by:                                       Released by:

Peter Denning, Chairman                            Jeffrey D. Paduan
Computer Science                                   Dean of Research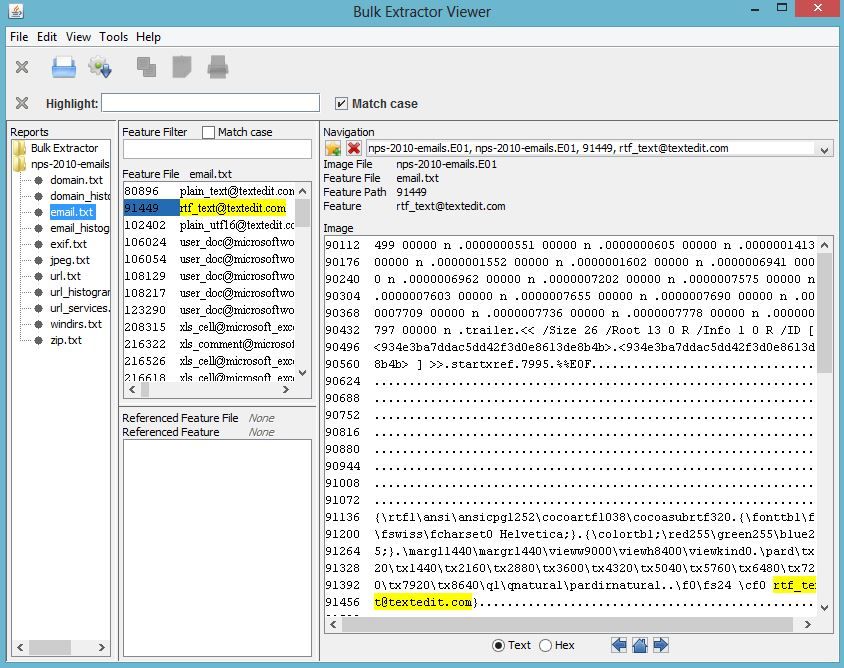
THIS PAGE INTENTIONALLY LEFT BLANK

                iv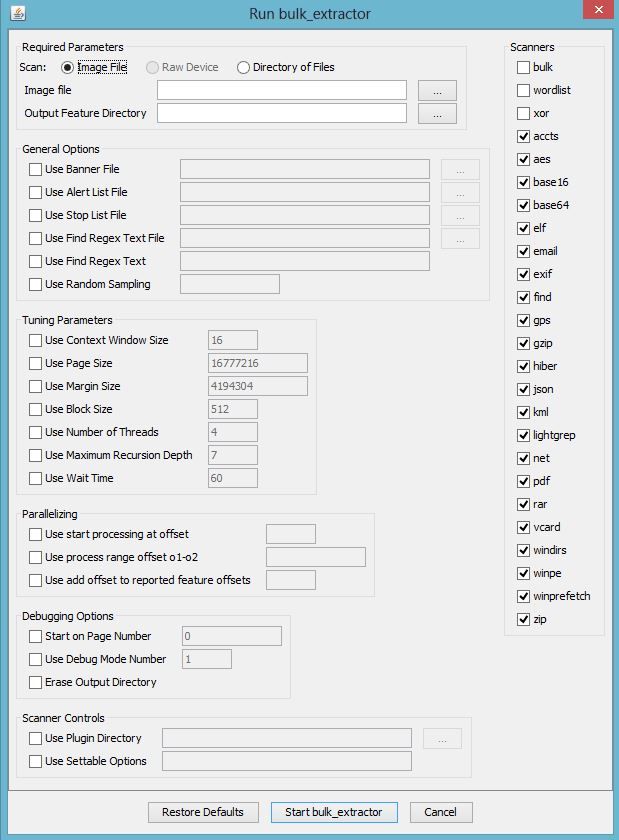
Form Approved
                 REPORT DOCUMENTATION PAGE                                                                                                OMB No. 0704–0188
The public reporting burden for this collection of information is estimated to average 1 hour per response, including the time for reviewing instructions, searching existing data sources,
gathering and maintaining the data needed, and completing and reviewing the collection of information. Send comments regarding this burden estimate or any other aspect of this collection
of information, including suggestions for reducing this burden to Department of Defense, Washington Headquarters Services, Directorate for Information Operations and Reports (0704–0188),
1215 Jefferson Davis Highway, Suite 1204, Arlington, VA 22202–4302. Respondents should be aware that notwithstanding any other provision of law, no person shall be subject to any penalty
for failing to comply with a collection of information if it does not display a currently valid OMB control number. PLEASE DO NOT RETURN YOUR FORM TO THE ABOVE
ADDRESS.
1. REPORT DATE (DD–MM–YYYY)                       2. REPORT TYPE                                                             3. DATES COVERED (From — To)
 31–8–2013                                         Technical Report                                                           2012-10-01—2013-09-15
4. TITLE AND SUBTITLE                                                                                            5a. CONTRACT NUMBER

                                                                                                                 5b. GRANT NUMBER

 Bulk Extractor 1.4 User’s Manual
                                                                                                                 5c. PROGRAM ELEMENT NUMBER

6. AUTHOR(S)                                                                                                     5d. PROJECT NUMBER

                                                                                                                 5e. TASK NUMBER

 Jessica R. Bradley, Simson L. Garfinkel
                                                                                                                 5f. WORK UNIT NUMBER

7. PERFORMING ORGANIZATION NAME(S) AND ADDRESS(ES)                                                                           8. PERFORMING ORGANIZATION REPORT
                                                                                                                                NUMBER

 Naval Postgraduate School
 Monterey, CA 93943                                                                                                           NPS-CS-13-006

9. SPONSORING / MONITORING AGENCY NAME(S) AND ADDRESS(ES)                                                                    10. SPONSOR/MONITOR’S ACRONYM(S)

 Defense Intelligence Agency                                                                                                 11. SPONSOR/MONITOR’S REPORT
                                                                                                                                 NUMBER(S)

12. DISTRIBUTION / AVAILABILITY STATEMENT

 Approved for public release; distribution is unlimited

13. SUPPLEMENTARY NOTES

 The views expressed in this report are those of the author and do not reflect the official policy or position of the Department of
 Defense or the U.S. Government.
14. ABSTRACT

 bulk extractor is a program that extracts features such as email addresses, credit card numbers, URLs, and other types of
 information from digital evidence files. It is a useful forensic investigation tool for many tasks such as malware and intrusion
 investigations, identity investigations and cyber investigations, as well as analyzing imagery and password cracking. This
 document provides instructions on how to use the program in Windows, Linux and Mac environments.

15. SUBJECT TERMS

 bulk extractor, User’s Manual
16. SECURITY CLASSIFICATION OF:                                17. LIMITATION OF             18. NUMBER          19a. NAME OF RESPONSIBLE PERSON
a. REPORT            b. ABSTRACT          c. THIS PAGE             ABSTRACT                      OF
                                                                                                 PAGES
                                                                                                                 19b. TELEPHONE NUMBER (include area code)
 Unclassified Unclassified Unclassified                                   UU                          69
   NSN 7540-01-280-5500                                                                                                                          Standard Form 298 (Rev. 8–98)
                                                                                                  i                                              Prescribed by ANSI Std. Z39.18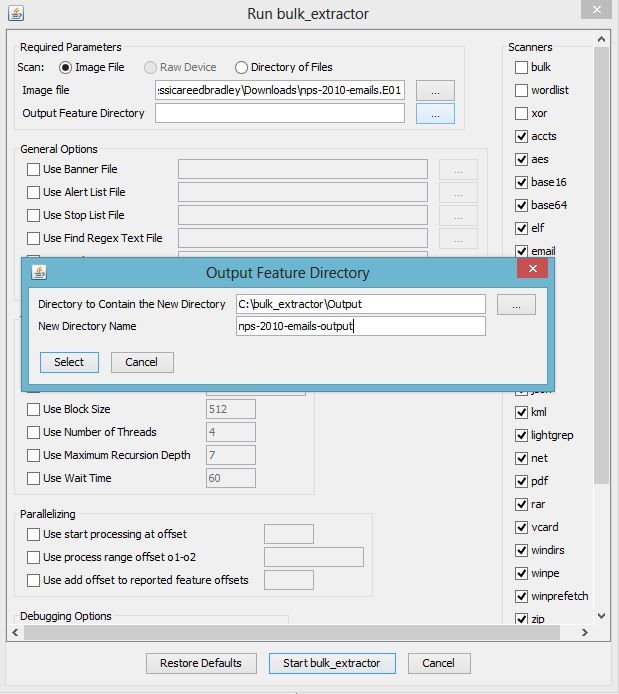
THIS PAGE INTENTIONALLY LEFT BLANK

                 ii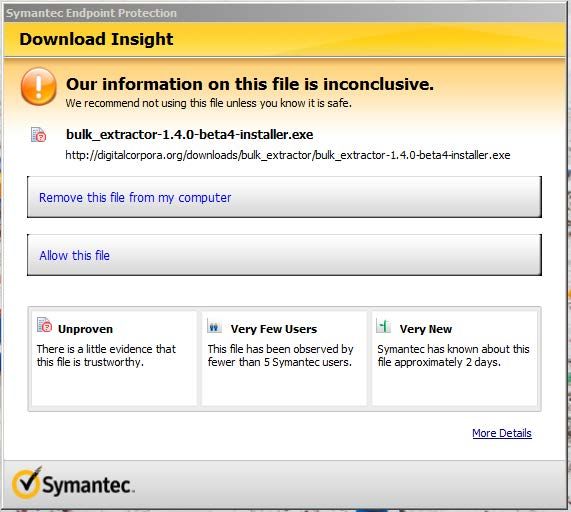
bulk extractor

USERS MANUAL

 Quickstart Guide Included
    August 28, 2013

      Authored by:
   Jessica R. Bradley
  Simson L. Garfinkel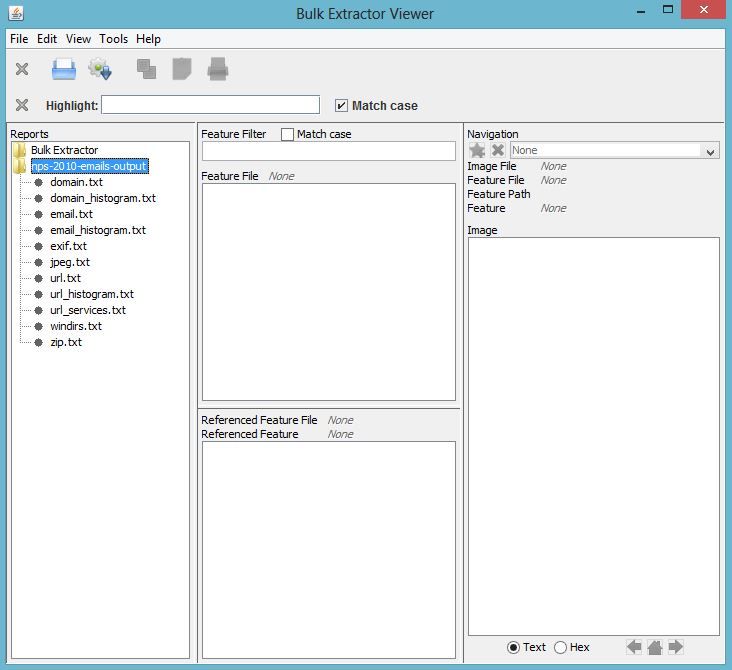
One Page Quickstart for Linux & Mac Users
This page provides a very brief introduction to downloading, installing and running bulk_extractor.
   1. If you do not already have one, obtain a disk image on which to run bulk_extractor.
      Sample images can be downloaded from http://digitalcorpora.org/corpora/
      disk-images. Suggestions include nps-2009-domexusers and
      nps-2009-ubnist1.gen3.

   2. Download the latest version of bulk_extractor. It can be obtained from http://digitalcorpora.
      org/downloads/bulk_extractor/. The file is called bulk_extractor-x.y.z.tar.gz
      where x.y.z is the latest version.
   3. Un-tar and un-zip the file. In the newly created bulk_extractor-x.y directory, run the
      following commands:

       ./configure
       make
       sudo make install

      [Refer to Subsubsection 3.1.1 Installing on Linux or Mac. Note, for full functionality,
      some users may need to first download and install dependent library files. Instructions are
      outlined in the referenced section.]
   4. To run bulk_extractor from the command line, type the following instructions:
       bulk_extractor -o output mydisk.raw
      In the above instructions, output is directory that will be created to store bulk_extractor
      results. It can not already exist. The input mydisk.raw is the disk image to be processed.
      [See Subsection 3.2 Run bulk_extractor from Command Line]
   5. To run bulk_extractor from the Bulk Extractor Viewer, navigate to the directory called
      /java_gui in the bulk_extractor folder and run the following command:
       ./BEViewer
      In the Bulk Extractor Viewer, click on the Gear/down arrow icon as depicted below.

      A window will pop up and the first two input boxes allow you to select an Image File
      and specify an Output Feature Directory to create. Enter both of those and then select
      the button at the bottom of the window titled "Start bulk_extractor" to run bulk_extractor.
      [See Subsection 3.3 Run bulk_extractor from Bulk Extractor Viewer ]
   6. Whether bulk_extractor was run from the command line or the Bulk Extractor Viewer
      tool, after the run the resulting output files will be contained in the specified output
      directory. Open that directory and verify files have been created. There should be 15-25
      files. Some will be empty and others will be populated with data.
   7. Users can join the google email users group for more information and help with any issues
      encountered. Email bulk_extractor-users+subscribe@googlegroups.com with a blank
      message to join.

                                                ii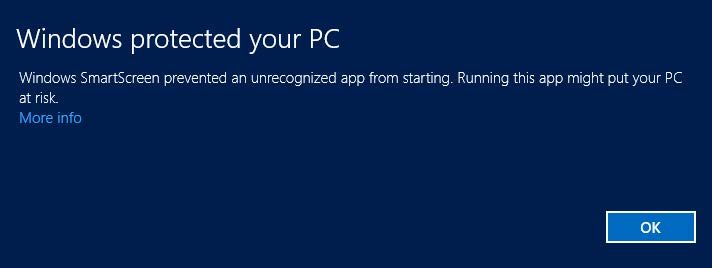
One Page Quickstart for Windows Users
This page provides a very brief introduction to downloading, installing and running bulk_extractor.

   1. If you do not already have one, obtain a disk image on which to run bulk_extractor.
      Sample images can be downloaded from http://digitalcorpora.org/corpora/
      disk-images. Suggestions include nps-2009-domexusers and
      nps-2009-ubnist1.gen3.

   2. Download the latest version of the bulk_extractor Windows installer. It can be ob-
      tained from http://digitalcorpora.org/downloads/bulk_extractor. The file
      to download is called bulk_extractor-x.y.z-windowsinstaller.exe where x.y.z
      is the latest version number. Run the installer file. This will automatically install
      bulk_extractor on your machine. The automatic installation includes the complete
      bulk_extractor system as well as the Bulk Extractor Viewer tool. [See Subsubsec-
      tion 3.1.2 Installing on Windows]

   3. To run bulk_extractor from the command line, type the following instructions:

       bulk_extractor -o output mydisk.raw

      In the above instructions, output is directory that will be created to store bulk_extractor
      results. It can not already exist. The input mydisk.raw is the disk image to be processed.
      [See Subsection 3.2 Run bulk_extractor from Command Line]

   4. To run bulk_extractor from the Bulk Extractor Viewer, run the program Bulk Extractor
      X.Y from the Start Menu.
      In the Bulk Extractor Viewer, click on the Gear/down arrow icon as depicted below.

      A window will pop up and the first two input boxes allow you to select an Image File
      and specify an Output Feature Directory to create. Enter both of those and then select
      the button at the bottom of the window titled "Start bulk_extractor" to run bulk_extractor.
      [See Subsection 3.3 Run bulk_extractor from Bulk Extractor Viewer ]

   5. Whether bulk_extractor was run from the command line or the Bulk Extractor Viewer
      tool, after the run the resulting output files will be contained in the specified output
      directory. Open that directory and verify files have been created. There should be 15-25
      files. Some will be empty and others will be populated with data.

   6. Users can join the google email users group for more information and help with any issues
      encountered. Email bulk_extractor-users+subscribe@googlegroups.com with a blank
      message to join.

                                                iii
Contents
1 Introduction 1
1.1 Overview of bulk_extractor . . . . . . . . . . . . . . . . . . . . . . . . . . . . 1
1.1.1 A bulk_extractor Success Story . . . . . . . . . . . . . . . . . . . . . 2
1.2 Purpose of this Manual . . . . . . . . . . . . . . . . . . . . . . . . . . . . . . 3
1.3 Conventions Used in this Manual . . . . . . . . . . . . . . . . . . . . . . . . . 3
2 How bulk_extractor Works 3
3 Running bulk_extractor 6
3.1 Installation Guide . . . . . . . . . . . . . . . . . . . . . . . . . . . . . . . . . 6
3.1.1 Installing on Linux or Mac . . . . . . . . . . . . . . . . . . . . . . . . 6
3.1.2 Installing on Windows . . . . . . . . . . . . . . . . . . . . . . . . . . 7
3.2 Run bulk_extractor from Command Line . . . . . . . . . . . . . . . . . . . . 9
3.3 Run bulk_extractor from Bulk Extractor Viewer . . . . . . . . . . . . . . . . 11
4 Processing Data 18
4.1 Types of Input Data . . . . . . . . . . . . . . . . . . . . . . . . . . . . . . . . 18
4.2 Scanners . . . . . . . . . . . . . . . . . . . . . . . . . . . . . . . . . . . . . . 19
4.3 Carving . . . . . . . . . . . . . . . . . . . . . . . . . . . . . . . . . . . . . . 22
4.4 Suppressing False Positives . . . . . . . . . . . . . . . . . . . . . . . . . . . . 23
4.5 Using an Alert List . . . . . . . . . . . . . . . . . . . . . . . . . . . . . . . . 25
4.6 The Importance of Compressed Data Processing . . . . . . . . . . . . . . . . . 25
5 Use Cases for bulk_extractor 26
5.1 Malware Investigations . . . . . . . . . . . . . . . . . . . . . . . . . . . . . . 26
5.2 Cyber Investigations . . . . . . . . . . . . . . . . . . . . . . . . . . . . . . . 27
5.3 Identity Investigations . . . . . . . . . . . . . . . . . . . . . . . . . . . . . . . 28
5.4 Password Cracking . . . . . . . . . . . . . . . . . . . . . . . . . . . . . . . . 29
5.5 Analyzing Imagery Information . . . . . . . . . . . . . . . . . . . . . . . . . 31
5.6 Using bulk_extractor in a Highly Specialized Environment . . . . . . . . . . . 31
6 Tuning bulk_extractor 31
7 Post Processing Capabilities 32
7.1 bulk_diff.py: Difference Between Runs . . . . . . . . . . . . . . . . . . . . . 32
7.2 identify_filenames.py: Identify File Origin of Features . . . . . . . . . . . . . 33
8 Worked Examples 33
8.1 Encoding . . . . . . . . . . . . . . . . . . . . . . . . . . . . . . . . . . . . . 33
9 2009-M57 Patents Scenario 34
9.1 Run bulk_extractor with the Data . . . . . . . . . . . . . . . . . . . . . . . . . 34
9.2 Digital Media Triage . . . . . . . . . . . . . . . . . . . . . . . . . . . . . . . 36
9.3 Analyzing Imagery . . . . . . . . . . . . . . . . . . . . . . . . . . . . . . . . 41
9.4 Password Cracking . . . . . . . . . . . . . . . . . . . . . . . . . . . . . . . . 42
9.5 Post Processing . . . . . . . . . . . . . . . . . . . . . . . . . . . . . . . . . . 44
iv10 NPS DOMEX Users Image 45
10.1 Malware Investigations . . . . . . . . . . . . . . . . . . . . . . . . . . . . . . 47
10.2 Cyber Investigations . . . . . . . . . . . . . . . . . . . . . . . . . . . . . . . 49
11 Troubleshooting 51
12 Related Reading 52
Appendices 54
A Output of bulk_extractor Help Command 54
v1 Introduction
1.1 Overview of bulk_extractor
bulk_extractor is a program that extracts features such as email addresses, credit card numbers,
URLs, and other types of information from digital evidence files. It is a useful forensic investi-
gation tool for many tasks such as malware and intrusion investigations, identity investigations
and cyber investigations, as well as analyzing imagery and password cracking. The program
provides several unusual capabilities including:
• It finds email addresses, URLs and credit card numbers that other tools miss because it
can process compressed data (like ZIP, PDF and GZIP files) and incomplete or partially
corrupted data. It can carve JPEGs, office documents and other kinds of files out of
fragments of compressed data. It will detect and carve encrypted RAR files.
• It builds word lists based on all of the words found within the data, even those in com-
pressed files that are in unallocated space. Those word lists can be useful for password
cracking.
• It is multi-threaded; running bulk_extractor on a computer with twice the number of cores
typically makes it complete a run in half the time.
• It creates histograms showing the most common email addresses, URLs, domains, search
terms and other kinds of information on the drive.
bulk_extractor operates on disk images, files or a directory of files and extracts useful infor-
mation without parsing the file system or file system structures. The input is split into pages
and processed by one or more scanners. The results are stored in feature files that can be
easily inspected, parsed, or processed with other automated tools. bulk_extractor also creates
histograms of features that it finds. This is useful because features such as email addresses and
internet search terms that are more common tend to be important.
In addition to the capabilities described above, bulk_extractor also includes
• A graphical user interface, Bulk Extractor Viewer, for browsing features stored in feature
files and for launching bulk_extractor scans
• A small number of python programs for performing additional analysis on feature files
bulk_extractor 1.4 detects and optimistically decompresses data in ZIP, GZIP, RAR, and Mi-
crosoft’s Hibernation files. This has proven useful, for example, in recovering email addresses
from fragments of compressed files found in unallocated space.
bulk_extractor contains a simple but effective mechanism for protecting against decompression
bombs. It also has capabilities specifically designed for Windows and malware analysis including
decoders for the Windows PE, Linux ELF, VCARD, Base16, Base64 and Windows directory
formats.
bulk_extractor gets its speed through the use of compiled search expressions and multi-threading.
The search expressions are written as pre-compiled regular expressions, essentially allowing
bulk_extractor to perform searches on disparate terms in parallel. Threading is accomplished
through the use of an analysis thread pool. After the features have been extracted, bulk_extractor
builds a histogram of email addresses, Google search terms, and other extracted features. Stop
1lists can also be used to remove features not relevant to a case.
bulk_extractor is distinguished from other forensic tools by its speed and thoroughness. Because
it ignores file system structure, bulk_extractor can process different parts of the disk in parallel.
This means that an 8-core machine will process a disk image roughly 8 times faster than a
1-core machine. bulk_extractor is also thorough. It automatically detects, decompresses, and
recursively re-processes data that has been compressed with a variety of algorithms. Our testing
has shown there is a significant amount of compressed data in the unallocated regions of file
systems missed by most forensics tools that are commonly in use today[5]. Another advantage of
ignoring file systems is that bulk_extractor can be used to process any kind of digital media. The
program has been used to process hard drives, SSDs, optical media, camera cards, cell phones,
network packet dumps, and other kinds of digital information.
Between 2005 and 2008, the bulk_extractor team interviewed law enforcement regarding their
use of forensic tools. Law enforcement officers wanted a highly automated tool for finding
email addresses and credit card numbers (including track 2 information), phone numbers, GPS
coordinates and EXIF information from JPEGs, search terms (extracted from URLs), and all
words that were present on the disk (for password cracking). The tool needed to run on Windows,
Linux and Mac-based systems with no user interaction. It also had to operate on raw disk images,
split-raw volumes and E01 files files. The tool needed to run at the maximum I/O speed of
the physical drive and never crash. Through these interviews, the initial requirements for the
bulk_extractor system were developed. Over the past five years, we have worked to create the
tool that those officers desired.
1.1.1 A bulk_extractor Success Story
One early bulk_extractor success story comes from the City of San Luis Obispo Police De-
partment in the Spring of 2010. The District Attorney filed charges against two individuals for
credit card Fraud and possession of materials to commit credit card fraud. The defendants were
arrested with a computer. Defense attorneys were expected to argue that the defendants were
unsophisticated and lacked knowledge to commit the crime. The examiner was given a 250 GB
drive the day before the preliminary hearing; typically it would take several days to conduct a
proper forensic investigation of that much data.
bulk_extractor found actionable evidence in only two and a half hours including the following
information:
• There were over 10,000 credit card numbers on the hard drive (illegal materials). Over
1000 of the credit card numbers were unique.
• The most common email address belonged to the primary defendant (evidence of posses-
sion).
• The most commonly occurring internet search engine queries concerned credit card fraud
and bank identification numbers (evidence of intent).
• The most commonly visited websites were in a foreign country whose primary language
is spoken by the defendant (evidence of flight risk).
Armed with this data, the defendants were held without bail.
2As bulk_extractor has been deployed and used in different applications, it has evolved to meet
additional requirements. This manual describes use cases for the bulk_extractor system and
demonstrates how users can take full advantage of all of its capabilities.
1.2 Purpose of this Manual
This Users Manual is intended to be useful to new, intermediate and experienced users of
bulk_extractor. It provides an in-depth review of the functionality included in bulk_extractor
and shows how to access and utilize features through both command line operation and the Bulk
Extractor Viewer. This manual includes working examples with links to the input data (disk
images) used, giving users the opportunity to work through the examples and utilize all aspects
of the system.
1.3 Conventions Used in this Manual
This manual uses standard formatting conventions to highlight file names, directory names and
example commands. The conventions for those specific types are described in this section.
Names of programs including the post-processing tools native to bulk_extractor and third-party
tools are shown in bold, as in tcpflow.
File names are displayed in a fixed width font. They will appear as filename.txt within the
text throughout the manual.
Directory names are displayed in italics. They appear as directoryname/ within the text. The
only exception is for directory names that are part of an example command. Directory names
referenced in example commands appear in the example command format.
Scanner names are denoted with bold, italicized text. They are always specified in lower-case,
because that is how they are referred in the options and usage information for bulk_extractor.
Names will appear as scannername.
This manual contains example commands that should be typed in by the user. A command
entered at the terminal is shown like this:
command
The first character on the line is the terminal prompt, and should not be typed. The black square
is used as the standard prompt in this manual, although the prompt shown on a users screen will
vary according to the system they are using.
2 How bulk_extractor Works
bulk_extractor finds email addresses, URLS, and CCNs that other tools miss. This is due in
part to the fact that bulk_extractor optimistically decompresses and re-analyzes all data (e.g. zip
fragments, gzip browser cache runs). The decompression operates on incomplete and corrupted
data until decompression fails. bulk_extractor can also build word lists for password cracking
There are three phases of operation in bulk_extractor: feature extraction, histogram creation,
post processing as shown in Figure 1. The output feature files contain extracted data designed
3Disk image
files
...
HISTOGRAM
EXTRACT FEATURES POST PROCESSING DONE
CREATION
.E01
.aff
.dd
.000, .001 report.xml — log file
telephone.txt — list of phone numbers with context
telephone_histogram.txt — histogram of phone numbers
vcard/ — directory of VCARDs
...
Figure 1: Three Phases of bulk_extractor Operation
for easy processing by third party programs or use in spreadsheet tools. The bulk_extractor
histogram system automatically summarizes features.
Features files are written using the feature recording system. As features are discovered, they
are sent to the feature recorder and recorded in the appropriate file. Multiple scanners might
write to the same feature file. For example, the exif scanner searches the file formats used
by digital cameras and finds GPS coordinates in images. Those findings are written to the
output file gps.txt by the gps feature recorder. A separate scanner, the gps scanner, searches
Garmin Trackpoint data and also finds GPS coordinates and writes them to gps.txt. It is
worth noting that some scanners also find more than one type of feature and write to several
feature files. For example, the email scanner looks for email addresses, domains, URLs and
RFC822 headers and writes them to email.txt, domain.txt, url.txt, rfc822.txt and
ether.txt respectively.
A feature file contains rows of features. Each row is typically comprised of an offset, a feature,
and the feature in evidence context although scanners are free to store whatever information they
wish. A few lines of an email feature file might look like the following:
OFFSET FEATURE FEATURE IN EVIDENCE CONTEXT
48198832 domexuser2@gmail.com __domexuser2@gmail.com/Home
48200361 domexuser2@live.com __domexuser2@live.comcorrespondents and other email addresses. The feature recording system automatically makes
histograms as data are processed. When the scanner writes to the feature recording system, the
relevant histograms are automatically updated.
A histogram file will, in general, look like the following file excerpt:
n=875 mozilla@kewis.ch (utf16=3)
n=651 charlie@m57.biz (utf16=120)
n=605 ajbanck@planet.nl
...
n=288 mattwillis@gmail.com
n=281 garths@oeone.com
n=226 michael.buettner@sun.com (utf16=2)
n=225 bugzilla@babylonsounds.com
n=218 berend.cornelius@sun.com
n=210 ips@mail.ips.es
n=201 mschroeder@mozilla.x-home.org
n=186 pat@m57.biz (utf16=1)
Each line shows a feature and the number of times that feature was found by bulk_extractor (the
histogram indicates how many times the item was found coded as UTF-16). Features are stored
in the file in order of occurrence with most frequent features appearing at the top of the file and
least frequent displayed at the bottom.
bulk_extractor has multiple scanners that extract features. Each scanner runs in an arbitrary order.
Scanners can be enabled or disabled which can be useful for debugging and speed optimization.
Some scanners are recursive and actually expand the data they are exploring, thereby creating
more data that bulk_extractor can analyze. These blocks are called sbufs. The "s" stands for the
word safe. All access to data in the sbuf is bounds-checked, so buffer overflow events are very
unlikely. The sbuf data structure is one of the reasons that bulk_extractor is so crash resistant.
Recursion is used for, among other things, decompressing ZLIB and Windows HIBERFILE,
extracting text from PDFs and handling compressed browser cache data.
The recursion process requires a new way to describe offsets. To do this, bulk_extractor
introduces the concept of the “forensic path.” The forensic path is a description of the origination
of a piece of data. It might come from, for example, a flat file, a data stream, or a decompression
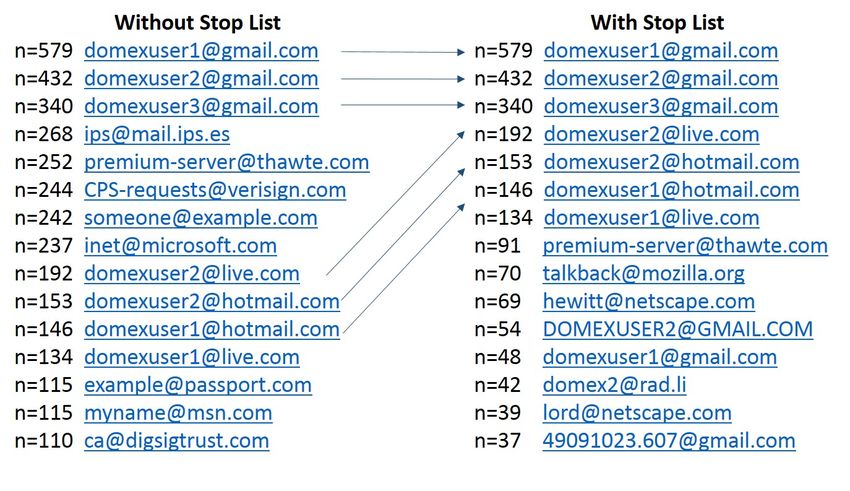
of some type of data. Consider an HTTP stream that contains a GZIP-compressed email as
shown in Figure 2. A series of scanners will first find the ZLIB compressed regions in the HTTP
stream that contain the email, decompress them, and then find the features in that email which
may include email addresses, names and phone numbers. Using this method, bulk_extractor
can find email addresses in compressed data. The forensic path for the email addresses found
indicate that it originated in an email, that was GZIP compressed and found in an HTTP stream.
The forensic path of the email addresses features found might be represented as follows:
11052168704-GZIP-3437 live.com eMn=’domexuser@live.com’;var srf_sDispM
11052168704-GZIP-3475 live.com pMn=’domexuser@live.com’;var srf_sDreCk
11052168704-GZIP-3512 live.com eCk=’domexuser@live.com’;var srf_sFT=’<
The full functionality of bulk_extractor is provided both through command line operation and the
GUI tool, Bulk Extractor Viewer. Both modes of operation work for Linux, Mac and Windows.
The following section describes how to download, install and run bulk_extractor using either the
command line or the Bulk Extractor Viewer.
5Figure 2: Forensic path of features found in email lead back to HTTP Stream
3 Running bulk_extractor
bulk_extractor is a command line tool with an accompanying graphical user interface tool, Bulk
Extractor Viewer. All of the command line functionality of bulk_extractor is also available in
the Bulk Extractor Viewer. Users can access the functionality in whichever way they prefer. In
this manual we review the bulk_extractor user options in both formats.
bulk_extractor can be run on a Linux, MacOS or Windows system. The fastest way to run
bulk_extractor is using Linux on a Linux system. Running on Windows provides the same
results, but the run will typically take 40
3.1 Installation Guide
Installation instructions vary for Linux/Mac users and Windows users. The following sections
explain how to install bulk_extractor on those systems.
3.1.1 Installing on Linux or Mac
Before compiling bulk_extractor for your platform, you may need to install other packages on
your system which bulk_extractor requires to compile cleanly and with a full set of capabilities.
Dependencies for Linux Fedora
This command should add the appropriate packages:
sudo yum update
sudo yum groupinstall development-tools
sudo yum install flex
6Dependencies for Linux Debian Testing (wheezy) or Ubuntu 13.0
The following command should add the appropriate libraries:
sudo apt-get -y install gcc g++ flex libewf-dev
Dependencies for Mac Systems
Mac users must first install Apple’s Xcode development system. Other components should be
downloaded using the MacPorts system. If you do not have MacPorts, go to the App store and
download and install it. It is free. Once it is installed, try:
sudo port install flex autoconf automake libewf-devel
Mac users should note that libewf-devel may not be available in ports. If it is not, download and
un-tar the libewf source, cd into the directory and run:
./configure
make
sudo make install
Download and Install bulk_extractor
Next, download the latest version of bulk_extractor. The software can be downloaded from
http://digitalcorpora.org/downloads/bulk_extractor/. The file to download will
be called bulk_extractor-x.y.z.tar.gz where x.y.z is the latest version. As of publication
of this manual, the latest version of bulk_extractor is 1.4.0.
After downloading the file, un-tar it. Then, in the newly created bulk_extractor-x.y.z directory,
run the following commands to install bulk_extractor in /usr/local/bin (by default):
./configure
make
sudo make install
With these instructions, the following directory will not be installed:
• plugins/ - This is for C/C++ developers only. You can develop your own bulk_extractor
plugins which will then be run at run-time with the bulk_extractor executable. Refer to the
bulk_extractor Programmers Manual for Developing Scanner Plug-ins [3] for more
information.
Instructions on running bulk_extractor from the command line can be found in Subsection 3.2.
The Bulk Extractor Viewer tool is installed as part of the above installation process. Specific
instructions on running it can be found in Subsection 3.3.
3.1.2 Installing on Windows
Windows users should download the Windows Installer for bulk_extractor. The file to download
is located at http://digitalcorpora.org/downloads/bulk_extractor/executables/
and is called bulk_extractor-x.y.z-windowsinstaller.exe where x.y.z is the latest ver-
sion number (1.4.0 - as of publication of this manual).
Next, run the bulk_extractor-x.y.z-windowsinstaller.exe file. This will automati-
cally install bulk_extractor on your machine. Because this file is not used by many Windows
7Figure 3: Anti-virus software, such as Symantec, often tries to block download of the installer
file
users, some anti-virus systems will try to manual delete it on download or block the download
as shown in Figure 3. Be aware that you may have to work around your anti-virus system.
Additionally, some Windows versions will try to prevent you from running it. Figure 4 shows
the message Windows 8 displays when trying to run the installer. To run anyway, click on “More
info” and then select “Run Anyway.”
When the installer file is executed, the installation will begin and show a dialog like the one
shown in Figure 5. Most users will not require the 32-bit installation and can un-check that box
if disk space is an issue. Click on “Install” and the installer will install bulk_extractor on your
system and then notify you when it is complete.
The automatic installation includes the Bulk Extractor Viewer tool as well as the complete
Figure 4: Windows 8 warning when trying to run the installer
8Figure 5: Dialog appears when the user executes the Windows Installer
bulk_extractor system that can be run from the command line. Java 7 or above must be installed
on the machine for the Bulk Extractor Viewer to run. Instructions on running bulk_extractor
from the command line can be found in Subsection 3.2. Instructions on running it from the
Bulk Extractor Viewer are located in Subsection 3.3.
3.2 Run bulk_extractor from Command Line
The two main parameters required to run bulk_extractor are an output directory and a disk image.
The output directory must be a directory that does not already exist. The disk image can be either
a file such as a disk image or a directory of individual files. bulk_extractor cannot process a
directory of disk images.
In the following instructions, output is the name of the directory that will be created to store the
bulk_extractor output. The file mydisk.raw is the name of the disk image that will be extracted
by bulk_extractor.
To run bulk_extractor from the command line on any machine, type the following command:
bulk_extractor -o output mydisk.raw
The above command on any of the supported operating systems assumes that the disk image
mydisk.raw is located in the directory where the command is being executed. However, you can
point bulk_extractor to a disk image found elsewhere on your machine by explicitly entering the
path to that image.
The following text shows the output that is produced when bulk_extractor is run on the file
nps-2010-emails.E01. The information printed indicates the version number, input file, out-
put directory and disk size. The screen is updated as bulk_extractor runs with status information.
bulk_extractor then prints performance information and the number of features found when the
run is complete.
C:\>bulk_extractor -o bulk_extractor\Output\nps-2010-emails bulk_extractor\In
putData\nps-2010-emails.E01
9bulk_extractor version: 1.4.0-beta4
Input file: bulk_extractor\InputData\nps-2010-emails.E01
Output directory: bulk_extractor\Output\nps-2010-emails
Disk Size: 10485760
Threads: 4
All data are read; waiting for threads to finish...
Time elapsed waiting for 1 thread to finish:
(timeout in 60 min .)
Time elapsed waiting for 1 thread to finish:
6 sec (timeout in 59 min 54 sec.)
Thread 0: Processing 0
All Threads Finished!
Producer time spent waiting: 0 sec.
Average consumer time spent waiting: 8.32332 sec.
Phase 2. Shutting down scanners
Phase 3. Creating Histograms
ccn histogram... ccn_track2 histogram... domain histogram...
email histogram... ether histogram... find histogram...
ip histogram... lightgrep histogram... tcp histogram...
telephone histogram... url histogram... url microsoft-live...
url services... url facebook-address... url facebook-id...
url searches...Elapsed time: 11.1603 sec.
Overall performance: 0.939557 MBytes/sec
Total email features found: 67
Note that bulk_extractor has automatically selected to use 4 threads; this is because the program
was run on a computer with 4 cores. In general, bulk_extractor automatically determines the
correct number of cores to use. It is not necessary to set the number of threads to use.
After running bulk_extractor, examine the output directory specified by name in the run com-
mand. There should now be a number of generated output files in that directory. There are several
categories of output created for each bulk_extractor run. First, there are feature files grouped by
category, which contain the features found and include the path, feature and context. Second,
there are histogram files that allow users to quickly see the features grouped by the frequency
in which they occur. Certain kids of files, such as JPEGs and KML files, may be carved into
directories. Finally, bulk_extractor creates a file report.xml, in DFXML format, that captures
the provenance of the run. After bulk_extractor has been run, all of these files will be found in
the output directory specified by the user.
The text below shows the results of running the command ls -s within the output directory from
the bulk_extractor run on the disk image nps-2010-emails.E01. The numbers next to the
file names indicate the file size and show that several of the files, including email.txt and
domain.txt, were populated with features during the run.
C:\bulk_extractor\Output\nps-2010-emails>ls -s
total 303
0 aes_keys.txt 0 kml.txt
0 alerts.txt 0 lightgrep.txt
0 ccn.txt 0 lightgrep_histogram.txt
0 ccn_histogram.txt 0 rar.txt
0 ccn_track2.txt 8 report.xml
0 ccn_track2_histogram.txt 0 rfc822.txt
64 domain.txt 0 tcp.txt
1 domain_histogram.txt 0 tcp_histogram.txt
0 elf.txt 0 telephone.txt
16 email.txt 0 telephone_histogram.txt
4 email_histogram.txt 96 url.txt
100 ether.txt 0 url_facebook-address.txt
0 ether_histogram.txt 0 url_facebook-id.txt
1 exif.txt 4 url_histogram.txt
0 find.txt 0 url_microsoft-live.txt
0 find_histogram.txt 0 url_searches.txt
0 gps.txt 1 url_services.txt
0 hex.txt 0 vcard.txt
0 ip.txt 12 windirs.txt
0 ip_histogram.txt 0 winpe.txt
0 jpeg 0 winprefetch.txt
8 jpeg.txt 88 zip.txt
0 json.txt
There are numerous feature files produced by bulk_extractor for each run. A feature file is a
tab delimited file that show a feature on each row. Each row includes a path, a feature and the
context. The files are in UTF-8 format.
Any of the feature files created by bulk_extractor may have an accompanying *_stopped.txt
file found in the output directory. This file will show all stopped entries of that type that have
been found so that users can examine those files to make sure nothing critical has been hidden.
A stopped features is a feature that appears in a stop list. The stop list is a list of features that
are not of concern for a particular investigation. For example, users may input a stop list file to
bulk_extractor that contains numerous email addresses that should be ignored and not marked as
a found feature. Rather than throwing away those results when they are found, bulk_extractor
will create a file, named email_stopped.txt that shows all email addresses from the stop list
that were found during the run. The stopped email addresses will not show up in the email.txt
file. More information on creating and using stop lists can be found in Subsection 4.4.
While the above commands are all that is required for basic operation, there are numerous usage
options that allow the user to affect input and output, tuning, path processing mode, debugging,
and control of scanners. All of those options are described when bulk_extractor is run with the
-h (help) option. It is important to note that the overwhelming tendency of users is to use many
of these options, however, that is not generally recommended. Most of the time, the best way to
run bulk_extractor is with no options specified other than -o to specify the output directory. For
best performance and results in general users should avoid adding them in. Only advanced users
in specific cases should use these options.
Running bulk_extractor with only the -h option specified produces the output shown in Ap-
pendix A. To run any optional usage options, they should be inserted before the input and output
options are specified. Specifically, the order should look like the following:
bulk_extractor [Usage Options] -o output mydisk.raw
The specific order in which multiple usage options are specified matters. Some of the options are
discussed within the following sections for specific use cases, other options are for programmer
or experimental use. In general, avoid using the options unless indicated for a specific purpose.
3.3 Run bulk_extractor from Bulk Extractor Viewer
On a Linux or Mac system, go to the directory where the Bulk Extractor Viewer is installed or
specify the full path name to the jar file. It will be in the location where the bulk_extractor code
was installed and in the sub-directory labeled java_gui. From that directory, run the following
command to start the Bulk Extractor Viewer:
11Figure 6: What Bulk Extractor Viewer looks like when it is started
./BEViewer
Windows users should go to the Start menu and choose Programs->Bulk_Extractor x.y.z->BE
Viewer with Bulk_extractor x.y.z (64-bit). If the 64-bit version can not be run on your machine,
you can choose the 32-bit version but it is not recommended for most users.
When the Bulk Extractor Viewer starts up, it will look like Figure 6. The look and feel may
vary slightly according to the specific operating system but all options should appear similar. To
run bulk_extractor from the viewer, click on the icon that looks like a gear with a down arrow.
It is next to the Print icon below the Tools menu. Clicking on this icon will bring up the “Run
bulk_extractor” Window as shown in Figure 7.
Next, in the “Run bulk_extractor” window select the Image File and Output Feature Direc-
tory to run bulk_extractor. Figure 8 shows an example where the user has selected the file
nps-2010-emails.E01 as input and is going to create a directory called nps-2010-charlie-
output in the parent directory C:\bulk_extractor\Output. Note that figures may vary slightly in
future versions of bulk_extractor but the major functionality will remain the same.
After selecting the input and output directories, click on the button at the bottom of the “Run
bulk_extractor” window labeled “Start bulk_extractor.” This will bring up the window shown in
12Figure 7: Clicking on gear icon brings up this “Run bulk_extractor” Window
13Figure 8: After selecting an Image File for input, the user must select an output directory to
create
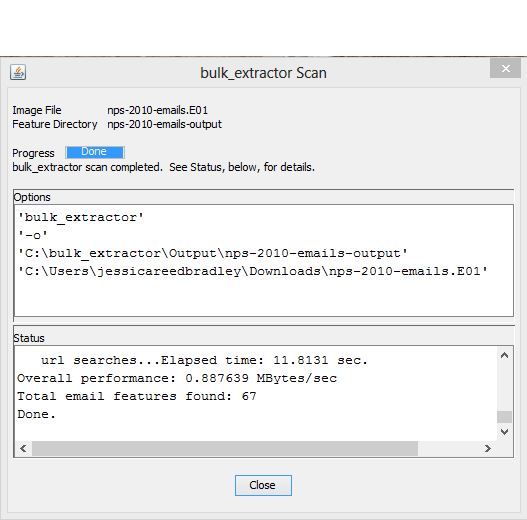
14Figure 9: Status window that shows what happens as bulk_extractor runs and indicates when
bulk_extractor is complete
Figure 9 that updates as bulk_extractor is running, providing status information during the run
and after the run is complete.
When the run is complete, a dialog will pop-up indicating the results are ready to be viewed.
Figure 10 shows this dialog. Click the “Ok” button which will return you to the main Bulk
Extractor Viewer window to view the results of the run. The “Reports” window on the left will
now show the newly created report. In this example, the report is called “nps-2010-emails-output.”
Clicking once on this report name will expand the report and show all of the files that have been
created as shown in Figure 11.
Clicking on one of the files will bring that file up in the “Feature File” window in the middle
of the screen. In the example, the user clicked on email.txt to view the email feature file.
Clicking on one of the features, in this case rtf_text@textedit.com, shows the feature in context
within the feature file on the right hand side of the window as shown in Figure 12.
15Figure 10: Dialog indicating the run of bulk_extractor is complete and results are ready to be
viewed
Figure 11: Reports window shows the newly created report and all of the files created in that
report
16Figure 12: While viewing the feature file, the user can select a feature to view with it”s full
context in the feature file as shown in the right hand side of the window
17Figure 13: User can view histograms of features, referenced feature files and specific features in
context
The user can also view histogram files in the Bulk Extractor Viewer. Clicking on the file,
email_histogram.txt in the Reports window on the left hand side will bring up the contents
of the histogram file in the middle window. It will also display the referenced feature file in the
window below the histogram file. In this case, the referenced feature file is email.txt. Clicking
on a feature in the histogram, in this example rtf_text@textedit.com, will display the feature in
context as found within the feature file on the right hand side of the screen as shown in Figure 13.
4 Processing Data
4.1 Types of Input Data
The bulk_extractor system can handle multiple image formats including E01, raw, split raw and
individual disk files as well as raw devices or files. It can also operate on memory and packet
captures, although packet captures will be more completely extracted if you pre-process them
with tcpflow.
The scanners all serve different functions and look for different types of information. Often,
a feature will be stored in a format not easily accessible and will require multiple scanners to
18extract the feature data. For example, some PDF files contain text data but the PDF format
is not directly searchable by the scanner that finds email addresses or the scanner that looks
for keywords. bulk_extractor resolves this by having the two scanners work together. The pdf
scanner will first extract all of the text from the PDF and then the other scanners will look at the
extracted text for features. This is important to remember when turning scanners off and on, as
scanners work together to retrieve the features from the disk image. The types of information
examined, extracted or carved by the existing bulk_extractor scanners are as described in Table
1, along with the scanners that process them and the specific sections where they are referenced
in this manual.
4.2 Scanners
There are multiple scanners deployed with the bulk_extractor system. For a detailed list of the
scanners installed with your version of bulk_extractor, run the following command:
bulk_extractor -H
This command will show all of the scanners installed with additional information included about
each scanner. Specifically, there is a description for each scanner, a list of the features it finds
and any relevant flags. A sample of the output is below:
Scanner Name: accts
flags: NONE
Scanner Interface version: 3
Author: Simson L. Garfinkel
Description: scans for CCNs, track 2, and phone #s
Scanner Version: 1.0
Feature Names: alerts ccn ccn_track2 telephone
Scanner Name: base16
flags: SCANNER_RECURSE
Scanner Interface version: 3
Author: Simson L. Garfinkel
Description: Base16 (hex) scanner
Scanner Version: 1.0
Feature Names: hex
...
Scanner Name: wordlist
flags: SCANNER_DISABLED
Scanner Interface version: 3
Author:
Description:
Scanner Version:
Feature Names: wordlist
This output shows that the accts scanner looks for credit card numbers, credit card track 2
information and phone numbers and finds the feature names alerts, ccn, ccn_track2 and tele-
phone. This means it writes to the feature files alerts.txt, ccn.txt, ccn_track2.txt, and
telephone.txt.
The output also shows that the base16 scanner is a recursive scanner (indicated by the flag
SCANNER_RECURSE) meaning it expands data or finds new data for other scanners to process.
It also writes to the file hex.txt.
Finally, the output shows that the wordlist scanner is disabled by default (indicated by the flag
SCANNER_DISABLED). This means that if the user would like to use the wordlist scanner, it
19Table 1: Input Data Processed by the Scanners
Scanner Data Type Section Discussed
Name in Manual
base16 Base 16 (hex) encoded data (includes Subsection 5.2
MD5 codes embedded in the data)
base64 Base 64 code Subsection 4.6 and
Subsection 5.2
elf Executable and Linkable Format (ELF) Subsection 5.1
exif EXIF structures from JPEGS (and carv- Subsection 5.5
ing of JPEG files)
gzip GZIP files and ZLIB-compressed GZIP Subsection 4.6 and
streams Subsection 5.2
aes In-memory AES keys from their key Subsection 5.2
schedules
json JavaScript Object Notation files and Subsection 5.1
objects downloaded from web servers,
as well as JSON-like objects found in
source code
jpeg JPEG carving. Default is only encoded Subsection 4.3 and
JPEGs are carved. JPEGs without EX- Subsection 5.5
IFs are also carved
kml KML files (carved) Subsection 5.3
rar RAR components in unencrypted Subsection 4.3
archives are decrypted and processed.
Encrypted RAR file are carved.
pdf Text from PDF files (extracted for pro- Subsection 4.6
cessing not carved)
windirs Windows FAT32 and NTFS directory Subsection 5.2
entries
hiber Windows Hibernation File Fragments Subsection 4.6
(decompressed and processed, not
carved)
winprefetch Windows Prefetch files, file fragments Subsection 5.1
(processed)
winpe Windows Preinstallation Environment Subsection 5.1
(PE) Executables (.exe and .dll files no-
tated with MD5 hash of first 4k)
vcard vCard files (carved) Subsection 5.3
gps XML from Garmin GPS devices (pro- Subsection 5.3
cessed)
zip ZIP files and zlib streams (processed, Subsection 4.3 and
and optionally carved) Subsection 4.6
will have to be specifically enabled. The wordlist scanner is useful for password cracking and is
discussed in Subsection 5.4.
20In general, most users will not need to enable or disable scanners. The default settings installed
with the bulk_extractor system work best for the majority of users. However, individual scanners
can be enabled or disabled for different purposes. To enable the wordlist scanner, which is
disabled by default, use the following command:
bulk_extractor -e wordlist -o output diskimage.raw
Additionally, users can disable a scanner that is enabled by default. Most of the scanners are
enabled by default. To disable the accts scanner, which is very CPU intensive, run the following
command:
bulk_extractor -x accts -o output diskimage.raw
The command -E disables all scanners, then enables the one that follows the option. For example,
to disable all scanners except the aes scanner, use the following command:
bulk_extractor -E aes -o output diskimage.raw
The options -E, -e and -x are all processed in order. So, the following command will also disable
all scanners and then enable the aes scanner:
bulk_extractor -x all -e aes -o output diskimage.raw
Some of the scanners installed with bulk_extractor have parameters that can be set and utilized
by advanced users for different purposes. Those parameters are also described in the -H output
described above (as well as the -h output) and include the following:
Settable Options (and their defaults):
-S work_start_work_end=YES Record work start and end of each scanner in
report.xml file ()
-S enable_histograms=YES Disable generation of histograms ()
-S debug_histogram_malloc_fail_frequency=0 Set >0 to make histogram maker
fail with memory allocations ()
-S hash_alg=md5 Specifies hash algorithm to be used for all hash
calculations ()
-S word_min=6 Minimum word size (wordlist)
-S word_max=14 Maximum word size (wordlist)
-S max_word_outfile_size=100000000 Maximum size of the words output file
(wordlist)
-S exif_debug=0 debug exif decoder (exif)
-S jpeg_carve_mode=1 0=carve none; 1=carve encoded; 2=carve all (exif)
-S min_jpeg_size=1000 Smallest JPEG stream that will be carved (exif)
-S zip_min_uncompr_size=6 Minimum size of a ZIP uncompressed object (zip)
-S zip_max_uncompr_size=268435456 Maximum size of a ZIP uncompressed
object (zip)
-S zip_name_len_max=1024 Maximum name of a ZIP component filename (zip)
-S rar_find_components=YES Search for RAR components (rar)
-S raw_find_volumes=YES Search for RAR volumes (rar)
-S gzip_max_uncompr_size=268435456 maximum size for decompressing GZIP
objects (gzip)
-S pdf_dump=NO Dump the contents of PDF buffers (pdf)
-S opt_weird_file_size=157286400 Weird file size (windirs)
-S opt_weird_file_size2=536870912 Weird file size2 (windirs)
-S opt_max_cluster=67108864 Ignore clusters larger than this (windirs)
-S opt_max_cluster2=268435456 Ignore clusters larger than this (windirs)
-S opt_max_bits_in_attrib=3 Ignore FAT32 entries with more attributes set
than this (windirs)
-S opt_max_weird_count=2 Ignore FAT32 entries with more things weird than
this (windirs)
-S opt_last_year=2020 Ignore FAT32 entries with a later year than this (windirs)
-S bulk_block_size=512 Block size (in bytes) for bulk data analysis (bulk)
-S DFRWS2012=NO True if running DFRWS2012 challenge code (bulk)
-S xor_mask=255 XOR mask string, in decimal (xor)
21To use any of these options, the user should specify the -S with the name=value pair when
running bulk_extractor as in the following example:
bulk_extractor -S name=value -o output diskimage.raw
As with the other scanner and bulk_extractor usage options, most users will not have to use any
of these options.
4.3 Carving
File carving is a special kind of carving in which files are recovered. File carving is useful for
both data recovery and forensic investigations because it can recover files when sectors containing
file system metadata are either overwritten or damaged [4]. Currently, bulk_extractor provides
carving of contiguous JPEG, ZIP and RAR files. To carve fragmented files we recommend
PhotoRec (free) or Adroit Photo Recovery( commercial). Additionally, Forensics Toolkit and
EnCase Forensic provide some carving capability on fragmented files.
Carved results are stored in two different places. First, a file listing all the files that are carved
are written to a corresponding .txt file: JPEG files to jpeg.txt, ZIP files to unzip.txt and
RAR files to unrar.txt. Second, the carved JPEG, ZIP and RAR files are placed in binned
directories that are named /jpeg, /unzip and /unrar respectively. For example, all carved JPEGs
will go in the directory /jpeg. The output files are further binned with 1000 files in each directory.
The directory names are 3 decimal digits. If there are more than 999,000 carved files of one
type, then the next set of directories are named with 4 digits. File names for JPEGs are the
forensicpath.jpg. File names for the ZIP carver are the forensicpath_filename. If the ZIP file
name has slashes in it (denoting directories), they are turned into ’_’ (underbars). For example,
the file mydocs/output/specialfile will be named mydocs_output_specialfile.
Table 2: There are three carving modes in bulk_extractor that are specified separately for each
file type, JPEG, ZIP and RAR.
Mode Mode Description
0 Do not carve files of the specified type.
1 Only carve encoded files of the specified type
2 Carve everything of the specified type.
As the above table describes, there are three carving modes in bulk_extractor that can be speci-
fied separately for each file type, JPEG, ZIP or RAR. The first mode, mode 0, explicitly tells
bulk_extractor not to carve files of that type. The second mode, mode 1, is on by default and
tells bulk_extractor to carve only encoded files of that type. If the user is running the ZIP carver
in mode 1 and there is a simple ZIP file, it will not get carved. However, if there is an encoded
attachment of that file (like Base64) it will get carved. The final mode, mode 2, will carve
everything of that type. There is no way to specify which types of files (particular extensions)
will get carved and which will not in mode 2. For example, bulk_extractor will carve both JPEGs
and doc files. It carves whatever is encountered.
To specify the carving modes for bulk_extractor, command line arguments can be specified. To
modify the JPEG carving modes, type the following where carve mode 1=default value that does
not need to be specified (carve encoded), 0=no carving or 2=carve everything:
bulk_extractor -S jpeg_carve_mode=1 -o output diskimage.raw
22To modify the ZIP carving modes, type the following where carve mode 1=default value that
does not need to be specified (carve encoded), 0=no carving or 2=carve everything:
bulk_extractor -S zip_carve_mode=1 -o output diskimage.raw
To modify the RAR carving modes, type the following where carve mode 1=default value that
does not need to be specified (carve encoded), 0=no carving or 2=carve everything:
bulk_extractor -S rar_carve_mode=1 -o output diskimage.raw
Any combination of the carving mode options can be specified for a given run. The carvers can
run in any combination of modes. For example, the JPEG carver can be run in mode 2 while the
RAR carving is turned off in mode 1 and the ZIP carver carves only encoded files in mode 1.
Because bulk_extractor can carve files and preserve original file extensions, there is a real possi-
bility that bulk_extractor might be carving out malware. There is no protection in bulk_extractor
against putting malware in a file on your hard drive. Users running bulk_extractor to look for
malware should turn off all anti-virus software because the anti-virus program will think its
creating malware and stop it. Then the user should should carefully scan the results looking for
malware before re-enabling the anti-virus.
4.4 Suppressing False Positives
Modern operating systems are filled with email addresses. They come from Windows binaries,
SSL certificates and sample documents. Most of these email addresses, particularly those that
occur the most frequently, such as someone@example.com, are not relevant to the case. It is
important to be able to suppress those email addresses not relevant to the case. To address this
problem, bulk_extractor provides two approaches.
First, bulk_extractor allows users to build a stop list or use an existing one available for download.
These stop lists are used to recognize and dismiss the email addresses that are native to the
Operating System. This approach works well for email addresses that are clearly invalid, such
as someone@example.com. For most email addresses, however, you will want to stop them in
some circumstances but not others. For example, there are over 20,000 Linux developers, you
want to stop their email addresses in program binaries, not in email messages.
To address this problem, bulk_extractor uses context-sensitive stop lists. Instead of a stop list of
features, this approach uses the feature+context. The following example is an excerpt from a
context-sensitive stop list file.
ubuntu-users@lists.ubuntu.com Maint\x0A935261357\x09ubuntu-users@lists.ubuntu.com\x0
ubuntu-motu@lists.ubuntu.com untu_\x0A923867047\x09ubuntu-motu@lists.ubuntu.com\x09
pschiffe@redhat.com Peter Schiffer - 0.8-1.1N\x94/\xC0-
phpdevel@echospace.com : Vlad Krupin \x0AMAINTENANCE:
anholt@freebsd.org 34-GZIP-1021192\x09anholt@freebsd.org\x09r: EricAnholt
ubuntu-motu@lists.ubuntu.com http\x0A938966489\x09ubuntu-motu@lists.ubuntu.com\x09
The context for the feature is the 8 characters on either side of the feature. Each “stop list” entry
is the feature+context. This ignores Linux developer email addresses in Linux binaries. The
email address will be ignored if found in that context but reported if it appears in a different
context.
23Figure 14: Email Histogram Results With and Without the Context-Sensitive Stop List. Results
from the Domexusers HD image.
There is a context-sensitive stop list for Microsoft Windows XP, 2000, 2003, Vista and several
Linux systems. The total stop list is 70 MB and includes 628,792 features in a 9 MB zip file.
The context-sensitive stop list prunes many of the OS-supplied features. By applying it to the
domexusers HD image (the image can be downloaded at http://http://digitalcorpora.
org/corp/nps/drives/nps-2009-domexusers/, the number of emails found went from
9,143 down to 4,459. This significantly reduces the amount of work to be done by the investigator.
Figure 14 shows how the histogram of email addresses differs when bulk_extractor is run with
and without the context-sensitive stop list. The context-sensitive stop list built for the various
operating systems described above can be downloaded from http://digitalcorpora.org/
downloads/bulk_extractor. The file will have the words “stoplist” in it somewhere. The
current version as of publication of this manual is called bulk_extractor-3-stoplist.zip.
It should be noted that bulk_extractor does allow the users to create stop lists that are not context
sensitive. A stop list can simply be a list of words that the user wants bulk_extractor to ignore.
For example, the following three lines would constitute a valid stop list file:
abc@google.com
ignore@microsoft.com
www.google.com
However for the reasons stated above, it is recommended that users rely on context-sensitive
stop lists when available to reduce the time required to analyze the results of a bulk_extractor run.
Stopped results are not completely hidden from users. If stopped feature are discovered, they
will be written to the appropriate category feature file with the extension _stopped.txt.
For example, stopped domain names that are found in the disk image will be written to
domain_stopped.txt in the output directory. The stopped files serve the purpose of al-
lowing users to verify that bulk_extractor is functioning properly and that the lists they have
written are being processed correctly.
24You can also read