NetSuite for iPhone - September 19, 2018 - Oracle Docs
←
→
Page content transcription
If your browser does not render page correctly, please read the page content below

NetSuite for iPhone

September 19, 2018    2018.2
Copyright © 2005, 2018, Oracle and/or its affiliates. All rights reserved.

This software and related documentation are provided under a license agreement containing
restrictions on use and disclosure and are protected by intellectual property laws. Except as expressly
permitted in your license agreement or allowed by law, you may not use, copy, reproduce, translate,
broadcast, modify, license, transmit, distribute, exhibit, perform, publish, or display any part, in any
form, or by any means. Reverse engineering, disassembly, or decompilation of this software, unless
required by law for interoperability, is prohibited.

The information contained herein is subject to change without notice and is not warranted to be error-
free. If you find any errors, please report them to us in writing.

If this is software or related documentation that is delivered to the U.S. Government or anyone
licensing it on behalf of the U.S. Government, then the following notice is applicable:

U.S. GOVERNMENT END USERS: Oracle programs, including any operating system, integrated software,
any programs installed on the hardware, and/or documentation, delivered to U.S. Government end
users are "commercial computer software" pursuant to the applicable Federal Acquisition Regulation
and agency-specific supplemental regulations. As such, use, duplication, disclosure, modification,
and adaptation of the programs, including any operating system, integrated software, any programs
installed on the hardware, and/or documentation, shall be subject to license terms and license
restrictions applicable to the programs. No other rights are granted to the U.S. Government.

This software or hardware is developed for general use in a variety of information management
applications. It is not developed or intended for use in any inherently dangerous applications, including
applications that may create a risk of personal injury. If you use this software or hardware in dangerous
applications, then you shall be responsible to take all appropriate fail-safe, backup, redundancy, and
other measures to ensure its safe use. Oracle Corporation and its affiliates disclaim any liability for any
damages caused by use of this software or hardware in dangerous applications.

Oracle and Java are registered trademarks of Oracle and/or its affiliates. Other names may be
trademarks of their respective owners.

Intel and Intel Xeon are trademarks or registered trademarks of Intel Corporation. All SPARC
trademarks are used under license and are trademarks or registered trademarks of SPARC
International, Inc. AMD, Opteron, the AMD logo, and the AMD Opteron logo are trademarks or
registered trademarks of Advanced Micro Devices. UNIX is a registered trademark of The Open Group.

This software or hardware and documentation may provide access to or information about content,
products, and services from third parties. Oracle Corporation and its affiliates are not responsible
for and expressly disclaim all warranties of any kind with respect to third-party content, products,
and services unless otherwise set forth in an applicable agreement between you and Oracle. Oracle
Corporation and its affiliates will not be responsible for any loss, costs, or damages incurred due to
your access to or use of third-party content, products, or services, except as set forth in an applicable
agreement between you and Oracle.

If this document is in public or private pre-General Availability status:

This documentation is in pre-General Availability status and is intended for demonstration and
preliminary use only. It may not be specific to the hardware on which you are using the software.
Oracle Corporation and its affiliates are not responsible for and expressly disclaim all warranties of any
kind with respect to this documentation and will not be responsible for any loss, costs, or damages
incurred due to the use of this documentation.

If this document is in private pre-General Availability status:

The information contained in this document is for informational sharing purposes only and should be
considered in your capacity as a customer advisory board member or pursuant to your pre-General
Availability trial agreement only. It is not a commitment to deliver any material, code, or functionality,
and should not be relied upon in making purchasing decisions. The development, release, and timing
of any features or functionality described in this document remains at the sole discretion of Oracle.

This document in any form, software or printed matter, contains proprietary information that is the
exclusive property of Oracle. Your access to and use of this confidential material is subject to the terms
and conditions of your Oracle Master Agreement, Oracle License and Services Agreement, Oracle
PartnerNetwork Agreement, Oracle distribution agreement, or other license agreement which has
been executed by you and Oracle and with which you agree to comply. This document and information
contained herein may not be disclosed, copied, reproduced, or distributed to anyone outside Oracle
without prior written consent of Oracle. This document is not part of your license agreement nor can it
be incorporated into any contractual agreement with Oracle or its subsidiaries or affiliates.

For information about Oracle's commitment to accessibility, visit the Oracle Accessibility Program
website at http://www.oracle.com/pls/topic/lookup?ctx=acc&id=docacc

Oracle customers that have purchased support have access to electronic support through My Oracle
Support. For information, visit http://www.oracle.com/pls/topic/lookup?ctx=acc&id=info or visit http://
www.oracle.com/pls/topic/lookup?ctx=acc&id=trs if you are hearing impaired.

Sample Code

Oracle may provide sample code in SuiteAnswers, the Help Center, User Guides, or elsewhere through
help links. All such sample code is provided "as is” and “as available”, for use only with an authorized
NetSuite Service account, and is made available as a SuiteCloud Technology subject to the SuiteCloud
Terms of Service at www.netsuite.com/tos.

Oracle may modify or remove sample code at any time without notice.

No Excessive Use of the Service

As the Service is a multi-tenant service offering on shared databases, Customer may not use the
Service in excess of limits or thresholds that Oracle considers commercially reasonable for the Service.
If Oracle reasonably concludes that a Customer’s use is excessive and/or will cause immediate or
ongoing performance issues for one or more of Oracle’s other customers, Oracle may slow down or
throttle Customer’s excess use until such time that Customer’s use stays within reasonable limits. If
Customer’s particular usage pattern requires a higher limit or threshold, then the Customer should
procure a subscription to the Service that accommodates a higher limit and/or threshold that more
effectively aligns with the Customer’s actual usage pattern.

Beta Features

Oracle may make available to Customer certain features that are labeled “beta” that are not yet
generally available. To use such features, Customer acknowledges and agrees that such beta features
are subject to the terms and conditions accepted by Customer upon activation of the feature, or in the
absence of such terms, subject to the limitations for the feature described in the User Guide and as
follows: The beta feature is a prototype or beta version only and is not error or bug free and Customer
agrees that it will use the beta feature carefully and will not use it in any way which might result in
any loss, corruption or unauthorized access of or to its or any third party’s property or information.
Customer must promptly report to Oracle any defects, errors or other problems in beta features
to support@netsuite.com or other designated contact for the specific beta feature. Oracle cannot
guarantee the continued availability of such beta features and may substantially modify or cease
providing such beta features without entitling Customer to any refund, credit, or other compensation.
Oracle makes no representations or warranties regarding functionality or use of beta features and
Oracle shall have no liability for any lost data, incomplete data, re-run time, inaccurate input, work
delay, lost profits or adverse effect on the performance of the Service resulting from the use of beta
features. Oracle’s standard service levels, warranties and related commitments regarding the Service
shall not apply to beta features and they may not be fully supported by Oracle’s customer support.
These limitations and exclusions shall apply until the date that Oracle at its sole option makes a beta
feature generally available to its customers and partners as part of the Service without a “beta” label.
Table of Contents
Overview .............................................................................................................................. 1
   Supported Roles ................................................................................................................ 1
   Supported Record Types .................................................................................................... 1
   Support for Custom Record Types ....................................................................................... 3
   Features with Limited Support ............................................................................................ 3
   Security ............................................................................................................................ 3
      Mobile Device Access Permission ..................................................................................... 3
      Data Security ................................................................................................................ 4
      Security Questions ......................................................................................................... 5
      Two-Factor Authentication .............................................................................................. 5
      IP Address Filtering ........................................................................................................ 5
Configuring NetSuite for iPhone .............................................................................................. 6
   Saving or Removing Your Login Details ................................................................................. 6
   Setting the Time Zone ........................................................................................................ 7
   Setting Date, Time and Number Formatting .......................................................................... 7
   Setting Language ............................................................................................................... 7
   Configuring Phone Call Logging ........................................................................................... 8
   Configuring Maximum Entries in Dropdowns ......................................................................... 8
   Configuring the Navigation Tab Bar ...................................................................................... 8
   Arranging the Home Dashboard .......................................................................................... 9
   Configuring Quick Add in NetSuite for iPhone ....................................................................... 9
   Changing Application Settings ............................................................................................ 10
Navigating NetSuite for iPhone .............................................................................................. 11
   Viewing Lists and Saved Searches ...................................................................................... 11
   Using Quick Actions ......................................................................................................... 12
   Using Quick Add .............................................................................................................. 12
   Using Recent Records ....................................................................................................... 12
   Using the Menu Bar ......................................................................................................... 12
   Using the Navigation Tab Bar ............................................................................................ 13
   Home Dashboard ............................................................................................................ 14
Using NetSuite for iPhone ..................................................................................................... 17
   Logging in to NetSuite for iPhone ...................................................................................... 17
   Logging out of NetSuite for iPhone .................................................................................... 18
   Changing Roles in NetSuite for iPhone ................................................................................ 18
   Searching ........................................................................................................................ 19
   Managing your Calendar ................................................................................................... 19
      Configuring the Calendar View ....................................................................................... 19
      Editing a Calendar Event ............................................................................................... 20
   Tracking Expenses ............................................................................................................ 21
      Creating and Editing Expense Reports ............................................................................ 22
   The Approvals Portlet ....................................................................................................... 24
   Tracking Time .................................................................................................................. 28
   Managing Your Time Using the My Time Feature .................................................................. 28
   Creating and Editing Time Entries ...................................................................................... 29
   Using the Timer ............................................................................................................... 30
      Tracking Calls with Phone Call Logging ............................................................................ 31
      Working with Lists ........................................................................................................ 32
      Working with Records ................................................................................................... 33
      Working with Saved Searches ........................................................................................ 36
   Push Notifications in NetSuite for iOS ................................................................................. 36
   The NetSuite for iOS Notification Center ............................................................................. 39
NetSuite for iPhone Troubleshooting ...................................................................................... 42
   Contacting Support About Your iPhone App ........................................................................ 42
NetSuite for iPhone FAQ ....................................................................................................... 44
Overview   1

Overview
NetSuite for iPhone puts all your key business information at your fingertips.

■ Monitor Essential KPIs and Indicators
   See Dashboard Portlets
■ Create and Submit Expense Reports
   See Tracking Expenses
■ Manage Your Schedule and Events
   See Managing your Calendar
■ Work with all Main Record Types
   See Supported Record Types
■ Keep Track of Billable Hours
   See Tracking Time
■ Make Instant Approvals of Purchase Orders and Expense Reports
   See The Approvals Portlet

        Note: NetSuite for iPhone supports all standard roles and the Employee Center role. To view
        Employee Center help, see the help topic Employee Center Basics.

Supported Roles
All standard roles, including Employee and Advanced Partner Center, are supported and enabled
by default. Customized roles and the System Administrator role will need the Mobile Device Access
permission adding before they can access NetSuite from their mobile device. This permission cannot
be added to the Administrator or Full Access roles.

If you are the Administrator and you require mobile access for the Administrator or Full Access roles,
you can add the Mobile Device Access permission to yourself as a user. See To add the mobile device
access permission to a user:.

Administrators can add/remove access for individual roles as required. See Mobile Device Access
Permission.

        Note: Customer, Vendor, and Partner Center roles are not supported.

Supported Record Types
NetSuite for iPhone supports all of the following record types:

Record Type                                      Supported Actions

†Basic Actions = Create, Delete, Edit, Reset, Save

Bills                                            Basic Actions †, Autofill, Cancel Bill, Recalc

NetSuite for iPhone
Supported Record Types 2
Record Type Supported Actions
Cases Basic Actions†, Grab
Contacts Basic Actions †
Customers Basic Actions †, Accept Payment
Custom Records Basic Actions †
See Support for Custom Record Types.
Employees Basic Actions †
Estimates Basic Actions †, Autofill, Invoice, Sales Order
Events Basic Actions †, Accept, Decline, Decline this Date, Quick Accept,
Tentative
Expense Reports Basic Actions †, Approve, Complete Later, Reject, Submit. See
Tracking Expenses.
Invoices Basic Actions †, Accept Payment, Autofill, Renew
Issues Basic Actions †
Items Basic Actions †
Leads Basic Actions †
Opportunities Basic Actions †
Partners Basic Actions †
Phone Calls Basic Actions †
Prospects Basic Actions †
Purchase Orders Basic Actions †, Approve, Autofill, Bill, Reject, Close (the purchase
order), Receive
Sales Orders Basic Actions †, Approve, Autofill, Bill Remaining, Cancel Order,
Close Order, Next Bill
Tasks Basic Actions †
Vendors Basic Actions †
In addition NetSuite for iPhone provides limited support for the following record types:
Record Type Supported Actions Limitations
†Basic Actions = Delete, Edit, Reset, Save
Cash Sale Basic Actions † Can only be accessed via one of the fully supported
record types listed above.
Media Items Cancel, Delete, Edit, Save Can only be accessed via one of the fully supported
record types listed above.
Messages Cancel, Create, Forward, Merge & Can only be accessed via one of the fully supported
Send, Preview, Reply, Reply to All, record types listed above, and is not supported for
Reset Saved Searches.
Payment Basic Actions † Can only be accessed via one of the fully supported
record types listed above.
Time Entries Cancel, Delete, Edit, Save Can only be accessed via one of the fully supported
record types listed above.
NetSuite for iPhoneSupported Record Types 3
Record Type Supported Actions Limitations
User Notes Basic Actions † Can only be accessed via one of the fully supported
record types listed above.
Support for Custom Record Types
NetSuite for iPhone provides complete access to custom records including support for view, edit, create
and delete (for any custom records already accessible via the NetSuite web application). You can also
access Saved Searches based on custom records, and search for custom records using the Global
Search feature.
Note: Administrators can control which custom record types are available on their user’s
devices. To be accessible from a mobile device, custom record types must have both the Allow
UI Access and the Allow Mobile Access boxes checked. See the help topics Creating Custom
Record Types and Prevent Access through the User Interface.
Features with Limited Support
The following features are not fully supported in the NetSuite for iPhone app:
■ VSOE – NetSuite's Vendor-Specific Objective Evidence (VSOE) feature is not supported. You can
access and edit records that have the VSOE feature enabled, but you will not be able to view or edit
the VSOE specific fields in those records. See the help topics Using the VSOE Feature and Setting Up
VSOE on an Item Record.
■ Advanced Inventory Management – You can access and edit records that have the feature enabled,
but you will not be able to view or edit the Advanced Inventory Management specific fields in those
records. See the help topic Advanced Inventory Management.
■ Advanced Bin Management – You can access and edit records that have the feature enabled, but
you will not be able to view or edit the Advanced Bin Management specific fields in those records.
See the help topic Advanced Bin / Numbered Inventory Management.
Security
NetSuite for iPhone utilizes the following features to enhance the security of your data while using a
mobile device.
■ Mobile Device Access Permission
■ Data Security
■ Security Questions
■ Two-Factor Authentication
■ IP Address Filtering
Mobile Device Access Permission
Administrators can control who has mobile access to their NetSuite accounts by enabling/disabling the
Mobile Device Access permission for each role. This enables administrators to control mobile access on
a role by role basis.
NetSuite for iPhoneSecurity 4
The Mobile Device Access permission is enabled, by default, for all roles except:
■ Custom roles and the System Administrator role — require the Mobile Device Access permission to
be enabled before they can access NetSuite from their mobile device.
■ Administrator, and Full Access roles — you cannot add the Mobile Device Access permission to
these roles.
Note: You cannot add the Mobile Device Access permission to the Administrator and Full
Access roles.
If you are the Administrator and you require mobile access for the Administrator or Full
Access roles, you can add the Mobile Device Access permission to yourself as a user. See To
add the mobile device access permission to a user:.
To add the mobile device access permission to a role:
Note: Only administrators can add this permission to a role. See the help topic Customizing or
Creating NetSuite Roles for further information on setting permissions.
1. Go to Setup > User/Roles > Manage Roles.
2. Click Edit/Customize next to the relevant role.
3. In the Permissions tab, click on the Setup subtab.
4. Click Add and select the Mobile Device Access permission.
5. Click Done then save the changes.
To add the mobile device access permission to a user:
Important: Administrators must ensure Global Permissions is enabled before completing this
procedure. See Setup > Company > Enable Features > Permissions > Global Permissions. Check
the Global Permissions box found in the Permissions subsection.
Note: For security reasons we recommend that you do not apply the Mobile Device Access
permission directly to a user, but instead apply the permission to the user’s role(s). See To add
the mobile device access permission to a role: and Using the Global Permissions Feature.
When a permission is added directly to a user, it applies globally regardless of which role the user
selects.
1. Go to Setup > User/Roles > Manage Users.
2. Click the relevant user.
3. Click the Edit button to enable editing of the user record.
4. In the Access tab, click on the Global Permissions subtab.
Note: Administrators — make sure the Global Permissions feature has been enabled.
5. Click Add and select Mobile Device Access from the dropdown list.
6. Click Save.
Data Security
NetSuite for iPhone does not store any un-encrypted NetSuite data on your mobile device.
NetSuite for iPhoneSecurity 5
The app stores a limited amount of encrypted NetSuite data locally on your iPhone. This includes Time
Logs. See Tracking Time.
You can use the Remember Me option to store your NetSuite username and password, enabling you
to log in and launch the application by just tapping the NetSuite icon. If you enable this option your
NetSuite password will be encrypted and stored on your iPhone. See Saving your login details.
Important: If you enable the Remember Me option be aware that anyone who has access to
your iPhone will also be able to access information in your NetSuite account and local data on
your phone.
Security Questions
Whenever you log in to NetSuite using a different device/browser you are required to provide a second
form of authentication in addition to your password. The first time you log in using your iPhone you will
be asked one of your three security questions.
Note: After resetting or reinstalling the mobile app you will again be asked one of your
security questions during log in.
Two-Factor Authentication
NetSuite for iPhone supports Two-factor Authentication (2FA) using RSA Tokens. When logging in to a
2FA role designated as RSA token authentication required, first enter your credentials and tap Log in.
On the separate 2FA screen, enter your token code and tap Authorize. RSA tokens are either generated
from a SecurID fob or from a soft token generated by the RSA SecurID Software Token app. You can
download this app from the App Store. For more information, see the help topic Setting Up an RSA
Token on iPhone or iPad.
Note: users are advised to be extra vigilant of device security when using software generated
tokens on the same device used to access the NetSuite app.
IP Address Filtering
Any settings for IP address filtering on your NetSuite account will also apply to accessing NetSuite via
the NetSuite for iPhone app. It is advised that you do not have this feature enabled for any roles you
use with your mobile device.
NetSuite for iPhoneConfiguring NetSuite for iPhone 6
Configuring NetSuite for iPhone
NetSuite for iPhone is primarily designed for use on the iPhone, but will work on any iOS device with
Apple iOS 11.x or higher that has access to the internet.
Note: NetSuite for iPhone is not supported on jailbroken devices
■ Saving or Removing Your Login Details
■ Setting the Time Zone
■ Setting Date, Time and Number Formatting
■ Setting Language
■ Configuring Maximum Entries in Dropdowns
■ Configuring the Navigation Tab Bar
■ Arranging the Home Dashboard
■ Configuring Quick Add in NetSuite for iPhone
■ Changing Application Settings
Saving or Removing Your Login Details
NetSuite for iPhone can store your login details using the Remember Me feature.
Storing your login details in the NetSuite for iPhone app has some inherent risks. When enabling the
Remember Me option you are required to accept the following terms.
By enabling the Remember Me option, your NetSuite Service password will be stored on your device
and encrypted using industry standard security measures. Anyone with access to your unlocked device
will be able to access your NetSuite Service account using this device; a person having access will be
able to view, add and edit information in your NetSuite Service account. As a precaution, you should
always utilize a passcode lock on your device and change your password regularly. If your device is lost
or stolen, you should report the incident to your NetSuite account administrator and you must change
your NetSuite password immediately.
By enabling the Remember Me option, You accept full responsibility for any losses and/or damages,
and You agree not to hold NetSuite or its affiliates liable for any losses and/or damages resulting from
saving your password information.
Note: Your iPhone stores the password securely using Apple's Keychain security functionality.
For more information see Data Security.
Saving your login details
1. Go to the Settings screen.
2. Tap Remember Me.
3. Enter the email address and password that you use to log in to your NetSuite account.
4. Tap Enable.
5. Read the NetSuite’s legal statement and only tap Agree if you wish to be bound by the terms.
Removing your login details
1. Go to the Settings screen.
NetSuite for iPhoneSaving or Removing Your Login Details 7
2. Tap Remember Me.
3. Tap Disable.
Setting the Time Zone
The time zone setting for your NetSuite for iPhone app is taken from your NetSuite account. Calendar
dates, schedules etc. will be displayed in that time zone. The application ignores the time zone settings
of your phone. The time zone setting of your NetSuite account can be configured from your mobile
device. See To change your NetSuite account time zone from your mobile device.
Time Zone Synchronization
NetSuite for iPhone is configured (by default) to notify you when your mobile device and your NetSuite
account have different time zones. When your mobile device’s time zone is adjusted the Global Actions
button will display a notifications alert.
Tap the Global Actions button to view the notification.
Tap the notification to go to the Time Zone screen. See To change your NetSuite account time zone
from your mobile device.
After you have visited the Time Zone screen, or tapped the notification, you will not receive further
time zone notifications until another change of time zone is detected.
To change your NetSuite account time zone from your mobile device
1. Go to the Settings screen and tap Time Zone.
2. On the Time Zone screen you have the following options:
■ Notification - tap to toggle off/on automatic notifications. The default setting is on.
■ Local - displays the time zone setting of your mobile device.
■ NetSuite - displays the time zone setting of your NetSuite account. Tap to edit.
Note: NetSuite account time zones may not match exactly to the time zone of your
mobile device. Select the best fit from the list of available time zones.
Setting Date, Time and Number Formatting
Date, Time and Number formatting for your NetSuite for iPhone app are taken from your NetSuite
account. You need to log in to the NetSuite web application to change these settings. See the help
topics Number Formats and Date Formats.
Setting Language
The language settings for your NetSuite for iPhone app are taken from your NetSuite account. You
need to log in to the NetSuite web application to change these settings. See the help topic Choosing a
Language for Your NetSuite User Interface.
NetSuite for iPhoneConfiguring Phone Call Logging 8
Configuring Phone Call Logging
Phone Call Logging allows you to track all phone calls initiated from your NetSuite for iPhone
application. This feature is switched off by default. Phone Call logging can also remind you to log your
last call. As soon as a call has ended, a popup alert reminds you to log the call. See Tracking Calls with
Phone Call Logging.
To enable phone call logging
1. Go to the Settings screen and tap Phone Call Logging.
2. On the Phone Call Logging screen you have the following options:
■ Auto-track Recent Calls - tap to toggle on/off automatic phone call logging. The default
setting is off.
■ Show Alert - display a notification popup when a call has ended. The popup provides a useful
reminder to log the call. This option is only available when Auto-track Recent Calls is enabled.
The alert provides the option to either log the call immediately or log the call later. If you
choose to log the call later, the call will be added to the Recent Calls portlet as an unlogged
call. See Dashboard Portlets.
3. Tap Done when you have finished configuring phone call logging.
Configuring Maximum Entries in Dropdowns
The number of entries in a list of options determines the type of selector used. Either a popup selector
or a roll selector. This can be configured in the NetSuite web application by setting the Maximum
Entries in Dropdowns preference.
To set the Maximum Entries in Dropdowns preference:
1. In the NetSuite web application, go to Home > Set Preferences.
2. On the General subtab, in the Optimizing NetSuite section, enter a value for the Maximum
Entries in Dropdowns field.
If the number of records in a list exceeds this number then the list automatically becomes a
popup list, otherwise the list is displayed as a roll selector.
3. Click Save.
Configuring the Navigation Tab Bar
You can configure the Tab Bar to display any 4 options from the following: Home, Calendar, Saved
Searches, and the list of supported record types. See Supported Record Types.
NetSuite for iPhoneConfiguring the Navigation Tab Bar 9
Note: When selecting record types for the Navigation Tab Bar consider your user roles and
which record types each role can access. If you select a record type that is not available in one of
your roles, then it will not be displayed when that role is active. Instead the next available item
in the list will ‘slide up’ to join the bar.
To configure the Navigation Tab Bar:
1. On the Navigation Tab bar, tap More.
2. On the Menu Bar, tap Reorder.
3. Press and drag the grab icon to move a record type up or down in the list.
The first 4 items, under the Tab Bar section, will be displayed in the Navigation Tab Bar. The
remaining items will be used, in the order listed, to substitute for any item which is not available
for the active role.
4. Tap Done when you have finished re-ordering your items.
Arranging the Home Dashboard
Note: The portlets in the iPhone application utilize 1-way synchronization. This means that
they display synchronized data, but changes to the portlets on your iPhone will not affect the
portlets on your NetSuite web application dashboard.
Rearranging the Home Dashboard portlets
1. From the Home Dashboard tap Reorder on the Menu Bar.
2. Press and drag the grab icon to move a panel to its required position.
3. Tap Done when you have finished re-ordering the portlets.
Note: Which portlets display on your Home Dashboard is defined by your NetSuite web
application Dashboard. See Dashboard Portlets.
Configuring Quick Add in NetSuite for iPhone
Quick Add allows you to quickly add a new record for a selected number of standard record types. The
list of available record types is defined in your NetSuite web application. For more information on using
NetSuite for iPhoneConfiguring Quick Add in NetSuite for iPhone 10
Quick Add on your mobile device see Using Quick Add. For more information on setting up Quick Add
see the help topics Quick Add Portlet and Using Quick Add for Standard Records.
Changing Application Settings
The Settings screen allows you to configure basic settings for the application as follows:
■ Remember Me – save your login details. See Saving or Removing Your Login Details.
■ Time Zone – change you NetSuite account time zone. See To change your NetSuite account time
zone from your mobile device.
■ Phone Call Logging – change you NetSuite account time zone. See Configuring Phone Call Logging.
■ About – provides the following basic information.
□ App Version.
□ Server Version.
□ User Login – the username you are currently logged in with.
□ Account – the account you are currently logged in with.
□ Role – your current user role.
Note: This information may be required when contacting Support.
■ EULA – access to read the EULA for the application.
■ Reset to defaults – reset the application’s settings to the factory defaults. After resetting the app
you will be required to provide an additional form of authentication upon your next login. See
Security Questions.
NetSuite for iPhoneNavigating NetSuite for iPhone 11
Navigating NetSuite for iPhone
NetSuite for iPhone utilizes standard iPhone touchscreen navigation. Users who are familiar with the
iPhone will be able to navigate through the intuitive interface. The following tips should be beneficial in
getting the most from NetSuite for iPhone.
■ Viewing Lists and Saved Searches
■ Using Quick Actions
■ Using Quick Add
■ Using Recent Records
■ Using the Menu Bar
■ Using the Navigation Tab Bar
■ Home Dashboard
Viewing Lists and Saved Searches
■ Lists predominantly display one column only. Rotate the phone 90 degrees to view in landscape
mode with all the columns displayed.
■ Lists and Saved Searches display the first 50 records returned. Each time you scroll to the bottom of
a list an additional 50 records are loaded.
■ Swipe a record in the list to reveal Quick Actions (only available in portrait mode). See Using Quick
Actions.
Note: Quick Actions are not available for Saved Searches.
■ Pan and scroll the list in landscape mode to view the required rows and columns.
■ The total number of records currently loaded is displayed at the bottom of the list.
■ Additional actions available when viewing Saved Searches:
□ Tap a column header to order the records in a Saved Search by the selected column. Tap the
same column header again to invert the ordering.
□ Tap a record in the Saved Search to open the record for viewing or editing.
NetSuite for iPhoneUsing Quick Actions 12
Using Quick Actions
When viewing a list of records or events in portrait mode you can swipe across a record to reveal a
selection of Quick Actions.
To hide the Quick Actions simply swipe across the record again.
The following Quick Actions are available:
■ All record types — Edit.
■ Contacts, Customers, Leads and Prospects — Call, Map and Email.
■ Events — Accept, Decline, Edit this Date, Cancel.
■ Phone Calls — Complete, Call.
■ Tasks — Complete.
The actions available for a specific record depend on the record type and its state.
Note: Quick Actions are not available for Saved Searches.
Note: Quick Actions are not available when viewing a list in landscape mode.
Using Quick Add
Quick Add lets you quickly add a new record for a selected number of standard record types. See
Configuring Quick Add in NetSuite for iPhone.
To add a new record using Quick Add:
1. Tap the Global Actions button. See Using the Menu Bar.
2. Tap the Quick Add icon.
3. Select the required record type.
4. If your configured Quick Add form does not provide all the details you require, tap the More
Details button.
If a newly added record is not immediately visible in the list of records, refresh the list view. See
Refreshing Screen Data.
Using Recent Records
Recent Records lets you access recently viewed or edited records. The list of recent records is
synchronized with your NetSuite web application, so any records viewed on your iPhone will also be
listed on your web application and vice versa.
Recent records can be found after tapping the Global Actions button.
Using the Menu Bar
The menu bar is available on most screens. It offers a selection of options related to the screen you are
currently viewing. Some of the most common options are listed here:
NetSuite for iPhoneUsing the Menu Bar 13
Menu Function
Button
Reorder/Done – on applicable screens you can toggle between editing and saving changes to the
layout. See Rearranging the Home Dashboard portlets.
Add – on applicable screens you can add a new record.
Global Search – offers the same functionality as the Global Search in your NetSuite web application.
See Searching for records with NetSuite for iPhone.
Global Actions – Tap the Global Actions button to display the following options:
■ Home – return to the Home Dashboard. See Home Dashboard.
■ Recent Records – show recently viewed or edited records. See Using Recent Records.
■ Choose Role – change user roles. See Changing Roles in NetSuite for iPhone.
■ Quick Add - quickly add a new record. See Using Quick Add.
■ Settings - configure basic settings for the application. See Changing Application Settings.
■ Timer - begin recording a new time log or edit existing time logs. See Creating a New Time Entry.
■ Help — access this documentation, contact Support, or visit SuiteAnswers.
■ Log out — log out of the application. See Logging out of NetSuite for iPhone.
■ Notifications — list current notifications. Click a notification to go directly to that screen. The Global
actions button is different if there are pending notifications.
The Global Actions button displays the number of notifications (if any).
Tap a notification to go to the relevant screen.
Using the Navigation Tab Bar
The Tab bar is a configurable set of quick link buttons to key features and records. The tab bar is
located at the bottom of the screen and is accessible from most parts of the app. To configure the tab
bar, tap the More icon. Tap the Reorder button. Rearrange the order of the tab bar by tapping and
dragging an item. To add and replace an existing tab bar button, tap and drag a More item into the Tab
Bar area. A typical tab bar configuration includes:
■ Home – go to the Home Dashboard.
■ Calendar – go to the calendar screen. See Managing your Calendar.
■ My Time – go to the My Time screen where you can manage your time sheets. See Tracking Time.
■ Contacts – go to your list of contacts. From this screen contacts can be sorted, filtered, created and
deleted.
■ More – Displays a list of additional role dependent record types. See Supported Record Types.
Note: The record types listed are dependant on your user role.
You can configure the Navigation Tab Bar to display any 4 options from the following: Home, Calendar,
Saved Searches, and the list of supported record types. See Supported Record Types.
NetSuite for iPhoneHome Dashboard 14
Home Dashboard
The Home Dashboard displays a selection of NetSuite web application Dashboard Portlets with up to
the minute data. See Dashboard Portlets.
Note: The portlets in the iPhone application utilize 1-way synchronization. This means that
they display synchronized data, but changes to the portlets on your iPhone will not affect the
portlets on your NetSuite web application Dashboard.
Dashboard Portlets
Portlets will only be displayed on your Home Dashboard if they are also displayed on your NetSuite
web application Dashboard. The following portlets are available.
■ Reminder - Displays the first 3 reminders from your NetSuite web application Dashboard. Tap
View List to see your full list of dashboard reminders. Reminders with an arrow alongside them are
based on the results of a saved search. Saved search results are all viewable directly within the app.
Reminders generated using a different method, for example workflows, are not supported natively
by the app. In such cases, a dialog will prompt you to open the NetSuite application in a browser.
■ Saved Search - Displays the first 3 custom search portlets from your NetSuite web application
Dashboard. Tap View List to see your full list of Saved Searches. See Working with Saved Searches.
■ Trend Graph - Displays the first trend graph from your NetSuite web application Dashboard. Tap
View List to see your full list of dashboard trend graphs. See the help topic Setting Up Trend Graph
Portlets.
■ Report Snapshot - Displays the first report snapshot from your NetSuite web application
Dashboard. Tap View List to see your full list of report snapshots. To display your dashboard report
NetSuite for iPhoneHome Dashboard 15
snapshots on your iPhone Home Dashboard they must be set to chart Display Type. List Display
Type is not supported in the iPhone app. See the help topic Setting Up a Report Snapshot Portlet.
■ Key Performance Indicators - The default behavior is to display the first 3 KPIs from your NetSuite
web application Dashboard. If you have set up headline KPIs the settings from the headline KPIs
will override this. Tap View List to see your full list of dashboard KPIs. See the help topic Highlighting
KPIs.
■ KPI Scorecard - A maximum of 1 KPI Scorecard can be displayed as configured in your NetSuite web
application Dashboard. Tap the scorecard to view the scorecard data. See the help topic Adding a
KPI Scorecard Portlet to a Dashboard.
■ KPI Meter - Displays the first KPI Meter as configured in your NetSuite web application. Use the left
and right arrows to view other KPI Meters.
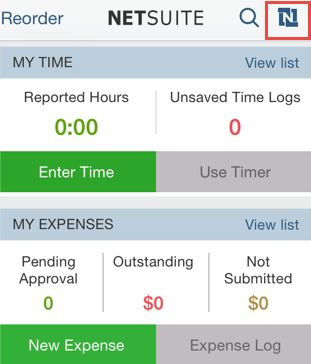
■ My Time — Displays the number of hours reported for the current time transactions, and the total
time recorded in unsaved time logs.
Note: This portlet is only available to users who have the necessary permission to create a
Time Entry record (the Track Time permission), and have the Time Sheet feature enabled on
their account. The portlet is included on the Home Dashboard by default.
□ Tap Enter Time to enter a new time entry record. See Creating a New Time Entry.
□ Tap Use Timer to access the Timer screen. See Creating a Time Log.
NetSuite for iPhoneHome Dashboard 16
■ My Expenses — Displays the number of expense records pending approval, the total value of
outstanding expenses, and the value of expenses not yet submitted.
Note: This portlet is only available to users who have the necessary permission to create
Expense Reports. The portlet is included on the Home Dashboard by default.
□ Tap View List to see your full list of outstanding expenses. See Viewing an Expense Report.
□ Tap New Expense Report to enter a new Expense Report. See Tracking Expenses.
■ Recent Calls — Displays the last 3 calls initiated from your NetSuite for iPhone application.
Note: This portlet is only available if you have enabled Phone Call logging. See Configuring
Phone Call Logging.
□ Tap View List to see your full list of recent calls.
□ Tap on any call in the list to log the call. See To Log a Phone Call on your Mobile Device.
NetSuite for iPhoneUsing NetSuite for iPhone 17
Using NetSuite for iPhone
■ Logging in to NetSuite for iPhone
■ Logging out of NetSuite for iPhone
■ Changing Roles in NetSuite for iPhone
■ Searching
■ Managing your Calendar
■ Tracking Time
■ Tracking Expenses
■ Tracking Calls with Phone Call Logging
■ Working with Lists
■ Working with Records
■ Viewing Lists and Saved Searches
■ Push Notifications in NetSuite for iOS
Logging in to NetSuite for iPhone
Note: Logging in to NetSuite for iPhone does not terminate any open NetSuite web application
sessions and logging in to the web application does not terminate a NetSuite for iPhone session.
Enable Remember Me if you want NetSuite for iPhone to remember your password and log in
automatically. See Saving your login details.
Note: Your iPhone stores the password securely using Apple's Keychain security functionality.
For more information see Data Security.
To log in to NetSuite for iPhone:
1. Enter the email address and password that you use to log in to your NetSuite account.
2. Tap Log In.
3. The first time you log in you will be required to answer one of your 3 security questions. See
Security Questions.
4. After logging in for the first time you will be prompted to select a role for your session. Note that
selecting a role for your iPhone session does not change your default role in the NetSuite web
application. On subsequent log in NetSuite for iPhone will remember the role from your previous
session. When logged in you can change roles. See Changing Roles in NetSuite for iPhone.
Log in using Face and Touch ID
NetSuite for iPhone supports Face and Touch ID. To log in using these features, enable Touch ID and
Face ID in your system settings. No further setup is required.
NetSuite for iPhoneLogging in to NetSuite for iPhone 18
Using Single Sign-on Login
To use SSO with the app, first check with your administrator that SAML has been enabled for your
company. See the help topic SAML Single Sign-on for complete setup instructions. You should then
request your administrator does the following:
■ Assigns you a (customized) role which has Mobile Device Access and SAML Single Sign-on
permissions.
■ Forwards you the NetSuite Account id. Administrators can find this at Setup > Company Information
> Account ID.
Note: If testing SSO in a Release Preview or Sandbox account, make sure that the entire
alphanumeric Account ID is supplied — for example, 2000201_RP
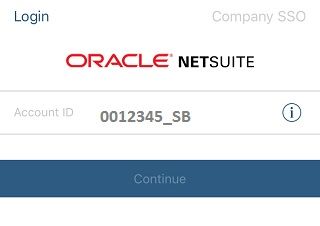
To use SSO to log in to the app:
1. Launch the app and tap on the Company SSO link.
2. Enter your NetSuite Account ID. You will only be asked for this information once.
Tip: Tapping the “i” icon provides a reminder of how to obtain your NetSuite Account ID
3. Tap Continue.
4. Log in from the third party authentication screen using your SAML credentials.
Logging out of NetSuite for iPhone
Note: Logging out of NetSuite for iPhone does not affect any open NetSuite web application
sessions.
To log out of NetSuite for iPhone:
1. Tap the Global Actions button on the Menu Bar. See Using the Menu Bar.
2. Tap the Log out icon.
Changing Roles in NetSuite for iPhone
To change your current role:
1. Tap the Global Actions button on the Menu Bar. See Using the Menu Bar.
NetSuite for iPhoneChanging Roles in NetSuite for iPhone 19
2. Tap the Choose Role icon.
3. Select a role from the list.
Note: You cannot select a role that does not have the Mobile Device Access permission
enabled. See To add the mobile device access permission to a role:.
Searching
NetSuite for iPhone provides a version of Global Search. Use it to search any of the supported record
types and your Saved Searches. See Supported Record Types.
Searching for records with NetSuite for iPhone
1. Tap the Global Search button on the Menu Bar. See Using the Menu Bar.
2. You can filter your search by tapping the required Quick Filter button from the list. The following
Quick Filters are available: lead, prospect, customer, contact, item, and sales order.
Alternatively, you can enter a search prefix to filter the search by any supported record type. A
search prefix is made up of all or some of the letters of a record type, plus a colon.
3. Enter your search term to begin the search.
4. Tap the Cancel button to the right of the search box to clear your results, search keywords, and
filter. Then enter a new search.
5. Tap the Cancel button on the Menu Bar to return to your previous screen.
Managing your Calendar
The time zone settings for your calendar are taken from your NetSuite web application. See Setting the
Time Zone.
Note: There is no prompt or warning that your mobile device and the NetSuite for iPhone app
are using different time zones.
Configuring the Calendar View
The Calendar bar offers options for viewing and configuring your calendar.
■ Today – shortcut to return to today’s date. The day’s activity list will be displayed underneath the
currently selected date view.
■ 1. Daily – displays a list view of daily activities.
□ Events are grouped into days. You can scroll down the list to find the event you require.
NetSuite for iPhoneManaging your Calendar 20
□ In Daily view your calendar will only display all events from today onwards. Events from past
days are not displayed.
■ 2. Weekly – display events for the selected week.
□ Use the left and right arrows to move between weeks.
□ Select any day of the week to view the events for that day.
■ 3. Monthly – displays events for the selected month.
□ Use the left and right arrows to move between months.
□ Select any day of the month to view the events for that day.
■ 4. Customize - Customize your calendar. Tap to access the following options:
□ Calendar — Select an active calendar from the list. The screen will display up to 4 most recently
used calendars, plus your own calendar (which remains at the top of the list). To add another
calendar to the list see Viewing an unlisted calendar.
Note: You can only view one calendar at a time.
□ Activities – select the types of activities to display in the calendar: Event, Phone Call, or Task. By
default all are selected.
Note: If you’d like phone calls and tasks that do not reserve time to show on your
calendar, you must configure the following calendar preferences in your NetSuite
account: Display Non-blocking Phone Calls in Calendar, and Display Non-blocking Tasks in
Calendar. See the help topic Setting Calendar Preferences.
Tap Done to save changes to your calendar customizations, or Cancel to return to the calendar view.
Viewing an unlisted calendar
1. On the Navigation Tab Bar tap the calendar icon. If the icon is not available — on the Navigation
Tab Bar tap More, then tap Calendar.
2. Tap the Customize button.
3. Tap Add.
4. From the Calendar Type Bar select the type of calendar.
5. Select the calendar you wish to view.
6. The calendar will be added to your calendar list and will be selected as the active calendar.
Editing a Calendar Event
To edit a calendar event:
1. Open Calendar.
2. Using Quick Actions: Swipe across the required event to reveal Quick Actions then tap Edit.
Alternatively: Tap the required event to open and view the event then tap Edit.
3. Tap the Record Navigator button to view the full list of screens for the event based on your
preferred form as set up in NetSuite.
4. Edit the event details.
5. Tap the Save button.
NetSuite for iPhoneTracking Expenses 21
Tracking Expenses
The ability to track expenses is available to all users who have the necessary permission to create
Expense Reports. From the My Expenses portlet you can create a new Expense Report and attach
expense receipts directly from your iPhone. See
■ Creating a New Expense Detail
■ Converting Expense Details into an Expense Report
■ Viewing an Expense Report
■ Editing an Expense Report
■ Creating a New Expense Report
Important: Creating Expense Reports requires File Cabinet to be enabled. Setup > Company
> Enable Features; Data Management.
Creating a New Expense Detail
Expense Details are the building blocks from which you create Expense Reports. They comprise an
image of the physical receipt, and accompanying description of what the expense relates to. You can
attach up to 4 images to an individual Expense Detail, making it easy to organize multiple expensible
items under a single category. For example car parking tickets, taxi fares or evening meals. It’s also
particularly useful for recording multi-page invoices, such as hotel bills. Saved Expense Details are
stored in the Expense Log. Expense logs are considered work in progress files, and therefore only saved
locally on the device. In comparison, expense reports are posted to NetSuite desktop accounts when
created.
To create an Expense Detail:
1. Tap New Expense on the Home Dashboard.
2. Tap the camera image icon.
3. Choose an existing image or capture a new image.
a. Tap the camera image icon again to add multiple images as required (max 4).
4. Complete the description fields.
5. Tap Done to save the Expense Detail.
Converting Expense Details into an Expense Report
After you have captured individual Expense Details and saved them to the Expense Log (see Creating
a New Expense Detail), you can convert Details into an Expense Report. Multiple Details can be added
to a single report, making it particularly useful for submitting trip-related expenses such as air fares,
accommodation, meals etc. as well as multi-page hotel bills.
To create an Expense Report:
1. From the Home Dashboard, tap Expense Log.
2. Tap Select Expenses to Report.
3. Select Expense Details to include in the Expense Report.
4. Tap Create Expense Report.
5. The generated report will be displayed for review.
NetSuite for iPhoneTracking Expenses 22
Important: make edits / amendments at this stage, as submitted reports can only be
edited by Administrator and Accountant roles within the app afterwards.
6. Add additional information to fields as required.
7. Tap Add to complete the review process for that Expense Detail / Row.
Note: Each Expense Detail that makes up the Expense Report must be reviewed
individually.
8. Complete report creation.
a. Tap Submit to save the Expense Report and submit Report for approval. “All Expenses
Successfully Added” is displayed.
b. Tap Complete Later to save the Expense Report to NetSuite.
9. Optional. Go to Home Dashboard and refresh screen. See Refreshing Screen Data. The value in
Pending Approval in the My Expenses portlet is updated.
Note: The submitted Expense Report will appear in the NetSuite web app. Go to Transactions
> Employees > Enter Expense Reports > List
Viewing an Expense Report
The Expense Reports screen provides a summary of currently pending reports. From here you can
check the approval stage and totals for each Report. You can customize what information is displayed.
Tapping an Expense Report will open the selected Report. See Working with Lists.
1. From the My Expenses portlet on the Home Dashboard, tap View List.
2. Alternatively: from the Navigation Tab Bar, select More > Expense Reports.
After the list is displayed you can sort, filter and configure the list. See Working with Lists.
3. Tap the required report to open and view the report.
For more information on working with Expense Reports see Editing an Expense Report, Attaching a File
to an Existing Expense Report, and Working with Records.
Creating and Editing Expense Reports
Creating a New Expense Report
1. From the My Expenses portlet on the Home Dashboard, tap View List.
a. Alternatively, Tap More on the menu bar > Expense Reports.
2. Tap and fill in any relevant fields.
3. Tap the Record Navigator button then tap Expenses.
4. Tap the add button to add a new expense to the selected report.
5. Select from the available options:
a. Row(s) from Expense Log
b. Row using Camera Photo
c. Blank row
NetSuite for iPhoneYou can also read