OX Operation Manual Version 1.2 - Universal Audio
←
→
Page content transcription
If your browser does not render page correctly, please read the page content below
OX Operation Manual

       Version 1.2

   Manual Version 210811

     www.uaudio.com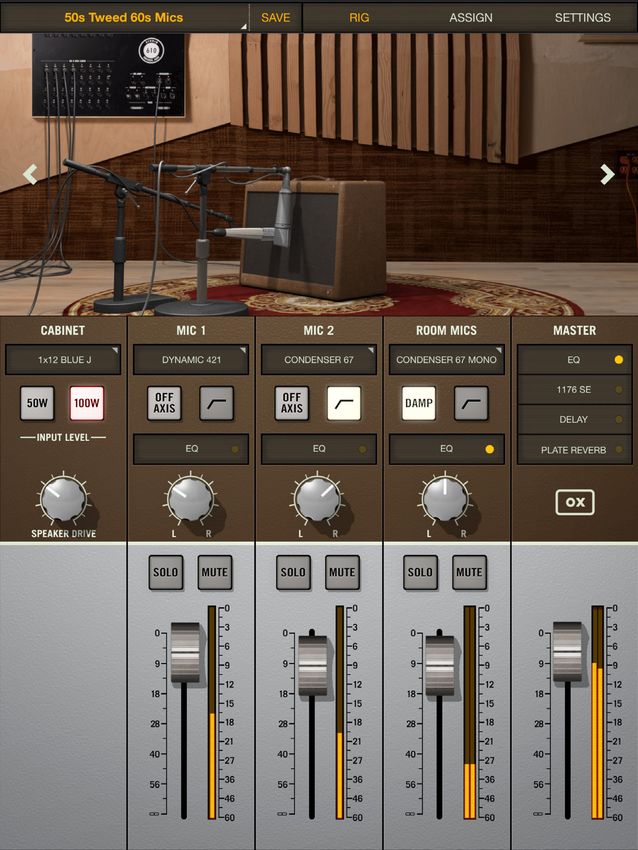
A Letter from Bill Putnam Jr.

Thank you for choosing the OX Amp Top Box as part of your music making experience.
We know that any new piece of gear requires an investment of time and money — and
our goal is to make your investment pay off.
Universal Audio’s family of products represent the best examples of what UA has stood
for over its long history; from its original founding in the 1950s by my father, to our
current vision of delivering the best of both analog and digital audio technologies.
The OX Amp Top Box allows you to play and record your tube amp in its perfect tonal
sweet spot — anywhere, and at any volume. Featuring the world’s best all-analog reactive
load, OX also offers album-quality mic and speaker cabinet emulations, UA’s Dynamic
Speaker Modeling, onboard UAD effects, and much more.
At UA, we are dedicated to the idea that technology should serve the creative process
— not be a barrier. These are the very ideals my father embodied as he invented audio
equipment. We believe the OX Amp Top Box will earn its way into your creative workflow
by providing stunning guitar tones and rock-solid reliability for years to come.
Please feel free to reach out to us via our website www.uaudio.com, and via our social
media channels. We look forward to hearing from you, and thank you once again for
choosing Universal Audio.

Sincerely,

Bill Putnam Jr.

OX Amp Top Box                              2                     Letter From Bill Putnam Jr.
Important Safety Information
        Before using this unit, be sure to carefully read these operating instructions and the safety
        suggestions. Afterwards, keep them handy for future reference. Take special care to follow
        the warnings indicated on the unit, as well as in the operating instructions.
   1.  Read the instructions.
   2.  Keep these instructions.
   3.  Heed all warnings.
   4.  Follow all instructions
   5.  Do not use this apparatus near water.
   6.  Clean only with dry cloth.
   7.  Do not block any ventilation openings. Install in accordance with the manufacturer’s
       instructions.
   8. Do not install near any heat source such as radiators, heat registers, stoves, or other
       apparatus (including amplifiers) that produce heat.
   9. Do not defeat the safety purpose of the polarized or grounding-type plug. A polarized plug
       has two blades with one wider than the other.
   10. Protect the power cord from being walked on or pinched particularly at plugs,
       convenience receptacles, and the point where they exit from the apparatus.
   11. Only use with attachments/accessories specified by the manufacturer.
   12. Refer all servicing to qualified service personnel. Servicing is required when the apparatus
       has been damaged in any way, such as power-supply cord or plug is damaged, liquid has
       been spilled or objects have fallen into the apparatus, the apparatus has been exposed to
       rain or moisture, does not operate normally, or has been dropped.

   Note: It is safe to install and operate OX Amp Top Box on top of a guitar or bass amplifier.

   •     OX Amp Top Box does not contain a fuse or any other user-replaceable parts.
   •     OX Amp Top Box circuitry contains a replaceable lithium battery. The battery should only
         be replaced by a qualified technician.
   •     CAUTION: Danger or explosion if battery is incorrectly replaced. Replace only with the
         same or equivalent type battery.
   •     CAUTION: The servicing instructions are for use by qualified service personnel only. To
         reduce the risk of electric shock, do not perform any servicing other than that contained
         in the operating instructions unless you are qualified to do so.

Description of symbols used
        The lightning flash represented by the arrow symbol in an equilateral triangle is intended to
        alert users to the presence of high voltage within the unit that could cause an electrical
        shock hazard.
        The exclamation mark in an equilateral triangle is intended to alert users to the existence
        of important instructions in the manual relating to the use and maintenance of the unit.

OX Amp Top Box                                     3                       Important Safety Information
Table Of Contents Tip: Click any section or page number
to jump directly to that page.
A Letter from Bill Putnam Jr................................................................... 2
Important Safety Information.................................................................. 3
Welcome to OX Amp Top Box!................................................................. 6
About OX Documentation..................................................................................... 7
Critical Operation Notes......................................................................... 8
Critical Notes — Avoid Equipment Damage........................................................... 8
Important Notes — Reduce Equipment Wear....................................................... 10
Quick Start......................................................................................... 11
Important Setup Steps...................................................................................... 11
Amp & Speaker Connections.............................................................................. 12
Output Connections.......................................................................................... 14
Control Knobs.................................................................................................. 15
Quick Operation Notes...................................................................................... 15
Controls & Connectors.......................................................................... 16
Front Panel...................................................................................................... 16
Rear Panel....................................................................................................... 19
OX Software App................................................................................. 24
OX App Features............................................................................................... 24
Essential App Concepts..................................................................................... 25
RIG View.......................................................................................................... 27
Presets Management......................................................................................... 30
Loading Presets................................................................................................ 32
Saving Presets.................................................................................................. 33
Effect Editors................................................................................................... 35
ASSIGN Views.................................................................................................. 36
Rig Slots Assign............................................................................................... 36
Rig Sets Assign................................................................................................ 38
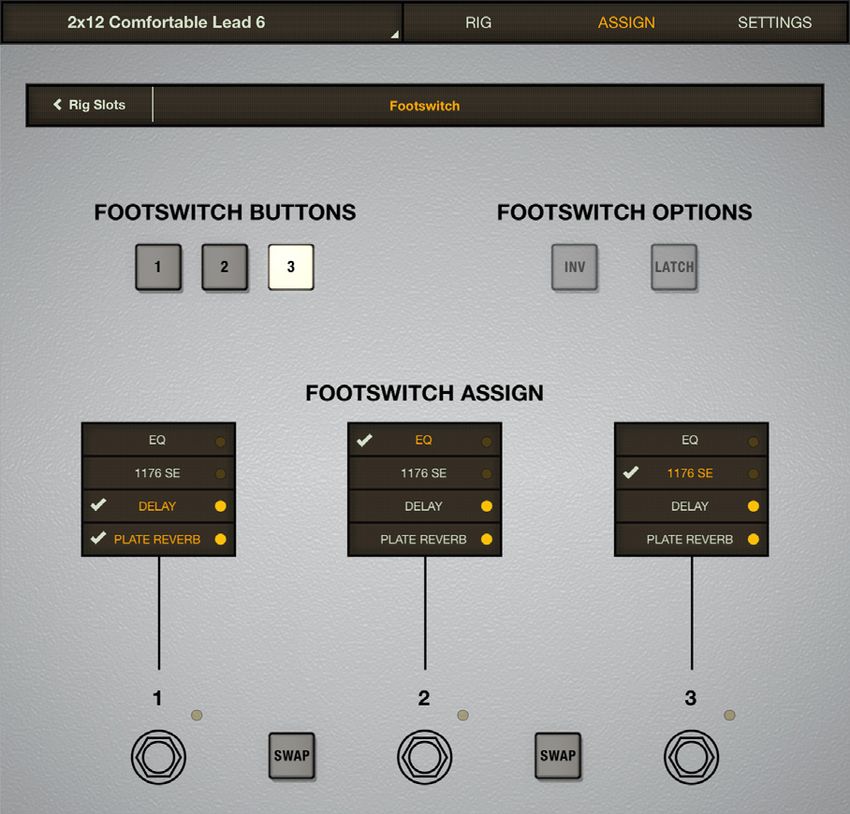
Footswitch Assign............................................................................................. 39
Footswitch Assign Controls................................................................................ 41
Footswitch Instructions..................................................................................... 43
SETTINGS View................................................................................................ 45
OX Amp Top Box 4 Table Of Contents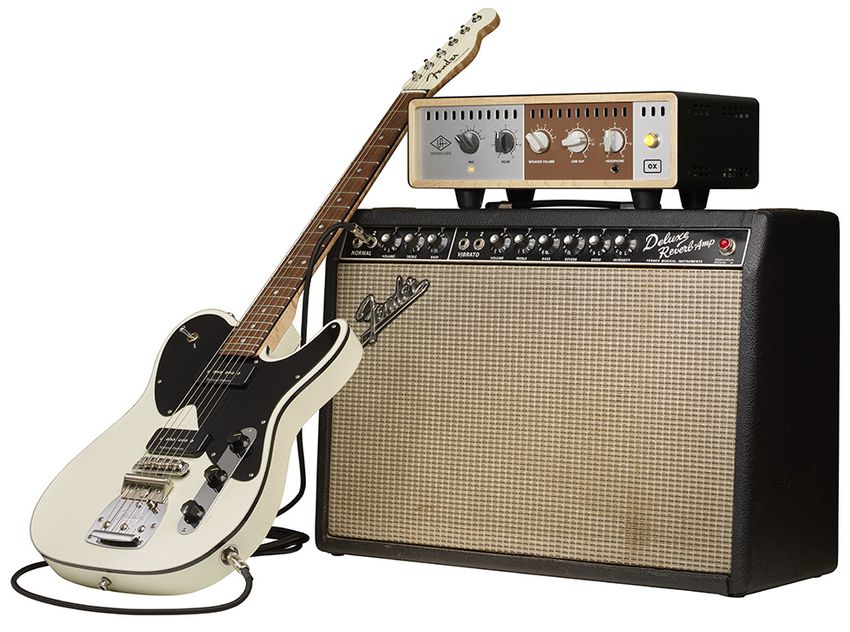
Rig, Cabinet, & Mic Descriptions........................................................... 46
    Default RIG Control Cab & Mic Presets............................................................... 46
    Default Rig Sets............................................................................................... 47
    Speaker Cabinets.............................................................................................. 48
    Cabinet Microphones ....................................................................................... 52
    Room Microphones........................................................................................... 54
OX System Overview............................................................................. 55
OX Wi-Fi Networking............................................................................ 59
    OX Wi-Fi Hotspot.............................................................................................. 59
    External Wi-Fi Networking................................................................................. 60
OX Registration................................................................................... 61
    OX Registration Overview................................................................................... 61
    OX Registration Procedure................................................................................. 62
Troubleshooting................................................................................... 64
    Wi-Fi Reset...................................................................................................... 64
    Factory Reset................................................................................................... 64
    Windows Computer Wi-Fi Reset.......................................................................... 65
Specifications..................................................................................... 66
Block Diagram..................................................................................... 68
Notices............................................................................................... 69
    Warranty.......................................................................................................... 69
    Repair Service.................................................................................................. 69
    Maintenance.................................................................................................... 69
    Compliance...................................................................................................... 70
Technical Support................................................................................ 74
    Universal Audio Knowledge Base........................................................................ 74
    YouTube Support Channel.................................................................................. 74
    Universal Audio Community Forums................................................................... 74
    Contact Universal Audio Support........................................................................ 74

OX Amp Top Box                                             5                                        Table Of Contents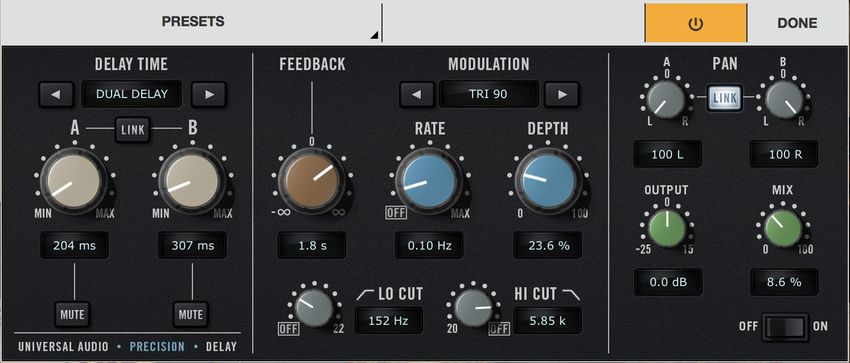
Welcome to OX Amp Top Box!
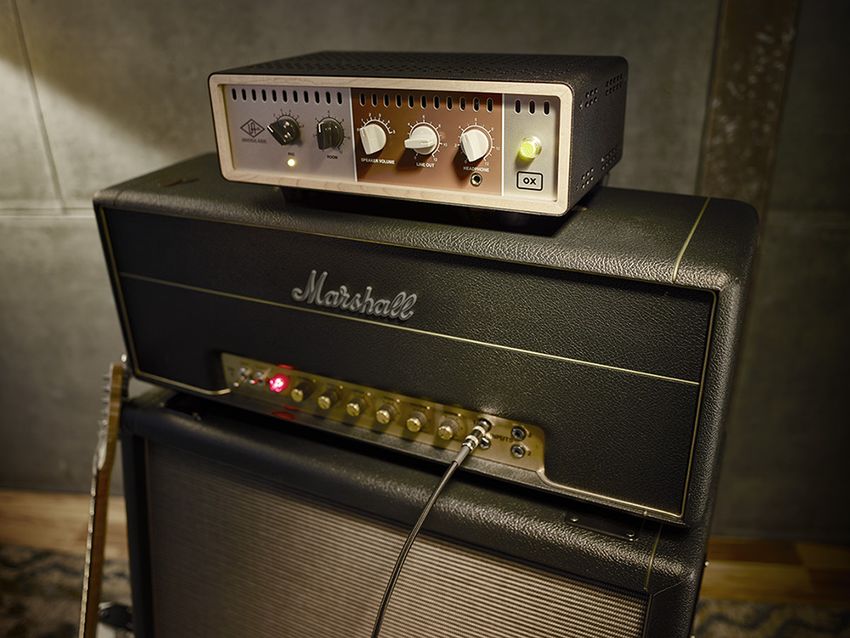
Get Legendary Studio Tones from your Tube Amp — Anywhere, at Any Volume.
OX is a premium reactive load box and guitar recording system, giving you perfectly
studio-miked amp sounds from your favorite tube amp. OX lets you play and record your
amp in its sweet spots — from huge clean tones and edge-of-breakup to fully cranked —
at any volume level, and with mic, room, and speaker cabinet emulations at the turn of a
knob.
Featuring Universal Audio’s breakthrough Dynamic Speaker Modeling, OX is the first
system to accurately emulate speaker drive, breakup, and cone cry — making it the
world’s finest speaker attenuator and guitar amp recording solution.
Now You Can:
• Play and record your tube amp in its tonal sweet spot — anywhere, at any volume,
with full dynamics
• Get stunning mic and guitar cabinet combinations at the turn of a RIG knob — no
miking required
• Audition, tweak, and save more than 125 jaw-dropping custom Rigs from
compatible iPad and Mac/Windows computers
• Get authentic “edge of destruction” sounds, complete with UA Dynamic Room
Modeling, speaker breakup, and cone cry
• Choose from 22 speaker cabinets, six cabinet mics, six room mics, and four
studio-quality effects with the OX software app to dial in the perfect combination
for your amp
• Use external footswitches for fast hands-free control of OX’s effects
The World’s Best Reactive Load Box
With decades of analog hardware engineering expertise, Universal Audio’s dream team of
engineers set out to design a reactive load box that retains the tone, dynamics, and feel
of your tube amp — no matter how much it’s attenuated. The goal was for your tube amp
to “see” OX as an actual speaker — with continuously variable impedance and response
— so you don’t lose a drop of tone or playing dynamics.
A Complete Guitar Recording System
OX’s front-panel, six-position RIG control allows you to quickly choose from complete
setups — including emulated speaker cabinets, close mics, ambient room mics, and up
to four simultaneous studio effects. OX is also the only guitar recording system to offer a
complete selection of expertly placed room mics, giving you the authentic experience of
pushing air while recording your cranked amp in a world-class tracking room.
OX Amp Top Box 6 Welcome to OX Amp Top Box!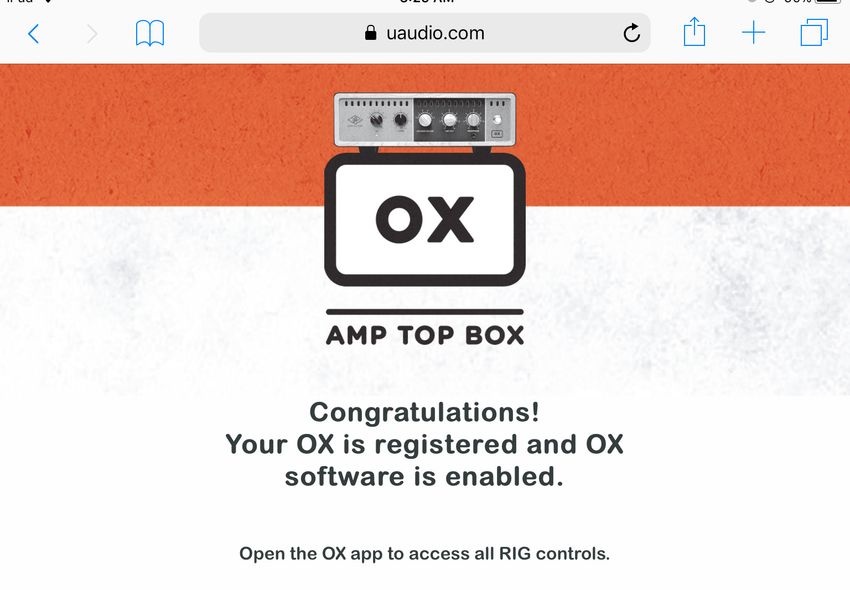
Dynamic Speaker Modeling
UA’s groundbreaking Dynamic Speaker Modeling faithfully emulates speaker breakup,
drive, and cone cry — an essential ingredient to authentic tube amp tones. Using
the Speaker Breakup knob in the OX app, you can control the harmonics and sonic
complexity that occurs only at certain frequencies and volume levels on various
speakers — far beyond a static Impulse Response system — giving you the same sonic
phenomenon that occurs with a real speaker cabinet.

A Beautiful Software App
Most guitar products do digital awkwardly. They’re ugly and hard to understand. The
OX software app, on the other hand, offers slick, intuitive control over all of OX’s RIG
settings via Wi-Fi — letting you tweak, store and recall hundreds of presets from your
iPad, Mac, or Windows 10 computer. You can then save your six favorite tones onto OX’s
front-panel RIG knob for instant recall in the studio or at a gig.

All The Right Connections
Not only does OX Amp Top Box feature a front-panel headphone jack for silent practice
with your cranked tube amp, it also sports a bevy of connections for all kinds of recording
and live workflows. Stereo S/PDIF digital outputs via RCA and optical TOSLINK, as well
as balanced TRS stereo line outputs with front panel level control, give you the necessary
connections for studio monitors, DAW, or live mixing console inputs.

About OX Documentation
This manual is your primary resource for connecting and operating OX hardware
and software. See the Table Of Contents at the beginning of the manual to find the
information you’re looking for, or use the search function in your PDF reader.
Links to other manual sections and web pages are highlighted in blue text. Click the link
to jump directly to the item.
   Tip: Use the “back” button in the PDF reader application to return to the previous
   page after clicking a link.
For additional resources such as videos and knowledge base articles, or to contact our
technical support team, see Technical Support.

OX Amp Top Box                              7                    Welcome to OX Amp Top Box!
Critical Operation Notes
         Caution: Connecting and/or operating OX incorrectly can cause permanent
         damage to your amplifier, OX, and/or other equipment connected to
         OX. Universal Audio is not responsible for equipment damage resulting
         from improper OX connections and/or operations. Review the important
         information in this chapter before connecting or using OX!

Critical Notes — Avoid Equipment Damage
Tube Amp Output Load
DON’T operate any tube amp without an output load such as a guitar speaker or OX.
Using a tube amp without an output load can permanently damage the tube amp.
   Caution: Always POWER OFF the tube amp before connecting or disconnecting its
   speaker output to guitar speakers or OX.

OX’s RED “FROM AMPLIFIER” Input Jack
DON’T connect the amp’s high-power speaker output to ANYTHING other than OX’s
FROM AMPLIFIER input jack. The nut on this jack is RED to indicate this input is ONLY
for the amp’s speaker output!

OX’s “TO SPEAKER” Output Jack
To avoid equipment damage to other gear, DON’T connect OX’s high-power TO SPEAKER
output jack to ANYTHING other than a guitar speaker cabinet!

Amp Power Rating
DON’T use OX with amplifiers exceeding 150 Watts RMS output power. Any amp with an
output power rating of 150 Watts RMS or less can be safely used with OX.

Speaker Cable Insertions
DON’T partially insert ¼” speaker cable plugs halfway into the jack or only to the first
click. The cable from the amp’s speaker output must be fully inserted into OX’s RED
FROM AMPLIFIER jack to connect the ground return for proper amp loading.

OX Amp Top Box                               8                         Critical Operation Notes
Speaker Cables
Use only high-quality 12 to 16 gauge unshielded ¼” mono TS (tip‑sleeve) speaker
cables for OX’s high-power FROM AMPLIFIER and TO SPEAKER connections. “Speaker”
is usually printed on these cables.
   Tip: As a general guideline, the longer a speaker cable is, the smaller its cable
   gauge needs to be (smaller gauge = bigger wires).

Rated Speaker Power
DON’T connect OX’s TO SPEAKER output to any speaker that is rated for a power level
that is significantly less than the connected amplifier’s output power to avoid speaker
damage.

Moisture and Liquids
DON’T expose OX to moisture or liquids. Make a habit of never putting beverages on your
OX. If liquid is spilled into the unit, immediately unplug the power cord from the AC
socket.

Cooling Airflow
DON’T cover OX’s air vents or otherwise restrict airflow around OX. The amp’s output
power is converted to heat by OX’s fanless attenuation circuit, and the air vents must be
unrestricted to dissipate this heat.

Solid State Amplifiers
OX can be used with solid state amplifiers (amps without vacuum tubes). However, when
connecting OX to solid state amps, extra caution is advised so as not to exceed OX’s
maximum input power rating of 150 Watts RMS or less.
An amp’s output power rating is sometimes labeled near the amp’s speaker output jack,
or contact the amp manufacturer for the power output specification.
         Caution: Many solid state amps exceed 150W output power and those that
         do can permanently damage OX. Damage that occurs from exceeding OX’s
         150W input power rating is not covered under warranty.

OX Amp Top Box                               9                         Critical Operation Notes
Important Notes — Reduce Equipment Wear
Circuit Wear with Power Attenuation
Circuitry within an attenuated amp is subject to the same wear and tear that would occur
if its output power was not attenuated. If an amp is constantly run at higher power levels,
the lifespan of an amp’s components is reduced accordingly.
Increased circuit wear applies especially to the amp’s vacuum tubes, capacitors, and
transformers due to the increased heat and current generated at higher power levels.
   Tip: A tube amp’s sweet spot might not be at full output power — a “dimed” amp
   doesn’t always sound better. Less power and soak might deliver better tone AND
   better tube life.

Impedance
Set OX’s IMPEDANCE knob to match the impedance of the amp’s speaker output.
Similarly, the total impedance of speaker(s) connected to OX’s TO SPEAKER jack should
match OX’s IMPEDANCE knob setting.
Many amps have multiple speaker output jacks with different impedance labels (4Ω, 8Ω,
etc.) for each output jack. If the amp’s speaker output impedance cannot be determined,
set OX’s IMPEDANCE knob to 8 ohms.
Note that when multiple speakers are combined (such as in a multi-speaker cabinet),
the total impedance depends on how the speakers are wired together. For example, two
8 ohm speakers wired in series has a total combined impedance of 16 ohms, but if they
are wired in parallel, the total combined impedance is 4 ohms.

OX Amp Top Box                              10                        Critical Operation Notes
Quick Start
       Caution: To avoid equipment damage, read the Critical Operation Notes before
       connecting or using OX!
This chapter provides brief instructions to help you get started with OX. For complete
details about every knob, switch, and jack, see Controls & Connectors.

Important Setup Steps
Follow these steps to properly connect and power OX and your amp. For visual
references, see the Amp & Speaker Connections and Output Connections diagrams on
the following pages.
       Caution: Always POWER OFF the amp before connecting or disconnecting its
       speaker output!

   1. POWER OFF the amplifier.
   2. Connect OX’s included power supply to an AC outlet and the power input jack on
      OX’s rear panel.
   3. Set OX's rear panel IMPEDANCE knob to match the amp’s speaker output
      impedance. If the amp’s speaker output impedance cannot be determined, set
      this knob to 8 ohms.
   4. Connect a ¼” speaker cable between the amp’s speaker output and the RED
      "FROM AMPLIFIER" input jack on OX’s rear panel.
   5. Set OX’s SPEAKER VOLUME, LINE OUT, and HEADPHONE knobs to position 0.
   6. Connect OX's outputs as desired (see Output Connections).
   7. Power on OX with its rear panel POWER switch, then power on the amp.
After following the important setup steps, OX is ready for use. Adjust the amp and OX
controls as desired.
   Important: If your amp doesn't seem loud enough or the SPEAKER VOLUME
   knob behaves unexpectedly (for example, it changes line/mon output levels or OX
   app signal levels, or speaker volume levels are not smoothly stepped), the amp
   connections may be reversed. Confirm the amp's speaker output is connected to
   OX's RED "FROM AMPLIFIER" input jack, NOT OX's TO SPEAKER output jack!

Setup Notes
   •   Remember to connect OX to AC power. OX requires the included external power
       supply to be operated.
   •   To download the full-color Quick Start Guide and Rig Control Cab & Mic Presets
       reference sheets included in the OX retail package, click here.

OX Amp Top Box                              11                                  Quick Start
Amp & Speaker Connections
Caution: Always POWER OFF the amp before connecting or disconnecting its
speaker output!
OX High-Power Wiring Notes
Caution: To avoid equipment and/or hearing damage, be careful to connect
and power the amp and OX in the proper sequence. See the Important Setup
Steps for specific instructions.
• Use only high-quality 12 to 16 gauge unshielded ¼” mono TS (tip‑sleeve) speaker
cables for OX’s high-power FROM AMPLIFIER and TO SPEAKER connections.
“Speaker” is usually printed directly on these cables.
• As a general guideline, the longer a speaker cable is, the smaller its cable gauge
needs to be (smaller gauge = bigger wires).
• Use the amp's "internal speaker" jack if there is more than one speaker output.
Amp Head and Cabinet Wiring
OX OUTPUT OX INPUT
“TO SPEAKER” “FROM AMPLIFIER”
Power Supply
Amp Speaker Output
TO OX INPUT
Amplifier Head
Guitar Speaker Speaker Cab Input
Cabinet FROM OX OUTPUT
OX high-power connections with an amp head and separate speaker cabinet
OX Amp Top Box 12 Quick StartCombo Amp Wiring
OX OUTPUT OX INPUT
“TO SPEAKER” “FROM AMPLIFIER”
Power Supply
Amp Speaker Output
TO OX INPUT
Speaker Cable Amp
Extension ¼” coupler Speaker
(if needed) (if needed) Cable
Combo Amp Speaker
FROM OX OUTPUT
Combo Amplifier
OX high-power connections with a combo amp
(speaker and amp in the same cabinet)
Combo Amp Wiring Notes
When connecting a combo amp to OX, the amp's internal speaker cable might not be
long enough to reach OX. The methods below can be used to extend the length of the
internal speaker cable so it can reach OX's "TO SPEAKER" output jack.
Speaker cable extension – A speaker extension cable has a ¼” female jack at one end
(which connects to the internal speaker's ¼” plug), and a ¼” male plug at the other end
(which connects to OX's "TO SPEAKER" output jack).
Female/Female coupler plus speaker cable – The barrel coupler has a ¼” female jack
at both ends. In this case, plug the internal speaker into one side of the coupler, and
an additional ¼” speaker cable (male/male) into the other side of the coupler. Plug the
other end of the additional speaker cable into OX's "TO SPEAKER" output jack.
No speaker jacks or plugs? – Speakers in older combo amps might be wired directly
to the internal amplifier, without removable connectors. In this case, a qualified amp
technician can modify the amp to accommodate ¼” connections.
OX Amp Top Box 13 Quick StartOutput Connections
Tip: All of OX's output connections are optional. You only need to connect the
outputs you want to use.
Headphones LINE / MON
(front panel) (analog)
DON’T connect OX
outputs to the amp!
S/PDIF (digital)
OX “TO SPEAKER”
Guitar Speaker Cabinet
Typical OX output connections
Guitar Speaker Cabinet
Connect a 1⁄4" speaker cable between OX’s rear panel TO SPEAKER jack and the guitar
speaker cabinet.
Line / Monitor Outputs
Connect OX’s rear panel LINE / MON OUT jacks to the line-level inputs of a stereo
monitor system, computer audio interface, or other audio gear. Use shielded 1⁄4"
balanced TRS or unbalanced TS line / instrument cables (not speaker cables).
Headphones
Connect stereo headphones to the 1⁄4" jack on OX’s front panel.
S/PDIF Digital Outputs
Connect OX’s rear panel S/PDIF digital output(s) to the digital input(s) of a computer
audio interface or other digital audio gear. The optical TOSLINK and coaxial RCA outputs
can both be used at the same time.
OX Amp Top Box 14 Quick StartControl Knobs
RIG SPEAKER VOLUME
Choose from six complete guitar cabinet+mic Adjusts the volume of the guitar
+room+effect presets. With OX app, select/adjust speaker cabinet connected to OX.
22 cabs, six mics, & four FX and assign to knob. Set to 0 for silent operation.
ROOM LINE OUT HEADPHONE
Instant access to mic’d Adjusts the level at OX's Adjusts the volume of stereo
studio ambience and air. stereo LINE/MON outputs. headphones connected here.
Quick Operation Notes
Tip: See Controls & Connectors for complete details about OX's knobs and jacks.
• RIG and ROOM knobs don’t affect OX's guitar speaker output. Rig preset sounds
are heard in OX’s Headphone, Line/Mon, and Digital S/PDIF outputs only. OX’s
guitar speaker output is pure analog amp tone.
• Changing RIG presets and/or settings can cause sudden level jumps in OX's
headphone, line/mon, and digital outputs. Be careful when adjusting the RIG
knob, and settings in the OX software app, when volumes are at higher levels.
• Digital output levels can be adjusted with the OX software app.
Tweak and Save Your Rigs with Free OX Software
OX includes free software (OX registration required) for iPad, Mac, and Windows.
With the OX software app, 22 cabinets, six cab microphones, six room mics, four
simultaneous effects, and hundreds of RIG presets can be wirelessly browsed, adjusted,
and assigned to the RIG knob over Wi-Fi. For complete details, see OX Software App.
Get the OX Software App
• From your Mac or Windows computer, visit www.uaudio.com/ox/app
• From your iPad, search “OX Amp Top Box” in the iOS App Store
OX Amp Top Box 15 Quick StartControls & Connectors
Important: See Quick Start for important power sequence and setup instructions.
Front Panel
Refer to the illustration below for numbered descriptions in this section.
1 3 4 5 6 8
2 7
OX’s front panel elements
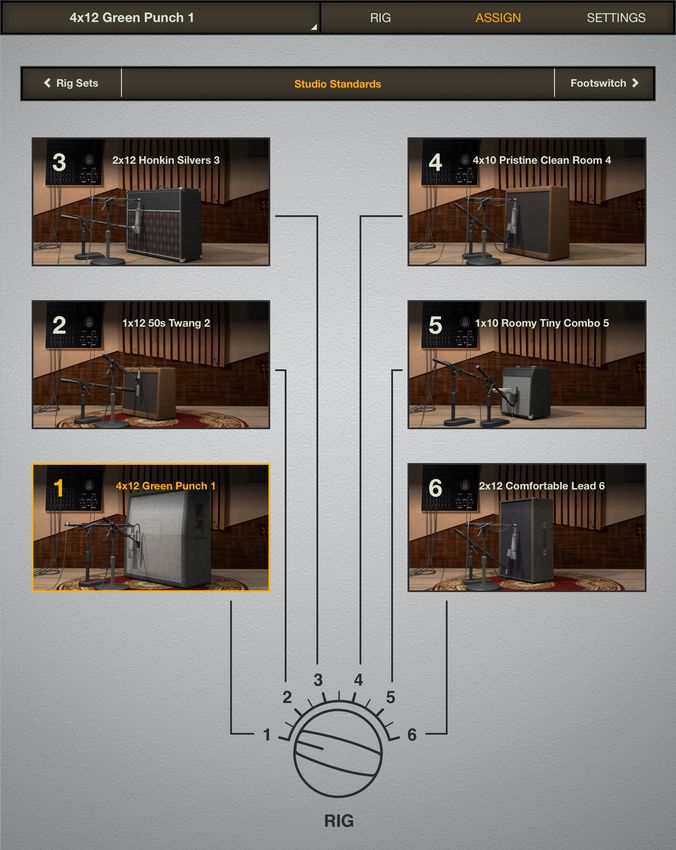
RIG (1)
Each of the six available RIG knob positions recalls a complete cabinet/mic/room/effects
preset. RIG tones are heard in the HEADPHONE, LINE / MON, and S/PDIF outputs, but
not in the TO SPEAKER output.
For a table of the six factory RIG knob assignments and the cabinet/mic/room/effect
settings used in each RIG knob position, see Default RIG Control Cab & Mic Presets.
Tip: The OX software app provides deep access to all RIG cab/mic/effects settings
and 100 carefully crafted factory presets. You can assign customized presets to
the RIG knob for instant hardware access when the app is not in use.
OX Amp Top Box 16 Controls & ConnectorsRIG LED (2)
The LED beneath the RIG knob illuminates to indicate certain operating conditions. The
LED states encountered during normal operation are listed in the table below.
Note: If RIG LED states not listed below are encountered, please contact UA
Technical Support.
RIG LED State Indication Notes
Rear panel POWER switch is in down position and/
Off OX is not powered
or AC adapter is not properly connected
Active RIG has been loaded via RIG knob or OX app
Green (solid) RIG is not modified
and is unchanged from stored version
Active RIG has been edited via ROOM knob or OX
Amber (solid) RIG is modified
app and is not stored
Amber (blinking) Firmware updating Firmware update is in process
Wi-Fi reset is initiated and Press reset switch again within 10 seconds to
Green (blinking)
awaiting user confirmation confirm Wi-Fi reset
Factory reset is initiated and Press reset switch again within 10 seconds to
Red (blinking)
awaiting user confirmation confirm factory reset
ROOM (3)
The ROOM knob adjusts the amount of mic’d studio ambience and air. Increase this
knob for more room ambience, or decrease for a drier close-mic tone.
When ROOM is adjusted, the RIG LED illuminates in amber, indicating the ROOM
amount is different than the value stored in the active RIG preset.
ROOM sounds are heard in the LINE / MON, HEADPHONE, and S/PDIF outputs, but not
in the TO SPEAKER output.
Tip: ROOM settings can be edited and stored with the OX software app.
OX Amp Top Box 17 Controls & ConnectorsSPEAKER VOLUME (4) This knob adjusts the loudness of the guitar speaker(s) connected at OX’s rear panel TO SPEAKER output jack. Six knob positions and five carefully crafted attenuation levels are available. Position 1 is the quietest available setting. Position 5 is the loudest available setting. At position 0, the speaker is OFF for silent operation. SPEAKER VOLUME does not change the signal level being routed into the digital section, which receives signal before this loudness control. This feature allows you to change the guitar speaker volume without changing levels at the LINE / MON, HEADPHONE, and S/PDIF outputs. Note: The guitar speaker volume is determined by the overall combination of amplifier power and output impedance, guitar speaker impedance, and OX’s rear panel IMPEDANCE knob. LINE OUT (5) The signal level at OX’s rear panel stereo LINE / MON outputs is adjusted with this knob. LINE OUT does not change the level at OX’s SPEAKER, HEADPHONE, or S/PDIF outputs. Rotating this knob fully counter-clockwise to the “0” position shuts off the LINE / MON outputs. HEADPHONE Knob (6) The volume of OX’s front panel stereo HEADPHONE output is adjusted with this knob. HEADPHONE does not change the level at OX’s SPEAKER, LINE / MON, or S/PDIF outputs. Rotating this knob fully counter-clockwise to the “0” position shuts off the HEADPHONE output. HEADPHONE Output (7) This TRS stereo unbalanced output jack accepts standard ¼” stereo headphones. Headphone volume is adjusted with the HEADPHONE knob above the jack. Caution: Changing RIG settings and/or presets can cause a sudden jump in headphone output levels. Exercise caution when adjusting Rigs (via RIG knob or OX software app) when the HEADPHONE output is at higher levels. OX Amp Top Box 18 Controls & Connectors
POWER Lamp (8)
The power lamp illuminates when OX is properly connected to AC power and the rear
panel POWER switch is in the UP position. When power is OFF, the lamp is unlit.
During system startup, OX’s outputs are inactive.
   Important: OX outputs are active only when OX is powered on and system startup
   is complete.

Rear Panel
Refer to the illustration below for numbered descriptions in this section.

          9 11                       15                                         19                                               22

                                                                           4Ω        16Ω
                                                              TO SPEAKER        8Ω         FROM AMPLIFIER

                                           OUT     SWITCH                                                   2/R         1/L
        POWER                  USB        S/PDIF    FOOT                                                    LINE / MON OUT    SERIAL NUMBER

                                                                                               150W
        POWER                  USB        S/PDIF    FOOT                                        RMS         LINE / MON OUT
                                           OUT     SWITCH                                      MAX          1/L         2/R
                                                                                                 !

                                                              TO SPEAKER                   FROM AMPLIFIER

       +12VDC 1.5A                                                         IMPEDANCE

        10                13              16                    18                             20               21
                     12         14                 17
                                                            OX’s rear panel elements

POWER Switch (9)
Use this toggle switch to apply power to OX. The included external power supply must be
properly connected (10) to apply power to OX.
   Important: Power must be ON to enable OX outputs.

In the up position, power is ON and the front panel POWER lamp (8) illuminates. In the
down position, OX power is OFF and the POWER lamp (8) is unlit.
System startup begins when OX is powered ON. While the system is starting, OX outputs
remain inactive. After startup is complete, the POWER lamp remains lit and OX outputs
are enabled.
   Note: When power is OFF, OX presents a 16 ohm load at the FROM AMPLIFIER
   input to prevent tube amp damage that could occur with an unloaded amp output.

OX Amp Top Box                                                                  19                                            Controls & Connectors
POWER Input (10)
Caution: Connect only the included external power supply to the POWER
input. Using a different power supply could damage OX and void the
warranty.
This 4-pin locking XLR jack accepts the DC output plug from OX’s included external
power supply. OX requires 12 volts DC power and its power supply draws approximately
18 Watts.
Connect the included IEC power cable to the inlet of the included external power supply
and an AC power outlet.
Note: Use the POWER switch above this jack to power the unit on and off. The AC
MAINS plug is the disconnect device.
Wi-Fi Status LED (11)
This LED indicates activity on OX’s built-in WI-Fi network. The LED states encountered
during normal operation are listed in the table below. For instructions on how to use OX’s
Wi-Fi networking, see OX Software.
Note: If Wi-Fi LED states not listed below are encountered, please contact UA
Technical Support.
Wi-FI LED
Indication Notes
State
No device is paired with OX’s internal Wi-Fi hotspot
Off No network connection
and OX is not paired with external Wi-Fi network
Blue (solid) Hotspot connection Device is paired with OX’s internal Wi-Fi hotspot
External network
Green (solid) OX is paired with external Wi-Fi network
connection
Attempting external OX is attempting to pair with external Wi-Fi network
Green (blinking)
network connection that was selected in OX app
Reset Switch (12)
This small push-button switch is used to reset OX’s Wi-Fi settings and reset OX to factory
defaults. For more information, see Troubleshooting.
Note: Reset is not necessary during normal operation.
USB Type-B Port (13) and USB Type-A Ports (14)
These ports are not functional.
OX Amp Top Box 20 Controls & ConnectorsS/PDIF Digital Outputs The S/PDIF digital output ports are for connecting OX’s left/right stereo output signals to the digital input(s) of a computer audio interface or other digital audio equipment The stereo signal at the digital outputs is the same stereo signal as the analog signals at the MON / LINE and HEADPHONE outputs. Both digital outputs carry the same stereo signal, and both digital outputs can be used at the same time. Digital signal levels can be adjusted with the master fader in the OX software app. Digital levels cannot be changed with OX’s hardware controls. Note: The sample rate of the digital outputs is fixed at 44.1 kHz. Tip: Using the S/PDIF outputs instead of the analog outputs (LINE/MON or HEADPHONE) delivers the purest signal path into other digital audio gear by reducing D/A and A/D conversions. Tip: If connecting OX to the S/PDIF input of an Apollo audio interface, activate the realtime S/PDIF sample rate conversion feature (SR CONVERT) in Apollo Console’s S/PDIF channel input strip to enable compatibility with all Apollo sample rates. Coaxial S/PDIF Digital Output (15) This stereo S/PDIF digital output jack accepts a 75-ohm coaxial RCA (phono) digital audio cable. Tip: Use this port to digitally connect OX’s stereo output signal to the S/PDIF input port on Universal Audio’s Apollo FireWire and Apollo 8/x8 audio interfaces. Note: For optimum results, use a 75-Ohm RCA cable that is specifically designed for digital audio. Optical S/PDIF Digital Output (16) This stereo S/PDIF digital output port accepts a TOSLINK optical cable. Tip: Use this port to digitally connect OX’s stereo output signal to the S/PDIF optical input port on Universal Audio’s Apollo Twin and Apollo 8p/x8p audio interfaces. Important: Although TOSLINK optical cables are also used for digital connections in ADAT format, this port outputs S/PDIF format only and is incompatible with ADAT optical inputs. FOOTSWITCH Input (17) This jack accepts 1, 2, and 3 button footswitches with TS (tip-sleeve) and TRS (tip-ring- sleeve) plugs for external control of OX’s built in effects. For details, see “Footswitch Assign” beginning on page 39. OX Amp Top Box 21 Controls & Connectors
TO SPEAKER Output (18)
                  Caution: This is a high-power output! To avoid equipment damage,
                  DO NOT connect this output to the input of studio monitors,
                  audio mixers, PA speakers, audio interfaces, computers, or similar
                  inputs. Connect this output to a guitar speaker cabinet ONLY.

                  Caution: To avoid equipment damage, DO NOT connect this output
                  to a guitar speaker cabinet that is rated for a power level that is
                  significantly less than the connected amplifier’s output power.

   Important: Use only a high-quality 12 to 16 gauge unshielded ¼” mono TS
   (tip‑sleeve) speaker cable for the high-power TO SPEAKER connection. “Speaker”
   is usually printed directly on these cables.

The guitar amp’s attenuated (power soaked) speaker signal with OX’s reactive load is
output here. Connect a high quality ¼” speaker cable between this jack and a guitar
speaker cabinet.
OX’s front panel SPEAKER VOLUME knob controls the loudness at this output. At the
knob’s minimum position (0), the speaker connected here is OFF for silent operation.
The signal path between OX’s FROM AMPLIFIER and TO SPEAKER jacks is pure analog.
Because this output is dry without cabinet/mic/room/effects processing, OX’s RIG and
ROOM knobs do not change the sound of the guitar speaker connected here.
SPEAKER Output Notes
  • To avoid sudden loud speaker volume, reduce the amp’s volume knob and/or OX’s
    front panel SPEAKER VOLUME knob to before connecting a guitar speaker cabinet.
  • This output is designed specifically for guitar speakers. Full-range flat-response
    speakers are not recommended for this output connection.

IMPEDANCE Knob (19)
This three-position knob sets the reactive load impedance that is present at OX’s FROM
AMPLIFIER input (and the tube amp’s speaker output). Settings of 4, 8, and 16 ohms
are available.
   Note: Set the IMPEDANCE knob to match your tube amp’s speaker output
   impedance. If the amp’s speaker output impedance cannot be determined, set
   this knob to 8 ohms.

OX Amp Top Box                             22                         Controls & Connectors
FROM AMPLIFIER Input (20)
Caution: To avoid permanent damage to the amplifier and/or OX:
• POWER OFF the amp before connecting or disconnecting its speaker output.
• DON’T p ower or operate any tube amp without an output load such as a
guitar speaker or OX.
• DON’T p artially insert ¼” speaker cable plugs halfway or only to the first
click. DO fully insert all speaker cable plugs to ensure proper ground
returns.
• DON’T u se OX with amplifiers exceeding 150 Watts RMS output power.
This jack is OX’s reactive load input. Connect a ¼” speaker cable between the tube
amp’s speaker output and this RED input jack. The signal received here is attenuated
(soaked) by the reactive load then passed to OX’s SPEAKER OUT jack.
Important: Use only a high-quality 12 to 16 gauge unshielded ¼” mono TS
(tip-sleeve) speaker cable for the high-power FROM AMPLIFIER connection.
“Speaker” is usually printed directly on these cables.
Note: When OX power is OFF, OX presents a 16 ohm load at the FROM
AMPLIFIER input to prevent tube amp damage that could occur with an unloaded
amp output.
LINE / MONITOR Outputs (21)
Note: Use only shielded line/instrument cables with these outputs. Don’t connect
unshielded speaker cables here.
The Left and Right LINE / MON outputs are for connecting OX to the analog line-level
stereo inputs of studio monitors, a computer audio interface, or other audio equipment.
Both ¼” jacks can accept balanced TRS (tip-ring-sleeve) or unbalanced TS (tip-sleeve)
connections. OX’s front panel LINE OUT knob controls the level at these outputs. At the
minimum position (0), the LINE / MON outputs are off.
Note: These stereo outputs are not summed to mono when only one output is
connected. When using a stereo preset (such as when microphones are panned or
with stereo effects), connect both outputs to hear both stereo channels.
Wi-Fi Address (22)
The hotspot name (SSID) and password for OX’s built-in wireless Wi-Fi network is printed
here. These login credentials are used when connecting the device running OX’s remote
control software application to the unit.
Note: Every OX unit as a unique hotspot name and password.
Tip: OX’s default hotspot name and password can be changed from within the
software OX app.
OX Amp Top Box 23 Controls & ConnectorsOX Software App OX includes free software (OX registration required) for iPad and Mac/Windows computers. With the OX software application, OX Rigs can be wirelessly accessed, modified, and stored with OX’s built-in Wi-Fi networking. The OX app provides deep access to all RIG and ROOM settings, allowing you to create a near-infinite variety of complete guitar tones and store hundreds of Rig presets. 125 carefully crafted default Rigs provide a wide variety of album-quality tones, or use the default Rigs as a starting place for your own custom tones. With the OX app, you can easily assign different Rigs to the OX’s six RIG knob slots, for access to your favorite Rigs when the OX app is not being used. Rig Sets can be easily assembled to quickly assign a batch of six Rigs to OX’s RIG knob slots for standalone stage and studio use. The OX app can control OX by pairing directly to its built-in Wi-Fi hotspot, or by connecting both OX and the device running the app to an existing Wi-Fi network. OX App Features • Full control of OX Amp Top Box Rigs via Wi-Fi on iPad or Mac/Windows computers • 125 Rig presets for instant album-quality guitar tones • Select from 22 classic speaker cabinets with vintage, NOS, and modern speakers • Choose from 8 boutique direct mics and 6 room mic combinations • Perfect your studio amp tones with EQ, Compression, Delay, and Plate Reverb • Create, manage, and save your own Rigs to OX hardware for standalone use • Assign external footswitches (not included) for hands-free control of OX’s effects OX App Requirements • OX Amp Top Box • 2.4 Ghz Wi-Fi network with internet connection to register (once only) • (Mac) macOS 10.14 Mojave or 10.15 Catalina • (Win) Windows 10 64-Bit Edition • (iPad) iOS 12 or iPadOS 13 • For complete compatibility information, visit help.uaudio.com Note: Operating systems not listed above are untested. Although untested operating systems may work, they are not supported by Universal Audio. Get OX App • From your Mac or Windows computer, visit www.uaudio.com/ox/app • From your iPad, search “OX Amp Top Box” in the iOS App Store • For app installation instructions, visit this KB article at help.uaudio.com OX Amp Top Box 24 OX Software App
Essential App Concepts
This section outlines several key concepts that will help you understand how the OX app
interacts with the OX hardware so you can get the most from your OX system. Similarly,
reviewing the OX System Overview and OX Wi-Fi Networking chapters is recommended to
help you get the most from the app.

OX’s Remote Control
The OX app is simply a wireless remote control interface to the completely self-contained
OX hardware unit. The app literally has no controls or settings of its own — EVERY
control and setting you see in the app is an exact mirror of OX’s current internal state.
The app controls OX’s digital functions. The app cannot control or store OX’s SPEAKER
VOLUME knob value because the reactive load and attenuation circuitry is pure analog.
   Note: OX signal processing — Dynamic Speaker/Room Modeling, mic mixing, EQ,
   master effects, and everything else — is performed in the OX hardware, not the app.

Everything Is Stored In OX
All OX data is stored within the OX hardware. Stored data includes all user Rig presets,
Rig Sets, effect presets, assignments, networking, and system settings. OX data is not
stored within the OX app or the iPad/Mac/Windows file system.
   Tip: The OX app can be safely deleted — or all iPad/Mac/Windows data removed (via
   reformat, reset, etc.) — and user data will remain intact in the OX hardware.

Current State Is Retained
When OX is powered off, the current state of all OX settings and data is retained. When
OX is powered on, OX will be in the exact same state as when it was powered off. This
includes all Wi-Fi networking/system settings, and RIG knob/footswitch assignments.
This feature lets you set OX the way you want with the app, and OX will sound the same
later without the app, even if OX was powered down.
For example, you can assign your favorite Rigs to the RIG knob, and access those Rigs
later — even if you power off OX and/or don’t have the OX app with you.
   Tip: If a Rig was modified but not yet saved when OX is powered off then on again,
   the Rig LED is amber, indicating the Rig is still in the same modified state that it
   was in before powering off.

Accessing Factory Rigs
OX includes 125 carefully-crafted factory Rig presets for instant album-quality guitar
tones. The factory Rigs can be used as-is, or as starting points when creating custom
Rigs. Factory Rig presets are loaded in the same way as user Rig presets.
   Tip: To access the factory Rigs, see Loading Presets.

OX Amp Top Box                              25                              OX Software App
App Views
The app has three main view screens: RIG, ASSIGN, and SETTINGS. Each view contains
the settings related to these functions.
RIG – Rig settings are adjusted in Rig view. Every sonic setting that changes the tone of
an individual Rig is contained within this view. Individual Rig presets are also managed
in this view.
ASSIGN – Individual Rigs and Rig Sets are assigned to OX’s RIG knob slots in Assign
view.
SETTINGS – OX’s Wi-Fi networking settings and global system settings are accessed in
Settings view. A link to UA’s OX Knowledge Base is available here for technical support.

Choosing App Views
To display any app view, select its view name at the top right of any app view.
   Tip: The name of the active view is highlighted in amber.

                            App view selectors with RIG view active

Terms
Specific terms are used in this chapter when describing the various OX component
functions. These terms are defined below.
OX – The self-contained OX hardware unit. OX does not refer to the OX software app or
the iPad/Mac/Windows device unless specifically noted otherwise.
App – OX’s remote control software application.
Rig – One complete guitar tone that contains the settings of all available sonic controls.
Rig Set – A collection of six individual Rigs that can be quickly assigned to OX’s RIG knob.
Effect(s) – OX’s four independent effect processors (EQ, compression, delay, and reverb).
Preset – One complete set control values stored within OX. OX has Rig presets and effect
presets. Presets are loaded, saved and renamed in the Presets Manager.

OX Amp Top Box                                26                              OX Software App
RIG View
All Rig settings are adjusted in Rig view. Every sonic setting that changes the tone of a
Rig is contained in this view. Individual Rig presets are also managed within this view.
In all, more than 60 parameters (many with dozens, and even hundreds, of possible
values) are available for sonic control of a Rig, for vast tonal possibilities.
Displayed Settings
All settings displayed in Rig view are a mirror of the current RIG knob selection on OX’s
front panel. If the RIG knob selection is changed, or the ROOM knob is adjusted, the
settings in Rig view are updated to reflect the new settings.
Note: As with all OX app views, Rig view is simply a mirror of OX’s internal state.
RIG view with typical settings
OX Amp Top Box 27 OX Software AppModifying Rigs
Every control and setting in Rig view is always active. To modify (edit) the Rig, simply
adjust any control to any available value, and the new setting is active.
Sonic settings available for modifying include the speaker cabinet, two cab mics, stereo
room mic, four master effects (each with individual controls), and the mic mixer with
its individual channel controls (mic off-axis and low-cut filter, mic EQ, pan, solo, mute,
channel faders), and master fader.
Modified (and unmodified) Rigs can be stored as a user preset. For methods, see Saving
Presets.
Important: If a Rig is modified and a preset is loaded before the modified Rig is
saved, the modified Rig is discarded. If you want to keep the modified Rig, save
the modified Rig as a preset before loading Rig presets.
Stored or Modified?
• If a Rig is not modified, the Rig name (at the upper left of the view screen) is
white, and the Rig LED on OX’s front panel is green, indicating the Rig was
previously stored.
• If a Rig has been modified with the app, or with the ROOM knob on OX’s front
panel, the Rig name and OX’s Rig LED are amber, indicating the modified Rig is
not yet stored.
• Additionally, SAVE appears in amber next to the Rig name to indicate the modified
Rig is not yet stored.
Stored Rig (left) and modified Rig (right) in OX app
OX Amp Top Box1. 1. 28 2. OX Software AppInput Level
The INPUT LEVEL switch sets the level from the amp (after OX’s reactive load) into OX’s
processors. The switch helps match the power output of the tube amp with optimum
levels for Dynamic Speaker Modeling.
As a general guideline when modifying Rigs, this switch should be “set-and-forget” to
the following values:
• If the tube amp outputs 50 Watts or less, set INPUT LEVEL to 50W.
• If the tube amp outputs more than 50 Watts, set INPUT LEVEL to 100W.
This general guideline does not mean you need to be concerned about levels being set
correctly, or that you need change this switch in factory Rigs to match your amp, or that
input levels are too low or too high.
Even if INPUT LEVEL is set to 50W with a 100-watt amp, or set to 100W with 5-watt
amp, you never need to worry. OX is designed to ensure input levels are never wrong.
Speaker Drive
SPEAKER DRIVE adjusts (in the simplest terms) the dynamic response of the speaker
cabinet. This unique and powerful control adjusts different aspects of OX’s Dynamic
Speaker Modeling.
At lower SPEAKER DRIVE ranges, the cabinet sounds more like the speaker(s) is new:
tighter and thicker, with more punch and bottom end. As SPEAKER DRIVE is increased,
you can hear, and feel, the cab get softer and spongy with more breakup, like a broken-in
speaker.
At higher ranges, breakup is more obvious, with crumbling of the lows and smearing of
the highs as the speaker is pushed harder. At the highest ranges, the speaker approaches
end of life: weaker, looser, darker, and sub-octave notes (cone cry) may be apparent with
certain note/cab combinations.
Master Fader and Output Meters
The master fader (at the lower right of RIG view) is the output level control for OX’s
stereo outputs. The stereo output level meters (next to the master fader) indicate signal
levels at the outputs.
When OX’s digital output level exceeds 0 on the meter, the top LED segment is RED,
indicating that the digital outputs are clipped. If connecting OX digitally to the inputs of
other digital audio equipment, avoid clipping the stereo output meters by reducing the
master fader.
Tip: When creating Rigs, it’s optimum to keep the output meters below maximum
so OX’s digital outputs won’t clip when connecting to other digital audio gear.
OX Amp Top Box 29 OX Software AppPresets Management
A preset is one complete set related control values stored within OX. OX has Rig presets
and effect presets. Effect presets include the cab/room mic EQ presets and the master
effect presets. OX presets are saved, loaded, and renamed within the Presets Manager.
Preset Contents
• A Rig preset contains ALL Rig settings, including all mic EQ and effect settings.
EQ and effect settings don’t need to be saved separately from the Rig.
• An effect preset contains all settings for one individual effect (EQ, compression,
delay, or reverb). To save all Rig effect settings at once, simply save the Rig.
Preset Types
Factory Preset
OX includes 125 factory Rig presets and dozens of factory effect presets. Factory presets
are read-only; they can be loaded and modified, but not overwritten. All factory presets
are within the FACTORY folders.
If a factory preset is modified, pressing SAVE opens the presets manager so the preset
can be named and saved into a user folder.
User Preset
User presets can be created, renamed, and deleted. Any Rig or effect preset you save is
a user preset. By default, user presets are saved in the USER folders.
If a user preset is modified, pressing SAVE stores the preset in place, overwriting the
existing preset. To create a new user preset, press SAVE AS (located within the presets
manager popover) instead.
Important: Deleting a user preset permanently erases the preset. A confirmation
dialog appears when deleting presets so you can cancel the operation.
Favorite Preset
Any factory or user preset can be tagged as a favorite. Favorite presets appear in the
FAVORITES folders for quick access. To tag favorite presets, press the STAR icon in
preset lists. To un-favorite, press the STAR icon again.
Note: Favorite presets remain in their original folders when tagged as a favorite.
OX Amp Top Box 30 OX Software AppPreset Folders
By default, the preset manager has three folders: FACTORY, FAVORITES, and USER. All
presets are within these folders.
• FACTORY folders, and their presets, cannot be renamed or deleted.
• FAVORITES folders cannot be renamed or deleted, but their contents can be
changed by tagging favorite presets with the STAR icon.
• USER folders can be created, renamed, and deleted. More than one user folder
can exist for more precise organization if desired.
Important: Deleting a user folder permanently erases the folder AND all user
presets within the folder. A confirmation dialog appears when deleting folders so
you can cancel the operation.
Presets Manager
Preset management functions — such as load, save, rename, delete, and favorites
tagging — are done in the presets manager popover within Rig view. How the presets
manager is accessed depends on the preset type:
• Rig presets –The popover appears when the RIG NAME area (at top left of RIG
view) is pressed.
• Effect presets –The popover appears when PRESET (at top left of effect editor) is
pressed.
Tip: You can keep the presets manager open to perform additional preset
operations. When finished, press DONE to close the popover.
Presets Manager Popover
New User Folder
Selected Folder (highlight) Options (dots)
Factory Folder (lock)
Favorite Rig (starred)
User Folders (no lock)
Factory Rig (lock)
Rig Folders Rig Presets
Elements in the presets manager popover. In this example, FAVORITES is the
selected folder (left column) and all favorite Rig presets are in the right column.
OX Amp Top Box 31 OX Software AppYou can also read