PD Dante User Manual v2.09 - (rev b 10/02/20) - Nixer Pro Audio
←
→
Page content transcription
If your browser does not render page correctly, please read the page content below

PD Dante
User Manual
   v2.09
 (rev b 10/02/20)
2

                  Nixer Ltd
               45 Evelyn Road
                  Dunstable
                Bedfordshire
                  LU5 4NG

                Telephone
              +44 1582 343111

                    email
           info@nixerproaudio.com

                  website
           www.nixerproaudio.com

PD Dante                        version 2.09 rev b – 10/02/2020
3

Contents

Manufacturer's CE Declaration of Conformity ......................................................................... 6
Important Safety Information .................................................................................................. 7
General Precautions ................................................................................................................. 8
Introduction ............................................................................................................................. 9
Welcome and Unpacking ....................................................................................................... 10
Quick Start Guide ................................................................................................................... 10
PD Dante Front View .............................................................................................................. 12
Left View ................................................................................................................................ 12
Right View .............................................................................................................................. 13
Power ..................................................................................................................................... 13
PD Dante Software................................................................................................................. 14
Main Input Screen .................................................................................................................. 14
Channel Assignment Window ................................................................................................ 19
Channel Setup Menu .............................................................................................................. 20
Focus ...................................................................................................................................... 21
Dante Menu ........................................................................................................................... 22
View RX Channels ................................................................................................................... 23
Unrouting RX Channels .......................................................................................................... 24
View TX channels ................................................................................................................... 25
Set Routing ............................................................................................................................. 25
Network Config ...................................................................................................................... 27
Memory Menu ....................................................................................................................... 30
Selecting a memory ................................................................................................................ 30
Editing the name of a memory ............................................................................................... 31
Selecting auto recall of a memory .......................................................................................... 31
The System Menu .................................................................................................................. 32
Mode ...................................................................................................................................... 32
Inputs ..................................................................................................................................... 33
Route Matrix .......................................................................................................................... 35
Outputs .................................................................................................................................. 36
>> ........................................................................................................................................... 37
4

System Info ............................................................................................................................ 39
PIN .......................................................................................................................................... 40
Update ................................................................................................................................... 42
Configuring Dante Networks .................................................................................................. 46
Correct IP configuration ......................................................................................................... 46
Possible IP network configuration mistakes .......................................................................... 46
Dimensioned drawing ............................................................................................................ 51
15way D-type pinout .............................................................................................................. 51

PD Dante                                                                                      version 2.09 rev b – 10/02/2020
5

PD Dante   version 2.09 rev b – 10/02/2020
6

Manufacturer's CE Declaration of Conformity
Manufacturer Identification

Legal Name:                             Nixer Ltd
                                        45 Evelyn Road, Dunstable
                                        Bedfordshire, LU5 4NG
                                        Tel.: +44 (0) 1582 343111

Representative:                         Nick Fletcher
Function:                               CEO/CTO

Product:                                PD-Dante - Audio over Ethernet Diagnostic Tool
Brand:                                  Nixer
Model:                                  PD-Dante (Mk 1)
CE Affixing Date:                       08.11.2017

Declaration:
Provided that it is installed, maintained and used in the application for which it is made, with
respect of the professional practices, relevant installation codes and manufacturer's
instructions:
We hereby declare, under our sole responsibility, that the above referenced product complies with the
essential requirements of Council Directives 2004/108/EC (EMC), 2006/95/EC (LVD) and 2011/65/EC
(ROHS)

European harmonized standards applied:

EMC             Emission                EN 61000-6-3:2007-10-01:
                                        EN55022:2007-06-01, Class B wireless,
                                        EN 550022:2007-06-01, wired
                Immunity                EN 61000-6-1:2007-12-01:
                                        EN 61000-4-2 + A1+A2: 2002-02-01,
                                        EN 61000-4-3: 2007-11-01,
                                        EN 61000-4-4: 2005-09-01,
                                        EN 61000-4-5:2007-08-01,
                                        EN 61000-4- 6+A1:2002-02-01,
Product safety:                         2006/95/EG
ROHS:

Signature of manufacturer's representative:

                  Nick Fletcher

PD Dante                                                          version 2.09 rev b – 10/02/2020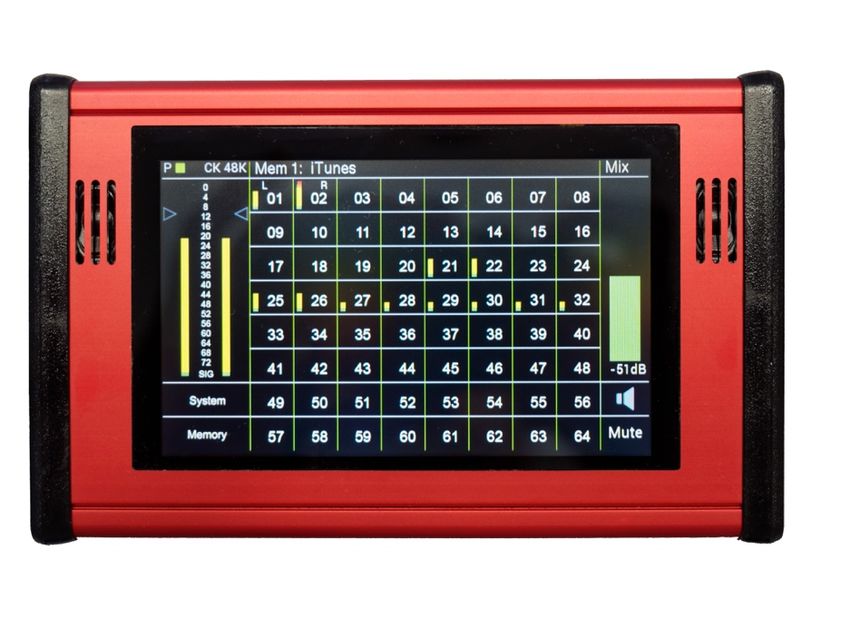
7

Important Safety Information

CAUTION: These servicing instructions are for use by qualified personnel only. To reduce
the risk of electric shock, do not perform any servicing other than that contained in the User
Manual unless you are qualified to do so. Refer all servicing to qualified service personnel.

   •   Read these instructions.
   •   Keep these instructions.
   •   Heed all warnings.
   •   Follow all instructions.
   •   Do not use this apparatus near water. Do not expose this apparatus to dripping or
       splashing and ensure that no objects filled with liquids, such as vases, are placed on
       this apparatus.
   •   Clean only with a dry cloth.
   •   Do not block any of the ventilation openings. Install in accordance with the
       manufacturer’s instructions.
   •   Do not install or use near any heat sources such as radiators, heat registers, stoves,
       or other apparatus that produce heat.
   •   Only use attachments/accessories specified by the manufacturer.
   •   Refer all servicing to qualified service personnel. Servicing is required when the
       apparatus has been damaged in any way, such as the power-supply cord or plug is
       damaged, liquid has been spilled or objects have fallen into the apparatus, the
       apparatus has been exposed to rain or moisture, does not operate normally, or has
       been dropped.
   •   To completely disconnect mains power from this apparatus, the power supply cord
       must be unplugged.

For US and CANADA only:
Do not defeat the safety purpose of the grounding-type plug. A grounding-type plug has two
blades and a third grounding prong. The wide blade or the third prong is provided for your
safety. When the provided plug does not fit into your outlet, consult an electrician for
replacement of the obsolete outlet.

The lightning flash with arrowhead symbol, within an equilateral triangle is intended to alert
the user to the presence of an uninsulated “dangerous voltage” within the product’s enclosure
that may be of sufficient magnitude to constitute a risk of electric shock to persons.

The exclamation point within an equilateral triangle is intended to alert the user to the
presence of important operating and maintenance (servicing) instructions in the literature
accompanying the appliance.

PD Dante                                                      version 2.09 rev b – 10/02/2020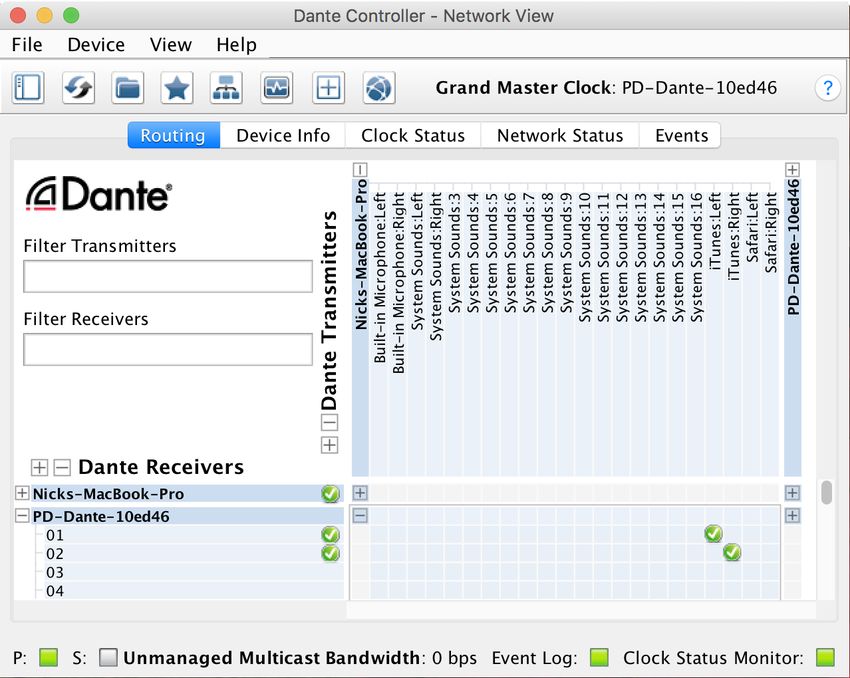
8

General Precautions
   •   Do not place heavy objects on the PD Dante, expose it to sharp objects or handle it
       in any way that may cause damage, e.g., rough handling and/or excessive vibration.
   •   Do not subject the equipment to dirt, dust, heat or vibration during operation or
       storage. Never expose the console to rain or moisture in any form. Should the unit
       become wet, turn it off and disconnect it from the power source without further
       delay. The equipment should be given sufficient time to dry out before
       recommencing operation.
   •   When cleaning the PD Dante, never use chemicals, abrasive substances or solvents.
   •   The front panel should be cleaned using a soft brush and a dry lint-free cloth. For
       persistent marks, use a soft cloth and isopropyl alcohol.
   •   Keep these instructions for future reference. Follow all warnings in this manual and
       those printed on the unit.
   •   The PD Dante must be connected following the guidance in this manual. Never
       connect power amplifier outputs directly to the PD Dante. Connectors and plugs
       must never be used for any other purpose than that for which they are intended.
   •   The equipment must be powered from an appropriate source which can be via the
       PoE input and/or the USB input. Use both inputs for redundancy purposes.
   •   The PD Dante must not be operated inside a case or enclosed as the housing acts as
       a heatsink for the components inside.
   •   Refer servicing to qualified technical personnel only.

PD Dante                                                    version 2.09 rev b – 10/02/2020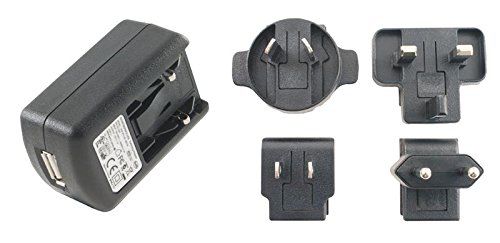
9

Introduction
Thank you for purchasing your new Nixer PD Dante audio network confidence monitor,
diagnostic and testing tool. This unit has been designed to make it convenient and easy to
test, setup and monitor audio signals within Dante networks. Operation is via it’s clear and
simple to use touchscreen interface and it is housed in a compact and robust case.

It’s a small portable Dante unit, which allows the monitoring of up to 64 Dante (or AES67)
channels at 48kHz (32 channels at 96kHz). The signals are presented to the user via the
inbuilt speakers or the headphone jack. The speakers are automatically muted when a
headphone jack is inserted. Simultaneous outputs are also available in the form of the stereo
balanced line outputs and AES output accessed via the 15way D-type.
The speakers and headphones have independent settings for volume, the unit recalling the last
used setting for each when changing between speakers and headphones.

The balanced line outputs and AES output can be configured to follow the volume settings of
the speakers or headphones. Alternatively, they can be set to independent levels with
individual trim controls for each.
Additional inputs are available as an unbalanced stereo line input on a 3.5mm jack, AES
input via the 15way D-type connector and a mic input on the headphone connector
(accommodating standard mobile phone headsets)
All of these inputs can be routed to any of the Dante output channels.

An internal oscillator with user adjustable frequency and level settings is available to send to
any of the 64 Dante outputs with options for Sine Wave, Square Wave or PNG.

The device is operated and controlled via the large 5.0” diagonal (127mm) 24bit colour LCD
and capacitive touch panel.
A simple and elegant menu system has been designed to be intuitive to navigate allowing the
user to access all the features of the PD Dante very quickly.
The high-resolution screen is easy to read presenting comprehensive metering, routing and
status information to the user.

Nixer Ltd was founded in 2000 by two professional audio design engineers who have
between them over 50 years’ experience of designing and manufacturing the highest quality
audio products possible. Their designs have been used on many world-famous shows on
Broadway, The West End and around the world.

PD Dante                                                       version 2.09 rev b – 10/02/2020
10

Welcome and Unpacking

Thank you for purchasing a PD Dante
Please take care when unpacking your product
In the box, you will find
    • the PD Dante
    • USB Plug top supply with adaptors for the
            o UK
            o Europe
            o USA
            o Australia
    • 0.5m USB lead
    • Quick Start Guide
Check that all the parts are present and in good condition

Please contact your retailer immediately should anything be incorrect

Quick Start Guide
Once you have unpacked your PD Dante you can follow this quick guide to get you started
using it.
Firstly, you will need to down load and install a copy of Dante Controller onto your PC/Mac
You can download this from
https://www.audinate.com/products/software/dante-controller
Next plug your PD Dante into your network with an RJ45 patch lead
If you have plugged into a PoE enabled router/port you will see the splash screen on the PD
Dante appear after a couple of seconds
If you do not have a PoE port, then you will need to plug in the supplied Plug Top Supply
and connect it to the PD Dante with the supplied USB cable. Note the USB cable supplied is
relatively short at 500mm this is due to the current draw of the PD Dante, longer cables may
work but we do not guarantee they will
After the PD Dante has booted you will be presented with the main screen
If you have a valid network connection the status light in the top left side of the screen next to
the P (primary) will turn green
At this point start Dante Controller on your PC/Mac and you will see your PD Dante appear
in the list of devices
You will then be able to select sources and destinations for your PD Dante
For more advice on using Dante Controller please visit the Audinate Website
Once you have done this you will be able to start using your PD Dante via the touch screen
interface

Please take the time to register your PD Dante here
http://www.nixerproaudio.com/Registration/registration.php
Once you have registered you will be full access to download the User Manual and any
software updates available for your PD Dante

PD Dante                                                        version 2.09 rev b – 10/02/2020
11
View of Dante Controller with PD Dante connected
Basic PD Dante connection diagram
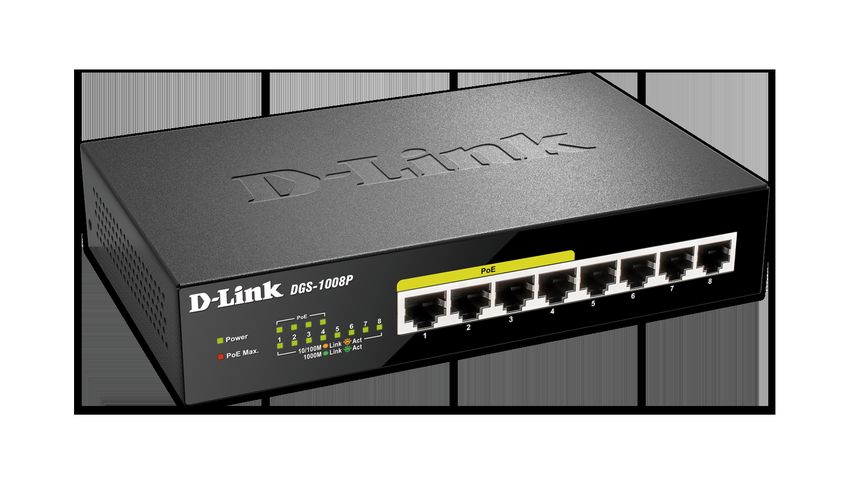
PoE Enable Switch Computer running Dante Controller
for setting initial connections
Dante Network USB Plug Top
containing other Supply
Dante enabled
devices
PD Dante powered via PoE or alternatively via
supplied USB Plug Top Supply
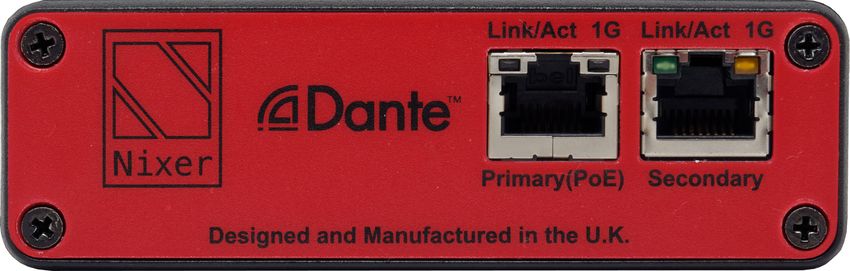
PD Dante version 2.09 rev b – 10/02/202012 PD Dante Front View The front of the unit has a large 5” (127mm) Capacitive touchscreen TFT display plus two small speakers for confidence monitoring. Left View Left view of the PD Dante showing the two 1G RJ45 Ethernet ports, Primary and Secondary The Primary port is also a PoE input. The PD Dante can be powered from a standard 13W PoE supply PD Dante version 2.09 rev b – 10/02/2020
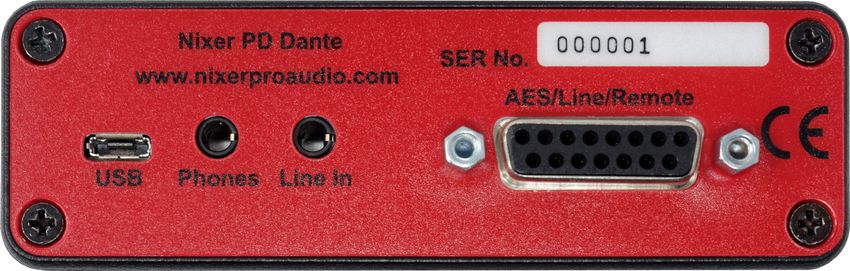
13

Right View

Right view of the PD Dante showing the micro USB AB connector which can be used to
power the unit. The unit can be powered by either USB or PoE. Both power inputs can be
used together for PSU redundancy. The USB port is also used for firmware upgrades for the
PD Dante
When powering the PD Dante from a PC/Laptop port it will need to be a high power (up to
2.5A) port to work. Please check your computer manual for information on this.
Next to the USB port is a 3.5mm (1/8inch) jack for headphones connection. This connector is
compatible with Apple iPhone headsets allowing the use of the microphone for talking back
into the Dante network.
Next is another 3.5mm (1/8inch) jack socket for connecting unbalanced stereo line playback
devices such as iPod, iPhone etc.
Again, this allows this signal to be injected into the Dante network
The final connector is a 15way D-type (pinout after specifications)
This has a balanced AES EBU input, balanced AES EBU output, Balanced Line Outputs for
L and R mix and Power/TX/RX remote control lines
A breakout lead for this connector is available separately

Power
Firstly, connect the PD Dante Primary port to a Dante Network
Then to turn on your PD Dante just apply a power source to either the PoE or USB
You will see the PD Dante splash screen which will give information on the Firmware
version and FPGA version.
After a few seconds, you will see the main input screen shown on the next page

PD Dante                                                   version 2.09 rev b – 10/02/2020
14
PD Dante Software
1 2 3
6
7
8
4
9
10
11
5 12
13
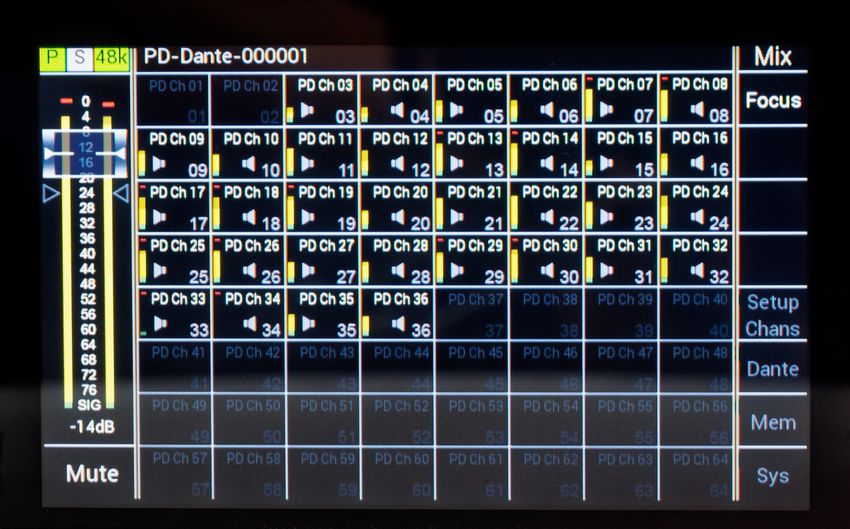
Main Input Screen
1. Dante Network Status Bar
Primary port status is shown by a “P” on a square box. The colour of the box will
change to reflect the current connection
a. Green = 1GHz network connection
b. Orange = 100MHz network connection
c. Grey = no valid network connection
Secondary port status is shown by a “S” on a square box. The colour of the box will
change to reflect the current connection
a. Green = 1GHz network connection
b. Orange = 100MHz network connection
c. Grey = no valid network connection
Clock Frequency is shown on a rectangular box. The colour of this box is normally
green when a valid clock is present with the clock speed overlaid on the box
a. 44K indicates a clock of 44.1kHz
b. 48K indicates a clock of 48Khz
c. 96K indicates a clock of 96Khz
d. – (displayed in grey) indicates there is no valid clock
PD Dante version 2.09 rev b – 10/02/202015
2. Main Menu Bar
The Main Menu Bar displays the Dante network name of the PD Dante
3. Displays Power status
PoE and USB power statuses are indicated here.
Grey background indicates no power present
Green background indicates power supply is active
4. Main Meters and Volume
a. 2 level meters displaying signal in 1dB steps from 0dBFS
down to -76dBFS
b. 0dBFs is indicated by a red segment b
i. Optionally peak hold can be enabled in the
c
Meter tab under the System menu. Normally
the peak is displayed in white, turning red d
when a 0dBFS is detected
c. Touching and dragging the volume fader knob will
change the volume level. The attenuation of the a
fader can be read through the transparent section
of the fader knob and also via f.
d. User defined nominal signal level is shown via two
grey triangles on either side of the meters. This
feature can be enabled and disabled via the Meter
e
tab under the System menu
e. SIG present indicated by a green segment f
f. The volume level attenuation is indicated by this value in dBs
5. Mute
a. Pressing this cell toggles the Mute function
b. Mute active is indicated with the button background turning Red
6. Focus
a. Pressing Focus toggles the Focus function which, is described in the Focus
section
7. The Mode Indicator
The operational mode of the PD Dante is shown here and can be toggled through the
following options by pressing it
a. Mix – allows the selection of channel(s) and assignment to the Left and Right
outputs
b. Mix (Hold) – only available in 8 channel view and enables PFL hold
PD Dante version 2.09 rev b – 10/02/202016
c. Listen – automatically assigns the selected channel to the L and R outputs
and cancels any previous selection (option to Hold which turns off the
automatic cancellation of the previous selected channel)
d. Listen (Hold) – only available in 64 channel view and enables the PFL hold
function
e. In 16 channel view only the Mix mode is available
8. PFL Hold indicator
9. Setup Channels
a. Pressing setup Channels will open the Setup channels window descried in the
Channels Setup Menu
10. Dante Button
Pressing the Dante button will open the Dante Network menu which is described in
the Dante Section
11. Memory
Pressing the Memory area will open the Memory Settings Menu
12. System Button
Pressing the system button will open the System Menu which is described in the
System Menu section
13. Channel Grid Area
The channel grid area can be configured to display in one of three possible modes via
the Mode menu tab under the Sys menu
8 Channel Mode
PD Dante version 2.09 rev b – 10/02/202017
i
ii
iii
a. This comprises a grid of 8 channels
b. Each individual cell displays
i. Channel name either
1. Routed subscription name in white or
2. Dante RX channel name in grey
ii. Solo button
iii. L and R routing assignment iv
iv. Full size input signal meter with an optional
peak indicator which will hold until reset (settings for
this are under the Meter tab in the Sys menu)
v. Input channel number
c. Touching a channel in the meter area will open the Channel v
Assignment window
d. Touching Solo will enable Solo function for the selected channel
i
16 Channel Mode
ii
a. This comprises an 8 by 2 grid of 16 channels
b. Each individual cell displays
i. Channel name either iii
1. Routed subscription name in white or
2. Dante RX channel name in grey iv
PD Dante version 2.09 rev b – 10/02/202018
ii. L and R routing assignment
iii. Large High-resolution input signal meter with an optional peak
indicator which will hold until reset (settings for this are under the
Meter tab in the Sys menu)
iv. Input channel number
c. Touching a channel will open the Channel Assignment window
64 Channel mode
a. This comprises an 8 by 8 grid of 64 channels
b. Each individual cell displays i
i. Channel name either
1. Routed subscription name in white or
2. Dante RX channel name in grey ii
i. High resolution input signal meter with an
optional peak indicator which will hold until reset
iii iv
(settings for this are under the Meter tab in the Sys
menu)
ii. L and R routing assignment
iii. Input channel number
c. Touching a channel will open the Channel Assignment window
PD Dante version 2.09 rev b – 10/02/202019
Channel Assignment Window
On pressing a Channel Cell the Channel Assignment window will open overlaying the Main
Input Screen
This window displays the following:
• Channel Number
• Dante RX Channel name and if there is a valid Dante connection the name and path
of that connection
• A high-resolution meter showing the level of the currently selected channel
• Left and Right assignment
o Dark Grey indicates that the channel is unassigned
o White indicates channels is assigned
o Pressing a button toggles the function
• Clear OVL – pressing this button clears the meter overload if it has set
o Orange indicates that a peak signal has been detected on the selected
channel
o Peak signal level to be detected is set up via the Sys Menu under the Meters
tab
o Dark grey indicates no peak signal has been detected (default state)
• Solo Listen – pressing this button will activate the Solo Listen function
o On selection, this button will turn from dark grey to green
o Main LR audio will be Muted
o Selected channel audio will be routed to the LR output
o Pressing the button, a second time or moving to another channel deactivates
this function and the main LR audio mix will be unmuted
• Channel Focus – toggles channel focus for the currently selected channel
• > - pressing this button increments one channel
• X – pressing this button closes this window
PD Dante version 2.09 rev b – 10/02/202020
Channel Setup Menu
On pressing a Setup Chans Button the Setup Channels Menu window will open overlaying
the Main Input Screen
This window displays the following:
• Route all Odd to L – pressing this button routes all Odd channels to the Left Output
• Route all Even to R – pressing this button routes all Even channels to the Right
Output
• Clear All OVLs – Clears all Channel OVL indicators that have been set
• Route all to L – pressing this button routes all channels to the Left Output
• Route all to R – pressing this button routes all channels to the Right Output
• Clear All Routing – pressing this button will clear all channel routing
• Focus All Off – Turns off Focus on all channels
• Focus All On – Turns on Focus on all channels
• Focus All Active – enables focus on all routed channels
• X – pressing this button closes this window
PD Dante version 2.09 rev b – 10/02/202021 Focus The Focus function on the PD Dante allows the user to highlight particular channels that are of more interest/importance Pressing the Focus button on the main screen toggles the Focus function Any channels which have had their Focus set to off in the Channel Assignment window will be dimmed relatively to channels which have their Focus set to on. The effect can be seen in the above example screen where the selected channels are now more prominent than the un selected channels Focus is saved with routing information in the memories. This makes it very easy for the user to create different Focus groups which change with a recalled memory PD Dante version 2.09 rev b – 10/02/2020
22

Dante Menu

On pressing the Dante Button, the Dante Menu window will open

This window displays the following

   •   A list of all the Dante devices on the network showing the following
            o Device name
            o Sample rate
            o Source (Src) select button
            o Destination (Dst) select button
   •   Select Device – allows a device to be selected for the list
   •   View RX Channels – will show the RX channels for the currently selected device and
       will be greyed out when no Dst (destination) is selected
   •   View TX Channels – will show the TX channels for the currently selected device and
       will be greyed out when no Src (source) is selected
   •   Set Routing – allows routing between any Dante devices on the network and will be
       greyed out when no Src (source) and Dst (destination) are selected
   •   Clear Local Routing – will clear all the subscribed channels on the RD Dante. It is
       followed by a confirmation window
   •   Network Config – allows the configuration of the network port of any connected
       Dante device and will be greyed out when no device is selected
   •   If the list of devices is longer than 8 units, the arrow keys will turn white on the left
       side of the screen
            o Single up arrow with a bar at the top will scroll to the top of the list
            o Double up arrow will scroll eight devices up the list
            o Single up arrow will scroll one device up the list
            o Single down arrow will scroll one device down the list
            o Double down arrow will scroll eight devices down the list
            o Single down arrow with a bar at the bottom will scroll to the bottom of the
                device list
   •   X – escapes back to the main screen

PD Dante                                                       version 2.09 rev b – 10/02/2020
23 View RX Channels Example of viewing the RX channels of the selected device Please note that to obtain the channel names the RD Dante will communicate via the network with the selected device which means there will be a short delay before the list is populated. A red “Spinner” will appear while this occurs Example of the “Spinner” running while RD Dante is fetching name On some occasions the list will remain grey which indicates that the names have not been retrieved. Simply press the Dst. (RX) Chans button to perform a refresh The list will appear in white once correctly retrieved PD Dante version 2.09 rev b – 10/02/2020
24

Unrouting RX Channels

It is also possible to remove individual and multiple routes in the RX channels screen.
Simply select the channel(s) that need to be unrouted. The background of selected
channel(s) will turn white
The Clear (RX) Routing button will also change to white
Press this button to unrouted selected channels – please note there is no confirmation
message the route(s) will simply be unrouted

PD Dante                                                    version 2.09 rev b – 10/02/2020
25

View TX channels

Example of viewing TX channels

Set Routing

To set the routing between any pair of Dante devices attached on the same network.
Press the Src (source) button for the device that audio is going to be listened too and it will
turn green.
Next press the Dst (destination) button for the device that will be connected to the source
signal

After this press the Set Routing button

PD Dante                                                       version 2.09 rev b – 10/02/2020
26

The screen will then change to the Source Channel(s) screen
Select the channel(s) that need to be routed and then press Next to go to the Destination
Channel(s) screen

The selection process always works from the lowest number to the highest number so for
example to select all 64 channels of another device

Select Channel 1 then go to the end of the list and select channel 64 and all the channels in
between will also be selected

Press Prev to go back to the previous screen or Home to return to the main Dante menu

Select a channel to route to and the list will automatically fill in with the number of channels
that were selected in the Source Channel(s) page

PD Dante                                                      version 2.09 rev b – 10/02/2020
27

Press Route to subscribe the selected routing and the following display will appear

The Selection has now been subscribed

Press Prev to go back to the previous screen or Home to return to the main Dante menu

Network Config

Pressing Network Config will bring up the screen below

From the Network Config menu the following can be changed

   •   Change between Switched and Redundant modes

PD Dante                                                    version 2.09 rev b – 10/02/2020
28

            o Current status is displayed in white
   •    Primary and Redundant can be changed independently to be
            o Manual – IP address, Net Mask etc can be set manually
            o Auto – IP address etc set by DCHP server
            o Current status displayed in white
To make a change to the settings touch the box of the item to be altered and it will turn red,
indicating a change of state.

To alter the IP address, Net Mask, DNS Server or Gateway touch the item to be changed and
the following popup will appear

The cell highlighted in white will be edited by typing with the number keys
   • Pressing the “.” key will step onto the next box or touching the desired box will also
       highlight it
   • Press “Bsp” to delete one character at a time in the selected box
   • Press “Esc” to abandon the edits
   • Press “Rtn” when finished editing to shut the pop up window

All pending changes will be highlighted in red
The Apply button will also turn red at this point to indicate changes have been made
Changes will not be applied until the Apply button is pressed
Once pressed the screen will display a confirmation screen
    • Press Yes to confirm changes

PD Dante                                                     version 2.09 rev b – 10/02/2020
29 • Press No to abandon the changes Restart will change to red and changes will not be applied to the edited unit until it has been rebooted by pressing Restart Anytime during the procedure pressing Home will return the user to the main Dante screen, if any changes are imminent and the Home button is pressed a pop up will appear PD Dante version 2.09 rev b – 10/02/2020
30

Memory Menu

On pressing the Memory Button the Memory Menu window will open

This window displays the following:

   •   Memory number and name (1 to 8)
   •   An on screen QWERTY keyboard
   •   Recall – pressing recall after selecting a memory will recall the memory
   •   Save – pressing this button saves the units current routing and focus settings to the
       selected memory
   •   Edit Name – pressing this button will allow the selected memorys name to be edited
   •   X – pressing this button closes this window

Selecting a memory

Pressing the name of a memory will highlight that memory which will then be displayed in a
larger font. This indicates which memory will be recalled, saved or have its name edited.

PD Dante                                                    version 2.09 rev b – 10/02/2020
31
Editing the name of a memory
With a memory highlighted pressing the Edit Name button will enable the name to be edited
with the on screen qwerty keyboard. The menu buttons change to Update Title and Cancel
• Once you have finished editing the name press the Update Title button to complete
the process
• Or press Cancel to escape without saving any of the changes
Selecting auto recall of a memory
A memory can be selected to Auto Recall when the PD Dante is turned on
• Select the memory you would like to Auto Recall
• Press the Auto Recall button which will change the Memory number to red
indicating that this memory will be recalled on power on
• Auto Recall will be indicated when no memory is selected by the memory number in
red
•
PD Dante version 2.09 rev b – 10/02/202032
The System Menu
Pressing the System button opens the System Menu
The System Menu consists of several tabs
• Mode
• Inputs
• Route Matrix
• Outputs
• >>
Mode
• Mix – Selects the PD Dante to Mix mode where it allows the selection of channel(s)
and assignment to the Left and Right outputs. Mixes can then be saved and recalled
to the Memories
• Listen – Selects the PD Dante to Listen mode where any selected channel is
immediately routed to the L R outputs and any previously selected channel is
cleared.
o Hold – Works in conjunction with Listen changing the Listen mode to additive
where each additional channel is routed directly to the LR outputs without
clearing the previous selection(s)
• PFL Trim (SOLO)
o Shows the current PFL trim gain which can be adjusted from 0dB to 30dB in
1dB steps
o – decreases the gain by 1dB
o + increases the gain by 1dB
• Screen Brightness
o Displays the screen brightness as a percentage and is adjustable from 100%
down to 20%
o – decreases the brightness by 5%
PD Dante version 2.09 rev b – 10/02/202033
o + increases the brightness by 5%
• Display Mode
o Select 64 chan to enable the 64 channel meter view on the main screen
o Select 8 chan to enable the 8 channel meter view on the main screen
o Select 16 chan to enable the 16 channel meter view on the main screen
Inputs
• The Input page is split into four areas
o Main Mix
o Mic/Line
o AES3
o Test Signal
• Main Mix
o A stereo meter displaying the main mix level
• Mic/Line
o A stereo meter displaying the selected inputs level (post the trim)
o A button that toggles between Mic and Line Inputs. The name of the
currently selected input will be displayed in the button
o The Line Input and Mic Inputs can be adjusted between +40dB and -12dB in
1dB steps via the volume bar
o The maximum input level for either the Mic Input or the Line Input is +8.5dBu
o A Mic bias of 2.6V is available at the microphone input
• AES3
o A stereo meter displaying the AES3 level (post the trim)
o The AES input can be adjusted from +20dB to -20dB in 1dB steps via the
volume bar
o There is also an indicator that will turn green when the input locks and the
sample frequency will also be displayed
o A red indicator means that there is no lock to the incoming signal
o The AES input features a sample rate convertor adjusting the sample rate to
the currently selected Dante rate internally
o The AES Input is accessed via an optional breakout cable which plugs into the
15way D-Sub socket
PD Dante version 2.09 rev b – 10/02/202034
• Test Signal
o A stereo meter displaying the test signal level (post trim)
o The PD Dante also features an internal signal generator
o There is a choice of the following signal generators
§ Sine wave
§ Square wave
§ Triangle wave
§ White Noise
§ Pink Noise
o The currently selected generator is indicated by the button in white
o Press one of the three buttons to select it
o The wave type button selects the wave type rotating through the options
§ Sine
§ Square
§ Triangle
o The frequency can be selected to be one of the following 50Hz, 100Hz,
200Hz, 500Hz, 1kHz, 2kHz, 5kHz or 10kHz please note at higher frequencies
the square and triangle waves will appear more and more like a sinewave
o Also note that the built-in speakers have a limited low frequency response
and frequencies below 200Hz will not be audible from them
o The signal level of the generator can be varied from 0dBFs down to -60dBFs
in 0.5dB steps via the volume bar
PD Dante version 2.09 rev b – 10/02/202035
Route Matrix
This page is split into two areas
• The four by six Output Routing Matrix
o Four rows displaying where the signal will be derived from
o Six columns displaying where the signal will be sent too
o Signals can be sent to all six destinations but can only come from one source
indicated by a level shown in white. All other possible sends will show their
pre-set level in grey
o Pressing one of the areas in this grid will select that send to the Output
Control area
• The selected Output Control area
o Displays the level of the currently selected matrix send on two high definition
meters
o Shows the name of the selected send and routing destination
o On Button – toggles the send between On and Off. Selecting a send to On will
deselect any previously routed send
o Output Level indicator
o Output Level trim controls which allow the output to be attenuated in 1dB
steps from 0db to -60dB
o Output Level can also be trimmed via the volume control
PD Dante version 2.09 rev b – 10/02/202036
Outputs
This page is split into seven areas, 6 stereo meters and a control area. Select an output by
touching its meter. Controls for that output will then be displayed in the control area
• HP/Spkrs
o A stereo meter displaying the current output level
o Speakers Disable – This button toggles between disabling the speakers but
leave the headphones functioning as normal
• Line Out
o A stereo meter displaying the current output level
o Line out follow:
§ Vol – when selected output will follow main mix Volume control
§ Mute – when selected output will follow main mix Mute
• AES Out
o A stereo meter displaying the current output level
o AES out follow:
§ Vol – when selected output will follow main mix Volume control
§ Mute – when selected output will follow main mix Mute
PD Dante version 2.09 rev b – 10/02/202037
• Outputs to Dante A, B and C
o Three stereo meters indicating the output level of Dante outputs A, B and C
o Pressing one of the three Dante outputs will select it to the output channel
selection area
o Displays the currently selected Dante output and which pair of Dante
channels it is routed to
o Pressing the single arrow buttons will increment or decrement the selected
Dante output by one pair i.e. increment 1&2 to 3&4, decrement 9&10 to 7&8
etc.
o Pressing the double arrow buttons will increment or decrement the selected
Dante output by five pairs i.e. increment 1&2 to 11&12, decrement 19&20 to
9&10 etc.
o Dante channels already assigned to an output will be skipped as Dante
outputs cannot be assigned to the same Dante channels
>>
Press this Tab to see additional Setup pages38
Meter Control
• Main Meters
o Nominal Level Ind – Enable to display nominal level markers on main stereo
meters
o Trim- – decrements the nominal level in 1dB steps
o Trim+ – increments the nominal level in 1dB steps
o Nominal level can be set from -6dbFS to -24dBFS
o Peak Hold – enables peak hold markers on the main meters
• Channel Meters
o OVL Ind – enables OVL markers on channel meters
o Trim- – decrements the OVL trigger level in 1dB steps
o Trim+ – increments the OVL trigger level in 1dB steps
o OVL trigger level can be set from 0dbFS down to -12dBFS
o Clear OVL – clears any set OVL markers on the main channel window
PD Dante version 2.09 rev b – 10/02/202039
System Info
Network connection parameters and firmware versions are displayed on this page
• Primary Connection
o IP Address
o Mask IP Address
o Gateway IP Address
o Network Speed
• Secondary Connection
o IP Address
o Mask IP Address
o Gateway IP Address
o Network Speed
• Brooklyn II Card firmware(s)
• PD Dante firmware and FPGA version
PD Dante version 2.09 rev b – 10/02/202040 PIN To set a PIN number on the PD Dante press SET The following pop up will appear Type in the required pin number (must be four digits) • Bsp – deletes the last character • Esc – escapes from this pop up without changes • Rtn – returns to the PIN menu keeping the set PIN After setting a PIN number and returning the main PIN screen a brief pop up will be displayed saying “Setting New PIN number” PD Dante version 2.09 rev b – 10/02/2020
41

Once the PIN has been set the screen will look like the following

To unlock the unit, type the PIN number. The lock button will change from “Unlock” to
“Lock”
At this point the unit is now locked and any settings that have been changed to “Protected”
will not be accessible until the unit is unlocked with the PIN number
To “Unlock” the device simply press the “Lock” button and type the Pin code when
requested
To “Clear” the PIN code press “Clear” and type in the code when requested

If the PIN code has been lost or forgotten send an email to support@nixerproaudio.com
with the title “PIN Code removal” and instructions on how to reset the PIN code will be
emailed back

PD Dante                                                     version 2.09 rev b – 10/02/2020
42

Update

To update your PD Dante

   •   If you do not have it download and install the Nixer BLM.exe from
       www.nixerproaudio.com
   •   Also download the latest firmware from ww.nixer.uk.com to your PC
   •   Next attach the PD Dante to the PC via the USB cable that came with your product
   •   Navigate to the Update Menu in the System menus and press the button to enter
       Boot Loader Mode. You will see a countdown of dots before the screen goes blank
   •   Your PD Dante is now ready to update
   •   Run the Nixer BLM program on your PC

PD Dante                                                  version 2.09 rev b – 10/02/2020
43
• Once the program is running change “Screen Flash” to “Main CPU” via the drop-
down menu and click connect
• You will now see that it says device connected in the status window
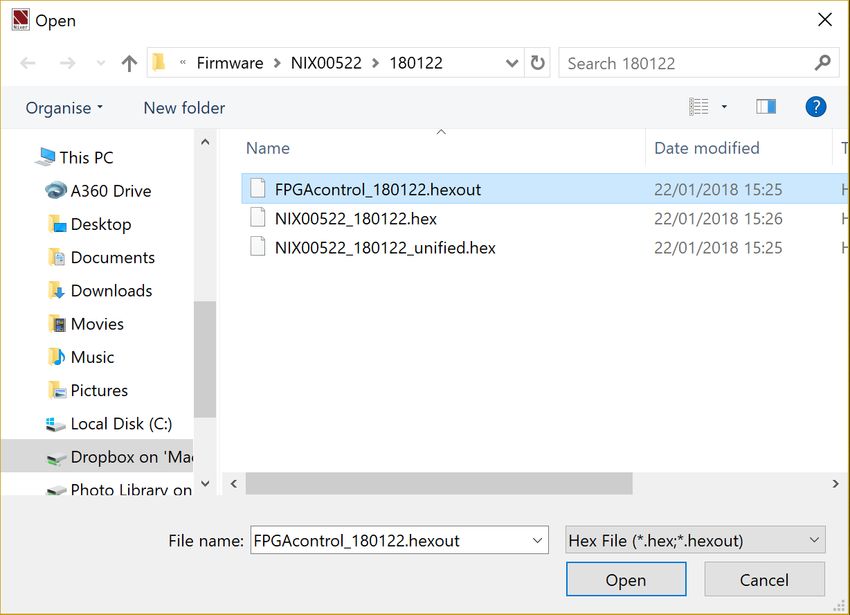
• Click on Load Hex File. Next navigate to and load in the .hex file that you
downloaded from ww.nixerproaudio.com
• Click the Erase-Program Button and your device will be reprogrammed. You will see
the progress in the status window and by the status bar which will gradually fill as
the device is programme
PD Dante version 2.09 rev b – 10/02/202044
• When the device has been programmed the status window will say “Programming
completed. Click Run Main and your unit will reboot with its updated software
• To update the FPGA firmware, start the Nixer BLM program
• Select FPGA Flash from the pull-down menu and click connect
• Once connected click Load Hex File and navigate to and open the .hexout file you
have downloaded
PD Dante version 2.09 rev b – 10/02/202045
• Click Erase-Program
• Once the status window says Programming complete click Run Main and your PD
Dante will reboot
• When the Splash Window starts you will see confirmation of the Main CPU firmware
followed by the FPGA version
PD Dante version 2.09 rev b – 10/02/202046
Configuring Dante Networks
You can configure your Dante network in one of two ways
• Switched (non-redundant) in this mode the Primary and Secondary ports are
effectively two ports of a switch and it does not matter which port you connect too.
• Redundant mode where the Primary port and Secondary port must be connected to
two independent networks. This then gives complete redundancy to the network
Correct IP configuration
Dante hardware devices are set to obtain their IP address automatically from the network.
They will either:
• Automatically assign themselves an address in the range 169.254.*.* (172.31.*.* for
the secondary network if present), or
• Obtain an IP address from a DHCP server if it is present on the network
Your PC or Mac TCP/IP network configuration set should be set to 'Obtain an IP address
automatically'. This way it will automatically acquire a Link Local automatic IP address in
the same network as other Dante devices. If a DHCP server is present, the computer and
Dante devices will all acquire their IP addresses via DHCP.
Possible IP network configuration mistakes
Possible network configuration errors are listed below. Dante Controller will try to
automatically detect these. If detected the offending device will be displayed in red.
Incorrect PC/Mac IP configuration
• Accidentally having multiple network interfaces with addresses in the same subnet
• If your secondary network is using Link Local (no DHCP server), all devices on that
network will be in the 172.31.*.* range. The secondary network interface for the
computer must be manually configured (using static IP addressing) to the same
range.
Incorrect general IP configuration
• Accidentally having multiple DHCP servers on the same network
Unusual – for example, someone may have a PC connected to the network with a
DHCP server running that they’re not aware of.
• Incorrectly configured static IP addresses
• You shouldn’t typically need to configure static IP addresses at all. If for some reason
you do, it must be in the same subnet as the rest of the network.
PD Dante version 2.09 rev b – 10/02/202047
Incorrect redundant network configuration
There are a few ways to incorrectly configure a redundant network. More than one of these
can be present at the same time.
• Connecting the secondary interface of a Dante device to the primary network
o Most commonly by either misunderstanding how redundancy works, and
using only one switch with all cables connected to it; or correctly using two
switches or networks, but accidentally connecting one secondary cable to a
primary network switch
• Joining the primary and secondary Dante networks
o By connecting primary and secondary switches, or perhaps just using one
switch.
• Multiple interfaces on the same device using the same IP address subnet
o Possibly by having the same DHCP server on both primary and secondary
networks, or both DHCP servers configured to serve the same IP addresses.
Also, mixing DHCP and Link Local on the same network can cause issues. It is
often necessary to have all devices and the computer on either DHCP or Link
Local.
Dante Latency will depend upon the number of switches the signal is being routed through
and on average a signal takes 100uS to travel through a switch (Please remember that each
Dante device contains one switch)
In a simple Dante network with just one external switch latencies below 0.25mS will be
easily attainable.
Note that Multicast streams will always have a latency of 1mS
For complex networks, it is recommended to set some values in DSCP part of the QoS
(Quality of Service) in managed routers/switches
There are 64 parameters in DSCP set all to Low Priority except for the following:
• #8 (Control Data) set to Medium Priority
• #46 (Audio Data) set to High Priority
• #56 (Clock) set to High Priority
You will need to refer to your router manual for how to adjust these settings
If using Multicast streams, Wi-Fi and/or 100Mbs it would be also advisable to use IGMP
snooping if it is available on your router as this will significantly reduce the overall data rate
on your network and only send data to the IP address that requests it rather than to all IP
addresses.
For Dante Cable Copper:
• Use CAT5e or CAT6, solid core, shielded
• Never use a copper cable longer than 100m
• Use cable with solid copper cores whenever possible
• Stranded copper cores are more flexible, but not so good at long distance
transmission
• Keep 60m maximum with stranded cable
• A lot of rugged “stage-cable” is stranded, so take care.
PD Dante version 2.09 rev b – 10/02/202048
For Dante Optical Cable:
• Multi-Mode up to 500metres – lower cost
• Single Mode up to several kilometres – longer distances and can be used with patch
panels
Recommended Switch Specifications
• 1Gbps (or more per port)
• Switching capacity 2x the total number of ports i.e. 10 ports = 20Gbps
• EEE (Energy Efficient Ethernet) must be disabled (if it can’t be then avoid it)
• Fan less operation
• Fibre module options
• Easy to use web interface
Do NOT under any circumstance use switches with EEE (Energy Efficient Ethernet or 'Green
Ethernet') enabled
If you are using a managed switch then please go into the system settings of the switch and
disable EEE
PD Dante version 2.09 rev b – 10/02/202049
Nixer PD Dante Specifications
1. Monitoring of 64 Dante channels at 48kHz (32 channels at 96kHz)
2. Output up to 64 Dante channels at 48kHz (32 channels at 96kHz)
3. Sample rates supported
a. 44.1kHz
b. 48kHz
c. 88.2kHz
d. 96kHz
4. Bit Depth supported
a. 16bit
b. 24bit
c. 32bit
5. AES67 compatible
6. Fully compatible with New Dante Domain Manager
7. Two main modes of operation
a. User defined mix to L and R output
i. 8 User memories with customizable names
b. PFL mode where selected channel is sent to LR with two modes
i. Auto cancel previous selection
ii. Additive with Clear button
8. 64 channel meters
a. High resolution meters
b. Optional Peak indicator with user definable trigger level
9. Main LR meters
a. Large high-resolution meters displaying 0dBFS down to -72dBFS in 1dB steps
b. Optional Peak hold
c. Optional Working level indicator with user definable level
10. Internal 2W/channel amplifier feeding either
a. 2x Internal speakers
b. Headphone output
11. Dual Balanced Line Outputs 0dBFS = +21dBu maximum output into 600ohms on
15way D-type connector
a. Fed from selection of (as shown in Route Matrix page 22)
b. Option to follow main volume control
c. User adjustable trim (0dB to -60dB in 1dB steps)
d. Output Mute relays
12. Stereo AES output on 15way D-type connector
a. Fed from selection of (as shown in Route Matrix page 22)
b. Option to follow main volume control
c. User adjustable trim (0 to -60dB in 1dB steps)
13. Stereo AES Input on 15way D-type connector
a. User selectable routing to Dante output(s)
b. Input Sample Rate converted to match Dante network
14. Stereo unbalanced line input on 3.5mm stereo jack
PD Dante version 2.09 rev b – 10/02/202050
a. with input level trim control suitable for use with common music playback
devices such as, iPods, iPhones, MP3 players
b. max input level +8.5dBu
15. 3.5mm Headphone socket and microphone input
a. Headphone output for driving loads from 8ohm to 600ohm
b. Microphone input with gain control (up to 40dB) and level trim
c. Socket wiring is suitable for use with most common mobile phone headsets
16. Dual 1Gbps RJ45 Dante inputs
a. 1Gbps or 100Mbps operation
b. User configurable for Switched or Redundant operation
c. Network configuration information available via menu
17. Power input via
a. PoE (13W) on Primary RJ45 connector
b. USB input (1.5A) auto negotiates with connected USB port
i. Direct from Mac/PC USB connector capable of delivering 1.5A
ii. USB mains adaptor
iii. USB battery pack
c. Both power inputs can be active at the same time for redundancy
18. USB port is also used for product firmware updates
19. Wired remote-control option on 15way D-type connector
a. RS485 balanced TX and RX pairs
b. 5V feed to connected device (up to 300mA)
20. Internal oscillator with selectable routing to Dante output(s) and level control
a. Sine Wave, Square Wave, Triangle Wave generation settable in steps to
frequency of 50Hz, 100Hz, 200Hz, 500Hz, 1kHz, 2kHz, 5kHz, 10kHz please
note at higher frequencies the square and triangle waves will appear more
and more like a sinewave
b. White Noise Generator
c. Pink Noise Generator
21. LCD
a. 5.0” (127mm) diagonal 24bit colour LCD with 800xRGBx480 resolution
b. LED backlight (adjustable brightness via software)
c. 5-point touch capacitive touch overlay with gesture support
22. Size
a. 173mm long by 106mm wide by 34mm height
b. 0.5kG
23. Optional mounting brackets
24. Optional Case
25. Optional breakout connector for 15way D-type connector
PD Dante version 2.09 rev b – 10/02/202051
Dimensioned drawing
15way D-type pinout
1 VCC
9 RX+
2 RX-
10 TX+
3 TX-
11 AES Input+
4 AES Input-
12 AES Output+
5 AES Output-
13 GND
6 Line Output 1+
14 Line Output 1-
7 GND
15 Line Output 2+
8 Line Output 2-
Nixer reserves the right to change product details and specifications without notice
Dante is a registered trademark of Audinate Pty
iPod and iPhone are registered trademarks of Apple Inc.
PD Dante version 2.09 rev b – 10/02/2020You can also read