Personal Mobility Scooter - Owner's Manual and Instructions
←
→
Page content transcription
If your browser does not render page correctly, please read the page content below

Personal Mobility Scooter

Owner’s Manual
and Instructions
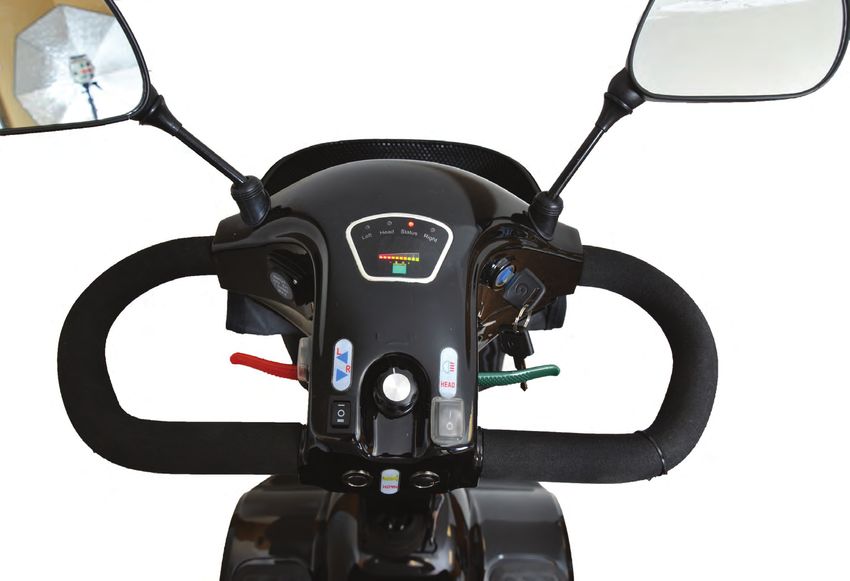
TABLE OF CONTENTS
I.    Introduction................................................................ 2

II.   Trekker Scooter.......................................................... 4

III. Assembly................................................................... 5

IV. Safety First................................................................. 11

V.    Electromagnetic Interference and Warning.................... 18

VI. Parts Introduction........................................................ 22

VII. Operation.................................................................. 23

VIII. Maintenance Schedule................................................ 37

IX. Basic Troubleshooting................................................. 38

X.    Specifications............................................................. 40

XI. Trekker Scooter Warranty............................................ 41

XII. Buyer’s Registration Form............................................. 44

1

INTRODUCTION

Thank you for purchasing the Trekker Personal Mobility Scooter (PM
Scooter). The Scooter you have purchased, has features exclusive to
our Trekker Scooter and was designed to provide you with comfort
and safety.

      WARNING: Carefully read this owner’s manual before using
      the vehicle. This manual contains important information
concerning the safe operation and proper maintenance of your PM
Scooter.
Improper use of the vehicle could result in harm, injury or accidents.

Before using your Scooter, make sure all components are present
and no damage has occurred during shipping. If you do not
receive a complete scooter or damage has occurred during
shipping - please contact Thermor Ltd.

This owner’s manual includes operating instructions for every
aspect of the Scooter and its assembly. With proper care and
maintenance, you should enjoy many years of dependable service
from your vehicle.

This manual includes a repair/maintenance record chart and
warranty information. Your scooter should receive regular
maintenance according to the schedule outlined in this manual
and/or the recommendation from an authorized Thermor service
representative.
Please keep the manual in a safe place or with the Trekker PM
Scooter.

                                                                    2
Purchaser’s Agreement
By accepting purchase of this product, you agree that you will not
alter, modify or change this product or remove or disconnect or
render inoperable any guards, shields or other safety features of
this product.

      Failure to follow the instructions, warnings and information
      provided in this manual and/or those located on the Trekker
Scooter can result in personal injury or product damage and will
void the Trekker Scooter product warranty.

Design changes may not be reflected in some illustrations/
pictures and the manual may not correspond to the vehicle that
you purchased. The manufacturer reserves the rights of final
interpretation of the manual.

    www.BIOSmedical.com
    TH3748_061113

3
TREKKER SCOOTER

                  4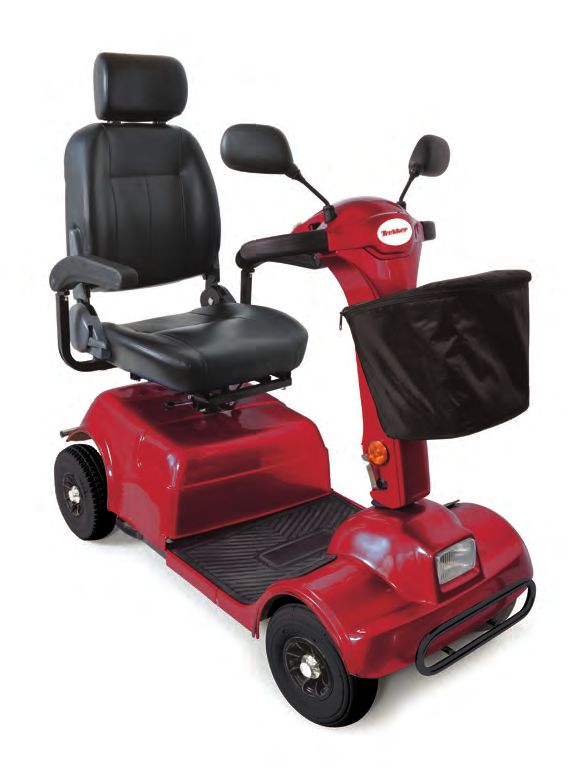
ASSEMBLY

      The scooter is heavy, assembly and disassembly will require
      assistance of one or more persons. Do not attempt to lift the
scooter beyond your physical capability and/or without assistance.

• Always assemble or disassemble the scooter on a level, dry
  surface
• Ensure you have sufficient room to work and move around while
  assembling or disassembling the scooter (1.83 meter circle or
  6 feet is recommended)

Fully Assembled Scooters
your scooter may come fully assembled, BATTERIES ARE NOT
ATTACHED on fully assembled scooters. Please follow the below
steps to attach the battery to the scooter.

The scooter’s parts can be heavy and difficult to maneuver, it is
always best to have assistance during the removal of the seat or
contact an authorized Thermor service center representative.

1. Ensure the tiller is in the most upright position.
2. Locate the seat rotation lever.

                                                        Seat rotation
                                                        lever

5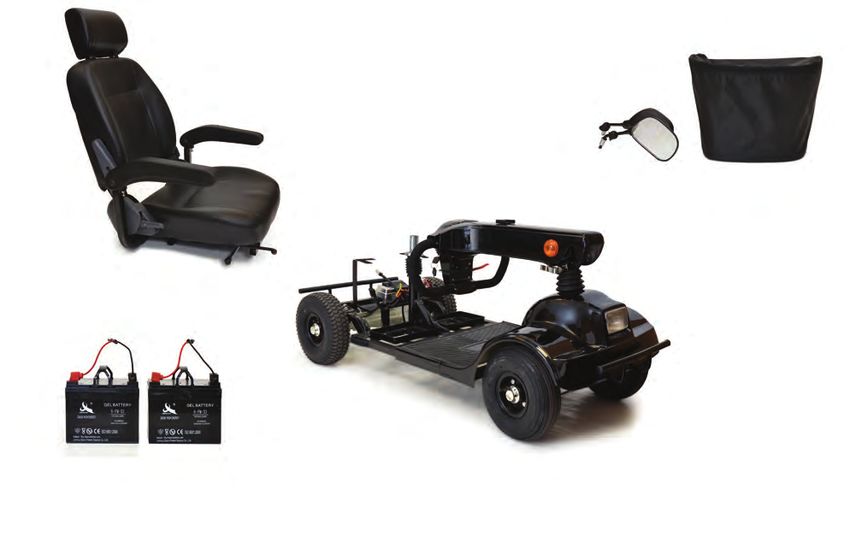
3. While gently pulling forward on the seat rotation lever, lift the
   seat upwards.
4. Remove rear shroud on the scooter.

5. Connect the shroud connectors.

6. Replace the rear shroud, ensure rear shroud are securely in
   place. Check that the wheels do not rub on the shroud frame.

7. Install seat see section ‘seat installation’.

                                                                       6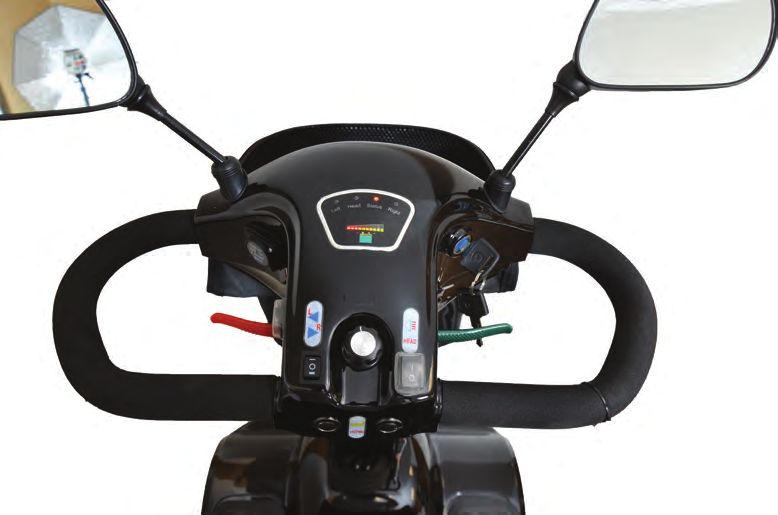
Assembly
The scooter comes disassembled in 6 parts + 1 battery charger. No
tools are required to assemble the scooter. Remove all scooter parts
from the carton and insure all parts are present.

Arm rest x 2               Battery pack x 2            Basket x 1
Seat x 1

Mirrors x 2 Scooter body x 1                    Battery Charger x1
			                                               (For indoor use only)

Battery Installation
1. Remove the rear shroud on the scooter.

7

2. Disconnect the shroud connectors.

3. Place the new batteries into the battery wells, with the terminals
   facing towards the front of the scooter.

4. Connect the red cable to the positive (+) battery terminal (red to
   red).
5. Connect the black cable to the negative (-) battery terminal
   (black to black).
6. Reconnect and tighten all screws that hold the battery terminals.

7. Ensure that the battery terminal boots are covering the battery
   terminals.

                                                                        8
8. Secure Velcro® straps over batteries and attach to scooter frame.
9. Replace the rear shroud, ensure rear shroud are securely in
   place.

      Check that the wheels do not rub on the shroud frame.

Seat Installation
1. Ensure the tiller is in the most up-right position.
2. With the rear shroud securely in place attach the seat by sliding
   the seat over the seat post.
3. With the seat resting on the post (must be held in place) pull
   forward on the seat rotation lever.
4. Move the chair slightly; in a side-to-side motion, until the seat
   drops in-place and locks.
5. If the seat locks on an angle, pull forward on the seat rotation
   lever and rotate the seat into the desired position.

                                                       Seat rotation
                                                       lever
                                               Seat post

9
Arm Installation
1. With the seat firmly in place, insert the armrest adjustment post
into the armrest housing.
2. Slide the armrest in or out to the desired position.
3. Tighten the armrest adjustment knobs located at the rear of the
scooter.
4. Ensure the armrest is firmly locked in place.
Mirror Installation
1. Insert the threaded end of the mirror into corresponding opening
on the top of the tiller.
2. Rotate the mirrors clockwise until tight.
3. Push the rubber boots located on the mirror down to cover the
threaded opening.
104. Adjust the mirrors to the desired position, to give you a good line
of sight.
Basket Installation
The scooter comes with a convenient basket with nylon cover.
1. Install the basket by inserting the basket U-bracket into the
housing located at the front of the tiller.
2. Push down gently on the basket until it is completely inserted.
SAFETY FIRST
The user should be familiar with the use and operation of this
vehicle before driving. Please read the recommendations listed in
the Safety First Briefs.
11Safety First Briefs
• Pedestrian traffic rules apply to the use of this vehicle
• Do not drive after consuming alcohol or when tired
• Some medications and/or physical limitations may impair your
ability to drive the scooter – consult with a physician before
driving the scooter
• For your own safety follow the rules that apply to pedestrians
• A sidewalk should be the first choice for someone using a scooter.
Never ride on highways, ride on the roadside in pedestrian
areas only
• If there is no sidewalk available then PM scooter should travel,
like pedestrians, along the left shoulder of the roadway facing
oncoming traffic
• Exercise caution when driving your PM Scooter in low light, your
scooter is not designed for use at night
• Be aware of traffic when crossing streets
• Be extremely careful when driving on busy streets or in shopping
plazas/malls
• Always follow traffic laws, check with your local municipality for
local traffic laws
Getting On and Off the Scooter
Be cautious when getting onto and off the scooter, it requires a
good sense of balance. Following the below safety tips will ensure
a safe experience.
• Turn the key off or remove it from the ignition before getting on
or off the scooter
• Ensure that the seat is securely locked in place
• Move the arms into an upward position before getting on or off
the scooter
12• Ensure the freewheel mode is in “Closed” position (see Rear
Section)
Free-wheel
lever
• Do not use the armrest to support your weight while entering or
exiting the scooter – using the armrest in this fashion may cause
a fall and/or the scooter to tip, causing personal injury
• Sit as far back as possible on the scooter to prevent tipping
Figure 2. Normal Driving Position Figure 2A. Increased Stability Driv
Practice Makes Perfect
Get to know your scooter; before using, understand its operation.
Familiarize yourself with all the controls and practice using the
scooter in a wide and open area, such as a park. Be aware of
driving conditions, accelerating, stopping, turning, reversing, and
moving up and down ramps.
13• Start with the lowest speed for your initial practice, until you feel
safe and confident. Progress to higher speeds only when you feel
you are able to easily operate and control your scooter
• Some medical conditions may require that the user practice
operating the Trekker Scooter, in the presence of a medical
attendant, assistant or trained family member abreast in assisting
the user in daily living activities
Driving
• Before driving your scooter carry-out the 9 point daily inspection
(see check list)
• Turn the key to the off position or remove it from the ignition
before getting on or off the scooter
• While driving keep your feet on the floorboard
• Be aware of other people and objects around you
• Avoid erratic body movement while the scooter is moving, this
action could cause you to lose your balance and result in injury
• Check your clothes to ensure garments do not get caught in the
wheels
• Do not bend, lean or reach for objects while on the scooter, such
action may cause the scooter to lose control or tip
• Keep both hands on the tiller while operating the scooter
Important Precautions
• The Trekker Mobility Scooter can only be used by one person at
a time
• Do not carry passengers, including children, on your scooter
• Do not allow children to play near the scooter while the batteries
are charging
• The maximum load is 158kgs (350lbs.), including driver and
any goods
14• Maximum load weight for the basket is 3kgs. (7lbs.) • Never carry an oxygen tank weighing more than 6.8kg. (15lbs.) • Ensure that the tiller and seat are locked and secured in place before driving • Do not remove the anti-tip wheels PROHIBITED – never remove or modify the anti-tip wheels, removal of the wheels or modification to the frame will result in voiding of the Trekker Scooter warranty. • Do not use the scooter if the rear anti-tip wheels are damaged or removed • Do not use your scooter on roads which are muddy, bumpy, snow covered, icy, without guard rails, fence or hedges ,heavy traffic and/or on any places where wheels could get stuck • Do not take your scooter onto escalators or stairs • Avoid rainy, snowy, misty or windy conditions • Your scooter should NEVER be used as a seat in a motor vehicle (e.g. buses, vans, trains, cars, etc.) • Do not use mobile phones or other wireless device while driving • Do not charge mobile phones or other electrical devices from the scooter • Switch off your scooter and remove key from ignition before using a mobile phone • Avoid the use of extension cords, do not connect them to the AC/DC converter or battery charger • Do not leave lit cigarettes unattended • Keep ashtrays away from the seat cushions • Do not use the scooter to tow another vehicle • Do not allow the scooter to be pushed by another vehicle • Do not attach a leash to the scooter to walk a pet 15
Ramps, Inclines, Corners and Dips
• Never use full power when turning corners or when on slopes
• Avoid erratic turns or driving in an “S” pattern, take wide turns
  and reduce speed in tight corners – to prevent tipping or falls
• Do not drive on slopes greater than 12 degrees
• Exercise caution and use lower speed settings when ascending
  or descending slopes
• Never place your scooter in neutral when stopping on a slope
• Do not drive the scooter side-ways or diagonally across an
  incline
     Avoid slippery inclines (wet leaves and/or grass, snow and
     ice covered surfaces, etc.), they could be potentially
     dangerous
• Exercise great caution and use low speeds for riding downhill,
  reversing, curb climbing and over uneven surfaces
• Exercise common sense when negotiating corners, inclines and
  driving the scooter

When driving up an incline, the centre of gravity shifts, it is best to
lean forward to improve the stability of the scooter. While driving
up an incline, if the speed control lever is released, the scooter will
roll back approximately 12” (30.5cm). Before the brake engages,
the same results will occur if travelling in reverse down an incline.

 Figure 2. Normal Driving Position     Figure 2A. Increased Stability Driving Position
                                                                                         16
Tire Safety
Scooter’s equipped with pneumatic tires; tires should be checked
weekly to ensure proper inflation pressures. Correct pressure will
prolong the life of the tires and ensure a safe smooth ride.
It is very important the psi/bar/kPa air pressure indicated on each
tire be maintained. Failure to do so could result in loss of control
and/or serious injuries.
Do not overinflate the tires, this could result in the tires bursting or
underinflate, which could result in loss of control.
Recommended tire pressures are: Front 250kPa and Rear 300kPa
Maximum Weight Capacities
The maximum weight capacity of the scooter is 158kg /350lbs
(including the driver and any goods), it is imperative that users stay
within the specified weight capacity. Exceeding the weight capacity will
void the warranty. Thermor will not be held responsible for damages to
property and/or injuries resulting from failure to observe the maximum
weight capacities.
Weather Precautions
• Avoid rainy, snowy, misty, icy or windy conditions – these
weather conditions could have adverse effects on the scooters
electrical system. Its always best to store the scooter in a dry and
clean location
• The scooters upholstery can be effected by prolonged exposure
to hot or cold temperatures, exercise caution when sitting on
the upholstered seat, after the scooter has been exposed to the
aforementioned conditions
17Doors and Elevators
Doors – Most public buildings are equipped with at least one
automated door at an accessible entrance; whenever possible use
this door option. Ensure that all garments, pocketbooks, packaged
or scooter accessories do not become caught in doors.
Never use the scooter on stairs or escalators.
Elevators
Entering – Wait until the elevator doors are completely open.
Watch for pedestrians, driving forward, slowly enter the elevator.
Exiting – wait until the doors are completely open, before slowly
reversing off the elevator. Use your mirrors to ensure no pedestrians
are behind you before and while reversing.
ELECTROMAGNETIC INTERFERENCE AND WARNING
There are some concerns about electromagnetic interference to
powered wheelchairs and scooters. You need to know what EMI
(Electromagnetic Interference) is and how to prevent such incidents.
The following paragraphs suggested by the FDA are intended to
provide you with some important information about this.
CAUTION: IT IS VERY IMPORTANT THAT YOU READ THIS
INFORMATION REGARDING THE POSSIBLE EFFECTS OF
ELECTROMAGNETIC INTERFERENCE ON YOUR MOTORIZED
PERSONAL MOBILITY SCOOTER.
Electromagnetic Interference (EMI) From Radio Wave Sources
Motorized scooters may be susceptible to electromagnetic
interference (EMI), which is interfering electromagnetic energy (EM)
18emitted from sources such as radio stations, TV stations, amateur
radio (HAM) transmitters, two-way radios, and cellular phones. The
interference (from radio wave sources) can cause the motorized
scooter to release its brakes, move by itself, or move in unintended
directions. It can also permanently damage the motorized scooter
control system. The intensity of the interfering EM energy can be
measured in volts per meter (v/m). Each motorized scooter can
resist EMI up to certain intensity. This is called its “immunity level.”
The higher the immunity level the greater the protection. At this
time, current technology is capable of achieving at least a 20-v/m
immunity level, which would provide useful protection from the
more common sources of radiated EMI. The immunity level of this
powered scooter as shipped, with no further modification, is not
known.
There are ample sources of relatively intense electromagnetic fields
in the everyday environment. Some of these sources are obvious
and easy to avoid. Others are not apparent and exposure is
unavoidable. However, we believe that by following the warnings
listed below, your risk to EMI will be minimized.
The sources of radiated EMI can be broadly classified into three
types:
1) Hand-held portable transceivers (transmitters-receivers) with the
antenna mounted directly on the transmitting unit. Examples
include: citizens band (CB) radios, “walkie talkie,” security, fire
and police transceivers, cellular telephones, and other personal
communication devices.
Note: Some cellular telephones and similar devices transmit
signals while they are ON, even when not being used.
192) Medium-range mobile transceivers such as those used in police
cars, fire trucks, ambulances, and taxis. These usually have the
antenna mounted on the outside of the vehicle.
3) Long-range transmitters and transceivers such as commercial
broadcast transmitters (radio and TV broadcast antenna towers)
and amateur (HAM) radios.
Other types of hand-held devices such as cordless phones,
laptop computers, AM/FM radios, TV sets, CD players, and
cassette players, and small appliances, such as electric shavers
and hair dryers, so far as we know, are not likely to cause EMI
problems to your motorized scooter.
Powered Scooter Electromagnetic Interference (EMI)
Because EM energy rapidly becomes more intense as one moves
closer to the transmitting antenna (source), the EM fields from hand-
held radio wave sources (transceivers) are of special concern. It is
possible to unintentionally bring high levels of EM energy very close
to the powered scooter’s control system while using these devices.
This can effect powered scooter movement and braking. Therefore,
the warnings listed below are recommended to prevent possible
interference with the control system of the motorized scooter.
20WARNINGS Electromagnetic interference (EMI) from sources such as radio and TV stations, amateur radio (HAM) transmitters, two-way radios, and cellular phones can effect powered scooter and motorized scooters. Following the warnings listed below should reduce the chance of unintended brake release or powered scooter movement, which could result in serious injury • Do not operate hand-held transceivers (transmitters-receivers) such as citizens band (CB) radios or turn ON personal communication devices, such as cellular phones, while the powered scooter is turned ON • Be aware of nearby transmitters, such as radio or TV stations, and try to avoid coming close to them • If unintended movement or brake release occurs, turn the powered scooter OFF as soon as it is safe • Be aware that adding accessories or components, or modifying the powered scooter, may make it more susceptible to EMI (Note: There is no easy way to evaluate their effect on the overall immunity of the motorized scooter) • Report all incidents of unintended movement or brake release of the motorized scooter to the manufacturer and NOTE whether there is a source of EMI nearby • 20 volts per meter (v/m) is generally an achievable and useful immunity level against EMI (The higher the level, the greater the protection) 21
PARTS INTRODUCTION

                                        1.  Control panel
  11                                    2.  Rearview mirrors
                                2       3.  Basket with cover
                    1                   4.  Tiller
                                        5.  Head lights
  10                                    6.  Front bumpers
                                        7.  Rear and front wheels
       9   12               3           8.  Side reflectors
                                        9.  Seat sliding lever
                    8
                                        10. Arm rest
                            4
                                        11. Captains chair
  7
                                    5       with head
                                        12. Seat rotation lever
                        6

                7

                                                                    22
OPERATION
Control Panel 4
1. Horn 9
2. Lights
3. Directionals 5
4. Battery meter console
8
5. Electronic speed
10
control dial
6. Speed control lever 7 6
(forward)
7. Speed control lever 3 2
(reverse)
1
8. Power switch
9. Charger receptacle
10. Electronic speed control switch
Remove the protective plastic film covering the battery
indicator.
Power Switch
1. To turn the power on, place the key into the ignition.
2. Turn the key clockwise to ON. The battery indicator should light-
up (make sure the batteries are fully charged).
3. Turn the key counterclockwise to OFF to switch the power–off.
4. The Trekker Scooter is equipped with an automatic shut–off
which will automatically shut the scooter off when it is not in use
for 20 minutes or more.
23Speed Control Dial
1. The ‘L’ indicates the slowest speed and the ‘H’ the fastest speed.
2. Turn the speed control knob clockwise (towards the ‘H’) for faster
speeds.
3. Turn the speed control knob counterclockwise (towards the ‘L’) for
slower speeds.
Moving and Braking
1. Lightly pull on the right-handed speed control lever (green), with
your right index and forefinger to move the scooter forwards.
2. Lightly pull the left-handed speed control lever (red), with your left
index and forefinger to move the scooter backwards - the reverse
warning horn will automatically sound.
3. To brake, release the speed control levers and the scooter will
quickly slow down and activate the electromagnetic brakes
automatically, bringing the scooter to a stop.
Horn
Press the horn button to sound the horn and release to disengage.
24Lights Toggle switch is marked, (I O) press the switch to I – to turn ON and O – to turn OFF. Directionals 1. To signal LEFT press the switch into the upward position (–). 2. To signal RIGHT press the switch into the downward position (=). 3. Neutral position is located in the center (O). The warning horn will automatically sound when directionals are engaged. 25
Electronic Speed Control Switch
The Trekker Scooter is equipped with an electronic speed control
switch that allows the user to power down the scooter.
1. The speed control switch is located on the left side of the control
   panel.
2. To operate at normal speeds push the switch to ‘H’.
3. To reduce speeds push switch to ‘L’ this will reduce the speeds
   that are achievable on the scooter by 20%.

Rear Section
Manual Freewheel Lever

                                                             Free-wheel
                                                             lever

The manual freewheel lever (located at the back of the scooter- see
image) allows the user to push the scooter short distances. When
the scooter is in freewheel mode the brake and drive systems are
disengaged.

      Remove the key from the ignition to ensure the scooter is OFF,
      before placing the scooter into freewheel mode
      Ensure the scooter is not on any incline, the surface must be
      completely flat
      Never sit on the scooter when it is in freewheel mode

                                                                    26
Never stand in-front or behind the scooter when placing the
scooter in freewheel mode, stand to the side
Make sure all garments, packages or other obstacles are
clear of the scooter to prevent injury
Always return the manual freewheel to the closed position
when task is completed
1. Standing on the side of the scooter, locate the freewheel lever
at the rear, right hand side of the scooter, just below the right
directional (see image).
2. Pull up on the lever to move it to its ‘Open’ position – the drive
and braking system are now disabled.
3. Standing at the side of the scooter, push the scooter into the
desired position.
4. When the user has finished moving the scooter, standing to the
side of the scooter, push the lever in a downward position to
‘Closed’, taking the scooter out of the freewheeled mode.
Anti-Tip Wheels
The anti-tip wheels are located at the rear of the scooter, they
are an important safety feature of the scooter.
PROHIBITED – never remove or modify the anti-tip wheels, removal
of the wheels or modification to the frame will result in voiding of
the Trekker Scooter warranty.
27Battery
Battery Charging
To ensure the best performance and maximum battery life, we
recommend frequent battery charging. Your scooter comes with
an external battery charger for your ease and convenience. The
console battery display makes charging simple and easy.
Battery Meter Console
When the key is inserted into the ignition and turned ON, the meter
will display approximate battery strength: red only = low battery
charge (battery low immediate charge needed), red/yellow =
moderate battery life (battery needs to be charged), red/yellow/
green = full battery charge (no charge needed).
Remove the protective plastic film covering the battery
indicator.
Charging the Battery
The off-board battery charger when plugged into the charger
receptacle, located on the side of the tiller console, charges the
scooter.
28
The charger supplied with the scooter charges the batteries based on
the amount of charge present in the batteries (trickle charge) or the
amount discharged by the batteries. When the battery charge is low,
the charger works harder, by sending more electrical current to the
batteries. When the batteries are fully charged the current sent by the
charger is almost zero amperage, in this manner it is very difficult to
over-charge the batteries. Ideally the scooter should be plugged in at
night before going to bed and disconnected in the morning.
Charge the scooter batteries 6–12 hours prior to using it for
the first time
We do not recommend charging the batteries for more than
24 consecutive hours
Charging the Battery
Step 1 - In a dry area, turn OFF the ignition and remove the key
Step 2 - Insert the plug into the charger socket located on the left
side of the steering column
Step 3 - Insert charger extension cord into a wall outlet
Step 4 - Charge the battery for 6-12 hours, depending on the usage
Step 5 - Disconnect the charger extension cord
29Step 6 - Insert the key into tiller and check that a full battery charge
has been achieved red/yellow/green = full battery charge.
If the far right, green light bar is flashing, remove the key
and reconnect the charger and continue to charge the
battery
We do not recommend you use any battery charger other
than the one supplied with the scooter
Battery Care
The batteries in the scooter are best kept fully charged, this
will prolong the life of the batteries and ensure reliable
performance. Batteries that are regularly and deeply discharged,
infrequently charged, stored in extreme temperatures or stored
without being fully charged, may result in permanent damage,
unreliability and a limited life span.
• If the scooter is used on a daily basis charge the battery after
use. Recommended 6-12 hours of charging
• If the scooter is used infrequently (once a week or less), charge
the batteries once a week for 8-12 hours
• If the scooter will be unattended for greater than 6 weeks, we
recommend you contact a BIOS Service Technician to disconnect
the batteries from the scooter
• Keep the scooter batteries fully charged
• Avoid running on empty or deeply discharging the scooter
batteries
• Protect the batteries from extreme heat or cold
• Batteries must always sit flat within the battery wells
30Changing Batteries
Batteries contain lead and lead compounds, when handling
batteries and accessories, wear gloves and goggles.
Contact an authorized Thermor service centre representative, to
service or replace batteries.
• Always change both batteries, never mix old batteries with
newer ones
• Always use batteries that are the exact same type, size,
chemistry and amp hours (Ah)
• Never replace the batteries while a rider is on the scooter
• Damaged or cracked batteries should be covered/with a
plastic bag and disposed of – contact your local waste disposal
authority for correct disposal methods in your area
• Keep the batteries and charger away from open flames or sparks
and any source of ignition
• Always have good ventilation when changing batteries
• Keep children away from batteries at all times and when they
are being charged
The components of the scooter can be awkward, heavy and
difficult to remove, it is best to have assistance during the
changing of the batteries or contact an authorized Thermor service
centre representative.
Step 1. Ensure that the scooter is not being charged, the tiller is
in the most upright position and the wheels are facing
forward.
Step 2. Remove the seat (see seat removal)
Step 3. Remove the rear shroud
Step 4. Disconnect the battery cables from their terminals
Step 5. Remove the old batteries from their battery wells – set
aside
31Step 6. Place the new batteries into the battery wells, with the
terminals facing towards the front of the scooter
Step 7. Connect the red cable to the positive (+) battery terminal
(red to red).
Step 8. Connect the black cable to the negative (-) battery terminal
(black to black).
Step 9. Reconnect and tighten all screws that hold the battery
terminals.
Step 10. Ensure that the battery terminal boots are covering the
battery terminals.
Step 11. Secure the Velcro® tie downs over battery and securely
attach to the scooter frame.
Step 12. Reinstall the rear shroud and seat.
Seat and Tiller Adjustments
Ensure the scooter is on a level surface
Do not make adjustments while the scooter is moving
After making adjustments ensure all locks, levers and nuts
are tight and in the locked position
32Seat Removal
The scooter’s parts can be heavy and difficult to maneuver, it is
always best to have assistance during the removal of the seat or
contact an authorized Thermor service center representative.
1. Ensure the tiller is in the most upright position.
2. Locate the seat rotation lever.
3. While gently pulling forward on the seat rotation lever, lift the
seat upwards.
Seat Rotation
The seat can be rotated left or right 90°.
1. Locate the seat rotation lever.
2. Push forward on the lever to disengage the seat.
3. Rotate the seat into the desired position.
4. Once the desired location has been achieved, release the lever.
5. Ensure the seat is locked in place.
Seat rotation
lever
Forward/Backwards Seat Adjustment
The seat can be repositioned forwards or backwards to change the
distance between the seat and the tiller.
33Seat Sliding Lever
1. Locate the seat sliding lever.
2. While pulling up on the lever, slide the seat forwards or
backwards into the desired position.
3. Release the lever when the seat is in desired position.
4. Ensure the seat locks in place – you will hear a click when the
seat has locked in place.
Seat sliding
lever
Armrest Adjustment
The armrest can be adjusted to change the width of the seat.
1. Locate the armrest adjustment knobs at the rear of the scooter.
2. To loosen the knobs turn the knobs counterclockwise.
3. Slide the armrest in or out to the desired position.
4. Tighten the knobs by turning them clockwise to lock into place.
5. Ensure the armrest is firmly locked in place.
The armrest can also be moved upwards and downwards to aid in
getting off or on the scooter.
Armrest
adjustment knob
34Back Adjustment
1. Locate the back rest lever.
2. Pull up on the lever to adjust the seat back.
3. When the desired position is achieved ensure that the lever
locks into place.
Tiller
Angle Adjustment
1. Locate the tiller lever.
2. Pull the lever outwards to disengage the tiller lock.
3. With the opposite hand move the tiller into position.
4. Ensure the tiller is locked by gently moving the tiller in a forward
and backwards motion, until it “locks” in place.
35CARE AND MAINTENANCE
To optimize the performance and longevity of the scooter, we
recommend that a Thermor authorized service representative
provide preventative maintenance on a regular basis. For an
authorized service representative please contact 1-866-320-1030.
Please see maintenance schedule, the scooter requires periodic
inspection and/or care and maintenance.
Cleaning
• Clean the scooter using a damp cloth and mild soap and/or dust
down the scooter once a week
• Avoid using harsh chemical or abrasive cleaners to clean the
fiberglass body, plastic parts or metal on the scooter
• Do not use vinyl conditioners on the scooters seat or wheels
• Do not use running water directly on the scooter – this could
result in damage to electrical components
• Use a damp cloth to clean upholstery – leaving the upholstery
exposed to the sun could result in sun damage of the upholstered
materials, this is considered normal wear and tear
Tires
Tire Inspection
• Scooters equipped with pneumatic tires; tires should be checked
weekly to ensure proper inflation pressures. Correct pressure will
prolong the life of the tires and ensure a safe smooth ride.
• Replace the tires when the depth of the tread is less than 0.5cm
(0.20”)
• Do not overinflate the tires, this could result in the tires bursting
or underinflate, which could result in loss of control
36• It is very important the psi/bar/kPa air pressure indicated on
each tire be maintained. Failure to do so could result in loss of
control and/or serious injuries
• Recommended tire pressures are: Front 250kPa and Rear 300kPa
Tire Replacement
See an authorized Thermor service center regarding
servicing and/or replacement of tires.
The Scooter is equipped with pneumatic tires; if a flat tire occurs
replace the tube.
INSPECTION AND MAINTENANCE SCHEDULE
9 Point Daily Checks
Item Inspection
Tiller • Check the motion
• Is there any looseness
• Does it turn smoothly
Speed Control Dial • Does it function
• Does it move easily
Speed Control Lever • Does it function
• Does the scooter move when
activated
• Does the scooter stop when
released
Motor • Any unusually loud noises
Battery Indicator • When the scooter is turned
ON does the indicator light up
• Check the battery charge, is
there enough power for the
trip
37Turn Signals • Do the turn signal lights work
Horn • Does the horn work
Tires • Check the tire pressure
• Are the tires damaged and/or
flat
• Is the tread depth more than
0.5cm (0.20”)
Other • Are there any oil or fluid leaks
BASIC TROUBLESHOOTING
The Trekker is equipped with diagnostic fault codes, which are
designed to help perform basic troubleshooting quickly and easily.
The scooter will display a diagnostic flash code in the event one of
the conditions listed below develops.
Fault Code Condition Solution
1 bar Battery charge is low Charge batteries as soon
as possible
2 bars Battery charge is low Change batteries
3 bars The scooter’s battery Unplug the charger and/
voltage is too high to or turn off the scooter
operate the scooter using the key, then turn the
or the charger is still scooter back on again If
connected to the off- travelling down a slope,
board charger port lower scooter speed to the
minimum setting
384 bars The freewheel Check the position of the
switch is activated switch or lever
or the manual brake
disengagement
mechanism is
operated
6 bars The S-drive is being This may be because
inhibited from driving. the battery charger is
Inhibit 2 is active connected or the seat is
not in the driving position.
See a Thermor authorized
service technician
7 bars A throttle fault is See a Thermor authorized
indicated service technician
8 bars A controller fault is Make sure that all
ind connections are secure.
See a Thermor authorized
service technician
9 bars Parking brake has See a Thermor authorized
bad connection service technician
10 bars An excessive voltage This is usually caused
had been applied to by a poor battery
the controller connection. Check the
battery connections. See a
Thermor authorized service
technician
39SPECIFICATIONS
PERFORMANCE DATA
Overall Length 51.38 (135.5 cm)
Overall Width 25.19” (64 cm)
Weight Capacity 158 kgs (350 lbs)
Max Speed Up to 7 km/h (4.35mph)
Turning Radius 1.48m (58”)
Ground Clearence 4”
Seat to Deck 18”
Seat to Ground 30”
Battery Charger Off–board, 5A
Range per Charge 40–48 Km (25–30 miles)
Batteries (2 Required) 33 AH
Total Battery Weight 28 kgs
Braking System Electric Regenerative Braking
Tires
Front Tire 10” x 3.3” Pneumatic
Rear Tire 10” x 3.3” Pneumatic
Seat Size (L X W X H) 18.89” x 19” x 30.7”
Heaviest Piece when Main Body
Disassembled 77 kg (169.40lbs)
40TREKKER SCOOTER WARRANTY 2 YEAR LIMITED WARRANTY Two (2) year LIMITED Warranty. Two years from date of purchase, Thermor will repair or replace at our option to the original purchaser free of charge any of the following parts found upon examination by an authorized rep of Thermor to be defective in material and or workmanship 2 Year limited warranty, including: • Main Frame • Seat Post • Fork • Tiller Frame 1 Year Limited warranty, including: For One (1) year from date of purchase, Thermor will repair or replace at our option to the original purchaser free of charge any of the following parts found upon examination by an authorized rep of Thermor to be defective in material and or workmanship • Transaxle • Motor Brake (electronic function only) • Brake • Rubber Components • Plastic Component’s except body • Electronic Controllers • Chargers • Harnesses • Any other electrical subassembly 41
90 Day Warranty
The battery is covered by a separate 90 day warranty, provided by the battery
manufacturer. Thermor and its associate companies are not the warrantor of the
batteries.

Note: Gradual deterioration in performance because the battery has been left in a
discharged state, left in cold conditions for an extended period of time, or worn out
through heavy use is not covered.

WARRANTY EXCLUSIONS

This warranty does not extend to those items which may require replacement due to
normal wear and tear.
• Plastic shrouds
• Motor brushes
• Upholstery and seating
• Brake Pads
• Tires and tubes
• Bearings
• Fuses/Bulbs
• Circumstances beyond the control of Thermor
• Labour, service calls, shipping, and other charges incurred for repair of the
  scooter, unless specifically authorized in advance by Thermor
• Repairs and/or modifications made to any part without specific consent from
  Thermor

Exclusions also include components with damage caused by:
• Contamination
• Abuse, misuse, accident, or negligence
• Battery fluid spillage or leakage
• Commercial use, or use other than normal
• Improper operations, maintenance or storage
                                                                                  42
• Products modified without Thermor’s express written consent including but not
limited to modifications through the use of unauthorized parts or attachments
• Change in operating noise, relative to the motors and gear boxes does not
constitute a failure (All such devices will exhibit a change in operating noises
due to aging)
Service Checks and Warranty Service:
Warranty service must be performed by an authorized Thermor dealer. Please contact
Thermor for an authorized Thermor dealer in your area and / or information.
All transportation costs and shipping damage incurred while submitting parts for
repair or replacement are the responsibility of the purchaser.
Thermor will not accept return of faulty parts without prior written authorization.
Thermor’s sole obligation and the user’s exclusive remedy under this warranty shall be
limited to such repair and/or replacement.
Please contact Thermor for information.
In the event the user/purchaser does not receive satisfactory warranty service, please
write or email directly to Thermor at the address located below. Provide Dealers name,
address and date of purchase; indicate the nature of the defect and the Scooter serial
number.
16975 Leslie Street Newmarket, ON L3Y 9A1 • toll free 1800-387-8520 •
PHONE: 905.952.3730 • FAX: 905.952.3731 • www.BIOSmedical.com
www.BIOSmedical.com
TH3748_061113
43BUYER’S REGISTRATION FORM
Mobility Scooter
NOTICE: COMPLETE THIS FORM AT TIME OF SALE TO REGISTER
WARRANTY.
Customer Name:____________________________________________
Address:___________________________________________________
City:__________________ Province:____________________________
Postal Code/ZIP: ______________
Telephone:_______________ Date of Purchase:__________________
Selling Dealer: _____________________________________________
Dealer Address: ____________________________________________
City: __________________ Province/State:_______________________
Dealer Phone: ___________________ Fax:_______________________
Model 80001
Serial Number:__________________ Colour:____________________
(Located on the Rear Frame)
44You can also read