Program Manual AppleIIGS Gazelle
←
→
Page content transcription
If your browser does not render page correctly, please read the page content below
Apple® IIGS           Gazelle
              Program Manual
Notes on the Freeware Edition
Gazelle was my second commercial telecommunications program, and was my first venture
into ProDOS for telecoms. My first program, Data Highway™ was written for DOS 3.3.
Gazelle was originally sold by Bidmuthin Technologies in the UK, and then by Kolour
Software, also in the UK. It has languished on my archive shelf for many years, but with the
recent increased interest in hacking the Apple II, especially getting it onto the Internet, I felt it
was time to dust off the patina of ages, and to now offer Gazelle as Freeware to everyone.
Gazelle has been resurrected from my archives, and has not been run in anger by me for
around 25 years, so it is offered “as is”. Any bugs in it I'm afraid will have to stay there, but
hopefully some of you might find it useful for one purpose or another.
Gazelle and its supporting documentation may not be printed,
copied, or distributed for profit.
Distributing and/or archiving is restricted while in an electronic form.
Any “free” distribution must be given permission by Ewen Wannop
in advance -- please contact via email by sending mail to:
spectrumdaddy@speccie.co.uk
There is no guarantee that the right to redistribute this material
will be granted. The contents of this document may not be
reprinted in part or in whole.
Ewen Wannop - 2015
Appleª is the trademark of Apple Computer Inc.
Hayesª is a trademark of Hayes Microcomputer Products Inc.
ProDOS © Apple, 1983
The Gazelle © Ewen Wannop, 1987
Disclaimer of Warranty:
APPLE COMPUTER (UK) Ltd MAKES NO WARRANTIES, EITHER EXPRESSED OR IMPLIED,
REGARDING THE ENCLOSED COMPUTER SOFTWARE PACKAGE, ITS MERCHANTABILITY OR
ITS FITNESS FOR ANY PARTICULAR PURPOSE.
Copyright Notice:
This manual is © Copyrighted. All rights are reserved. It may not be copied, photocopied, reproduced
or translated to any other medium.
We reserve the right to alter the specifications of the product described in this manual at any time and
without prior notice.
2Gazelle Welcome to Gazelle What Is Gazelle ? Gazelle, is an integrated communications program running under the ProDOS disk operating system for the Apple //e and //c and IIGS computers. When used in conjunction with a suitable serial interface and modem, it will allow you to use your Apple computer as a general ASCII Communications or Viewdata Terminal. Gazelle permits the online display of Viewdata frames in high-quality colour if you have a IIGS and an analog RGB monitor. Viewdata frames can be displayed offline in colour with a //e or //c double Hi-Res colour display. They may also be viewed offline in colour on the //e by using a Keyzone Spectragram colour card and RGB monitor. Using Gazelle, subscribers will be able to make full use of Prestel and Telecom Gold. It also enables the use of other Viewdata systems, bulletin boards and public data networks and systems which utilise the DEC VT100 standard. Gazelle's user-to-user communication capability is exceptional, and the user friendliness of the program is unrivalled. Gazelle supports transmission of file transfers either by spooling, Xon/Xoff flow control or by Xmodem protocol. It also has a large storage buffer to capture and preserve incoming and outgoing data. There are a host of features which may be configured to individual user requirements. The configuration of the program is saved to a disk file and is restored the next time the program is run. Gazelle fully supports Hayes protocol modems such as the Pace Linnet or Series Four modems, and offers a powerful and extensive Macro system which can auto-control many of the repetitive functions that are required in modern communications. Gazelle has a powerful Viewdata frame editor and display system. This will allow the editing and display in full colour of Viewdata frames on a suitable television or monitor. Frames may be prepared and shown by a carousel option e.g. for Point of Sale display. Frames may also be prepared offline by Information Providers for later transmission to a viewdata system. Welcome 3
Contents

Table Of Contents

Introduction !                                                      !    Quickspool !                   25
                                                                    !    Printer !                      26
!       ❍!   Freeware Notes !                         2             !    Imagewriter !                  26
!       !    What is Gazelle ? !                      3             !    AppleWorks !                   26
!       !    How to use the Manual !                  6
!       !    Notation !                               6   !        ❍!    File Menu !                    27
!       !    Introduction to communications !         7   !        !     Directory !                    27
!       !    System Requirements !                    7             !    Prefix !                       27
                                                                    !    Volumes !                      28
!       ❍!   Getting Started !                        9             !    Wipe File !                    28
!       !    First Configuration !                    9             !    Newname !                      28
!       !    Getting the Program up and running !     9             !    Lock-Unlock !                  28
!       !    If the worst happens !                  10             !    Make Direct !                  29
!       !    Using the Program !                     10             !    Send File !                    29
                                                                    !    Receive !                      31
    !   ❍!   Going Online !                          12             !    Xmodem !                       32
!       !    Dialling with manual dial modems !      12
!       !    Dialling with Hayes protocol modems !   12   !        ❍!     Config Menu !                 33
!       !    If things do not work as expected !     13   !        !      Archive !                     33
                                                                    !     Install !                     33
    !   ❍!   The ProDOS Operating System !           14       !    !      Colour Cards!                 35
                                                              !          !Printersetup !                35
                                                                    !     Speed !                       37
Terminal Program !                                   16             !     Word Format !                 37
                                                                    !     Duplex !                      38
!       ❍!   Options Menu !                          16             !     Echo !                        38
!       !    Timer !                                 16             !     LineFeeds !                   39
!       !    Set Date !                              16             !     Use Bny II !                  39
!       !    White Text !                            17             !     Xon/Xoff !                    40
!       !    Editor !                                17
!       !    Get Macro !                             17   !         ❍!   Help Menu !                    40
!       !    Macro Edit !                            18           ! !    The Help file system !         40
!       !    Dial !                                  19
!       !    Ringoff !                               19
!       !    Line VT100 !                            20   Viewdata Editor !                             41
!       !    Viewdata !                              20
!       !    Quit !                                  21   !        The Structure of Viewdata Frames !   41
!                                                         !        The Editing Commands !               42
!       ❍!   Buffer Menu !                           22   !        The Attribute Commands !             42
!       !    Wipe !                                  22
!       !    Save !                                  23   !        ❍!    Options Menu !                 43
!       !    Load !                                  23   !        !     Edit Frame !                   43
!       !    View !                                  23   !        !     Save Frame !                   43
         !   Dump Frame !                            24   !        !     Dump Frame !                   24
         !   Enable !                                25   !        !     Grab Frame !                   43

Table of Contents                                                                                       4
! ! Transfer ! 43 ! ! Wipe File ! 28
! ! Labels ! 44 ! ! Newname ! 28
! ! Quit ! 21 ! ! Lock-Unlock ! 28
! ! Make Direct ! 29
! ❍! Choices Menu ! 44 ! ! Appleworks ! 26
! ! Load Buffer ! 44 ! ! Set Date ! 16
! ! View Buffer ! 23
! ! Mono Text ! 44 ! ❍! Help Menu ! 40
! ! Kolour ! 45
! ! Quickspool ! 45
! ! Printer ! 26 ! Appendix A
! ! Imagewrter ! 26 ! ! Preparing Gazelle for other devices ! 56
! ! Display ! 46
! ! Rotate ! 46
! Appendix B
! ❍! File Menu ! 47 ! ! Trouble Shooting ! 57
! ! Directory ! 27
! ! Prefix ! 27
! ! Volumes ! 28 ! Appendix C
! ! Wipe File ! 28 ! ! An overview of Xmodem and Binary II ! 60
! ! Newname ! 28 ! ! Xmodem Transfer ! 60
! ! Lock-Unlock ! 28 ! ! Binary II Protocol ! 60
! ! Make Direct ! 29 ! ! ProDOS Xmodem ! 61
! ! Archive ! 33
! ! Printersetup ! 35
! ! Set Date ! 16 ! Appendix D
! ! The IIGS disc version ! 61
! ❍! Blanks Menu ! 47
! ! IP Frame ! 47
! ! Message Frames ! 48 ! Appendix E
! ! The Macro Command Tables ! 61
! ❍! Help Menu ! 40
! Appendix F
! ! Macro Tutorial ! 64
Copy Utilities Program ! 49 ! ! Macros Overview ! 64
! ! The Macro Table Structure ! 64
! ❍! Options Menu ! 49 ! ! Prestel.Macro ! 64
! ! Set Dos Slot ! 49 ! ! Gold.Macro ! 65
! ! Dos3.3 Copy ! 50 ! ! TABBS.Macro ! 66
! ! ProDOS Copy ! 50 ! ! Finally ! 67
! ! Exit Path ! 51 !
! ! X/Commands ! 51 ! Appendix G
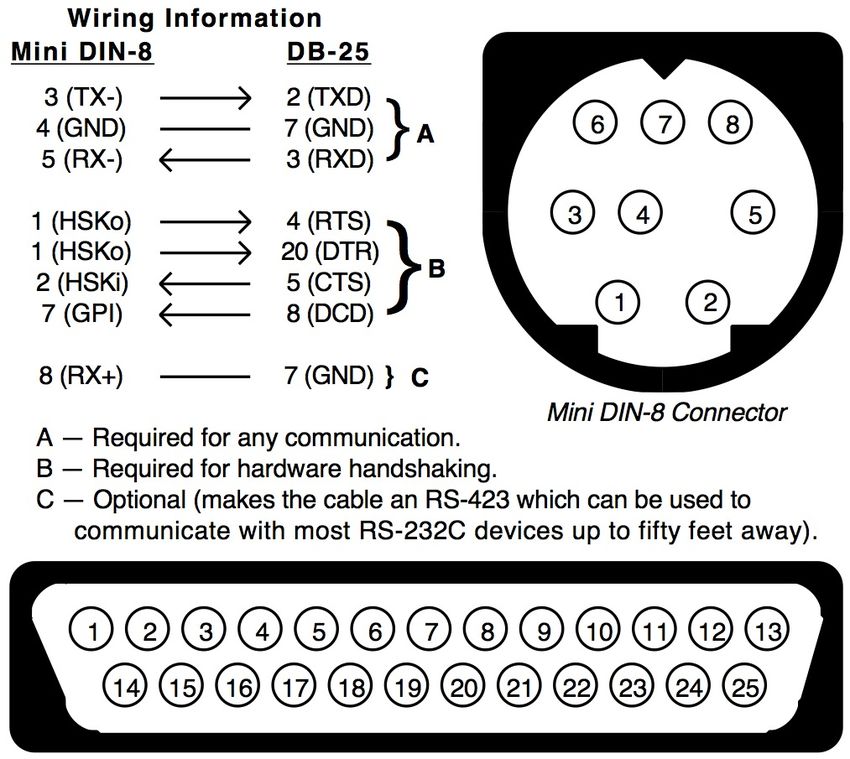
! ! RX Table ! 51 ! ! Modem Cable Wiring ! 68
! ! TX Table ! 52
! ! Alter Font ! 52 ! Appendix H
! ! Baud Control ! 52 ! ! Common Hayes Commands ! 69
! ! Quit ! 21
! Index ! ! 71
! ❍! Zap Menu ! 53
! ! Pack Bin II ! 53
! ! Unpack Bin II ! 53
! ! Alter File ! 54
! ! Strip Hibt ! 54
! ! L/F Strip ! 54
! ! CPM Strip ! 54
! ! View Strip ! 55
! ! Type Files! 55
! ❍! Files Menu ! 55
! ! Directory ! 27
! ! Prefix ! 27
! ! Volumes ! 28
Table of Contents 5Getting Started
Things You Need To Know
How To Use The Manual
All the commands within Gazelle are available with just one or two keystrokes, and each is fully
described in this manual under the appropriate chapter and subsection. Once these functions
have been mastered, this manual will serve as a useful Reference Guide.
The reference section of the manual follows chapters and subsections which correspond to the
main menu windows.
The manual begins with a general introduction to installing and using the program and then leads
to communications protocols, the initial setting-up and configuration of Gazelle for your particular
computer and Serial Card combination.
At the end of many of the individual command descriptions, you will find suggestion boxes. These
have been included to extend your understanding of the possible uses and of the power of the
program - and to increase your enjoyment of communications.
Notation!
Throughout this manual, the following abbreviations have been used to represent keys on the
Apple keyboard:
! ! = Carriage Return ! ! = Space Bar
! != Escape ! ! = Ctrl-Reset
! ! = Open Apple ! ! ! = Closed Apple
! != Delete Key ! ! ! = Backspace
! ! = Line Feed ! ! ! = Control
Control keys are represented by , where ‘n’ is the key to be pressed. The left and right
Carets should not be entered.
We may often refer to:
! 'Commands' - These are the choices within these windows.
'The Status Bar' - This is the top line of the screen which displays the status of the program, and
is seen whenever the 80-column display is active. The Status Bar is not displayed however, while
in Viewdata mode, or while in VT100 emulation.
Getting Started 6Reference
Introduction to Communications
The Gazelle Program includes:
❏ A general communications program
❏ A basic VT100 terminal emulator
❏ An optional display which emulates a Prestel or Viewdata terminal
A 'terminal' program is the means by which a microcomputer can be used as a terminal to another
computer. It provides the software interface that works in conjunction with the communications
hardware to allow meaningful communications to take place.
Gazelle reads and interprets incoming data from a Serial Port and generates the appropriate
information on your screen. This may consist of Prestel frames or Text.
Gazelle also accepts your input and commands from the keyboard and transmits them to the
remote system via the Serial Port. Other commands and 'housekeeping' functions are carried out
behind the scenes and take place without you being aware of them. The emphasis is always on
ease of use.
System Requirements
Gazelle is designed to run only on the Apple //e, //c and IIGS computers. The Gazelle archive is
supplied as four files, representing two versions of the program:
❏ Gazelle.po is a 5.25 inch ProDOS disk image, which will run on the //c, //e and IIGS, using a
serial communications card in one of the expansion slots. The files on the disk are also available
in the Gazelle5.25.SHK archive.
❏ Gazelle.2mg is a 3.5 inch Universal disk image designed to run on the IIGS only, using either
the internal serial ports or a communications card in an expansion slot. The files on the disk are
also available in the Gazelle3.5.SHK archive.
The manual applies equally to both versions of the program; differences are very slight and are
outlined where appropriate.
❏ The files from Gazelle5.25.SHK archive may be copied to a 3.5 inch disc, but will not offer
the functions of the IIGS version.
❏ See Appendix A for full details of how to copy the files.
❏ See Appendix D for the differences in the IIGS version.
Reference 7//e System
Gazelle requires a minimum of a 128K Apple //e. You will have 128K available if you have an
extended 80 column card in the auxiliary slot. Gazelle also requires a serial communications card
and one disk drive. Suitable Serial Cards are the Mastercard's from PACE, the Super Serial Card
from Apple, and the CCS7710 Serial Card from California Computer Systems. If you have a
Mouse Card in slot 4 you will be able to use the mouse functions and clock from within the
program.
//c System
You may use an Apple //c computer with or without a mouse.
IIgs System
You may use the IIGS with or without a mouse and with either the internal ports, or a suitable
serial card.
If you are using a TransWarp GS accelerator card, you should select the fast GS speed from the
TransWarp Control Panel and not the full TransWarp speed.
All Systems
❏ You must also have a suitable modem to connect to the telephone network. Suitable modems
are the Linnet or Series Four from PACE, or any Hayes compatible modem.
❏ On the //e, you may use a Keyzone Spectragram colour card for offline high quality colour
displays.
Finally, you may use any of the memory expansion Ram cards that follow the Apple memory
expansion standard. These are seen by ProDOS as /RAM drives which you may then use as
though they were normal disk volumes.
❏ It is recommended that you copy the Gazelle files to a hard disk or /RAM volume. This will
speed up both the operation and switching of the three programs.
You may use as many floppy disk drives or hard drives as you wish, provided that they are all
recognised by ProDOS 8.
❏ Issuing the Volumes command will show you the devices that ProDOS has seen and
recognised.
You should refer to the Installation section in the Configuration Menu chapter for full information
on setting up your Serial Card. This section also has comprehensive details on installing all the
hardware and software options of the program.
Reference 8Getting Started
First Configuration!
The full Gazelle archive consists of:
❏ This User Manual in PDF format.
❏ 5.25" inch and 3.5" inch .2mg Universal disk images.
❏ Gazelle is Freeware, and you are allowed to make copies for your own personal use.
[Suggestion]
If you only have one disk drive, you may wish to remove some of the files from your working copy
in order to make room for your own text files. Appendix A will tell you how to do this and which
files you should leave on the disk.
Getting the Program Up and Running
❏ Make sure that your Serial Card is correctly installed. You should refer both to the instructions
that came with your Serial Card and to the section on Installation
To boot the program, place the Gazelle disk in the boot drive and switch on. If you already have
your computer switched on, place the disk in the boot drive and press .
❏ On booting Gazelle for the first time, it may be necessary to configure the program for your
particular hardware configuration
Gazelle attempts to configure itself for your computer and Serial Card every time it boots. A //c
will always be recognised despite any previous archiving of the disc, and you will not need to re-
configure to use the program even if it was last used on a //e. Whether you need to make any
further changes, will depend to some extent on the status of the program when it was last
archived.
❏ As the program boots itself you will see a Hi-Res title screen displayed
To reach the Main Program, press the bar, and the program will automatically load and run
the main terminal program. When the title screen clears you will see the menu display. If the
window under the word ptions is displayed, and the Get Macro command is highlighted, you
need do no more to start using the program.
If however you see a window marked 'Card Installation', follow the screen prompts to install the
program for your particular combination of interface cards and hardware.
When you have finished entering all the details, you will be asked if you wish to Archive this
configuration. If you are sure you have entered the correct details, enter 'Y' and save the status of
the program to disk.
Getting Started 9If the Worst Happens . . .
Upon first booting the disc, you may see no title screen at all, but a message like this appears
instead:
** THE GAZELLE **
THIS PROGRAM NEEDS A //C, //E OR IIGS
NOT ALL SYSTEM FILES ARE PRESENT
OR A SYSTEM ERROR OCCURRED - RESTART
Here's What to Do . . .
❏ Check that you are using an extended 128K Apple //e
The program will NOT run on an Apple II+ or on a 64K Apple //e, or on an Apple //e that does not
have an 80-column card.
❏ If you are sure that you have the correct computer configuration, try switching off the computer
and waiting a few seconds before switching back on again and re-booting the disk.
If you still receive this error message, check that your working copy of the Gazelle disk has not
been damaged in any way.
❏ It is important that the Gazelle program has all its system files intact. Any missing or altered
files may cause an error as the disk is booted.
❏ If you have copied all the Gazelle files to a /RAM or hard disk, you must set the working prefix
to the subdirectory that contains these files before you launch the GAZELLE.SYSTEM program.
Do not launch from Basic as a full pathname, set the Prefix first to the target subdirectory.
[Suggestion] !
❏ The title screen will display itself for some seconds after the disk has fully booted, press
to go straight to the Get Macro window with the prompt selected
❏ As the key you press will be acted on when the menu is shown, you may jump to anywhere in
the menus by pressing the appropriate key. Any key other than the ditor or opy key will
run the main program
❏ Appendix A shows how to transfer the necessary system files so you will be able to use Gazelle
on a Ram card, 3.5 inch drive or hard disk drive
Using the Program!
Gazelle has been designed to be as simple and user-friendly as possible in use. In due course
you will become confident in using some of the new and powerful commands available to you with
Gazelle. These are all described in their appropriate section of the manual.
In the meantime to familiarise yourself with Gazelle, we suggest that you leave commands whose
operation you are now unfamiliar with, and follow only those that you already understand.
❏ If you are going to use a mouse on your //c, you must first tell Gazelle it is there. Click the
mouse button when you see the menu display. This is unnecessary on the //e and IIGS.
Moving round the menu windows can be done in a number of different ways. The simplest way is
to use the arrow keys or the mouse to move around the windows and highlight the different
commands.
Getting Started 10For speed, you can also use the initial letter of each command or window. First press the key that
corresponds to the first letter of the window you want, and then the first letter of the destination
command. For instance and will take you straight to the Directory command.
❏ When you have selected a command, it can either be executed with the key.
❏ or by clicking the mouse button once.
The operative state of some commands can be toggled with the key. For instance the
Viewdata command in the ptions window will change its flag status from 'N' to 'Y' when
is pressed.
Other commands will simply be selected for further action by pressing , and some further
input will be needed to make them work. The Directory command in the ile window for
instance, will ask for the name of the volume you wish to display, before continuing with the
command.
❏ Two screens may be displayed during use - the online Screen and the Menu Screen.
The online Screen is reached by pressing the key to clear the menu screen and go 'online'
The key is a 'magic' key that allows you to abort or return from commands and also takes
you back and forth from the online Screen to the Menu Screen.
Use as often as you like, and when in doubt do not hesitate to use it - or a double-click of
the mouse instead.
Using the key you will see that the online display is always restored as you last left it, with
your cursor at its last position on that screen.
While the Menu Screen is active, any keys you may press will either cause a command to be
executed, or else they will be ignored. When you are online, these key presses will be sent out to
the modem and from there to the host computer.
From the online Screen, with a suitable modem connected, you will be in a position to dial up a
database or bulletin board. You may start to use the program in earnest!
Gazelle is configured at the factory with settings for 300 baud and 8+N+1 data bits which allow
you to connect to many bulletin boards, data bases or Telecom Gold. Full descriptions and
meanings of these settings are given later in the Speed and Word Format sections.
There are lists of telephone numbers in computer magazines. These will generally be for Bulletin
Boards or other services. To access Telecom Gold or Prestel, you will need to become a
subscriber to these services.
Try out the sample macros, PRESTEL.MACRO, GOLD.MACRO and TABBS.MACRO. They will
automatically log on to the appropriate system if you have a Hayes compatible modem
connected. Examine the macros and refer to Appendix F to see how they were constructed.
[Suggestion] !
If you are using a mouse, a single click will give a and a double-click will give an .
This will always be the case except when you are at the menu screen and you have a command
highlighted. A double- click will then give you the appropriate Help screen. Also by moving the
mouse, you will have the same effect as using the cursor keys, to help you move round the menu
windows.
[Suggestion]
If things 'hang' try pressing to clear the problem. You will lose no data, and will be left
exactly where you were, hopefully with the problem now cleared.
Getting Started 11Going Online
Dialing a database - Manual dial modems
❏ Go to the online mode by using the key. Once actively online you are ready to dial up a
database.
❏ Make sure that the speed of the program matches that of your modem. Gazelle's default speed
is 300 baud.
Set the modem to the correct speed as advised in its operating manual.
❏ Dial the service you require.
When you hear a tone from the host computer, put your modem online by pressing the connect
button.
❏ As soon as the connect or carrier detect light is steadily lit place the phone back on its hook.
You will now be connected to the host computer. In most cases this will mean that you will see
words or system messages streaming on to the screen.
If this happens, you are successfully connected to and talking with another computer.
❏ If not, go to the next main section to see what to do next.
❏ Once online every key you press will be transmitted to the host system and each incoming
character will be displayed on the screen.
This dialogue is all that you will normally need to use to interactively work with most host systems.
If you need to preserve any of the incoming data, refer to the various sections on spooling or file
transfer.
If you need to clear the screen at any time, use the key.
❏ To return to the menu screen use the key.
Dialing a Database - Hayes protocol Modems
Hayes protocol modems are intelligent modems containing microprocessors. They are small self-
contained computers, and you control them by means of a series of standard commands.
You may either dial using the Dial command or by sending commands directly to your modem.
❏ Using the Dial command, simply enter the telephone number of the host computer and press
. Gazelle will control the modem and try and connect you. If you are successful you will be
taken to the online screen.
If you see words or system messages streaming on to the screen, you are now successfully
connected to another computer.
❏ If you were not connected an error message may be given by your modem.
❏ To manually dial with a Hayes protocol modem, you must first go to the online mode by using
the key.
Going Online Page 12❏ Once actively online you are ready to dial up a database.
❏ Get the attention of the modem by sending it AT- you should see the 'AT' echoed back to
your screen and an OK appear on the line below.
If this does not happen, try sending an ATZ command to reset the modem. Alternatively,
reset the modem by its switch or turn it off for a few seconds.
If you still get no response, either refer to your modem installation manual, or jump to the next
section.
❏ With the OK command successfully displayed, send the number you require with the ATD
command like this:
ATD01234567
❏ After a pause to let the modem dial out the number you should now be connected to the ho
,àst computer. You may see a Carrier Detect light come on and a CONNECT' or 'OK' message
returned to your screen. If all is well you should then see words or system messages arriving on
the screen
If this happens, you are successfully connected to and talking with another computer.
If things do not turn out as expected
We hope that everything went according to plan and that you never reach this section ...
If all was well skip this section of the manual.
Once you have your system working smoothly, you should never need to come back here.
❏ However there are so many possible combinations of connections, cables and program states,
that something may not have gone quite right somewhere.
❏ It is important to look systematically for each possible error and eliminate them one by one.
❏ The source of the error is very often a simple oversight or incorrect connection - it is seldom a
true hardware or software fault that will require outside intervention to put right.
❏ Use the trouble-shooting section in Appendix B and check out all the possible error conditions
first. Only if this fails, should you ask for further help.
If an error has occurred, you will get familiarised through trouble-shooting with the way that each
item connects into the system.
It will help you use the system more efficiently, and will help you find the solution quickly to any
future problems that might arise.
❏ Now go to Appendix B and look at the symptoms one by one.
❏ Search carefully to see where the problem may lie, and correct it before trying the system out
once again.
Going Online Page 13The ProDOS Operating System
❏ If you are already conversant with ProDOS you may jump to the next section of this manual.
❏ Those unfamiliar with how ProDOS operates, or are used only to DOS 3.3, Pascal or CP/M,
should read the rest of this section.
ProDOS is Apple's disk operating system for use with its II series computers. ProDOS is a
powerful file management system, and can handle a number of disk and /RAM devices, or even
hard disk drives, at any one time.
Gazelle fully supports ProDOS, and uses it throughout for file management and interactive data
storage. Nearly all the features that are available with ProDOS are supported by Gazelle.
❏ The most notable exception and difference from DOS 3.3 is the ability to do disk formatting.
If you need to format a disk before you go online, use the Apple FILER program, or the format
option of a disk utility.
The key to successful use of ProDOS is to understand the file and volume name conventions
which make up its Hierarchical Filing System. Once these have been understood, you will be able
to easily follow the descriptions of the various disk management commands described in the
chapter on File commands.
Unlike previous disk operating systems for the Apple II computers, ProDOS refers to disk drives
or devices by volume name rather than slot or drive numbers. However to maintain some
continuity with DOS 3.3, Gazelle allows the use of slot and drive numbers with some commands.
Refer to the chapter on File commands for further details.
ProDOS naming starts with each disk having a unique name. As with all ProDOS names, this
name must be:
❏ A maximum of 15 characters in length.
❏ It must start with an alpha symbol.
❏ It can have only upper case letters.
❏ It must have no spaces and no commas.
❏ You may only add stops and numbers into the name.
ProDOS will reject any file names it does not like, and no harm will be done if an illegal name is
entered.
The disk or volume name is first defined when the disk is formatted, but may be changed later.
Do not name two discs with the same name or you may have serious problems if they both are
present while trying to write files.
Each file is also given a name, though this only needs to be unique within its own directory. This
name must follow the same conventions as the volume name and must be no more than 15
symbols long.
As far as ProDOS is concerned, file names can be referred to in two ways:
❏ By their name only.
❏ By the volume name and the file name together.
This combination of volume name and file name must also follow a particular convention.
The ProDOS Operating System Page 14Whenever you refer to a volume name, for ProDOS to know that it is a volume name, you must
place a backslash in front of the name like this:
/VOLUMENAME
A file name by itself is given like this:
FILENAME
A file name complete with its volume name is given like this:
/VOLUMENAME/FILENAME
A further backslash acts as a separator from the volume name and the file name.
A disk (or volume) maintains a list of all the files within that volume. This directory is present as
the volume directory on all discs or devices and is analogous to the CATALOG under DOS 3.3.
However this directory may also contain subdirectories that lead to further directory lists of files.
This extends the power of the ProDOS system.
These subdirectories themselves have names, and are referred to in the same way as volume
names. A file in a subdirectory would need to be referred to by its full list of directory names like
this:
/VOLUMENAME/SUBDIRECTORY1/SUBDIRECTORY2/FILENAME
This complete entry makes up a pathname that leads to a particular file. The complete pathname
can consist of any number of subdirectories, but the complete pathname must not be longer than
64 characters.
ProDOS maintains a current working default pathname or prefix at all times. This points to the
volume and any subdirectories that you are currently working with. You can change this default
prefix at any time. So to change the default prefix to the example given, you would need to enter
at the Prefix command the following:
/VOLUMENAME/SUBDIRECTORY1/SUBDIRECTORY2
From then on all files referred to by file name would be looked for in SUBDIRECTORY2.
You may refer to a file:
❏ By its name only, if it lies within the current default prefix.
❏ By its full pathname if it does not.
ProDOS will then look on all the active devices until it finds the correct path to that file.
ProDOS has error trapping and 'passes' on all errors that occur. Gazelle traps these errors, and
displays an error window with a suitable descriptive message. It is up to you to correct any errors
before continuing. Most errors will be self-descriptive, and if an unusual error occurs it will simply
be referred to by its ProDOS error number.
The ProDOS Operating System Page 15The Terminal Program
OPTIONS MENU ptions
TIMER
The Timer command is available if you have an active clock. The state of the Timer is toggled on
or off using the key. A clock will be active if you have a //c, a IIGS, a Mouse Card or a clock
card recognised by ProDOS.
Activating the timer starts a 24-hour elapsed time clock which is quite separate from the main
time display. The timer will return to zero every 24 hours, and when it is selected, replaces the
normal hours/minutes/seconds display while online or receiving files with Xmodem.
Elapsed time is recognised by the '+' symbol following the seconds display.
The timer can be zeroed at any time by:
❏ Pressing the '9' key from the menu screen
❏ Pressing and the '9' key while online
❏ From a macro using the '✽R' pair, this will also start the timer if it is not already active
[Suggestion]
Use the Timer function to keep a record of your long distance sessions.
SET DATE !
The Date and Time may be set on the Status Bar using the Set Date command. This command is
not used on the IIGS.
With the menu displayed on the main program or the Editor program, you may reach this
command by:
❏ Pressing , , or...
❏ By using cursor keys or the mouse.
❏ In the Copy program reach this command by:
❏ Pressing , , or...
❏ By using cursor keys or the mouse.
❏ Gazelle will then prompt you to enter the date in the form (DD/MMM/YY), e.g. 29.FEB.88
You may use any punctuation between the numbers. The month must be entered as letters. The
date will be checked to see that it is a valid one. If it is not correct you must enter it again.
❏ Next enter the time in the format (HH/MM).
❏ If you are using a //c or Mouse card, Gazelle will keep correct time after being set.
The displayed date and time will be written to disk when you archive the status of the program,
this date and time will be restored next time you boot the disk.
❏ If a clock card is found when you next boot the program, the time will be taken from that card
and not from the archived value on disk.
The Terminal Program Page 16WHITE TEXT !
On the IIGS the Set Date command is replaced by a WHITE TEXT command. This gives clearer
text from the Viewdata display on a monochrome screen connected to the IIgs.
EDITOR !
The Editor allows you to prepare messages for uploading. It is only an aid for message
preparation and lacks most of the sophisticated features of word-processors such as AppleWriter
ProDOS or AppleWorks.
❏ When the Editor is selected, a check is made to see if the buffer is empty.
If not you will be prompted 'Wipe Buffer (Y/N)?'
This offers the choice of retaining any data that may already be in the buffer or wiping it clean to
start afresh.
❏ You are next asked to Choose a line width to suit the destination system. If no width is entered,
Gazelle will use a default of 63 characters.
During text entry, the editor word-wraps to this line width as it operates to ensure that messages
are correctly formatted without word breaks on the destination screen.
❏ As you reach the end of each line, you are warned with a bell, and text will be word-wrapped.
The Editor automatically enters a at the end of each line to minimise the problems of
uploading to systems such as Telecom Gold.
❏ During entry only the current line may be edited. You may however use the forward key to copy
over any letters that are on the screen.
❏ The key will drag any text to the right of the cursor as it deletes to the left.
❏ All characters input will insert into the line if there is text to the right of the cursor. If the line
becomes too long, text will 'fall off' the end.
❏ The key leads to a screen prompt for the pathname to save your message on disk. The
message is still held in the main storage buffer.
Use the conventional /VOLUMENAME/FILENAME to save the message as a ProDOS file on disk.
GET MACRO !
Communications can be automated by using Macros.
❏ Activate the command with or a single mouse click
❏ If your macro is stored on the selected volume, simply type its file name, or for a macro on any
disc, type the:
/VOLUMENAME/FILENAME
The macro will be loaded and made active, and the macro will be run if the first element starts
with the command *! (See Macro Edit and Appendix E for further details)
A macro is simply a prepared file containing a string of commands which may be executed
automatically upon demand. A macro table consists of up to 8 macro elements, each of which
may contain one or more command pairs.
Many remote systems require the user to enter an identity string and password, or require a
complex logging on procedure such as that of connecting to Telecom Gold through a PSS PAD.
Or there may be repetitive commands to be entered to navigate your way around a database.
❏ From the Menu Screen simply press the number key (1-8) that refers to the particular macro
element you want to start.
The Terminal Program Page 17❏ From the online Screen press the key and while keeping it down, press the required
number key (1-8) and then release both keys.
❏ To stop a macro that may still be active, use the '0' key.
❏ Split up the various parts of a long macro sequence between the eight elements of a macro
table. If a macro then 'sticks', you can simply restart the appropriate element.
A macro named START.MACRO will be executed automatically on booting Gazelle.
Try the sample macros provided. See Appendix F for further details.
MACRO EDIT !
The Macro Editor allows you to prepare macro tables to be used immediately, or saved to disk for
later use. Macros are a powerful means of issuing command sequences which can control both
the host systems you may be connected with, and many of the functions of Gazelle itself.
The Macro Editor first offers you the macro in memory, or you may move straight to a fresh
screen. When you are finished entering a table, use the key to finish editing. You have the
choice to save the macro to disk and install it in memory for immediate use.
❏ To bypass saving the macro to disc, press for the option to install it in memory.
❏ If you do not install the macro table, and do not save the table to disc, it will be lost and you will
need to start all over again.
Use the cursor keys to move around the edit window and the key to remove unwanted
characters. Any keys typed will be inserted, pushing the following text to the right.
Be careful, as the line will fall off the end if it goes too far.
keys are displayed as their inverse equivalent.
❏ If you need to use the cursor keys or the key within a macro, press the key first.
If you need to use the key, press it twice.
Macros follow a precise syntax in order that they may work:
❏ Each individual command must start with an asterisk and is then followed by a command letter.
❏ This asterisk/letter 'pair' may then be followed by further command strings as required.
Refer to Appendix E to see descriptions of the individual command pairs.
An error in a macro element will stop the execution of the whole macro. Each line element may be
up to 63 characters long.
❏ Finish each line with an asterisk on its own, the rest of the line can then safely remain filled with
space.
❏ Remember to put in anyDIAL ! (Hayes Protocol modems only)
The Dial command (together with the Ringoff command) allows the full control of Hayes protocol
modems only.
You will be prompted to enter a number to dial, and the last number dialled since booting up
Gazelle will be displayed.
❏ Just press 'Y' if you want to dial it again.
❏ Any other key will prompt you again for a new number.
The telephone number you enter may include any letter or spacing sequences required by your
modem.
❏ If the first character of the number string is a 'P' or a 'T' signifying the type of dialing required,
this will be remembered and used the next time a dialing command is issued. The default is 'P' for
pulse dialing.
Dialing can take some time to execute, so be patient while the program gets the attention of the
modem.
❏ If the modem responds incorrectly to the dialing sequence, dialing will be aborted and a
message 'No response ..' will be given.
❏ If the modem responds correctly, you will be taken directly to the online screen and the timer
will also be zeroed.
❏ You can re-dial the same number if required by returning to the Dial command.
How Gazelle dials Hayes Modems:
❏ First an ATV1 is sent followed by
❏ the ATDP(T){number} command
❏ If the modem did not respond at first an ATQ is tried
❏ If there is still no response an escape sequence '+++' is sent before repeating the whole cycle
❏ If there is still no response the program gives up and aborts with an error message. Try
resetting the modem and check that the program is set to the correct baud rate
RINGOFF ! (Hayes Protocol modems only)
The Ringoff command, like the dialing command, will only control Hayes protocol modems.
❏ A escape sequence is sent to get attention of the modem.
❏ Then Gazelle attempts to hangup the line.
❏ Finally it restores various settings that may have been changed while dialing.
How Gazelle uses Ringoff:
❏ The Hayes escape sequence '+++' is first sent to the modem.
❏ This is followed by an ATH and ATV1 .
This sequence of commands should ensure that the modem will respond correctly to any further
commands you then send manually from the keyboard.
The Terminal Program Page 19LINE VT100 !
You may toggle the state of the Line VT100 flag with the key from Standard (N) to VT100
mode (Y).
Standard Mode (N)
Gazelle emulates a standard Datamedia terminal in its normal 80-column online screen. Data
prints at the bottom line of the screen display and scrolls off the top.
Gazelle normally strips any line feeds received immediately following sent to the screen do not contain a
linefeed. Direct cursor control allows the cursor to be positioned anywhere on the screen, and
there are some selective clear screen commands as well. Highlighted text is also supported.
As VT100 emulation requires the full screen for its display, the Status Bar is not updated in this
mode, and will eventually scroll or clear from the screen.
If you are in doubt as to which display to use, switch VT100 emulation off, and then only switch it
on if you have any problems with the subsequent display or with cursor control.
[Suggestion] !
If you require the VT100 'prefix' keys use a macro table to emulate them from software.
VIEWDATA !
You may toggle the state of the Viewdata flag with the key, flipping the online display
between Viewdata and Ascii.
Many Viewdata systems are now in use around the world. One such is Prestel which offers some
half a million pages of information. Many other private systems are also in use. The number is
growing rapidly as interest increases in the concept of interactive information gathering.
❏ Viewdata and ASCII systems construct their screen displays in different ways.
The normal ASCII method of displaying data on a screen involves scrolling data from the top of
the screen and fill the screen downwards. When the screen becomes filled, data is scrolled
upwards and new data is added at the bottom of the screen.
Viewdata displays are page or frame-based and no scrolling takes place, the cursor simply wraps
round to the top of the screen when it reaches the bottom.
Viewdata protocols also involve the use of graphics as well as ASCII text. In fact a complete
character set has been developed which is used to build frames in 'block' text and graphics, and
these are shown in the example file included on the Gazelle disk VIEWDATA.CODES. Load this
in and view it.
❏ Each line (within a frame of 24 lines by 40 columns) is built using normal ASCII characters and
control codes.
If any code is missing or corrupted the current line or even the whole screen may be affected.
This can sometimes occur when a bad or noisy phone line is used.
The Terminal Program Page 20Gazelle offers a powerful Viewdata emulation screen with few limitations (The flash command is
not enabled for example). If you have a IIGS colour screen, you will encounter no limitations to
the display. Except on the IIgs the online Viewdata display will be represented in black and white.
The readability of the Viewdata display will not be affected by this limitation.
Viewdata systems make extensive use of the '✽' and '#' symbols within their commands, so to
make your keying quicker while in the Viewdata screen display:
❏ The key is reconfigured to send the Viewdata '#'.
❏ The key will send '✽'.
❏ If you need to send a use the key.
❏ will reveal hidden data.
Some commands will either not work while in Viewdata mode, or will be changed in how they
work. These are explained under each individual command throughout this manual. Files cannot
be saved in AppleWorks format while the Viewdata mode has been selected. This has been done
so that attribute commands embedded within a Viewdata frame may be correctly preserved.
[Suggestion] !
To keep your phone costs to a minimum:
❏ Keep your buffer open while online, then...
❏ after you log off from a Viewdata system save the buffer and then...
❏ use the View Buffer command to page back and forth through as many as sixty Viewdata
frames that you may have captured
[Suggestion]
For quick and easy logons:
❏ Use your log-on macro to select the Viewdata display.
❏ Dial the correct number.
❏ Send your log-on sequence at the Ctrl-E prompt, and to finally re select the 80-column display
after you have logged off.
[Suggestion] !
If you wish to edit the text content of Viewdata frames with AppleWorks, first save to disk
normally, then use the 'View Strip' option in the Copy program to produce a cleaner ASCII text file,
and then load and re-save the buffer with the Viewdata flag off and the AppleWorks flag on.
[Suggestion] !
Switch off Xon/Xoff flow control to allow the Viewdata cursor command to work correctly.
QUIT !
You can leave the program in one of two ways, either by pressing to boot a
new disk or by leaving through the Gazelle Selector when you choose Quit.
The Selector menu gives various options:
❏ Running AppleWorks (or another program - see the Copy program).
❏ Running the main Terminal program.
❏ Running the Editor program.
❏ Running the Copy Utilities program.
❏ Leaving by the ProDOS exit routine.
The Terminal Program Page 21The Quit option runs a file on the Gazelle disk. If this file is not found, Gazelle will prompt you for
the Master Disk. If the file is still not found, the ProDOS exit routine will be selected instead.
You will be prompted to save the buffer if this contains data. Saying No will bypass and run the
Selector. Return to the Terminal program from the Selector if you select Quit by mistake. The
buffer is not lost as you pass from one Gazelle program to another.
❏ If you select the AppleWorks option, the Selector will search for the volume called:
'/APPLEWORKS' and the file 'APLWORKS.SYSTEM'
❏ Press to accept the current prefix or else enter a new prefix and enter the name of the
SYSTEM file to run.
BUFFER MENU uffer
❏ The easiest way of storing data is in the Capture Buffer.
Gazelle maintains various buffers, some of which are used for specific storage such as an active
macro table, others for general purpose use.
The Capture Buffer is used when you wish to keep a record of your 'online' sessions, preserving
both what you have sent to the host computer, and what the host computer has sent to your
screen.
A buffer is quite simply a piece of memory put aside for the storage of data, and can be of any
desired length. Gazelle has a Main Buffer 44K in length, and we shall refer to this buffer whenever
we talk about the Buffer commands. It lies in the extra 64K of Ram available in auxiliary memory.
The Status Bar will show the state of this buffer at all times. However the actual message seen
will depend on the current command being executed:
❏ Usually you will see how much is actually in the buffer.
❏ Sometimes such as when Viewing the buffer, you will see where you actually are positioned in
the buffer.
❏ Other times, such as when spooling to disc, you will see how large the spool file has become.
❏ If you are capturing a file using the Receive command, you will simply see a message to say
that the capture file is open.
❏ At the menu screen, you will always see the true state of the buffer displayed.
❏ The Buffer is preserved if you run the Editor or Copy programs, but beware of the Kolour flag. If
this is set the buffer will be truncated on entry to the Editor.
WIPE !
This command will allow you to completely wipe (or erase) the current contents of the buffer.
You will be asked to confirm that this is really what you wish to do:
! 'Wipe buffer (Y/N) ?'
❏ Answering 'Y' will cause Gazelle to proceed with the command.
❏ Answering 'N' or any other key, will leave the buffer intact.
Be careful because once Wiped, you cannot restore the contents of the buffer in any way. If the
buffer was empty before you entered this command, selecting the command will appear to have
no effect.
The Terminal Program Page 22SAVE !
You may save the contents of the buffer to disk at any time by using the Save command:
❏ You will be prompted for a filename. Enter a full pathname if required.
❏ On entering a valid name, the entire contents of the buffer will be saved to disc.
❏ On completion of this command, the contents of the buffer are left intact.
❏ You must Wipe the buffer after a Save if you wish to clear it out for fresh data.
The type of file saved will depend on the state of the 'Appleworks' flag at the time:
❏ Toggle AppleWorks to 'Y' to save as an AWP file.
❏ Toggle AppleWorks to 'N' to save as a TXT file.
If the copy buffer becomes full while online, you will be automatically prompted to either Save or
Wipe the contents. The buffer will be wiped automatically after a Save in this way. This speeds up
the process while you are online. As long as the sending computer responds to Xon/Xoff flow
control, you will not lose any data while this action takes place. The files are saved as a maximum
44k, this can be loaded into most word processors for later editing.
LOAD !
This command loads a Text or AppleWorks file to the buffer. This is usually done offline so that
you can View a file:
❏ You will be asked for the target file name.
❏ Enter the full pathname if necessary.
❏ If the file name was valid and the file exists, it will be loaded into the buffer.
❏ The status bar will show the size of the file that was loaded .
❏ If the file was an AppleWorks file, it will be correctly loaded into ASCII text format.
NOTE: The operation of loading the buffer will OVERWRITE the previous contents so that they
cannot be recovered.
If you need the current buffer contents, you must first save them to disk with the Save command
before proceeding to Load a new file.
[Suggestion] !
If you need to have a copy of an AppleWorks file in standard Text format:
❏ Simply Load to the buffer and then save again to disk with the 'AppleWorks' flag off.
You can of course in the same way prepare an AppleWorks file from a text file if you have the
'AppleWorks' flag on.
VIEW !
You may view the contents of the buffer at any time, even while you are online.
❏ A pointer is kept to your position in the buffer. Viewing always starts from this pointer and it can
be reset to the buffer start.
Viewing in 80-column display
Use the bar to start and stop scrolling of the display.
❏ The left cursor key will reduce scrolling speed.
The Terminal Program Page 23❏ The right cursor key will increase it.
❏ The up and down cursor keys will page you back and forth in the buffer, clearing the screen for
each new display.
❏ Use the key to return to the menu.
The Status Bar will show you the current position of the buffer pointer, and the actual size of the
data in the buffer.
If you have the Printer flag set, then the buffer will be sent directly to the printer, and you will not
be able to control the display.
Whether you see a display on the screen or not will depend on:
❏ Whether you have the Printer Echo flag set
❏ Whether the printer card also sends output to the screen
❏ Use the key to abort printing if you wish.
Viewing with the Viewdata display
The Viewdata display is shown one frame at a time.
You may page back and forth through the pages in the buffer using bar and the up and
down cursor keys:
❏ The bar will give you the next page.
❏ The down arrow key will jump forward a page.
❏ The up cursor key will take you back a page.
❏ Use the key to return to the menu.
While you are viewing a frame the 'R' key will reveal any concealed data.
❏ Press the key to dump a page to the printer. The printer must have been selected first
[Suggestion] !
If you are going to have an 'online' session with Prestel or a Viewdata system, keep the buffer
enabled.
❏ Once 'offline' you will then be able to page back and forth through the sixty or so pages you
have captured.
❏ Save the buffer to disk and then Load and View these pages later.
❏ If you wish to View these pages in colour from the editor program there are some limitations to
file length - see the section on the Viewdata Editor 'Load Buffer' on page 36 for full details.
DUMP FRAME !
The Dump Frame command will give a printout of the current display screen. The printer must
have been selected from the Install command for a dump to take place.
❏ Press offline or while online to dump the 80 column screen.
Depending on the current display mode and the settings of the various flags, you will get either:
❏ A text dump on any printer.
❏ A High-Res dump on an Imagewriter.
Selecting the Dump Frame command with both the printer and Viewdata flags ON will give one of
two screen dumps:
❏ A High-Res Graphic dump if the 'Imagewrter' flag is also ON.
The Terminal Program Page 24❏ A text dump if the 'Imagewrter' flag is OFF.
A text dump of a Viewdata screen will only include the text part of the Viewdata screen.
Selecting the Dump Frame command with both the printer and Viewdata flags OFF you will get:
❏ A printout of the current 80 column text screen.
The printer initialising string is sent to the printer at the start of each of the 80 column dumps. You
will be returned to the online screen at the end of the dump.
❏ If you have selected the Palette colour card, you will not be able to make Hi-Res graphic
dumps.
❏ If your printer card itself gives screen echo, you may get corruption of the display.
NOTE: A printer must be connected with any printer commands that you select, or you will find
that the program may hang.
ENABLE !
Normally Gazelle defaults to Buffer Enabled and all incoming data is automatically stored in the
buffer as well as being displayed on the screen. This status exists when the Enable option is
active (shown by the flag 'Y').
If you do not wish to keep a copy of incoming and outgoing data:
❏ Switch the buffer off by setting the Enable command to 'N'.
From then on all incoming data during an online session will only be displayed and will NOT be
copied into the buffer. It will be lost for ever once it has been displayed.
❏ Switch the buffer back on if you wish to keep the incoming data.
When the buffer is full, you will be prompted to either ave or ipe the buffer. If you choose
to Save the buffer it will then be Wiped automatically after it has been saved to disk.
The buffer will be automatically switched off if you have selected Quickspool. The incoming data
in this case will be spooled automatically to disc, and you will not lose any data from an online
session.
QUICKSPOOL !
The Quickspool command quickly spools data in small blocks to the disk to minimise disruptions
while online. The Quickspool command first opens a spool file and then stores incoming data
continuously into this file.
❏ You will be prompted for a file name, and this file will be allocated on disc.
❏ A suffix is added to all file names used by Quickspool, so you will only be able to enter a file
name with a maximum of 13 characters.
❏ The suffix starts with '.A', and in the event of a Quickspool file reaching a length of 44K, this file
is closed and a new one is opened with the suffix '.B'.
❏ If 26 files have been opened, the suffix will change to 'AA', and the spooling will continue with
'AZ' changing to 'BA' and so on.
In this way a continuous spool operation will be effected, with a spool capability of over 30
megabytes to suffix 'ZZ'. When you have finished spooling you should close the open file by re-
selecting Quickspool.
For Quickspool to work correctly, the host system must respond to Xon/Xoff commands.
❏ Viewdata systems do not usually respond to the Xon/Xoff flow control, so it is not advisable to
use Quickspool while using these systems.
The Terminal Program Page 25The Status Bar will show you the size of the current Quickspool file being written, and is given in
blocks and bytes. A block is 512 bytes long, and refers to a ProDOS disk block.
❏ You will not be able to write out AppleWorks files from Quickspool, even though the AppleWorks
flag is set.
❏ Use the normal buffer Enable command and when full save the buffer manually if you require
AppleWorks files.
PRINTER !
If you have selected a printer from the Install menu, or are using an Apple //c or IIGS, you will be
able to select the Printer command. Refer also to the Printersetup command in the onfig
menu.
By switching this command on the printer is initialised either by:
❏ Sending a or sending the printer Init string you have entered.
❏ If you do not have a printer card connected the program may crash and you will have to re-
boot.
You will need to switch on the printer with this command to make any text dumps of Viewdata
frames, and also to print any buffer contents.
You can if you wish see the screen display as well - select Echo on from the Printersetup
command. Some printer cards may cause the screen display to corrupt so try it out and see what
happens.
❏ Then Archive the setup you find best for your printer.
You do not need to switch the printer on with this command to dump the 80 column display
screen, but you must have the printer selected from the Install command first.
IMAGEWRTER !
If you have an Apple Imagewriter printer with a //c, a IIGS or a suitable serial card in the printer
slot of your //e, switch this command on by toggling to 'Y' with the key.
You will then be able to print full High-Res Graphic dumps from Viewdata frames using the Dump
command. These dumps can take some time to print so if you prefer the faster, text only printer
dump, switch this command off ('N').
❏ If you do not have the required hardware or your printer is not an Imagewriter, you will get
either no output or corrupted output from the Dump Frame command if the Imagewrter flag is set
to 'Y'. You may even find the program hangs.
If you have selected Imagewriter graphic dumps, you must have a printer card that is able to pass
full 8 bit data to the printer. An initialising command Z is first sent to the printer card
to disable any possible sensitivity to characters. This 'Zap' string is recognised by all the
Apple printer ports.
Gazelle can only try to determine during Install that a suitable printer card is present, it cannot be
sure that it will in fact operate correctly when this command is issue
APPLEWORKS
If you are a regular user of AppleWorks, you may wish to have your text files in the AWP format
rather than as normal Text files.
❏ With the AppleWorks flag set to 'Y', Gazelle will always write out AWP format files when it
Saves the buffer - either from the menu or when the buffer is full while online.
The Terminal Program Page 26❏ It will also write out AWP files when Receiving text files.
❏ It will not write out AWP files while a Quickspool file is open or if the Viewdata flag has been
set.
FILE MENU ile
DIRECTORY !
The Directory command gives a directory in ProDOS format of any selected volume or device:
❏ When you are prompted for the directory name, the default prefix will be displayed.
Either press to accept the default pathname and list that volume or enter a new pathname
to list another directory. You must put the pathname in correct proDOS format preceded with a
backslash.
❏ Use the forward cursor key to copy any existing pathname to use it as part of a pathname to a
subdirectory. Use the Tab key to jump to the next backslash separator.
You may also display a directory for any drive that ProDOS has recognised:
❏ Simply enter in the format S6,D1 (or even simply D1 or D2) to select the appropriate slot and
drive.
❏ You cannot set the prefix in this way to a drive or device that ProDOS has not recognised.
If you are displaying the main volume directory the Bottom Status Bar displays:
❏ The size of the volume.
❏ The blocks free.
❏ The blocks used.
If you are displaying a subdirectory, this information is not available.
❏ Press while the display is paused to dump the display to the printer.
PREFIX !
The Prefix command enables you to change the default prefix within ProDOS.
ProDOS uses its default prefix to precede all file names when it prepares the complete pathname
to a particular file. If the file name is given in its full format with all the preceding directories and
subdirectories, this prefix is ignored.
❏ Select Prefix.
❏ Activate with .
❏ The current prefix will be displayed.
You may copy over this with the forward cursor key to start a prefix leading to a different
subdirectory. Use the Tab key to jump to the next backslash separator. If you wish to enter a new
prefix enter the complete volume name and any subdirectory names in the correct format.
❏ ProDOS will reject any invalid names.
When you Archive the status of the program, the default prefix currently in use will be saved to
disk with the other settings, even though it may not be the same prefix as the boot volume which
it is being archived to. The next time that the program is booted, Gazelle will attempt to restore
this default prefix. If that particular volume is not found online, the boot prefix will be used instead.
The Terminal Program Page 27You can also read