QuickBooks Online Starting Out with For Businesses - Intuit
←
→
Page content transcription
If your browser does not render page correctly, please read the page content below

Starting Out with

QuickBooks Online
     For Businesses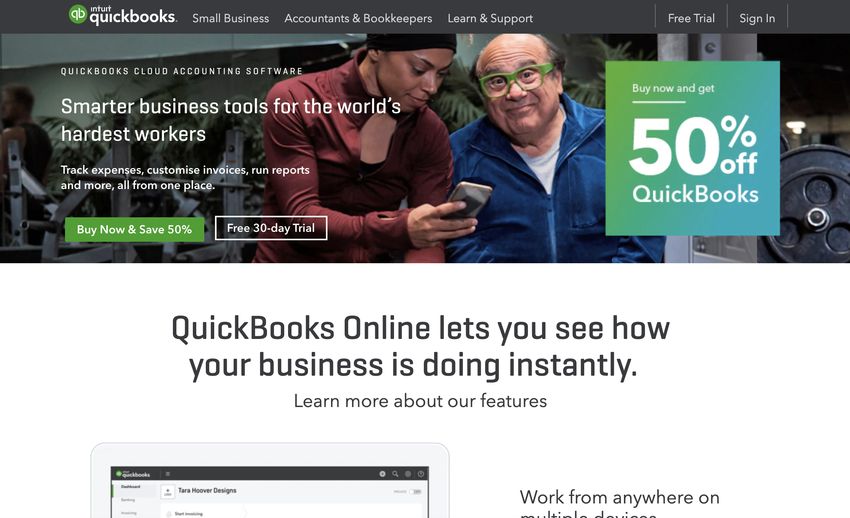
Starting Out with QuickBooks Online

Copyright
Copyright 2019 Intuit Limited
All Rights Reserved
This document remains the property of Intuit Limited and cannot be reproduced or transmitted
in any format without the written permission of the author.
Intuit Limited
Intuit Limited is a company registered in England with company number 2679414.
Trademarks
©2019 Intuit Ltd. All rights reserved. Intuit the Intuit logo, Lacerte, ProAdvisor, ProSeries and
QuickBooks, among others, are trademarks or registered trademarks of Intuit Inc. in the United
States and other countries. Other parties’ marks are the property of their respective owners.
Notice to Readers
These publications distributed by Intuit Limited are intended to assist accounting professionals
in their practices by providing current and accurate information. However, no assurance is given
that the information is comprehensive in its coverage or that it is suitable in dealing with your
particular situation. Accordingly, the information provided should not be relied upon as a
substitute for independent research. Intuit Limited does not render any accounting, legal, or
other professional advice nor does it have any responsibility for updating or revising any
information presented herein. Intuit Limited cannot warrant that the material contained herein
will continue to be accurate nor that it is completely free of errors when published. Readers
should verify statements before relying on them.
Purpose
This document has been specifically created as a training guide only for those progressing
through QuickBooks Online Training with Intuit Limited, and is current at the time of
publication.
Version

© 2019 Intuit Limited                                                              Page 2 of 76

Starting Out with QuickBooks Online

Contents
1.        Introduction to QuickBooks Online ..................................................................3

          Which QuickBooks Online is right for me? .................................................................... 6

          QuickBooks Online Packages Available ........................................................................ 6

          Benefits of using QuickBooks Online ............................................................................. 7

          Mobile devices and QuickBooks Online ........................................................................ 7

          Our case study for today’s training ................................................................................. 8
2.        Navigating QuickBooks Online ........................................................................9

          Navigating the QuickBooks Online Home Page ........................................................... 9
3.        Company File Setup ....................................................................................... 13

          Sales Tax Setup................................................................................................................ 14

          Using the Tax Centre ...................................................................................................... 15

          Accounts ........................................................................................................................... 14

          Taxable Payments Annual Report (TPARS) ................Error! Bookmark not defined.

          Managing Users .............................................................................................................. 19

          Multi-Currency ................................................................................................................. 22

          Importing Data ................................................................................................................ 17

          Customers Import ........................................................................................................... 24

          Products and Services .................................................................................................... 25
4.        Online Banking .............................................................................................. 27

          Linking Bank Accounts & Importing Bank transactions.............................................. 27

          Linking Bank Accounts or Credit Cards for Automatic Bank Feeds ......................... 29

          Importing Bank Transactions ......................................................................................... 30

          How to Add Transactions ............................................................................................... 31

          How to Match Transactions ............................................................................................ 31

          Processing Transactions - Debits .................................................................................. 31

          Processing Transactions - Credits ................................................................................. 32

          How to accept multiple transactions in batches ......................................................... 32

          Adding Attachments to Transactions ........................................................................... 32

© 2019 Intuit Limited                                                                                                          Page 3 of 76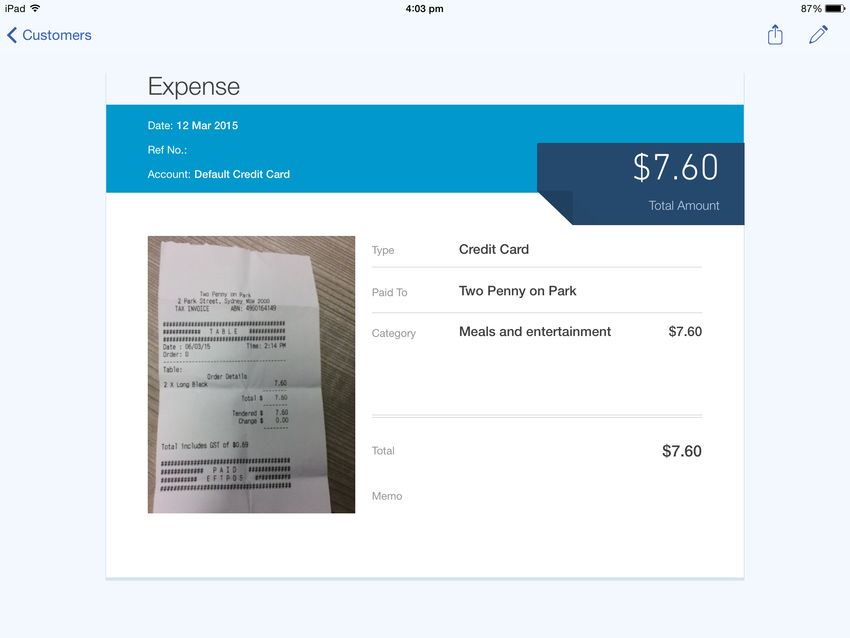
Starting Out with QuickBooks Online

          Setting up Bank Rules ..................................................................................................... 33
5.        Transactions ................................................................................................... 34

          Creating and Managing Quotes ................................................................................... 34

          Creating and Managing Invoices .................................................................................. 36

          Receiving Payment of Invoices ...................................................................................... 37

          Customising Invoices ...................................................................................................... 39

          Attachments ..................................................................................................................... 39

          Expense Transactions ..................................................................................................... 40

          Bills .................................................................................................................................... 41

          Paying Bills ....................................................................................................................... 41

          Recurring transactions .................................................................................................... 42

          Class and Location Tracking .......................................................................................... 43

          Turning on Class Tracking and/or Location Tracking ................................................ 43

          Partial Purchase Orders .................................................................................................. 44

          Create a Partial Purchase Order .................................................................................... 44
6.        Budgets .......................................................................................................... 49

          Budget vs. Actuals ........................................................................................................... 49

          Set up Budget Report ..................................................................................................... 49
7.        Projects .......................................................................................................... 50

          Turn on Projects in Settings ........................................................................................... 52

          Create and track your projects ...................................................................................... 53

          Add a transaction to a project outside of Projects...................................................... 54

          Move existing transactions into Projects ...................................................................... 54
8.        Bank Reconciliation ....................................................................................... 56

          Banking Reconciliation Tools......................................................................................... 57
9.        Managing GST ................................................................................................ 60

          QuickBooks Online Helps You to Manage Your GST. ................................................ 60

          GST Reports Used to Review ......................................................................................... 61

          Revision of GST................................................................................................................ 61

© 2019 Intuit Limited                                                                                                               Page 4 of 76
Starting Out with QuickBooks Online
Completing the GST ....................................................................................................... 62
GST Exception Detail ...................................................................................................... 63
12. Running Reports ............................................................................................ 64
Profit & Loss / Balance Sheet ......................................................................................... 64
Customising Reports ...................................................................................................... 65
Report Groups ................................................................................................................. 67
Automated Reports......................................................................................................... 68
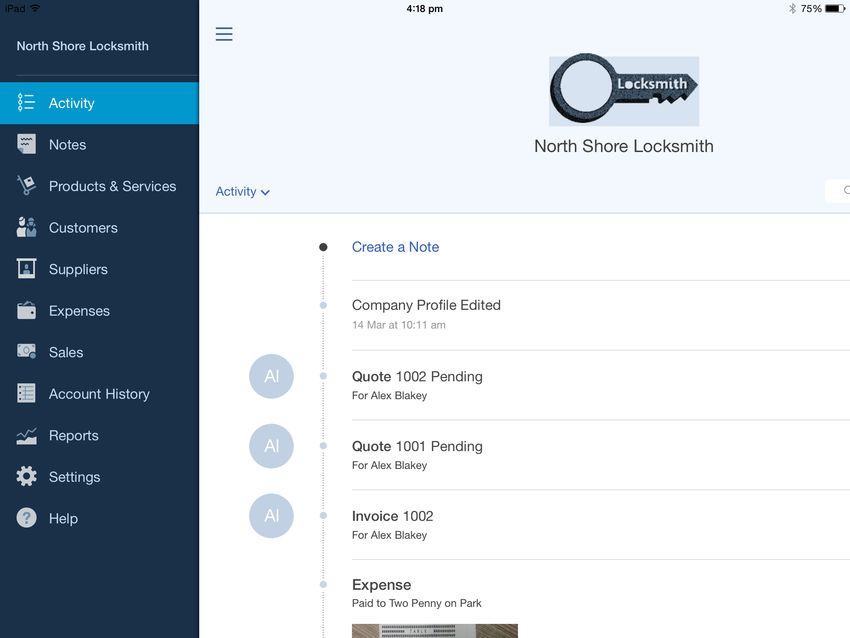
13. Mobile Apps – Take the Ipad / Iphone Tour ................................................... 69
Download the QuickBooks Online Mobile App ......................................................... 69
Creating and Sending Quotes on an iPad/iPhone ..................................................... 72
Capturing Expenses on an iPad/iPhone....................................................................... 74
Run reports on an iPad/iPhone ..................................................................................... 74
14. Help & Support .............................................................................................. 75
In-product support .......................................................................................................... 75
Customer Care email support ....................................................................................... 76
Online support ................................................................................................................ 76
Get connected socially ................................................................................................... 76
15. Next Steps ...................................................................................................... 77
Providing Feedback ........................................................................................................ 77
© 2019 Intuit Limited Page 5 of 76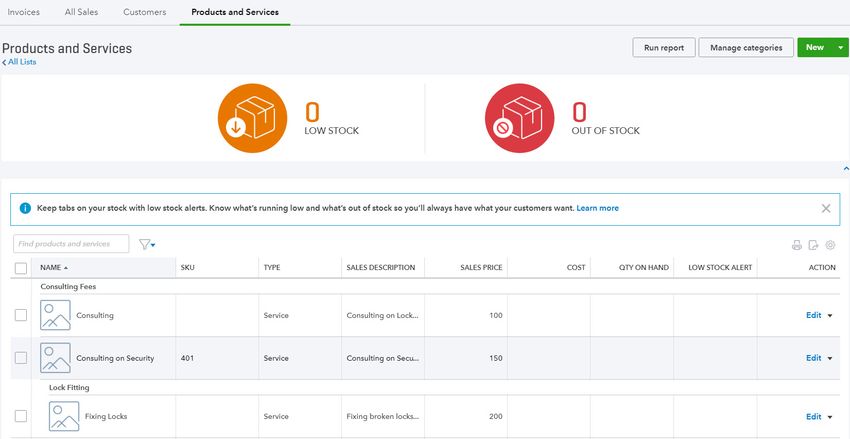
Starting Out with QuickBooks Online

   1. Introduction to QuickBooks Online

Which QuickBooks Online is right for me?
Every small business has different needs. We find the industries most suited to cloud software
and product like QuickBooks Online include:
Appointment based businesses that offer services by appointment, such as a doctor’s office,
salon or driving school.
Retail and eCommerce businesses that sell or resell products, such as food trucks, eBay sellers
or coffee shops.
Professional and field service businesses that get paid by the project, job or gig, such as
contractors, photographers or wedding planners.

QuickBooks Online Packages Available
There are three versions of QuickBooks Online. A plan can be chosen to suit the requirements of
the business.
Each offering provides features relevant to the selected plan. Further details on the features
available under each product version can be found at
https://quickbooks.intuit.com/global/pricing/
The number of business users allowed varies per plan.
Simple Start            1 user
Essentials              3 users
Plus                    5 users
You can also invite in your Accounting or Bookkeeping professional. These invites are not
included in the Business user allowance. Accountant/Bookkeeper Firms allowed are 2 users
across ALL plans.

© 2019 Intuit Limited                                                              Page 6 of 76
Starting Out with QuickBooks Online

Benefits of using QuickBooks Online
When you work online you will both have access to everything the cloud can offer and the benefits
that come with it. These include:

Mobile devices and QuickBooks Online
QuickBooks Online is available via browser across several mobile devices including iOS and
Android.

We encourage you to download QuickBooks Online from the app stores listed below..

© 2019 Intuit Limited                                                             Page 7 of 76
Starting Out with QuickBooks Online

Our case study for today’s training
Jay Reyes, Jay’s Coffee Co.
                                         Jay Reyes is the new owner of Jay’s Coffee Co. For the
                                         past 5 years he has honed his skills working for others.
                                         He has always dreamed of starting his own business.
                                         After months of planning, Jack has decided that now is
                                         the right time to start. Jack has done his research and
                                         there aren’t many coffee shops in his area. It is a great
                                         place to start a business.
                                         Jay has asked around about how he could manage his
                                         bookwork and his previous boss suggested he sign up to
                                         QuickBooks Online.
                                         Jay is looking for the following in a software package:
    •   Ease of use
    •   Timely information for decision making
    •   Build for use on mobile device
    •   Extensive reporting

Today Jay will feature in our demonstration and training exercise throughout the course of this
class.

© 2019 Intuit Limited                                                               Page 8 of 76
Starting Out with QuickBooks Online

   2. Navigating QuickBooks Online
QuickBooks Online has been designed to be intuitive, fast and simple to use. The user interface
is simple and unified, which results in fewer clicks to find the desired information or functions.
You can sign into your QuickBooks Online file from the https://quickbooks.intuit.com/global/
website.

Navigating the QuickBooks Online Home Page
    1. Open your preferred browser and type https://quickbooks.intuit.com/global/
    2. Click on the Sign In button located in the top right hand corner and select QuickBooks
       Online

    3. Enter your QuickBooks Online User ID and password and select Sign In.

© 2019 Intuit Limited                                                              Page 9 of 76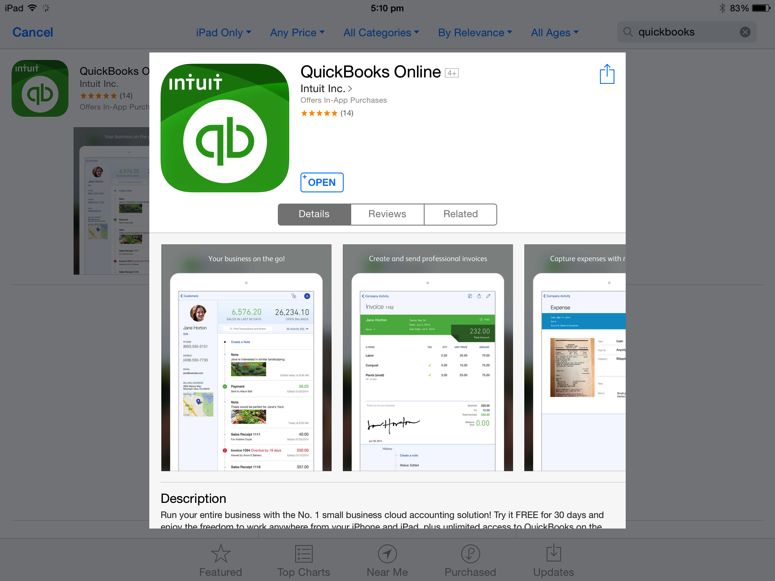
Starting Out with QuickBooks Online

The Home Page displays a summary of key information. A new file setup would display as below
with no transactions.
Company settings are in the top right corner of your QuickBooks Online screen, accessed by
clicking on the Gear icon. We will cover this in Company File Setup.
To access the Help function, click on the question mark icon next to the company menu in the top
right corner. This is covered in the final chapter Help and Support.

© 2019 Intuit Limited                                                            Page 10 of 76
Starting Out with QuickBooks Online

The Create button in the top right corner of the screen gives quick access to create new
transactions and other records:

Search – Use this feature to quickly look up QuickBooks Online transactions by number, date, or
dollar amount. The Advanced Search feature provides additional filter options.
Recent Transactions – Use this feature to display a list of recently recorded transactions, each of
which can be opened by clicking into the search box.
Show less - The Create window also has a simplified view accessed via the show less option.

                            The left-hand navigation bar provides access to:

                            Dashboard displays a summarised view of relevant information in a graphic mode.
                            This view can change depending on your data

                            Banking displays your linked bank feeds and bank rules

                            Sales shows transactions including Invoices, All Sales, Customers and Products and
                            Services

                            Expenses shows all purchase related transactions and supplier details

                            Employees provides access to the employee related processes.

                            Reports provides access to the reports available in QuickBooks Online.

                            Taxes allows you to add tax to your invoices and track taxes you owe.

                            Accounting includes the Chart of Accounts and tools to reconcile your relevant bank
                            accounts.

                            When signed in as an Administrator the Apps menu will access featured applications
                            and add-ons to QuickBooks Online from this page.

© 2019 Intuit Limited                                                                               Page 11 of 76
Starting Out with QuickBooks Online Clicking the Hamburger icon will collapse the left menu, which is handy if you need some more screen real estate. The rest of the Dashboard can display: Bank Accounts – Connect and review accounts and balances Activities – Transactional activity can be reviewed and filtered Panels – will give you an overview of key metrics in your business Privacy – In a public location, the Privacy option can be turned on to hide financial information © 2019 Intuit Limited Page 12 of 76
Starting Out with QuickBooks Online

   3. Company File Setup
Many options for customising QuickBooks Online can be accessed by clicking on the Gear icon
in the top right corner.
You can customise the options regarding how QuickBooks Online operates based on the best
fit for your business in Company Settings. To access this area, click Gear icon > Settings >
Company Settings.

You will also find many other tool and customisations options from the Gear icon.

© 2019 Intuit Limited                                                            Page 13 of 76
Starting Out with QuickBooks Online

Sales Tax Setup
QuickBooks Online can automatically track your sales tax for you through the Tax feature. To
use the tax feature, you need to first turn it on and then create your tax codes as necessary.
In this section we will cover setup, how to use tax centre and reporting.

Here are the steps to setup your Tax centre:
    1. Select the TAXES option from the left hand navigation menu.
    2. Click Set Up tax

This will display the Set up Sales Tax screen
    3. Select the correct Tax Name, tax period, filing frequency, reporting method, sales rate,
       and purchase rate

    4. Click Next

© 2019 Intuit Limited                                                              Page 14 of 76
Starting Out with QuickBooks Online Using the Tax Centre If you need to make changes to the setup information, there is an Edit settings button available in the next screen. Here you can change the Tax agency name, the start of tax period, and filing frequency. Note: Please note that once a rate has been created, you cannot delete the rate. If you need to change that rate, deactivate the rate and then create a new one. If you need to change a tax rate, we recommend you create a new tax rate instead of updating an existing one because the existing rate may have been used on prior transactions and changing the rate could affect your sales tax tracking. Please note that you can't have two rates with the same name. To solve this, rename the deactivated rate something else. Then, make a new tax rate with the correct name. Once the settings are saved, the Tax screen will display the Tax due, the amount collected and paid for the current period, andthe Prepare Return button. © 2019 Intuit Limited Page 15 of 76
Starting Out with QuickBooks Online

Add Group Rate

Important: Group tax, once created, cannot be edited or deleted.

    1. In the Tax Centre, select Add Tax.

    2. Select "Group Rate" and then select Next.

    3. Enter the Tax Code and Description.

    4. Select the Tax Rate and where it applies to Net, Tax, or both.

    5. Select Done.

© 2019 Intuit Limited                                                             Page 16 of 76
Starting Out with QuickBooks Online Accounts To track the transactions and balances for key reports like the Balance Sheet and Profit and Loss, QuickBooks online uses a list of accounts, or Chart of Accounts. The setup process will create a generic Chart of Accounts which can be customised. Manually add an Account Locate the Chart of Accounts, select the Gear Icon > Your Company > Chart of Accounts. Select New from the top right hand corner. This opens a new screen where the account can be configured. Category Type - specifies the account type. Note: Cash and cash equivalents is used for setting up Bank Accounts. Credit Cards are set up as Category Type - Credit Card. Typically, Expenses are coded as ‘non-capital’ and Asset purchases are coded ‘capital’. Out of Scope refers to accounts and transactions that are not reportable. e.g. Owner’s Drawings. Detail Type - provides more detail on the Category type selected. It is a compulsory field although it does not affect any financial reporting. Select the detail type closest to the account being set up. Name - this is the name of the Account being set up. It is what is seen in the Chart of Accounts List. Number – An optional account number. Description - allows greater detail of the name to be added and is optional. Is sub-account - place a tick in the sub-account selection field to make the account being set up a sub-account of another account. © 2019 Intuit Limited Page 17 of 76
Starting Out with QuickBooks Online

Default Tax Code - select the appropriate GST coding for the account being set up.
To update the Chart of Accounts you would click Save and Close.

Note: An alternative way to navigate to the Chart of Account is via the Accounting tab from the left hand navigation
bar.

Managing Users
The number of business users allowed varies per QuickBooks Online subscription selected.
Simple Start              1 user
Essentials                3 users
Plus                      5 users
You can also invite two Accounting or Bookkeeping professionals. These invitations are not
included in the Business user allowance and are available for all subscription plans.
To manage users, select the Gear icon > Your Company > Manage Users.
Here you can see the list of users names, email, status, date added and whether they are billable.
Manage Users allows creation, modification or deletion of business users in the QuickBooks
Online file.

To add a new user, select Add User and from here you can select your user type and choose their
access rights

© 2019 Intuit Limited                                                                             Page 18 of 76
Starting Out with QuickBooks Online

User roles
When creating or editing a user, assign one of the following types of access rights:

Company                 Company Administrators have access to all features and capabilities
Administrator           in QuickBooks.

Standard User           This is an ordinary user. The person may have access to all
                        QuickBooks features, or you can limit access to:

                        Customers and Sales

                        Suppliers and Purchases

                        You can also choose to give this user some administrative
                        capabilities.

Administrator           You are the Master Administrator. There is only one Master
                        Administrator. Initially, it is the user who created your company. This
                        user has all the access rights of a Company Administrator. You
                        cannot delete or change the access rights for the Master
                        Administrator. However, you can transfer the Master Administrator
                        role to another user and then edit or delete this user.

Time Tracking           When Time Tracking Only users log into QuickBooks, they see a
Only                    special version that has only timesheets for themselves and time
                        reports. This user doesn't count toward your current user limit.

Reports Only            When Reports Only users log into QuickBooks, they see a special
                        version that shows only reports. They can access virtually all reports,
                        except payroll reports and any others that list contact information of
                        employees, customers, or vendors. This user doesn't count toward
                        your current user limit.

Accountant user         You can also identify one user as your accountant. The accountant
                        does not count toward your current user limit.

                        The accountant user can have any of the access rights, but you
                        probably want to give your accountant regular or custom access.

                        You can have only one user identified as your accountant, but you
                        can invite another accountant to access your company. To do this,
                        under Accounting Firms, click Invite Accountant. This user does not
                        count toward your user limit.

© 2019 Intuit Limited                                                                 Page 19 of 76
Starting Out with QuickBooks Online
A Standard user can have access to all features, or access can be limited by:
• Customers and Sales
• Suppliers and Purchases
For example, a Standard User with restricted access to Sales Centre is set up as below:
1. In the Manage Users window, select New
2. Select Regular or custom user
3. Select Next.
Set this new user’s access rights as Limited for Customer & Sales
Set the user settings
© 2019 Intuit Limited Page 20 of 76Starting Out with QuickBooks Online Note: The Standard user role is the only user access role where you can set restrictions on to the billing, user management and settings section of the product. To complete the user invitation setup, enter user’s email address and select Next An email will be sent out to the new user to enable the activation of their account. © 2019 Intuit Limited Page 21 of 76
Starting Out with QuickBooks Online

Multi-Currency
If you do business with foreign suppliers and/or customers, QuickBooks Online can be set up for
multiple currencies. Click on Gear icon > Accounts and Settings > Advanced.
Click on Currency to open the Currency Centre. The default Home Currency is set to US Dollar.
Place a tick in the box next to Multicurrency and tick I understand I can’t undo Multicurrency.
Save.

Once turned on, the Currency Centre will also be found under the Gear icon > Lists.
You can add, edit and revalue currency from the Currency Centre

© 2019 Intuit Limited                                                            Page 22 of 76
Starting Out with QuickBooks Online

Importing Data
If you are currently using another accounting software program, go to this link for the latest
information on conversion options.
intuit.com.au/accountants-and-bookkeepers/convert-client-data
Sometimes the accounting data in your current file cannot be cleaned up in a reasonable
timeframe. In these cases, importing your data is a great option to start with a clean accounting
file. To import data:
Go to the Gear icon > Tools > Import data and select the type of data you would like to import.

Note: Download a Sample File to use as a template for correct file mapping. File types for import must be of .xlsx or
.csv file type.

© 2019 Intuit Limited                                                                            Page 23 of 76
Starting Out with QuickBooks Online

Customers Import
1. Select Customers.
2. Browse for the File to be imported.
3. Once the import file is chosen, Next
4. Review the fields (columns from import file) to ensure they are matched correctly with
   QuickBooks Online fields for Customers. If necessary, change the mapping of any field, and
   select Next.

5. Review the list and make any corrections if required, directly in the preview screen. Click on
   Import to finalise the file import.
Suppliers Import
To import Supplier data into your QuickBooks Online company file, follow the same process as
above. Remember to select Suppliers when specifying the type of data to be imported.
Chart of Accounts import
To import Chart of Accounts data into your QuickBooks Online company file, follow the same
process as above. Remember to select Chart of Accounts when specifying the type of data to be
imported.
Products and Services
To import Products and Services data into your QuickBooks Online company file, follow the same
process as above. Remember to select Products and Services when specifying the type of data
to be imported.

Note: to complete the import process, the Chart of Accounts list must be imported prior to the Products and Services
list.

© 2019 Intuit Limited                                                                            Page 24 of 76
Starting Out with QuickBooks Online

Products and Services
This section takes us through how to set up products and services list in QuickBooks Online. The
products and services list represents the list of products and/or services that you sell. You will use
items from the products and services list when you create customer invoices, enter purchase
orders, and work with inventory.
When completing an invoice, a product or service must be created. This can be done on the fly.

Note: Inventory Item will only display as a selection option in QuickBooks Online Version Plus and if Inventory Tracking
has been turned on.

When setting up a new file, the default Products and Services created by default are ‘Hours’ and
‘Services’. Additional Products and Services can be manually created.
To locate the Products and Services list, select the Gear icon > Lists > Products and Services.

Select New from the top right of the screen.
Once the appropriate type has been selected, complete the setup process.

© 2019 Intuit Limited                                                                              Page 25 of 76
Starting Out with QuickBooks Online

Name - the name of the service, such as consulting services, repair, cleaning, etc. The name must
be a unique name.
SKU - Stock Keeping Unit number. An individual type of product will have its own individual SKU
number.
Category - is a means of classifying Products and Service sold to customers. Additionally,
categories save you time when completing transaction forms, since you can search for items by
category
Sales Information description - Enter the description of the service in the “Description on sales
forms” field. The description will automatically populate the description field on a Sales form.
Sales Price/Rate - Add a price in this field if the price is fixed. The price will automatically
populate the ‘Rate’ column on a Sales form. If a price is not added during the setup process, it
can be added directly in the Sales form.

Note: Inclusive of Tax - the tick box is selected if the price entered is to include Tax

Income account
Select an ‘Income’ account type that is associated with this product or Service. Pay attention to
the account being selected to ensure it is an Income account.

Note: the income accounts need to be setup PRIOR to Product and Service setup.

Tax – select the relevant tax code for income
Purchasing Information - tick the select box if the Product or Service being set up is also used
for Purchasing. Set up as required.
To exit the screen click Save and Close.

© 2019 Intuit Limited                                                                                 Page 26 of 76
Starting Out with QuickBooks Online

    4. Online Banking

Linking Bank Accounts & Importing Bank transactions
Linking bank and credit card accounts to QuickBooks Online saves time and reduces errors by
downloading transaction’s directly from your accounts from a secure online connection
Transactions can be imported by either
    1. Linking the accounts via automated bank feeds
        Once a secure connection has been established with your bank, transactions will
        automatically transfer or “feed” directly to your QuickBooks Online Company file.
    2. Downloading a bank file from your online banking system
        Alternatively bank transactions can be imported manually. Download the data from your
        bank or credit card and then upload the file to your QuickBooks Online account. Import
        files must be in the format of excel CSV
These two methods can be used independently or together. The bank automatic feed option will
bring through up to 90 days of transactions.
If additional days are required, the balance of dates can be imported in via a bank file e.g. .csv
file
Once these transactions have been imported, QuickBooks Online will instruct you to do the
following:
•   Automatically match these imported transactions with a transaction you have already
    recorded
•   Record as a new transaction by allocating it to an account and a payee’s name
•   Recall how you managed a similar transaction previously. It will suggest allocating it to the
    same account and payee again.

© 2019 Intuit Limited                                                             Page 27 of 76
Starting Out with QuickBooks Online Linking Bank Accounts or Credit Cards for Automatic Bank Feeds From the left-hand navigation bar select Banking. Ensure you have the Banking Tab selected. Click on Add account. Locate your financial institution by selecting the relevant icon or by typing its name and clicking the magnifying glass. Enter your Banking Institution User ID and password to enable QuickBooks Online to connect to your bank account. © 2019 Intuit Limited Page 28 of 76
Starting Out with QuickBooks Online

Note: If your bank or financial institution is not listed or if you prefer not to have your bank account linked, you may
also download your transactions from your bank in a csv or other file format and then upload them into QuickBooks
Online manually.

1. Once connected, tick the bank accounts to connect to QuickBooks Online. Then choose the
   Account type (Bank or Credit Card) from the QuickBooks Account drop down list provided.
2. Click on Connect to download the transactions
3. Once your transactions are securely downloaded, click I’m done, let’s go.

© 2019 Intuit Limited                                                                                 Page 29 of 76
Starting Out with QuickBooks Online

Importing Bank Transactions
An alternative to linking your bank accounts is to import bank transactions that have downloaded
from Internet Banking from the Bank. Once this file has been downloaded:
1. Select File upload from the Banking screen.
2. Browse to locate the file to upload. Select Next.
3. From the drop-down list of accounts in QuickBooks Online, select the appropriate bank
   account to which the file’s transactions are to be linked, then uploaded and choose Save.
4. A message will appear indicating that your bank data has been saved.
5. Click Finish.
Once the transactions are imported into the Banking centre, the transactions are ready for review
and action.
There are three tabs in the Banking centre

For Review
New transactions will appear under this tab where they can be reviewed and actioned.
Transaction in this tab do not affect the financials in any way. It is only once they are actioned that
they appear on the banking registers and impact the financials.
Reviewed
Transactions that have been actioned will now appear under this tab and transactions are now
found in QuickBooks Online
Excluded
Transactions that are not required to appear in the banking register can be moved from the For
Review tab to Excluded. Transactions that have been excluded have no impact on the
QuickBooks Online file.
For example - a new file created from July 1 connected to the bank feeds has brought through
June transactions. Those transactions up to June 30 can be excluded, leaving only those from
July 1 onwards only.

© 2019 Intuit Limited                                                                Page 30 of 76
Starting Out with QuickBooks Online

How to Add Transactions
Once banking feeds are connected or transactions have been imported into QuickBooks Online,
you are ready to Match or Add the transactions.
All the downloaded or imported Transactions will appear under For Review tab. To add a
transaction, click on the transaction to expand it. Allocate the type of Transaction, Supplier or
Customer, Account Category, GST and click Add

You can also Split a transaction to allocate it against multiple Account categories and or separate
tax and amounts.

How to Match Transactions
QuickBooks Online will offer to match the transaction to the bank detail, the transaction date,
amount, customer and or supplier name or the ID of the transaction.
To accept a Matched transaction, click on the Match button at the end of the row under the Action
column.

Processing Transactions - Debits
Debit transactions will default to Expense unless matched to an existing Bill or Bill Payment. The
Expense selection can be changed to Cheque or Transfer transaction types. The transfer option
is useful when transferring money from one bank account to another, drawings entry, loan
account, or payroll clearing.

© 2019 Intuit Limited                                                              Page 31 of 76
Starting Out with QuickBooks Online

Processing Transactions - Credits
Credit transactions will default to Deposit unless matched with an Open Invoice or Invoice
payment. The Deposit selection can be changed to Sales Receipt or Transfer transaction types.
The Transfer option is useful when transferring money from one bank account to another,
drawings entry or loan account

How to accept multiple transactions in batches
To accept multiple transactions at the same time, select the transactions you wish to action (either
select individual transaction by clicking the tick box at the left, or select the tick box at the top to
select all transactions), and then under batch actions select Accept Selected.

Other batch actions include:
•   Exclude Select – Transactions will be excluded and not imported into QuickBooks online.
•   Modify Selected – Allows you to modify multiple transactions all at once.

Adding Attachments to Transactions
Transactions that have not been Matched to an entry can have an attachment added to it during
the bank Add process. Browse to the file to attach.
If using the QuickBooks Online Mobile APP to take a photo of an expense this will be seen under
the Attachment area.

Note: only one file can be added from the Banking screen. Additional attachments can be added by opening the
transaction once saved.

© 2019 Intuit Limited                                                                        Page 32 of 76
Starting Out with QuickBooks Online

Setting up Bank Rules
Bank Rules allows greater control of bank transactions as they are added to the QuickBooks
Online Company.
Bank Rules can be defined via Money In or Money Out and the bank account the transaction it
relates to (if you have more than one bank account).
The transactions can be identified using separate conditions using
    •   Bank Text, using the logic of Contains or Doesn’t Contain
    •   Description using the logic of Contains, Is Exactly or Doesn’t contain.
    •   Amount using the logic of Equals, Is greater than, Is less than or Doesn’t equal
Up to five separate conditions can be added.
To complete the rule, allocate the Payee, categorise it, apply a tax code, or apply a class and/or
Location. In addition, you can add a memo to the transaction.
Example of Creating a new Bank Rule
1. In the new window click on the box in the top right called New Rule

2. Enter a rule name, call it Officeworks
3. Select if this is for Money In or Money Out transactions. Set it as Money Out
4. Select the bank account the rule will relate to
5. Select the appropriate conditions to meet the rule
6. Then select the appropriate actions.
7. Optionally choose a Location and/or Class and/or Memo.
8. If transaction is to be added into the file choose Automatically add to my books

Note: transactions Automatically added will not be found in the review tab

© 2019 Intuit Limited                                                                       Page 33 of 76
Starting Out with QuickBooks Online 5. Transactions Creating and Managing Quotes Estimates are easy to create and customise in QuickBooks Online. Before creating the first estimate, double check your company file setting is correctly completed. e.g. set up for tax, quantities, custom transactions etc. Creating Quotes Estimates can be easily accessed from the Create or Quick Create menu. To create a Estimate: 1. Go to Create > Customers > Estimates. 2. Complete the on-screen estimate, including selecting a customer, add date, estimate number, whether amounts are tax inclusive/exclusive/out of scope, Products and Services of your choosing, the quantity, description and rate for each. 3. Add more lines, if needed. Complete any other desired fields, such as the Discount or add a message to be displayed on the estimate. 4. If necessary, attach a document or any file by clicking on Attachments in the bottom left corner of the form. This can be used to store related documents for future references. Files sizes can go up to 25MB each transaction. 5. Select Save and Send to email your customer the estimate. Click Save to save the estimate and return to the homepage. © 2019 Intuit Limited Page 34 of 76
Starting Out with QuickBooks Online

Managing Quotes
Once the customer agrees to your estimate, it can be changed to an Invoice.
1. Estimates can be found using the Search and Recent Transactions functions, but the easiest
   way is by selecting Customers from the left-hand navigation bar.
2. In the Customer Centre, click on the Estimates box in the Money bar. Locate the customer you
   wish to update the quote for. Select ‘Create Invoice’ to convert the estimate to an invoice.

Note: Estimates can be updated for ‘Status’ i.e. Accepted, and then converted to an Invoice.

© 2019 Intuit Limited                                                                           Page 35 of 76
Starting Out with QuickBooks Online

Creating and Managing Invoices
Invoices can be easily entered from the Create menu.
1. In the Create > Customers > Invoice.
2. Complete the on-screen invoice, including selecting a customer, add date, invoice number,
   whether amounts are tax inclusive/exclusive/out of scope of GST, Products and Services of
   your choosing, the quantity, description and rate of each, and the GST code.

3. Add more lines, if needed. Complete any other desired fields, such as the Discount or add a
   message to be displayed on the invoice.
4. If necessary, attach a document or any file by clicking on Attachments in the bottom left corner
   of the form. This can be used to store related documents for future references. Files sizes can
   go up to 25MB each transaction
5. Select Save and Send to email your customer their invoice, click Save and Close to simply save
   the invoice and return to the homepage or select Save and New to save the invoice and create
   a new one.

© 2019 Intuit Limited                                                              Page 36 of 76
Starting Out with QuickBooks Online

Receiving Payment of Invoices
To receive a payment on an existing invoice, use Create > Customers > Receive Payments.
Choose a customer and select Invoices to be Paid, Bank Account to be deposited and the date
of payment.

© 2019 Intuit Limited                                                        Page 37 of 76
Starting Out with QuickBooks Online

Customising Invoices
Customise the look of an invoice template by including a logo, editing the font and more.
This can be done by going to the Gear Icon > Your Company > Custom Form Styles.
Click on New Style and select Invoice

Choose a template and accent colour, upload your logo, and specify columns, header, footer and
more. This same customisation window can be accessed at the bottom of an invoice by selecting
Customise at the bottom of the invoice form.

© 2019 Intuit Limited                                                           Page 38 of 76
Starting Out with QuickBooks Online

Attachments
All transactions can have attachments added to them. The attachments can be added by
browsing to a file from your local computer or the file can be dragged into the attachment field
from within any transaction.

Attachments can also be found and actioned from the Attachments Page.
If you need to upload a batch of attachments and link them to other transactions later, for example
the terms and conditions document, then follow these steps:
Gear Icon > Lists > Attachments.

•     Drag/Drop files in the Attachments field, or click on the Attachments paper pin icon, find
      the location of the document to upload and then click Save to upload
•     Maximum size 25MB - is the total of the size of all attachments added to a transaction.
•     Review the attachment under the Name column
The Attachments window also has the following features:
Batch Actions – Export and process transactions (Invoice and Expense) directly from this window
    1. Export the image or document, tick the box required and click Export from the Batch
       action drop down
    2. Create Invoice or Create Expense, tick the document you want added to the transaction
       and choose either Create Invoice or Create Expense
    3. Print the list of attachments in your file from the printer icon
    4. From the grey settings icon next to the print icon, choose which columns are shown in this
       window
    5. Edit, Delete, Create Invoice and Create Expense from the dropdown box under Action

© 2019 Intuit Limited                                                                Page 39 of 76
Starting Out with QuickBooks Online Expense Transactions 1. To enter an expense transaction, select Create > Supplier > Expense. 2. In the Expense window, select the account the expense was paid from such as petty cash, a bank account or credit card account. 3. Complete the detail of the expense transaction including the payee, the reference number, the date, whether the amounts are tax inclusive/exclusive/out of the scope of GST, etc. 4. Define the expense by allocating it to the relevant account (if using general ledger accounts) and/or item details (products and services are already linked to general ledger accounts). 5. Any additional fields such as a Memo can be completed, and you can also choose to add an Attachment (source document) for this expense. Click Save and Close. © 2019 Intuit Limited Page 40 of 76
Starting Out with QuickBooks Online

Bills
Bills, available in QuickBooks Online Essentials and Plus, can be accessed from the Create >
Suppliers > Bill.

Paying Bills
When paying bills, select Expenses > Suppliers from the left-hand navigation bar or the Create
window.
In the Supplier Centre, click on the Open Bills box in the Money bar. Locate the supplier you wish
to pay a bill for. Select Make Payment to apply the payment against the invoice.

© 2019 Intuit Limited                                                             Page 41 of 76
Starting Out with QuickBooks Online

Recurring transactions
Recurring transactions are a way to quickly create different transactions with the same information
that will happen on a regular occurrence. These transactions can be setup to record automatically
or they can be set up for manual entry via the template created under the recurring transactions
feature.
QuickBooks Online will save the transaction as a template and will allow you to manually change
the date and amount at the anniversary of the occurrence of the next due transaction if
unscheduled. If scheduled, QuickBooks Online will automatically post the transaction. Invoices
can be set to automatically email you while you sleep.
The recurring transactions feature is available in Plus and Essentials versions, but not in Simple
Start.
To view the recurring transaction list, navigate to Gear icon > Lists > Recurring Transactions.

© 2019 Intuit Limited                                                              Page 42 of 76
Starting Out with QuickBooks Online

Class and Location Tracking
QuickBooks Online Plus users can take advantage of Class Tracking, Location Tracking, or both.
Class and Location tracking configuration is ideal for management reporting purposes by
enabling tracking for separate parts of your business.
This feature is enabled in ALL account types and all transactions except transfer.

  Class Tracking                                    Location Tracking

  You can assign a class to a transaction or        You can only assign a location to an
  specify a setting that allows you to assign a     entire transaction.
  different class for each detail line of a
  transaction.

  You can set QuickBooks Online to prompt           There is no missing location prompt.
  you for missing classes on transactions.

  You cannot group deposits by class.               You can group deposits by location,
                                                    which is convenient in case different
                                                    locations of the same company deposit
                                                    their monies at different bank locations.

Turning on Class Tracking and/or Location Tracking
To turn on Class and Location Tracking, click Gear icon > Account and Settings > Advanced.
Then select Categories and check the boxes next to Location Tracking and/or Class Tracking.
Class Tracking can be configured to
    •   warn when a class has not been assigned to a transaction (optional)
    •   display the Class as one to each row in transaction or
    •   one class for the entire transaction.

© 2019 Intuit Limited                                                              Page 43 of 76
Starting Out with QuickBooks Online Partial Purchase Orders Sometimes the reality of Purchases isn’t that simple. We know that often QuickBooks Online users have to find ways to record more complex transactions – often resulting in multiple transactions being recorded, taking you more time in entry and troubleshooting. Here are some new and upcoming options that will make handling complex sales and purchases easier. To use purchase orders, you must be using the Plus version of QuickBooks Online and you will need to turn this feature on in your Company Settings Create a Partial Purchase Order Create a new purchase order to your supplier You will notice a new box under the Suppler Name which will currently say “open” When the stock arrives and you have the Supplier Bill you can receive the stock in by creating a “Bill” and your purchase order across from the drawer. © 2019 Intuit Limited Page 44 of 76
Starting Out with QuickBooks Online

Add the purchase order to your Bill

If you have not received all items you can enter the amounts you have received and the
undelivered items will remain on an open purchase order

© 2019 Intuit Limited                                                           Page 45 of 76
Starting Out with QuickBooks Online

The Purchase order will remain open until the balance of items have been received or the
purchase order is manually closed.
You can update the purchase order status to closed which will finalise the entire purchase order.

Or you can close off individual items on the purchase order.

You can also run reports to get an overview of what you have on backorder/order with your
suppliers

© 2019 Intuit Limited                                                            Page 46 of 76
Starting Out with QuickBooks Online

Run the Open Purchase Order List Report for a summary of purchase orders and the value
outstanding:

Run the Open Purchase Order Detailed Report for a list of items you have on backorder and/or
order.

© 2019 Intuit Limited                                                          Page 47 of 76
Starting Out with QuickBooks Online

    6. Budgets
Help you prepare a budget. Success requires planning. Nearly 50% of new businesses fail within
five years. Use the QuickBooks Online budget feature to estimate future income and expense
so that over time you can compare it against actual performance.
QuickBooks Online budgets are based on the financial year that is set up in Company Settings.
You can only create budgets one year at a time. One year in the past and 6 in the future, and no
limit on budgets you require to forecast. QuickBooks Online allows you to create and manage
multiple budgets.
Access Budgeting from the gear icon then select an existing budget or click Add Budget. New
budgets in QuickBooks Online can be created from historical information, from scratch or
copied from another budget. Budgets are categorised based on income and expense accounts
and can be further categorised into customers, classes or locations.
Amounts are entered and edited one line at a time. Enter annual or quarterly amounts and
calculate a monthly average or enter monthly amounts with an option to copy it across the
remainder of a row. Amounts are automatically rounded to the nearest dollar. All budget
reports show in whole numbers.
The budget grid defaults to show rows as accounts and columns as months. Check and uncheck
Show Blank Rows to show or hide blank rows. If the budget is subdivided, you can change the
Show Rows as drop-down field to your other criteria (Class, Location, Customer) as long as there
are fewer than 200 active records for those criteria.

© 2019 Intuit Limited                                                            Page 48 of 76
Starting Out with QuickBooks Online
Budget vs. Actuals
Budgets may be set up for different purposes
● to forecast future profitability of the business,
● track expected performance of a department or
● compare the estimate on a job to the actual performance
Having a plan improves a company’s chance of success by putting them in control of the
direction of the business and giving them the tools to measure the progress.
There are two types of budget reports:
● Budget Overview – This report shows a summary of budgeted amounts for a specific
budget
● Budget vs. Actuals – This report shows a summary of budgeted amounts versus actual
amounts and their variances and variance percentages
Set up Budget Report
1. Select Reports> All Reports.
2. Select Business Overview.
3. Click to select Budget Overview Report or Budget vs. Actuals Report
4. If it doesn’t pop up automatically, click under General > Budget and select or change
which budget to view (if you have more than one), the report dates, accrual/cash basis,
filter for customer, class, location or specify columns shown.
5. When finished customising, click the Run Report button.
Note: Companies can use budgets to to help review job-costing by measuring customer estimates against actual job
costs. This can be done in QuickBooks Online using budgets. Since QuickBooks Online allows you to create multiple
budgets, you can create a budget for each job. Create each budget from scratch, subdivided for a particular customer.
Specify the customer job and enter the estimated income and cost details for the particular job. Then run a Budget vs.
Actual, renamed Estimate vs. Actual, report. Customise it to filter for the specific customer job. Save this report to
regularly monitor the progress of the work.
© 2019 Intuit Limited Page 49 of 76Starting Out with QuickBooks Online
7. Projects
Projects help you organise all the pieces that make up a project, including transactions, time,
and running reports so you always know how your project’s doing. Quickly access your active
projects, assign transactions to them, and get project-specific reports like Project Profitability,
Unbilled Time and Expenses, Non-billable Time and the Transactions tab for sales related
transactions.
What is the advantage of the Project Centre?
Projects have three reports that are customised to track these cost centres. These can be
accessed on the Overview Tab from within the project. These include;
• Project profitability
• non-billable time
• unbilled time
Because these reports are accessible right from the project centre, no special customisation are
needed and you don’t even need to leave the Project Centre to see them - meaning;
• Your Projects will be centralised.
• You can add transactions for your Project directly from the Project Centre: Invoices,
Invoice Payments, Expenses, Quotes, and Timesheets.
• You can add transactions with the + (Global create) button as well as for other
transactions, such as Bills, Cheques, Journal Entries, etc.
• You can add notes for your Project such as start, completion, etc.
• You can update the progress of your Project from In Progress to Completed or
Cancelled.
© 2019 Intuit Limited Page 50 of 76Starting Out with QuickBooks Online Once you have started creating transactions you will then be able to view these on the Transactions Tab from within the project How are Projects different from sub-customers or classes? Projects are similar to sub-customers and classes, but the advantage is multiple reports for each Project are grouped together. You may have a sub-customer, which is not a Project, but only Projects will show in the Project Centre. © 2019 Intuit Limited Page 51 of 76
Starting Out with QuickBooks Online

Turn on Projects in Settings
Projects can be turned on from within QuickBooks Labs, to turn this on;
    1. click the Gear Icon
    2. select Company Settings
    3. Select the Advanced Tab

    4. Select Projects and select the tick box to turn Projects on
    5. click Save

© 2019 Intuit Limited                                                               Page 52 of 76
Starting Out with QuickBooks Online
Create and track your projects
Set up your first project
1. Select Projects from the menu.
2. Select Add your first project.
3. Name the project, and select or add a customer.
4. You can add a note now or later, and then Save.
5. You’ll see your new project card. Go ahead and select it.
6. Let’s add an invoice to your project.
a. Go to Add to project, and select Invoice.
b. The Project name will pre-fill, so just enter your invoice as usual, and then Save.
7. It’s easy to add other transactions to your project.
a. Go to Add to project and choose an Expense (Or Invoice, Receive Payment,
Estimate, or Time or Purchase Order).
b. Enter the vendor/supplier's name, fill in the details, and also include the Project
name just to the right of the line amount. (You can add multiple projects on
multiple lines.)
c. Select Save.
© 2019 Intuit Limited Page 53 of 76Starting Out with QuickBooks Online
Add a transaction to a project outside of Projects
1. Open global create (+), and choose Invoice (or any other transaction).
2. Pick the project from the Customer/Projects drop-down or fill in the project.
3. Add your info as usual.
4. Remember to Save.
Run Project-specific reports
1. Select the project.
2. Click any of the reports (Project Profitability, Non-billable Time or Unbilled time and
expenses).
Note: The more transactions you assign to your project, the more insights you’ll see in the reports.
Move existing transactions into Projects
If you are using sub-customers, you can merge the transactions into your project by changing
the name of the sub-customer to be the same as the project. Here’s how:
1. Set up the project under the same parent customer as the sub-customer. It must be
named differently than the sub-Customer.
2. Go back to Customers and choose the sub-customer.
3. Edit the name of the sub-customer to the project name and say Yes to merge.
4. All the transactions for that sub-customer will now be in the project!
© 2019 Intuit Limited Page 54 of 76You can also read