Recipes for engaged & active online learning - The Office of Digital Learning & Inquiry Middlebury College - Pressbooks at Middlebury
←
→
Page content transcription
If your browser does not render page correctly, please read the page content below
The Asynchronous Cookbook
   recipes for engaged & active online learning

                    brought to you by
         The Office of Digital Learning & Inquiry
                  Middlebury College
The Asynchronous Cookbook by Office of Digital Learning & Inquiry, Middlebury
College is licensed under a Creative Commons
Attribution-NonCommercial-ShareAlike 4.0 International License, except where
otherwise noted.
Contents

    Contributors

 1. Introduction
 2. Some Key Concepts
 3. Group and Team Work in Asynchronous Settings
 4. Discussion Activities
 5. Mapping Activities
 6. Games
 7. Simulations & Labs
 8. Writing
 9. Presentations
Contributors
The activities in this cookbook draw on research and good practice
in online course design to provide recipes – concise and specific
instructions and examples – for adding asynchronous activities to
a course. We will be adding recipes, so please check back often.
DLINQ staff contributors to the cookbook include:
Dr. Sonja Burrows – Instructional Designer
Dr. Sarah Lohnes Watulak – Director of Digital Pedagogy and
Media
Dr. Jeni Henrickson – Instructional Designer
Heather Stafford – Instructional Designer
Dr. Sarah Payne – Instructional Designer
Luke Phelan – Instructional Designer
Contributors | 11. Introduction
What Is Asynchronous Learning?
Asynchronous interactions allow students to join and participate in
class activities on their own schedule (though usually by a deadline).
An example of asynchronous learning is a pre-recorded lecture that
students watch followed by discussion board interactions. Some
asynchronous learning is self-paced or self-study – meaning, no
peer or instructor interaction – which you may have experienced if
you’ve ever had to complete a workplace training module. However,
we want to stress that asynchronous learning can also be active
and completed in a learning community of peers and instructors. In
this cookbook, we offer recipes for the latter: asynchronous online
learning that is designed for peer and instructor interaction, but
which takes place over time, instead of at the same time. For all
of the recipes presented in this cookbook, interaction is a key
ingredient.
Why Should I Use Asynchronous Activities in My
Course?
Whether you are designing a hybrid course (with some in-person
and some online activities), or a fully online course, having regular,
meaningful asynchronous activities in place in which everyone can
participate, means fewer interruptions to learning should you need
to pivot based on changes in the learning context (illness,
shutdowns, etc.). If students are already using social annotation
tools to discuss the weekly readings, that’s one less adjustment you
need to make.
Introduction | 3And we know that synchronous learning may not be the best for all students, all of the time. (And asynchronous learning is the preferred mode for some students all of the time, for example, for students who have full time jobs.) There are a number of barriers to full and equitable participation in synchronous learning, including time zone, Internet access, accessibility, and Zoom fatigue. Blending synchronous and asynchronous activities provides the opportunity for all students to fully participate in your course. We’d like to think about synchronous and asynchronous as working together, rather than at opposite and opposing ends of a spectrum. Research indicates that blending synchronous and asynchronous interactions in remote/online courses can promote social presence and combat students’ feelings of disconnectedness while supporting student learning. Daniel Stanford of DePaul University created the Bandwidth/ Immediacy Matrix as a way of visualizing activities that span the range from synchronous (high immediacy) to asynchronous (low immediacy) as well as high bandwidth and low bandwidth. You might consider plotting your class activities in the matrix, aiming for a spread of activities across the 4 quadrants. 4 | Introduction
Why Did We Make This Cookbook?

In Camp Design Online, we offer some big-picture theory and
practice for creating engaging online courses, based on research
and good practice. The activities in this cookbook draw on many of
the principles we share in Camp Design, packaged into recipes that
provide concise and specific instructions for adding asynchronous
activities to a course.

Discipline-specific Concerns

Most of the activities in this cookbook can be used in any discipline;
however, online learning provides unique challenges for teaching
foreign languages, for performance based disciplines such as
interpreting, the performing arts, and teacher education, and for lab
disciplines. You may wish to refer to the resources linked below for

                                                      Introduction | 5
a general overview of the types of asynchronous activities that work well for these disciplines, and then return to the cookbook to find out how to put the activities into practice. Language Learning Online Teaching Performance-based Skills Online Teaching Lab Courses Online 6 | Introduction
2. Some Key Concepts
Preparing Students to Engage in Asynchronous
Learning
It can be helpful to prepare students for what to expect from your
course and from the asynchronous activities, to address any
misconceptions up front, and help students understand what it
means to be successful in their learning. Below, we’ve shared a few
examples from instructors’ syllabi for how they’ve framed things for
their students.
From INTD 1227 Inclusive Design and Design Justice, a fully
asynchronous online course taught by Sarah Lohnes Watulak and
Amy Collier:
“This is a facilitated asynchronous class, meaning that we’ll be
interacting a lot with each other online, with deadlines for
assignments and activities spread throughout the week. There are
no required, scheduled live meetings. We will have weekly optional
live sessions, with days/times that vary week-to-week. Check the
Week Overview page for each week for the time and date. We will
not introduce new material in these sessions; they’ll be for Q&A,
chatting through what you’re learning, etc.
You might be wondering, where will the professors be, in this
asynchronous class? Will I ever see or interact with them, or will I
be doing this on my own? You’ll see us in short videos introducing
elements of the course, and course concepts; you’ll hear from us
in the feedback we give on assignments; you’ll interact with us
during optional Zoom sessions, required 1:1 conversations about
your project work, in the margins of texts that we’re annotating in
Hypothes.is, and in conversations on Teams. Same goes for your
peers; you’ll see your classmates in optional Zoom sessions, in small
group conversations about your project work, in the margins of
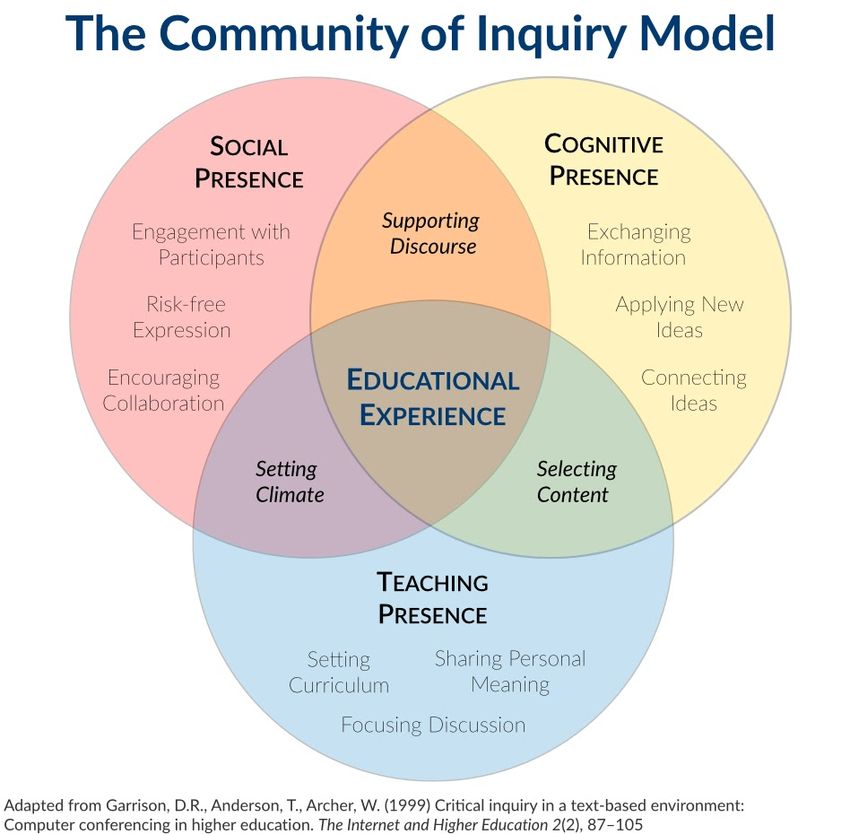
Some Key Concepts | 7texts that we’re annotating with Hypothes.is, and in Teams. The asynchronicity of this course is part of our inclusive design for this course, as we try to ensure that everyone in the class can participate fully.” Framing Learner Engagement with the Community of Inquiry Model The Community of Inquiry framework describes the elements – teaching presence, cognitive presence, and social presence – that are ideally present in the learning environment, activities, and assessments, in order to create an effective and engaging online learning experience. Teaching presence is defined as “the design, facilitation, and direction of the social and cognitive processes for the purpose of realizing the relevant learning outcomes” (Anderson, Rourke, Garrison, & Archer, 2001). Cognitive presence is defined as “the extent to which learners are able to construct and confirm meaning through sustained reflection and discourse” (Garrison, Anderson, & Archer, 2001, 2004). Social presence is defined as “a level of connectedness among instructors and students that determines how motivated participants are to take an active role in their own and their peers’ meaning-making processes” (Whitside, Dikkers, & Lewis, 2014). 8 | Some Key Concepts
We use the CoI framework for online courses because it helps us
to plan for, and intentionally design for, the kinds of interactions
we think will help foster meaningful learning and connection in an
online course. Each of the elements — social presence, cognitive
presence, and teaching presence — can be implemented in course
design in many different ways, and the recipes in this cookbook
provide options for each element.

Creating Accessible Materials

Accessibility is a key component of designing inclusive and equitable
learning environments. We recommend creating accessible content
from the start, rather than in reaction to a specific need at a specific

                                                 Some Key Concepts | 9
time. Including accessibility in your design process means not only that you save time and effort by not having to retrofit your materials, but your materials are usable by a wide variety of learners with a variety of needs and preferences. For example, in the built environment, we might think about how a curb cut in the sidewalk was originally designed for wheelchairs, but is also very useful for people pushing strollers, skateboarders, and people on crutches. In the digital environment, video captions were designed to facilitate access to video content for people who are deaf and hard of hearing, they are also useful for students who are learning English, and to understand fast speech. The good news is that many of our common tools now have easy-to-use accessibility options built right into them. Check out the blog post Creating Accessible Digital Materials for resources and instructions on how to create accessible PDF files, accessibility in Canvas, live subtitling in Google Slides, using SensusAccess to automatically convert documents into a range of alternate and accessible formats, and more. But There Are So Many Tools! How Do I Choose? While there are approximately 10 bazillion* ed tech tools out there, in most cases, these recipes highlight tools that are available and supported at Middlebury. We offer these specific tools to help combat decision fatigue, and because these tools have, by and large, been vetted by Middlebury for privacy, security, and accessibility. *a completely made up number 10 | Some Key Concepts
3. Group and Team Work in
Asynchronous Settings
Collaborative group work is a common component of many classes
across the curriculum. All of the information that is shared in this
section is representative of processes that should take place with
any group project assignment, however it is specifically adjusted to
focus on the necessity of asynchronous work when students are
working together at a distance. As a first step a faculty member
should be able to answer each of these questions before assigning a
group project to their class:

 1. What learning goal is the collaborative work addressing?
    Ensure this learning goals is represented in your assessment
    criteria.
2. How will you assess the group’s work?
3. How are you going to teach, support and mentor students
    through group work?

If you are not sure how to answer question #3 – good news! That’s
what we’ll cover in this section. If you are stumped on questions 1 &
2 this might be a sign that you should re-think the assignment and
determine whether it truly needs to be a group project, or if you
could address the same learning goals by transitioning the project
to an independent one.

Laying the Groundwork – Assigning
Self-Assessments

Before students can work together effectively, they need to

                                              Group and Team Work in
                                            Asynchronous Settings | 11
understand the way that they work and the implications that process will have on a group project. This can be done relatively easily by assigning a self-assessment to students. Here is an example. This work can be used as a foundation for developing agreements within the group. In an asynchronous format student could share their self-assessments in a shared drive or document so that they can all learn a little bit about each other before they begin working together. You could also ask students to share a video or audio narrative of their assessment with their group as a way of helping them to get to know each other as more than text on a screen. Building Connections – Establishing Communication Channels and Protocols Being able to provide a default communication channel option to groups of students is a great first step in helping them to develop as a team. Keep in mind that some tools – like Google Docs, are not easily accessible in all countries. Be sure that you recommend students test out different solutions with the full group before settling on any. As a way of testing out their communication tools, it’s a great practice to require groups to come up with a team agreement where they can establish norms for how their group will communicate what info and how quickly members should expect a response. It will be important for them to consider what information is communicated best via text vs. in person in a video or phone call. Consider how easy it is to misinterpret tone in an email and how that can foster miscommunication. How will the team work to mitigate this? When working remotely it is very easy to feel alone. It’s important for students to know this and find ways to proactively address it within the group from the start. One way to combat this as a team 12 | Group and Team Work in Asynchronous Settings
is for team members to actively reach out to each other throughout
the week to check in, ask questions and share progress. When in
doubt – over communicate! It’s easy to feel like “no one needs or
wants to know this” but ask yourself how often you have been
annoyed by someone sharing information with you about a project
that you are working on? Work against the assumption that you
are “bothering” someone and towards the idea that you are
“connecting” with someone.
  Collaborative documentation can take the place of synchronous
meetings, however it is important to mirror many of the processes
that would occur in a meeting, within the documentation.
Comments in the margins can mimic the in meeting chatter to
clarify ideas, ask questions, etc. Be sure to leave space for questions
and challenges to assumptions and welcome them into the
conversation. Questions and challenges are potential for growth!
  An “Action Items” section at the end of notes can be used to
summarize what was decided and action steps that need to be taken
along with who will take them.
  Guide students through considering how you will organize your
asynchronous work to ensure that everyone stays on the same page
and everyone can find information quickly. Documentation can also
be a good way to clear up confusions, as not all team members may
remember an outcome the same way you do. Having it written down
makes that confusion concrete and gives teams the opportunity to
address it.

Failure to Plan is a Plan for Failure

Set your students up for success by requiring them to create
collaboration plans. The communication plan discussed in the
previous sub-section should play a big part in this process. It’s really
important for remote teams to set expectations and consistent
guidelines for how they will work. You can consider this the

                     Group and Team Work in Asynchronous Settings | 13
blueprint for your students’ work moving forward. Without it – it’s very easy to get off track as there is no foundation to return to if the work is not going well. Make it clear that as a group it’s everyone’s responsibility to make sure that all voices are heard. Group members should actively work to ensure that all members of the group have time to share their ideas and questions. Specifically point out that this means that students who like to participate actively should be sure to take on the responsibility to be sure to draw others into the conversation. Conversely, group members who tend to like to listen more and document work, will now need to ensure that they share their thoughts frequently. Encourage the group to check in frequently with each other to be sure that technology is working well for all members of a group. If someone is experiencing difficulty, work together as a group to come up with solutions for what you might do to ensure the experience is better for all group members. If you are not sure how to solve a problem – check in with DLINQ, we’d be happy to offer some suggestions! Assume Positive Intent At any point in time different team members can be impacted by a variety of events, challenges, etc. in their life. It’s important to address this with students before they run into this issue so they know how to be on the lookout for issues, and what to do to address them. Being mindful, observant and kind are all valuable skills regardless of the location of any team that we work on. Life events can significantly impact our ability to show up as fully engaged team members. Remind students to be careful about making assumptions about a team member’s behavior, as you never know what is going on in their life at any point in time. Over time groups will develop trust that will enable them to be more upfront about impacts on their work. Clarify to students that this doesn’t mean everyone 14 | Group and Team Work in Asynchronous Settings
needs to share details about their personal life, but it can mean that
you feel comfortable telling your group members when something
else is on your mind and you are not quite up to the task today.
It’s important for all team members to be aware of when they are
making assumptions about others’ behavior, and consider that they
might not know the whole story. This is a good time to point out
that you are a support that is available to students. If students
feel something is off with a team member and they don’t feel
comfortable reaching out to them, checking in with you may be a
good first step.
  The last piece of advice that we have here can be a tough one,
but it’s critical. Remind your students of the importance of assuming
positive intent, and model this in your interactions with students.
Working remotely is challenging and it is so easy to misinterpret
cues, behavior and language. Trying to reframe your conversations
by starting at a place of positive intent can truly improve the
connection and trust between team members. It’s not easy work,
but when done well it can be a transformative experience and
certainly one that students will use again and again in their future.
  Additional Resources

 • Some Tips for How to Work Collaboratively Online – blog post
    about the project that initially inspired these resources by
    DLINQ instructional designer Heather Stafford
 • 8 Ways to Improve Group Work Online by Cathy N. Davidson
    and Christina Katopodis

 • Group work: Using cooperative learning groups effectively –
    from Vanderbilt University

 • Assessing Group Work – from UNSW Sydney

 • Reflective Listening – from UNSW Sydney

 • Five Steps to Improving Online Group Work Assignments –
    from Faculty Focus

                    Group and Team Work in Asynchronous Settings | 15
• Tips for When Group Projects Aren’t Working – from the
Eberly Center Carnegie Mellon
• Assessing Group Work – from the Eberly Center at Carnegie
Mellon
• Project Based Learning for Online Spaces – from the
Instructional Design team at WPI
• Self & Peer Evaluation of Group Work Contributions for
Research Papers and Oral Presentations – from California State
University, Northridge
16 | Group and Team Work in Asynchronous Settings4. Discussion Activities
Recipes in this chapter
• Text-based Annotation
• Video-based Annotation
• Student-led Threaded Discussions
Chapter Intro
Discussion activities provide an excellent starting point for faculty
who are new to asynchronous activities, or aren’t sure where to
start, but are looking for a way to add regular, asynchronous
activities to their course. Discussion activities can be used to add
instructor-student and student-student interaction to your course;
in Community of Inquiry-speak, use these activities to add
instructor presence, social presence, (and cognitive presence,
depending on the goal of the activity) to your course (see Chapter
2 for more on the Community of Inquiry framework). You can use
these recipes as a lead-in to your synchronous class time, by asking
students to read, discuss, share feedback prior to your scheduled
synchronous meeting. That way, you can spend your synchronous
class in a more meaningful way, whether that’s digging deeper into
the material, or creating community (or both).
Discussion Activities | 17Please see Chapter 3 for recommendations for creating successful
group/team interactions.
Text-based Annotation
Social annotation is collaboratively “marking up”
digital texts & media, using tools that allow students to
annotate a reading together, interstitch and connect
comments, and respond to/add to each other’s
annotations. It is also a social learning activity – it’s a
way for students to learn from one another
asynchronously.
18 | Discussion ActivitiesPrep Ahead
Select your readings and make sure that they are available in a
digital format (a PDF, a web page)
Ingredients
• Digital readings
• Learning goal(s)
• Prompts/expectations for students
• A social annotation tool
• Assessment and/or feedback strategy
Step by Step Instructions
1. Identify your learning goal. Do you want students to
engage with the readings in order to:
▪ Close reading: Students annotate course readings
▪ Breadth/critical reading: Students annotate readings
on the web
▪ Deepening understanding: Students add context,
multimedia to readings
▪ Interaction: As a replacement for/addition to
discussions
▪ Drawing connections in research: Students annotate
sources to connect to other contexts and sources
▪ Translation: Providing translations for difficult/
colloquial language texts
▪ Critique: Layering critique on media, reporting
Discussion Activities | 192. Create a prompt/instructions for the activity. Sample
prompt:
Digital annotation and discussion of key texts should
connect to key ideas in the texts, show your
engagement with those ideas, as well as connections
to your personal experience. Digital annotations can
and should also include engagement with peers’
annotations and questions that you have about the
text – this is a chance for you to learn from one
another. You might:
▪ Define words that you don’t know.
▪ Ask questions.
▪ Answer questions.
▪ Link to similar articles, or things that passages remind
you of from other courses or your personal
experiences.
▪ Provide analysis.
3. Choose a social annotation tool. Middlebury licenses 2
social annotation tools: Hypothes.is, and Perusall. They
both provide features for the core function of annotating a
reading, and they are both available to use from within
Canvas. Some differences:
▪ Hypothes.is:
▪ Allows annotations on websites, and readings in
Canvas
▪ Annotations can be private, shared to a group, or
public.
▪ Integration with SpeedGrader
▪ Currently doing a pilot at Midd
You can find out more about Hypothes.is on the
20 | Discussion ActivitiesDLINQ Toolkit Hypothes.is page, including
instructions for how to use it.
▪ Perusall:
▪ Annotation tool for uploaded documents or
purchased textbooks (this option is attractive for
courses that depend on a textbook, such as in the
sciences)
▪ Also supports video annotation
▪ Integrated with Canvas
You can find out more about Perusall on the DLINQ
Toolkit Perusall page, including instructions for how
to use it.
4. Give feedback/assess
▪ Given that this will likely be a new activity for
students, after your first annotation activity, we
suggest that you provide brief, formative feedback to
your students (either individually, or as a whole class)
as to how the annotations and discussions met your
expectations, and what you might like to see done
differently the next time.
▪ We also strongly encourage you to model the types of
annotations and interactions you would like to see by
participating in the activity yourself. That does not
mean responding to every students’ annotation, but
adding a handful of annotations and comments will
show your students what you’re looking for – and,
your participation is a great opportunity to integrate
instructor presence into course (they can see that you
are there and engaging with them and their ideas).
▪ Any graded assessment of the activity should tie
closely back to your learning goals and specific
Discussion Activities | 21instructions. If your learning goals are for students to
critique the text, and for students to interact with one
another, then your assessment should align with those
criteria.
EXAMPLE
Working with Primary Texts, Surfacing Learning Gaps
History 103, The Making of Europe, Dr. Louisa
Burnham
“How annotation meets course learning goals:
An example – Students read and annotated the text of
Magna Carta off a British Library website. It led to a lot
of great observations – and perhaps even more
importantly for me, led to me understanding what
students DIDN’T understand. Because my class was only
partly synchronous (sections only), this meant that I
spent less time in class talking about MC, but still felt
like they were getting important things out of it (and
that I knew where they were going astray and could
help guide them). This was our 5th Perusall assignment
(out of 7).”
Additional Resources
• Slides from Social Annotation for Learning workshop
• Slides from Hypothes.is workshop
• Slides from Perusall workshop
22 | Discussion ActivitiesVideo-based Annotation
There are a number of tools available that allow
students to annotate a video, inserting comments,
observations, and feedback right at the moment in a
video where it applies. As with text-based annotation,
video annotation can serve as an excellent
asynchronous social learning activity.
The source of the video used for annotation can vary
from a publicly available external video on YouTube, to a
recording created by the instructor, to recordings that
students themselves create. The topic focus of the video
content can be whatever fits your learning objectives
and course content — a documentary, student
presentations, student skill practice (e.g., music,
language learning, dance, theater, speech,
interpretation), student creative work (e.g., animation,
film production, website design), a “lecture” video, and
other endless possibilities.
Discussion Activities | 23Prep Ahead
Determine what type of video content students will be working with
and/or creating, and what platform you plan to use for sharing and
annotation.
Ingredients
• Learning goal(s)
• Videos
• Prompts/expectations for students
• A video annotation tool
• Assessment and/or feedback strategy
Step by Step Instructions
1. Identify your learning goal. Do you want students to
engage with the video(s) in order to:
▪ Close analysis: Students annotate course videos
▪ Breadth/critical analysis: Students annotate videos of
their choice related to the learning topic
▪ Deepening understanding: Students add context,
multimedia to videos
▪ Interaction: As a means of fostering discussion among
students
▪ Drawing connections in research: Students annotate
videos to connect to other contexts and sources
▪ Translation: Providing translations for difficult/
colloquial language videos
▪ Critique: Layering critique on media, reporting
24 | Discussion Activities▪ Peer Feedback: Providing feedback to peers on
presentations and/or skill practice
2. Create a prompt/instructions for the activity. Sample
prompt:
Digital annotation and discussion of key ideas in the
video should connect to key ideas in the course or
module, show your engagement with those ideas, as
well as connections to your personal experience.
Digital annotations can and should also include
engagement with peers’ annotations and questions
that you have about the video – this is a chance for
you to learn from one another. You might:
▪ Define words that you don’t know.
▪ Ask questions.
▪ Answer questions.
▪ Link to similar articles or media, or things that
passages remind you of from other courses or your
personal experiences.
▪ Provide analysis.
▪ Provide feedback on skills practiced in the video.
3. Choose a video annotation tool.
▪ Middlebury licenses GoReact, which is available both
as a standalone web tool, and as an external app
integrated with Canvas. GoReact allows instructors
and students to record or upload their own videos,
either individually or in small groups of up to nine
people.
▪ Video assignments can be individual in nature, where
only the instructor will be able to add or view
annotations, or social in nature, where the instuctor
Discussion Activities | 25can open annotation and viewing to select class
members or to the entire class. Annotations can be
multi-modal, and users can create and share
annotation marker sets as well.
▪ Perusall (described in the Text-based Annotation
recipe) also offers video annotation, although it is not
as robust or flexible (or easy to use) as GoReact.
Another free option for video annotation is VideoAnt,
which is managed by the University of Minnesota.
4. Give feedback/assess.
▪ Given that this will likely be a new activity for
students, after your first annotation activity, we
suggest that you provide brief, formative feedback to
your students (either individually, or as a whole class)
as to how the annotations and discussions met your
expectations, and what you might like to see done
differently the next time.
▪ We also strongly encourage you to model the types of
annotations and interactions you would like to see by
participating in the activity yourself. That does not
mean responding to every students’ annotation, but
adding a handful of annotations and comments will
show your students what you’re looking for – and,
your participation is a great opportunity to integrate
instructor presence into the course (they can see that
you are there and engaging with them and their ideas).
▪ Any graded assessment of the activity should tie
closely back to your learning goals and specific
instructions. If your learning goals are for students to
critique the video, and for students to interact with
one another, then your assessment should align with
those criteria.
26 | Discussion ActivitiesEXAMPLE
GoReact Presentation Assignment
This activity combines community building with an
informative presentation and annotated discussion.
First, introduce students to GoReact and video
annotation through a short tutorial that showcases the
tool and the features students will be asked to engage
with there (you could record your own tutorial or share
one of the many tutorials created by GoReact staff).
Then, ask students to complete a brief, ungraded
practice activity using GoReact. Have them record and
share a very short (maximum 90 second) video
explaining one of their life passions. Then ask them to
try out inserting feedback and comments into their own
video along with the video of one peer.
Move on from there to an informative or persuasive
presentation assignment. Have students, either solo or
in a team, record themselves presenting on a topic of
their choice that is related to your course content and
learning objectives. They could use a video editing and
recording tool of their choice and then upload to
GoReact, or simply use GoReact itself to do the
recording.
Provide a rubric that details the expectations for the
presentation, the maximum length it should be, and
what items within the presentation will be assessed.
Once students have submitted their assignment, they
can peer review one to two of their classmate’s video
Discussion Activities | 27presentations, using your rubric as a guide for providing
feedback.
Allow the students to re-record their video
presentation, incorporating feedback from their peers.
Once the revised presentation is submitted, you as the
instructor can go through and provide annotated
feedback on the final video submission.
Additional Resources
• GoReact Instructor Guide
• Investigating the Social Interactions of Beginning Teachers
Using a Video Annotation Tool, by Joshua Ellis, Justin
McFadden, Tasneem Anwar, and Gillian Roehrig.
28 | Discussion ActivitiesStudent-Led Threaded Discussions
Creating space for student-led asynchronous
discussions in your course can give you another
opportunity to foster peer-to-peer interaction and
learning while granting student agency to your learners.
Probably the most common way to do this is through
the use of a discussion forum or board. Canvas offers
the ability to do this; however, it can also be
accomplished through messaging apps like Teams or
Slack.
Prep Ahead
To prepare for this assignment faculty should consider how they
want to structure their student-led discussions. In particular, they
should consider:
• What will be the role of the student facilitator?
• How frequently will the student-led discussions occur?
• How can you adequately convey your expectations to ensure
that the discussion reflects the goals that you wish to see
demonstrated?
• Will you assess the work of the facilitator and the participants?
If so, how?
Once you have determined this structure, it is important to write
up an initial description of this assignment plan so that students are
Discussion Activities | 29aware of all of the expectations and guidelines that they will need to
adhere to.
Ingredients
• Guidelines & expectations for students
• Learning goals being addressed
• Assessment and feedback strategy
• Discussion forum tool
Step by Step Instructions
1. Identify your learning goal. Do you want students to lead
and respond to student lead discussions to:
▪ Foster peer to peer learning?
▪ More deeply examine and question core course
concepts?
▪ Analyze and process readings in a collaborative
setting?
▪ Develop reading prompts and facilitate discussion?
2. Create instructions and guidelines for the assignment.
You may be able to reuse this content if you assign a
weekly student-led discussion forum. Sample prompt:
Each week one student in the class has signed up to lead
the class discussion on the weekly reading. As the
discussion leader, it is your responsibility to formulate 2-3
reading prompt questions that you can share with the
class at the beginning of the week. Throughout the week
you will also be responsible for facilitating the discussion
30 | Discussion Activitiesby connecting relevant observations and responses and
generally “jumping in” whenever it seems like facilitation
can help move the conversation along.
3. Choose a Discussion Tool. Middlebury licenses two tools
that can easily be used for discussion forum purposes:
Canvas and Microsoft Teams. If you are already using one
of the tools for your course, we would recommend you
stick with that tool, to keep your course tech usage as
streamlined as possible.
▪ Learn more about Canvas and Microsoft Teams.
4. Create the structure for the discussion(s) in your tool of
choice. If you will have a pattern of discussions in your
course, you may be able to duplicate the structure
throughout the course so that your forums are all prepped
and ready to go at the start of the semester. Both Canvas
and Microsoft Teams allow you to control visibility so that
the “prepped” forums are not visible to students until you
want them to be.
5. Give feedback/assess. Early in the semester, you should
provide students with the ways in which you will assess
both their facilitation and participation in the student-led
forums (see Prep Ahead section above). Whatever your
assessment strategy is, it should be aligned with the
learning goals outlined in connection with the assignment.
It can be very helpful to provide models and exemplars of
past discussions to demonstrate to students what you are
looking for in their work.
Discussion Activities | 31EXAMPLE
Student Podcast Panel Discussion with Canvas Forum
for Class Reactions
Professor Daniel Chatham at the Middlebury Institute
offers a fun spin on student-led discussions with his
student podcast panel discussions. Students participate
twice during the semester as panelists. Panelists find an
interesting news item from the week, present a concise
summary, explain potential implications to a course
topic, and specifically address a guiding question for
that week’s episode (those guiding questions change to
compliment course topics). On weeks when they are not
panelists, students listen to the weekly episode and post
their reaction or additional thoughts in a discussion
forum on Canvas. Panelists are then free to respond.
Read more about Professor Chatham’s podcast
discussions at the Middlebury Teaching & Learning
Knowledge Base.
Additional Resources
• Student-led Facilitation Strategies in Online Discussions (PDF),
by Evrim Baran and Ana-Paula Correia
• Student-led Online Discussions: A Feminist Praxis to Mitigate
Digital Gender Inequality, by Alice Lai
32 | Discussion Activities5. Mapping Activities
Recipes in this chapter
• Geographical Mapping
• Concept Mapping
Chapter Intro
Mapping, in its broadest terms, involves the visual or spatial
organization of information. There are many different types of maps
that can be created as learning activities, ranging from geographical
maps, to concept maps, to hierarchical or process maps. Mapping
incorporates a wide range of skill sets, including:
• Critical thinking (e.g., how do I identify and choose data sets
for my map, what might the data on this map tell me about this
place or about the people who live there, what does the data
on this map show me over time, how might the data on this
map be biased)
• Interdisciplinarity (e.g., by layering data sets from multiple
disciplines or time periods on a map, by showing relationships
between people and places)
• Spatial thinking / awareness (spatial thinking plays a role in
activities ranging from understanding language and art, to
geography and geoscience, to scientific modeling, geometry,
astronomy, etc.)
Mapping Activities | 33• Data visualization
• Digital storytelling
• Bias awareness (maps are not neutral / ahistorical / apolitical)
• Mapping also offers opportunities to:
◦ Connect global or big-picture issues and ideas to local
communities
◦ Personalize and humanize learning
◦ Visualize learning
◦ Communicate learning
Questions that are helpful to consider as you prepare your mapping
activity include:
• What will be the theme and topic for the map, and on what
location will students focus? Will you determine the theme,
topic, and location, or will students be given the opportunity to
choose their own?
• What are the key learning objectives?
• What type of mapping will the activity include? Some
possibilities are:
◦ Simple geographical map with one data layer (e.g., place
markers identifying key locations)
◦ Complex geographical map with multiple data layers (e.g.,
place markers identifying key locations plus population
data)
◦ Concept map
◦ Timeline
◦ Process map
◦ Site map (e.g., such as for a website or a blueprint for a
building)
• Will students work solo or in teams and why?
• What modality and tool do you plan to use and why?
• From what source do you plan for students to gather data for
their maps?
• How will students submit and showcase their work? Will their
34 | Mapping Activitieswork be viewable only by other members of the class, or will it
be shared in a more public forum?
What constitutes data? Where do I find reliable data?
• Data can be related to real-world events, a fictional world, or
you can collect (or geocode/georeference) your own data
• Data can be in the form of text, shapefiles, raster files (images),
or other data linked to place
• ArcGIS Online has data available for anyone to access, but you
need to check the source as any user can share data in the
ArcGIS platform
• City, state, federal government, and NGO websites often share
place-based data that is accessible to the public
• Organizations like USGS, NIH, and the Census Bureau (TIGER)
are also good sources of data
Middlebury resources for data and questions about data include:
• Middlebury Library Maps & GIS Research Guide
• David Rumsey Historical Map Collection
• MiddData
• META Lab (data analytics and research lab at the Middlebury
Institute)
Middlebury also has a Data Services Librarian, Ryan Clement, who is
a great resource for all things data!
Mapping Activities | 35Geographical Mapping
Geographical mapping projects can be used across
disciplines as a way for students to form connections
between people or issues and places. As noted in the
introduction to this chapter, mapping allows learners to
connect global or big-picture issues and ideas to their
local communities; personalize and humanize their
learning; visualize their learning; and communicate their
learning to others.
Prep Ahead
Select a topic/theme of focus. This could be any place-based topic
that can be visually presented using geographical maps and the
layering of data on those maps.
Sample ideas for broad topics/themes include:
36 | Mapping Activities• Environmental Studies/Indigenous History
• Politics/Voting
• Environmental Studies/Land Use
• Public Health/COVID
• Human Geography/Migration
Ingredients
• Learning goal(s)
• Prompts/expectations for students
• A geographical mapping tool
• Assessment and/or feedback strategy
Step by Step Instructions
1. Identify your learning goal. Some examples:
▪ Identify and visualize relationships between people
and places
▪ Identify and visualize changes in a place over time
▪ Identify reliable data sources and explain how to
assess data
▪ Raise bias awareness
▪ Identify and collect your own data to help analyze a
complex issue
▪ Communicate meaning through data visualization
2. Create a prompt/instructions for the activity. Sample
prompt:
Choose a topic, guiding question, and specific
Mapping Activities | 37location (geographic place), and design and create a
map or story map that incorporates multiple data and
media to explain your topic. The map should include
some layering of data related to the topic chosen that
help illustrate relationships between the data and the
place chosen. Additional guidelines include:
▪ Identify your chosen topic, guiding question, and
location.
▪ Highlight key places on the map related to your
chosen topic.
▪ Visualize one or more data sets related to your chosen
topic by either creating your own map and adding the
data sets to them, or choosing existing maps with data
sets already incorporated. Don’t forget to identify the
source of your data and/or maps.
▪ Incorporate select media, such as photos, illustrations,
or videos, that allow your map viewers to interact
with, and gain deeper understanding of, your chosen
topic.
▪ Provide a short written analysis of the data that is
displayed.
3. Choose a mapping tool. Mapping tools can be as simple as
a pencil and piece of paper, or as sophisticated as an
online application like ArcGIS. At Middlebury, faculty and
students have free access to a variety of digital tools that
can be used for mapping, including:
▪ ArcGIS Online: This is a sophisticated online mapping
tool that can be used to create and analyze complex
maps with multiple data layers. While creating maps
using ArcGIS Online has a bit of a learning curve,
there are many online tutorials created by ESRI (the
tool developer) that facilitate technical learning.
38 | Mapping ActivitiesArcGIS Online also offers a wide array of already-
created maps with data layers for students to explore
and analyze, as well as incorporate into their own
mapping projects.
▪ ArcGIS StoryMaps: This is an easy-to-use online tool
students can use to create and share basic interactive
maps as well as digital stories incorporating maps and
other media (images, audio, video, text). ESRI (the tool
developer) offers many online tutorials that facilitate
technical learning, as well as highlight examples of
StoryMaps created by others.
▪ ArcGIS Survey123: This is an easy-to-use survey
creation tool (form tool) that integrates well with
ArcGIS mapping tools if you’re interested in collecting
your own data to use on maps.
▪ Google Maps: Allows you to create and share basic
interactive maps. Must be logged into your
Middlebury Google account to be able to create and
share your own map creations. Not nearly as
sophisticated as the ArcGIS tools, and will not be
accessible for students living in locations that block
access to Google apps (e.g., China).
4. Give feedback/assess. Depending on your learning goals,
there are different approaches you can take to assessing
mapping projects. Rubrics are helpful to illustrate
expectations about what all should be included in the
mapping project, as well as what items of the map will be
assessed. You may want to also incorporate peer feedback
as part of the learning process, if the project timeline
allows enough time for students to be able to incorporate
any peer feedback into their final submission. Items that
both you and any peer reviewers might assess / provide
feedback on include:
Mapping Activities | 39▪ Map construction (are key locations highlighted? Are
data layers clear, readable, and understandable? If
symbols are used, are they clearly defined in a legend
or elsewhere?)
▪ General design (well organized, easy to read,
interactive elements work as expected, facilitates
understanding of the topic)
▪ Data (Is the data source identified? Is the data source
reliable? Are the data clearly presented? Does the
presentation of the data introduce any bias through
the way it is visually represented?)
▪ Text explanation, if required, is present and meets
expectations outlined in the project guidelines
▪ Added visuals or media, if required, are present,
sources are identified, and visual/media are clearly
connected to the topic at hand and facilitate
understanding of that topic
EXAMPLE
History/American Studies
Vermont Life’s Vermont: A Collaborative Web Project
Prof. Kathryn Morse
Course Description: Students in this course work
collaboratively to build an online history project aimed
at a wide audience. The goal is to construct a website
that examines the evolution of historical images and the
meaning of the state over time, paying particular
attention to consumerism, the environment, tourism,
40 | Mapping Activitiesurban-rural contrasts, local food movements, and ways
that race, class, and gender influence all of these.
StoryMap Assignment: Tell a story about change over
time in the Burlington Lakeside neighborhood. It should
have 5 or 6 entries, each one of which makes a
particular observation that moves forward your
narrative of change in the Lakeside neighborhood. As an
alternative, you could focus on one map and highlight
what that map reveals about the neighborhood at a
particular moment in time. Students are given several
maps ranging from 1890-1942 and some census forms
from the early twentieth century. They are not expected
to cover the entire 52-year period of the maps. Students
are free to find and use other documents.
Additional Resources
• Recording of a DLINQ presentation on Mapping Across
Disciplines: view in Panopto.
• Additional resources, including overviews of a few sample
lessons shared by Middlebury faculty, are included in the
DLINQ presentation slide deck, along with links to the various
mapping tools highlighted in the presentation.
Mapping Activities | 41Concept Mapping
Concept maps are visualizations of knowledge that
illustrate relationships between topics. They typically
begin with a main idea, and then branch out to show
how that main idea can be broken down into specific
topics. Concept maps can help students develop
abstract thinking skills, organize knowledge, make
connections between topics, and communicate their
understanding of a topic. Concept mapping can be done
as an individual, small-group, or whole-class activity.
“At its core, [a concept map] is made of concepts that
are connected together by lines (or arrows) that are
labelled with the relationship between the concepts.
The concepts are usually found in circles or boxes.
Concept maps are a cross disciplinary active learning
technique that help students manage concepts into sub-
concepts, synthesize information, see a larger picture
and develop higher-order thinking skills and strategies
42 | Mapping Activities(Lee et al, 2013). Concept maps can summarize a part of
a book, connect historical events, describe how a
business is run, develop a personal care plan or patient
treatment, describe how the body works, or the
interconnectedness of a wetland’s ecology.” Tomaswick,
L. and Marcinkiewicz, J. (2018). Active Learning –
Concept Maps. Kent State University Center for
Teaching and Learning.
Prep Ahead
Select a concept or theme with which to start. This could be any
concept that can be visually presented by illustrating relationships
between the concept of focus and associated topics.
Ingredients
• Learning goal(s)
• Prompts/expectations for students
• A concept mapping tool
• Assessment and/or feedback strategy
Step by Step Instructions
1. Identify your learning goal(s). Some examples:
Mapping Activities | 43▪ Identify and visualize relationships between concepts
▪ Explore the meaning and reach of a given concept
▪ Communicate meaning through data visualization
▪ Synthesize and integrate information and ideas
2. Create a prompt/instructions for the activity. Select a
concept or theme with which to start. This could be any
concept that can be visually presented by illustrating
relationships between the concept of focus and associated
topics. Sample prompt: Create a map that visualizes the
concept of “ecology.” Your map should help illustrate
relationships between the main concept and its associated
topics. It’s ok to include short phrases in your concept
map. Provide a brief written analysis (no more than one
paragraph) to accompany your concept map that explains
your thought process as you created the map, and that
highlights key relationships illustrated by the map. What
did you learn by creating this map?“Be sure students
understand the expectations (purpose, variables, how to
use linking phrases to show relationships between
variables, direction of arrows, number of connections).
Share an example of what the map might look like
(something they are familiar with) and discuss what else
might be added to them.” (source)
3. Choose a concept mapping tool. Concept mapping tools
can be as simple as a pencil and piece of paper (which
students can then photograph to share online), or there
are many online tools available. Here are three no-cost
online options:
▪ Canva
▪ Free Mind
▪ Mindomo (free account is limited to 3 concept maps)
44 | Mapping Activities4. Give feedback/assess. Depending on your learning goals,
there are different approaches you can take to assessing
concept mapping projects. We recommend using concept
maps as low- or no-stakes options for facilitating critical
thinking and understanding around key course concepts.
Rubrics are helpful to illustrate expectations about what all
students should include in their maps, as well as what
aspects of the map will be assessed. You may want to also
incorporate peer feedback as part of the learning process,
particularly if the project timeline allows enough time for
students to be able to incorporate any peer feedback into
their final submission. Items that both you and any peer
reviewers might assess / provide feedback on include:
▪ General design (well organized, easy to follow,
facilitates understanding of the concept, illustrates
relationships between topics)
▪ Text summary, if required, is present and meets
expectations outlined in the project guidelines
▪ Added visuals or media, if required, are present,
sources are identified, and visual/media are clearly
connected to the topic at hand and facilitate
understanding of that topic
EXAMPLE
As illustrated by the example below, instructors can
have students revisit a concept map several times over
the course of a semester, and ask them to make
revisions to the map based on new understandings or
connections they may have formed.
Mapping Activities | 45Formative Assessment Using Concept Mapping: A
Geoscience Application
At the beginning of an Introductory Meteorology unit
on Moisture in the Atmosphere, the instructor passes
out copies of a concept map (Acrobat PDF 450kB May 2
05) to students. The major concepts are identified, but
detail is missing. As the unit progresses the instructor
asks students to add to the original concept map. For
example, the students could add:
• the types of reservoirs that occur on land
• different types of precipitation
• additional mechanisms such as transpiration
As the unit progresses, students continue to see the
major concepts repeatedly, and the instructor can track
student understandings of the relationships of parts to
the whole (or misconceptions) as they arise by collecting
and reviewing the concept maps.
Additional Resources
• Concept Mapping in the Classroom, by Kathy Schrock
(includes an extensive list of concept mapping tools, as well as
samples of different types of concept maps)
• Tomaswick, L. and Marcinkiewicz, J. (2018). Active Learning –
Concept Maps. Kent State University Center for Teaching and
Learning.
• Tools for Formative Assessment: Concept Mapping (University
of North Texas Health Sciences Center)
• Chan C. (2009). Concept Map Assessment. University of Hong
Kong.
46 | Mapping Activities• The Ultimate Guide to Concept Maps: From Its Origin to
Concept Map Best Practices, from Amanda Athuraliya on
Creately
Mapping Activities | 476. Games
Recipes in this chapter
• Trivia Games
• Digital Escape Rooms
Chapter Intro
We think of games as being fun and playful, and using games (or
gamified elements) in the classroom has been shown to be linked
to increased engagement and motivation to learn. Students can
use games to learn or review knowledge and skills, and immersive
games can provide a context for applying skills and knowledge (see
for example, Virtual escape room helps nursing students learn
clinical skills).
48 | GamesTrivia Games
Trivia games provide a way to gamify course content,
providing a fun, low-stakes way for students to learn
together while reviewing key skills or knowledge.
Don’t forget that you can have students create the
game as well! Students will have to review facts in order
to create a game, and the game can be shared with
other students or the whole class for further review. You
could have students create and swap trivia games.
Prep Ahead
Decide on the style of trivia game you want to play, as this will shape
the resources that you’ll need to pull it off. For example, if you plan
to create a Jeopardy-style game for students to use for individual
Games | 49review, you’ll need to create, or find and modify, a Jeopardy-style
game board.
Ingredients
• Learning goal(s)
• Prompts/expectations for students
• A trivia game template or tool
• Assessment and/or feedback strategy
Step by Step Instructions
1. Identify your learning goals. Some examples:
▪ Students will use game to review course topics with
the goal of achieving 100% correct responses.
▪ Students will create a review game for their
classmates on a course topic, with accurate questions
and responses.
2. Create a prompt/instructions. Your instructions will
depend a bit on the exact game that you are playing, and
how game play is configured (the size of groups, the
number of rounds, any specific rules for turn taking, etc.).
Make sure to let students know ahead of time any details
of game play, as well as whether and how the game will be
assessed.
3. Identify a tool. There are lots of options for creating trivia
games. Here are a few:
▪ Jeopardy game using Google Slides template – can be
50 | GamesYou can also read


