RNA STAR COMPLETE SARS-COV-2 - INSTRUCTIONS FOR USE - LUMIRADX
←
→
Page content transcription
If your browser does not render page correctly, please read the page content below
SARS-CoV-2
  RNA STAR Complete

 Instructions for Use
 For Research Use Only - Not For Use in Diagnostic Procedures

 Catalog #L018180330096

ART-00045 Rev 5 · Rev date 2021/02
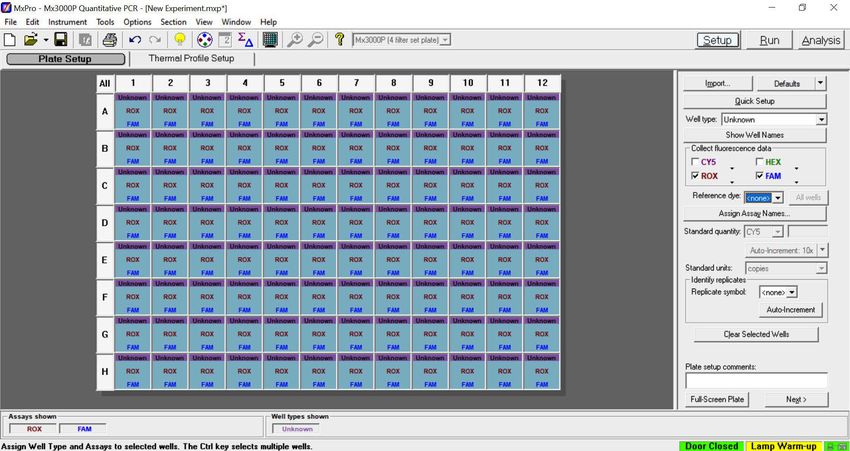
Table of Contents
1      Summary and Explanation                                                                          4

2      Principles of the Procedure                                                                      4

3      Materials Provided                                                                               4

4      Materials Required (But Not Provided)                                                            5

5      Warnings and Precautions                                                                         6

6      Reagent Storage, Handling, and Stability                                                         6

7      Sample Collection, Handling, and Storage                                                         7
       7.1     Sample Collection                                                                        7
       7.2     Transporting Samples                                                                     7
       7.3     Storing Samples                                                                          7

8      LumiraDx SARS-CoV-2 RNA STAR Complete Preparation                                                8
       8.1     Sample Preparation                                                                       8
       8.2     qSTAR Guidelines                                                                         8
       8.3     qSTAR Reagent Preparation – Swab Samples                                                 9
       8.4     qSTAR Reagent Preparation – Saliva Samples                                              10
       8.5     Stand-alone Instructions for Processing of a Single Sample                              11
       8.6     Stand-alone Instructions for Sample Processing in a Deepwell Format                     12

9      RNA STAR Complete Setup for RocheTM LightCycler 480 II                                          13
       9.1     Programming the Run Template and Sample Template                                        13
       9.2     Programming Initial Run and Creating Analysis Template                                  15
       9.3     Using the Run / Sample / Analysis Template                                              16

10     RNA STAR Complete Setup for Applied BiosystemsTM 7500 Fast Dx                                   18
       10.1    Programming the Run Template                                                            18
       10.2    Programming Runs Using the Run Template                                                 22

11     RNA STAR Complete Setup for Applied BiosystemsTM QuantStudio 5                                  23
       11.1    Programming Instructions for PC/Laptop-connected Instrument                             23
       11.2    Analysis Instructions                                                                   26
       11.3    Programming Instructions for Stand-Alone Instrument                                     26
       11.4    Analysis Instructions                                                                   29

12     RNA STAR Complete Setup for Applied BiosystemsTM QuantStudio 7 Flex                             30
       12.1    Programming Instructions for PC/Laptop-connected Instrument                             30
       12.2    Analysis Instructions                                                                   33
       12.3    Programming Instructions for Stand-Alone Instrument                                     34
       12.4    Analysis Instructions                                                                   37

13     RNA STAR Complete Setup for Applied BiosystemsTM QuantStudio 7 Pro                              39
       13.1    Programming Instructions for PC/Laptop-connected Instrument                             39
       13.2    Analysis Instructions                                                                   42

ART-00045 Rev 5 · Rev date 2021/02         LumiraDx SARS-CoV-2 RNA STAR Complete Instructions for Use – 2
14     RNA STAR Complete Setup for Bio-Rad CFX96 Touch System                                         43
       14.1    Programming Instructions for PC/Laptop-connected instrument                            43
       14.2    Analysis Instructions                                                                  46

15     RNA STAR Complete Setup for AgilentTM AriaMx                                                   47
       15.1    Programming Instructions for PC/Laptop-connected Instrument                            47
       15.2    Analysis Instructions                                                                  48
       15.3    Programming Instructions Using Instrument Touch Screen                                 49
       15.4    Analysis Instructions                                                                  50

16     RNA STAR Complete Setup for AgilentTM Stratagene Mx3005P                                       51
       16.1    Programming Instructions for PC/Laptop-connected Instrument                            51
       16.2    Analysis Instructions                                                                  53

17     Analysis of Results                                                                            54
       17.1    LumiraDx SARS-CoV-2 RNA STAR Complete Controls                                         54
       17.2    Analysis of Experimental Sample Results                                                55

18     Quality Control                                                                                55

19     Contact Information, Ordering, and Product Support                                             56

ART-00045 Rev 5 · Rev date 2021/02        LumiraDx SARS-CoV-2 RNA STAR Complete Instructions for Use – 3
1       Summary and Explanation
    LumiraDx SARS-CoV-2 RNA STAR Complete is a rapid, non-isothermal nucleic acid amplification technique
    utilizing qSTAR technology, which detects SARS-CoV-2 viral nucleic acid in under twenty minutes, without
    needing to perform any sample purification or extraction. The LumiraDx SARS-CoV-2 RNA STAR Complete
    Internal Control, Primer and Probe (IC/P) Mix is designed for the qualitative detection of nucleic acid from
    SARS-CoV-2 in upper respiratory samples (such as nasal, mid-turbinate, nasopharyngeal and oropharyngeal
    swabs) and saliva samples. LumiraDx SARS-CoV-2 RNA STAR Complete reagents are for research use only and
    not for use in diagnostic procedures.

2       Principles of the Procedure
    In a single reaction, SARS-CoV-2 virus can be lysed and amplified from upper respiratory samples (such as
    nasal, mid-turbinate, nasopharyngeal and oropharyngeal swabs) and saliva samples. The SARS-CoV-2 virions
    are lysed by the presence of detergents found in the LumiraDx SARS-CoV-2 RNA STAR Complete Extraction
    Buffer. The nucleic acids present in the lysed swab samples are reverse transcribed to form cDNA which is then
    subsequently amplified by qSTAR using primers that target a specific region in the SARS-CoV-2 genome.
    Amplification of the cDNA by qSTAR is subject to shuttling, a plurality of times, between an upper temperature
    at which the activity of one of the enzymes, the polymerase, is relatively favored, and a lower temperature at
    which the activity of the nicking-enzyme is relatively favored.

    Controlling enzyme activity by “temperature gating” and optimizing reaction kinetics, the qSTAR amplification
    method coupled with an extraction buffer has shown consistency and control of amplification, whilst
    maintaining the sensitivity of detection, to allow for reliable and accurate detection of viral nucleic acid
    without performing extraction within minutes. Generated products are specifically detected with molecular
    beacons designed to anneal to the target amplicon by any of the following instruments: Roche LightCycler
    480 II (software version SW 1.5.1), Applied Biosystems 7500 Fast Dx (software version 1.4.1), Applied Biosystems
    QuantStudio 5 (software version 1.5.1), Applied Biosystems QuantStudio 7 Flex (software version 1.3), Applied
    Biosystems QuantStudio 7 Pro (software version 2.4.3), Bio-Rad CFX96 Touch System (software version 3.1),
    Agilent AriaMx (software version 1.71), or the Agilent Stratagene Mx3005P (software version 4.10) RT-PCR
    Instruments.

3       Materials Provided
     Component                                     Description                      Volume    Storage
     LumiraDx SARS-CoV-2 RNA STAR Complete         SARS-CoV-2 Positive Control
                                                                                    500 μL    < 8°C
     Positive Control Media (Pos. Ctrl. Med.)      (ZeptoMetrix 50,000cp/mL)
     LumiraDx SARS-CoV-2 RNA STAR Complete         Negative Control (Molecular
                                                                                    1.5 mL    -25°C to -15°C
     Negative Control Media (Neg. Ctrl. Med.)      Biology Grade Water)
     LumiraDx SARS-CoV-2 RNA STAR Complete
                                                   Saliva Reagent                   120 μL    -25°C to -15°C
     Saliva Reagent
     LumiraDx SARS-CoV-2 RNA STAR Complete
                                                   Salt Mix                         1 mL      -25°C to -15°C
     Salt Mix
     LumiraDx SARS-CoV-2 RNA STAR Complete
                                                   Nucleic Acid Extraction Buffer   500 μL    -25°C to -15°C
     Extraction Buffer
     LumiraDx SARS-CoV-2 RNA STAR Complete
                                                   Internal Control & Primer Mix    120 μL    -25°C to -15°C
     Internal Control & Primer Mix (IC/P Mix)
     LumiraDx SARS-CoV-2 RNA STAR Complete
                                                   Master Mix                       2x 1 mL   -25°C to -15°C
     Master Mix

ART-00045 Rev 5 · Rev date 2021/02              LumiraDx SARS-CoV-2 RNA STAR Complete Instructions for Use – 4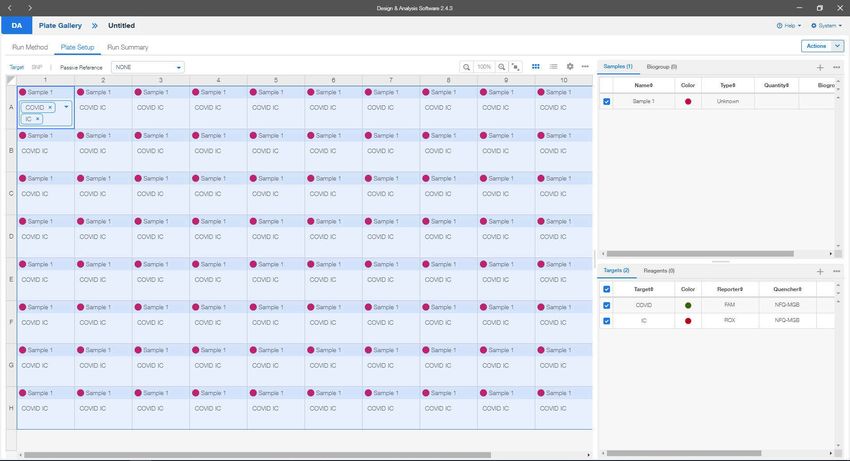
4       Materials Required (But Not Provided)
     Consumables                                                               Source                                Catalog #
     Appropriate Personal Protective Equipment                                 General lab supplier                  n/a
     Aerosol Barrier Pipette Tips with Filters                                 General lab supplier                  n/a
     Microcentrifuge Tubes (DNase/RNase free), 0.6 to 5mL                      General lab supplier                  n/a
     Powder-Free Nitrile Glove                                                 General lab supplier                  n/a
     Deep Well 96-Well Plates (U-bottom)                                       General lab supplier                  n/a
     Reagent Reservoirs (for minimal dead volume)                              General lab supplier                  n/a
     Sealable Waster Bag or Container                                          General lab supplier                  n/a
     KimWipes                                                                  General lab supplier                  n/a

     Reagents                                                                  Source                                Catalog #
     Sodium Hypochlorite Solution (Bleach)                                     ThermoFisher Scientific               SS290-1
     70% Isopropanol (or 70% Ethanol)                                          VWR                                   89499-420
     DNAZapTM (or equivalent)                                                  ThermoFisher Scientific               AM9890
     RNaseZapTM (or equivalent)                                                ThermoFisher Scientific               AM9782
     Molecular Biology Grade Water                                             Corning                               46-000-CM
     Compatible Transport Medias                                               General lab supplier                  n/a
         345TK-2 Viral Transport Medium with Flocked Swab                      Ruhof Corporation                     345TK-2
         Copan Universal Transport Media                                       Copan                                 3C047N
         Puritan UniTranz-RT Transport System                                  Puritan Medical Product               UT-316
         BD Universal Viral Transport                                          BD                                    220220
         Transport Medium                                                      Corning                               25-500-CM
         Viral Transport Medium                                                Hardy Diagnostics                     R99
         Saline, 0.85%                                                         Hardy Diagnostics                     U157
         PBS (pH 7.4), 1X                                                      ThermoFisher Scientific               10010023

     Option for PCR Instruments & Consumables                                  Source                                Catalog #
     Roche LightCycler 480 II (software version SW 1.5.1)                      Roche Life Science                    5015278001
          VWR Adhesive Film for Microplates                                    VWR                                   60941-070
          LightCycler 480 Multiwell Plate 96, Clear                            Roche Life Science                    5102413001
     Applied Biosystems 7500 Fast Dx (software version 1.4.1)                  ThermoFisher Scientific               4406984
     Applied Biosystems QuantStudio 5 (software version 1.5.1)                 ThermoFisher Scientific               A28574
     Applied Biosystems QuantStudio 7 Flex (software version 1.3)              ThermoFisher Scientific               4485698
     Applied Biosystems QuantStudio 7 Pro (software version 2.4.3)             ThermoFisher Scientific               A43183
          Applied Biosystems Optical Adhesive Covers                           ThermoFisher Scientific               4360954
          Applied Biosystems MicroAmp Optical 96-Well Plate                    ThermoFisher Scientific               4306737
     Bio-Rad CFX96 Touch System (software version 3.1)                         Bio-Rad                               1855195
          Eppendorf twin.tec Real-Time PCR Plate 96-Well Semi-Skirted          Eppendorf                             951022043
     Agilent Aria Mx (software version 1.71)                                   Agilent Technologies                  G8830A
          AriaMx 96 Adhesive Seals                                             Agilent Technologies                  401492
          AriaMx 96 Well Plates, Skirted, LP                                   Agilent Technologies                  401490
     Agilent Stratagene Mx3005P (software version 4.10)                        Agilent                               401511
          Applied Biosystems MicroAmp Clear Adhesive Film                      ThermoFisher Scientific               4306311
          Eppendorf twin.tec Real-Time PCR Plate 96-Well Semi-Skirted          Eppendorf                             951022043
     Universal Sealing Film and Plate*                                         General lab supplier                  n/a
          ThermalSeal A Sealing Film                                           Research Product International        202545
          Heat-Resistant Polypropylene Film for Raised-Rim Plates              VWR                                   89087-690
    *This universal sealing film and plate have been found to be compatible with all instruments listed above (except Bio-Rad CFX96).

     Equipment                                                                 Source                                Catalog #
     -80ºC Laboratory Freezer                                                  General lab supplier                  n/a
     -25ºC to -15ºC Laboratory Freezer                                         General lab supplier                  n/a
     2ºC to 8ºC Laboratory Refrigerator                                        General lab supplier                  n/a
     Adjustable Multi-Channel Pipettes (2-20μL, 20-200μL)                      General lab supplier                  n/a
     Adjustable Micropipettes (0.5-10μL, 2-20μL, 20-200μL, 100-1000μL)         General lab supplier                  n/a
     Centrifuges (for 0.6 to 5mL tubes and 96-well plates)                     General lab supplier                  n/a
     PCR Hood                                                                  General lab supplier                  n/a
     Vortex                                                                    General lab supplier                  n/a
     Cold Blocks                                                               General lab supplier                  n/a
     IsoFreeze PCR Racks                                                       Thomas Scientific                     1148D61
     Racks for Microcentrifuge Tubes                                           General lab supplier                  n/a
     USB Flash Drive                                                           General lab supplier                  n/a

ART-00045 Rev 5 · Rev date 2021/02                      LumiraDx SARS-CoV-2 RNA STAR Complete Instructions for Use – 5
5       Warnings and Precautions
    •   For research use only - not for use in diagnostic procedures.
    •   Follow standard precautions. All samples and positive controls should be considered potentially infectious
        and handled accordingly.
    •   Do not eat, drink, smoke, apply cosmetics or handle contact lenses in areas where reagents and samples
        are handled.
    •   Use personal protective equipment such as, but not limited to, gloves and lab coats when handling kit
        reagents while performing this assay and handling materials including samples, reagents, pipettes, and
        other equipment and reagents.
    •   Dispose of unused kit reagents and samples according to institutional, local, and national regulations.
    •   Reagents used with this assay described in section 8 contain guanidinium thiocyanate or guanidine-
        containing materials. Highly reactive and/or toxic compounds may form if combined with sodium
        hypochlorite (bleach).
    •   Only use listed components provided for LumiraDx SARS-CoV-2 RNA STAR Complete; other LumiraDx
        products may not contain the same formulations as needed for this assay.
    •   Before collection of the saliva sample, ensure that the person has not used oral hygiene products within at
        least 30 minutes prior to collection.

6       Reagent Storage, Handling, and Stability
    •   Upon receipt, store the LumiraDx SARS-CoV-2 RNA STAR Complete reagents between - 15 °C to – 25 °C.
    •   After initial use, store LumiraDx SARS-CoV-2 RNA STAR Complete Negative Control Media (Neg. Ctrl. Med.),
        LumiraDx SARS-CoV-2 RNA STAR Complete Saliva Reagent, LumiraDx SARS-CoV-2 RNA STAR Complete Salt
        Mix, LumiraDx SARS-CoV-2 RNA STAR Complete Extraction Buffer, LumiraDx SARS-CoV-2 RNA STAR Complete
        Internal Control & Primer Mix (IC/P Mix), and LumiraDx SARS-CoV-2 RNA STAR Complete Master Mix
        between – 15 °C to – 25 °C.
    •   Store LumiraDx SARS-CoV-2 RNA STAR Complete Positive Control Media (Pos. Ctrl. Med.) at < 8 °C.
    •   Always check the expiration date prior to use. Do not use expired reagents.
    •   Protect fluorogenic probes from light – probes are a component in the LumiraDx SARS-CoV-2 RNA STAR
        Complete Internal Control & Primer Mix (IC/P Mix).
    •   The Saliva Reagent, Salt Mix, Extraction Buffer, Internal Control/Primer Mix, and Master Mix must be thawed
        and kept on a cold block or ice at all times during preparation and use.
    •   The external controls, Pos. Ctrl. Med. and Neg. Ctrl. Med., must also be thawed and kept cold at all times
        during preparation and use.

ART-00045 Rev 5 · Rev date 2021/02              LumiraDx SARS-CoV-2 RNA STAR Complete Instructions for Use – 6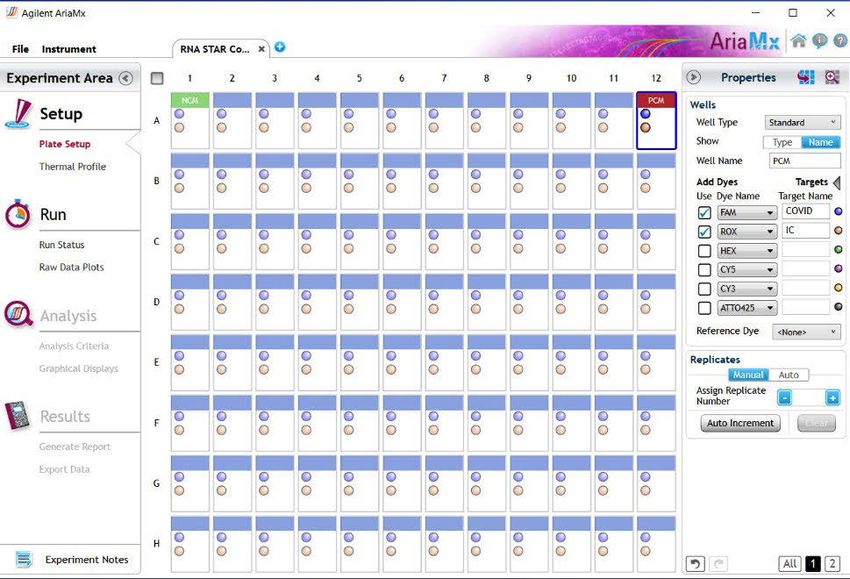
7         Sample Collection, Handling, and Storage
    The following sample types are considered acceptable for use with LumiraDx SARS-CoV-2 RNA STAR Complete:
    nasal swabs, mid-turbinate swabs, nasopharyngeal swabs, oropharyngeal swabs, and saliva samples.

    7.1       Sample Collection
    •     Swab samples should be collected using only swabs with a synthetic tip, such as nylon or Dacron®, and
          an aluminum or plastic shaft. Calcium alginate swabs are unacceptable and cotton swabs with wooden
          shafts are not recommended.
    •     For wet swab collection - Respiratory samples should be collected and placed into appropriate transport
          media, such as viral transport media (VTM), 0.85% saline solution, or phosphate buffer saline (PBS –
          calcium and magnesium free). Swabs provided in up to 3 mL of compatible transport media are
          acceptable, but to save on reagents and improve performance, one (1) mL of buffer is suggested.
    •     For dry swab collection - Respiratory samples should be collected and placed in a sterile, dry transport
          tube, such as a standard 15 mL Falcon tube. For elution of a dry swab sample, add 1 mL of compatible
          transport media (VTM, 0.85% Saline, or PBS), soak the swab for 30 seconds then swirl the solution
          thoroughly by rotating the swab against the side of the tube 5 times (beware of cross-contamination from
          splashing). Discard the swab in biohazard waste.
    •     Saliva Sample Collection – Saliva samples must be self-collected in a healthcare setting under the
          supervision of a healthcare provider. Avoid coughing prior to harvesting of the sample. No eating,
          drinking, smoking, chewing of gum or brushing teeth for at least 30 minutes prior to sampling. No dental
          work or examination performed 24 hours prior to saliva collection. A minimum of one (1) mL volume
          should be transferred to any vial, such as a 5 mL tube, that does not contain preservatives.

    7.2       Transporting Samples
    •     Samples must be packaged, shipped, and transported according to the current edition of the
          International Air Transport Association (IATA) Dangerous Goods Regulation. Follow shipping regulations for
          UN 3373 Biological Substance, Category B when sending potential SARS-CoV-2 samples.
    •     If wet swab is expressed in a compatible buffer (i.e. viral transport media (VTM), 0.85% saline solution, or
          phosphate buffer saline (PBS – calcium and magnesium free)) store samples at 2 to 8 °C for up to 72
          hours after collection. If a delay in testing or shipping is expected, store samples at -70°C or below and
          ship on dry ice.
    •     Dry swabs may be shipped in a dry tube without cold chain, with stability established up to 3 days for dry
          polyester or foam swabs. Additionally, if a delay in testing or shipping is expected, dry swabs can be
          expressed in saline (1 mL) and frozen for longer storage. Store frozen samples at -70°C or below and ship
          on dry ice.
    •     Saliva samples may be shipped without a cold chain requirement up to 48-hours post-collection.

    7.3       Storing Samples
    •     Dry swab samples are stable either at room temperature for up to 48-hours, or refrigerated (2 to 8 °C) for
          up to 72 hours, before processing. Wet swab samples can be stored at room temperature or refrigerated
          (2 to 8 °C) for up to 72 hours before processing.
    •     Samples received cold can be stored refrigerated (2 to 8 °C) for up to 72 hours, from time of collection,
          before processing.
    •     If samples cannot be assayed within 72 hours of collection, both dry-swab and wet-swab samples should
          be frozen at < -70 °C.
    •     Saliva samples are stable at room temperature for up to 5 days.

ART-00045 Rev 5 · Rev date 2021/02                LumiraDx SARS-CoV-2 RNA STAR Complete Instructions for Use – 7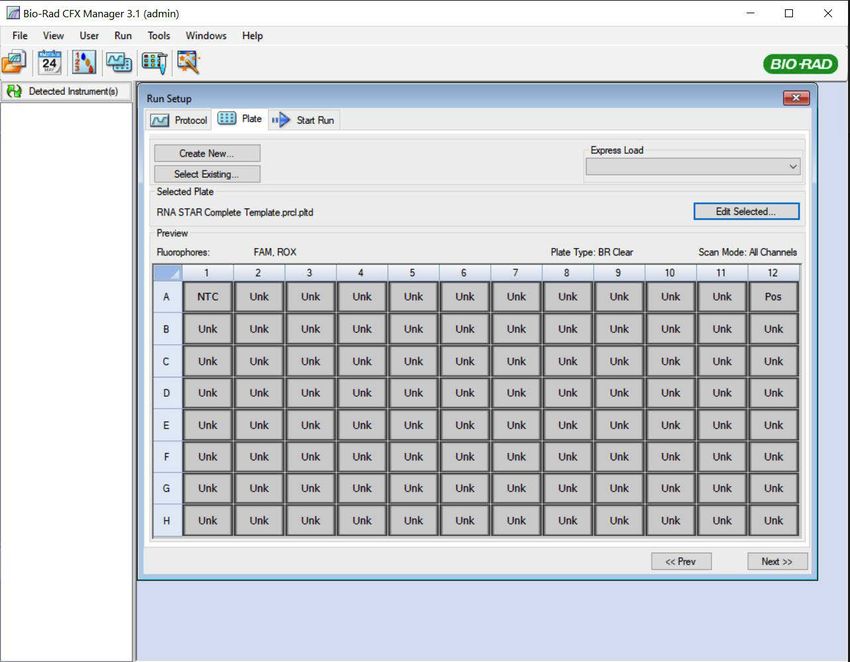
8         LumiraDx SARS-CoV-2 RNA STAR Complete Preparation

    8.1       Sample Preparation
    This assay is compatible with swabs stored in an empty (dry) tube, with swabs stored in compatible transport
    media (VTM, 0.85% Saline, or PBS) or with saliva. It is important that the LumiraDx SARS-CoV-2 RNA STAR
    Complete Positive Control Media (Pos. Ctrl. Med.) and the LumiraDx SARS-CoV-2 RNA STAR Complete Negative
    Control Media (Neg. Ctrl. Med.) are treated as independent samples and both must be included as external
    controls in every plate. See Section 16.1 for more information about the LumiraDx SARS-CoV-2 RNA STAR
    Controls.
    NOTE: Please handle the Pos. Ctrl. Med. with care as it can cause false positives if accidentally spilled or
    handled carelessly. To avoid cross-contamination, use separate pipette tips for all materials.
    1.    Thaw LumiraDx SARS-CoV-2 RNA STAR Complete Positive Control Media (Pos. Ctrl. Med.) and LumiraDx
          SARS-CoV-2 RNA STAR Complete Negative Control Media (Neg. Ctrl. Med.) on a cold block, vortex the Pos.
          Ctrl. Med. and Neg. Ctrl. Med. for 5 seconds then centrifuge for 5 seconds to collect reagents at the
          bottom of the tube.
    2.    To assemble the 1x PCM (Positive Control Media), freshly dilute 20.0 µL Pos. Ctrl. Med. with 60.0 µL Neg.
          Ctrl. Med. in a pre-chilled microcentrifuge tube. To assemble the 1x NCM (Negative Control Media),
          always freshly pipette 80.0 µL Neg. Ctrl. Med into a pre-chilled microcentrifuge tube.
    3.    Swab samples (24 μL) or saliva samples (22.8 μL) will be added directly to the sample plate prepared in
          Section 8.3 or Section 8.4, respectively.
          a. If swab samples are provided dry, transfer the swab into a vial, such as a 5 mL tube or deep well
               plate, containing 1 mL compatible transport media and soak the swab for a minimum of 30 seconds.
               Swirl thoroughly by rotating the swab against the side of the tube 5 times then express the swab on
               the side of tube, outside of the liquid, prior to removing (beware of cross-contamination from
               splashing). Discard the swab in biohazard waste.
          b. For saliva samples, at minimum one (1) mL saliva can be collected in any vial, such as a 5 mL tube,
               that does not contain preservatives. Centrifuge the saliva sample at 6000 rpm for 1 to 5 minutes then
               immediately transfer the supernatant 1 (22.8 μL) to the sample plate prepared in Section 8.4. The
               remainder of the supernatant (~ 500 μL) can be transferred to a microcentrifuge tube for storage or
               retesting and will not need future spinning.

    8.2       qSTAR Guidelines
    NOTE: Amplification technologies such as qSTAR, like PCR, are sensitive to accidental introduction of product
    from previous amplification reactions. Incorrect results could occur if either the sample or the qSTAR reagents
    used in the amplification step become contaminated by accidental introduction of amplification product
    (amplicon). Workflow in the laboratory should always proceed in a unidirectional manner to minimize such
    contamination events.
    •     Maintain separate areas for assay setup and handling of samples.
    •     Change aerosol barrier pipette tips between all manual liquid transfers.
    •     During preparation of samples, compliance with good laboratory techniques is essential to minimize the
          risk of cross-contamination between samples, and the inadvertent introduction of nucleases into samples
          during and after the extraction procedure. Proper aseptic technique should always be used when
          working with nucleic acids.
    •     Maintain separate, dedicated equipment (e.g., pipettes, microcentrifuges) and supplies (e.g.,
          microcentrifuge tubes, pipette tips) for assay setup and handling of samples.
    •     Wear a clean lab coat and powder-free disposable gloves (not previously worn) when setting up assays.
    •     Change gloves often and whenever contamination is suspected.
    •     Keep tubes and plates capped, covered, or sealed as much as possible.
    •     It is recommended to use a cold block as loose tubes on ice may lead to contamination.
    •     LumiraDx SARS-CoV-2 RNA STAR Complete Saliva Reagent, LumiraDx SARS-CoV-2 RNA STAR Complete Salt
          Mix, LumiraDx SARS-CoV-2 RNA STAR Complete Extraction Buffer, LumiraDx SARS-CoV-2 RNA STAR Complete
          IC/P Mix, and LumiraDx SARS-CoV-2 RNA STAR Complete Master Mix must be thawed and maintained on a
          cold block equilibrated to 4 °C at all times during preparation and use. Provided that the reagents are not
          entirely consumed in the first use, the reagents may be re-frozen no more than three times.
    •     Work surfaces, pipettes, and centrifuges should be cleaned and decontaminated with cleaning products
          (e.g. 10% bleach, “DNAZapTM”, “RNaseZap®” or “RNase AWAY®”, etc.) to minimize risk of nucleic acid
          contamination. Residual bleach should be removed using Nuclease Free Water and 70% Ethanol.

1
    The pellet after spinning for 1 min may not be visible. Make sure to aspirate the supernatant from the top of the liquid level.

ART-00045 Rev 5 · Rev date 2021/02                     LumiraDx SARS-CoV-2 RNA STAR Complete Instructions for Use – 8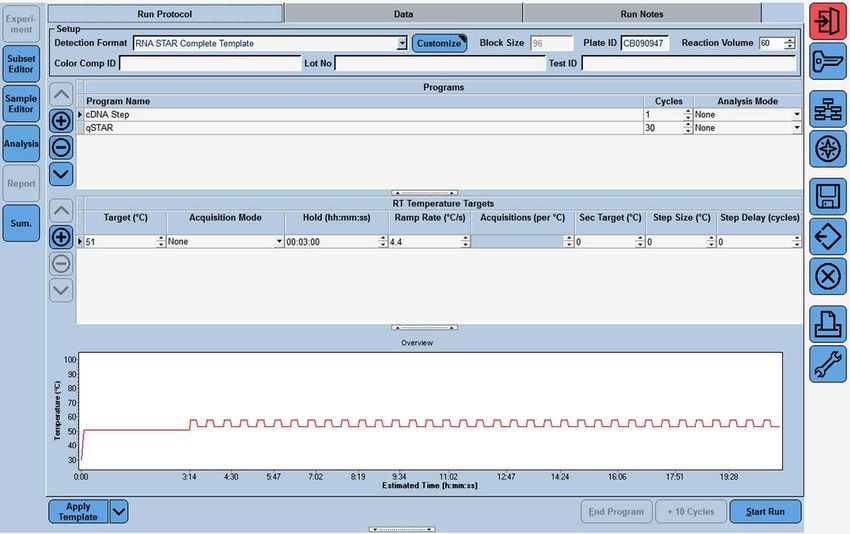
8.3       qSTAR Reagent Preparation – Swab Samples
 It is necessary to make excess Reaction Mix to allow for pipetting error. Additionally, it is recommended to read
 through the following instructions before attempting to set up the Reaction Mix. All components should be
 thawed and kept on a cold block equilibrated between 2 to 8 °C to maintain the integrity of the reagents.
 Furthermore, it is recommended to queue the thermocycler (i.e. Roche LC 480 II, ABI 7500 Fast Dx, ABI QS 5,
 ABI QS 7 Flex, ABI QS 7 Pro, Bio-Rad CFX96, Agilent AriaMx, or the Agilent Stratagene Mx3005P) prior to
 performing the instructions below to ensure the performance of this assay is maintained.

 1.    Thaw the LumiraDx SARS-CoV-2 RNA STAR Complete kit components in a cold block equilibrated between
       2 to 8 °C; i.e. LumiraDx SARS CoV-2 RNA STAR Complete Salt Mix, LumiraDx SARS CoV-2 RNA STAR Complete
       Extraction Buffer, LumiraDx SARS CoV-2 RNA STAR Complete Internal Control & Primer Mix (IC/P Mix), and
       LumiraDx SARS CoV-2 RNA STAR Complete Master Mix. Invert each tube to mix then centrifuge for 5
       seconds to collect reagents at the bottom of the tube (do not vortex samples).
 2.    Transfer 24.0 μL of swab samples prepared in Step 3a of Section 8.1 and transfer 24.0 μL of external
       controls prepared in Step 2 of Section 8.1 into an appropriate, pre-chilled, 96-well plate. Add 4.8 µL
       Extraction Buffer, per well of sample and external controls, and mix by slowly pipetting up and down 10
       times while minimizing bubbles. The addition and mixing of Extraction Buffer can be simplified by using a
       multi-channel pipette and chilled reagent reservoir. If needed, seal and centrifuge the 96-well plate to
       collect the sample at the bottom of the well.
 3.    Determine the number of reactions (N) to be prepared per assay:

        Reaction Mix Setup        1 Rxn        100 Rxns      N Rxns
        Salt Mix                  10.0 µL      1000 µL       N x 10.0 µL
        IC/P Mix                   1.2 µL       120 µL       N x 1.2 µL
        Master Mix                20.0 µL      2000 µL       N x 20.0 µL
        Total Volume              31.2 µL      3120 µL       N x 31.2 µL

 4.    Assuming one reaction is needed, perform the following to make the Reaction Mix:
       a. Combine 10.0 µL Salt Mix and 1.2 µL IC/P Mix in a pre-chilled microcentrifuge tube, mix by slowly
           pipetting up and down 4 times without introducing bubbles (do not vortex and do not spin down for
           an excessive amount of time), then place tube back on the cold block.
       b. Add 20.0 µL Master Mix to finalize the Reaction Mix, mix by pipetting up and down 4 to 6 times without
           introducing bubbles, centrifuge briefly to collect contents at bottom of tube, then place tube back on
           the cold block.
 5.    Transfer 31.2 µL of Reaction Mix to each well with sample and external controls. Mix by slowly pipetting up
       and down 10 times without introducing bubbles. The addition and mixing of Reaction Mix can be
       simplified by using a multi-channel pipette and chilled reagent reservoir. Seal the 96-well plate using an
       appropriate optically clear adhesive and centrifuge the plate at 2000 rpm for 20 seconds to collect
       contents at bottom of plate.
 6.    Place the 96-well plate in a thermocycler and follow instrument specific protocols and analysis procedures
       detailed below.

ART-00045 Rev 5 · Rev date 2021/02            LumiraDx SARS-CoV-2 RNA STAR Complete Instructions for Use – 9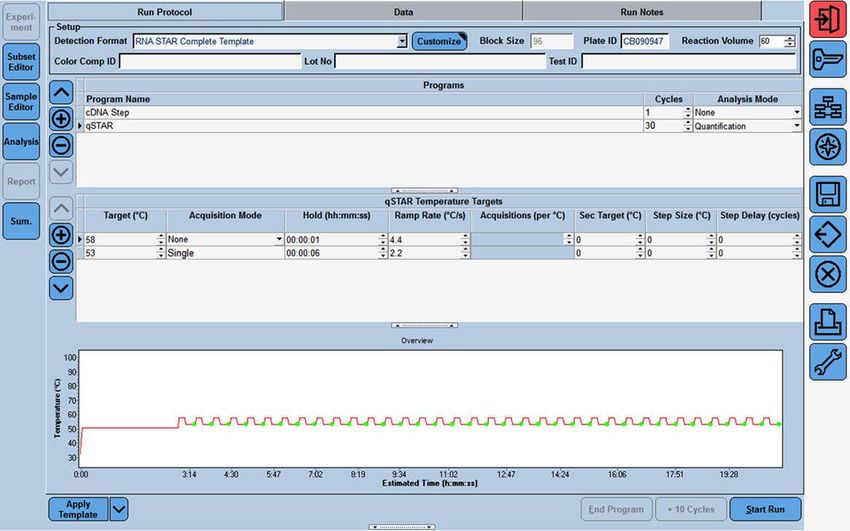
8.4       qSTAR Reagent Preparation – Saliva Samples
 It is necessary to make excess Saliva Extraction Mix and Reaction Mix to allow for pipetting error. Additionally, it
 is recommended to read through the following instructions before attempting to set up the Saliva Extraction
 Mix and Reaction Mix. All components should be thawed and kept on a cold block equilibrated between 2 to
 8 °C to maintain the integrity of the reagents. Furthermore, it is recommended to queue the thermocycler (i.e.
 Roche LC 480 II, ABI 7500 Fast Dx, ABI QS 5, ABI QS 7 Flex, ABI QS 7 Pro, Bio-Rad CFX96, Agilent AriaMx, or the
 Agilent Stratagene Mx3005P) prior to performing the instructions below to ensure the performance of this
 assay is maintained.

 1.    Thaw the LumiraDx SARS-CoV-2 RNA STAR Complete kit components in a cold block equilibrated between
       2 to 8 °C; i.e. LumiraDx SARS CoV-2 RNA STAR Complete Saliva Reagent, LumiraDx SARS CoV-2 RNA STAR
       Complete Salt Mix, LumiraDx SARS CoV-2 RNA STAR Complete Extraction Buffer, LumiraDx SARS CoV-2 RNA
       STAR Complete Internal Control & Primer Mix (IC/P Mix), and LumiraDx SARS CoV-2 RNA STAR Complete
       Master Mix. Invert each tube to mix then centrifuge for 5 seconds to collect reagents at the bottom of the
       tube (do not vortex samples).
 2.    Determine the number of reactions (N) to be prepared per assay:

        Saliva Extraction Mix Setup    1 Rxn       100 Rxns     N Rxns
        Saliva Reagent                 1.2 µL      120 µL       N x 1.2 µL
        Extraction Buffer              4.8 µL      480 µL       N x 4.8 µL
        Total Volume                   6.0 µL      600 µL       N x 6.0 µL

 3.    Assuming one reaction is needed, combine 1.2 µL Saliva Reagent and 4.8 µL Extraction Buffer to create
       the Saliva Extraction Mix in a pre-chilled microcentrifuge tube, mix by slowly pipetting up and down 4 to 6
       times without introducing bubbles, then place tube back on the cold block.
 4.    Transfer 22.8 μL of saliva supernatant prepared in Step 3b of Section 8.1 and transfer 22.8 μL of external
       controls prepared in Step 2 of Section 8.1 into an appropriate, pre-chilled, 96-well plate. Add 6.0 µL Saliva
       Extraction Mix, per well of sample and external controls, and mix by slowly pipetting up and down 10 times
       without introducing bubbles. The addition and mixing of Saliva Extraction Mix can be simplified by using a
       multi-channel pipette and chilled reagent reservoir. If needed, seal and centrifuge the 96-well plate to
       collect the sample at the bottom of the well.
 5.    Determine the number of reactions (N) to be prepared per assay:

        Reaction Mix Setup            1 Rxn       100 Rxns    N Rxns
        Salt Mix                      10.0 µL     1000 µL     N x 10.0 µL
        IC/P Mix                       1.2 µL      120 µL     N x 1.2 µL
        Master Mix                    20.0 µL     2000 µL     N x 20.0 µL
        Total Volume                  31.2 µL     3120 µL     N x 31.2 µL

 6.    Assuming one reaction is needed, perform the following to make the Reaction Mix:
       a. Combine 10.0 µL Salt Mix and 1.2 µL IC/P Mix in a pre-chilled microcentrifuge tube, mix by slowly
           pipetting up and down 4 times without introducing bubbles (do not vortex and do not spin down for
           an excessive amount of time), then place tube back on the cold block.
       b. Add 20.0 µL Master Mix to finalize the Reaction Mix, mix by pipetting up and down 10 times without
           introducing bubbles, centrifuge briefly, then place tube back on the cold block.
 7.    Transfer 31.2 µL of Reaction Mix to each well with sample and external controls. Mix by slowly pipetting up
       and down 10 times without introducing bubbles. The addition and mixing of Reaction Mix can be
       simplified by using a multi-channel pipette and chilled reagent reservoir. Seal the 96-well plate using an
       appropriate optically clear adhesive and centrifuge the plate at 2000 rpm for 10 seconds to collect
       contents at bottom of plate.
 8.    Place the 96-well plate in a thermocycler and follow instrument specific protocols and analysis procedures
       detailed below.

ART-00045 Rev 5 · Rev date 2021/02              LumiraDx SARS-CoV-2 RNA STAR Complete Instructions for Use – 10
8.5 Stand-alone Instructions for Processing of a Single Sample
The following instructions provide an example for the processing of a single sample (can be a dry swab
sample, a wet swab sample, or a saliva sample) up to the final setup of the sample plate. Swabs provided in
up to 3 mL of compatible transport media are acceptable but, to improve performance, one (1) mL of buffer
is recommended.
NOTE: It is recommended to read through the following instructions before attempting to set up the Reaction
Mix. All components should be thawed and kept on a cold block equilibrated between 2 to 8 °C to maintain
the integrity of the reagents. Additionally, it is recommended to queue the thermocycler (i.e. Roche LC 480 II,
ABI 7500 Fast Dx, ABI QS 5, ABI QS 7 Flex, ABI QS 7 Pro, Bio-Rad CFX96, Agilent AriaMx, or the Agilent Stratagene
Mx3005P) prior to performing the instructions below to ensure the performance of this assay is maintained.
1. Thaw the LumiraDx SARS-CoV-2 RNA STAR Complete kit components in a cold block equilibrated between
2 to 8 °C; i.e. LumiraDx SARS CoV-2 RNA STAR Complete Positive Control Media (Pos. Ctrl. Med.), LumiraDx
SARS CoV-2 RNA STAR Complete Negative Control Media (Neg. Ctrl. Med.), LumiraDx SARS CoV-2 RNA
STAR Complete Saliva Reagent, LumiraDx SARS CoV-2 RNA STAR Complete Salt Mix, LumiraDx SARS CoV-2
RNA STAR Complete Extraction Buffer, LumiraDx SARS CoV-2 RNA STAR Complete Internal Control & Primer
Mix (IC/P Mix), and LumiraDx SARS CoV-2 RNA STAR Complete Master Mix. Invert each tube to mix then
centrifuge for 5 seconds to collect reagents at the bottom of the tube (do not vortex samples).
2a. If swab is provided dry, transfer one (1) mL of a compatible transport media into a suitable tube (e.g.
polypropylene microcentrifuge tube). Place and soak the swab for at least 30 seconds then swirl
thoroughly by rotating the swab against the side of the tube up to 5 times. Express the swab on the side of
tube, outside of the liquid, prior to removing (beware of cross-contamination from splashing). Discard the
swab in biohazard waste. If swab sample is provided wet, up to 3 mL of compatible transport media (VTM,
0.85% Saline, or PBS) is acceptable, but this higher volume may impact sensitivity.
2b. For saliva sample, at minimum one (1) mL saliva can be collected in any vial (e.g. 5 mL tube) that does
not contain preservatives. Immediately before use, centrifuge the saliva sample at 6000 rpm for 1 to 5
minutes. If storage is needed, the supernatant (~ 500 μL) can be transferred to a microcentrifuge tube
and will not need future spinning.
3. Assemble fresh 1x PCM (Positive Control Media) by diluting 20.0 µL Pos. Ctrl. Med. with 60.0 µL Neg. Ctrl.
Med. in a pre-chilled microcentrifuge tube. Assemble the 1x NCM (Negative Control Media) by
transferring 80.0 μL Neg. Ctrl. Med. into a pre-chilled microcentrifuge tube.
4. Transfer 24.0 μL of swab samples prepared in Step 2a or 22.8 μL of saliva supernatant prepared in Step 2b
and transfer 24.0 μL of external controls prepared in Step 3 using a single-channel pipette into an
appropriate, pre-chilled, 96-well plate.
5a. For swab sample, add 4.8 µL of Extraction Buffer to the 96-well plate and mix by slowly pipetting up and
down 10 times without introducing bubbles. The addition and mixing of Extraction Buffer can be simplified
by using a multi-channel pipette and chilled reagent reservoir. If needed, seal and centrifuge the 96-well
plate to collect the sample at the bottom of the well.
5b. For saliva sample, premix in a suitable pre-chilled tube (i.e. microcentrifuge tube or 5 mL tube) the Saliva
Extraction Mix by combining N x 1.2 µL Saliva Reagent and N x 4.8 µL Extraction Buffer, then slowly pipette
up and down 4 to 6 times without introducing bubbles and centrifuge. Transfer 6.0 µL Saliva Extraction Mix
to the 96-well plate and mix by slowly pipetting up and down 10 times without introducing bubbles.
6. Determine the number of reactions (N) to be prepared per assay and prepare Reaction Mix in a suitable
pre-chilled tube by following the order in the table below. Between each reagent, slowly mix by pipetting
up and down 4 to 6 times without introducing bubbles and pulse centrifuge.
Reaction Mix 1 Rxn N Rxns
Salt Mix 10.0 µL N x 10.0 µL
IC/P Mix 1.2 µL N x 1.2 µL
Master Mix 20.0 µL N x 20.0 µL
Total Volume 31.2 µL N x 31.2 µL
7. Transfer 31.2 μL of Reaction Mix to each well with sample and external controls. Mix by slowly pipetting up
and down 10 times without introducing bubbles. Seal the 96-well plate using an appropriate optically
clear adhesive and centrifuge the plate at 2000 rpm for 10 seconds to collect contents at bottom of plate.
8. Place the 96-well plate in a thermocycler and follow instrument specific protocols and analysis procedures
detailed below.
ART-00045 Rev 5 · Rev date 2021/02 LumiraDx SARS-CoV-2 RNA STAR Complete Instructions for Use – 118.6 Stand-alone Instructions for Sample Processing in a Deepwell Format
The following instructions provide an example for the processing of dry swab samples, using a deepwell plate,
up to the final setup of the sample plate. The following language assumes 94 dry swab samples and two
external controls will be processed in which the entirety of the reagents provided in the LumiraDx SARS CoV-2
RNA STAR Complete kit will be consumed.
NOTE: It is recommended to read through the following instructions before attempting to set up the Reaction
Mix. All components, including the assembled Reaction Mix, should be thawed and kept on a cold block
equilibrated between 2 to 8 °C to maintain the integrity of the reagents. Additionally, it is recommended to
queue the thermocycler (i.e. Roche LC 480 II, ABI 7500 Fast Dx, ABI QS 5, ABI QS 7 Flex, ABI QS 7 Pro, Bio-Rad
CFX96, Agilent AriaMx, or the Agilent Stratagene Mx3005P) prior to performing the instructions below to ensure
the performance of this assay is maintained.
1. Thaw the LumiraDx SARS-CoV-2 RNA STAR Complete kit components in a cold block equilibrated between
2 to 8 °C; i.e. LumiraDx SARS CoV-2 RNA STAR Complete Positive Control Media (Pos. Ctrl. Med.), LumiraDx
SARS CoV-2 RNA STAR Complete Negative Control Media (Neg. Ctrl. Med.), LumiraDx SARS CoV-2 RNA
STAR Complete Salt Mix, LumiraDx SARS CoV-2 RNA STAR Complete Extraction Buffer, LumiraDx SARS CoV-2
RNA STAR Complete Internal Control & Primer Mix (IC/P Mix), and LumiraDx SARS CoV-2 RNA STAR
Complete Master Mix. Invert each tube to mix then centrifuge for 5 seconds to collect reagents at the
bottom of the tube (do not vortex samples).
2. Pour 100 mL of a compatible transport media (VTM, 0.85% Saline, or PBS) into a suitable reagent reservoir.
Transfer one (1) mL to each deepwell using a multi-channel pipette. Leave two designated wells, A1 and
A12, empty for the external controls assembled in Step 4.
3. Add a single dry swab sample to each deepwell in use. Soak the swab for a minimum of 30 seconds then
swirl thoroughly by rotating the swab against the side of the deepwell 5 times. Express the swab on the
side of the well, outside of the liquid, prior to removing (beware of cross-contamination from splashing).
Discard the swab in biohazard waste.
4. Assemble the 1x PCM (Positive Control Media) by diluting 200 µL Pos. Ctrl. Med. with 600 µL Neg. Ctrl. Med.
in a pre-chilled microcentrifuge tube. Assemble the 1x NCM (Negative Control Media) by transferring
800 µL Neg. Ctrl. Med. into a pre-chilled microcentrifuge tube. Alternatively, the PCM and NCM can be
prepared directly in the deepwell in which position A1 should be loaded with the NCM and position A12
should be loaded with the PCM.
5. Mix the sample prepared in Step 3 and the external controls prepared in Step 4 by slowly pipetting up and
down 4 to 6 times without introducing air bubbles then transfer 24.0 μL using a multi-channel pipette into
an appropriate, pre-chilled, 96-well plate. Add 4.8 µL of Extraction Buffer, per well, and mix by slowly
pipetting up and down 10 times while minimizing bubbles. If needed, seal and centrifuge the 96-well plate
to collect the sample at the bottom of the well.
6. Assuming 96 reactions are needed, prepare Reaction Mix in a pre-chilled 5mL tube by following the order
in the table below. Between each reagent, slowly mix by pipetting up and down 4 to 6 times without
introducing bubbles.
Reaction Mix 100 Rxns
Salt Mix 1000µL
IC/P Mix 120µL
Master Mix 2x 1000µL
Total 3120µL
7. Transfer Reaction Mix to a pre-chilled reagent reservoir (for minimal dead volume) using a single channel
pipette. Then, using a multi-channel pipette, transfer 31.2 μL of Reaction Mix to each well with sample and
external controls. Mix by slowly pipetting up and down 10 times without introducing bubbles. Seal the 96-
well plate using an appropriate optically clear adhesive and centrifuge the plate at 2000 rpm for
20 seconds to collect contents at bottom of plate.
8. Place the 96-well plate in a thermocycler and follow instrument specific protocols and analysis procedures
detailed below.
ART-00045 Rev 5 · Rev date 2021/02 LumiraDx SARS-CoV-2 RNA STAR Complete Instructions for Use – 129 RNA STAR Complete Setup for RocheTM LightCycler 480 II
Refer to “User Manual Part Number 05152062001 0208” for additional information. The instrument
programming instructions are intended for setup of an entire 96-well plate. If the entire plate is not used,
please deselect wells as appropriate during analysis.
9.1 Programming the Run Template and Sample Template
1. Launch the LightCycler (LC) 480 desktop software (version SW 1.5.1). If prompted, ‘Log On’ to the
‘Traceable Database’.
2. Click the ‘Tools’ button in the startup screen in the lower right of the software. Select ‘Detection Formats’
and click ‘New’ in the ‘Tools’ window that opens. Name the new ‘Detection Formats’ as “RNA STAR
Complete Template”. In the ‘Filter Combination Selection’ section select ‘465-510’ (Excitation – Emission)
and ‘533-610’. In the ‘Selected Filter Combination List’ section under ‘Name’ type in “COVID” for ‘465-510’
and type “IC” for ‘533-610’. Verify the ‘Melt Factor’ for ‘465-510’ is set to ‘1’ and for ‘533-610’ is set to ‘1’, the
‘Quantification Factor’ for ‘465-510’ is set to ‘1’ and for ‘533-610’ is set to ‘10’, and the ‘Max Integration
Time’ for ‘465-510’ is set to ‘1’ and for ‘533-610’ is set to ‘2’. Click ‘Close’ to exit the ‘Tools’ window.
3. To access this newly created ‘Detection Format’, use the ‘Exit the application’ button and reload the
LightCycler (LC) 480 software (version SW 1.5.1). After closing and reloading the software, in the
‘Experiment Creation’ section, select either ‘White’ or ‘Clear Plates’ and click ‘New Experiment’.
ART-00045 Rev 5 · Rev date 2021/02 LumiraDx SARS-CoV-2 RNA STAR Complete Instructions for Use – 134. Select from the ‘Detection Format’ drop-down menu “RNA STAR Complete Template”. Set ‘Reaction
Volume’ to ‘60’ in the upper right of the software. In the ‘Program Name’ section type “cDNA Step”, set
‘Cycles’ to ‘1’, and set ‘Analysis Mode’ to ‘None’. Set cDNA Step ‘RT Temperature Targets’ as follows: set
‘Target (°C)’ to ‘51’, set ‘Acquisition Mode’ to ‘None’, set ‘Hold (hh:mm:ss)’ to ‘0:03:00’, set ‘Ramp Rate
(°C/s)’ to ‘4.4’, and set ‘Sec Target (°C)’, ‘Step Size (°C)’, and ‘Step Delay (cycles)’ to ‘0’ (see image
above for guidance).
5. Click the “+” button on the upper left of the software to add another ‘Programs’. In the ‘Program Name’
section type “qSTAR”, set ‘Cycles’ to ‘30’, and set ‘Analysis Mode’ to ‘Quantification’. Change qSTAR
‘Temperature Targets’ as follows: set ‘Target (°C)’ to ‘58’, set ‘Acquisition Mode’ to ‘None’, set ‘Hold
(hh:mm:ss)’ to ‘0:00:01’, set ‘Ramp Rate (°C/s)’ to ‘4.4’, and set ‘Sec Target (°C)’, ‘Step Size (°C)’, and
‘Step Delay (cycles)’ to ‘0’. Select the “+” button on the lower left of the software to add another
‘Temperature Target’. Set ‘Target (°C)’ to ‘53’, set ‘Acquisition Mode’ to ‘Single’, set ‘Hold (hh:mm:ss)’ to
‘0:00:06’, set ‘Ramp Rate (°C/s)’ to ‘2.2’, and set ‘Sec Target (°C)’, ‘Step Size (°C)’, and ‘Step Delay
(cycles)’ to ‘0’.
ART-00045 Rev 5 · Rev date 2021/02 LumiraDx SARS-CoV-2 RNA STAR Complete Instructions for Use – 14NOTE: The instrument will display a run time that might not be accurate as the instrument does not accurately
account for the 1 sec cycle at 58 °C.
6. In the lower left corner of the click select the pull-down menu next to the ‘Apply Template’ button. Select
‘Save As Template’. Double-click the ‘Templates’ folder. Click the ‘Run Templates’ folder and ‘Name’ the
file “RNA STAR Complete Template” and click the ‘Check’ button to exit the ‘Save Template’ window.
7. Click the ‘Sample Editor Tab’ on the left side of the software. Click the ‘A1’ well location on the 96 well
sample plate and in the ‘Edit Properties’ section define the ‘Sample Name’ as “NCM” (Negative Control
Media). Push the ‘Enter’ button on the keyboard. Click the ‘A12’ well and define the ‘Sample Name’ as
“PCM” (Positive Control Media). Push the ‘Enter’ button on the keyboard.
8. In the lower left corner of the click select the pull-down menu next to the ‘Apply Template’ button. Select
‘Save As Template’. Double-click the ‘Templates’ folder. Click the ‘Sample Templates’ folder and ‘Name’
the file “RNA STAR Complete Sample Template” and click the ‘Check’ button to exit the ‘Save Template’
window.
9. Exit the software. If prompted, click ‘No’ to not save.
9.2 Programming Initial Run and Creating Analysis Template
It is recommended to setup the instrument up to step 4 before preparing the Reagent Mix as defined in the
qSTAR Reagent Preparation section above. The 96-well plate should be recently centrifuged to guarantee all
reagents are at the bottom of the plate and kept on a cold block. Use 96-well plates and seals compatible
with the instrument manufacturer (see Option for PCR Instruments & Consumables table above).
NOTE: The Analysis Template is only established after the initial run has been completed.
1. Launch the LightCycler (LC) 480 desktop software (version SW 1.5.1).
2. Click ‘New Experiment from Template’ and in the ‘Run Templates’ drop-down menu, select ‘RNA STAR
Complete Template’ then click the ‘Check’ button to exit the ‘Create Experiments from Template’ window.
Proceed to the ‘Sample Editor’ tab on the left of the software.
3. Select ‘Apply Template’ (do not select the drop-down menu next to the ‘Apply Template’ button) on the
bottom left of the screen. Double-click the Templates folder then double-click the ‘Sample Templates’
folder and choose the ‘RNA STAR Complete Sample Template’. Click the ‘Check’ button to exit the ‘Apply
Template’ window. The NCM and PCM should be loaded into positions A1 and A12 of the plate. If not
already selected, select all wells. Individual ‘Sample Names’ can be entered in the ‘Step 3: Edit Properties’
section if desired.
4. On the LightCycler 480 II instrument, push the Load Plate “” button on the front of the instrument. The
instrument drawer will automatically come out. Insert the 96-well plate onto the instrument drawer. Align
the notch of the 96-well plate with the notch on the instrument drawer. Push the Load Plate “” button
to close the plate holder.
ART-00045 Rev 5 · Rev date 2021/02 LumiraDx SARS-CoV-2 RNA STAR Complete Instructions for Use – 155. In the LightCycler (LC) 480 desktop software proceed to the ‘Experiment’ tab on the upper left of the
software. Click ‘Start Run’ on the bottom right of the software. A ‘Plate Sensor if off’ warning may appear.
Click the ‘Check’ button to exit this warning. In the ‘Save LightCycler 480 Experiment’ window that opens,
double-click the ‘Experiments’ folder and save under the ‘Name’ “RNA STAR Complete [YYMMDD_Plate#]”
then click the ‘Check’ button to exit this window.
6. After the run has finished, proceed to the ‘Analysis’ tab on the left of the software. Choose ‘Abs Quant/Fit
Points’ in the ‘Create new analysis’ section. Click the ‘Check’ button to exit the ‘Create New Analysis’ pop-
up window.
7. Click the ‘Background (2-6)’ button on the software. Set ‘Min Offset’ to ‘0’ and ‘Max Offset’ to ‘3’ and click
the ‘Check’ button to exit the ‘Background Settings’ window.
8. Confirm that ‘Color Compensation’ is ‘(Off)’ for all analytes on the bottom of the software and confirm
‘First Cycle’ is set to ‘1’ and ‘Last Cycle’ is set to ‘35’. Proceed to the ‘Noise Band’ tab at the upper middle
of the software.
9. Select from the pull-down menu next to the ‘Noiseband (Auto)’ button at the bottom of the software select
‘Noiseband (STD Mult)’. Click ‘Filter Comb (456-510)’ and select ‘COVID’. Click the ‘Check’ button to exit
the ‘Filter Combination’ window. Set ‘STD Multiplier’ to ‘22.0000’. Click ‘Filter Comb (456-510)’ and select
‘IC’. Click the ‘Check’ button to exit the ‘Filter Combination’ window. Set ‘STD Multiplier’ to ‘22.0000’.
10. Save the new analysis protocol as a template for future use. In the lower left corner of the screen select
the pull-down menu next to the ‘Apply Template’ button and click ‘Save As Template’. Double-click the
‘Templates’ Folder. Select the ‘Analysis Templates’ Folder and ‘Name’ the file “RNA STAR Complete
Analysis Template” and click the ‘Check’ button to exit the ‘Save Template’ window. Click ‘Calculate’ at
the bottom of the software.
11. To create a report, select the ‘Save’ button on the right of the software. If prompted, define ‘Enter the
reason for the changes’ as “Report” and click the ‘Check’ button to exit the window. Proceed to the
‘Report’ tab on the left of the software.
12. Select the box next to ‘Results’ in the ‘General’ tab under the ‘Abs Quant/Fit Points’ section. Click
‘Generate’ then click the ‘Save’ button on the right of the software. If prompted, define ‘Enter the reason
for the changes’ as “Save” and click the ‘Check’ button to exit the window.
13. Remove the plate from the LightCycler 480 II instrument using the Load Plate “” button on the front of
the instrument.
14. Remove the plate and discard the plate in a sealable waste bag or container.
9.3 Using the Run / Sample / Analysis Template
It is recommended to setup the instrument up to step 3 before preparing the Reagent Mix as defined in the
qSTAR Reagent Preparation section above. The 96-well plate should be recently centrifuged to guarantee all
reagents are at the bottom of the plate and kept on a cold block. Use 96-well plates and seals compatible
with the instrument manufacturer (see Option for PCR Instruments & Consumables table above).
1. Launch the LightCycler (LC) 480 desktop software (version SW 1.5.1).
2. Click ‘New Experiment from Template’ and in the ‘Run Templates’ drop-down menu select ‘RNA STAR
Complete Template’ then click the ‘Check’ button to exit the ‘Create Experiments from Template’ window.
Proceed to the ‘Sample Editor’ tab on the left of the software.
3. Select ‘Apply Template’ (do not select the drop-down menu next to the ‘Apply Template’ button) on the
bottom left of the screen. Double-click the Templates folder then double-click the ‘Sample Templates’
folder and choose the ‘RNA STAR Complete Sample Template’. Click the ‘Check’ button to exit the ‘Apply
Template’ window. The NCM and PCM should be loaded into positions A1 and A12 of the plate. If not
already selected, select all wells. Individual ‘Sample Names’ can be entered in the ‘Step 3: Edit Properties’
section if desired.
4. On the LightCycler 480 II instrument, push the Load Plate “” button on the front of the instrument. The
instrument drawer will automatically come out. Insert the 96-well plate onto the instrument drawer. Align
the notch of the 96-well plate with the notch on the instrument drawer. Push the Load Plate “” button
to close the plate holder.
5. In the LightCycler (LC) 480 desktop software proceed to the ‘Experiment’ tab on the upper left of the
software. Click ‘Start Run’ on the bottom right of the software. A ‘Plate Sensor if off’ warning may appear.
Click the ‘Check’ button to exit this warning. In the ‘Save LightCycler 480 Experiment’ window that opens,
double-click the ‘Experiments’ folder and save under the ‘Name’ “RNA STAR Complete [YYMMDD_Plate#]”
then click the ‘Check’ button to exit this window.
ART-00045 Rev 5 · Rev date 2021/02 LumiraDx SARS-CoV-2 RNA STAR Complete Instructions for Use – 166. After the run has finished, proceed to the ‘Analysis’ tab on the left of the software. Choose ‘Abs Quant/Fit
Points’ in the ‘Create new analysis’ section. Click the ‘Check’ button to exit the ‘Create New Analysis’ pop-
up window.
7. In the lower left corner click ‘Apply Template’ (do not select the drop-down menu next to the ‘Apply
Template’ button). Double-click the ‘Templates’ folder. Double click the ‘Analysis Templates’ folder and
select the ‘RNA STAR Complete Analysis Template’. Click the ‘Check’ button to exit the window. An “Apply
template to the active analysis” message may appear. Click ‘Yes’ to proceed.
8. Click ‘Calculate’ then create a report by selecting the ‘Save’ button on the right of the software. If
prompted, define ‘Enter the reason for the changes’ as “Report” and click the ‘Check’ button to exit the
window. Proceed to the ‘Report’ tab on the left of the software.
9. Select the box next to ‘Results’ in the ‘General’ tab under the ‘Abs Quant/Fit Points’ section. Click
‘Generate’ then click the ‘Save’ button on the right of the software. If prompted, define ‘Enter the reason
for the changes’ as “Save” and click the ‘Check’ button to exit the window.
10. Remove the plate from the LightCycler 480 II instrument using the Load Plate “” button on the front of
the instrument.
11. Remove the plate and discard the plate in a sealable waste bag or container.
ART-00045 Rev 5 · Rev date 2021/02 LumiraDx SARS-CoV-2 RNA STAR Complete Instructions for Use – 1710 RNA STAR Complete Setup for Applied BiosystemsTM 7500 Fast Dx
Refer to “User Manual Part Number 4406991” for additional information. The instrument programming
instructions are intended for setup of an entire 96-well plate. If the entire plate is not used, please deselect
wells as appropriate during analysis.
10.1 Programming the Run Template
1. Launch the 7500 Fast System desktop software (version 1.4.1).
2. The ‘Quick Startup document’ window will open. Click ‘Create New Document’ to start the ‘New
Document Wizard’. In the ‘Define Document’ window verify the default settings: ‘Assay’ is set to ‘Standard
Curve (Absolute Quantification)’, ‘Container’ is set to ‘96-Well Clear’, ‘Template’ is set to ‘Blank Document’,
‘Run Mode’ is set to ‘Fast 7500’, ‘Operator’ is defined as “[your operator name]”, ‘Comments’ is set to ‘SDS
v1.4.1’ and ‘Plate Name’ is defined as “RNA STAR Complete Template”. Click ‘Next’.
ART-00045 Rev 5 · Rev date 2021/02 LumiraDx SARS-CoV-2 RNA STAR Complete Instructions for Use – 183. In the ‘Select Detectors’ window, click ‘New Detector’ to open the ‘New Detector’ pop-up window and
define these settings: define ‘Name’ as “COVID”, define ‘Description’ to “COVID Channel”, set ‘Reporter’
dye to ‘FAM’, set ‘Quencher’ to ‘(none)’, and set ‘Color’ to ‘Green’. Select ‘OK’. Click ‘New Detector’ again
to open the ‘New Detector’ pop-up window and define these settings: set ‘Name’ to “IC”, define
‘Description’ to “IC Channel”, set ‘Reporter’ dye to ‘ROX’, set ‘Quencher’ to ‘(none)’, and set ‘Color’ to
‘Red’. Click ‘OK’. Highlight each detector (COVID & IC) and click the ‘Add >>’ button to add the detectors
to the ‘Detectors in Document’ column. From the ‘Passive Reference’ drop-down menu, select ‘(none)’.
Click ‘Next’.
NOTE: It is important to make sure the ‘Passive Reference’ drop-down menu has ‘(none)’ selected. If ‘ROX’ is
not removed as a ‘Passive Reference’ dye the IC channel will be impacted and the run must be repeated.
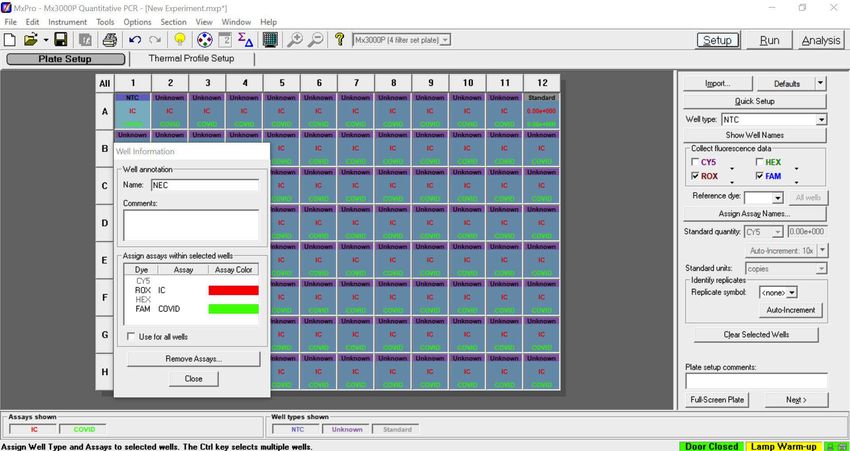
4. In the ‘Set Up Sample Plate’ window click the gray box between “A” and “1” to select all wells then select
boxes under the ‘Use’ section to add the COVID and IC Detector to all wells. Click ‘Finish’. The wizard will
close, and a screen will display the ‘Setup’ tab and ‘Plate’ tab. This will show the sample plate that was set
up during the quick start. For the initial set up, select location ‘A1’, right click and select ‘Well Inspector’. In
the ‘Well Inspector’ window, define the ‘Sample Name’ as “NCM” (Negative Control Media). Select the
‘COVID’ Detector line, under ‘Task’ select from the drop-down menu ‘NTC’. Select the ‘IC’ Detector line,
under ‘Task’ select from the drop-down menu ‘NTC’. Verify the ‘Passive Reference’ is set to ‘(none)’. Click
‘Close’.
ART-00045 Rev 5 · Rev date 2021/02 LumiraDx SARS-CoV-2 RNA STAR Complete Instructions for Use – 19You can also read