Rodent Surgery Application of Aseptic Technique and Perioperative Care
←
→
Page content transcription
If your browser does not render page correctly, please read the page content below
Rodent Surgery
         Application of Aseptic Technique and Perioperative Care

                               Marcel I. Perret-Gentil, DVM, MS
                               University Veterinarian & Director
                              Laboratory Animal Resources Center
                             The University of Texas at San Antonio
                                         (210) 458-6692
                                         larc@utsa.edu

Purpose of this document

This is a handout that accompanies a hands-on rodent surgery workshop in the Laboratory Animal Resources
Center (LARC). The principles and methods outlined in this handout are sound, however, your institutional
policies and guidelines should be followed.

Regulations and Guidelines
      The Guide for the Care and Use of Laboratory Animals (National Research Council) can be
       downloaded from http://aaalac.org/resources/Guide_2011.pdf. The 2011 Guide states, “Inadequate
       or improper technique may lead to subclinical infections that can cause adverse physiologic and
       behavioral responses (Beamer 1972; Bradfield et al. 1992; Cunliffe-Beamer 1990; Waynforth 1980,
       1987) affecting surgical success, animal well-being, and research results (Cooper et al. 2000).
       General principles of aseptic technique should be followed for all survival surgical procedures
       (ACLAM 2001).”

      According to OLAW guidelines for rodents and the Guide, a dedicated facility is not required, but
       surgery must be performed using aseptic technique.

      The UTSA IACUC Rodent Survival Surgery policy can be found by going to
       http://vpr.utsa.edu/oric/iacuc/policies.php.

Justification for Applying Aseptic Technique in Rodent Surgery
   Importance of maintaining asepsis (NRC Guide for the Care and Use of Laboratory Animals):

       Although mice and rats have been touted as being resistant to post-surgical infections, the literature
       contains numerous articles that document how subclinical infections such as Pseudomonas
       aeruginosa, Corynebacterium kutscheri, mouse hepatitis virus, or Spironucleus muris can become
       clinical diseases following stress or immune suppression (Foster, et al., 1982).

       Historically, researchers have performed surgery in rodents in a non-aseptic manner. However,
       experimental evidence has been obtained to suggest that infections take a subclinical profile in rats
       and mice. Improvement in post-op recovery by increased food/water consumption due to
       implementing aseptic surgical technique has also been documented (Cunliffe-Beamer, T.L, 1972-73.
       Cunliffe-Beamer, T.L. Biomethodology, 1983). Experimentally induced wound infections in rats
       were not associated with gross clinical or obvious behavioral signs (Bradfield, Schachtman,
       McLaughlin, Steffen). Subclinical infections can lead to behavioral and physiological changes
       (Behavioral and Physiologic Effects of Inapparent Wound Infection in Rats, Lab. Animal Science,
       42 (6), 572-578, 1992. Errata, Vol 43 (2), 20, 1993.)

  It is unsafe to assume there is anything special, in either way, about the resistance of rodents to infections.
  Rodent models have been used for antibacterial research in which rodents have been used to model human
  bacterial diseases, including surgery related conditions. This fact would suggest that there might be no

                                                      1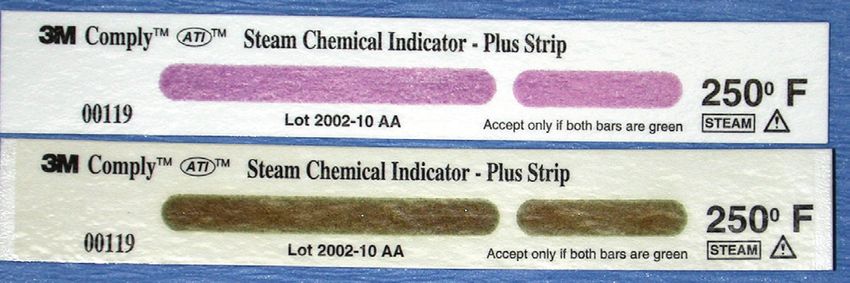
differences between rodents and other mammalian species, including humans, in the development of
  infections, including postsurgical infections (Morris T., Laboratory Animals, 1995, Vol 29, page 26).

Definitions
           Sterile: Free from all living microorganisms and their spores.
           Asepsis: Very insignificant numbers of microorganisms. A condition in which living pathogenic
            organisms are absent; a state of sterility.
           Aseptic surgery: The performance of an operation with sterile gloves, instruments, etc., and
            utilizing precautions against the introduction of infectious microorganisms from the outside
            environment.
           Contaminated /Colonized: Bacteria / microorganisms present (106 / gram tissue). Clinical infection is
            evident and cultures are positive.
            0 Bacteria                                                                      >1,000,000
            Sterile                    Aseptic                Contaminated                    Infected
           Sterilization: The process whereby all viable microorganisms are eliminated or destroyed. The
            criterion for adequate sterilization is the failure of organisms to grow if a growth-supporting
            medium is supplied.
           Disinfection: The chemical or physical process that involves the destruction of pathogenic
            organisms. All disinfectants are effective against vegetative forms of organisms, but not
            necessarily spores.
           Major Surgery: Any surgical intervention that penetrates and exposes a body cavity or produces
            substantial impairment of physical or physiologic functions (such as laparotomy, thoracotomy,
            craniotomy, joint replacement, and limb amputation).
           Minor Surgery: Any surgical intervention that does not expose a body cavity and causes little or
            no physical impairment (such as wound suturing; peripheral-vessel cannulation; such routine
            farm-animal procedures as castration, dehorning, and repair of prolapses; and most procedures
            routinely done on an "outpatient" basis in veterinary clinical practice).

Good Technique includes:                       Wrong instrument
                                               holding – See
           Asepsis                            Surgical Technique
           Gentle tissue handling             section
           Minimal dissection of tissue
           Appropriate use of instruments
           Effective hemostasis
           Correct use of suture materials and patterns

       Skills are Practiced, Developed, and Refined
                 Practice, Practice, Practice

Special Considerations
       Rats and mice have a high surface area to body volume ratio and rapid metabolism.
            - With high metabolic rate and limited fat storage, energy depletion can be stressful.
            - Pharmacological doses tend to be higher than in larger species.
            - Dehydrate faster per unit of time.
            - Lose body heat rapidly through hairless areas. Hypothermia during surgery is a frequent
                cause of intraoperative mortality.

       Surgical Stress:

                                                     2
-   The major responses to surgery are characterized by an elevation in plasma concentrations of
               catecholamines, corticosterone, growth hormone, vasopressin, renin, aldosterone and
               prolactin, and by a reduction in plasma concentrations of FSH, LH and testosterone. Plasma
               insulin and glucagon concentrations fluctuate. These hormonal responses to tissue trauma
               produce an increase in glycogenolysis and lipolysis, and result in hyperglycemia. The
               duration of the hyperglycemia varies, but after major surgery the response may persist for 4-
               6 hours. More prolonged changes in protein metabolism occur, leading to negative nitrogen
               balance lasting for several days. Even minor surgical procedures can produce prolonged
               effects.

           -   Minimizing tissue trauma, preventing infection, controlling postsurgical pain and
               discomfort, and supporting the animal’s nutritional needs will reduce the magnitude of the
               metabolic response to surgery. The purpose of a survival surgical procedure is to produce an
               animal model that is defined and that has the smallest degree of non-treatment variability.
               An important objective is to return the animal to physiological normality, or to a defined
               state of abnormality, as rapidly as possible.

Hemostasis
      It is important to minimize bleeding during surgery because:
            - Blood is an ideal growth media for bacteria
            - Blood loss leads to poor recovery and increases the chance of death
            - Blood loss increases post-op recovery time
            - Blood loss may introduce research variables
      To minimize blood loss:
            - Dissect along tissue planes
            - Do not cut across muscle when possible
            - Identify, isolate, retract large vessels
            - Know the anatomy

Tissue Trauma & Contamination
      Trauma and infection negatively impact the animal and also serve as a confounding variable
       for experimental data. Diminish tissue trauma and infection by adhering to the following four
       principles:
           - “Surgery is gentle”: Rough tissue handling results in increased pain.
           - “Time is trauma”: Organ exposure to room environment is toxic to tissues. The longer the
               exposure the greater the trauma. Find the right balance between speed and quality of work.
               Incidence of infection increases 3 fold when surgery is longer than 90 minutes.
           - “Wet tissues are happy tissues”: Avoid desiccation by maintaining tissues wet at all times
               with warm saline or lactated ringer’s solution (LRS).
           - “The solution for pollution is dilution”: Infection occurs when the number (generally ~106
               infectious particles/gram of tissue in
               immunocompentent animals) of infectious
               particles overwhelm the animal’s immune
               system. Adhere as close as possible to the
               aseptic principles outlined in these notes to
               diminish the number of microorganisms in
               the wound site. If contamination occurs,
               dilute the contaminant with use of copious
               amounts of warm rinse solution (sterile
               saline or lactated Ringer’s solution).

        0 Bacteria                                                                      >1,000,000
        Sterile                   Aseptic                 Contaminated                    Infected
                                                   3
Dealing with the Risk
There is no such thing as a 100% guarantee or a risk-free environment
Have to decide on the level of risk that is acceptable
- Dependent on the type of procedure
- Dependent on the complexity of the procedure
- Dependent on the species
- Dependent on the consequences of failure
Effect of Biomaterials
Significantly decrease the number of bacteria needed to become clinically infected.
infection/sepsis
- ~1000 - 10,000 bacteria / microorganisms present (Paston et al. J Clin Micro, 1993)
- clinically infected
- culture positive
0 Bacteria 1,000 10,000 >1,000,000
Sterile Aseptic Contaminated Infected
Preoperative Preparation
Assess health status. Recommendations:
o Three to five-day acclimation to animal facility, to overcome the stress of transportation.
o Should be free of clinical signs of disease:
Appearance should include normal posture and movement, glossy coat, bright eyes.
Assess the character of respiration (no sneezing, coughing, or unusual respiratory
sounds) and the cardiovascular status (bright pink coloration of ears and mucous
membranes, albino animals).
Normal intake of food and water.
Fasting rats and mice is generally unnecessary
Because rats and mice do not vomit, they do not have the risk of intra/post-op vomiting as in
other species. If you will perform a surgery on the gastrointestinal tract, then you can fast the
animals but briefly (a few hours). However, the reason for doing it should be considered
carefully and weighed against the disturbance of normal metabolic processes needed for
homeostasis. For example, starvation will not empty the stomach unless it is for more than 24
hours, but it will seriously deplete glycogen reserves in the liver (Behavioural and cardiac
responses to a sudden change in environmental stimuli: effect of forced shift in food intake,
Steenbergen JM; Koolhaas JM; Strubbe JH; Bohus B. Physiology and Behaviour 45, 729-733.
Also Vermeulen JK, Vries de A, Schlingmann F & Remie R, (1997). Food deprivation:
common sense or nonsense? Animal Technology, Vol 48, No 2, p 45-54).
Animal positioning
o If limbs must be positioned for control of the surgical field, avoid placing excessive tension
on the limbs, which may cause neural damage and shut off circulation.
o Only tie down the limb(s) that need to be positioned. Remember the animal indicates that it
may be becoming light by limb movement.
o Avoid stretching the limbs into an unnatural position, which may traumatize joints as well as
impair breathing.
o If limbs must be tied down, apply strips of white tape around the carpal area and forelimbs.
You can also tie a length of tape over the back, from carpus to carpus, to stabilize the
forelimbs and torso.
4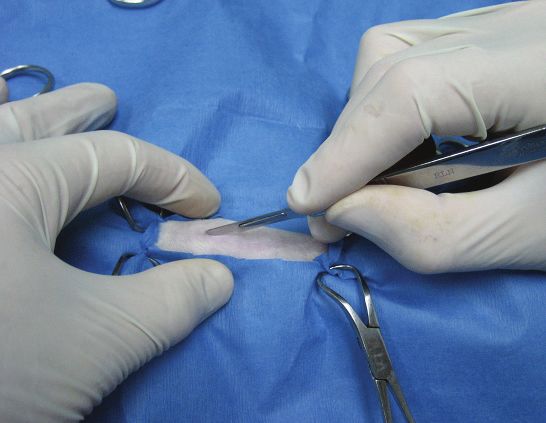
   Never use the anesthetized animal’s body as a table. Do not rest your hands or your instruments on
        the chest or abdomen. External pressure interferes with respiration and blood circulation.

General Preparations for Surgery
Useful suggestions for dealing with some of the unique challenges of rodent
surgery have been published (Cunliffe-Beamer 1983, 1993).”

    Location
     The elaborate operating suites mandated by the NRC Guide and USDA
       Animal Welfare Act for larger species are not required for rats and mice.
     What is necessary and required for survival surgery in these species is:
       1) A clean, neat (uncluttered), disinfected area dedicated
           to rodent surgery for the duration of the procedure.
       2) Free of debris and equipment not related to surgery.                            ANIMAL PREP
       3) A separation of functions of animal prep, operating
                                                                         SURGERY
           field and animal recovery. These may be adjoining
           areas on a long bench top or better yet, animal prep is
           best when performed in a room separate from the room
           where surgery is to be performed. The rationale is to
           avoid contaminating the operating field with loose
           animal fur, splashes from incision site scrubbing, and
           bedding dust and fur from nearby cages.
       4) Avoid locations that are beneath supply ducts to
           minimize contamination from dust.
       5) Avoid high traffic areas such as those near doorways to prevent unnecessary interruptions and
           creation of air turbulence.

    Instruments
     Surgical instruments should be autoclaved. Be sure to use an indicator to test that
        the instruments are sterile, e.g. the strip test or chemical color indicator shown in
        these pictures. Temp stripes turn black indicating proper sterilization has occurred
        and chemical color indicator turns brown.

                                                                     All

                                                                                   Unsterile            Sterile
        Instruments must be double wrapped in linen or special paper or
        placed in a special metal box equipped with a filter before sterilization. Expiration dates should be
        printed on all equipment packs. At UTSA packs are considered expired one year after sterilization or
        if a pack has ripped (exposing contents) or become wet.

        Autoclave settings should be as follows:
            Autoclave Settings         Temp (F)        Pressure (PSI)      Time (min)
          General Wrapped Items            250               20               30
              Bottled Solutions            250               20               30
                  'Flashing'               270               30               4-7

        'Flashing' is when an instrument is autoclaved unwrapped for a shorter period of time. 'Flashing' is
        often used when a critical instrument is dropped.

                                                      5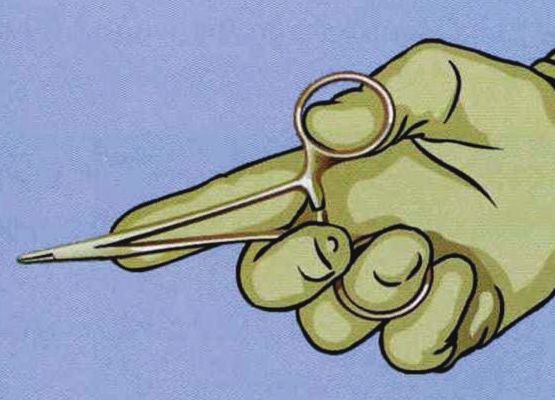
   If performing batch surgeries, i.e. using the same instruments on a series of animals, wipe them clean
    and resterilize the instrument tips (e.g. in a hot bead sterilizers – see next section below) between
    animals. You may need two sets of instruments to alternate use between animals.

   Hot bead sterilizer
        o This method sterilizes only the tips of the instruments.
        o Beads must be pre-heated to the recommended
           temperature and the instruments exposed for the
           recommended time (generally tips of instruments are
           exposed for 15 sec).
        o Gross debris must be removed from the instrument prior
           to sterilization.
        o Instrument must be allowed to cool before touching
           tissues.
        o Best used for sterilizing instruments between surgeries.
        o If you are doing a full day of batch surgeries, then use a
           fresh set of autoclaved instruments for the morning and
                                                                        Hot Bead Sterilizer
           the afternoon series.
        o No more than five rodent surgeries is recommended by using this sterilization method
           (depending on your institutional guidelines). A new set of autoclaved instruments must be
           used for the next group of animals.

   Liquid sterilants (e.g. glutaraldehyde [Cidex])
       o If using cold sterilant solutions make sure instruments are exposed for the proper length of
            time specified by the manufacturer and expiration dates of solutions are observed
       o Instruments must be removed from solution and rinsed with sterile water, saline, or alcohol
       o Rinsed instruments must be placed on a sterile field

   Delicate instruments
        o Delicate instruments, materials for implantation or items that otherwise may melt or become
            damaged when heated can be sterilized using ethylene oxide
        o The packs must be sufficiently aerated to prevent toxic side effects from residual gas
        o This may require 24 to 72 hours

   Instrument packs
    Once packs are opened all other sterile equipment must be placed on the sterile field.
    These items must be opened in a way as to prevent contamination of the item or the surgical pack

   Organize the instruments in your surgical pack
       o Point all tips in one direction.
       o It is helpful to place them in the order used.
       o Between surgeries cover the tips of the instruments with sterile gauze.
       o Note that the space between the pack and the draped animal is not sterile; do not lay
           instruments in this space.

                                                 6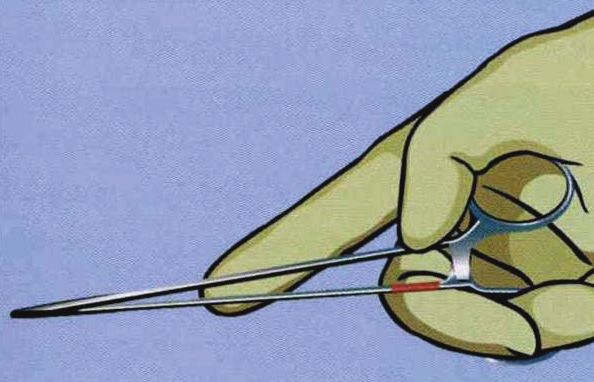
Animal Prep
Animals waiting for surgery should be kept at a visual and olfactory
distance from those animals undergoing surgery.
Anesthesia
o Isoflurane or sevoflurane gas anesthesia administration through a
precision vaporizer is generally considered the preferred method of
anesthesia in rodents; however injectable anesthetics may also be
used.
o Gas anesthesia may be induced in an induction chamber or it may
be preceded by an injectable anesthetic cocktail.
o For maintenance of anesthesia, a gas mask or endotracheal
tube may be used to deliver the anesthetic. Endotracheal
intubation can be performed using a 14-18 gauge intravenous catheter in a rat and a 20-
21-gauge IV catheter in a mouse, trimmed to the length between the nose and thoracic inlet.
Specialized apparatuses and kits can be purchased to facilitate intubation of rats and mice.
o We recommend the use of a calibrated precision vaporizer as the safest method of gas
delivery. However, if gas is delivered without a precision vaporizer, the following
guidelines may be used:
For induction, a concentration of 2-5% concentration of isoflurane gas is normally
adequate. To use either gas accurately, the induction chamber volume must be
known precisely. After determining the chamber volume (it is recommended to
record this permanently somewhere easily retrievable), add 0.1-0.2 ml of gas (in
liquid form from the bottle) for each liter of chamber capacity. This can be done by
applying the gas in liquid phase from its bottle to a cotton ball below the false floor
of the container. For small containers, a piece of cotton can be enclosed in a
histology tissue cassette and the agent may be poured or applied onto the cotton in
the cassette. Use of 0.2 ml liquid agent per 1000 ml chamber volume will give
about a 4% concentration of gas. In the experience of the veterinary staff at Emory
University, using nine naïve ICR mice (5 males & 4 females; 2 months of age)
introduced to the chamber sequentially after the introduction of isoflurane (0.2 ml/L
chamber volume), recumbency was obtained in 57 +/- 21 seconds. However, for
rapid and effective induction, the agent had to be replenished in the chamber
approximately every 3 mice. Gas delivered by this method must be done under a
chemical fume hood or type IIB Biosafety cabinets that are vented to the outside.
Volume of liquid agent/ Approximate concentration of
1000 ml chamber volume isoflurane or halothane
0.05 ml 1%
0.1 ml 2%
0.2 ml 4%
0.3 ml 6%
This method of gas anesthesia delivery should only be used for very short
procedures.
Gas Anesthesia Scavenging
o Waste gas from anesthetic gasses must be scavenged. Acceptable methods are:
Downdraft tables. These are usually only effective up to a height of 6-8 inches from the
surface. Do not use induction chambers taller than this for induction of anesthesia.
Chemical fume hood.
Type IIB biosafety cabinets that are vented to the outside.
Charcoal canisters. Charcoal canisters must be weighed before it is used for the first
time, and after each use. Most canisters must be replaced after an increase in the
7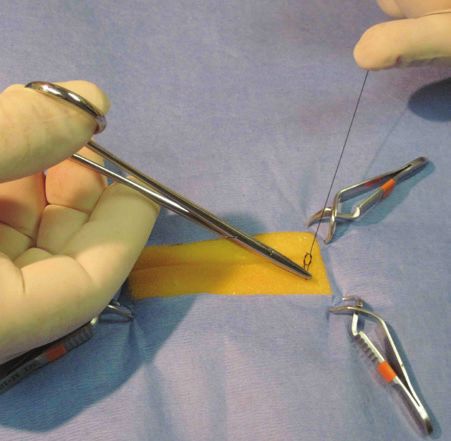
recommended weight (generally 50 gram). Depending on the size of the canister and the
manufacturer’s recommendations, the canister should also be weighed during especially
long procedures to assure its continued effectiveness.
Protect the eyes: Anesthetized animals should have corneas protected with an ophthalmic ointment.
Avoid touching the eye with the tip of the ointment dispenser as it may scratch the cornea.
Hair Removal
o Remove fur along the incision site with small clippers. Clip a generous area to
ensure fur does not contaminate the wound and a sufficient area that can be disinfected
around the incision site, but avoid taking off too much fur, because this will reduce the
animal’s ability to regulate its body temperature. Use the sticky side of white tape to lift off
the loose fur.
o An easy alternative to clipping is hair plucking. Hair follicles in mice (not other rodent
species) are usually in telogen or resting phase and hair can be removed without injury.
o Depilatory creams may also be used. Strict adherence to time of exposure is important as
prolongued exposure of these creams on the skin may lead to chemical burns.
Antiseptic preparation of surgical site:
o The use of alcohol alone is not adequate.
o Standard surgical prep consists of three alternating scrubs of an chlorhexidine and 70%
alcohol. Although pictures in this presentation illustrate the use of iodophors (povidone
iodine), its use is no longer recommended as it has been shown to be inferior to
chlorhexidine.
o Using a gauze sponge or cotton tipped applicator, cleansing should be done in a circular
motion.
o Begin at the center of the shaved area and work toward the
periphery.
o Never go back to the center with the same sponge.
o Scrubs should be alternated between a chlorhexidine scrub and alcohol, ending with an
chlorhexidine solution, NOT scrub. Scrub soaps are irritating to subcutaneous tissue.
o Be careful not to excessively wet the animal as this can exacerbate hypothermia.
Chlorhexidine (not
iodophors or povidone
iodine) is recommended
for skin prep
Draping is necessary when viscera or sterile instruments may come in contact with unprepped skin
and fur. Types of drapes that may be used are:
o Surgical paper drape. It is inexpensive, autoclavable.
It may be precut or one in which you must cut a hole.
8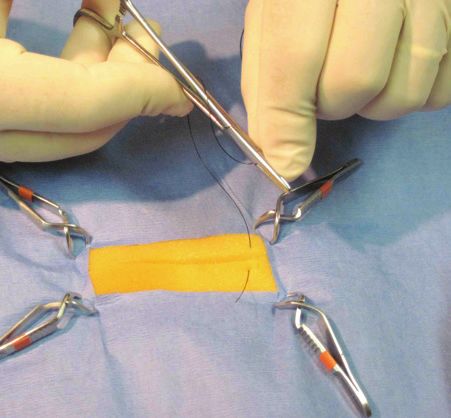
A disadvantage to paper drapes is that they usually cover the animal making monitoring
difficult.
o Plastic drapes offer the advantage of more visibility.
o Transparent, self-adhesive drapes, provided that the animal’s body is dry (use sterile gauze to
daub dry prepped skin).
o Glad’s Press’n Seal provides a sterile, inexpensive
and effective method to cover the surgical field.
Although this is a food/grocery item, at UTSA we
tested it and results were negative for the presence of
any microorganisms and organic material. The sticky
part is placed on the (entire) animal, which allows
easy monitoring due to the see-through nature of this
material. Make sure the nose is exposed to avoid suffocation.
o Sterile gauze sponges can also be used for draping.
o Stockinette over the animal provides a convenient sterile field.
o Pre-cut pieces of aluminum foil, ~8.5 X 6 inches for a mouse, stacked and autoclaved
The surgeon holds the sterile foil in hand or places it directly on the surgical surface.
The assistant places the mouse on foil in dorsal, ventral, or lateral recumbency according
to procedure.
The surgeon wraps and positions the mouse (without touching the mouse) as desired.
At the end of the procedure, the surgeon hands off the foil wrapped mouse to the
assistant.
For rats, may want to use heavy duty foil. The heavy duty foil is useful for mice for
unusual positions, e.g. thoracic inlet for thymus injection or ablation, access to
perineum, etc.
Be sure the shiny side goes to the mouse to avoid glare.
Note that heat-sink hypothermia can be an issue if the animal is cold to start with, or
overly wet (scrub, alcohol) or if surgery is performed in a safety cabinet/wind tunnel.
To avoid this problem always use a warmed anesthesia/prep area, and heated surgical
surface.
The foil keeps the surgical area sterile for the next mouse.
Note: During surgery
Be careful not to get paper or cloth drapes wet.
Wet material acts as a wick to pull bacteria through from the non-sterile surface below.
When this happens instruments should be considered contaminated.
Surgeon
Wash hands with an antiseptic soap.
Use sterile surgical gloves, mask, clean
lab coat. When using powdered gloves
remove powder with sterile saline.
Powder from gloves is a foreign material
that leads to foreign body reaction.
If performing batch surgeries replace
gloves or rinse your gloved hand or
fingers with chemical sterilant followed Granuloma from talcum
by saline rinse. Sterilant residues on powder on surgeon’s gloves
gloves will be irritating to tissues and
will increase the risk for local infection. Dry with a sterile towel. Put on new sterile gloves when
these become uncomfortable, torn or punctured.
9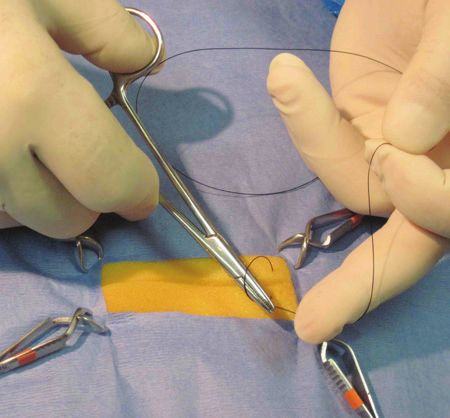
   Donning surgical gloves:
    o Open the package of gloves observing sterile technique
    o Remember, the inside of the package is STERILE – exam gloves are not the same as sterile
       gloves

   Donning surgical gloves procedure:
    1. Don the gloves in such a way that prevents contamination of the outer surface of the gloves.
    2. One glove is lifted from the opened glove package by its turned down cuff.
    3. & 4. The glove is pulled on the hand with a rotating motion.

        1                        2                        3                        4

        5                        6                        7                        8

    5. Place the gloved fingers beneath the cuff of the other glove.
    6. With the gloved fingers under the cuff, the glove is placed on the ungloved hand. The folded cuff
    protects the gloved hand from contamination.
    7. It is pulled over the cuff of the lab coat following insertion of the hand.
    8. The fingers are then slipped under the cuff of the first glove to pull it over the lab coat cuff.

    For a video on donning sterile surgical gloves go to
    http://vpr.utsa.edu/files/larc/DonningSterileSurgicalGloves.mov

Maintaining Asepsis

Once the surgeon, surgical areas, and rat are prepared, one must remain conscious throughout the
procedure not to break the aseptic barrier that has been created
 Gloved hands should be held elevated above the waist and should touch only the surgical incision
    and sterile objects, i.e. sterile instrument tray, sterile drape.
 Once gloved, do not touch or lean over a non-sterile area. Do not drop your hands to your sides.
    Do not touch gloves to your skin or clothes.
 Always lift an instrument from a sterile pouch or sterile surface. Do not drag instruments over the
    pack/drape edges because they can become contaminated.
 Do not allow surgical instruments to fall below the edge of the table. If an instrument does fall, the
    instrument is no longer considered sterile and should not be picked up and reused until resterilized.
 Sterile surfaces are to be kept dry. Moisture can lead to contamination of the surgical area.

                                                 10
Preventing hypothermia
Support normal body temperature during anesthesia.
o Rats and mice have a high surface area and lose body heat rapidly by conduction.
o A major cause of surgical mortality is not always the surgery or the anesthesia but
hypothermia. Body temperature drops precipitously under sedation or anesthesia. Low
body temperatures can cause irreversible shock and death.
o Animals should be provided with a heat source during the pre-, intra- and post-operative
periods.
o Improper heating devices can also be dangerous. Electric heating pads are generally
discouraged for use with rodents as they have varying temperatures across the surface.
o Slide warmers can be used as a heat source during recovery.
o The safest device is a circulating hot water blanket.
o Place the animal on insulating materials (e.g. bubble wrap or folded drape).
o Place a heating lamp at a distance, which controls heating.
o You can test the environmental temperature by placing a thermometer in the vicinity of the
animal for the approximate duration of a surgery (only 1-2° higher than body temp is
necessary).
o It’s easier to maintain normal body temperature than to reheat a chilled animal. If the animal
is allowed to chill, there will be a reduction in circulation and organ function.
o Supplemental heat is especially important when using chemical fume hoods or biosafety
cabinets because of the high airflow generated in these hoods.
o Keep warm fluids on the tissue constantly within an open cavity.
o Check body temperature throughout procedure.
o Keep the room temperature set at 80 degrees if possible.
o Homeostatic blankets can be utilized.
o Place animals in pre-warmed approved incubators during recovery if available.
Rat Intubation
Items required
o Rat Intubation Kit
o Rodent Work Stand
o 2% Lidocaine
o Cut away Speculum
o Otoscope
o Clear 14-18 ga Catheter (intubation tube)
Procedure
1. Have everything ready before you start!
2. Draw .3 mL of Lidocaine into a syringe, purge into applicator
3. Check to insure the intubation tube doesn’t pass the thoracic inlet, if necessary the tube
should be shortened. 200 g rats; the tube will not be too long
4. Shortening the tube: Cut the tube at a 45º bevel with a sharp blade. A smooth rounded tip
will pass easily through the cords. A sharp point will be traumatic and should not be used.
5. Once the tube is ready, umbilical tape (used to secure the tube) is tied to the catheter hub. A
place is provided on the stand to hold the umbilical tape container.
6. Place the tube over guide wire; making sure it is loosely fitted onto the hub so it can be
easily advanced.
7. Adjust the guide wire using the syringe plunger. It must be long enough to reach the
midpoint of the trachea but should not reach the bifurcation.
8. Place speculum onto the Otoscope. Keep handle pointed up during intubation. The
speculum is mounted so the cut away portion is facing the operator’s dominant hand when
the handle is held up. This angle allows for side access.
119. Configure work stand for rat; body positioners are rotated so the shallow stepped ends face
away from the operator.
10. Once properly sedated, the rat is placed in a supine position on the stand. Fasten the body
positioners to stabilize. Care is taken to insure the rat will not rotate to the right or left, this
could compromise the technique.
11. Place selected intubation tube onto guide wire with tip on the inside of the guide wire. Note:
If the tip is not appropriately placed it may pull away from the guide wire and cause
difficulty or trauma as it passes the cords.
12. Apply the incisor loop and secure to the stand.
13. Tilt the stand to a 45º angle.
14. Place the small cotton swab under the tongue and rotate towards the operator to extend the
tongue and lift the mandible.
15. Turn the speculum light on, rest elbow on bench/table, place hand on stand and insert the
speculum gently and parallel to the hard palette. Carefully elevate until a clear view of the
cords is obtained. The otoscope may be lowered or lifted to obtain a clear view but must
remain parallel to the stand and should not be rocked or rotated down.
16. Once the cords are visualized insert the lidocaine applicator at side of mouth and advance
toward cords.
17. If the cords are not seen, apply gentle pressure to the soft palette.
18. Place 1 or 2 drops of lidocaine. Allow a few seconds for the lidocaine to take effect.
19. The guide wire is inserted at the corner of the mouth, passed through the cords into the
trachea. Note: Do not insert the guide wire past the thoracic inlet.
20. Remove the speculum; advance the intubation tube over the guide wire and into the trachea.
Advance until the ties are behind the incisors. Immediately remove the guide wire.
21. Lower the stand and check the tube for correct positioning.
Cooled mirror may show breath condensation
Fogging seen at time of respiration indicates proper placement.
22. Do not attempt to intubate more than two times; trauma and swelling can cause respiratory
obstruction or death.
23. Carefully remove the incisor loop, loosen body positioners and gently turn the rat to the
prone position.
24. The ties are secured over the whiskers and over the nose.
25. Recheck placement of intubation tube.
26. Considerable care must be taken when removing the rat from the stand and connecting to the
breathing apparatus.
12Intraoperative Anesthesia and Analgesia:
Anesthesia is a state where all perceived sensations are absent. Because drug effect can vary, you must
assess the depth of anesthesia prior to beginning a painful procedure such as surgery.
The depth of anesthesia and the level of analgesia must be adequate to prevent the animal from feeling any
pain in response to a surgical stimulus. Before making an incision, squeeze both rear paws firmly (toe pinch
reflex) 3-4 times, but without injuring it, to test the animal’s perception of sensation and pain. If the animal
withdraws its leg or if respiration rate increases, then the anesthesia is too light. The front toe pinch reflex
may not be reliable as the pain perception may be present in the absence of a front toe pinch reflex. Assess
how much time elapsed from administering the anesthetic and compare that to the expected time of peak
effect. You may have to wait longer for the anesthetic to take effect. Or, if surgery was delayed, the
anesthetic may have worn off. If neither of these time factors may account for the inadequate anesthesia, it is
possible that you may have to use a higher dose rate of your anesthetic.
Preemptive analgesia is the prevention of pain before it occurs. As an adjunct to general anesthesia, a local
anesthetic is used to desensitize a body area before making an incision. This reduces the pain of the surgical
wound postoperatively and in healing. Preemptive analgesia is also accomplished by administering a
systemic analgesic before the pain insult occurs (e.g. before the surgical incision is made). In general,
analgesics are more effective when administered prior to surgery.
Much of the post surgical pain is the result of the sensations produced in the skin and body wall of the
incision area. Anesthesia of the local nerves prior to incising these tissues will greatly reduce post-op pain
and distress.
When the skin and tissues are incised, local sensory nerves become excited and transmit impulses to the
brain that are interpreted as pain. During general anesthesia, the animal is unconscious and is unable to
perceive the neural stimulations from the incision site and so is unaware of painful sensations. However,
when the anesthetic has worn off, the brain will process these neural excitatory impulses, which continue
postoperatively for days until the incision is healed. The result is that the surgical wound is painful and
sensitive to touch and movement.
If a systemic analgesic or a local anesthetic is infiltrated prior to the incision, it will block or diminish the
sensory neuroexcitation caused by cutting the tissues. When the animal wakes up, it will have a reduction in
sensory stimuli from the incision area, and pain of the surgical wound will be greatly decreased both initially
and throughout the period of wound repair.
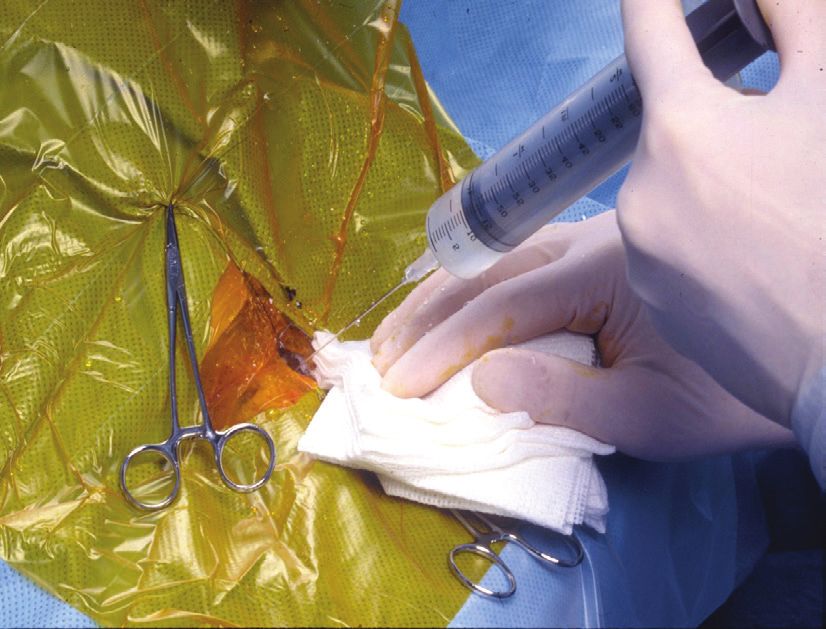
Inject a local anesthetic subcutaneously to infiltrate it in the vicinity where the incision will be made. Allow
a few moments for it to diffuse and take effect before beginning the surgery.
An effective and simple analgesic consideration (that does not require the use of DEA controlled drugs)
would be to prepare a 50/50 mix of lidocaine 1-2% with 0.5% bupivacaine. This is inexpensive and easy to
administer. The surgeon can infiltrate the incision area just prior to closure or better yet, prior to making the
incision. Lidocaine provides almost immediate pain control for 20-40 minutes and bupivacaine provides
longer pain control for up to 4-6 hours. Since bupivacaine tends to sting upon injection, we recommend
injecting it after the animal is anesthetized. In general major surgery requires systemic analgesics as the
lidocaine/bupivacaine infusion only provides pain management to the incision site. Lidocaine and
bupivacaine doses should not exceed 10 and 6 mg/kg respectively. Higher doses may lead to heart
arrhythmias.
METHODS OF DELIVERY OF INHALANT AGENTS TO RODENTS
The best method for the delivery of volatile agents to rodents involves the use of a precision vaporizer and an
anesthesia chamber alone or in combination with a face mask appropriately sized for rodents. LARC has the
equipment to safely and effectively administer inhalant anesthetics (isoflurane) to rodents using a
precision vaporizer. Please contact LARC for details regarding use of this equipment. The rodent is
placed within the chamber for induction at 4-5% isoflurane concentration. Once anesthetized, the animal is
13removed from the chamber with anesthesia maintained by delivery through a face mask at 1-3% concentration. Both chamber and mask delivery incorporate the use of a precision vaporizer for precise control of the concentration of anesthetic gas delivered to the patient. Because oxygen flow is required to volatilize the liquid anesthetic placed within the vaporizer, oxygen is also delivered to the patient and helps to maintain the blood oxygen saturation. Because fairly high fresh gas flows are required for either chamber or mask delivery, adequate scavenging of waste anesthetic gases is necessary to avoid exposure to personnel. In general, isoflurane anesthesia is superior to injectable anesthesia. Animals are more quickly induced and recovered, and close to 100% of the gas is eliminated through the lungs without being metabolized, (
support is critical upon recovery to avoid hypoglycemia. Nutritional support can be provided by simply
providing a high-quality pelleted rodent diet as soon as the animal has recovered sufficiently to ambulate and
eat (remember - rodents do not vomit so pre-anesthetic fasting is not typically performed). Diet gels that
contain moisture and calorie dense nutrition placed in containers at the bottom of the cage contained in cups
can be especially helpful for the recovery rodent. For information on these supplements go to Bio-Serv
(http://www.bio-serv.com/) or Clear H2O (http://clearh2o.com/).

Fluid deficits can be corrected by subcutaneous or intraperitoneal injection of warmed saline, Lactated
Ringers solution or replacement fluids (e.g., Normosol).

Because rodents are frequently anesthetized with injectable agents that inhibit blinking (e.g., ketamine),
ocular lubrication is important to protect against corneal ulceration.

                                                      15
Intraoperative Care
Monitoring:
o Anesthetized animals must be monitored during the procedure to assure they stay in the proper
anesthetic plane.
o The anesthetic plane can be assessed by pinching the toes, tail or ears of the animal for reflex
response.
o Any reaction of the animal indicates the animal is too light and should be given more anesthetic.
o The color of the mucous membranes and exposed tissues such as the pink soles of the feet are
easy to monitor. Bright pink and red as apposed to pale, dusky grey or blue indicates tissue
perfusion and oxygenation.
o Respiratory pattern and frequency will also give an indication of anesthetic depth.
o Core body temperature can also be monitored in rats and mice.
o Pulse oximetry can be used in to monitor pulse and oxygenation.
o Electrocardiograms can also be used.
**Respiration – animal turns “blue” (hairless areas) if hypoxic.
-Evaluate the need for delivering oxygen….no special equipment is required. A tube
delivering oxygen from a tank (turned to low flow) can be taped onto the table in the
vicinity of the animal’s nose. Alternatively, a face mask may be made from a
syringe case or syringe barrel.
-Maintain airway patency.
o Be careful in positioning the animal’s head and neck.
o Prevent blockage of the respiratory passages by blood, mucus, other material.
-If respiration rate falls progressively:
o If surgery is in progress, assist ventilation by gentle compression of the chest.
o If surgery is complete, administer an anesthetic antagonist (if appropriate) or a
respiratory stimulant (e.g. doxapram).
**Cardiovascular function – the animal’s hairless areas (normally pink) turn “white” if tissue
perfusion is poor.
-Assess the cause of cardiac impairment.
o Anesthetic overdose – if appropriate, use an antagonist or an anticholinergics
(e.g. atropine).
o Hypothermia – greatest cause of rodent surgical mortality.
o Hemorrhage of 3-4 ml in a 200 g rat will cause irreversible shock.
Surgical technique to minimize blood loss.
Blood transfusion – Ideal for inbred strains; no cross-matching
necessary (keep a donor handy if the risk of hemorrhage is high).
**Outbred strains - no problem likely when transfused once.
Blood volume is approximately 70 ml/kg. Hemorrhage and loss of
10% volume is tolerable, but 20-25% loss will cause shock.
Blood Vol 10% loss 20% loss
(shock risk)
Mouse 1.5 ml 0.15 ml 0.3 ml
20 g
Rat 15 ml 1.5 ml 3.0 ml
200 g
-Consider using fluid therapy – to support cardiovascular function or to prevent dehydration.
Animals will have reduced food and water intake for 1-2 days after surgery.
Providing sterile, warmed, physiological fluids (SQ, IP or IV) can be used to
compensate for hemorrhage and reduction in water intake postoperatively.
Recommended fluid replacement for mice is 17–33 ml/kg (~0.3-0.7 ml for a 20
g mouse) SC and 33 ml/kg (~0.7 ml for a 20 g mouse) IP; and for rats is 25
16ml/kg (~5 ml for a 200 g rat) SC or IP. Sterile LRS or physiological saline
warmed to body temp may be injected before the procedure if a prolonged
recovery is expected or extensive hemorrhage may be likely.
Or, infuse IV at a rate of 2 ml/100g/hr. A tail vein catheter may be placed
before the procedure to be available for IV infusions if necessary.
-Consider whether the animal will have a reduced water intake for 12-24 hours post-op.
Provide replacement fluids following guidelines in the previous section.
ECG – capability required for low amplitude and high rate monitoring.
Tail cuff for blood pressure.
Surgical Technique:
o Minimize contamination of the operative field during surgery by restricting the movement of
gloved hands and sterile instruments.
o Plan the incisions to avoid large vessels in the skin or body wall.
o Handle tissues gently and avoid excessive force in tissue retraction, which can cause necrosis.
o Avoid or minimize hemorrhage, but if it occurs, wick away blood with a sterile gauze sponge, Q
tips or gel foam spears. Avoid using a wiping action, which traumatizes tissues and may cause
renewed bleeding. Use a wicking or blotting action instead.
o If a wound becomes contaminated, use warm, sterile LRS or saline to irrigate and cleanse the
area.
INSTRUMENT HANDLING: Generally scissors and hemostats are held with the thumb and the
ring finger. Thumb forceps are held using a pencil grip technique.
The following pictures illustrate proper (and improper) instrument holding:
Safe surgical blade loading Safe surgical blade unloading
Wrong instrument holding Pencil grip technique for holding
thumb forceps
Based on the pictures above re. thumb forceps holding, evaluate the picture on page two of this
handout. What’s wrong with the technique displayed on page two?
17Thumb &
Ring finger
Holding hemostats or scissors
Thumb & Ring finger
Holding the needle driver Palming the needle driver
Thumb & Ring finger
SKIN INCISION: Placing tension on the sides of the incision with
the non-dominant index finger and thumb while holding the scalpel
handle with the dominant hand.
NEEDLE TYPE: If suturing with a needle, use the right type of needle for the type of tissue.
SOFT TISSUES – Use a tapered (round-bodied)
needle on internal tissues (e.g. intestine, muscle,
peritoneum). This type of needle passes
atraumatically through soft tissues and allows
them to “seal” behind the needle. Generally it is best not to use a
cutting edge needle in soft tissues because this type of needle would
tear the tissue, undermining the suture line, and it is more likely to
cut through blood vessels leading to more hemorrhage in vascular
tissues (e.g. muscle).
SKIN – Use a cutting edge needle on the skin
(cutting or reverse cutting needle). The dermis
has tough fibrous tissue. To pass a needle
through it, cutting edges are needed to slide the
needle through the skin. This minimizes trauma and irritation to the
skin. As a result, the animal will be less likely to self-traumatize the
sutured incision. On the other hand, if a tapered needle were used,
the needle would have to be tugged through. The tugging and
stretching of the skin would increase soreness of the skin wound.
Swaged-eye needles impose less trauma on tissues than do threaded needles.
18ARMING THE NEEDLE:
Needle loading
zone
Load the needle in its middle third (the loading zone)
Hold the needle with the tip of the needle
holder with the needle perpendicular to the
jaws of the needle holder
Holding the needle too close to the site of suture attachment
will result in needle bending.
SUTURE MATERIAL: Use the right kind of suture material for
the type of tissue.
o Internal layers – Use an absorbable material, unless permanent ligatures are needed.
Example material: Vicryl, PDS, Dexon, Maxon, sizes 3-0 and 4-0 in a rat; 4-0 and 5-0 in a
mouse. Silk is frequently used for cardiovascular procedures.
o Skin layer – Use a nonabsorbable monofilament sutures in skin (Prolene, nylon, stainless
steel), wound clips, staples and/or tissue glue.
DO NOT use braided sutures, like “silk” because they tend to wick bacteria and
tissue reaction and infection. This raises the chances of animal self-trauma.
Sizes 3-0 and 4-0 in a rat; 4-0 and 5-0 in a mouse.
Stainless steel (SS) to suture skin may be assembled
inexpensively by purchasing a spool of 30 ga SS
orthopedic wire.
› A designated length of SS wire is threaded through a
22 ga needle.
› The needle is bent at ~1200 to secure (kink) the wire in
the needle.
› The hub of the needle broken away and discarded.
› The suture and needle must be autoclaved before using
in survival procedures.
› When closing skin, two throws are enough to secure the suture.
SUTURE LAYERS AND PATTERNS: Body wall & subcutaneous layer
1. Body wall (abdominal) – The suture line should be a simple,
interrupted pattern, using absorbable suture material. A
continuous pattern may also be used but it has some
drawbacks. The body wall layer is an important one because
it must take the tension in the body wall caused by animal
movement, and so this layer must hold fast against tension.
If a continuous suture line were used, and if a knot slipped or
the suture broke, then the entire incision would dehisce.
However, if simple interrupted sutures are used, then the
19incision line is better protected.
2. Subcutaneous tissue – The suture line should be in a single
continuous pattern, using absorbable suture. This should be used
in larger rats which have a sizeable amount of subcutaneous
tissue. It is generally not used in mice. Closing this layer
collapses the potential space between tissue layers, preventing a
seroma and abscess from forming. The subcutaneous layer will Dead Space
not have the tension of the body wall, and so that suture strength
is not needed. Therefore, the continuous pattern can be safely
used for its advantage of speed in suturing.
3. Skin – The suture line should be in a simple, interrupted pattern,
for the same reasons as for the body wall layer. Use a nonabsorbable/monofilament
material.
Insert the needle about 5 mm from the wound margin.
Space interrupted sutures (or clips) about 5-8 mm apart.
Don’t cut suture so short as it can unravel later.
A lot of rodents gnaw at externalized sutures so a buried suture line or wound clips are
recommended.
Cyanoacrylate skin glue (e.g. Vetbond, Nexaband, Dermabond) can be used for non-
tension bearing wounds to appose skin edges for small incisions or to reinforce skin
edges between sutures. Don’t bathe the skin wound because animals are likely to self-
traumatize the area if there’s glue residue on the skin surface. Carefully place a tiny
drop via an applicator tube onto the subcutaneous tissues or right over the skin. Use a
probe to push the opposing edges of skin together, margin to margin. Avoid getting
adhesive on the fur, or else the animal may later open up the wound in the process of
removing the glue from its fur.
4. Closure – Proper apposition:
Restore alignment of the tissues.
Balance adequate closure with too much suture. Suture is a foreign body and too much
can effect healing.
Skin closure should be done by apposition of cut ends and not by overlapping of layers
Proper Apposition Improper Apposition
20KNOT TYING/SECURITY
Tie all sutures (any layer) with square knots with a third throw (3-4 throws). Square
knots provide greater knot security against slipage when compared to slip knots. Prolene
and nylon are slippery and may need 5 throws.
Don’t cut knot strands too short. If cut too short, they will come undone later.
If skin sutures are cut too long, the animal may chew on them and in so doing, remove
the suture.
Slip Knot Square Knot
GRASPING TISSUES WITH THE THUMB FORCEPS
Generally skin and body wall (linea alba) are
grasped with fine rat tooth or Brown Adson
forceps.
Rat tooth forceps could be injurious to soft
tissue.
Rat tooth forceps
HOLDING THE SUTURE TOO FAR OR TOO CLOSE
When suturing hold the long end of the suture with your non-dominant hand at a
comfortable distance from the knot (not too far, not too close).
Suture held too far Suture held too close
21IMPROVING SPEED AND ACCURACY WHILE DECREASING TISSUE TRAUMA
(Remember: Surgery is Gentle!!! & Time is Trauma!!!)
Stabilize your hands on a towel, animal or table to minimize trembling
Note the comfortable, well-supported & rested position of the hands, while
using the middle, ring & pinky fingers to stabilize the instruments & hands
Hold the long suture strand with the non-dominant thumb and index finger
creating a “V” between them. Hold the jaws of the needle driver on the “V” to
improve your moves
Point the tip of the thumb and index towards the suture knot and incision
while the “apex” of the “V” points away from the incision
Synchronize the dominant and non-dominant hands to move the jaws of the
needle driver towards the short tail of the suture
Grasp the short tail of the suture with the jaws of the needle driver
Use the dorsal surface of the non-dominant
middle finger (distal phalanx) to pull on the long
suture strand while pulling on the short strand
with the needle driver
As above, grasp the short tail of the suture with the needle driver using the
“V” created by the non-dominant thumb and index to stabilize the jaws of the
needle driver
Use the palmar surface of the non-dominant
middle finger (distal phalanx) to pull on the
long suture strand while pulling on the short
strand with the needle driver
Minimize excessive tissue trauma with the suture and forceps. Avoid excessive traumatic
pull on tissue while holding the suture… Make your moves fluid and smooth
22EZ CLIPS
EZ Clip Appliers provide an excellent,
fast and easy to apply method of skin
Clip Remover
wound closure. It is particularly helpful
on animals with tendencies to chew their Clip Applier
external sutures.
Clips are easily removed with removing
forceps.
Place them approximately 5-8 mm apart. #7 clips for mice & small rats, #9 for rats
TISSUE ADHESIVES
Wound closure should be simple, rapid, inexpensive, and painless, and should achieve optimal cosmetic
results.
The ideal surgical adhesive would be safe for topical application, easy to apply, polymerize rapidly, support
the approximated skin edges and maintain the skin edge eversion necessary for maximum wound healing and
acceptable cosmesis, and eliminate the need for suture removal. Tissue adhesives offer many of the
advantages of the ideal wound closure devices. They are painless and have antimicrobial activity against
gram-positive organisms. They have a low rate of dehiscence and a low infection rate, and provide excellent
cosmetic results. The use of DERMABOND* Topical Skin Adhesive (2-Octyl Cyanoacrylate) significantly
decreases the time of treatment for wound closure and eliminates the need for postoperative suture removal.
And, although 5- to 7-day follow-up visits may still be necessary, patients will not experience the anxiety and
discomfort often associated with suture removal. Additional benefits of DERMABOND adhesive include
ease of use, formation of its own protective barrier, eliminating the need for additional bandages, and
excellent cosmetic outcome. Although tissue adhesives have many advantages, successful incorporation into
surgical use depends on an understanding of the indications, contraindications, and proper method of
application.
3M™ Vetbond™ Tissue Adhesive
3M™ Vetbond™ Tissue Adhesive (n-butyl cyanoacrylate) provides quality
wound management. It polymerizes in seconds after contact with tissue and
body fluids and binds wound edges together so natural healing can occur.
A Guide for Using Dermabond Adhesive
1. Clean and debride the wound and establish hemostasis. Be sure wound edges
and surrounding skin are dry, to assure direct tissue contact and prevent premature
polymerization of DERMABOND adhesive.
Use subcutaneous sutures as needed. DERMABOND adhesive should not be used
as a replacement for proper subcutaneous closure. MONOCRYL* (poliglecaprone 25) suture would be an
excellent choice for subcutaneous closure.
2. Remove applicator from packaging and hold with
tip pointed upward. Apply pressure at the midpoint of
the ampule, crushing the inner glass ampule. Invert
applicator and gently squeeze to express the liquid
23through the applicator tip. After crushing the inner glass ampule, use DERMABOND adhesive immediately.
3. To prevent inadvertent run-off of DERMABOND
adhesive, position the wound in a horizontal plane.
Manually approximate the wound edges with forceps
or gloved fingers. Use gentle brushing strokes to
apply a thin film of liquid to the approximated wound
edges, and maintain proper eversion of skin edges as
you apply DERMABOND adhesive. The adhesive
should extend at least 1/2 centimeter on each side of the apposed wound edges. Apply DERMABOND
adhesive from above the wound.
Avoid seepage into the wound as it may delay healing.
4. When using DERMABOND adhesive on the face, it is important to prevent the product from trickling into
the eyes; failure to do so may seal the eyes shut. Prior to application, apply petroleum jelly around the eye to
block the adhesive from entering the eye. Protect and hold the eye closed with a dry gauze pad and position
the patient with a slight horizontal tilt so that any run-off travels away from the eye.
5. Gradually build up three or four thin layers of adhesive. Ensure the adhesive is evenly distributed over the
wound. Maintain approximation of the wound edges until the adhesive sets and forms a flexible film. This
should occur about 1 minute after applying the last layer.
6. Do not apply ointments or medications on top of DERMONBOND
adhesive
DEHISCENCE – Suture lines coming undone.
The animal will chew and remove sutures if they are irritating.
Be aware whether the suture strand will poke a body part or fold of skin. In skin fold areas, a suture
strand may jab the skin and cause irritation. This may occur with monofilament nylon, because the cut
end is hard. Skin fold irritation may be avoided by altering the placement of the sutures, changing the
length of suture strands or by softening the suture material with daily applications of petroleum jelly to
the suture end only.
Avoid drawing sutures too tight. Wound margins normally become moderately edematous. Tight sutures
will strangulate tissue and be painful. Overtightening skin sutures is the most common reason for animals
removing their stitches.
Maintain good aseptic technique. Infection macerates the wound margin and causes sutures to loosen
and fall out.
24SUTURE REMOVAL
Whether using sutures or staples, these must generally be removed from the skin at 10-14 days after
the surgery. The time will vary depending on the surgical site. If sutures or clips are not removed,
they will become embedded in the skin and will cause irritation and possibly infection. At some
point, the animal will chew and remove the sutures or clips because of the irritation. Remove sutures
by lifting the knot and cutting the suture portion that was under the skin prior to pulling, then cut as
close as possible to the skin as possible to avoid contaminated suture from entering the skin.
.
Prophylactic Antibiotics
Rarely needed if true aseptic principles are adhered to, but if used, keep the following guiding
principles in mind:
o Antibiotics may make a 3rd rate surgeon into a 2nd rate surgeon, but they will never make a
1st rate surgeon out of a 2nd rate surgeon
o Administer before surgery so high tissue levels are present at the time of surgery
o Pre-op antibiotics can reduce the risk of infection in complicated surgeries
o Generally there is no need for antibiotics after surgery
o Use broad spectrum antibiotics
o “Good antibiotics do not make up for poor surgery.” The “Guide” states that the application
of prophylactic antibiotics is not a substitute for the practice of proper aseptic surgery.
In guinea pigs, rabbits and hamsters an inappropriate antibiotic can cause fatalities.
Postoperative Care
If possible, use anesthetic/sedative antagonists to recover the animal more quickly from anesthesia.
o Yohimbine or atipamezole – to reverse xylazine and medetomidine respectively.
o For respiratory depression – doxapram, 5-10 mg/kg IV or IP. Retreat as necessary (15 min
intervals).
Continue providing a source of heat until the animal is conscious
enough. Animals are considered conscious enough when the righting
reflex has returned. The righting reflex is tested by placing the animal
on its side or back. If the animal places itself on its four feet, then the
righting reflex has returned.
Provide clean bedding to avoid wound contamination.
Assess food and water intake for several days.
o Animals may not drink for one or more day post-op and will
therefore dehydrate. Recommended fluid replacement for
mice is 17–33 ml/kg SC and 33 ml/kg IP; and for rats is 25
ml/kg SC or IP.
o If animals are dehydrated, provide further fluid therapy and consider doing so by IV
infusion. However, since IV administration is difficult to do in rodents, SC or IP
administration provide a good alternative. Test for dehydration by pinching and pulling the
skin just cranial to the shoulder blades into a tent and then releasing it (“tenting the skin”). If
normally hydrated, the skin will snap back towards the body. If dehydrated, the skin will fall
slowly into place.
25You can also read