Ropox Bathtub User Manual & Mounting Instructions - Keep this manual with the product at all times!
←
→
Page content transcription
If your browser does not render page correctly, please read the page content below
Ropox Bathtub
                        User Manual & Mounting Instructions
               Keep this manual with the product at all times!
PDF 6128 / 08.01.2019
Contents

.................................................................................................................................................................................1
Contents .................................................................................................................................................................2
Presale information ...............................................................................................................................................4
   General product information ................................................................................................................................4
Presale information ...............................................................................................................................................5
   Installations interfaces..........................................................................................................................................5
Presale information ...............................................................................................................................................6
      Connection adapters ........................................................................................................................................7
Presale information – Accessories ......................................................................................................................8
   Flexible safety stop strip.......................................................................................................................................8
Accessories ............................................................................................................................................................9
   Shower bed, folding up ........................................................................................................................................9
Accessories ..........................................................................................................................................................10
Accessories ..........................................................................................................................................................11
   Folding bed guard ..............................................................................................................................................11
Accessories ..........................................................................................................................................................12
   Castors ...............................................................................................................................................................12
   Showerhead holder ............................................................................................................................................12
Presale information - Cleaning ...........................................................................................................................13
   Plastic tub ...........................................................................................................................................................13
   Mixer tap, shower hose and hand shower: ........................................................................................................13
User information ..................................................................................................................................................14
User information ..................................................................................................................................................15
   Label...................................................................................................................................................................15
Mounting instructions .........................................................................................................................................16
Electrical components ........................................................................................................................................17
   Wiring diagrams .................................................................................................................................................17
Electrical components ........................................................................................................................................18
Electrical components ........................................................................................................................................19
   Location of flexible safety stop strip ...................................................................................................................19
Electrical components ........................................................................................................................................20
   Connections .......................................................................................................................................................20
     Motor cables are connected to ports 1 & 3. Ports 2 & 4 are not used and have therefore been provided with
    blind plugs.........................................................................................................................................................20
   Dismounting .......................................................................................................................................................20
   Location of the handheld control switch .............................................................................................................20
Safety instructions ..............................................................................................................................................21
Service information – Fault finding ...................................................................................................................22
Service information - Maintenance ....................................................................................................................23
CE Marking ...........................................................................................................................................................24
                                                                                                                                                            © ROPOX 2014
                                                                                   Page 2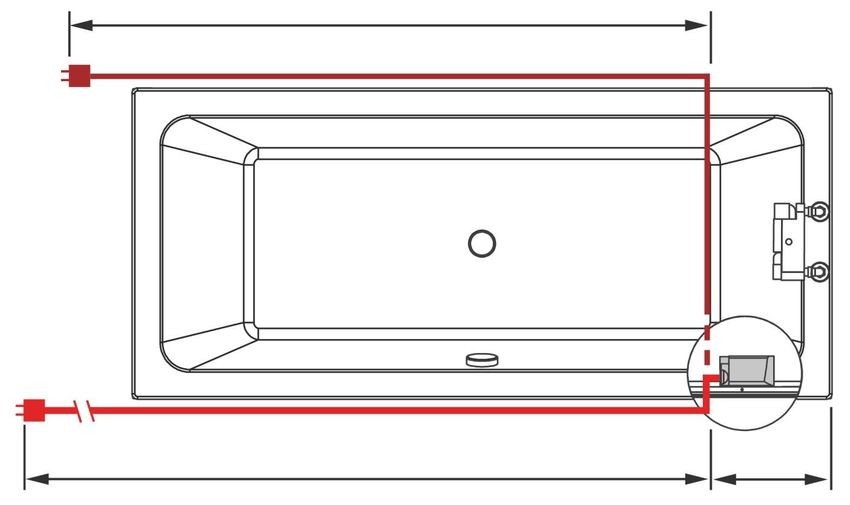
EU – Declaration of Conformity .........................................................................................................................24
Complaints ...........................................................................................................................................................25
...............................................................................................................................................................................25

                            It is important to read this manual prior to mounting and
                                                         use

                                                                                                                                                           © ROPOX 2014
                                                                                  Page 3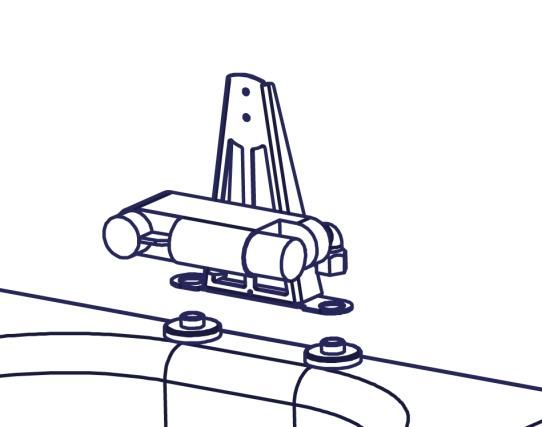
Presale information

General product information
The height-adjustable bathtub is designed for washing and bathing children and
adults with a weight of up to 250 kg. The bathtub is ideal for private homes, day-
care centres and the like to ensure correct and optimum working conditions for
the care personnel. The product is approved for use in wet rooms.

Item numbers

  Length / width    160x70cm 170x75cm 180x80cm
 Bathtub item No.   40-14156   40-14157     40-14158

                                                       Width
                                 Length

Technical data:
Product name:            Bathtub, height-adjustable
Power supply:            230V, 50Hz, max 2.0A,
Duty cycle max.:         Max. 10%, 2 min. ON/18 min. OFF
Height:                  Bathtub 61 – 91 cm
                         Incl. standard mixer tap 67 – 97 cm
Material – frame:        Stainless steel, surface-treated steel and aluminium
Material – tub:          Fibre-reinforced acrylic
Surface treatment:       Powder-coated, white RAL 9010 mat, chromite
Product weight:          70kg / 75kg / 80kg
Max. load:               350 kg. Max. recommended user weight 250 kg
Manufacturer:            Ropox, DK-4700 Næstved, Tel. +45 55 75 05 00

         This product has CE marking according to the Medical Devices, Low
         Voltage and EMC Directives and has been tested according to the
         European Standards DS/EN ISO 12182 and DS/EN ISO 60601-1. The
         product belongs to risk class 1.

                                                                        © ROPOX 2014
                                          Page 4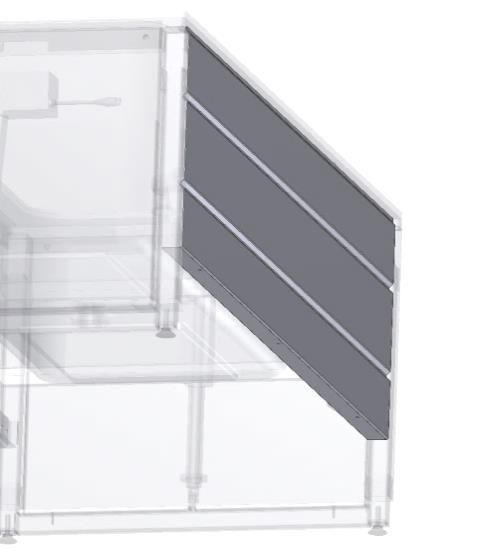
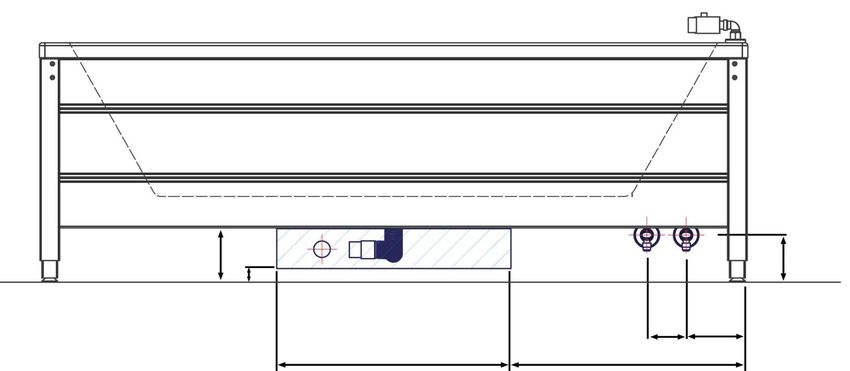
Presale information

Installations interfaces
Power

                     Power supply points must be located according to
                       national or international directions / standards

Reach of mains cable:
Full length = 3.5m

                                   160x70: 2.2m
                                   170x75: 2.15m
                                   180x80: 2.1m

                                      2.8m                                0.28m

                                                                             © ROPOX 2014
                                             Page 5
Presale information
Water

Applies to 160x70 and 170x75 bathtub.
The hatched area is the recommended area for location of drain.

                                       14cm

                                                                                         12cm
                                              6cm

                                                                                   8cm
                                                                          10cm   15cm

                                                                80cm

Applies to 180x80 bathtub:
                      14cm

                                                                                         12cm
                             6cm

                                                                          10cm   15cm

                                    80cm                           50cm

   Note:                                            Note:
   Flexible drain hose (Ø40).                       Stop valves with 1/2” external
   Length 51-150cm.                                 thread (not provided).
   Drain in wall finished with an                   Turn downward as shown. Flexible
   Ø40x88° bend (not provided)                      hoses (100cm) from mixer tap will
                                                    reach 14cm outside the frame.

                                                                                 © ROPOX 2014
                                    Page 6
Connection adapters
If the above recommendations cannot be met, the components described below
may be ordered independent of type of installation in building.
Water connection adapters
Installation in
Hoses from bathtub Adapter
room (not provided)
No adapter required
1/2"
Thread
1/2”
1/2" -> 3/8" 3/8"
Item No. 97001670 Thread
1/2" -> 15mm 15mm
Item No. 97001666 Pipe
Hose extensions
Hose from bathtub Coupling piece Additional hose
1/2" x 1/2", 0,5m, steel
Item No. 97001123
1/2" -> 1/2" 1/2" x 1/2", 1m, plastic
Item No. 97001669 Item No. 97001120
Drain adapters
Installation in
Drain hose from bathtub Adapter
room (not provided)
Ø40 -> Ø32 Ø32
Item No. 97002104
Ø40
Ø40 No adapter required
Ø50
Ø40 -> Ø50
Item No. 97001664
Drain extensions
Drain hose from bathtub Samlingsmuffe Additional drain hose
Ø40 flex hose, 40-110cm
Item No. 97001160
Ø40
Ø40-Ø40 Ø40 flex hose, 51-150cm
Item No. 97001663 V.nr. 97001159
© ROPOX 2014
Page 7Presale information – Accessories
Flexible safety stop strip
As an option, the bathtub may be ordered with a flexible safety stop strip for one
or two sides. If the bathtub stands in a corner, a safety stop for one side will be
sufficient. If the bathtub is freestanding or provided with castors, we recommend
safety stops on two sides.
Item Nos.
Bathtub 160x70cm 170x75cm 180x80cm
Safety stop for one
40-14206 40-14207 40-14208
side
Safety stop for two
40-14216 40-14217 40-14218
sides
Safety stop strip for one side:
Safety stop strip for two sides:
© ROPOX 2014
Page 8Accessories
Shower bed, folding up
The shower bed is available as an option and may be mounted on existing
bathtubs. It may fitted on the right-hand or left-hand side of the bathtub. ”Right-
hand” means that the mixer tap is located to the right when viewed from the front
of the bathtub. Available sizes appear from the table below.
Item Nos.
Bathtub 160x70cm 170x75cm 180x80cm
40-14226 (right) 40-14227 (right) 40-14228 (right)
Shower bed
40-14236 (left) 40-14237 (left) 40-14238 (left)
Length/width 155x68cm 165x73cm 175x78cm
Please note that the shower bed will result in an increase
of the height by 5.5 cm
Dimension sketches
C E
D
A
B
A B C D E
160x70cm 131–161cm 66-96cm 155cm 131cm 68cm
170x75cm 136-166cm 66-96cm 165cm 141cm 73cm
180x80cm 141-171cm 66-96cm 175cm 151cm 78cm
© ROPOX 2014
Page 9Accessories
Mounting of shower bed
If the shower bed is ordered together with the bathtub, it will be “right-hand”. If
mounting on the left-hand side is required, it must appear from the order.
Right-hand (standard)
Definition:
The mixer tap is located on the
right-hand side of the bathtub
Right-hand fitting
Left-hand
fitting with
gas spring
x4
© ROPOX 2014
Page 10Accessories
Folding bed guard
A folding bed guard is available as an option. It is mounted on the side of the
bathtub by means of an angular fitting.
Note that the bed guard is identical for all bathtubs and that the angular fitting has
different lengths to suit the specific bathtub.
Bathtub 160x70cm 170x75cm 180x80cm
Bed guard (110cm) 40-14186 40-14187 40-14188
Bed guard
Angular fitting
Note
As the bed guard may be folded down, there may be entrapment zones that
cannot be covered. Therefore, ALWAYS ensure that there is no risk of
entrapment when folding the bed guard up or down.
© ROPOX 2014
Page 11Accessories
Castors
As an option, the bathtub is available with a set of castors, whereby the mobility
and flexibility will be increased.
Bathtub 160x70cm 170x75cm 180x80cm
Set of castors 40-14111 40-14112 40-14113
Please note that the castors will result in an increase of the height by 9cm
Showerhead holder
As an option, a showerhead holder is available for mounting on the wall fitting of
the showerhead.
Bathtub 160x70cm 170x75cm 180x80cm
Holder 40-14120
© ROPOX 2014
Page 12Presale information - Cleaning
Do not use a high-pressure washer to clean the bathtub. The bathtub is not
machine washable.
Simply use a soft cloth with soapy water of max. 60°C. Always wash the bathtub
after use to prevent dirt from sticking to the surface.
Important!
Do not use scouring powder or other abrasives, as they will scratch the surfaces
of the frame and cover plates. Also, avoid the use of cleaning utensils with
sharp edges. Never use strong acids or alkaline products.
Plastic tub
Clean the surface with a soft cloth and soapy water. Do not use abrasive
cleaning agents. Resistant spots may be removed with hot water and a mild
soap.
Spots of glue may be removed with vinegar and water. Wash with water.
Always clean the bathtub after use to prevent dirt from sticking to the surface.
Important!
The bathtub may be used for washing clothes with a normal detergent. Do not
use the bathtub for soaking over a longer period as some detergents may
contain aggressive substances.
Damage and scratches in the surface may easily be repaired. Fill scratches with
fluid acrylic, let it dry and polish by means of a Duravit repair kit for bathtubs.
Contact Ropox A/S or Duravit A/S for further information.
Mixer tap, shower hose and hand shower:
Clean at regular intervals with a soft cloth with water and a customary cleaning
agent. Decalcify the mixer tap and filter with vinegar and wash with water. Do
not use strong cleaning agents for chrome surfaces.
© ROPOX 2014
Page 13User information
The height of the bathtub is adjustable between 61 and 91cm to ensure
optimum and correct working height for the care personnel. The carer is the
intended operator of the bathtub.
The height of the bathtub is adjusted by pressing the UP▲ and DOWN▼
buttons of the handheld control switch. The control switch has a spiral cord with
an extended length of approx. 200cm.
Maks
Max. last
loader 350water:
incl. kg inkl.
350vann. Anbefalt
kg. Max. maksimal brukervekt
recommended er 250
user weight: 250 kg.
kg
67 - 97cm
61 - 91cm
It is recommended to adjust the bathtub to bottom position after use.
Note that there is a risk of getting trapped when the bathtub is adjusted
upward. The mixer tap is 6cm higher than the bathtub. Owing to the safety
stop strips there is no entrapment risk when the bathtub is adjusted
downward.
If the handheld control switch is damaged or does not work, it should be replaced
immediately. The buttons are ”press and keep depressed”.
The movement of the bathtub stops as soon as you let go of the button. This is an
important safety factor.
© ROPOX 2014
Page 14User information
Label
Each bathtub has a label of its own as illustrated. This label contains important
information to be stated in connection with inquiries to the supplier. It also
contains information about the power supply.
The label will be found on the inside of one of the legs.
Serial No.
Item No.
Name /
model
2 min. operation
at max. load -
then 18 min.
pause
See explanation below
Production Max. load
year & month person + water
Symbols
The user manual MUST be read prior to mounting and use.
Waste must be sorted – if possible for recycling.
Type B equipment according to EN 60601-1.
Class 2 equipment. No earth connection. Control unit double insulated.
CE marking. This product meets the requirements for ”General Safety
and Functionality” of the current EU Directives and Standards.
i EMC information
The electrical components of the bathtub meet the requirements for
Electromagnetic Compatibility (EMC), if mounting and daily use are in
accordance with the instructions of this manual. In seldom cases, the
bathtub may be affected by electronic signals from laptops, mobile
phones or the like.
© ROPOX 2014
Page 15Mounting instructions
1. The bathtub is delivered as an assembled unit.
2. Place the bathtub and adjust the four setscrews of the feet to make sure
that the bathtub is horizontal.
3. Connect water supply and drain hoses, see presale information for further
details concerning installation interfaces.
4. Connect mains cable to 230V, 50Hz.
© ROPOX 2014
Page 16Electrical components
Wiring diagrams
The bathtub will be delivered assembled with all electrical components and
cables. All you have to do is to insert the mains cable into the socket and to
tape the safety stop strip under the side covers (available for one or two sides).
The diagram shows connection of the cables with the control unit located
behind the side covers.
Diagram for bathtub without safety stop strip
4
1
2
Blind plug
3
Blind plug
1. Control unit
2. 230V cable
3. Motor, connected to ports 1 & 3
4. Handheld control switch
© ROPOX 2014
Page 17Electrical components
Diagram for bathtub with flexible safety stop strip
4
Blind plugs
1
5 2
Blind plug
3
6
Blind plug
7
1. Control unit
2. 230V mains cable
3. Motor, connected to ports 1 & 3
4. Handheld control switch
5. MJB box
6. Safety stop strip
7. End resistance
All plug-in connections are waterproof and mounting/dismounting may therefore
be a little difficult. Make sure that all plugs have the correct position before
inserting them into the control unit. The plugs must be pressed home until the
black O-ring is no longer visible.
Motor, control unit and handheld control switch have protection IP66. This
means that they are dust and waterproof.
The electrical system is designed for periodical use, i.e. a max. duty cycle of
10%.: 2 min. continuous operation followed by 18 min. pause.
© ROPOX 2014
Page 18Electrical components
Location of flexible safety stop strip
To ensure optimum safety, the safety stop strip should be located on the
underside of the side cover as illustrated.
4mm from front
End resistance Additional safety stop strip
for two sides
MJB box
Safety stop strip for one
side
© ROPOX 2014
Page 19Electrical components
Connections
Motor cables are connected to ports 1 &
3. Ports 2 & 4 are not used and have
therefore been provided with blind
plugs.
If the bathtub has no safety stop strip and
MJB box, the hand control is connected
direct to port ”HB”.
A safety lock fitting must be used after
mounting of all cables. Push this fitting over
the plugs until a “click” is heard”. Safety lock fitting
The 230V cable is connected to the port on
the side of the control unit.
Dismounting
Just pull out the 230V cable.
Before dismounting the remaining cables from the control unit, the safety lock
fitting must be removed. Release the locking clips at either end of the fitting and
pull it out. Now the cables may be dismounted.
In oder to maintain the full IP66 protection it is very important that all cable
connections are correct.
Location of the handheld control switch
The bracket for the handheld control switch may be placed on the corner of the
bathtub as illustrated. Use the two screws provided.
May also be
!!! The bracket on the mounted on the
wall
bathtub should only be
used when the bathtub
is under supervision, as
the control switch must
be kept out of reach of
children. The bracket
may also be mounted
on the wall.
© ROPOX 2014
Page 20Safety instructions
• The bathtub should only be used by persons who have read and understood
these instructions.
• We recommend a safety stop strip on one or two sides in order to prevent
damage and accidents. Even if safety stops have been mounted it important
to ensure that there are no persons, animals or objects under the bathtub
during height adjustment.
• Always use the bathtub in a manner excluding the risk of damage to persons
or property. The person operating the bathtub is responsible for avoiding
damage or injury.
• If the bathtub is used in publicly accessible locations where children or
persons with reduced observation capability may get near it, the person
operating the bathtub must pay attention to those present in order to prevent
dangerous situations.
• Make sure that there is free space above and below the bathtub to allow
height adjustment.
• Do not overload the bathtub.
• Do not operate the bathtub in case of defects or damage.
• Do not use the bathtub in an explosive environment.
• Modifications, which may influence the operation or construction of the
bathtub, are not allowed.
• Installation, service and repairs should be carried out by competent
personnel.
• During inspections, service or repairs load should be removed from the
bathtub.
• After 2 min. continuous operation, there must be an18 min. pause.
© ROPOX 2014
Page 21Service information – Fault finding
Problem Remedy
The bathtub does not Check whether
move up or down when - 230V has been connected and current is
the hand-control switch is available,
pressed - the motor has been connected with the
control unit,
- the control switch has been connected with
the MJB box and the control unit,
- the motors are overloaded (note: 2 min. ON,
18 min OFF).
Control switch defective Check whether
- the bathtub works with another control switch
When pressing the UP The plugs may not have been inserted
and DOWN buttons you correctly.
only hear ”clicks” from Dismount all cables from the control unit and
the control unit, the insert them again.
bathtub does not move Resetting may be required.
The bathtub is not Reset
horizontal / level
Resetting:
Press and hold the UP (▲) and DOWN (▼) buttons. Keep the buttons
depressed until the control unit has beeped approx. ten times. After that, the
bathtub may be adjusted to the bottom position for resetting.
Waste handling
Used equipment must be disposed of according to national law. We
recommend dismantling of the product to the greatest possible extent so
that most parts may be recycled. Note that this product contains
electrical components. Examples of sorting groups: Metal, plastic,
cables, electronic parts and parts for destruction.
Working area
i Temperature: 5°C to 45°C
Relative humidity: 5% to 85% non-condensing
Factors affecting the product during storage and transport
i
© ROPOX 2014
Page 22Service information - Maintenance
After one month:
Check: Mounting of mixer tap
Flexible hose connections – water supply and drain
Once a year (at least):
Adjust the bathtub to top position and check that
1. all bolts on the top and bottom of the actuator are securely tightened,
2. all connections (water supply and drain) are in order and undamaged,
3. mixer tap, shower hose and shower head are in order and undamaged,
4. the frame and cover plates are undamaged.
5. Press the DOWN button, adjust the bathtub to bottom position and check
that the movement is smooth and even. See that the hose connections
follow the movement of the bathtub without getting jammed.
6. Now press the UP button, adjust the bathtub to top position, and check
that the movement is smooth and even. See that the hose connections
follow the movement of the bathtub without getting jammed.
7. Press the DOWN button, let the bathtub move 2-5 cm downward, and
activate the safety stops with a light pressure. The bathtub should now
stop the downward movement, move 1-2 cm upward and stop.
Resetting:
Press and hold the UP (▲) and DOWN (▼) buttons. Keep the buttons
depressed until the control unit has beeped approx. 10 times. Now adjust the
bathtub to bottom position for resetting.
© ROPOX 2014
Page 23CE Marking
- Better ways to better days -
EU – Declaration of Conformity
I, the undersigned, hereby declare that the following main products
40-14156 Ropox Bathtub length x width 160 x 70 cm
40-14157 Ropox Bathtub length x width 170 x 75 cm
40-14158 Ropox Bathtub length x width 180 x 80 cm
and all accessories belong to risk class I and conform to the following Directives and
Standards:
DIRECTIVES
• Medical Devices Directive No. 93/42/EEC, amended by Directive No.
98/79/EC
• Low Voltage Directive No. 73/23/EEC, amended by Directive No. 93/68/EEC
• EMC-Directive No. 89/336/EEC, amended by Directives Nos. 92/31/EEC and
93/68/EEC
STANDARDS
DS/EN 1041: 2009 Information supplied by the manufacturer of medical devices.
DS/EN 12182: 2012: Assistive devices for persons with functional disabilities -
General requirements and test methods.
DS/EN 14971: 2006: Medical devices – The use of risk management in
connection with medical devices.
DS/EN 60204-1: Safety on machinery – Electrical equipment of machines - Part 1:
General requirements.
DS/EN 60601-1: Medical electrical equipment - Part 1: General requirements for basic
safety and essential performance.
(Applying to the electrical components of the product)
DS/EN 9999: 2011: Assistive devices for persons with functional disabilities -
Classification and terminology.
Date: 01-09-2014
© ROPOX 2014
Page 24Complaints
See General Terms of Sale and Delivery on www.ropox.dk
ROPOX A/S
Ringstedgade 221
DK – 4700 Naestved
Tel.: +45 55 75 05 00 Fax.: +45 55 75 05 50
E-mail: info@ropox.dk
www.ropox.com
© ROPOX 2014
Page 25You can also read